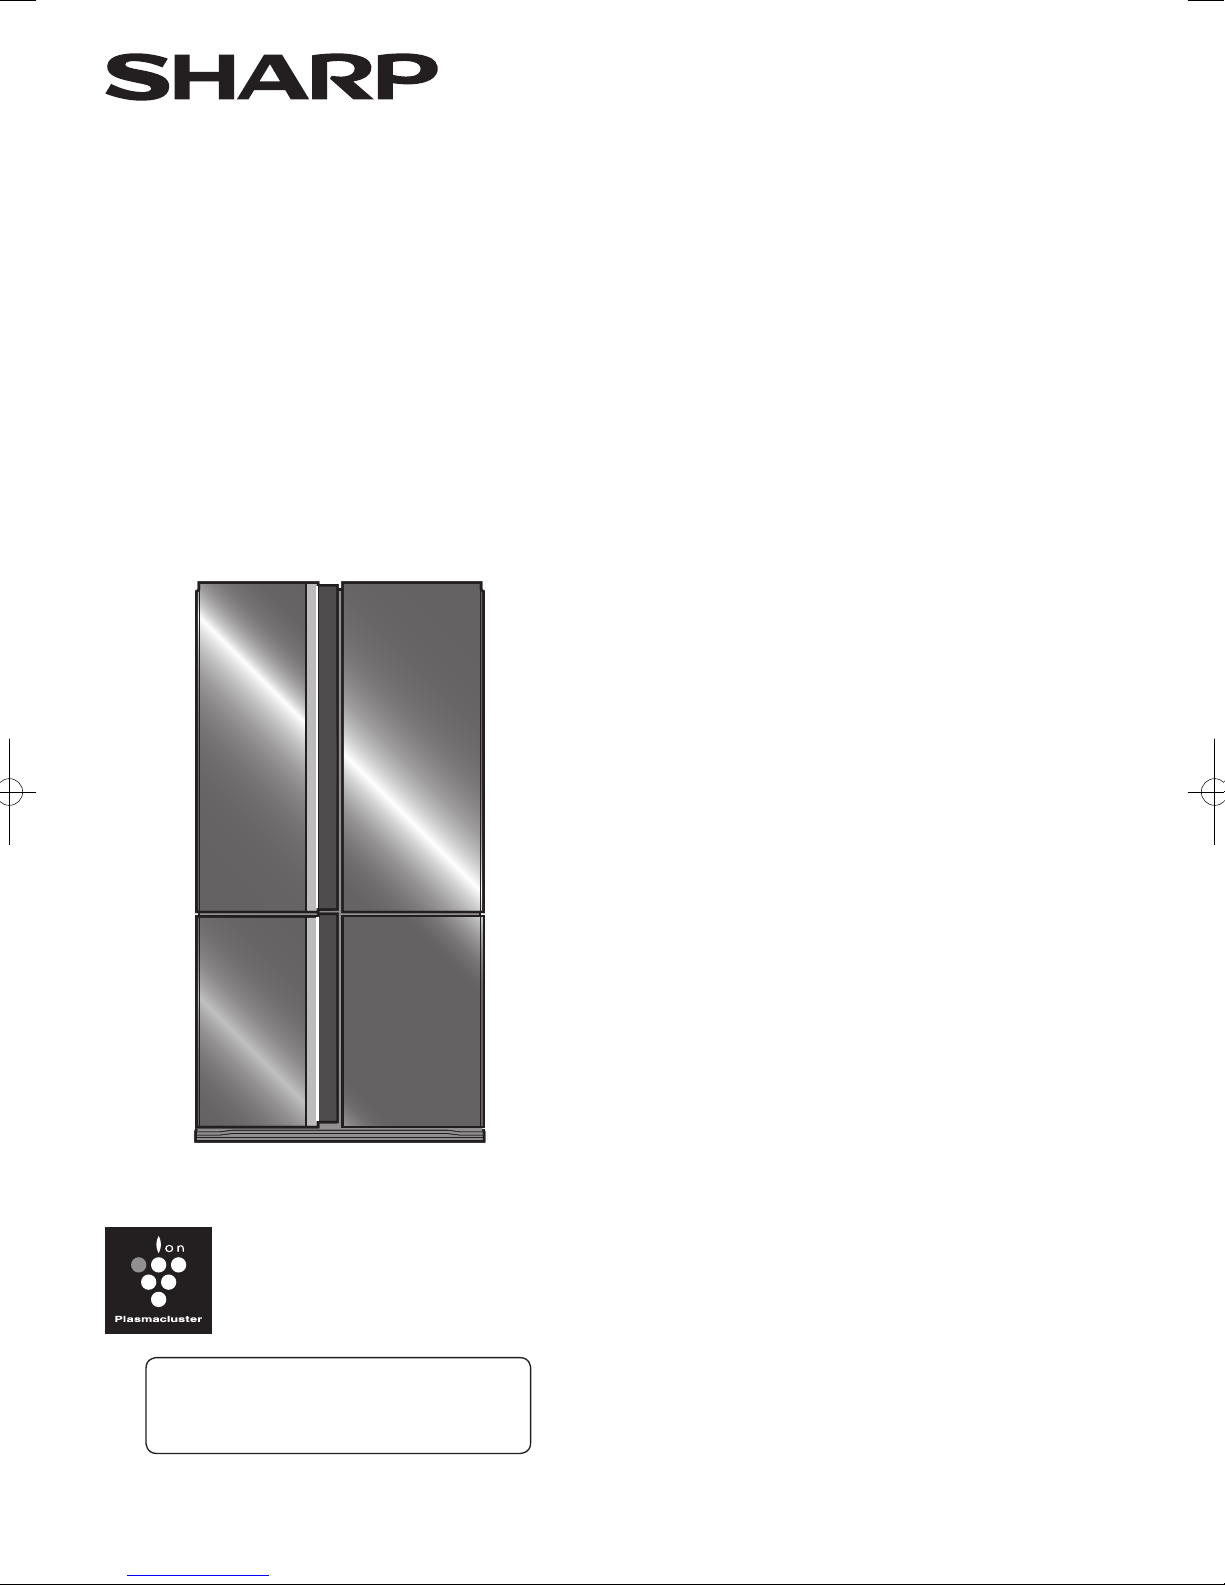
Sharp SJ-FS676V User manual
Device of this mark is a trademark of
Sharp Corporation.
Plasmacluster is a registered trademark
or a trademark of Sharp Corporation.
REFRIGERATOR - FREEZER
OPERATION MANUAL
CONTENTS
WARNING• ................................. 2
CAUTION• . . . . . . . . . . . . . . . . . . . . . . . . . . . . . . . . . . 2
INSTALLATION• ............................. 3
DESCRIPTION• . . . . . . . . . . . . . . . . . . . . . . . . . . . . . . 4
OPERATION• ............................... 6
AUTOMATIC ICE MAKER• . . . . . . . . . . . . . . . . . . . . 12
STORING FOOD• ........................... 15
CARE AND CLEANING• . . . . . . . . . . . . . . . . . . . . . . 16
BEFORE YOU CALL FOR SERVICE• ........... 17
SPECIFICATION• ........................... 18
WARRANTY• ............................... 19
MODEL
SJ-FS676V
(B351).indb 1 2012/08/10 9:07:11

2
Household use only
Thank you very much for buying this SHARP product. Before using your SHARP refrigerator,
please read this operation manual to ensure that you gain the maximum benet from it.
This refrigerator contains ammable refrigerant (R600a: ■
isobutane) and insulation blowing gas (cyclopentane).
Observe the following rules to prevent ignition and
explosion.
The refrigeration system behind and inside the•
refrigerator contains refrigerant. Do not allow any sharp
objects to come into contact with the refrigeration
system.
Do not use mechanical devices or other means to•
accelerate the defrosting process. (This refrigerator has
adopted automatic defrosting system.)
Do not use electric appliances inside the refrigerator.•
Use only the specied parts for the refrigerator •
compartment light.
Do not block the openings on the circumference of the•
refrigerator.
Do not use ammable sprays, such as spray paint near •
the refrigerator. It may cause explosion or re.
If the refrigeration system should get punctured, do not•
touch the wall outlet and do not use open ames. Open
the window and air out the room. Then ask a service
agent approved by SHARP for servicing.
This refrigerator should be disposed appropriately.•
Take the refrigerator to a recycling plant for ammable
refrigerant and insulation blowing gases.
Do not store highly volatile and ammable materials such ■
as ether, petrol, propane gas, aerosol cans, adhesive
agents and pure alcohol etc.
These materials are liable to explode.
Dust deposited on the power plug may cause re. Wipe it ■
off carefully.
Do not attempt to change or modify this refrigerator. This■
may result in re, electric shock or injury.
Do not touch the machinery parts of the automatic ice■
maker (upper section of the ice storage box). Operating
the ice maker may cause injury.
Ensure that the refrigerator presents no danger to children■
while being stored for disposal. (e.g. remove the magnetic
door seals to prevent child entrapment.)
WARNING
Attention about Power supply:■
Do not use an extension cord or adapter plug.•
Make sure that the power cord has not been damaged•
during installation or moving. If the power plug or cord
is loose, do not insert the power plug. There is a risk of
electric shock or re.
Disconnect from the mains electricity supply by removing•
the mains plug from the electricity supply socket. Do
not remove by pulling the mains lead. This may cause
electric shock or re.
Should the exible supply cord be damaged, it must be •
replaced by a service agent approved by SHARP as a
special cord is required.
Do not touch the compressor unit or its peripheral parts,■
as they become extremely hot during operation and the
metal edges may cause injury.
Do not touch foods or metal containers in the freezer■
compartment with your wet hands. This may cause
frostbite.
Do not place bottled and canned drinks in the freezer as■
they may crack when frozen.
In case of gas leak, ventilate the area by opening a■
window, etc. Do not touch the refrigerator or the power
outlet.
Do not place objects containing liquid or unsteady objects■
on top of refrigerator.
This refrigerator is not intended for use by persons■
(including children) with reduced physical, sensory or
mental capabilities, or lack of experience and knowledge,
unless they have been given supervision or instruction
concerning use of the refrigerator by a person responsible
for their safety. Young children should be supervised to
ensure that they do not play with the refrigerator.
CAUTION
(B351)P2-P19_Eng.indd 2 2012/08/10 17:08:33

3
WARNING
Do not install the refrigerator in a damp or wet location■
as this may cause damage to the insulation and a
leakage. Condensation may also build on the outer
cabinet and cause rust.
1Keep adequate ventilation space around the refrigerator.
The gure shows the minimum required space for •
installing the refrigerator. The amount of space
around the refrigerator affects the amount of power
consumption.
Insufcient spacing will decrease cooling efciency •
and increase energy consumption. This may reduce
the life of the unit and void warranty.
2Use the two front adjustable feet, to ensure that the
refrigerator is positioned rmly and at on the oor.
Before using your refrigerator
Clean the inside parts with a cloth soaked in warm water.
If soapy water is used, wipe it off thoroughly with water.
INSTALLATION
90mm
or more
60mm
or more
60mm
or more
1180 mm
1500 mm
60mm or more
3 When right and left doors are not properly aligned, adjust
using the adjustable feet.
NOTE
Position your refrigerator so that the plug is accessible.•
Keep your refrigerator out of direct sunlight.•
Do not place next to heat generating appliance.•
Do not place directly on the ground. Provide suitable stand.•
If the mains power is switched on when the door is open, the•
door alarm will sound. Close the door to stop the alarm.
Adjustable foot
When the left door is
raised.
When the right door is
raised.
Lower the foot
at right side.
Lower the foot
at left side.
(Until the adjustable foot on the
other side is slightly off-ground.)
4Remove the 4 screws of the cabinet lower part, and
then set the foot cover (supplied inside the refrigerator
compartment) with removed 4 screws.
Screw
(4 screws)
Screw
Foot cover
Free standing type
5 Connect the power plug to a 230/240 volt. 10 amp.
power point.
(B351)P2-P19_Eng.indd 3 2012/08/10 17:08:35
4
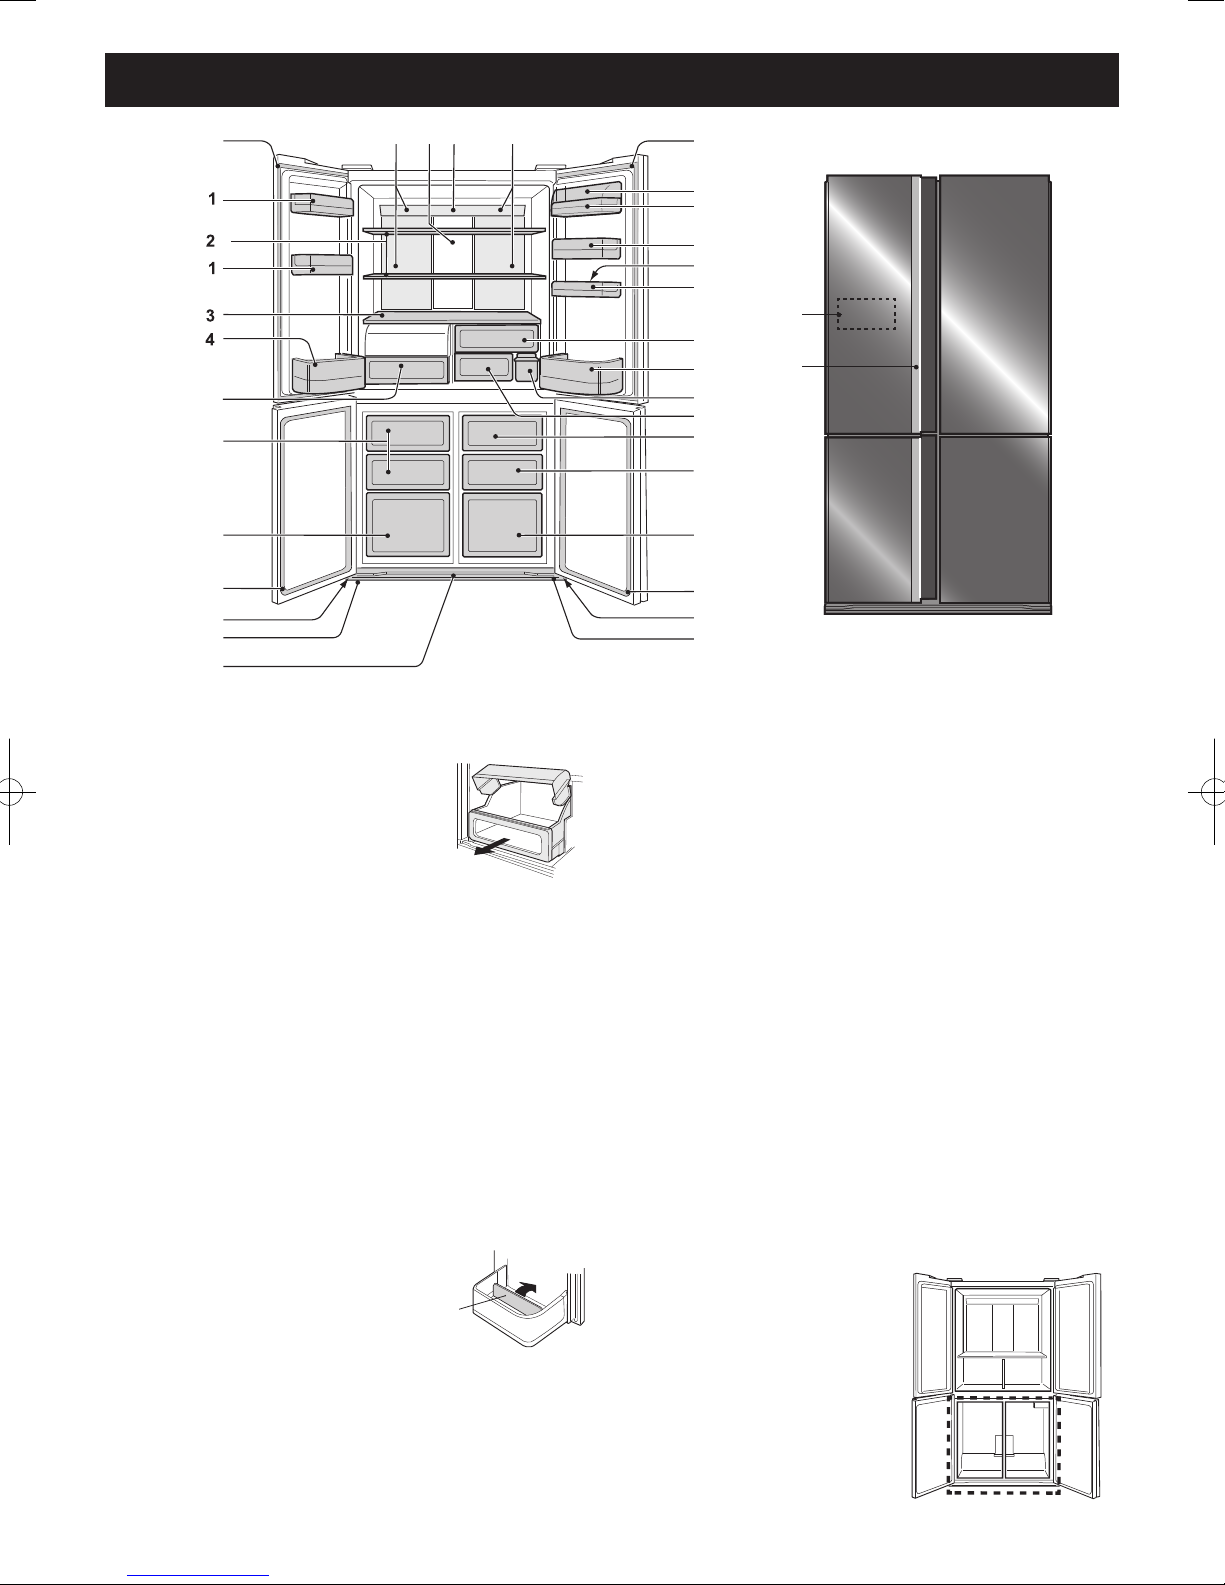
Door pockets1. (3 pcs.)
Refrigerator shelves2. (2 pcs.)
Shelf3.
Bottle pocket (left)4.
Highly sealed vegetable crisper5.
The cover of the Vegetable crisper
opens as the case is pulled.
Freezer cases (small)6. (3 pcs.)
Freezer cases (large)7. (2 pcs.)
Casters8. (4 pcs.)
Adjustable feet9. (2 pcs.)
Foot cover10.
Aluminum panel11.
The panel is cooled from the rear, thus indirectly cools
the refrigerator compartment. In this way, food is
refrigerated gently, without exposing it to cold air ow.
Light12.
Utility pocket cover13.
Utility pocket14.
Egg tray15.
Egg pocket16.
Fruit case17.
Bottle pocket (right)18.
To store large-size bottles, move the
partition all the way back.
Water tank19.
Fresh case20.
Ice storage box21.
To prevent damage to the Ice storage box, do not make
ice in the Ice storage box or pour oil into it.
Magnetic door seals22. (4 pcs.)
Eco sign23.
With the refrigerator door left open, the lamp will slowly
change its color from blue to orange. It shows that the
temperature in the refrigerator is rising.
Touch control panel24.
Handle indicator25.
When Plasmacluster, Energy saving and Temperature
increase sign start the operation, the indicator will ash.
Plasmacluster : Blue
Energy saving : Green
Temperature increase sign : Orange
Deodorising unit
Deodorising catalyst is installed on the routes of cold air.
No operation and cleaning are required.
NOTE
Deodorising unit cannot remove all of the odours thoroughly.•
Wrap the food with strong odours.
If you wish to store large items within
your freezer
You may remove any of the items numbered 6,7,21.
Partition
DESCRIPTION
17
18
5
22 22
22 22
23
21
7 7
6
6
8 8
99
10
1112 12
13
14
1
15
16
19
20
24
25
(B351)P2-P19_Eng.indd 4 2012/08/10 17:08:36
5
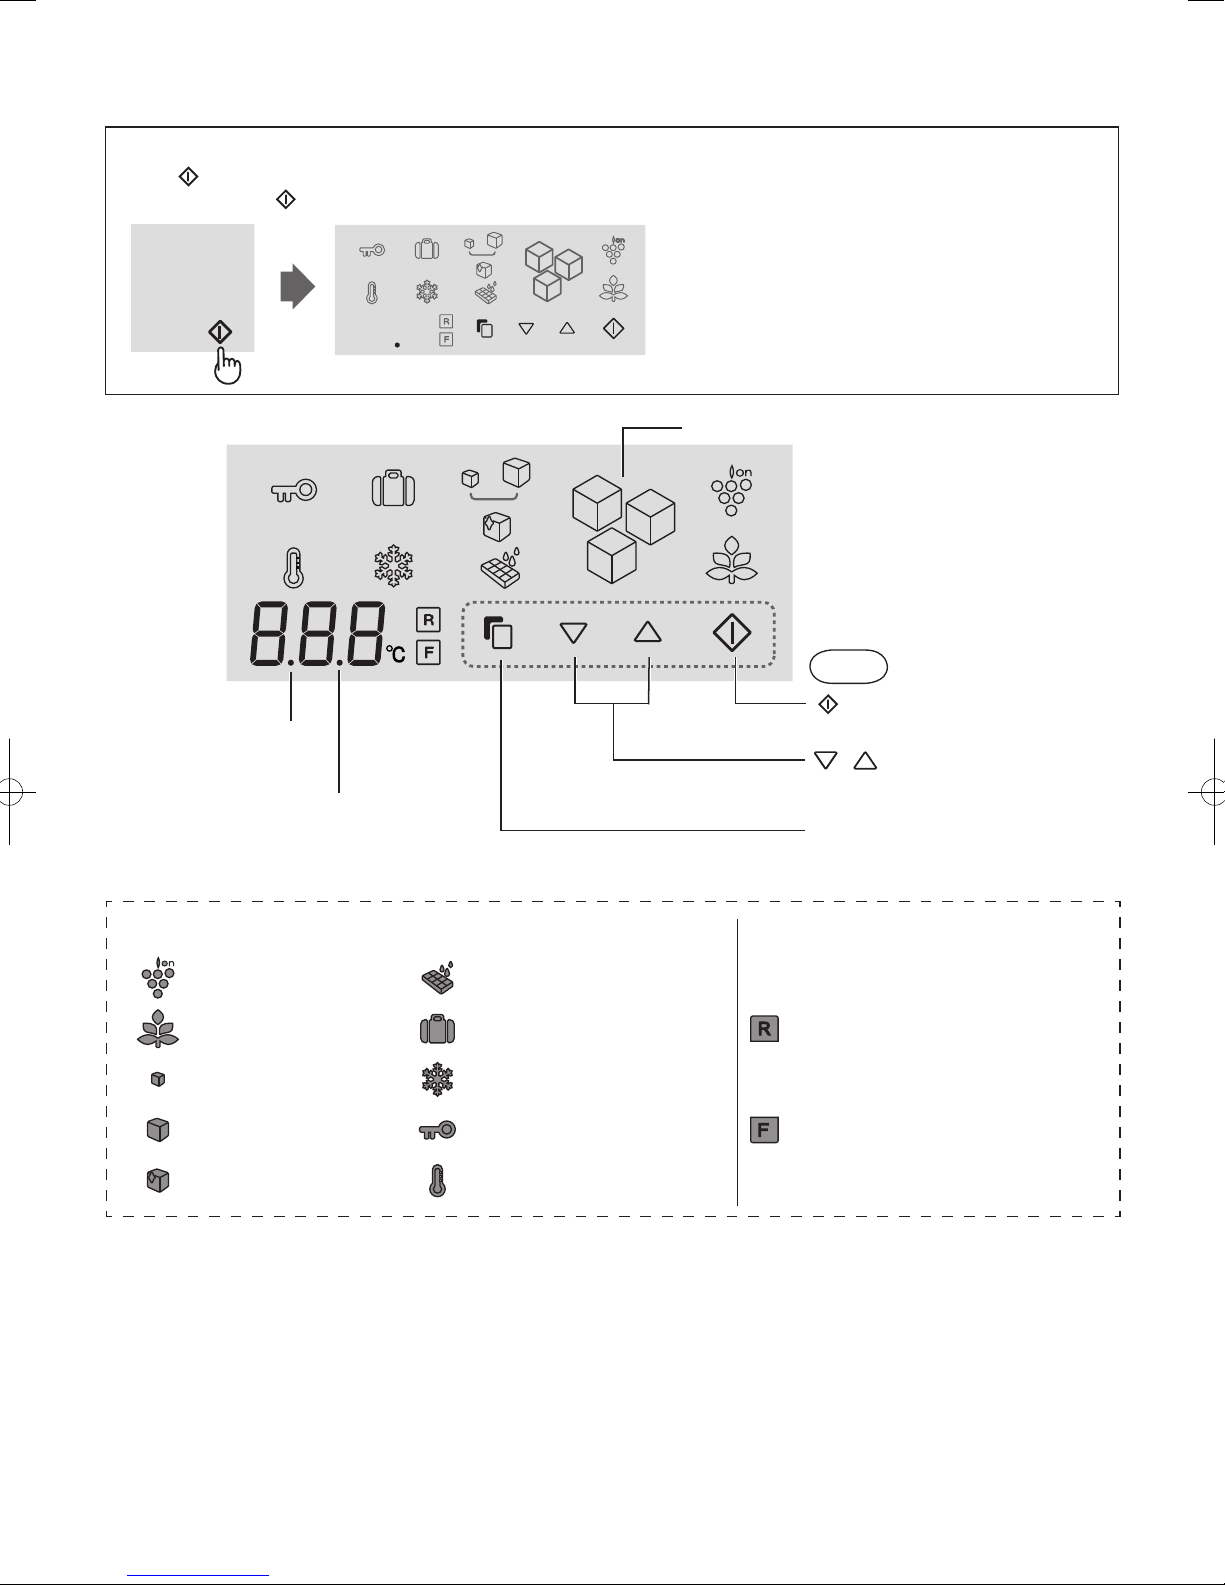
Touch control panel
To operate, touch the keys.
To light the control panel
Press (Enter) key.
Normally, only the (Enter) key is displayed.
The panel will light and show the current setting.•
After setting the features, when there is no operation•
for 1 minute, the display will automatically return to
the standby display.
Thus if there is no operation for another 1 minute, the
display will be turned off.
<Standby display>
Ice making process indicator
(Enter) key
Finalize the setting.
/ key
Press to select feature ON/OFF or
temperature setting.
Select key
Press to select feature icon and door
alarm signal.
Sound OFF indication
This indication shows
sound “OFF”.
Door alarm indication
This indication shows door
alarm “ON”.
Feature icons Icons of features in operation are colored. Controlling temperature icons
Plasmacluster Ice tray cleaning
Energy saving Vacation mode Refrigerator compartment
Ice making Express Freezing
Large ice making Child lock Freezer compartment
Clear ice making Temperature increase sign
At the time of re-power distribution
When there is a power failure during the operation of •
Express freezing or Ice tray cleaning, the operation is
stopped.
Ice making process indicator returns to the initial state.•
The other settings will show similarly as before having the•
power failure.
Keys
Every time you open the door
Control panel will light up to show the current setting.
Operation is not accepted while the refrigerator door is•
opened.
(B351)P2-P19_Eng.indd 5 2012/08/10 17:08:40

6
OPERATION
Plasmacluster
The ionizer inside your refrigerator releases clusters of ions,
which are collective masses of positive and negative ions,
into the refrigerator compartment.
These ion clusters inactivate airborne mould fungus.
To start operation
1Select “Plasmacluster icon”.
2Select “ON”.
3Finalize the setting.
Additionally the handle indicator (Blue) will blink
3 times.
Handle indicator in operation
Every time you close the door, the indicator will ash. (Blue)•
If Energy saving is also in operation, the indicator will ash •
6 times.
(Blue→Green→Blue→Green→Blue→Green)
mould
fungus
To cancel operation
It is the same method as starting operation.
Select “OFF” in step 2.
NOTE
There may be a slight odour in the refrigerator. This is the•
smell of ozone generated by the ionizer. The amount of
ozone is minimal, and quickly decomposes in the refrigerator.
Flashing
(B351)P2-P19_Eng.indd 6 2012/08/10 17:08:41
7
Energy Saving
Use this feature when you want to switch the appliance to
energy-saving operation.
To start operation
1Select “Energy saving” icon.
(The icon is green.)
2Select “ON”.
3Finalize the setting.
Additionally the handle indicator (Green) will blink
3 times.
Handle indicator in operation
Every time you close the door, the indicator will ash •
(Green).
If Plasmacluster is also in operation, the indicator will ash •
6 times.
(Blue→Green→Blue→Green→Blue→Green)
To cancel operation
It is the same method as starting operation.
Select “OFF” in step 2.
NOTE
While this feature is operating, the inside temperature of the•
refrigerator and freezer compartment will be higher than the
preset temperature by about 1°C(refrigerator) and about
2°C(freezer). This is the guide under the condition of the
preset temperature 3°C(refrigerator) and -18°C(freezer). The
display of preset temperature will not be changed.
The efciency of power saving depends on the usage •
environment (controlling temperature, ambient temperature,
frequency of opening or closing the door, amount of food).
Cancel this feature when you feel the beverages are not•
cooled enough or ice making takes time.
Tips for saving energy
Keep the ventilation space as much as possible around■
the refrigerator.
Keep your refrigerator out of direct sunlight, and do not■
place next to heat generating appliance.
Open your refrigerator door as briey as possible.■
Hot foods should be cooled before storing.■
Place the food evenly on the shelves to allow the■
cooling air to circulate efciently.
Flashing
(B351)P2-P19_Eng.indd 7 2012/08/20 10:04:26
8
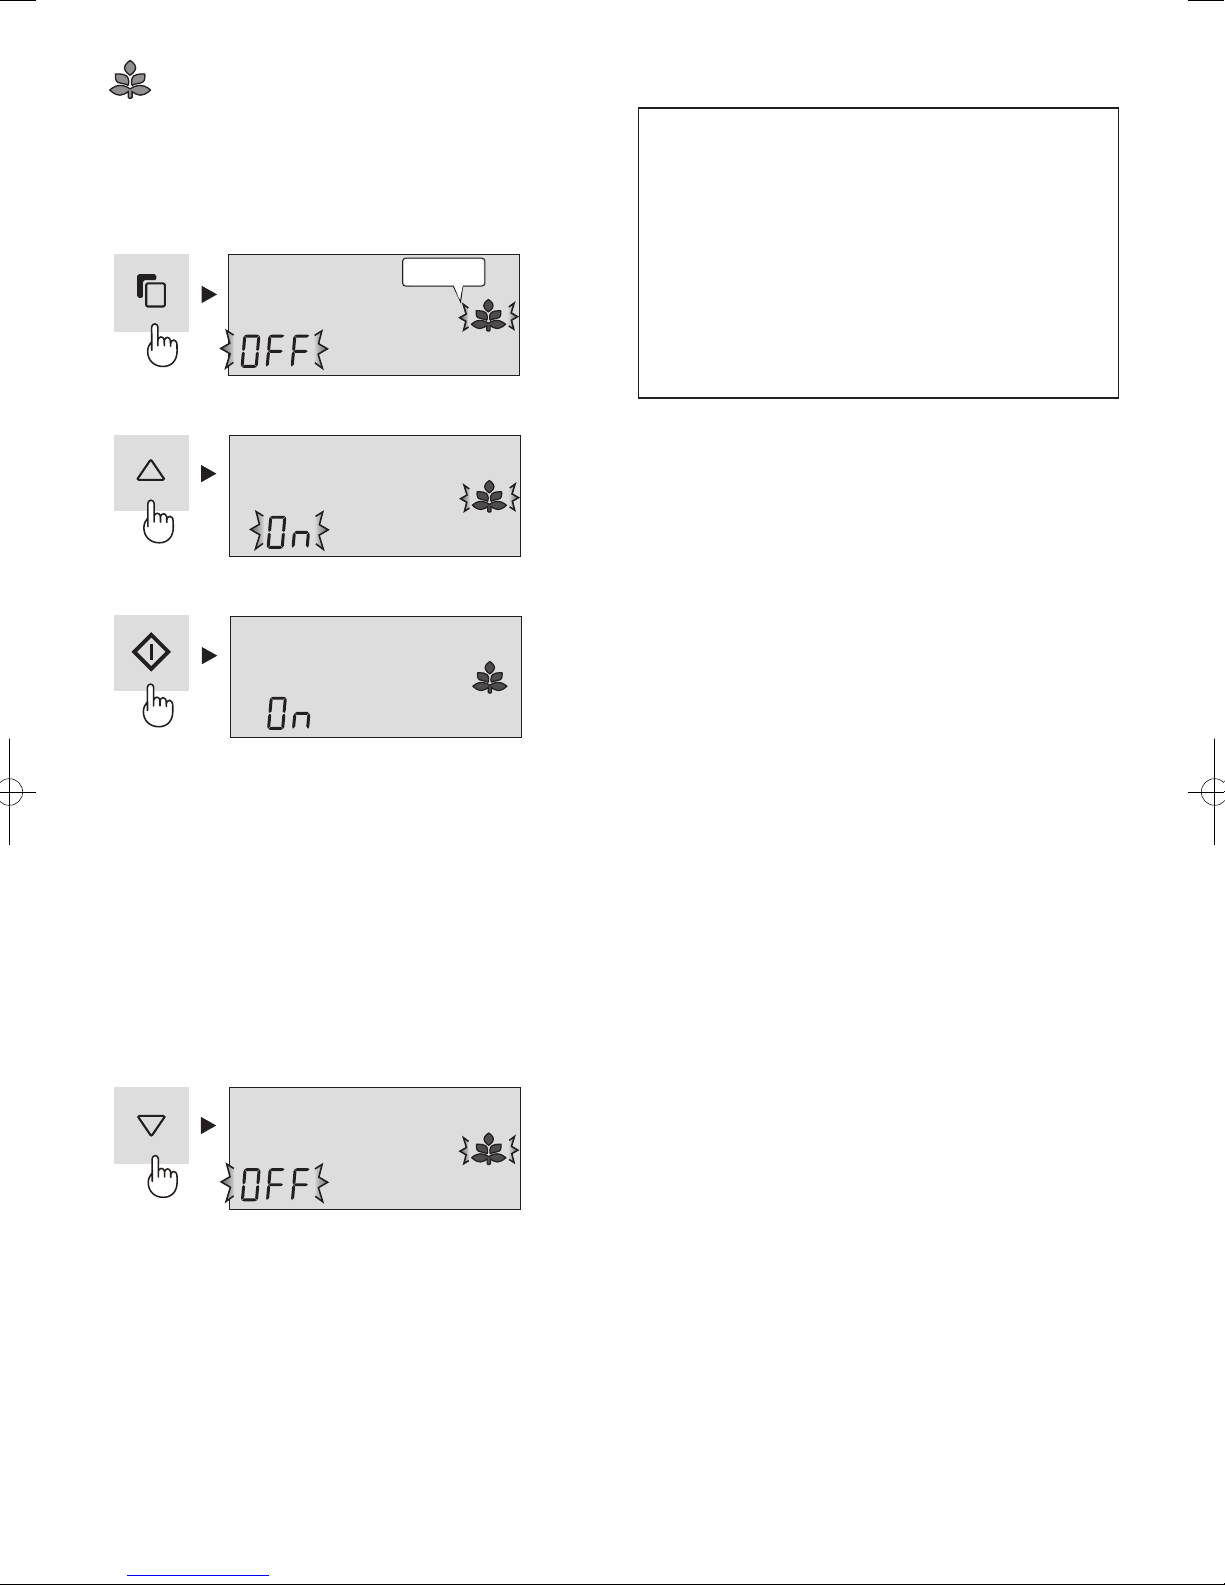
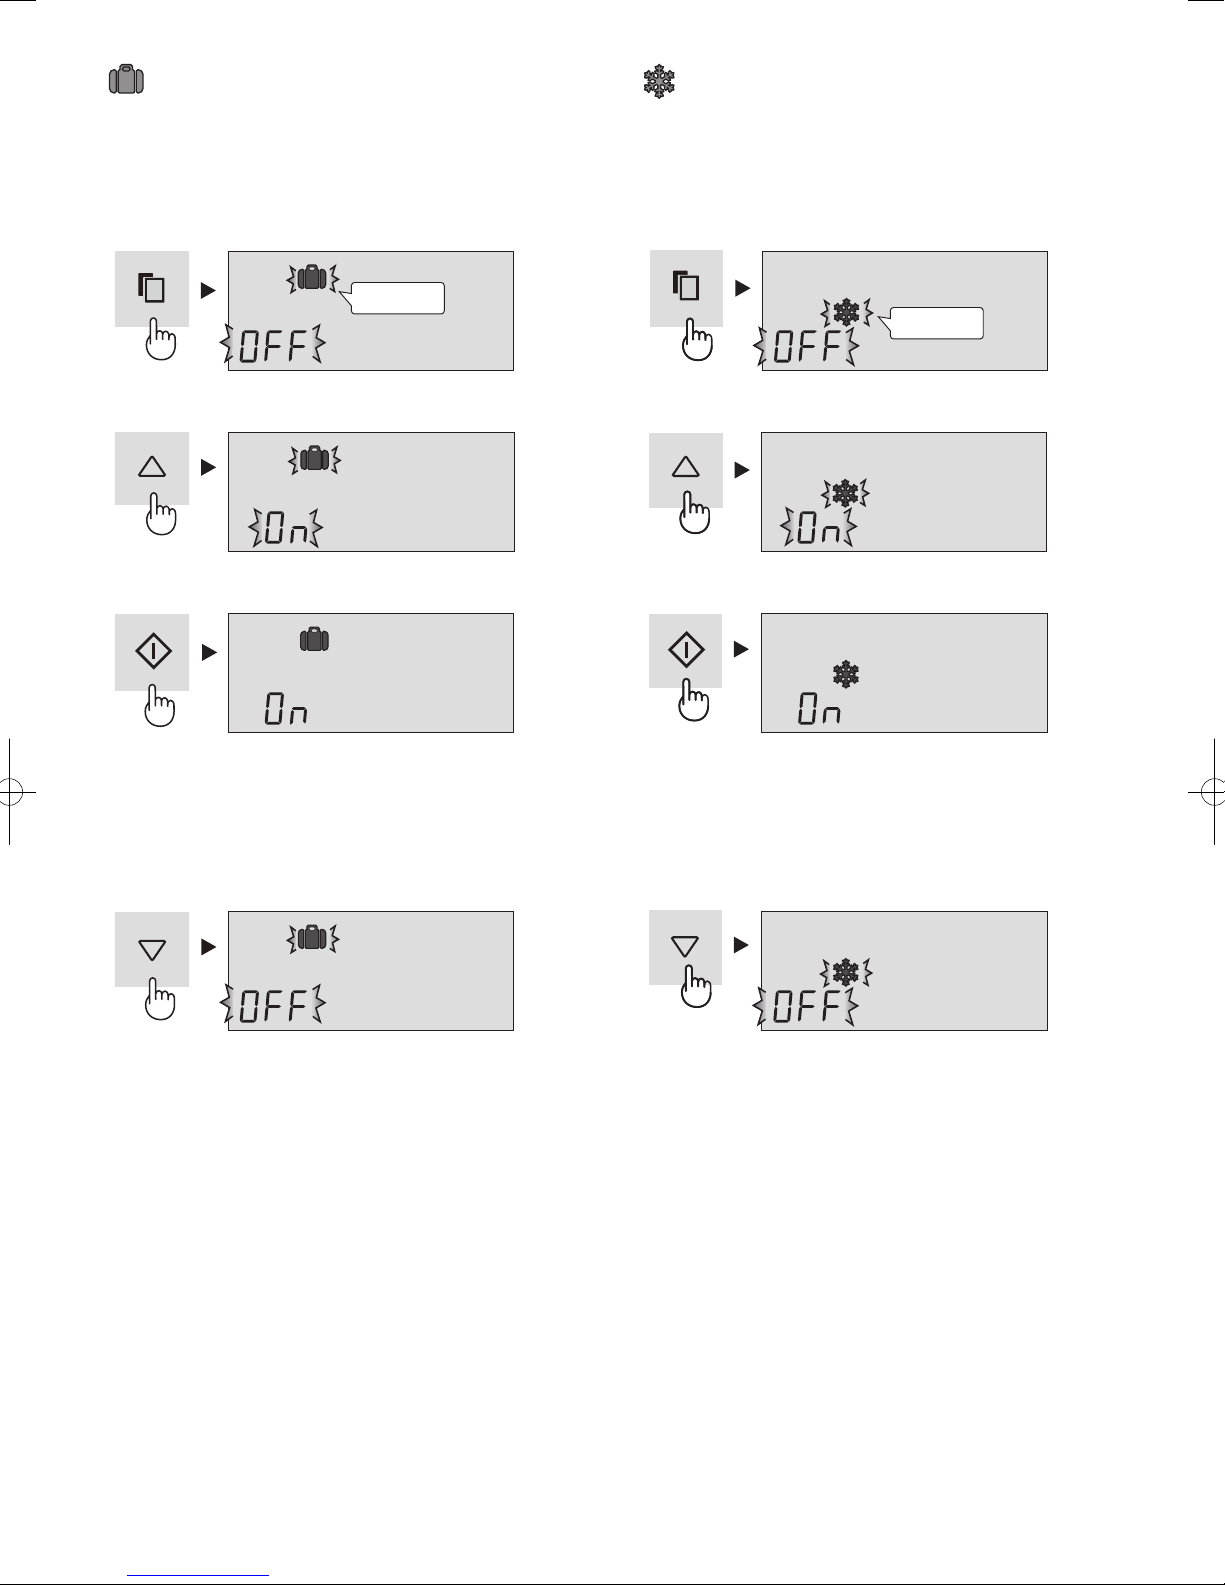
Vacation mode
Use this feature when going on a trip or leaving the house
for a long time.
To start operation
1Select “Vacation mode” icon.
2Select “ON”.
3Finalize the setting.
To cancel operation
It is the same method as starting operation.
Select “OFF” in step 2.
NOTE
The temperature inside the refrigerator compartment will be•
adjusted to about 10°C.
Food storage period in the refrigerator compartment becomes•
approx.1/2-1/3 of normal operation. Please utilize only when
there is no perishable food.
Temperature of refrigerator compartment cannot be modied. •
(“10°C” is indicated on the display.)
Express Freezing
High-quality frozen foods can be made using this feature
and is convenient for home-freezing.
To start operation
1Select “Express freezing” icon.
2Select “ON”.
3Finalize the setting.
To cancel operation
It is the same method as starting operation.
Select “OFF” in step 2.
NOTE
Express Freezing ends automatically in about 2 hours.•
(The icon will disappear.)
Large foods cannot be frozen in a single operation.•
Express Freezing may require more than 2 hours in the case•
operation overlaps with defrosting as operation is started after
defrosting is completed.
Avoid opening the door as much as possible during operation•
of this feature.
Flashing
Flashing
(B351)P2-P19_Eng.indd 8 2012/08/10 17:08:44
9
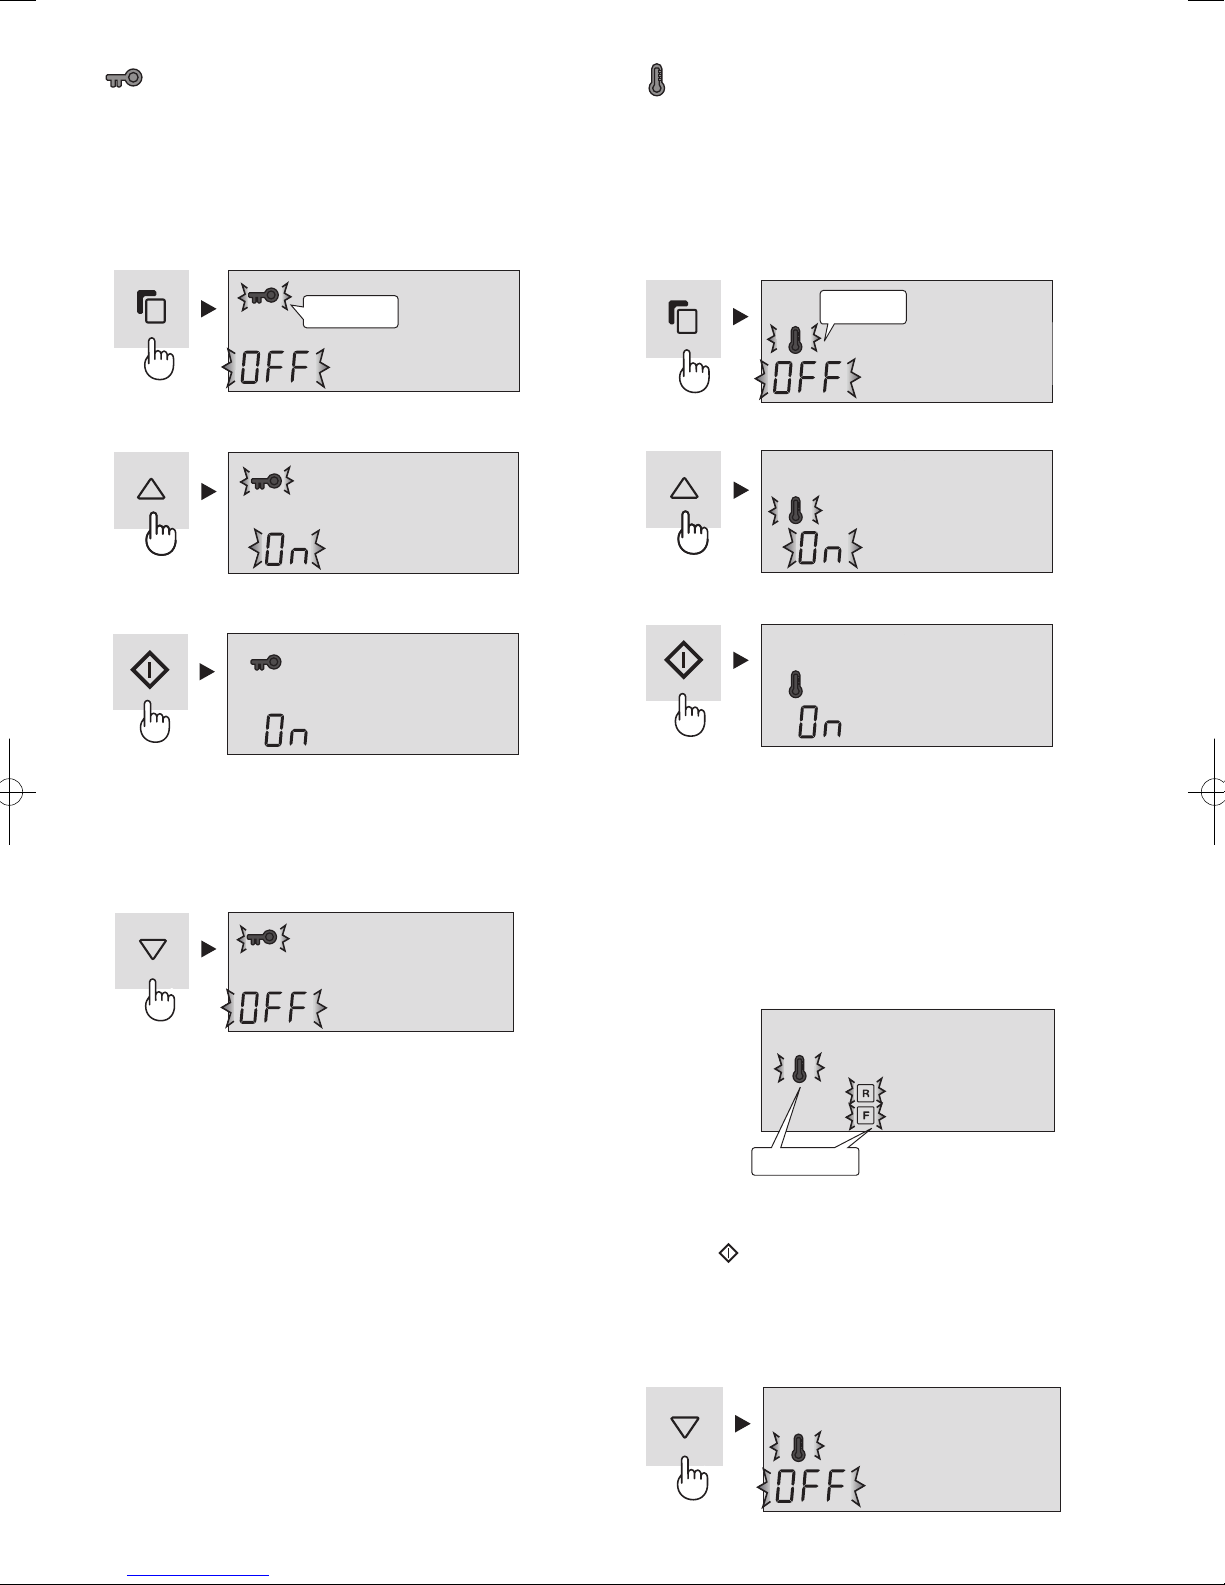
Child Lock
Key operation of the control panel will be locked. Use this
feature to prevent the panel from being used unintentionally
by children or someone.
To start operation
1Select “Child lock” icon.
2Select “ON”.
3Finalize the setting.
To cancel operation
It is the same method as starting operation.
Select “OFF” in step 2.
Temperature Increase sign
While this feature is operating, it will indicate the rise of
inside temperature caused by power failure or some other
malfunction.
To start operation
1Select “Temperature incrase sign” icon.
(The icon is orange.)
2Select “ON”.
3Finalize the setting.
Additionally the handle indicator (Orange) will blink
3 times.
Indication of temperature increase
If the inside temperature becomes as follows, temperature•
increase will be indicated.
Refrigerator : more than 10°C
Freezer: more than -10°C
Check the quality of food before you eat.•
Indication
Icons will blink.•
Handle indicator (orange) will blink every 30 seconds.•
How to cancel the indicator blink
Press the key while the icons are blinking.
To cancel operation
It is the same method as starting operation.
Select “OFF” in step 2.
Flashing Flashing
Blink slowly
(B351)P2-P19_Eng.indd 9 2012/08/10 17:08:46
10
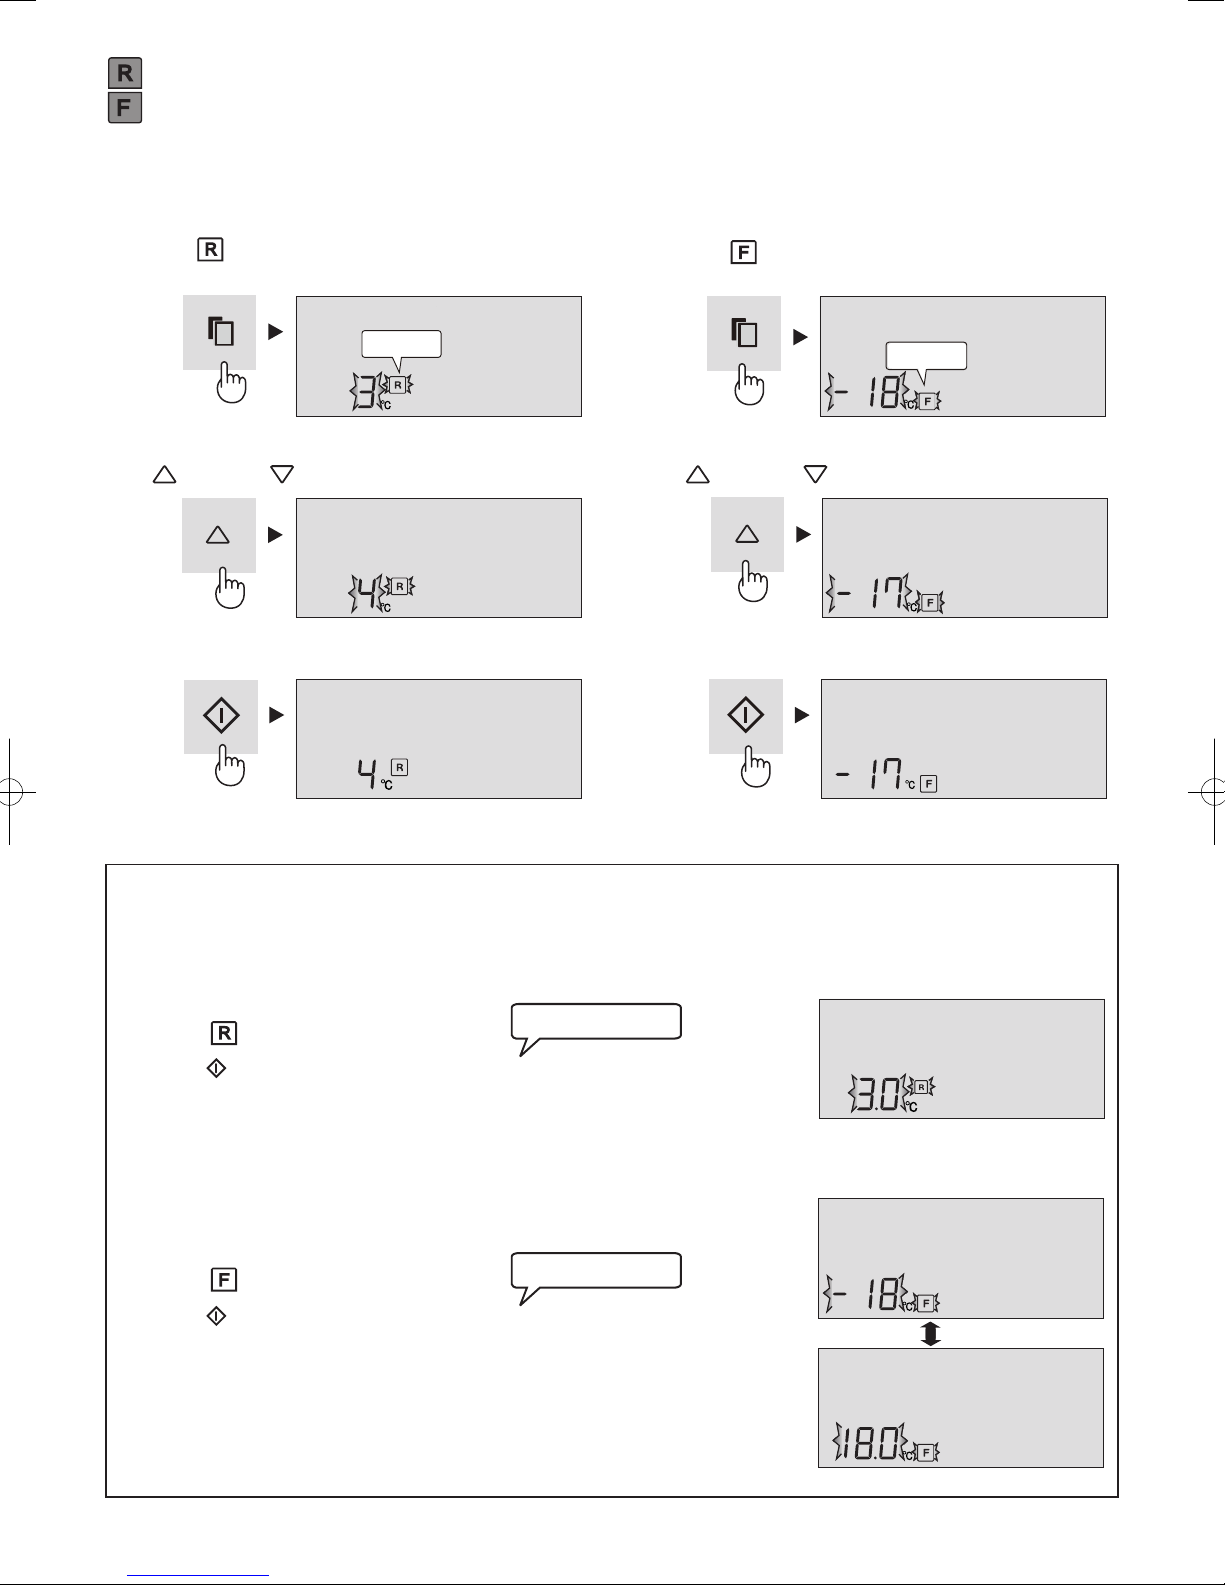
Advanced Setting of Freezer / Refrigerator compartment
The temperature of freezer compartment and refrigerator compartment can be adjusted in steps of 0.5 °C by following steps
1to 3below.
Refrigerator compartment
Select
1. icon.
Press
2. key continuously for 3 seconds or more.
The current preset temperature on the display will be changed to 3.0 °C.
(The display will be indicated like right gure.)
Adjust the temperature in the same way as steps
3. 2to 3above.
Follow steps 1to 2 again if you want to adjust the temperature in steps of 1°C.
Freezer compartment
Select
1. icon.
Press
2. key continuously for 3 seconds or more.
The current preset temperature on the display will be changed to -18.0 °C.
(The display will be indicated alternately like right gure.)
Adjust the temperature in the same way as steps
3. 2to 3above.
Follow steps 1to 2 again if you want to adjust the temperature in steps of 1°C.
Controlling Temperature
The refrigerator controls its temperature automatically. However, if needed, adjust the temperature as follows.
Refrigerator compartment
Adjustable between 0°C and 6°C in steps of 1°C.
1Select icon.
The display shows the current preset temperature.
2Set the temperature.
[ : increase, : decrease ]
3Finalize the setting.
Freezer compartment
Adjustable between -13°C and -21°C in steps of 1°C.
1Select icon.
The display shows the current preset temperature.
2Set the temperature.
[ : increase, : decrease ]
3Finalize the setting.
Beep beep beep
Flashing Flashing
Beep beep beep
(B351)P2-P19_Eng.indd 10 2012/08/10 17:08:50
Table of contents
Other Sharp Refrigerator manuals

Sharp
Sharp SJ-LE160M0X-EU User manual

Sharp
Sharp SJ-TB01ITXW1-UA User manual

Sharp
Sharp SJ-XG640M User manual

Sharp
Sharp SJ-C20 SL Series User manual

Sharp
Sharp SJ-XE35PM User manual

Sharp
Sharp SJ-BA05DTXW2-EU User manual

Sharp
Sharp SJ-BA10IHXI1-EU User manual

Sharp
Sharp SJ-F821VM-SS User manual

Sharp
Sharp SJ-20T-H2 User manual

Sharp
Sharp SJ-FBB05DTXWE-EU User manual

Sharp
Sharp SJ-47L-A2 User manual

Sharp
Sharp SJ-BA05IMXRE-EU User manual

Sharp
Sharp SJ-F70RV User manual

Sharp
Sharp SJ-HD491P-S User manual

Sharp
Sharp SJ-BA31IHXI2-EN User manual

Sharp
Sharp SJ-SX830F User manual

Sharp
Sharp SJ-F5X75VGW User manual

Sharp
Sharp SJ-GX820F User manual

Sharp
Sharp SJ-X201E User manual

Sharp
Sharp SJ-PT520R User manual


