Sharp Aquos LC 32HT3U User manual

Remote Replicator
Duplicateur distant
Duplicador remoto
AN-H06RCU
Remote control unit
Télécommande
Unidad de control remoto
AN-32HTRC
ENGLISHFRANÇAISESPAÑOL
OPERATION MANUAL FOR HOTEL OPERATOR
MODE D'EMPLOI POUR HOTELIER
MANUAL DE OPERACIÓN PARA EMPRESAS HOTELERAS
AN-32HTRC AN-H06RCU
LC-32HT3U
LC-37HT3U
LC-42HT3U
LC-32HT3U
LC-37HT3U
LC-42HT3U

TO REDUCE THE RISK OF FIRE OR ELECTRIC SHOCK, DO
NOT EXPOSE THIS PRODUCT TO RAIN OR MOISTURE.
WARNING:
The lightning flash with arrow-head
symbol, within an equilateral triangle,
is intended to alert the user to the
presence of uninsulated “dangerous
voltage” within the product's
enclosure that may be of sufficient
magnitude to constitute a risk of
electric shock to persons.
The exclamation point within a
triangle is intended to alert the user
to the presence of important
operating and maintenance
(servicing) instructions in the
literature accompanying the product.
CAUTION
RISK OF ELECTRIC SHOCK
DO NOT OPEN
CAUTION: TO REDUCE THE RISK OF ELECTRIC SHOCK,
DO NOT REMOVE COVER (OR BACK).
NO USER-SERVICEABLE PARTS INSIDE.
REFER SERVICING TO QUALIFIED SERVICE
PERSONNEL.
1
ENGLISH
Remote Replicator
(AN-H06RCU)
Remote control unit
(AN-32HTRC)
OPERATION MANUAL FOR HOTEL OPERATOR
• This operation manual is for LODGENET, ONCOMMAND,
NXTV, nSTREAMS and SeaChange users.
• This operation manual explains how to set or adjust the TV
settings with the Remote Replicator (AN-H06RCU) and the
remote control unit (AN-32HTRC), the optional accessories of
the LCD TV (LC-32HT3U/LC-37HT3U/LC-42HT3U) designed
for hotel guest rooms.
• The illustrations and on-screen displays in this operation
manual are for explanation purposes and may vary slightly from
the actual operations.
• Menu items that are not selectable are grayed out.
• The examples used throughout this manual are based on the
LC-37HT3U model.
ENGLISH
IMPORTANT INFORMATION

TO PREVENT ELECTRIC SHOCK, MATCH WIDE BLADE OF PLUG TO WIDE
SLOT, FULLY INSERT.
CAUTION:
WARNING: FCC Regulations state that any unauthorized changes or modifications to this equipment not expressly
approved by the manufacturer could void the user's authority to operate this equipment.
“Note to CATV system installer: This reminder is provided to call the CATV system installer's attention to Article 820-40 of the National
Electrical Code that provides guidelines for proper grounding and, in particular, specifies that the cable ground shall be connected to the
grounding system of the building, as close to the point of cable entry as practical.”
This product utilizes tin-lead solder, and fluorescent lamp containing a small amount of
mercury. Disposal of these materials may be regulated due to environmental
considerations. For disposal or recycling information, please contact your local
authorities, the Electronic Industries Alliance: www.eiae.org, the lamp recycling
organization: www.lamprecycle.org or Sharp at 1-800-BE-SHARP (For U.S.A. Only)
CAUTION:
This product satisfies FCC regulations when shielded cables and connectors are used to connect the unit to other
equipment. To prevent electromagnetic interference with electric appliances such as radios and televisions, use shielded
cables and connectors for connections.
INFORMATION:
This equipment has been tested and found to comply with the limits for a Class B digital device, pursuant to Part 15 of the FCC
Rules. These limits are designed to provide reasonable protection against harmful interference in a residential installation. This
equipment generates, uses and can radiate radio frequency energy and, if not installed and used in accordance with the
instructions, may cause harmful interference to radio communications. However, there is no guarantee that interference will not
occur in a particular installation. If this equipment does cause harmful interference to radio or television reception, which can be
determined by turning the equipment off and on, the user is encouraged to try to correct the interference by one or more of the
following measures:
Reorient or relocate the receiving antenna.
Increase the separation between the equipment and receiver.
Connect the equipment into an outlet on a circuit different from that to which the receiver is connected.
Consult the dealer or an experienced radio/TV technician for help.
DECLARATION OF CONFORMITY:
This device complies with Part 15 of the FCC Rules. Operation is subject to the following two conditions:
(1) This device may not cause harmful interference, and (2) this device must accept any interference
received, including interference that may cause undesired operation.
RESPONSIBLE PARTY:
SHARP ELECTRONICS CORPORATION
Sharp Plaza, Mahwah, New Jersey 07430-2135
TEL: 1-800-BE-SHARP
For Business Customers: URL http://www.sharpusa.com
CAUTION:
DO NOT PLACE THIS PRODUCT ON AN UNSTABLE CART, STAND, TRIPOD, BRACKET, OR TABLE.
THE PRODUCT MAY FALL CAUSING SERIOUS PERSONAL INJURY AND SERIOUS DAMAGE TO
THE PRODUCT. USE ONLY WITH A CART, STAND, TRIPOD, BRACKET, OR TABLE RECOMMENDED
BY THE MANUFACTURER OR SOLD WITH THE PRODUCT. FOLLOW THE MANUFACTURER'S
INSTRUCTIONS WHEN INSTALLING THE PRODUCT AND USE MOUNTING ACCESSORIES
RECOMMENDED BY THE MANUFACTURER. A PRODUCT AND CART COMBINATION SHOULD BE
MOVED WITH CARE. QUICK STOPS, EXCESSIVE FORCE, AND UNEVEN SURFACES MAY CAUSE
THE PRODUCT AND CART COMBINATION TO OVERTURN.
2
• Manufactured under license from Dolby Laboratories. “Dolby” and the double-D symbol are trademarks of Dolby
Laboratories.
• “HDMI, the HDMI logo and High-Definition Multimedia Interface are trademarks or registered trademarks of HDMI
Licensing LLC.”
IMPORTANT INFORMATION
SHARP LIQUID CRYSTAL TELEVISION, MODEL LC-32HT3U/LC-37HT3U/LC-42HT3U
Trademarks

Electricity is used to perform many useful functions, but it can also cause personal injuries and property damage
if improperly handled. This product has been engineered and manufactured with the highest priority on safety.
However, improper use can result in electric shock and/or fire. In order to prevent potential danger, please
observe the following instructions when installing, operating and cleaning the product. To ensure your safety
and prolong the service life of your Liquid Crystal Television, please read the following precautions carefully
before using the product.
1) Read these instructions.
2) Keep these instructions.
3) Heed all warnings.
4) Follow all instructions.
5) Do not use this apparatus near water.
6) Clean only with dry cloth.
7) Do not block any ventilation openings. Install in accordance with the manufacturer's instructions.
8) Do not install near any heat sources such as radiators, heat registers, stoves, or other apparatus (including
amplifiers) that produce heat.
9) Do not defeat the safety purpose of the polarized or grounding-type plug. A polarized plug has two blades
with one wider than the other. A grounding type plug has two blades and a third grounding prong. The
wide blade or the third prong are provided for your safety. If the provided plug does not fit into your outlet,
consult an electrician for replacement of the obsolete outlet.
10) Protect the power cord from being walked on or pinched particularly at plugs, convenience receptacles,
and the point where they exit from the apparatus.
11) Only use attachments/accessories specified by the manufacturer.
12) Use only with the cart, stand, tripod, bracket, or table specified by the manufacturer, or sold
with the apparatus. When a cart is used, use caution when moving the cart/apparatus
combination to avoid injury from tip-over.
13) Unplug this apparatus during lightning storms or when unused for long periods of time.
14) Refer all servicing to qualified service personnel. Servicing is required when the apparatus has been
damaged in any way, such as power-supply cord or plug is damaged, liquid has been spilled or objects
have fallen into the apparatus, the apparatus has been exposed to rain or moisture, does not operate
normally, or has been dropped.
Additional Safety Information
15) Power Sources—This product should be operated only from the type of power source indicated on the
marking label. If you are not sure of the type of power supply to your home, consult your product dealer or
local power company. For products intended to operate from battery power, or other sources, refer to the
operating instructions.
16) Overloading—Do not overload wall outlets, extension cords, or integral convenience receptacles as this
can result in a risk of fire or electric shock.
17) Object and Liquid Entry—Never push objects of any kind into this product through openings as they may
touch dangerous voltage points or short-out parts that could result in a fire or electric shock. Never spill
liquid of any kind on the product.
18) Damage Requiring Service—Unplug this product from the wall outlet and refer servicing to qualified
service personnel under the following conditions:
a) When the AC cord or plug is damaged,
b) If liquid has been spilled, or objects have fallen into the product,
c) If the product has been exposed to rain or water,
d) If the product does not operate normally by following the operating instructions.
Adjust only those controls that are covered by the operating instructions as an improper adjustment
of other controls may result in damage and will often require extensive work by a qualified technician
to restore the product to its normal operation,
e) If the product has been dropped or damaged in any way, and
f) When the product exhibits a distinct change in performance - this indicates a need for service.
19) Replacement Parts—When replacement parts are required, be sure the service technician has used
replacement parts specified by the manufacturer or have the same characteristics as the original part.
Unauthorized substitutions may result in fire, electric shock, or other hazards.
20) Safety Check—Upon completion of any service or repairs to this product, ask the service technician to
perform safety checks to determine that the product is in proper operating condition.
21) Wall or ceiling mounting—When mounting the product on a wall or ceiling, be sure to install the product
according to the method recommended by the manufacturer.
3
IMPORTANT SAFETY INSTRUCTIONS

4
IMPORTANT INFORMATION ..................................1
Trademarks..............................................................2
IMPORTANT SAFETY INSTRUCTIONS..................3
Contents ..................................................................4
General notes...........................................................6
Accessories ........................................................6
TV modes index ..................................................6
Explanation of the remote control unit, TV modes
and the buttons on the TV .................................6
Quick TV cloning guide (for the PPV TV)...............7
Quick TV cloning guide (for the Normal TV) ..........8
Quick setup for LODGENET users.........................9
PPV System ........................................................9
Function Menu Setup ..........................................9
Default Channel .................................................10
Default Volume ..................................................10
Room Mode ......................................................11
CH Re-Map .......................................................11
View Mode ........................................................12
Quick setup for ONCOMMAND users .................13
PPV System ......................................................13
Default Channel .................................................13
Default Volume ..................................................14
Room Mode ......................................................14
Label Input.........................................................15
CH Re-Map .......................................................15
View Mode ........................................................16
Quick setup for NXTV users .................................17
PPV System ......................................................17
Default Channel .................................................17
Default Volume ..................................................18
Room Mode ......................................................18
CH Re-Map .......................................................19
View Mode ........................................................19
Quick setup for nSTREAMS users .......................20
PPV System ......................................................20
Function Menu Setup ........................................20
Default Channel .................................................20
Default Volume ..................................................21
Room Mode ......................................................21
CH Re-Map .......................................................22
View Mode ........................................................22
Quick setup for SeaChange users .......................23
PPV System ......................................................23
Default Channel .................................................23
Default Volume ..................................................24
Room Mode ......................................................24
CH Re-Map .......................................................25
View Mode ........................................................25
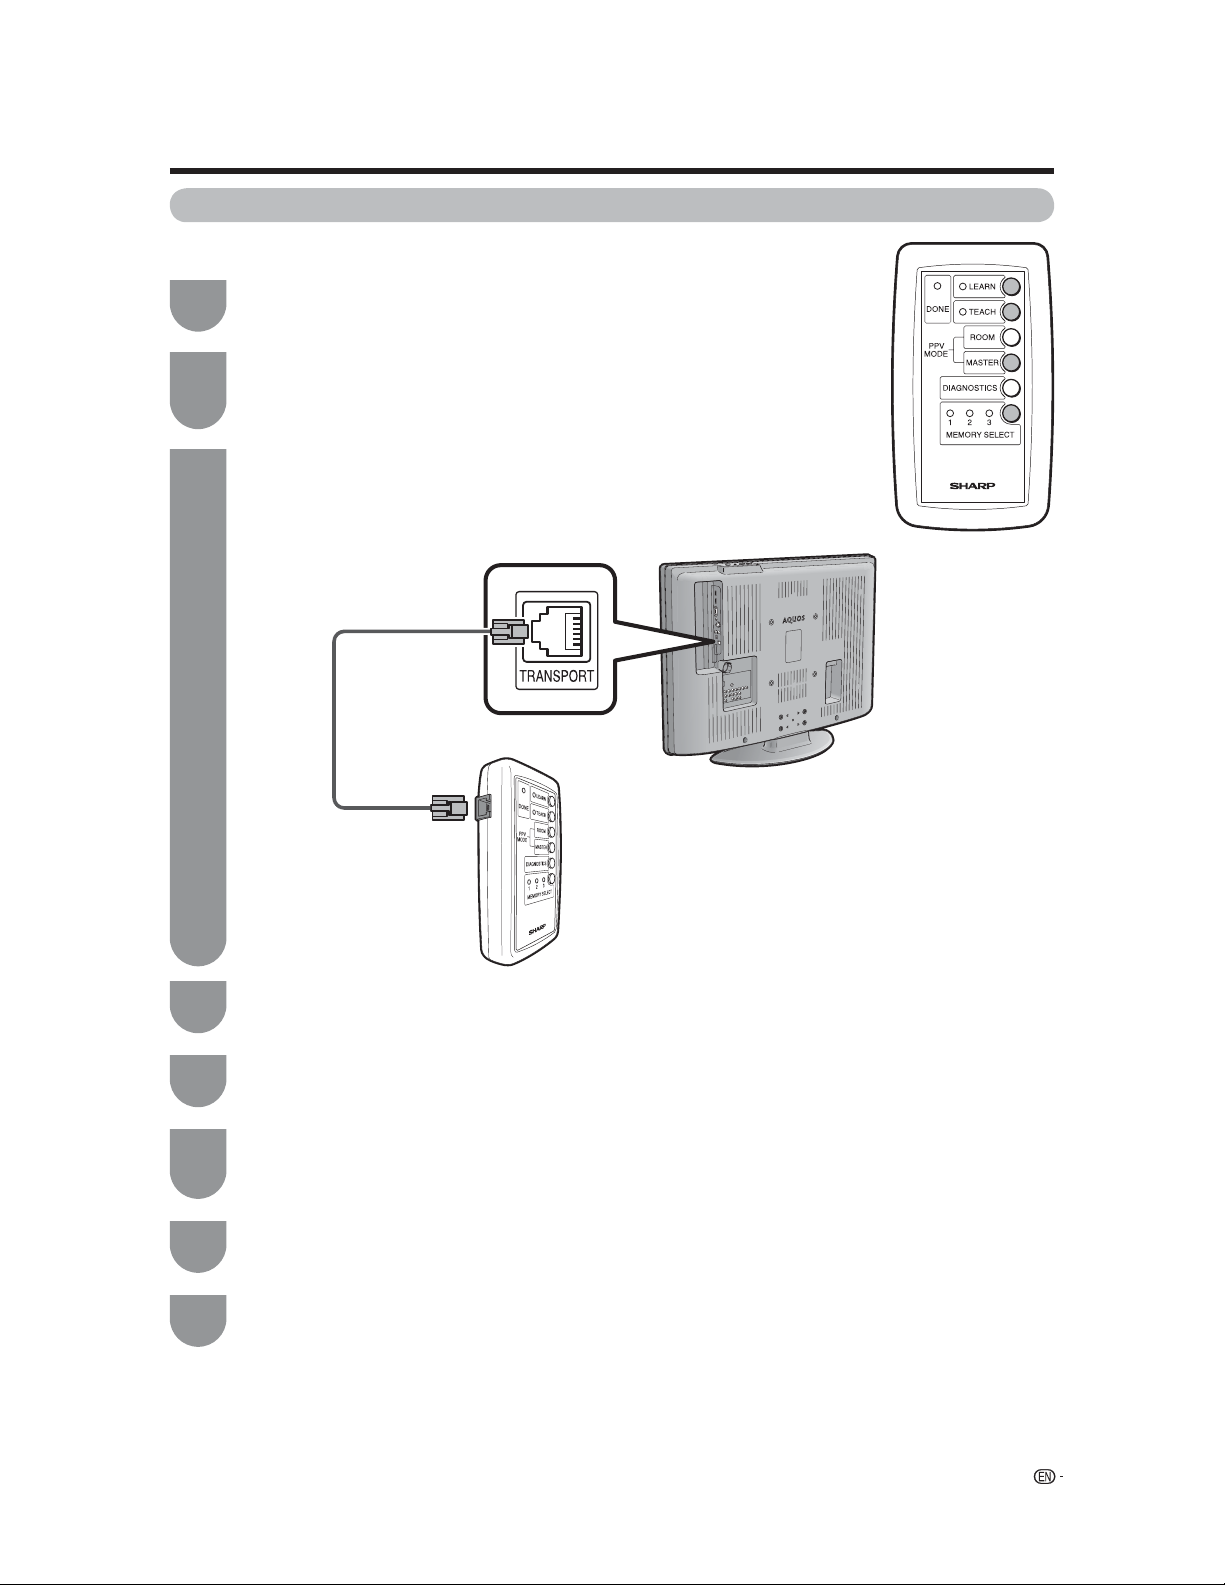
Remote Replicator ................................................26
Part names ........................................................26
Inserting the battery ...........................................26
Storing the settings from the TV.........................27
Transferring the settings to the TV .....................27
Storing the settings from the TV (for NXTV users
only) ................................................................27
Transferring the settings to the TV (for NXTV users
only) ................................................................27
Configuration memory banks .............................27
DIAGNOSTICS mode (PPV TV only)...................27
Other settings for the PPV TV mode....................29
PPV TV menu ....................................................29
TV Mode .......................................................29
Reset ............................................................29
Function menu (for LODGENET and nSTREAMS
users only).......................................................30
Option menu (for LODGENET and nSTREAMS
users only).......................................................30
Remote control unit .............................................31
Part names ........................................................31
Inserting the batteries ........................................32
Using the remote control unit.............................32
Cautions regarding the remote control unit....32
Preparation ............................................................33
Connecting a Blu-ray disc player, HD-DVD
player, DVD player or a Digital TV STB (Air or
Cable)..............................................................33
Connecting a VCR, game console
or camcorder...................................................33
Using Digital Audio Output.................................33
Connecting HDMI equipment.............................34
Connecting a PC ...............................................34
PC compatibility chart........................................34
Watching TV...........................................................35
Turning on the power.........................................35
Turning off the power.........................................35
Initial setup ........................................................36
Simple button operations for changing channels
...37
Simple button operations for changing volume/
sound..............................................................38
Setting MTS/SAP stereo mode ..........................39
Setting Digital broadcasting audio mode............39
Contents

5
Basic adjustment settings ....................................40
Menu operation buttons.....................................40
On-Screen Display.............................................40
PPV TV mode menu items
(for TV/INPUT 1/INPUT 2/INPUT 3)..................41
PPV TV mode menu items (for HDMI/PC-IN)......42
NORMAL TV mode menu items.........................43
EZ Setup ...........................................................44
Channel Setup...................................................44
Antenna Setup - DIGITAL ..................................45
Favorite channel setting .....................................46
Picture adjustments ...........................................47
OPC setting ..................................................47
Advanced picture adjustments ......................48
Color Temperature ........................................48
Black.............................................................48
I/P Setting .....................................................48
Film Mode (3:2 pull-down) .............................48
3D-Y/C .........................................................48
Monochrome ................................................48
Range of OPC...............................................48
Sound adjustment .............................................49
Surround ...........................................................49
Power Control ...................................................50
Digital Setup ......................................................50
Audio Setup ..................................................50
Using external equipment.....................................51
Displaying an external equipment image ............51
Input Select .......................................................51
Displaying an image from HDMI equipment........52
Input Skip ..........................................................52
Useful adjustment settings...................................53
Auto Sync. adjustment (for Analog PC input mode
only) ................................................................53
Fine Sync. adjustment .......................................53
Language setting ...............................................54
Image position ...................................................54
Reset.................................................................54
Input Label.........................................................55
Sleep Timer .......................................................55
View Mode for 4:3 Programs .............................56
View Mode for HD Programs .............................56
View Mode (for PC input mode) .........................57
Advanced Option setting ...................................58
Audio Only ....................................................58
Digital Noise Reduction .................................58
Output Select................................................58
Color System ................................................58
Program Title Display ....................................58
AV MODE ..........................................................59
Input Signal (for Analog PC input mode only) .....59
Closed Captions and Digital Closed Captions ....60
Caption Setup ...................................................61
Secret number setting for parental control (AV
input mode only)..............................................62
Parental control (setting V-CHIP level) ................64
How to temporarily release the V-CHIP BLOCK .67
Reactivating the temporarily released V-CHIP
BLOCK............................................................67
Other viewing options ...........................................68
Freezing images.................................................68
Presetting remote control function .....................68
Contents
Appendix ................................................................72
Troubleshooting.................................................72
Troubleshooting-Digital broadcasting.................72

6
PPV TV mode
(ON LINE/STAND ALONE)
(Factory preset)
Press MASTER
Press MASTER
Press ROOM
Set from the TV Mode menu
MASTER mode
Normal TV mode
ROOM mode
c
d
c
d
PPV TV
Normal TV
ONLINE*1
STAND
ALONE*2
MASTER mode
Room
mode
R/C
Buttons
TV
Buttons*3
On
Off
Off
MASTER mode
Room
mode
R/C
Buttons
TV
Buttons*3
On
On
Off
Off
On
ggg
g
–
g
g
–
g
g
g
g
g
–
–
g
–
g
–
–
g
–
g
gg*4
Remote control unit of
LCD TV Remote
Replicator
MASTER
or ROOM
button
Other
buttons
Same
function as
TV buttons
Other
functions
TV
buttons
Remote
control unit
supplied by
PPV
provider
General notes
Accessories
Accessories included with the LC-32HT3U/LC-37HT3U/LC-42HT3U
See pages 8, 12 and 13 of the operation manual of LC-32HT3U/LC-37HT3U/LC-42HT3U.
Optional accessories for the LC-32HT3U/LC-37HT3U/LC-42HT3U
• Remote Replicator: Stores the TV settings from one TV (LC-32HT3U/LC-37HT3U/LC-42HT3U) and transfers the TV settings
to other TVs (LC-32HT3U/LC-37HT3U/LC-42HT3U).
•
Remote control unit: Sets or adjusts the TV. The remote control unit is for hotel operators only and should not be used by hotel guests.
TV modes index
The diagram below explains the TV modes of the LC-32HT3U/LC-37HT3U/LC-42HT3U models.
PPV TV mode: This mode has two modes, MASTER mode and ROOM mode.
• MASTER mode: Allows hotel operators to set or adjust the TV.
• ROOM mode: This mode is for hotel guests.
Normal TV mode: The TV functions as a normal TV. (See page 29.)
Explanation of the remote control unit, TV modes and the buttons on the TV
The accessible buttons of the remote control unit and TV panel will change depending on the TV mode.
g........ Enabled l........ Disabled ........ No effect
*1 ONLINE: When the TV is connected to the PPV terminal box, and the PPV terminal box is operational
*2
STAND ALONE: When the TV is not connected to the PPV terminal box or the TV is connected to the PPV terminal box, but the PPV terminal box is not operationa
l
*3
TV INPUT Button: You can change the input source using INPUT on the TV when “TV Buttons” and “TV INPUT Button” are set to Respond.
*4 The LEARN/TEACH buttons also work in Normal TV mode. (The DIAGNOSTICS button will have no effect.)
NOTE
• Depending on the Room Mode setting (see page 11, 14, 18, 21 and 24), press MASTER or ROOM on the Remote Replicator
to turn on or turn off the TV.

7
General notes
Quick TV cloning guide (for the PPV TV)
The steps below show the process of setting TVs for hotel guest rooms.
1
2
3
4
5
6
7
8
Use the remote control unit to set or adjust the TV (TV with the master settings).
(LODGENET users: See pages 9 to 12. ONCOMMAND users: See pages 13 to
16. NXTV users: See pages 17 to 19. nSTREAMS users: See pages 20 to 22.
SeaChange users: See pages 23 to 25.)
Press MASTER on the Remote Replicator to turn on the TV. (See page 26.)
Press MEMORY SELECT on the Remote Replicator to select the memory bank number in which you
want to store the data. (See pages 26 and 27.)
Connect the TRANSPORT terminal of the TV to the TRANSPORT (RJ-11)
connector of the Remote Replicator with the supplied RJ-11 cable.
• For NXTV users, perform steps on page 27 before connecting the TV and the
Remote Replicator.
RJ-11 cable
Press LEARN on the Remote Replicator to store the TV settings in the Remote Replicator. (See pages 26
and 27.)
Disconnect the RJ-11 cable from the TV (TV with the master settings), and connect to the other TV (TV to
be cloned) that you want to transfer the data.
• For NXTV users, perform steps on page 27 before connecting the TV and the Remote Replicator.
Press MEMORY SELECT on the Remote Replicator to select the memory bank number that contains the
data you want to send. (See pages 26 and 27.)
Press TEACH on the Remote Replicator to transfer the TV settings. (See pages 26 and 27.)

8
General notes
Quick TV cloning guide (for the Normal TV)
If already in Normal TV mode, begin from step 6.
1
2
3
4
5
Press MASTER on the Remote Replicator to turn on the TV. (See page 26.)
Press MENU and the MENU screen displays.
Press c/dto select “PPV TV”.
Press a/bto select “TV Mode”, and then press ENTER.
Press c/dto select “Normal TV”, and then press ENTER.
• When you select “Normal TV”, enter “2433” for the password, and then the TV will automatically turn off after the
message. The TV enters the Normal TV mode when it is turned on again.
PPV TV
PPV System
TV Mode
Room Mode
Function Menu Setup
[PPV TV]
[LODGENET]
Default Channel [2]
Default Volume [20]
Reset
CH Re-Map
Selected item Description
PPV TV Sets and adjusts the TV, and
communicates with the PPV terminal
box.
Normal TV Functions as a normal TV.
6Use the remote control unit to set or adjust the TV. (TV with the master settings) (See pages 36, 44 to 67.)
7Perform step 3 through step 8 for PPV TV on the previous page. (See page 7.)
8Wait until the power is completely off.
To turn the power on again after performing TEACH, wait approximately 15 seconds after the TV enters
Standby Mode (dark screen). Then turn the power on.

9
Quick setup for LODGENET users
For quick setup, use the remote control unit to perform
the following operations. Before the setup, press
MASTER on the Remote Replicator to turn on the TV
in the MASTER mode.
PPV TV
PPV System
TV Mode
Room Mode
Function Menu Setup
[PPV TV]
[LODGENET]
Default Channel [2]
Default Volume [20]
Reset
CH Re-Map
PPV System
Sets the Pay Per View system.
1Press MENU and the MENU screen displays.
2Press c/dto select “PPV TV”.
3Press a/bto select “PPV System”, and then
press ENTER.
4Press a/bto select “LODGENET”, and then
press ENTER.
• The TV will automatically turn off. Press MASTER
on the Remote Replicator to turn on the TV again.
Function Menu Setup
You can select the menu items to display on the
Function menu. (See page 30.) The Function menu can
be displayed by pressing the TV FUNCTION button
on the LODGENET remote control unit.
1Repeat steps 1 and 2 in PPV System.
2Press a/bto select “Function Menu Setup”,
and then press ENTER.
3Press a/bto select the desired item, and
then press ENTER to select “On” or “Off”.
4Press MENU to exit.
Selected item Description
Language You can select a language from
English, French and Spanish for On
Screen Display. (See page 30.)
View Mod You can select the screen size.
(See page 30.)
Input Select You can select the input source.
(See page 30.)
Parental CTRL You can set the secret number.
(See pages 62 to 67.)
NOTE
• Parental CTRL setting from the hotel server has priority
over the TV setting.

10
Quick setup for LODGENET users
Default Channel
Sets the default channel.
1Press MENU and the MENU screen displays.
2Press c/dto select “PPV TV”.
3Press a/bto select “Default Channel”, and
then press ENTER.
4Press a/bto select “Analog/Digital”, and then
press ENTER.
5Press c/dto select “Analog” or “Digital”, and
then press ENTER.
6Press a/bto select “Analog” or “Digital”, and
then press ENTER.
7Input the default channel number by using
0 – 9, and then press ENTER.
• The channel number is based on the physical
number, and it may be different from the displayed
channel number specified by the hotel server.
8Press MENU to exit.
NOTE
• Default Channel setting from the hotel server has priority
over the TV setting when the TV is connected to the PPV
terminal box (ONLINE).
• The TV returns to the default channel when the TV is turned
on and is not connected to the PPV terminal box (STAND
ALONE)
Default Volume
Sets the default volume or turns the Auto adjustment
on or off for when the TV is turned on. The Auto
adjustment sets the volume to a suitable level
depending on the previously used volume setting.
1Repeat steps 1 and 2 in Default Channel.
2Press a/bto select “Default Volume”, and
then press ENTER.
3Press a/bto select “Volume” or “Auto
adjustment”.
4For “Volume”, press c/dto set the default
volume.
For “Auto adjustment”, press c/dto select
“On” or “Off”.
5Press MENU to exit.
NOTE
• Default Volume setting from the hotel server has priority
over the TV setting.
• For resetting all Default Volume adjustment items to the
factory preset values, select “Reset” in step 3, and then
press ENTER.

11
Quick setup for LODGENET users
Room Mode
You can set “Maximum Volume”, “R/C Buttons”, “TV
Buttons” and “TV INPUT Button” for the ROOM mode.
1Press MENU and the MENU screen displays.
2Press c/dto select “PPV TV”.
3Press a/bto select “Room Mode”, and then
press ENTER.
4Press a/bto select the desired item, and
then press ENTER.
5For “Maximum Volume”, press c/dto set the
volume.
For “R/C Buttons”, “TV Buttons” and “TV INPUT
Button”, press c/dto select “Respond” or
“No Respond”, and then press ENTER.
6Press MENU to exit.
NOTE
• Maximum Volume setting from the hotel server has priority
over the TV setting.
• When you set the Maximum Volume lower than the Default
Volume, the Default Volume setting will be automatically set
to the same level as the Maximum Volume.
• Some buttons on the remote control unit will not work
in the ROOM mode even though “R/C Buttons” is set to
“Respond”.
• Depending on the Room Mode setting, press MASTER or
ROOM on the Remote Replicator to turn on or turn off the
TV.
• “TV INPUT Button” is grayed out when “TV Buttons” is set
to “No Respond”.
• For resetting all Room Mode adjustment items to the
factory preset values, select “Reset” in step 4.
CH Re-Map
Sets the channel order (logical channel) to your
preferred order.
1Press MENU and the MENU screen displays.
2Press c/dto select “PPV TV”.
3Press a/bto select “CH Re-Map”, and then
press ENTER.
4Press a/bto select “CH Set”, and then press
ENTER.
5Press a/b/c/dto select the Logical CH you
want to set, and then press ENTER.
NOTE
• For resetting all logical channels to the factory preset
values, select “CH Reset All” in step 4, press c/dto
select “Yes”, and then press ENTER.
Selected item Description
Maximum
Volume
Set the maximum volume in the
ROOM mode.
R/C Buttons Select “Respond” to enable or “No
Respond” to disable the functions of
the remote control unit.
TV Buttons Select “Respond” to enable or “No
Respond” to disable the functions of
the TV buttons.
TV INPUT
Button
Select “Respond” to enable or “No
Respond” to disable the functions of
the INPUT button on the TV.
6Press a/bto select “ANALOG” , “DIGITAL”
or the desired input source, and then press
ENTER.
When you select “ANALOG” or “DIGITAL”,
input the channel number by using 0 – 9, and
then press ENTER.
• Select “Reset” for resetting the channel to the
factory preset value.
• When you input digital channels with a single
number after the dot, input 0 after the dot.
(e. g., Channel 22.1):
Press 0s2s2s0s1sENTER
4Repeat the steps 5 and 6 until all desired
logical channels are set.
5Press MENU to exit.

12
Quick setup for LODGENET users
View Mode
You can set the picture size for when the TV is turned
on.
1Press VIEW MODE.
• The View Mode menu displays.
2Press VIEW MODE or a/bwhile the View
Mode menu is still on the screen.
• You can sequentially select a View Mode that has
its own aspect ratio.
View Mode
Side Bar
S. Stretch
Zoom
Stretch
Side Bar:
Suitable for viewing
conventional 4:3 programs in
their normal format.
S.Stretch (Smart stretch):
Suitable for stretching 4:3
programs to fill the screen.
Zoom:
Suitable for viewing wide-
screen 2.35:1 anamorphic
DVDs in full screen.
Stretch:
This mode is useful for 1.78:1
DVDs.
When viewing 1.85:1 DVDs,
stretch mode will still show
very thin black bands at the
top and bottom of the screen
You can set other menu items, such as
Brightness, in the PPV TV mode. (See
pages 41 to 67.)
When you are finished setting the
menu items, perform steps 3 to 8 on
page 7 to complete the storing and
transferring of the data to the TV

13
For quick setup, use the remote control unit to perform
the following operations. Before the setup, press
MASTER on the Remote Replicator to turn on the TV
in the MASTER mode.
Quick setup for ONCOMMAND users
PPV TV
PPV System
TV Mode
Room Mode
[PPV TV]
[ONCOMMAND]
Default Channel [2]
Default Volume [20]
Reset
Label Input
CH Re-Map
PPV System
Sets the Pay Per View system.
1Press MENU and the MENU screen displays.
2Press c/dto select “PPV TV”.
3Press a/bto select “PPV System”, and then
press ENTER.
4Press a/bto select “ONCOMMAND”, and
then press ENTER.
• The TV will automatically turn off. Press MASTER
on the Remote Replicator to turn on the TV again.
1Repeat steps 1 and 2 in PPV System.
2Press a/bto select “Default Channel”, and
then press ENTER.
3Press a/bto select “Analog/Digital”, and
then press ENTER.
4Press c/dto select “Analog” or “Digital”, and
then press ENTER.
5Press a/bto select “Analog” or “Digital”, and
then press ENTER.
Default Channel
Sets the default channel.
6Input the default channel number by using
0 – 9, and then press ENTER.
• The channel number is based on the physical
number, and it may be different from the displayed
channel number specified by the hotel server.
7Press MENU to exit.
NOTE
• Default Channel setting from the hotel server has priority
over the TV setting when the TV is connected to the PPV
terminal box (ONLINE).
• The TV returns to the default channel when the TV is turned
on and is not connected to the PPV terminal box (STAND
ALONE).

14
Default Volume
Sets the default volume or turns the Auto adjustment
on or off for when the TV is turned on. The Auto
adjustment sets the volume to a suitable level
depending on the previously used volume setting.
Quick setup for ONCOMMAND users
1Press MENU and the MENU screen displays.
2Press c/dto select “PPV TV”.
3Press a/bto select “Default Volume”, and
then press ENTER.
4Press a/bto select “Volume” or “Auto
adjustment”.
5For “Volume”, press c/dto set the default
volume.
For “Auto adjustment”, press c/dto select
“On” or “Off”.
6Press MENU to exit.
NOTE
• Default Volume setting from the hotel server has priority
over the TV setting.
• For resetting all Default Volume adjustment items to the
factory preset values, select “Reset” in step 4, and then
press ENTER.
Room Mode
You can set “Maximum Volume”, “R/C Buttons”, “TV
Buttons” and “TV INPUT Button” for the ROOM mode.
1Repeat steps 1 and 2 in Default Volume.
2Press a/bto select “Room Mode”, and then
press ENTER.
3Press a/bto select the desired item, and
then press ENTER.
4For “Maximum Volume”, press c/dto set the
volume.
For “R/C Buttons”, “TV Buttons” and “TV
INPUT Button”, press c/dto select
“Respond” or “No Respond”, and then press
ENTER.
Selected item Description
Maximum
Volume
Set the maximum volume in the
ROOM mode.
R/C Buttons Select “Respond” to enable or “No
Respond” to disable the functions of
the remote control unit.
TV Buttons Select “Respond” to enable or “No
Respond” to disable the functions of
the TV buttons.
TV INPUT
Button
Select “Respond” to enable or “No
Respond” to disable the functions of
the INPUT button on the TV.
5Press MENU to exit.
NOTE
• Maximum Volume setting from the hotel server has priority
over the TV setting.
• When you set the Maximum Volume lower than the Default
Volume, the Default Volume setting will be automatically set
to the same level as the Maximum Volume.
• Some buttons on the remote control unit will not work
in the ROOM mode even though “R/C Buttons” is set to
“Respond”.
• Depending on the Room Mode setting, press MASTER or
ROOM on the Remote Replicator to turn on or turn off the
TV
• “TV INPUT Button” is grayed out when “TV Buttons” is set
to “No Respond”.
• For resetting all Room Mode adjustment items to the
factory preset values, select “Reset” in step 3.

15
Quick setup for ONCOMMAND users
Label Input
You can assign a label to each input source and
channel.
1Press MENU and the MENU screen displays.
2Press c/dto select “PPV TV”.
3Press a/bto select “Label Input”, and then
press ENTER.
4Press a/bto select the desired input source,
and then press ENTER
5For “INPUT 1” to “INPUT 6”:
1Press a/b/c/dand ENTER to select
each character of the new name for the
input source.
2Press a/b/c/dto select “END”, and
then press ENTER to complete the
labeling.
For “TV”:
1Press c/dto select “Air” or “Cable”, and
then press bto move down.
2Press c/dto select the channel number
you want to label, and then press bto
move down.
• The channel number is based on the physical
number, and it may be different from the
displayed channel number specified by the
hotel server.
3Select “Select”, and then press ENTER.
4Press a/b/c/dand ENTER to select
each character of the new name for the
channel.
5Press a/b/c/dto select “END”, and
then press ENTER to complete the
labeling.
6Press MENU to exit.
NOTE
• Depending on the system version, you can assign a label
using the hotel server.
• When you change the input name for “INPUT 1” through
“INPUT 6” in the Label Input setting, the input name
you have labeled will not change even if you change the
Language setting.
CH Re-Map
Sets the channel order (logical channel) to your
preferred order.
1Press MENU and the MENU screen displays
2Press c/dto select “PPV TV”.
3Press a/bto select “CH Re-Map”, and then
press ENTER.
4Press a/bto select “CH Set”, and then press
ENTER.
5Press a/b/c/dto select the Logical CH you
want to set, and then press ENTER.
6Press a/bto select “ANALOG” , “DIGITAL”
or the desired input source, and then press
ENTER.
When you select “ANALOG” or “DIGITAL”,
input the channel number by using 0 – 9, and
then press ENTER.
• Select “Reset” for resetting the channel to the
factory preset value.
• When you input digital channels with a single
number after the dot, input 0after the dot.
(e. g., Channel 22.1):
Press 0s2s2s0s1sENTER
NOTE
• For resetting all logical channels to the factory preset
values, select “CH Reset All” in step 4, press c/dto
select “Yes”, and then press ENTER.
7Repeat the steps 5 and 6 until all desired logical
channels are set.
8Press MENU to exit.

16
Quick setup for ONCOMMAND users
View Mode
You can set the picture size for when the TV is turned
on.
1Press VIEW MODE.
• The View Mode menu displays.
2Press VIEW MODE or a/bwhile the View
Mode menu is still on the screen.
• You can sequentially select a View Mode that has
its own aspect ratio.
View Mode
Side Bar
S. Stretch
Zoom
Stretch
Side Bar:
Suitable for viewing
conventional 4:3 programs in
their normal format.
S.Stretch (Smart stretch):
Suitable for stretching 4:3
programs to fill the screen.
Zoom:
Suitable for viewing wide-
screen 2.35:1 anamorphic
DVDs in full screen.
Stretch:
This mode is useful for 1.78:1
DVDs.
When viewing 1.85:1 DVDs,
stretch mode will still show
very thin black bands at the
top and bottom of the screen.
You can set other menu items, such as
Brightness, in the PPV TV mode. (See
pages 41 to 67.)
When you are finished setting the menu
items, perform steps 3 to 8 on page 7
to complete the storing and transferring
of the data to the TV
NOTE
• Some ONCOMMAND PPV systems are not compatible
with changing the View Mode. Confirm that your system
is compatible with a View Mode before you set it. If your
system is not compatible with the desired mode, set the
View Mode default setting to “S.Stretch”.

17
Quick setup for NXTV users
PPV TV
PPV System
TV Mode
Room Mode
[PPV TV]
[NXTV]
Default Channel [2]
Default Volume [20]
Reset
CH Re-Map
For quick setup, use the remote control unit to perform
the following operations. Before the setup, press
MASTER on the Remote Replicator to turn on the TV
in the MASTER mode.
PPV System
Sets the Pay Per View system.
Press a/bto select “NXTV”, and then press
ENTER.
• The TV will automatically turn off. Press MASTER
on the Remote Replicator to turn on the TV again.
Press MENU and the MENU screen displays.
Press c/dto select “PPV TV”.
Press a/bto select “PPV System”, and then
press ENTER.
1
2
3
4
Default Channel
Sets the default channel.
Press c/dto select “Analog” or “Digital”, and
then press ENTER.
Repeat steps 1 and 2 in PPV System.
Press a/bto select “Default Channel”, and
then press ENTER.
Press a/bto select “Analog/Digital”, and
then press ENTER.
1
2
3
4
Press MENU to exit.
Press a/bto select “Analog” or “Digital”, and
then press ENTER.
Input the default channel number by using
0 – 9, and then press ENTER.
• The channel number is based on the physical
number, and it may be different from the displayed
channel number specified by the hotel server.
5
6
7
NOTE
• Default Channel setting from the hotel server has priority
over the TV setting when the TV is connected to the PPV
terminal box (ONLINE).
• The TV returns to the default channel when the TV is turned
on and is not connected to the PPV terminal box (STAND
ALONE).

18
Quick setup for NXTV users
Default Volume
Sets the default volume or turns the Auto adjustment
on or off for when the TV is turned on. The Auto
adjustment sets the volume to a suitable level
depending on the previously used volume setting.
Press a/bto select “Volume” or “Auto
adjustment”.
Press MENU and the MENU screen displays.
Press c/dto select “PPV TV”.
Press a/bto select “Default Volume”, and
then press ENTER.
1
2
3
4
For “Volume”, press c/dto set the default
volume.
For “Auto adjustment”, press c/dto select
“On” or “Off”.
Press MENU to exit.
5
6
NOTE
• Default Volume setting from the hotel server has priority
over the TV setting.
• For resetting all Default Volume adjustment items to the
factory preset values, select “Reset” in step 4, and then
press ENTER.
Room Mode
You can set “Maximum Volume”, “R/C Buttons”, “TV
Buttons” and “TV INPUT Button” for the ROOM mode.
For “Maximum Volume”, press c/dto set the
volume.
For “R/C Buttons”, “TV Buttons” and “TV
INPUT Button”, press c/dto select
“Respond” or “No Respond”, and then press
ENTER.
Repeat steps 1 and 2 in Default Volume.
Press a/bto select “Room Mode”, and then
press ENTER.
Press a/bto select the desired item, and
then press ENTER.
1
2
3
4
Selected item Description
Maximum
Volume
Set the maximum volume in the
ROOM mode.
R/C Buttons Select “Respond” to enable or “No
Respond” to disable the functions of
the remote control unit.
TV Buttons Select “Respond” to enable or “No
Respond” to disable the functions of
the TV buttons.
TV INPUT
Button
Select “Respond” to enable or “No
Respond” to disable the functions of
the INPUT button on the TV.
Press MENU to exit.
5
NOTE
• Maximum Volume setting from the hotel server has priority
over the TV setting.
• When you set the Maximum Volume lower than the Default
Volume, the Default Volume setting will be automatically set
to the same level as the Maximum Volume.
• Some buttons on the remote control unit will not work
in the ROOM mode even though “R/C Buttons” is set to
“Respond”.
• Depending on the Room Mode setting, press MASTER or
ROOM on the Remote Replicator to turn on or turn off the
TV.
• “TV INPUT Button” is grayed out when “TV Buttons” is set
to “No Respond”.
• For resetting all Room Mode adjustment items to the
factory preset values, select “Reset” in step 3.

19
Quick setup for NXTV users
Press MENU and the MENU screen displays.
Press c/dto select “PPV TV”.
Press a/bto select “CH Re-Map”, and then
press ENTER.
Press a/bto select “CH Set”, and then press
ENTER.
Press a/b/c/dto select the Logical CH you
want to set, and then press ENTER.
NOTE
• For resetting all logical channels to the factory preset
values, select “CH Reset All” in step 4, press c/dto
select “Yes”, and then press ENTER.
CH Re-Map
Sets the channel order (logical channel) to your
preferred order.
1
2
3
4
5
6Press a/bto select “ANALOG” , “DIGITAL”
or the desired input source, and then press
ENTER.
When you select “ANALOG” or “DIGITAL”,
input the channel number by using 0 – 9, and
then press ENTER.
• Select “Reset” for resetting the channel to the
factory preset value.
• When you input digital channels with a single
number after the dot, input 0after the dot.
(e. g., Channel 22.1):
Press 0s2s2s0s1sENTER
Repeat the steps 5 and 6 until all desired
logical channels are set.
7
Press MENU to exit.
8
View Mode
You can set the picture size for when the TV is turned
on.
1Press VIEW MODE.
• The View Mode menu displays.
2Press VIEW MODE or a/bwhile the View
Mode menu is still on the screen.
• You can sequentially select a View Mode that has
its own aspect ratio.
View Mode
Side Bar
S. Stretch
Zoom
Stretch
Side Bar:
Suitable for viewing
conventional 4:3 programs in
their normal format.
S.Stretch (Smart stretch):
Suitable for stretching 4:3
programs to fill the screen.
Zoom:
Suitable for viewing wide-
screen 2.35:1 anamorphic
DVDs in full screen.
Stretch:
This mode is useful for 1.78:1
DVDs.
When viewing 1.85:1 DVDs,
stretch mode will still show
very thin black bands at the
top and bottom of the screen.
You can set other menu items, such as
Brightness, in the PPV TV mode. (See
pages 41 to 67.)
When you are finished setting the menu
items, perform steps 3 to 8 on page 7
to complete the storing and transferring
of the data to the TV.
Other manuals for Aquos LC 32HT3U
2
This manual suits for next models
2
Table of contents
Other Sharp TV Accessories manuals