Sharper Image SP6075 User manual

DECT 6.0
SP6075

CONTENTS MAIN FEATURES
1.8GHZ digital technology ensuring clear&secure voice quality
GAP compatible
Handsfree function
Polyphonic ringer
Backlit LCD display and brightness adjustably (8levels) on handset
Call Waiting
Handset powering down function
5 basic ringer tone ,5 polyphonic ringer tone and ring off
40 groups Missed Call memory(number and name)
10 groups Outgoing Call memory
50 groups Phonebook memory
DTMF/ FSK dual Caller ID system
5 steps digital volume control for ringer tone/earpiece/speaker on handset
Page, Intercom, 3-way conference
Auto answer
Keypad lock, Non-disturbance
Low battery indicator
FLASH
Alarm Clock
Time showing on LCD display
Maximum 5 handsets are linked to the same base unit,
and Maximum 4 Bases per Handset
Phonebook max 50 entries, max 12 characters of name and 20
digits of number per entry
Sixteen languages
~1~
Technical details........................................29
Declaration and conformity........................29
Cleaning and care.....................................29
Troubleshooting.........................................28
Base setting on base unit...........................27
Reset base to default setting......................27
To modify pin code......................................27
To set flash time..........................................26
To set dial mode(TONE or PULSE)............26
To set base ring melody and volume..........26
Base basic setting from the handset...........26
Contents.................................................1
Main Feature...........................................2
Caution...................................................3
Package contents..................................3
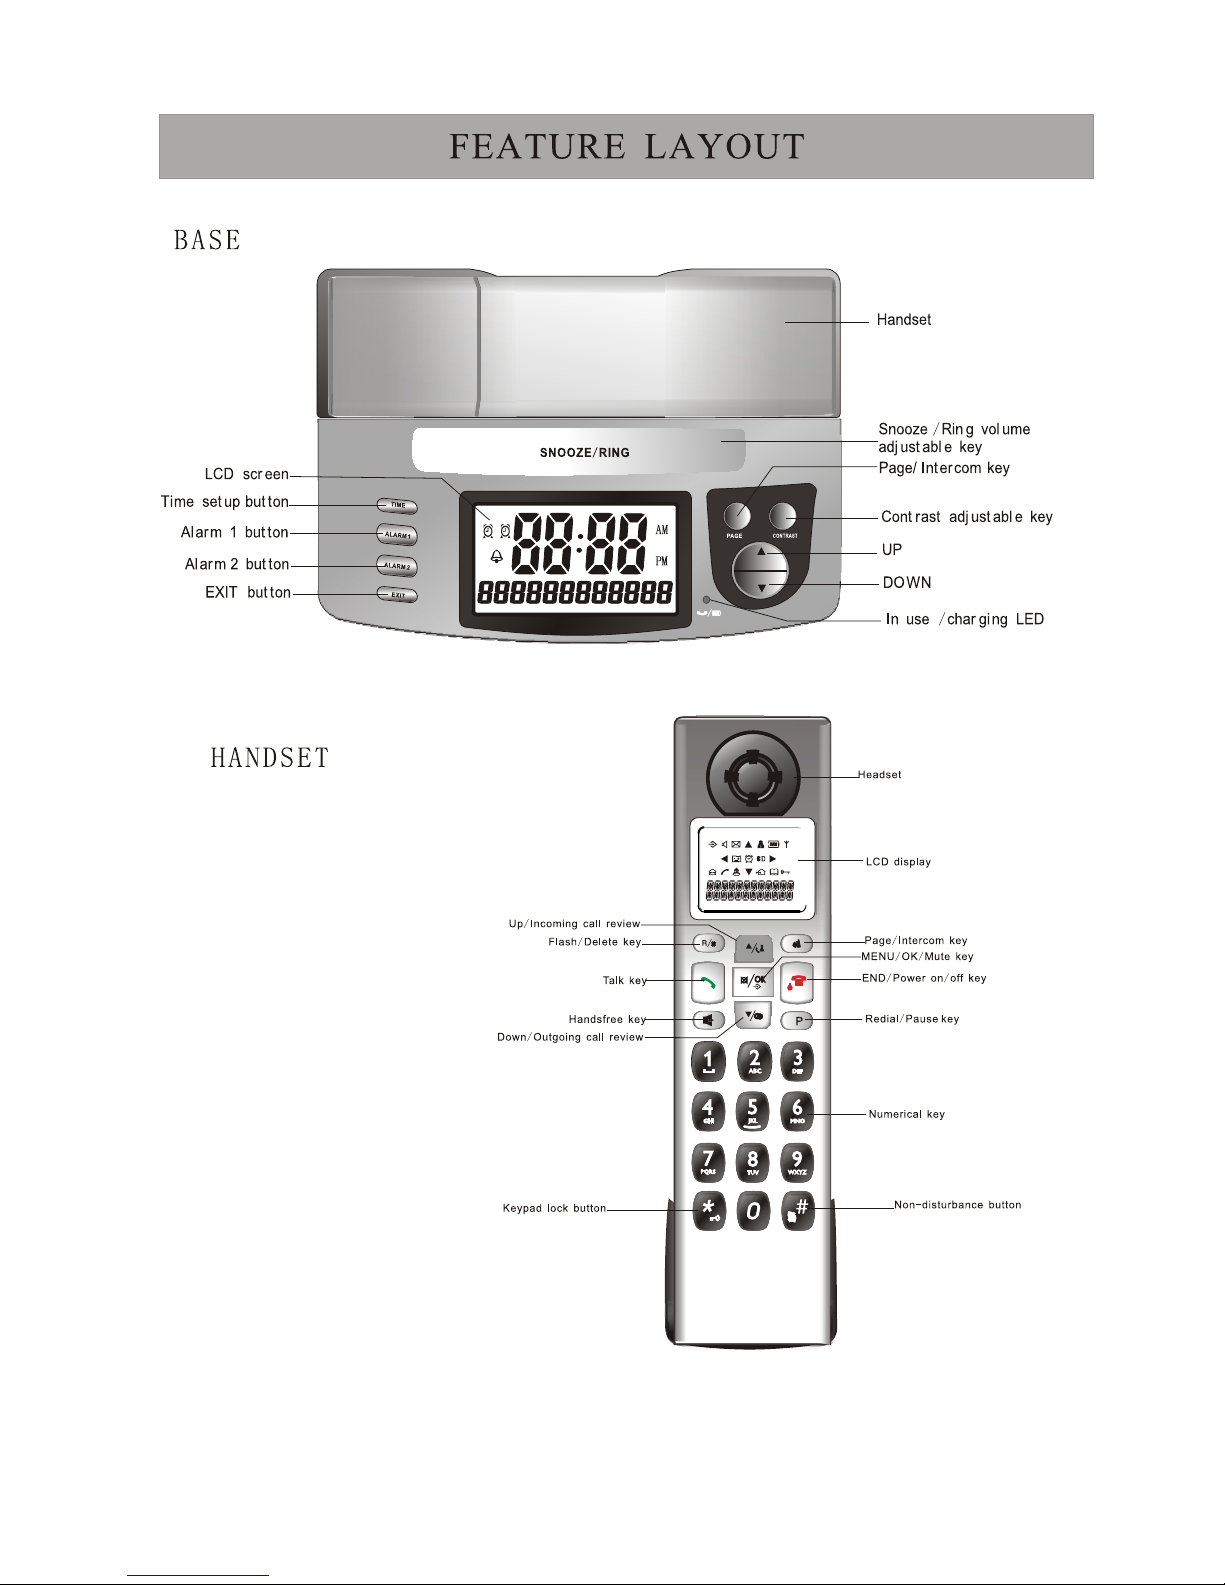
Feature layout........................................4
Installation instruction.............................5
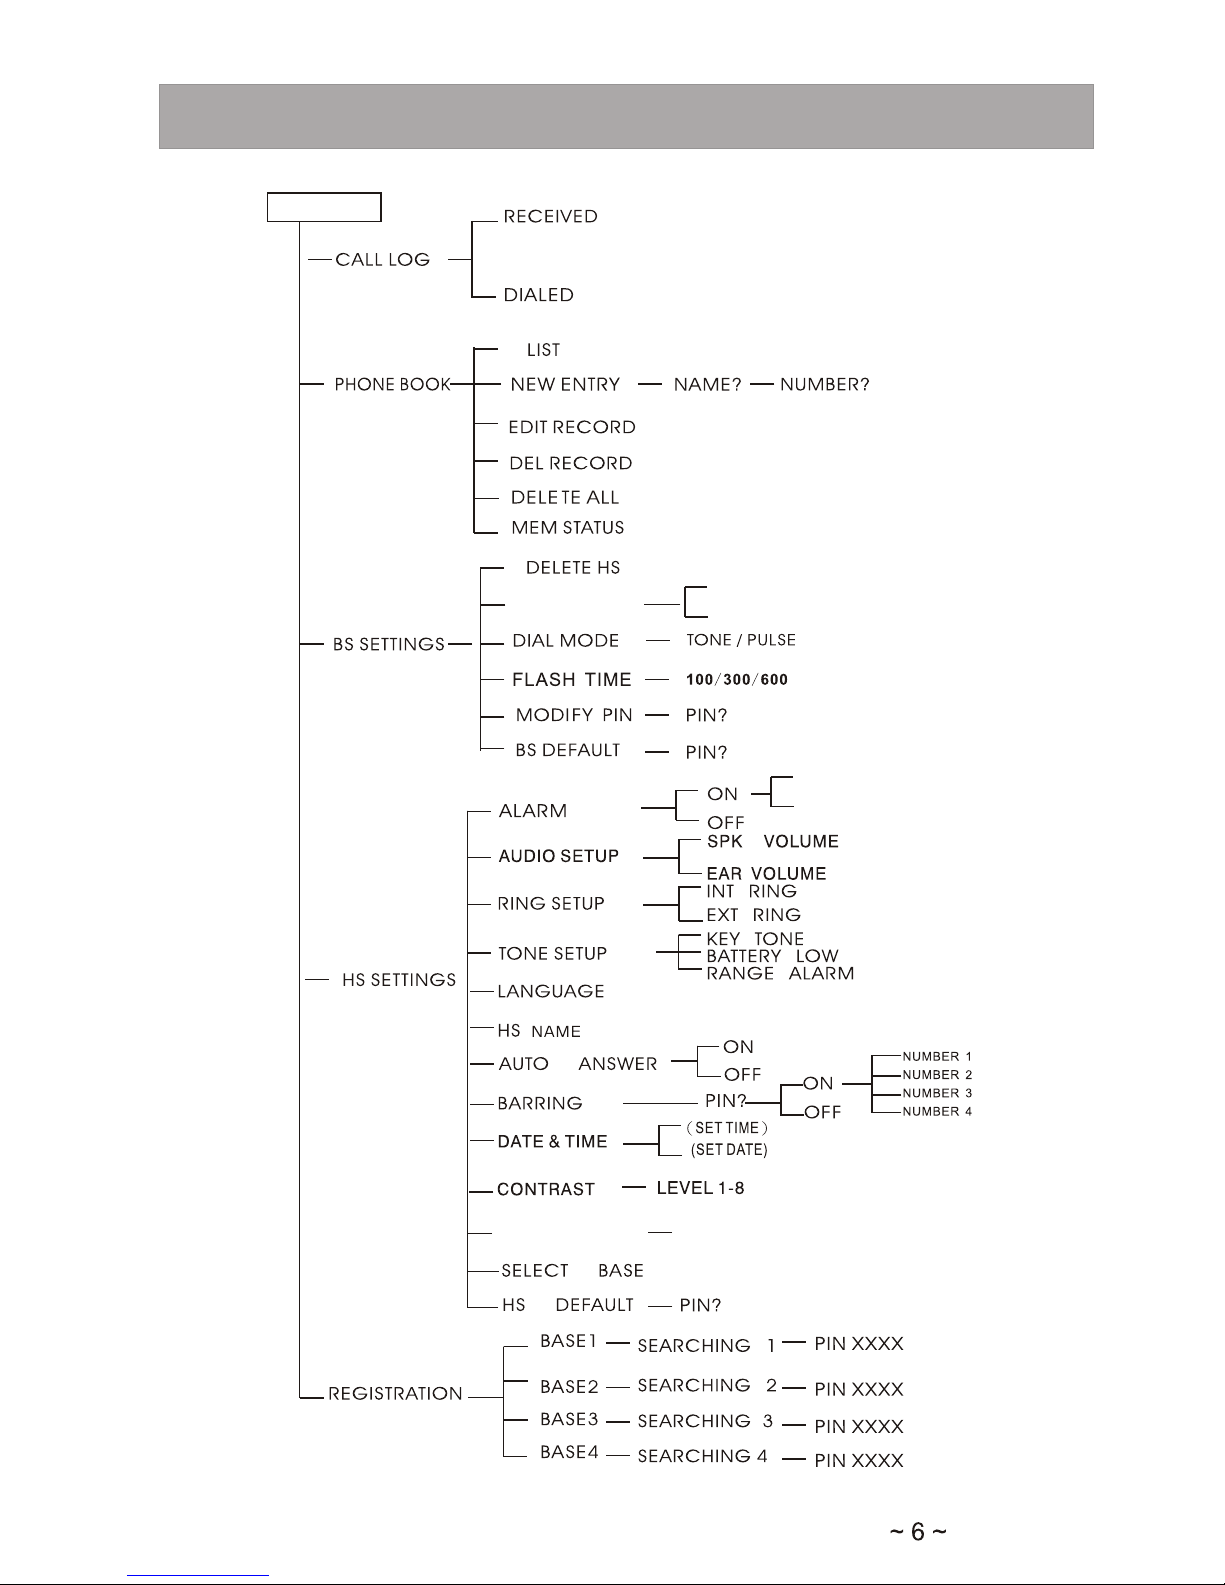
Menu overview.......................................6
What's on display...................................7
Function key description........................8
Read first before use..............................9
To set date and time..............................10
To set time on base ..............................10
To set time on handset ........................10
To set alarm tone...................................10
To set base alarm ................................10
Base alarm tone snooze on/off.............11
To set handset alarm ...........................11
To turn on/off handset power ................11
To lock/unlock keypad ..........................11
To make or answer calls .......................12
To make a call.......................................12
To make a call from redial list................12
To make a call from......................12
Caller Display(CID) list.................12
To mute the mouthpiece ..............12
To register and deregister ............13
To register a handset.................................13
To select a base unit .................................13
To de-register a handset.......................13
Phonebook Memory Managem............ent
Phonebook memory management........14
How to enter characters ?.....................14
To review phonebook memory..............15
To add a new phobebook entery...........15
To modify a phobebook memory..........15
To delete a new phobebook entery.......16
To delete all phobebook enteries...........16
To review phone memory status............16
To store redial number in phonebook...17
Call ID and call log management...........17
Caller Dispaly (CID)...............................17
To adjust Handset ringing melodies............20
To adjust Handset ringing volume .............20
To set handet TONES................................21
To turn key tone on/off...............................21
To turn battery low alert tone on/off............21
To turn out of range alarm tone on/off.......22
To use a multi- handset system.................22
To make an internal call.............................22
To transfer an outside call..........................22
To set up 3-way conference call.................23
Personalizing your handset ......................23
To change the handset name.....................23
To select handset display language...........24
To set handset call barring function............24
To set handset default settings...................25
To set handset LCD contrast.......................25
To turn on/off "NON-DISTURB" function...25
To turn off voice mail prompt icon..............25
"ADD TO PB" from dialed call list..............18
DELETE a call from received call list.........18
DELETE a call from the dialed call list.......19
"DELETE ALL" from the dialed call lis........19
Handset tones and volume setting.... ........19
Caller ID information on display.................17
CALL LOG managemnet...........................18
"ADD TO PB" from received call list..........18

CONTENTS MAIN FEATURES
M a i n f e a t u r e s … … . … … … … … … … … … … … … … … … … … … … . … 3
S af e t y I n s t r uc t i o n o f t h e p o w e r s u p p l y… … … . . . …… … … … . .. . . . . . .. . . . . . 3
F e a t u r e L a y o u t … … … … … … … … … … … … … … … . … … … … … … . . . . . 4
I n s t a l l a t i o n G u i d a n c e . . … … … … … … … … … … … … … … … … … … … 6
M e n u O v e r v i e w … … … … … … … … … … … … … … … … … … … … … … 7
F u n c t i o n S e t t i n g … … … … … … … … . . … … … … … … … … … . . … … … … 8
R e g i s t e r a n d D e r e g i s t e r … … … … … … … … … … … … … … … … … … 8
I n c o m i n g c a l l r e v i e w i n g / c a l l - b a c k / s t o r e / d e l e t e … … … … … … … 9
T h e D e l e t i o n o f T h e Vo i c e M a i l P r o m p t … … . . . … … … … … … … … 9
O u t g o i n g c a l l r e v i e w i n g / c a l l - b a c k / s t o r e / d e l e t e … … … … … … … 1 0
P h o n e b o o k f u n c t i o n … … … … … … … … … … … … … … … … … … 1 0
D e l e t e H S … … … … … … … … … … … … … … … … … … … … … … … … … 1 2
B S R i n g S e t u p … … … … … … … … … … … … … … … … … … … … … … 1 2
D i a l i n g m o d e s e t t i n g … … … … … … … … … … … … … … … … … … … … 1 2
F l a s h t i m e s e t t i n g … … … … … … … … … … … … … … … … … … . … … … 1 3
M o d i f y P i n C o d e S e t t i n g . … … … … … … … … … . . … … … … … … … … 1 3
A l a r m s e t t i n g … … … … … … … … … … … … … … … … … … … … … … 1 3
A u d i o s e t u p … … … … … … … … … … … … … … … … … … … … … … 1 3
R i n g m e l o d y s e t t i n g … … … … … . . … … … … … … … … … … … … … … … 1 4
H a n d s e t t o n e s e t t i n g … … … … … … … … … … … … … … … … … … 1 4 - 1 5
L a n g u a g e s e t t i n g … … … … … … … … … … … … … … … … … . … … … … 1 5
H an d s e t N a m e s e tt i n g … …. . . . . .. . . . . .. . . . . .. . . . . . . . . . .. . . . . .. . . . . .. . . . . .. . . . . .. . . . . .. . 1 5
A u t o / a n y k e y a n s w e r … … … . . … … … . . . … … … … … … … … … … … … 1 5 - 1 6
C a l l b a r r i n g s e t t i n g . . … … … … … … … … … … … … … … … … … … 1 6
T i m e s e t t i n g … … … … … … … … … … … … … … … … … … … … … … … 1 6
L C D C o n t r a s t a d j u s t m e n t … … … … … … … … … … … … … … … … … . … 1 7
Local area code ……………………………………………………………17
S e l e c t B a s e … … … … … … … … … … … … … … … … … … … … … … … 1 7
Re s t or e d e fa u l t s et t in g … . . .. . .. . .. . . .. . .. . . .. . .. . .. . . .. . .. . . . . . .. . .. . . .. . .. . .. . . .. . .. . 1 7
C a l l d i a l i n g … … … … … … … … … … … … … … … … … … … … … … … 1 8
C a l l A n s w e r … . . … … … … … … … … … … … … … … … … … … … … … 1 8
P a g e f r o m b a s e t o h a n d s e t . … … … … … … … … … … … … … … … … … 1 8
C a l l - t r a n s f e r a m o n g h a n d s e t s ( m u l t i - h a n d s e t ) … … … … … … … … … 1 8
M e m o r y a n d a u t o t i m e a d j u s t a b l e … … … … … … … … … … … … … … 1 8
P r e - d i a l i n g f u n c t i o n … … … … … … … … … … … … … … … … … … … … 1 8
Vo l u m e c o n t r o l … … … … … … … … … … … … … … … … … … … … … … 1 9
R e d i a l f u n c t i o n … … … … … … … … … … … … … … … … … … … … … … 1 9
P a u s e f u n c t i o n … … … … … … … … … … … … … … … … … … … … … … 1 9
F l a s h f u n c t i o n … … … … … … … … … … … … … … … … … … … … … … . 1 9
N o n - d i s t u r b s e t t i n g … … … … … … … … … … … … … … … … … … … … 1 9
K e y p a d l o c k o n / o f f s e t t i n g … … … … … … … … … … … … … … … … … 1 9
H a n d s e t o n / o f f s e t t i n g … … … … … … … … … … … … … … … … … … … 1 9
T h r e e w a y t a l k i n g ( m u l t i p l e h a n d s e t s ) … … … … … … … … … … … … … 1 9
I n t e r c o m f u n c t i o n b e t w e e n h a n d s e t s … … … … … … … … … … … … … 1 9
I n u s e /C h a r g e L E D … … … … … … … … … … … … … … … … … … … 2 0
Pa g e /In t er c om k ey …… … …… … …… … …… … …… … … …… … …… … .2 0
Powering up the Base ………………………………………………………….20
S e t t i m e … … … … … … … … … … … … … … … … … … … … … … … … … … . 2 0
Alarm clock………………… ……………………………………………………20-21
Se t ca ll r in g vo lu me … …… …… …… …… …… …… …… …… …… …… …. 21
Set back light brig htness………………………………… ……………………….21
Maintenance …………………………………………………………....………………22
digital technology ensuring clear&secure voice quality
GAP compatible
Handsfree function
Backlit LCD
Call Waiting
Handset powering down function
5 basic ringer tone ,5 polyphonic ringer tone and ring off
40 groups Missed Call memory(number and name)
10 groups Outgoing Call memory
50 groups Phonebook memory
DTMF/ FSK dual Caller ID system
5 steps digital volume control for ringer tone/earpiece/speaker on handset
Page, Intercom, 3-way conference
Auto answer
Keypad lock, Non-disturbance
Low battery indicator
FLASH
Alarm Clock
Time showing on LCD display
Maximum 5 handsets are linked to the same base unit,
and Maximum 4 Bases per Handset
Phonebook max 50 entries, max 12 characters of name and 20
digits of number per entry
Sixteen languages
Page/Waikie-Talkie/Call-transferring function
HANDSET
CALL LOG
BS SETTING
HS SETTING
DAIL/ANSWER CALLS
PHONE BOOK
OTHER FUNCTIONS
BASE
~2~
Enhanced
LCD contrast adjustable(8 levels) for handset
(optional)

~3~
CAUTION: When using telephone equipment, there are basic safety instructions that should always be followed.
Refer to the IMPORTANT SAFETY INSTRUCTIONS provided with this product and save them for future reference.
NOTE: Some of the precautions below may not apply to your product, e.g.: Battery and
power cord precautions.
When using your telephone equipment, basic safety precautions should always be followed to
reduce the risk of fire, electric shock and injury, including the following:
1. Read and understand all instructions.
2. Follow all warnings and instructions marked on the product.
3. Unplug this product from the wall outlet before cleaning. Do not use liquid or aerosol cleaners.
Use a damp cloth for cleaning.
4. Do not use this product near water (for example, near a bath tub, kitchen sink or swimming
pool).
5. Do not place this product on an unstable surface.
6. Slots and openings in the back or bottom of this product are provided for ventilation. To protect
them from overheating, these openings must not be blocked by placing the product on a soft
surface such as a bed, sofa or rug. This product should never be placed near or over a radiator
or heat register. This product should not be placed in any area where proper ventilation is not
provided.
7. Never push objects of any kind into the ventilation slots of this product as they may touch
dangerous voltage points or create a short circuit that could result in a risk of fire or electric
shock. Never spill liquid of any kind on the product.
8. Use only the power cord and batteries indicated in this manual.
9. This product should be operated only from the type of power source indicated on the marking
label. If you are not sure of the type of power supply in your home, consult your dealer or local
power company.
10. Plug the adaptor to the socket - outlet that is closest to the equipment and which is easily
accessible.
11. Do not allow anything to rest on the power cord. Do not install this product where the cord
may have anyone walking on it.
12. To reduce the risk of electric shock, do not disassemble this product, but take it to an
authorized service facility. Opening or removing parts of the telephone base or handset other
than specified access doors may expose you to dangerous voltages or other risks. Incorrect
reassembling can cause electric shock when the product is subsequently used.
13. Do not overload wall outlets and extension cords as this can result in the risk of fire or electric
shock.
14. The power adapter is intended to be correctly oriented in a vertical or floor mount position.
The prongs are not designed to hold the plug in place if it is plugged into a ceiling or an
under-the-table/cabinet outlet.
15. Unplug this product from the wall outlet and refer servicing to an authorized service facility
under the following conditions:
A. When the power supply cord or plug is damaged or frayed.
B. If liquid has been spilled onto the product.
C. If the product has been exposed to rain or water.
D. If the product does not operate normally by following the operating instructions. Adjust
only those controls that are covered by the operating instructions, as improper adjustment
of other controls may result in damage and often requires extensive work by an authorized
Important Safety Instructions

~4~
base unit 1pc
handset unit 1pc for single system(2pcs for Twin system, 3pcs for Triple system)
rechargeable battery(1.2V 400mAh) 2pcs per handset
base power adaptor --DC 6V 200mA
technician to restore the product to normal operation.
E. If the product has been dropped and damaged.
F. If the product exhibits a distinct change in performance.
16. Avoid using a telephone (other than cordless) during an electrical storm. There is a remote
risk of electric shock from lightning.
17. Do not use the telephone to report a gas leak in the vicinity of the leak.
18. Do not dispose of batteries in a fire. They may explode. Check with local codes for possible
special disposal instructions.
For Products That Require Batteries
Important Battery Precautions
● Use only the type of battery specified in this user manual
● Batteries may present a risk of fire, explosion, or chemical burn if abused. Do not try to charge
a battery that is not intended to be recharged.
● Do not dispose of the battery(ies) in a fire. They may explode. Check with local codes for
disposal instructions.
● Non-rechargeable batteries, such as alkaline batteries, may leak if left in your product for a long
period of time. Remove the batteries from the product if you are not going to use it for a month or
more.
● If your product uses more than one battery, do not mix types and make sure they are inserted
correctly. Mixing different types of batteries or inserting them incorrectly, may cause them to
lleak.
● Discard any leaky or deformed battery immediately. Leakage from battery acid can cause skin
burns or other personal injury.
● Please help to protect the environment by recycling or disposing of batteries according to
federal, state, and local regulations.

~5~

~6~

INSTALLATION INSTRUCTION MENU OVERVIEW
BASE UNIT:
HANDSET:
* Line cord, outlet jack, adapter, power jack.
* It is not recommended to install extension handsets over 3 units which
may degrade the conversation quality.
(1.2v rechargeable battery 2pcs)
To fully perform this device, we recommend to have the batteries charged for over
10 hours at the initial use.
(Line Cord)
(Line Jack)
(DC Jack)
MENU
SNOOZE ON
SNOOZE OFF
RING SETUP
BS MELODY
BS VOLUME
AREACODE SET AREACODE?

Icon Description Function
MENU The menu icon will be shown when the user is accessing menu
Caller ID
1).The CID icon will be displayed when viewing the CID list.
2).The icon will flash when the CID list is full.
在浏览来电列表时,若有新来电,将在CID图标旁边显示N图标.
PHONEBOOK
The phonebook icon will be displayed when the viewing the phonebook entries.
In addition, the icon will flash when the Phonebook Memory is full.
当浏览电话本记录时显示电话本图标.另外,当电话本记录满时此图标将闪烁.
BATTERY_IND
The battery icon will provide both a charging indication and an indication of the current
battery status to the user, as described in section 2.1.6.
电池图标可指示充电和当前电池容量,如2.1.6部分的描述.
VMWI_IND
This icon will be shown as steady when a new voice message is received from the network.
WMWI full (flashing)
当收到来自网络的一条新语音信息时,将显示此图标.若VMWI已满,则闪烁
OFF HOOK
The icon will be displayed when the user has pressed off hook
当用户按摘机键后,LCD将会显示此图标
EXTERNAL call
This icon will be displayed when an external call is in progress.
当外线正在通话时,将显示此图标
INTERNAL call
This icon will be displayed when an internal call is in progress.
当内线正在通话时,将显示此图标.
ALARM_IND
The alarm icon will be shown as steady on when the alarm is set.
The alarm icon will flash when the alarm is triggered.
当设置了闹钟时,将显示此图标.
ANTENNA
The antenna icon will always be shown on the display, it indicates for
Signal strength, flashes when registration to base is lost, when RSSI is low.
天线图标将一直显示,指示信号的强弱.在与主机对码的手机丢失和RSSI很低时,图标将闪烁.
KEYLOCK_IND
This icon will be displayed when the handset keypad is locked.
当手机键盘锁定时LCD显示此图标.
HANDSFREE
The icon will be displayed when the speaker is in use on the handset.
当手机免提通话时LCD显示此图标
NEW CID
The icon will be displayed along with the <CID_ICON> when a new CID entry is currently
being viewed.在查看当前新来电时,此图标和<CID>图标一并显示.
RING OFF
The icon will be displayed when ring set to off
当铃声设置为关时LCD显示此图标.
NEW CID
The icon will be displayed along with the <CID_ICON> when a new CID entry is currently
being viewed.在查看当前新来电时,此图标和<CID>图标一并显示.
RING OFF
The icon will be displayed when ring set to off
当铃声设置为关时LCD显示此图标.
PHONEBOOK
1).The phonebook icon will be displayed while viewing or editing
2). In addition, the icon will flash when the Phonebook Memory is full.
BATTERY LEVEL
VMWI The icon indicate user has new voice message from network service.
EXTERNAL CALL This icon will be displayed when an external call is in progress.
INTERNAL CALL
This icon will be displayed whenan internal call is in progress.
ALARM ON
1). The alarm icon will be shown when the alarm function is set to "ON".
2). The icon will flash when the alarm tone ring is being triggered.
ANTENNA
KEY LOCKED
This icon will be displayed when the handset keys are locked.
HANDSFREE The icon will be displayed when the speakerphone is being trigged.
RING OFF
The icon will be displayed when external ring being set to off
phonebook memory .
1).In standby mode, the icon show battery level.
2).In charge mode, battery level blinks to indicate handset is charging.
1). In standby mode, the antenna icon is steady, it means handset
2). when the icon flashes, it means handset lost link with base unit.
link up on base,
UP/DOWN
UP/DOWN for ring volume adjustment
UP/DOWN for earpiece and speakerphone volume adjustment
NEW CID
The icon will be displayed with "CID" mark together, it indicate user has
new CID not be read.
3).when user has new CID, it will blink with icon together.
LEFT/RIGHT
when memorized number or CID number more than 12 digits, the icon
will be display to notice there are some digits hidden.
icons
2).number field for call or phonebook
3).character field for CID or phonebook
1).clock time and talk time
4).character field for MENU display
operating mode,
What's on display
~7~

OFF HOOK 1). press it to enter off-hook mode for making or answering a call.
,.
HANDSFREE 1). In standby mode, press it to enter handsfree mode,
, , ,
MENU/OK/MUTE
.
1). In standby mode, press the key to enter menu program,
.
1).In talk mode, press once to hang up the call(external and internal);
2). press and hold it for 3s to switch handset power on/off.
.
.
PAUSE/REDIAL 1). In talk mode , first pressing it for "last number redial"
.
INTERCOM 1). In standby mode, press it to set up an internal call to
2) in external call mode, press it to transfer an external to
.
STAR/LOCK
.
.
UP / CID
DOWN/Outgoing call
2). while an intercom call is coming in, press it to establish
2). Under handsfree mode, press it to switch handsfree mode
2). while editing menu and select settings , press it for confirming
3). In talk mode, press the key to switch mute and un-mute.
3).while edit menu or functions, press it to go back to standby mode.
2).In dialling mode(talk mode dialling or predial),
another handset or establish 3-party conference call.
2). briefly press it when setting up conference call
1).In standby mode, press and hold it about 3s to switch
3). press and hold about 3s when in pulse dialling mode to
change to tone dialing for the rest of that call.
OFF-HooK
Power on/off / C
1). press to scroll up through the lists and menu options.
2). during talk mode, press to increase volume in the earpiece
3). in standby mode, press to review the caller ID list
1). press to scroll down through the lists and menu options.
2).during talk mode, press to decrease volume in the
3). in standby mode, press to review the outgoing list
HASH /Ring on/off In standby mode, press and hold it about 3s to switch the
handset external ring on/off.
an internal call.
and loudspeaker.
earpiece and loudspeaker.
the key lock on/off
another handset;
.
FLASH/EXIT/DEL
1). under talk mode, press it to execute "flash time" function,
2). while edit menu or functions, press it to return previous
3).press to erase a digit or letter while input a number or name.
you may need this function if your phone is connected to a PBX.
step operating.
press it to create a pause time(3.6s)
(only one group)
the selection.
and handset mode.
Key Description Function Definition
Function key description
TIME TIME SETTING
press and hold the button on base to set base clock time.
ALARM 1
ALARM 2
ALARM 1 SETTING
press and hold the button on base to set base alarm 1 time.
briefly press it to turn on/off alarm tone 1
ALARM 2 SETTING
press and hold the button on base to set base alarm 2 time.
briefly press it to turn on/off alarm 1
EXIT EXIT
When setting time, press the key to exit time setting.
SNOOZR/RING
SNOOZR ALARM
RING VOLUME
When alarm tone comes, press it to stop alarm tone.
In standby mode, press it to adjust base ring volume.
CONTRAST LCD CONTRAST
briefly press it to adjust ring volume.
PAGE PAGE
Briefly press it to call handset
Press and hold it about 3s to enter base registering mode.
~8~

Radio signals between handset and base unit
To use your cordless handset and base unit together, you must be able to establish a radio
The signal range between the handset and the base station is in accordance with the approved
standard.
•Maximum range: 300metres outdoors
•Maximum range: 50metres indoor
The signal range could become lower during normal use. Any large metal object, like a refrigerator,
a mirror, a filing cabinet, metallic doors or reinforced concrete, between the handset and the base
For the best radio signal, it is recommended that your telephone is at the highest possible position.
If there is no radio signal reception, Base 1 message and the signal level icon will flash
Interference
If the sound quality gets worse as you move around while on a call, this is probably caused by
interference between the handset and the base unit, perhaps because you are too near to another
phone or other electrical equipment.
Move to a different position to clear the interference. If you do not move, it might cause a short break
or your call may be cut off.
"Out of range" warning
If you hear a warning tone during a call, or the sound in the earpiece becomes faint or distorted,
you may be going out of range of the base unit.
Move nearer to the base unit within 20 seconds, until the earpiece sound improves. Otherwise,
your call may be cut off.
Battery safety
ONLY use the rechargeable batteries supplied with the handset.
DO NOT use non-rechargeable batteries-they may burst and cause damage to your telephone.
Read first before use
unit may block the radio signal. The signal strength may also be reduced by other solid structures,
like walls, or by other radio or electrical interference.
link between them.
on the display.
Mains power connection
IMPORTANT - The CH-D707 base unit must be used with the mains adapter supplied
Using any other adapter may result in non-compliance with
invalidate any approval given to this apparatus.
with the unit. EN60950, and will
Connection and conditions for use
You can connect your CH-D707 to a direct exchange line (DEL)
--- a line connected to a local exchange, with its own phone
number; to an extension socket connected to a DEL; or to an
extension on an approved compatible PBX.
The ringer equivalence numbers (RENs) of all instruments
(phones, fax machines, etc.) connected to an exchange line
must not add up to more than 4 ----- otherwise, one or more of
them may not ring and/or answer calls correctly. The CH-D707
has a REN of 1, and most other telephones have a REN of 1
unless marked
~9~

To set Date and Time
The format for the date is DD-MM-YYYY.
Note :If you subscribe to Caller Display , your CH-D707 time and date settings will
automatically updated by the network when you receive an incoming call.
The Caller Display service only sends the month and date, not the year, so you
may still need to set the year.
If the time and date are set on the cordless handset, it will automatically be updated
on the base unit, and vice-versa, if set time on base unit, handset display time will
The clock format can be switched by base "TIME" button.
The format for clock is HH:MM.
between 12-hour(with AM/PM display) and 24-hour.
Set time on base:
In standby mode, press and hold "TIME" button till clock display flashes on "hour" setting,
then shortly press base "UP" or "DOWN key to set hour step by step, or long press "UP"
or "DOWN" button to continuously adjust the "hour".
After "hour" is set, press "TIME" button to confirm , "Minute"will flash and allow you set
"minute" on the same way as "hour" setting
* * During time setting, press "EXIT"button to exit previous setting and return to idle mode.
Set time on handset :
In standby mode, press button to enter setting mode.
1).
2).press button to select "HS SETTINGS",
3).press button to enter the next step setting,
4).press button to select " DATE & TIME",
5).press button to enter the selection, it will show "SET TIME",
7).press button to confirm time setting and return to "SET TIME" menu.
8). press button to select " SET DATE",
10).press button to confirm date setting.
11). press button to go back to stand-by mode.
automatically be updated.
In standby mode, press and hold key on base unit to set the time of base alarm clock 1,
1. Set base Alarm
The base unit allows to set 2 clock alarm --->ALARM 1 & ALARM 2
ALARM 1 till the left clock icon start blinking, and "hour" digit also start flashing , press "UP" or "DOWN"
button to adjust "hour" to your desired value, then briefly press key again, "minute"
ALARM 1
ALARM 1
press "UP" or "DOWN" button to adjust "minute" to your desired value, then briefly press
ALARM 1
key LCD display will return to previous time(which is running) and base will sound a "du"tone to
inform alarm clock 1 is set.
Note : 1). during clock setting, long press "UP" or "DOWN" key to adjust the digit continuously.
2 ). in base standby mode, shortly press key to switch "alarm 1" ring on/off,
ALARM 1 while the left clock
icon lights, "alarm 1" ring is switched on.
To set alarm tone
digit start flashing,
~10~
press button to enter time setting, blinking cursor will guides to set "hour"/"minute"
6).
press button to enter date setting, blinking cursor will guides to set "date"/"month"/
9).
"year" by numeral keys in sequence
by numeral keys in sequence

While handset in "off" mode,Press and hold the button for 3s to turn
handset 'ON'.
In standby mode, press and hold the button for 3 seconds to turn
handset 'OFF'.
** Y ou can switch handset off to save battery .
1.
2.
Note: To answer a call when the handset is switched off, you need to switch it
back on. It may take a few moments for the handset to re-establish a radio link
with the base unit(and handset will give a tone to tell "link-up").
** When the handset is in "off" mode, the unit can not be used for emergency calls.
In standby mode,Press and hold "
" button for 3 seconds till the icon
appears on the
display, all of handset keys are locked (except " " button) .
To lock
To unlock *
While handset key locked, press and hold " " button for 3s, handset will
give a "du" tone, then unlock the keys, icon will disappear .
** Note: 1). while handset keys locked, you can not make any emergency call s.
2). while handset keys locked, you still can answer calls when handset is ringing.
In standby mode, press and hold key on base unit to set the time of base alarm
ALARM 2 clock 2, till the right clock icon start blinking, and "hour" digit also start flashing , press "UP" or
"DOWN" button to adjust "hour" to your desired value, then briefly press key again,
ALARM 2
press "UP" or "DOWN" button to adjust "minute" to your desired value, then briefly press
key ,LCD display will return to previous time(which is running) and base will sound
a "du" tone to inform alarm clock 1 is set.
Note : 1). during clock setting, long press "UP" or "DOWN" key to adjust the digit continuously.
2 ). in base standby mode, shortly press key to switch "alarm 2" ring on/off,
while the
right clock icon lights, "alarm 2" ring is switched on.
ALARM 2
ALARM 2
ALARM 2
2. base alarm tone snooze on/off
While alarm 1 or 2 is switched on, and running time come to set time , base will ring with alarm
tone, and you can shut off the ringer tone by shortly pressing "SNOOZE" button,
otherwise ring will last 10s and will repeat at 5 minutes interval.
3. Set handset alarm
In standby mode, press button to enter setting mode.
1).
2).press button to select "HS SETTINGS",
3).press button to enter handset function setting,display will show "ALARM"
4).press button to enter the selection, it will show "OFF"(extra-factory setting).
6).press button to confirm the selection, handset display will show 00...00
7).press button to confirm the setting, display will show "SNOOZE ON"
9).press button to go back to stand-by mode.
press button to select "ON",
5).
and cursor will blink to let you to set alarm time (from left to right).
and clock icon (you can press button to select "SNOOZE OFF, )
8).press button to confirm the selection
** When "SNOOZE ON" is selected, alarm tone will repeat at
5 minutes interval.
if "SNOOZE OFF" is selected, alarm tone ring only sounds once.
To lock/unlock keypad
To switch on /off handaset power
"minute" digit start flashing,
~11~

To make a call
a call
1) press button and the TALK icon will appear,OR press button
and the SPEAKERPHONE icon will appear, you will hear dial tone ,
2). input telephone number by numeral keys to make a call.
** You can also make a call by using the Pre-Dialling function:
Key in the required telephone number in standby mode, and if you make a mistake you can
correct it by using the button to delete digits , then get line by pressing or
The number will be dialled out automatically
**To insert a pause in the dialling number, press the button, a letter "P" will be
shown in the number. While number is dialed out, 3.6s pause will be added.
To make and answer calls
To make a call
To make a call from the redial list
To make a call from Caller Display (CID) list
To make a call from redial list
3) press button to end the call
There are two ways to enter redial list:
1). Press button to enter the redial list(outgoing call), the handset
can maximum memorize 10 groups dialed number at most.
2). Press or button to scroll the redail list to find your desired number.
In standby mode:
3). Press or button to dial out the number,
4). press button to end the call
In talk mode,
After get line, first press button , the unit will dial out one group of
(it is last number redial function of one group number) number,
To make a call from Caller Display(CID) list:
The unit can save 40 group of CID memory(number or name) .
1). In standby mode, press button to enter CID list,
2). Press or button to scroll the CID list to find your desired number or name.
3). Press or button to get line to make a call.
4). press button to end the call
To mute the mouthpiece
1).In talk mode, press button at any time, mouthpiece is muted, display will
show "CALL MUTED", another side can not hear you under muting mode
2). second press button to un-mute mouthpiece, "CALL MUTED" will disappear,
user return to normal talk mode
~12~
button,

Display: HS1 03-53
Display: 0000
Display:
CALL LOG
Display:
DELETE HANDSET
Display: 0000
Display: HS~
Then input register pin code like PIN 0000 (pressing button to erase if any error)
>>Press button to confirm, once registration succeed, a sound of “di du du” can be
heard and the screen will display:
>>Long sound of “bi bi” will be heard and screen displays BASE 1 and keep blinking
if fail in registration, this device will return to standby mode automatically 2 seconds
later and it is required the registration again.
>> To activate the additional handset(s) (if available), the repeat operation is required
as above (max link up to 5 handsets); once the registration succeed, then the screen will
display HS2 or HS3 accordingly.
B: deregistration (base unit and handset)
Note: it is not recommend to do the deregistration unless the link-up between handset
and base is lost permanently.
Handset Deregister
(applicable to multi handsets only)
>>at standby model, Press button till screen displays
>>Press or button to select BS SETTINGS
>>Press button and the screen displays
>>Press button and it displays PIN? Input registration pin code like PIN 0000
(note: 0000 is the defaulted pin code on this device)
>>Press button to enter handset deregistration setting mode,
press or to select handset to be deregistered.
>>Press button to confirm, a sound of “di du” will guide you the successful
deregistration done, or else a sound of 'bibi” heard to indicate the deregistration is
failed (Note: the original No.1 handset are restricted to do deregistration)
>>Press button to turn into standby mode
Base Deregister
>> at standby mode, press and hold PAGE button continuously up to 5S'till
LINE BUSY LED blink, fast press PAGE button intermittently for 7 times and
then the LINE BUSY LED will get blinking fast, until LINE BUSY LED turn
off. It indicates that the deregistration succeeds.
(NOTE: the operation is effective only under fast operation of the pressing)
Display:
BASE SETTIN G
Display: BASE 1
To register and deregister
Note : the registration has already been done on this device when ex-factory, antenna
icon will appear at the top of right corner while handset power on. While antenna icon
is steady on display, it means handset has linked up with base unit.
If antenna icon blinks long time on display, it means lost linking with base units, you
are required to re-register the handset. process as below:
1).on base unit, press button to start registering mode, base will give a beep tone
PAGE
2). press button on handset to enter menu setting mode, then press button
with red LED start blinking (if more 2 minutes and register not suceed , blinking will stop,
you need to re-press "PAGE" key again) .
to find "Registration" menu,
3). press button to start handset registering mode, handset will display "searching",
4). if handset find base unit, display will show "PIN CODE", blinking cursor will guide to input
pin code 0000(default value).
5). if registration is sucessful, handset will give a long beep tone, then antenna icon is steady,
display will show , it means it is the first handset of the base unit.
1
6 ). if registration is not sucessful, handset will return to searching status, you need to try again.
To register a handset
To select a base unit
The handset can be registered to different base (up to a maximum of 4) at same time,
and you can select which base you want the handset to operate with.
If you select "AUTO" the handset will link with the first of the registered
bases that it finds.
To de-register a handset
You may need to do this if you need to replace a faulty handset.
In standby mode, press button to enter setting mode.
1).
2). press or button to select "HS SETTINGS",
3). press button to enter handset function setting,
4). press or button to find "SELECT BASE",
5). press button to enter next step, handset will show "BASE 1,
6). press or button to scroll " BASE 2", "BASE 3", "BASE 4", "AUTO"
if base number followed " ", it means handset had been registered on this base,
7).press button to confirm, then handset link up to your desired base unit.
~13~
In standby mode, press button to enter setting mode.
1).
2). press or button to select "BS SETTINGS",

1. In standby mode, press button to enter setting mode.
2. Press or button up and down to scroll setting item.
3. Press to enter the selected function setting.
4. Press button to back last main menu setting.
5. Press to exit
>> at standby mode, press & hold <PAGE> button on base unit continuously over
5S' till LINE BUSY LED blink.
With presence of above state, do the operation on handset.
>> based on standby mode on handset, Press button ,
the screen will display
>>Press or button to select REGISTRATION
>>Press button to confirm
>>Press or button to select the wanted registration
base unit ranged BASE 1~4
>>Press button to activate the SEARCHING on handset,
and then screen displays
Note: the registration has already been done on this device when ex-factory, antenna
icon will appear at the top of left corner while it connects with the telephone
line. It indicates the registration is lost and the repeat registration is required if no
antenna icon displays or the displaying is blinking.
Handset Setting Mode
Register and deregister
A: registration operation
It will take few seconds to success the registration till LCD screen displays PIN? ,
otherwise, the repeat operation as above is required.
Display:
Display:
Display:
Display: SEARCHING
BASE 1
REGIST RATIO N
CALL LOG
3). press button to enter base menu setting,handset show " DEL HS"
6). press or button to select the desired handset(HS 2, 3, 4) which you
4). press button to enter next step setting, handset will show "PIN CODE"
7). press button to confirm the selection, handset will return to show "HS 1 "
then show "unregistered").
(** the deleted handset will sound a beep tone,
Phonebook Memory Management
You can store up to 50 numbers in each handset's Phone Book (memory). Each
number can have up to 20 digits, and you can store a name of up to 12 characters
with the number. (If you try to store more, the handset will give a sharp warning
tone and the extra letter/number will not be saved in memory.)
Also, you can select a different ringer melody for each entry,
but this will only work if you subscribe to CID
How to enter characters ?
To use the characters you press on the button where you see the character
, you press
if you want to insert the letter
once,
e.g. if you want to insert the letter "A"
"B", you continously press twice,
if you want to insert the letter "C", you continously press three times.
if you want to insert the letter "AA", wait a moment after first "A", till the
cursor jump to second letter location, then input second "A"
The detailed letters input rule, please see the following table.
Key pad table
1st 2nd 3rd 4th 5th 6th
_ , ?
! ’
” ( ) : ; .
A B C 2
D E F 3
G H I 4
J K L 5
M N O 6
P Q R S 7
T U V 8
W X Y Z 9
space 0 + - @ = / \ [ ]
*
#
? !
1
7th 8th 9th 10th 11th 12th 13th 14th
á
~
ú
í
~
N
5). press button to confirm, after you input correct pin code(default 0000)
then handset will show "HS 1 "
want to delete(Please note you only can delete HS which number followed with mark: )
~14~

Phonebook submenu structure:
"LIST"---- shows all of phonebook memories one by one
"NEW ENTRY"--- add a new phonebook entry
"EDIT RECORD"--- modify an existing phonebook memory
"DEL RECORD"--- delete a phonebook memory
"DELETE ALL "--- delete all phonebook memories
"MEM STATUS"--- shows the number of entries programmed in the total phonebook capacitor.
To review phonebook memory(name and number):
you can enter phonebook menu to review phonebook list one by one.
1). In standby mode, press
button to enter handset setting mode,
2). press button to select "PHONEBOOK",
3). press button to confirm,handset show " LIST"
4). press button to enter memory list, display will show first entry(as letter sequence)
5). press or button to review all of phonebook memories(name),
6). when display show phonebook name , press "0" button to switch phonebook number/name reviewing.
7). press button to exit present setting and return to previous menu.
8). press button to return to standby mode.
To add a new phobebook entery
1). In standby mode, press
button to enter handset setting mode,
2). press button to select "PHONEBOOK",
3). press button to confirm,handset show " LIST"
4). press button once to find "NEW ENTRY"
5). press button to confirm, display show " NAME?" , directly input name characters
numeral keys from key "2" to "9"(please read page 14--
"How to enter characters ? ")
6). while name input is finished , press button to confirm, display will show "NUMBER"
directly input telephone numbers by numeral keys.
7). press button to confirm,display will show "MELODY 1" and play ring melody to user,
10).press button to exit present setting and return to previous menu.
11).press button to return to standby mode.
NOTE: If error input for name and number, user can briefly press button to erase one
character or one digit, press and hold button to erase all of input, press or
button to shift cursor to any character or digit.
To modify a phobebook memory
1). In standby mode, press
button to enter handset setting mode,
2). press button to select "PHONEBOOK",
3). press button to confirm,handset show " LIST"
4). press button twice to find "EDIT RECORD"
5). press button to confirm,display will show the first phonebook memory
it is to let user to choose special ring melody for different phonebook memory. While incoming
call number match phonebook memory number, handset will sound chosed ring melody.
9). press button to confirm, display return to "NEW ENTRY" to let user add more a memory.
8).press or button to select desired melody(total 10 kinds ring melody).
~15~

7). press button to start name character modification , blinking cursor guide user to
8). press button to confirm name and display will show phonebook number, blinking
cursor guide user to modify number.
modify character,
6). press or button to scroll phonebook memories(name) to find the desired one,
9). press button to confirm,display will show "MELODY 1" and play ring melody to user,
12).press button to exit present setting and return to previous menu.
13).press button to return to standby mode.
it is to let user to choose special ring melody for different phonebook memory. While incoming
call number match phonebook memory number, handset will sound chosed ring melody.
11).
press button to confirm, display return to "NEW ENTRY" to let user add more a memory.
10). press or button to select desired melody(total 10 kinds ring melody).
To delete a new phobebook record
1). In standby mode, press
button to enter handset setting mode,
2). press button to select "PHONEBOOK",
3). press button to confirm,handset show " LIST"
4). press or button to find "DEL RECORD"
5). press button to confirm,display will show the first phonebook memory
6). press or button to scroll phonebook memories(name) to find the desired one,
7). press button to confirm selection , handset will show "CONFIRM?"
8). press button to execute the operation, handset will sound a beep tone and display
return to "DEL RECORD" menu to let user delete more a memory.
9). press button to exit present setting and return to previous menu.
10).press button to return to standby mode.
To delete all of phobebook records
1). In standby mode, press
button to enter handset setting mode,
2). press button to select "PHONEBOOK",
3). press button to confirm,handset show " LIST"
4). press or button to find "DEL ALL"
5). press button to confirm, handset will show "CONFIRM?"
6). press button to confirm the operation, handset will sound a beep tone and display
return to "DEL ALL" menu
7). press button to exit present setting and return to previous menu.
8). press button to return to standby mode.
To review phone memory status
It maybe helpful for user to know phonebook memory capacitor and occupied status if necessary
1). In standby mode, press
button to enter handset setting mode,
2). press button to select "PHONEBOOK",
3). press button to confirm,handset show " LIST"
4). press button once to find "MEM STATUS" , handset will show " 01/50"(for instance)
"01" means one phonebook is saved in total memory, "50" means maximum memory
capacitor is 50.
5). press button to exit present setting and return to previous menu.
6). press button to return to standby mode.
~16~

To store redial number in phonebook
1. in the idle mode, press button to enter redial number list(10 groups at most)
2). press or button to find the desired number ,
3). press button , handset will show "ADD TO PB"
4). press button, handset will show "NAME", input name character by numeral keys
5). press button, handset will show the selected number with cursor flashes in the
end of number , you still can edit the number
6). press button to confirm,display will show "MELODY 1" and play ring melody to user,
7). press or button to select desired melody(total 10 kinds ring melody).
9).press button to exit present setting and return to previous menu.
10).press button to return to standby mode.
8). press button to confirm, display return to dialed list to let user add more into memory.
Caller ID and call log management
Caller Dispaly (CID)
To subscribe to this feature you need to contact your service provider, and there may be a charge
for this service.
Caller Display lets you see the phone numbers of your callers on the display before you answer.
Both answered and unanswered calls are stored, up to a maximum of 20 calls. When the caller
display list is full, any new caller display entry will replace the oldest record.
the caller's number (up to 20 digits)
the date and time of the call
the caller's name (up to 12 characters) if the incoming number matches an entry
The caller display information includes:
in the phonebook
Note: it will also display the caller's name if the network sends it,
The display may also show the following:
UNAVAILABLE - if the number of the caller is unavailable, e.g. from an international
call. (This may also appear with a number, as certain networks can send
WITHHELD - if the call is from someone who has withheld their number.
a "name unavailable" message with the caller's number.)
"While a new caller incoming, handset will show caller number with new CID icon
and
If the incoming number matches an entry in the phonebook, display will show number and name
alternatively,
Answered or unanswered incoming call are stored, user can reviewe caller ID information by two ways
1). In standby mode, user can press button to enter caller ID list
A>.
press or button to scroll caller ID list,
. In standby mode, icon will fl ash to inform user has new CID.
and
B>. use "CALL LOG" menu to review caller ID list.
1). press
button to enter handset setting mode, handset will show "CALL LOG"
2). press
button, handset will show "RECEIVED"
3). press
button to enter caller ID list
press or button to scroll caller ID list,
4).
2).
use shortcut key " " to review caller ID list
~17~
To review caller ID list

**if caller ID information included name, it will only show name in the list, pressing "0" button can
switch caller ID number, number or call time.
**If caller is not answered or reviewed before , " " " " "
and will be displayed while you review
**If caller is answered or reviewed before ,
display only show icon " "
review caller ID list
CALL LOG managemnet
The handset can automatically save incoming call and dialed call in "CALL LOG" menu
( "RECEIVED" and "DIALED"), the user can manage these numbers if necessary.
"RECEIVED" ---caller ID list (incoming call)
"DIALED" ---redialed list(outgoing call)
CALL LOG structure
"ADD TO PB"---save a received call or dialed call into phonebook
"DELETE" ---delete a received call or dialed call from the list
"DELETE ALL" ---delete all received calls or dialed calls from the list
1). press
button to enter handset setting mode, handset will show "CALL LOG"
2). press
button, handset will show "RECEIVED"
3). press
button to enter caller ID list
press or button to select the desired number you want to save ,
4).
5). press button , handset will show "ADD TO PB"
6). press button, handset will show "NAME", input name character by numeral keys
7). press button, handset will show the selected number with cursor flashes in the
end of number , you still can edit the number
8). press button to confirm,display will show "MELODY 1" and play ring melody to user,
9). press or button to select desired melody(total 10 kinds ring melody).
11).press button to exit present setting and return to previous menu.
12).press button to return to standby mode.
10).press button to confirm, display return to dialed list to let user add more into memory.
"ADD TO PB" from received call list
"ADD TO PB" from dialed call list
1). press
button to enter handset setting mode, handset will show "CALL LOG"
2). press
button, handset will show "RECEIVED"
4). press
button to enter the dialed call list
3). press button to select "DIALED",
The balance operation is same as above "ADD TO PB" from received call list
step 4 to 12.
DELETE a call from received call list
While you review received call list(see above )
1). press button , handset will show "ADD TO PB"
"ADD TO PB" from received call list
press button once to select "DELETE"
2).
3). press button to confirm, display show "CONFIRM?"
4). press button to double confirm, handset will give a beep tone and display
show next received call.
5). press button to exit present setting and return to previous menu.
6). press button to return to standby mode.
~18~
Table of contents