SHENZHEN CLEVER ELECTRONIC SPDU2100 User manual

SHENZHEN CLEVER ELECTRONIC CO., LTD
SPDU2100 User Manual

SHENZHEN CLEVER ELECTRONIC CO., LTD
SPDU2100 User Manual
Ⅰ. Introduction
1. SPDU--- Sequential Controlling Power Distribution Unit is an intelligent product developed and produced by
CLEVER.
2. According to customer’s set of the power on/off sequence and the interval time, SPDU can realize the
sequential power on/off which can avoid the instantaneous power resulting from the current shock when many
equipments power on/off simultaneously and can meet the technical requirement of the system operation.
Ⅱ. Function description
1. Sequential power on/off
With the buttons, customer can set the outlets to sequential power on/off to avoid the error, interference among
equipments and power system pollution resulting from the transient current attack when many types of equipment
turn on/off at the same time.
2. Sequential power on/off in groups
With the buttons, customer can group the outlets and let them power on/off in groups.
3. Configure the interval time
With the buttons, customer can set the interval time of power on/off of several equipments conveniently.
4. Controlling power on/off state of outlets
With the buttons, customer can set the power on/off state of individual outlet.
5. Dynamic adjusting/controlling function
According to the technical requirement, customer can adjust the on/off state of individual outlet or group outlets
at times without affecting the normal operating state.
6. Start/Stop delay function
With the start/stop delay button, customer can operate safely and accurately.
7. Immediate cut off function
Specially designed switch can cut off the power when the equipment is wrongly operated.
8. Display the load current and voltage
Digital AC ammeter and voltage meter can accurately display the load current and voltage and their changes.
9. Display the output state
The LED can clearly display the SPDU operating state.
10. Socket with anti-fall device
IEC320 C13 with anti-fall device makes the plug fixed and not easy to fall down.

SHENZHEN CLEVER ELECTRONIC CO., LTD
Ⅲ. Applicable scopes
1.SPDU series products can be applied to server cabinet, network cabinet and so on.
2. Customers can choose the outlet standard and quantity according to their requirement.
3. SPDU series products are in accord with the RoHS directive and are suitable to 220/110VAC power voltage.
Ⅳ. Installation method
Horizontal installation.
Ⅴ. Performance parameters
Item Basic description
Rating input voltage 125/250VAC 50/60HZ;
Max. Load current 16A/32 A
Cable specification 3× 2.5 mm²×3M ,3× 6.0 mm²×3M
Input
Input standard IEC60309 industrial plug/IP4
Socket standard IEC320 C13, C19,MEMA 5-15R, NEMA 5-20R
Output quantity 8 way, 12 way
Rating output current 10A
Output
Max. Output current 16A/32A
Digital display LED nixie tube, 3 numbers in red
Accuracy ±1%+1
Digital AC ammeter
Resolution 100mA
Digital display LED nixie tube, 3 numbers in red
Accuracy ±1%+1
Display
Digital AC voltage
meter Resolution 1V
Dimension L×W×H = 482.6mm×216mm×44.8mm
Mounting hole 465mm
Weight Y1
Power consumption 2~6W
Product
specification
Case color black
ROHS Yes
Temperature 0℃-55℃;
Working
environment Relative humidity 10-90%;
Y1:Product weight is determined by the outlet quantity.
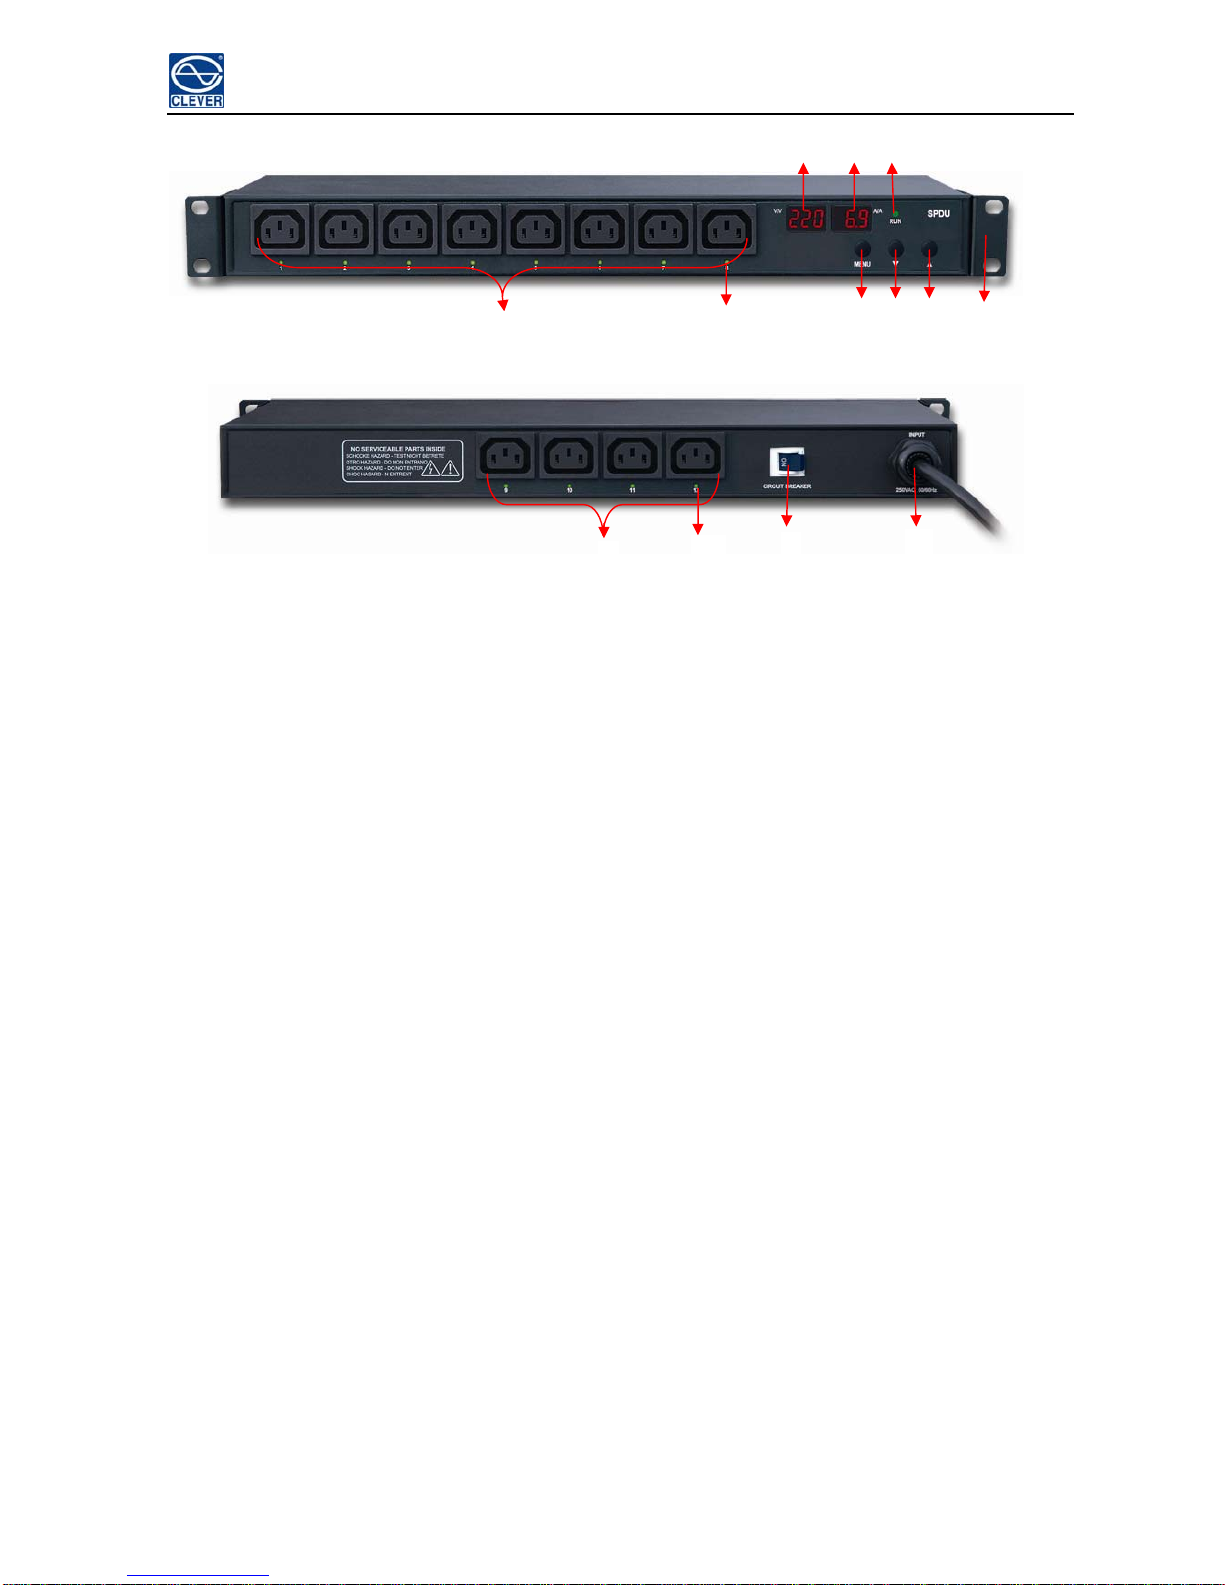
Ⅵ. Product chart
SHENZHEN CLEVER ELECTRONIC CO., LTD
Instruction:
1. RUN:flashes when SPDU is in normal operation
2. Digital display tube: displays the load current and voltage
3. △ button: move forward
4. ▽button: move back
5. MENU: functional button
6. Outlet indicator
7. Outlets
8. Mounting bracket
9. Overload protection
10. Cable input hole
Ⅶ. Operating instruction
1. Setting instruction
1.1. Insert the SPDU plug to the socket, press “MENU” button and then turn on the power to enter into the
setting mode. RUN indicator flashes slowly (about every 4s). 20s without operation will return to the main
interface. At this time, press “MENU” to enter the operating menu again. In the mode, none outlet electrified.
1.1.1. Button functions
MENU: enter the nest menu, select or back to the former menu
△: Move forward
▽: Move back
2
34
5
1
2
7
6
Front
10
9
8
7
6
Back

SHENZHEN CLEVER ELECTRONIC CO., LTD
1.1.2. Display instruction:
1.2. Group setting
1.2.1. The outlets of SPDU can set 4 groups
1.2.2. In menu 1, select 1, press “MENU” to enter menu 2, select the outlets to be grouped, and press “MENU”
to enter menu 3(select “00” and press “MENU” can return to the former menu), menu 3 now displays the outlets
not grouped. Press “△” or “▽” to select the outlet and then press “MENU” to add it in the group. To return the
former menu, select “00” and press “MENU”. In case wrongly operated, customer can recover to the factory
default.
1.3. Group check
In menu 1, select 2 to enter menu 2, select the group to check, and press “MENU” to enter menu 3, press “△” or
“▽” to check all the outlet in this group.
1.4. Select the outlets
In menu 1, select 3 to enter menu 2, press “△” or “▽” to select the outlets. At the same time, menu 3 displays
the corresponding state of the outlet (1: on when electrify; 0: off when electrify). If need to modify, press
“MENU” to enter menu 3 to do.
1.5. Set the interval time
In menu 1, select 4, menu 2 displays the interval time at the present. Press “△” or “▽” to set the interval time
and then press “MENU” to save. The interval time should be 0-15 seconds.
1.6. Recover to factory default
In menu 1, select 5 to enter menu 2, press “MENU” to select (00: back; 01: recover to factory default). When
select to recover the factory default, the digital panel lights. When the recover finishes, the system will
automatically retrieve from the menu.
2. Electrify SPDU
Insert SPDU plug into the socket and turn on the power, the RUN indicator flashes quickly and the digital display
panel lights, SPDU goes into the starting procedure now. The outlets (in group) will power on sequentially
according to the former setting. When the power on of the outlets finish, the RUN indicator flashes slowly (about
every 2S). And the digital display panel will show the present load current and voltage.
Instruction:
①:Menu 1 display (1 number)
②:Menu2 display (2 numbers)
③:Menu3 dis
p
la
y
(
2 numbers
)
①②③

SHENZHEN CLEVER ELECTRONIC CO., LTD
2.1. Start/Stop SPDU when the main power electrified
Press “MENU” for 3S to start the stopping function, if succeed (RUN indicator flashes quickly), move away your
finger to enter the stopping procedure. The outlets will power off sequentially, and the RUN indicator flashes
slowly (about every 4S). If need to start again, press “MENU” for 3S to start the starting function, if succeed
(RUN indicator flashes quickly), move away your finger to enter the starting procedure. The outlets will power
on sequentially, and the RUN indicator flashes slowly (about every 2S)
2.2. Start/Stop the outlet (effective when the starting procedure performs)
Press “MENU”, select 3 in menu 1 to enter menu 2, select the outlets to start/stop and press “MENU” to enter
menu 3. After the set, press “MENU” to save. Then the outlet will start/stop accordingly.
Attention: Do the above operation after the SPDU stopping procedure finishes, customer can only modify the
power on/off state value of the outlet when restarting the SPDU (the function is the same with the statement in
1.4)
2.3. Group and check the outlets after electrify the SPDU
The same with the statement in 1.2 and 1.3
2.4. Set the interval time after electrify the SPDU
The same with the statement in 1.5
3. Power off in urgent situation
In urgent situation, turn off power switch on the SPDU to cut off the power.
4. Attention
Please turn off the outlets before insert or pull the equipment plugs.
Ⅷ. Fittings list
1. Bolt M6 4PCS
2. Nut M6 4PCS
3. User manual CD 1PC
Ⅸ. Quality warranty
We guarantee to repair the product for two years. During the period, our obligation is limited to replace or repair
it. The repair is generally free during the two-year’s period. If the product has beyond the guaranteed time or the
fault arises from customer’s incorrect operation, some amount of money should be paid.
The above warranty does not apply to the following situation:
1. The damage caused by customers’incorrect or inadequate repair;
2. The damage caused by unauthorized modification or misusing;

SHENZHEN CLEVER ELECTRONIC CO., LTD
3. The damage caused by using out of the product allowed environment.
Repairing Notice:
1. If you want to return the product for repair, please make sure it packed in the bandbox or carton. The damage
caused during the transportation is not warranted to repair.
2. Please give a brief description of the repairing product about the problem and its operating process.
3. The customer should pay for the returning freight, all the tariffs and taxes.
4. Please write down your name, address and the telephone number by which we can contact you at anytime.
Table of contents


