Shenzhen Roundwhale Technology R-C3 User manual

User Manual
Version: 1.0
1!/!30!
!!
INSTRUCTION MANUAL
FOR
Combo Electrotherapy Device
Model: R-C3
This manual is valid for the R-C3 Stimulator

User Manual
Version: 1.0
2!/!30!
!!
Be sure to read this instruction manual before operating and keeping it where safe.
This user manual is published by Shenzhen Roundwhale Technology Co., LTD.
Shenzhen Roundwhale Technology Co., Ltd. does not guarantee its contents and
reserves the right to improve and amend it at any time without prior notice. Amendments
will however be published in a new edition of this manual.
All Rights Reserved.
R-C3 Rev.V1.0© 2019, printed in Feb. 13, 2019.
Declaration of conformity:
Shenzhen Roundwhale Technology Co., Ltd. declares that the device complies with
following normative documents:
IEC60601-1, IEC60601-1-2, IEC60601-1-11, IEC60601-2-10, IEC62304,
ISO10993-5, ISO10993-10, ISO10993-1, ISO14971
TABLE OF CONTENTS
1.
FOREWORD
!........................................................................................................................!4!
1.1!Introduction!................................................................................................................!4!
1.2!Medicalbackground!..................................................................................................!5!
2. SAFETY INFORMATION
!...................................................................................................!5!
2.1 Intended use!..................................................................................................................!6!
2.2!Important!Safety!Precautions!and!Warnings!...................................................................!6!
3. GETTING TO KNOW YOUR DEVICE!.............................................................................!9!
3.1!Accessories!.......................................................................................................................!9!

User Manual
Version: 1.0
3!/!30!
!!
3.2!LCD!display!.......................................................................................................................!9!
3.3!Device!illustration!...........................................................................................................!10!
4. SPECIFICATION!...............................................................................................................!11!
4.1Technical!information!.....................................................................................................!11!
5. OPERATING INSTRUCTION!.........................................................................................!12!
5.1!Connect!electrode!pads!to!electrode!wires!...................................................................!12!
5.2!Connect!electrode!wires!to!device!.................................................................................!13!
5.3!Electrode!........................................................................................................................!13!
6. INSTRUCTIONS FOR USE!.............................................................................................!18!
6.1!Turn!on!...........................................................................................................................!18!
6.2!Select!treatment!mode!..................................................................................................!18!
6.3!Select!treatment!program!..............................................................................................!18!
6.4Set!program!parameter!...................................................................................................!18!
6.5!Start!treatment!...............................................................................................................!19!
6.6!Adjust!the!output!intensity!............................................................................................!20!
6.7!Stop!the!treatment!and!turn!off!the!device!...................................................................!20!
6.8!Load!detection!................................................................................................................!20!
6.9Safety!lock!feature!..........................................................................................................!21!
6.10!Low!battery!detection!..................................................................................................!21!
6.11!Usage!of!electrode!pads!...............................................................................................!22!
6.12!Where!do!I!attach!electrode!pads?!..............................................................................!22!
7. Cleaning and maintenance!...........................................................................................!23!
7.1!Cleaning!and!care!for!the!device!....................................................................................!23!
7.2!Maintenance!..................................................................................................................!24!
8. Troubleshooting!..............................................................................................................!24!
9. Storage!..............................................................................................................................!25!
9.1!Storingthe!Electrode!Pads!and!Lead!Wires!....................................................................!25!
9.2!Storing!the!Unit!..............................................................................................................!25!
10. Disposal!..........................................................................................................................!25!
11. Electromagnetic compatibility (EMC) tables!.........................................................!26!

User Manual
Version: 1.0
4!/!30!
!!
12. Normalized symbols!....................................................................................................!28!
13. WARRANTY!....................................................................................................................!29!
1.
FOREWORD
1.1
Introduction
The device R-C3 is a dual channel output TENS, EMS and MASSAGE stimulator.
Before using, please read all the instructions in this user manual carefully and keep it safe
for future use.
The COMBO stimulator belongs to the group of electrical stimulation systems. It has
three basic functions– TENS (Transcutaneous Electrical Nerve Stimulation), EMS
(Electronic Muscle Stimulation) and MASSAGE.
Function of the COMBO stimulator: The device has 22 programs (9 TENS programs, 8
EMS programs and 5 MASSAGE programs) and applies electric currents in the
low-frequency range for therapy. Each program controls the generated electric impulses,
their intensity, frequency and pulse width.
Based on simulating the body’s natural pulses, the mechanism of electrical stimulation
equipment is to create electric impulses that are transcutaneous transmitted to nerves or

User Manual
Version: 1.0
5!/!30!
!!
muscle fibers through electrode. The intensity of the dual channel can be adjusted
independently and can be applied individually to one body part. This dual channel
devicecan be used with four pieces of electrodes, which allows you to stimulate one
muscle groups simultaneously with a wide selection of standard programs. The electrical
pulse is firstly transmitted to the tissue, then it affects the transmission of stimulation in
nerves as well as muscle tissues in the body parts.
1.2
Medical background
1.2.1 ABOUT PAIN
Pain is an important signal in the human body warning system. It reminds us that
something is wrong, without which, abnormal conditions may go undetected, causing
damage or injury to vital parts of our bodies. Even though pain is a necessary warning
signal of trauma or malfunction in the body, nature may have gone too far in its design.
A side from its function in diagnosis, long-lasting persistent pain serves useless purpose.
Pain does not occur until encoded message travels to the brain where it is decoded,
analyzed, and reacted to, from the injured area along the small nerves leading to the
spinal cord. There the message is transmitted to different nerves that travel up the spinal
cord to the brain. Then the pain message is interpreted, referred to and pain is felt.
1.2.2 WHAT IS TENS?
TENS (Transcutaneous Electrical Nerve Stimulation) is effective in relief of pain. It is
daily used and clinically proven by physiotherapists, care givers and top athletes around
the world. High-frequency TENS currents activates the pain-inhibiting mechanisms of the
nervous system. Electrical impulses from electrodes, placed on the skin over or near the
pain area, stimulate the nerves to block the pain signals to the brain, causing the pain go
unperceived. Low-frequency TENS currents facilitate the release of endorphins, the body’s
natural painkillers.
1.2.3 WHAT IS EMS?
Electrical Muscle Stimulation is an internationally accepted and proven way of treating
muscular injuries. It works by sending electronic pulses to the muscle needing treatment.
That causes the muscle to exercise passively. It is a product deriving from the square
waveform, originally invented by John Faraday in 1831. Through the square waveform, it
is able to work directly on muscle motor neurons. The EMS System has low-frequency and
this in conjunction with the square wave pattern allows direct work on muscle groupings.
2. SAFETY INFORMATION

User Manual
Version: 1.0
6!/!30!
!!
2.1 Intended use
TENS mode
It is used for temporary relief of pain associated with sore and aching muscles in the
neck, shoulder, back, joint, hip, hand, abdomen, foot, upper extremities (arm) and lower
extremities (leg) due to strain from exercise or normal household work activities.
EMS mode
The EMS stimulation program stimulates healthy muscles in order to improve and
facilitate muscle performance.
Massage mode
The Massage stimulation program provides relaxing muscle vibration to loosen tight
muscles.
2.2 Important Safety Precautions and Warnings
It is important that you read all the warnings and precautions included in
this manual because they are intended to keep you safe, prevent risk of
injury and avoid a situation that could result in damage to the device.
SAFETY SYMBOLS USED IN THIS MANUAL
2.2.1 Contraindication
1) Do not use this device if you are using a cardiac pacemaker, implanted
defibrillator, or other implanted metallic or electronic devices. Such use
could cause electric shock, burns, electrical interference, or death.
2) The device should not be used when cancerous lesions or other lesions are present
in the treatment area.
3) Stimulation should not be applied over swollen, infected, inflamed areas or skin
eruptions (e.g. phlebitis, thrombophlebitis, varicose veins, etc.).
4) Electrode placements must be avoided in the carotid sinus
area (anterior neck) or transcerebrally (through the head).
5) This device should not be used in overly enervated areas.
6) Inguinal hernia.
7) Do not use on scarred areas following a surgery for at least 10 months after the
operation.
8) Do not use with serious arterial circulatory problems in the lower limbs.
2.2.2 WARNING
1) If you have had medical or physical treatment for your pain, consult with your physician
before use.

User Manual
Version: 1.0
7!/!30!
!!
2) If your pain is not subdued, becomes more than mild, or lasts for more than five days,
stop using the device and consult with your physician.
3) Do not apply stimulation over your neck because this could cause severe muscle
spasms resulting in closure of your airway, difficulty in breathing, or adverse effects
on heart rhythm or blood pressure.
4) Do not apply stimulation across your chest because the introduction of electrical
current into the chest may cause rhythm disturbances to your heart, which could be
lethal.
5) Do not apply stimulation over, or in proximity to, cancerous lesions.
6) Do not apply stimulation in the presence of electronic monitoring equipment (e.g.,
cardiac monitors, ECG alarms), which may not operate properly when electrical
stimulation device is in use.
7) Do not apply stimulation when in bath or shower.
8) Do not apply stimulation while sleeping.
9) Do not apply stimulation while driving, operating machinery, or during any activity when
electrical stimulation can put you at risk of injury.
10) Apply stimulation only to normal, intact, clean, healthy skin.
11) The long-term effects of electrical stimulation are unknown. Electrical stimulation
device cannot replace drugs.
12) Stimulation should not take place while the user is connected to high-frequency
surgical equipment, which may cause burn injuries on the skin under the electrodes,
as well as problems with the stimulator.
13) Do not use the stimulator in the vicinity of shortwave or microwave therapy
equipment, since this may affect the output power of the stimulator.
14) Never use it near the cardiac area. Stimulation electrodes should
never be placed anywhere on the front of the thorax (marked by ribs
and breastbone), but above all not on the two large pectoral
muscles. There it can increase the risk of ventricular fibrillation and lead to cardiac
arrest.
15) Never use it on the eye, head and face area.
16) Never use it near the genitals.
17) Never use it on the areas of the skin which lack normal sensation.
18) Keep electrodes separate during treatment. It could result in improper stimulation or
skin burns if electrodes are in contact with each other.
19) Keep the stimulator out of reach of children.

User Manual
Version: 1.0
8!/!30!
!!
20) Consult your doctor if you are in any doubt what so ever.
21) Discontinue it and do not increase the intensity level if you feel discomfort during use.
2.2.3 Precautions
1)
TENS is not effective for pain of central origin including headache.
2)
TENS is not a substitute for pain medications and other pain management therapies.
3)
TENS is a symptomatic treatment and, as such, suppresses the sensation of pain
that would otherwise serve as a protective mechanism.
4)
Effectiveness is highly dependent upon patient selection by a practitioner qualified in
the management of pain patients.
5)
Since the effects of stimulation of the brain are unknown, stimulation should not be
applied across your head, and electrodes should not be placed on opposite sides of
your head.
6)
The safety of electrical stimulation during pregnancy has not been established.
7)
You may experience skin irritation or hypersensitivity due to the electrical stimulation
or electrical conductive medium (silica gel).
8)
If you have suspected or diagnosed heart disease or epilepsy, you should follow
precautions recommended by your physician.
9)
Caution if you have a tendency to bleed internally, e.g. following an injury of fracture.
10)
Consult with your physician prior to use the device after a recent surgical procedure,
because stimulation may disrupt the healing process.
11)
Caution if stimulation is intended to be applied over the menstruation or pregnant
uterus.
12)
For single patient use only.
13)
This stimulator should not be used by patient who is noncompliant and emotionally
disturbed including whom with dementia or low IQ.
14)
The instruction of use is listed and should be obeyed; any improper use may be
dangerous.
15)
Rare cases of skin irritation may occur at the site of the electrode placement
following long-term application.
16)
Do not use this device in the presence of other equipment which sends electrical
pulses to your body.
17)
Do not use sharp objects such as a pencil or ballpoint tip to operate the buttons on
the control panel.
18)
Check the electrode connections before each use.
19)
Electrical stimulators should be used only with the electrodes recommended for use
by the manufacturer.
2.2.4 Adverse Reactions

User Manual
Version: 1.0
9!/!30!
!!
1) Possible skin irritation or electrode burn under the electrodes may occur.
2) On very rare occasions, first-time users of EMS report feeling light-headed or faint.
We recommend that you use the product while seated until you become accustomed
to the sensation.
3) If the stimulation makes you uncomfortable, reduce the stimulation intensity to a
comfortable level and contact your physician if problems continue.
3. GETTING TO KNOW YOUR DEVICE
3.1 Accessories
No.
Description
QTY
1
The COMBO Stimulator
1pc
2
Electrode pad (50mm×50mm )
4pcs
3
Electrode wires
2pcs
4
USB cable
1pc
5
User manual
1pc
!
3.2 LCD display
!
No.
Function description
No.
Function description
1!
Treatment mode
10
Intensity for Channel 2
2!
Symbol of Program
11
Symbol of Channel 2
3!
Low battery indicator
12
Symbol of treatment time (min)
4!
Symbol of SET
13
Symbol of pulse width (uS)
5!
Program number
14
Symbol of pulse rate (Hz)
User Manual
Version: 1.0
10!/!30!
!
6!
Symbol of Channel 1
15
Treatment time
7!
Intensity for Channel 1
16
Timer sign
8!
Key locking symbol
9!
Indicator of no load ( Channel 1 and
Channel 2)
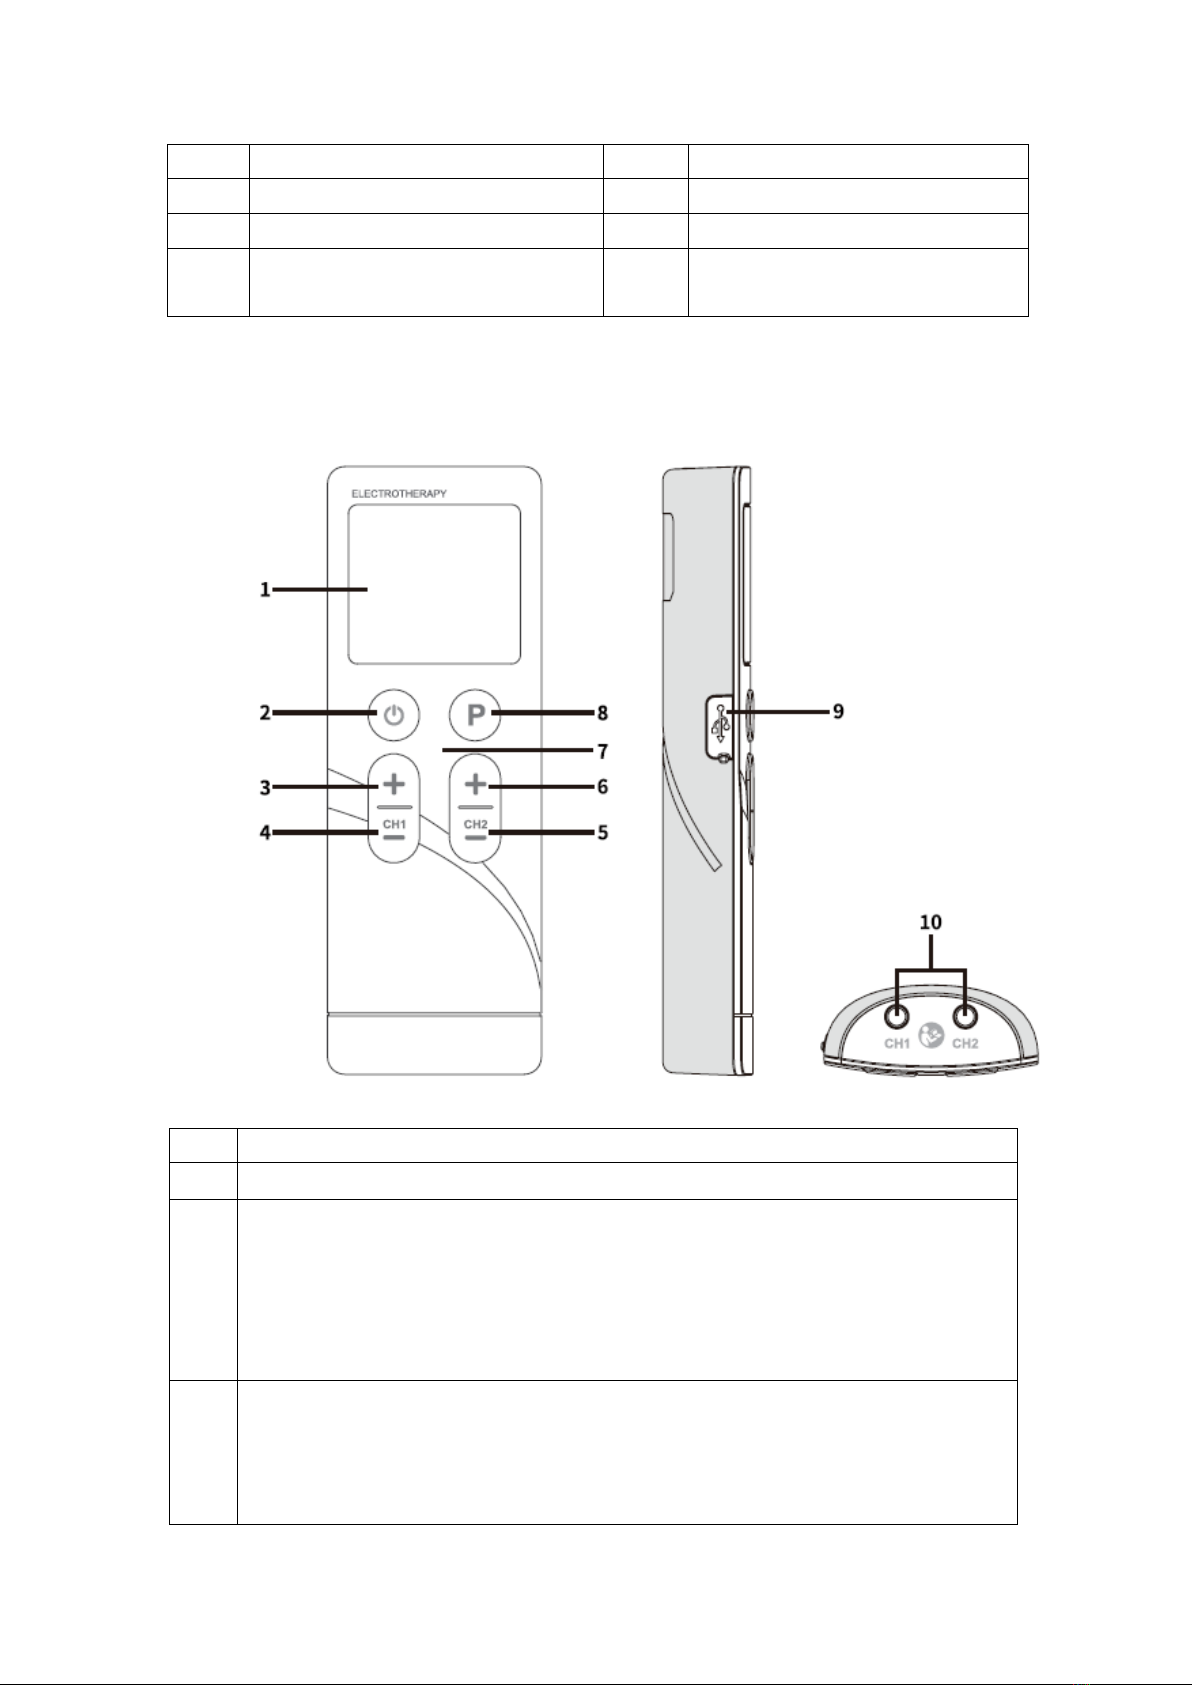
3.3 Device illustration
!
!
!
No.
Description
1!
LCD display
2!
[ON/OFF/M] button:
At power sleeping mode, press the [ON/OFF/M] button to turn on the device;
At standby mode, press the [ON/OFF/M] button to select treatment mode;
At standby mode, press and hold the [ON/OFF/M] button to turn off the device;
At treating mode, press the [ON/OFF/M] button to stop the treatment.
3!
[+] button:
At standby or treating mode, press the [+] button to increase the intensity of CH1;
At setting mode, press the [+] button to increase the corresponding data for the
pulse rate, pulse width or treatment time.

User Manual
Version: 1.0
11!/!30!
!
4!
[-] button:
At treating mode, press the [-] button to decrease the intensity of CH1;
At the key locking mode, press the [-] button to unlock the keys;
At setting mode, press the [-] button to decrease the corresponding data for the
pulse rate, pulse width or treatment time.
5!
[-] button:
At treating mode, press the [-] button to decrease the intensity of CH2;
At the key locking mode, press the [-] button to unlock the keys;
At setting mode, press the [-] button to decrease the corresponding data for the
pulse rate, pulse width or treatment time.
6!
[+] button:
At standby or treating mode, press the [+] button to increase the intensity of CH2;
At setting mode, press the [+] button to increase the corresponding data for the
pulse rate, pulse width or treatment time.
7!
Charger indicator:
When the device is charging, the indicator light will be yellow;
When charging is completed, the indicator light will be green.
8!
[P] button:
At standby mode, press the [P] button to select the treatment program;
At standby mode, press and hold [P] button to enter the setting mode.
9!
USB socket
10!
Output sockets
4. SPECIFICATION
4.1Technical information
Device name
Combo Electrotherapy Device
Model/type
R-C3
Power sources
3.7 V Li-ion batteries
Power supply
Input: 100-240V AC, 50/60Hz,0.2A; Output: 5V DC, 300mA
Output channel
Dual channel
Waveform
Bi-phase square-wave pulse
Output current
Max. 120mA (at 500ohm load)
Output intensity
0 to 40 levels, adjustable
Treatment mode:
TENS, EMS and MASSAGE mode
Operating condition
5°C to 40°C with a relative humidity of 15%-93%, atmospheric
pressure from 700 hPa to 1060 hPa
Storage condition
-10°C to 55°C with a relative humidity of 10%-95%,
atmospheric pressure from 700 hPa to 1060 hPa

User Manual
Version: 1.0
12!/!30!
!
Dimension
142 x 50 x21.4mm (L x W x T)
Weight
About 85g
Automatic shutoff
1 minute
Classification
BF type applied part, internal power equipment, IP22
Size of electrodes pad
50x50mm, square
Output precision
±20% error is allowed forall the output parameters
!
TENS mode!
Number of programs
9 programs
P. W. ( Pulse Width)
100-300μs
P. R . ( Pulse Rate)
2-100Hz (Hz=vibration per second)
Treatment time
5-90 minutes
!
!
EMS mode!
Number of programs
8 programs
P. W. ( Pulse Width)
100μs-300μs
P. R . ( Pulse Rate)
2-100Hz (Hz=vibration per second)
Treatment time
5-90 minutes
MASSAGE mode!
Number of programs
5 programs
P. W. ( Pulse width)
100-250μs
P. R . ( Pulse Rate)
8-100Hz (Hz=vibration per second)
Treatment time
30 minutes
5. OPERATING INSTRUCTION
!
5.1 Connect electrode pads to electrode wires
Insert the electrode wires connector into electrode connector. Make sure they are
properly connected to ensure the good performance. Please refer to the picture.

User Manual
Version: 1.0
13!/!30!
!
Always use the electrode pads which comply with the requirements of the
IEC/EN60601-1, ISO10993-1/-5/-10 and IEC/ EN60601-1-2, as well as CE and FDA 510(K)
regulation.
5.2 Connect electrode wires to device
Before proceeding to this step, ensure that the device is completely switched OFF.
Hold the insulated portion of the electrode wire connector, and insert the plug into the
receptacle on the top of the main device.
Ensure the electrode wires are inserted correctly. The device has two output receptacles
controlled by Channel A and Channel B at the top of the unit. You may choose to use one
channel with one pair of electrode wires or both channels with two pairs of electrode wires.
Using both channels gives the user the advantage of stimulating two different areas at the
same time.
Do not insert the plug of the electrode wires into any AC power supply socket.
!
5.3 Electrode
5.3.1 Electrode options
The electrodes should be routinely replaced when they start to lose their
adhesiveness. If you are unsure of your electrode adhesive properties, please order
new replacement electrodes. Replacing electrodes should be re-ordered under the
advice of your physician or the device manufacturer to ensure proper quality. Follow
application procedures outlined on electrode packing when using the new replacement
electrodes to maintain optimal stimulation and to prevent skin irritation.
!
5.3.2 Place electrodes on skin
Place the electrode on the body part in need of
treatment, according to the instruction of this
user manual. Please make the skin clean
before use and ensure the skin and electrode

User Manual
Version: 1.0
14!/!30!
!
connect well.
1. Always remove the electrodes from the skin with a moderate pull in order to avoid
injury in the event of highly sensitive skin.
2. Before applying the self-adhesive electrodes, it is recommended to wash and
degrease the skin, and then dry it.
3. Do not turn on the device when the self-adhesive electrodes are not positioned on
the body.
4. To remove or move the electrodes, switch off the device or the appropriate channel
first in order to avoid unwanted irritation.
5. It is recommended that, at minimum,1.97” x 1.97”self-adhesive square electrodes
are used at the treatment area.
6. Never remove the self-adhesive electrodes from the skin while the device is still on.
!
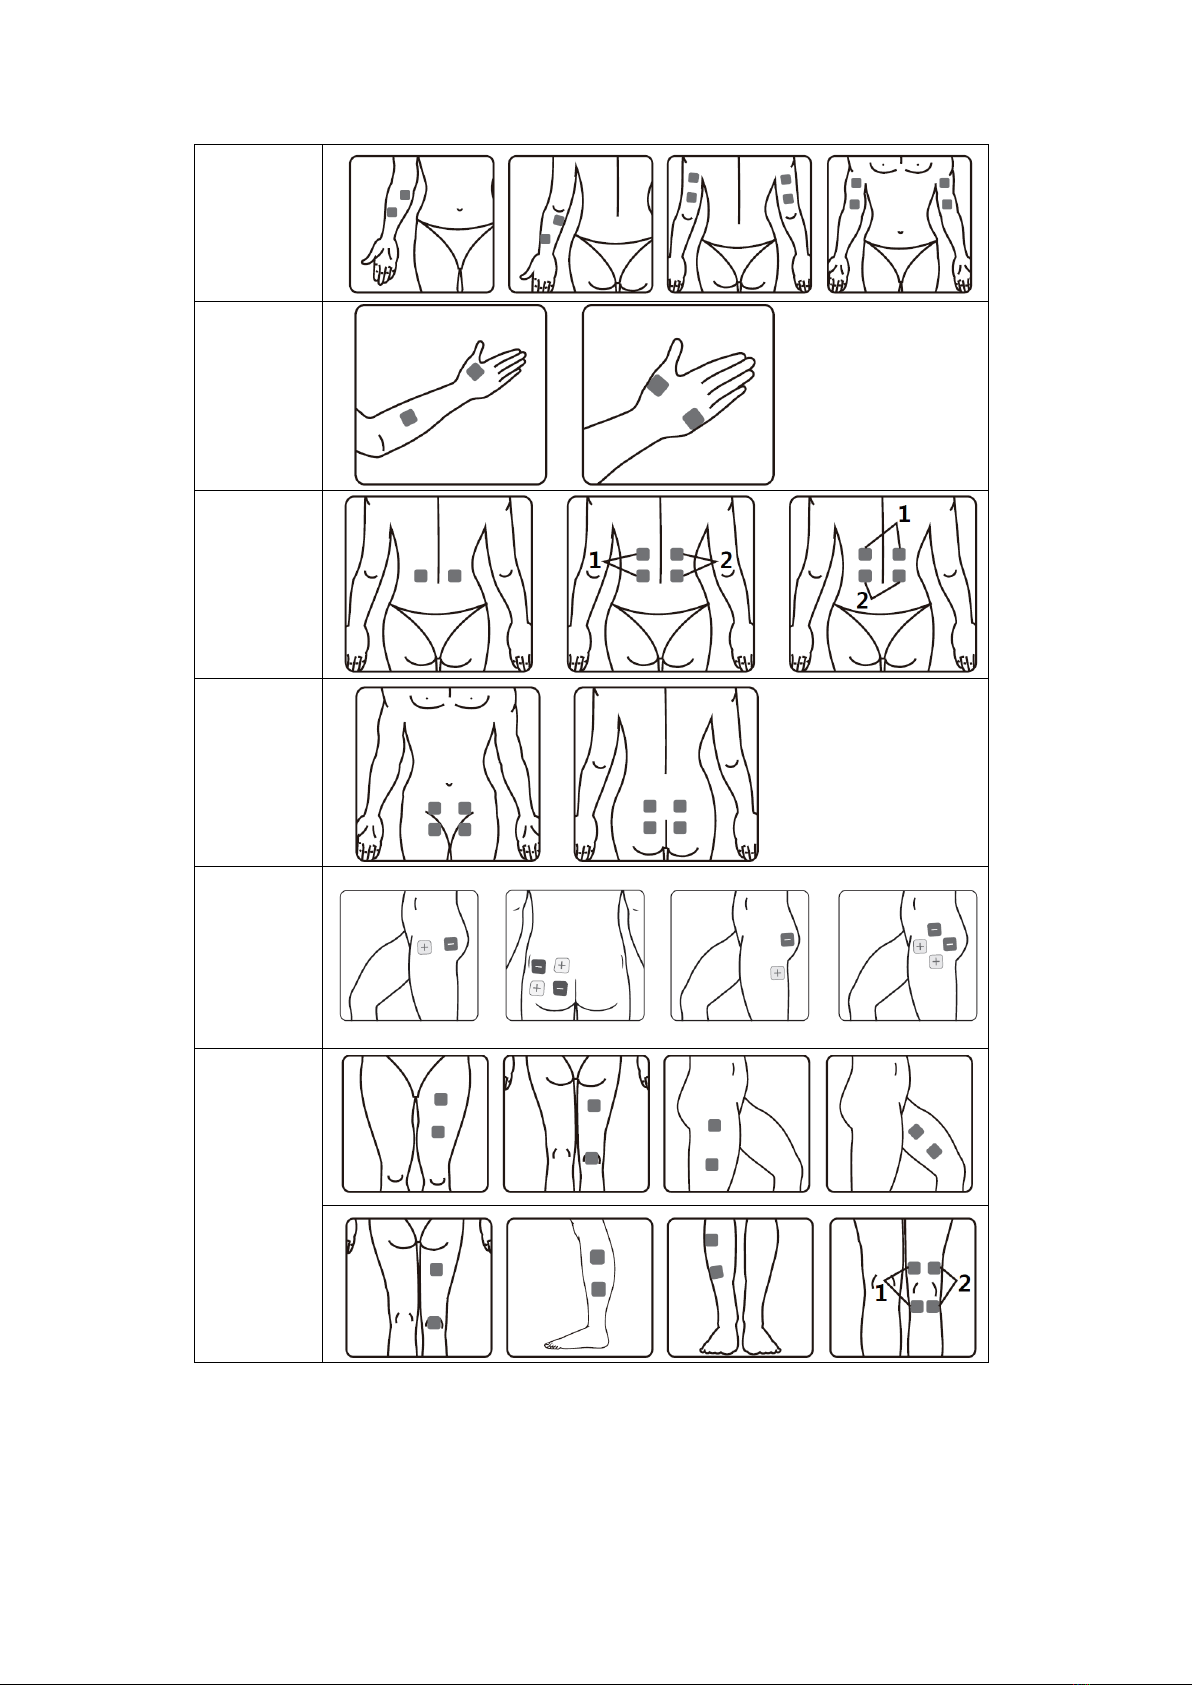
5.3.3 Electrode placement
R-C3 is a kind of OTC stimulator, suitable for home use. You only have to use according
to the user manual, place the electrode on the position where you feel pain. Conduct
exercise, treatment and adjustment based on your own feeling.
Position of electrode placement under TENS programs
Neck
Shoulder
User Manual
Version: 1.0
15!/!30!
!
Arm
Hand
Back
Abdomen
Hip
Leg

User Manual
Version: 1.0
16!/!30!
!
Foot
Joint
(knee)
Joint
(elbow)
Joint
(ankle)
Joint
(wrist)
Position of electrode placement under EMS programs
Neck
Shoulder

User Manual
Version: 1.0
17!/!30!
!
Arm
Hand
Back
Abdomen
Hip
Leg
Foot
User Manual
Version: 1.0
18!/!30!
!
6. INSTRUCTIONS FOR USE
6.1 Turn on
Press the [ON/OFF/M] button to turn the device on, the LCD will be lit. And then it goes
into the standby mode as the picture shown below.
!
!
!
!
!
!
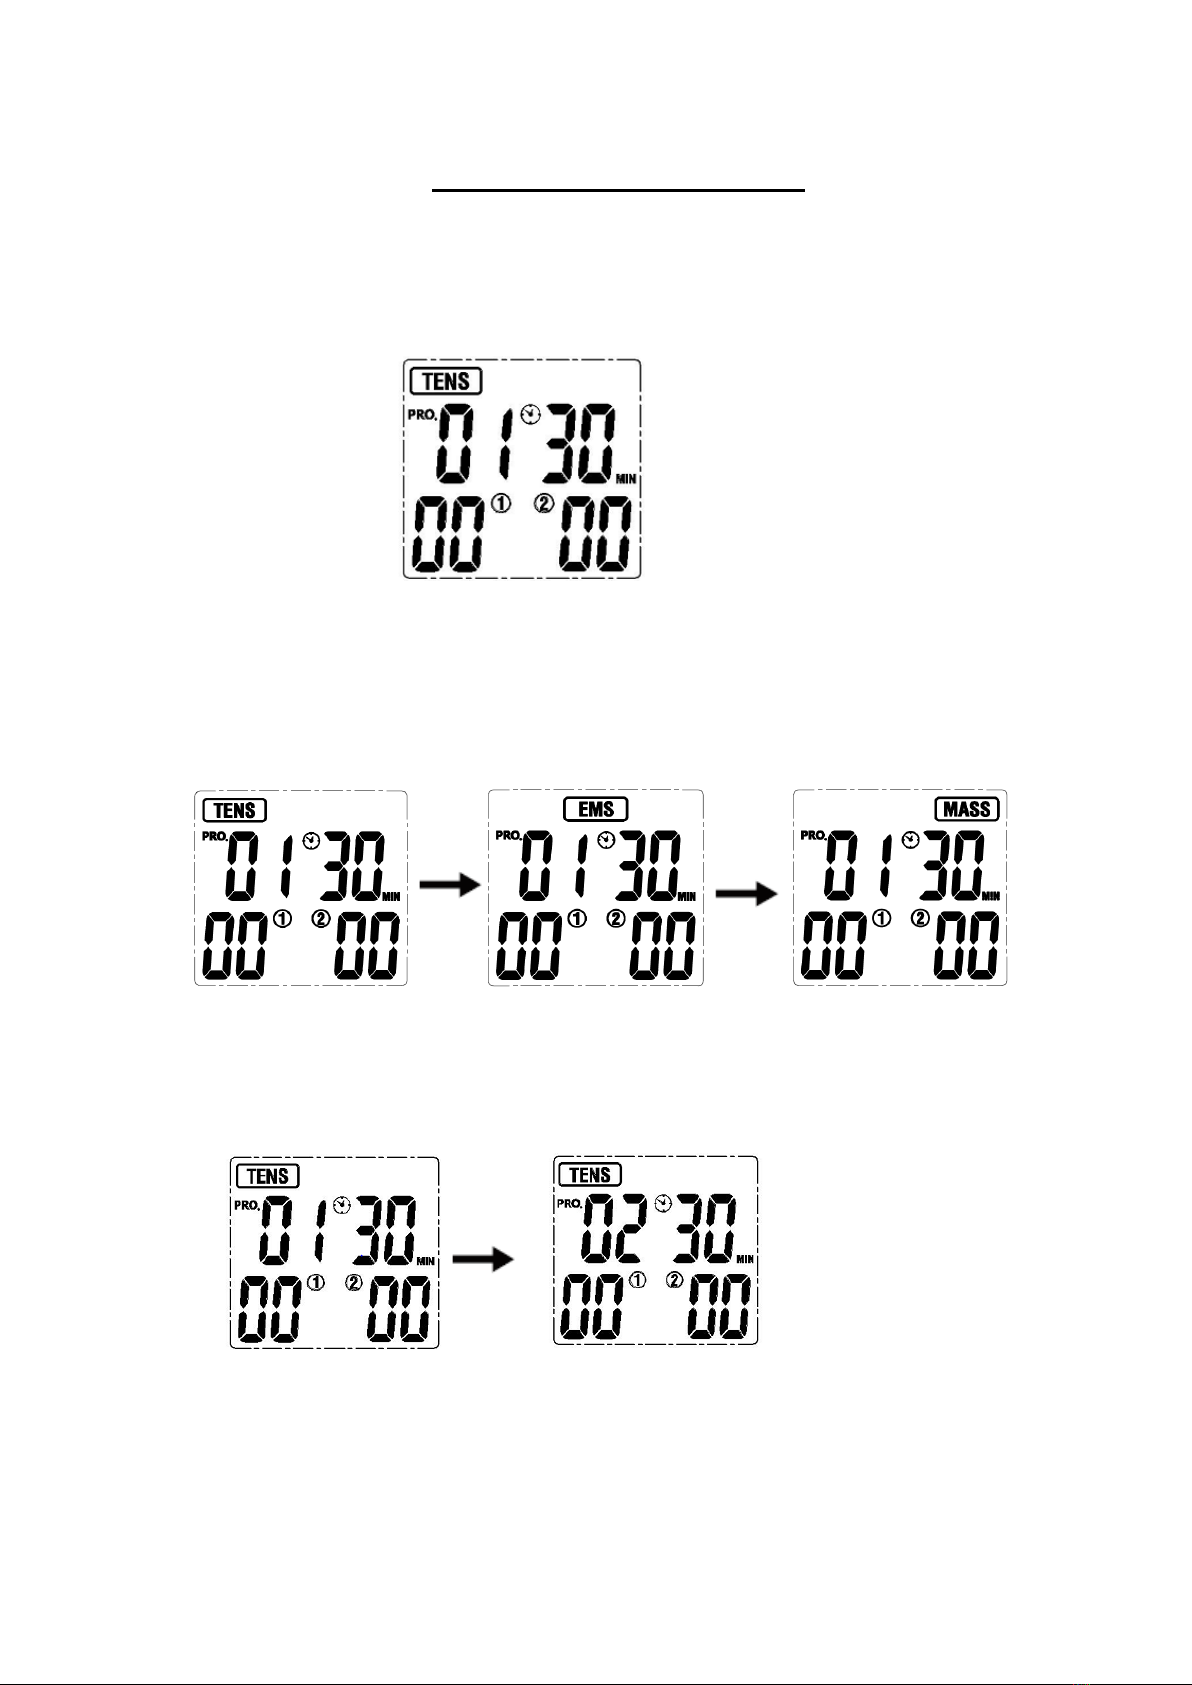
6.2 Select treatment mode
Press the [ON/OFF/M] button to select which treatment mode (TENS-EMS-MASS) you
will use. The LCD screen displays as follows:
!
!
!
!
!
!
!
!
!
6.3 Select treatment program
Based on your needs, press [P] button to select the treatment program. The LCD
screen displays as follows:
6.4Set program parameter
In standby mode, press [p] button adjust the treatment program to U1, U2 or U3 of
the TENS or EMS mode. Press and hold the [p] to enter the setting program.
1) Press [P] button to adjust pulse rate -> pulse width -> treatment time by setting the
parameter.

User Manual
Version: 1.0
19!/!30!
!
2) Press [+]/[-] button to adjust corresponding data.
Treatment
mode
Program
NO.
Treatment time
(min)
Frequency(Hz)
Pulse width
(us)
Type
TENS
U1
Default:30
Adjustable:(5-90)
Default:50
Adjustable:(2-100)
Default:180
Adjustable:(100-300)
Con.
U2
Default:30
Adjustable:(5-90)
Default:60
Adjustable:(2-100)
Default:160-260
Adjustable:(100-300)
PWM
U3
Default:30
Adjustable:(5-90)
Default:60
Adjustable:(2-100)
Default:260
(100-300)
IM
EMS
U1
Default:30
Adjustable:(5-90)
Default:5
(2-125)
Default:300
(100-300)
Con.
U2
Default:30
Adjustable:(5-90)
Default:60
(20-100)
Default:200
(100-300)
SY
U3
Default:30
Adjustable:(5-90)
Default:70
(20-100)
Default:200
(100-300)
AL
!
3) Press [ON/OFF/M] button to return to the standby mode.!
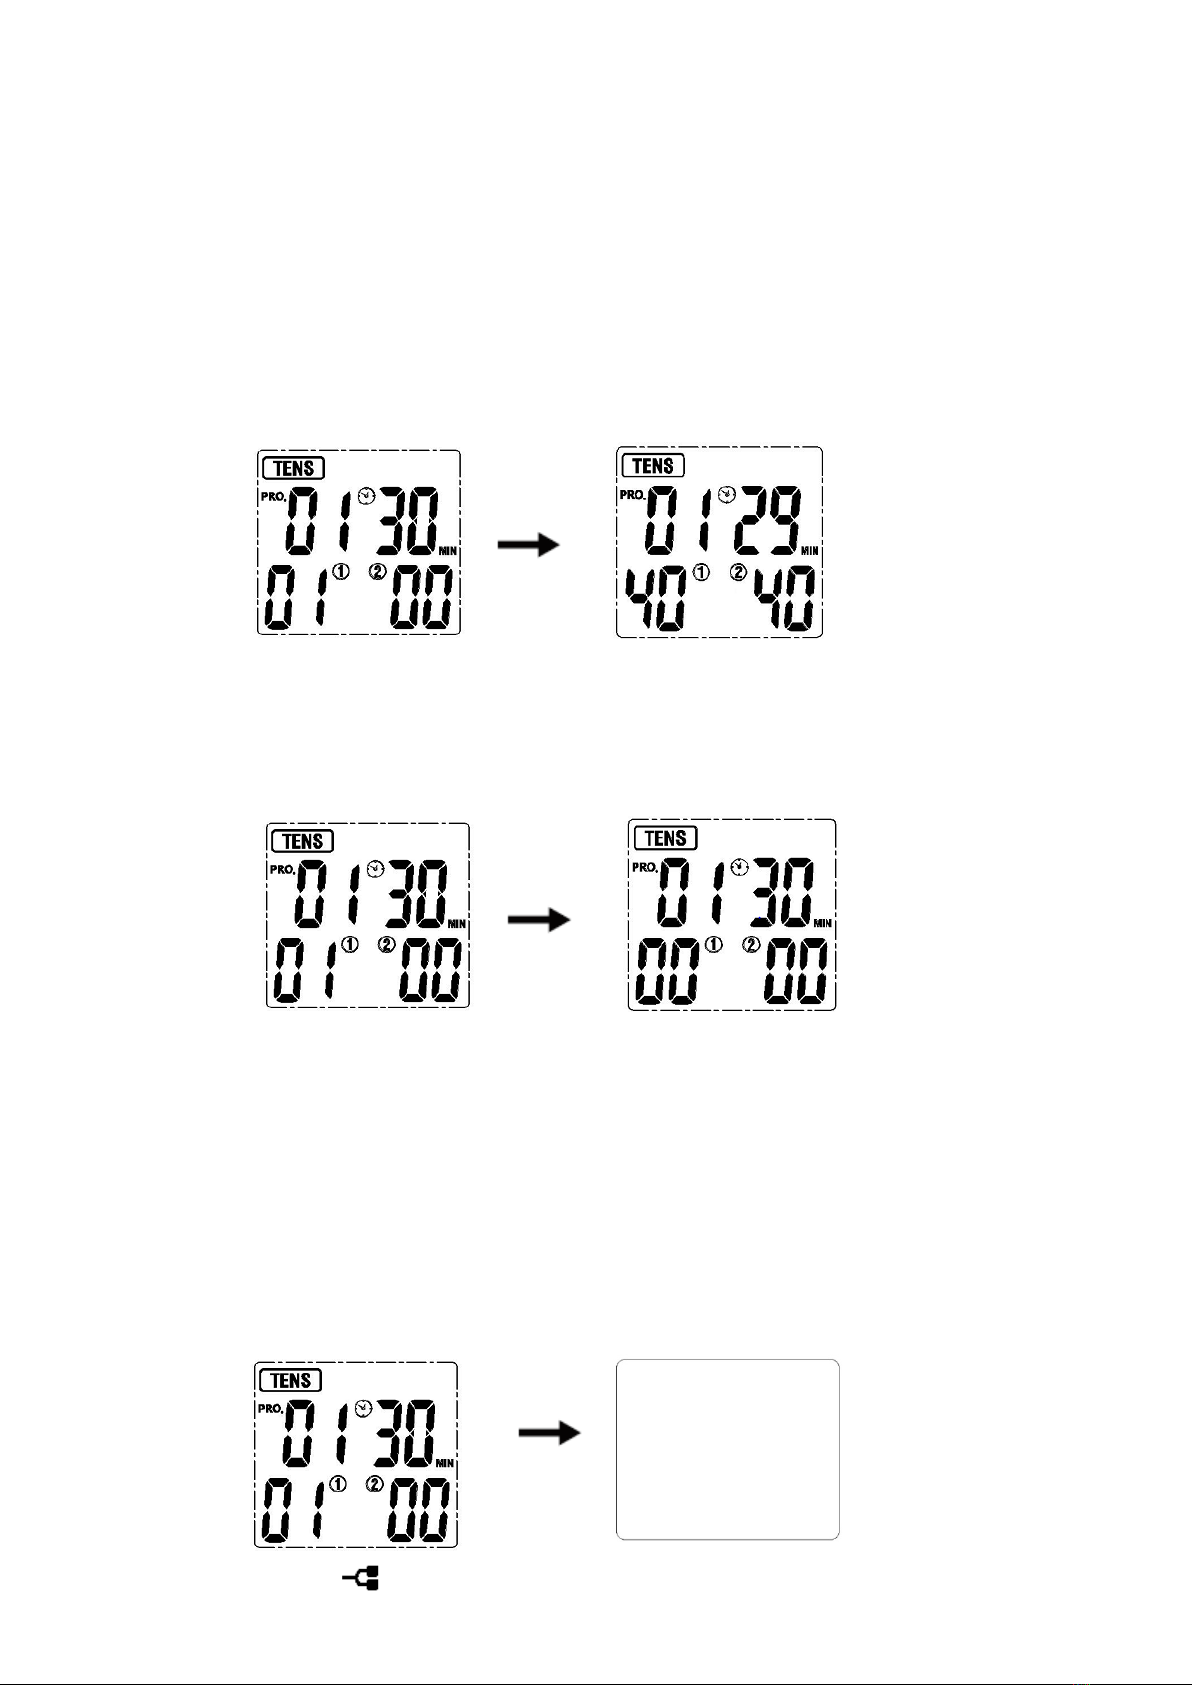
6.5 Start treatment
Press the [+] button of CH1 to increase the channel 1 intensity, press the [+] button of
CH2 to increase the channel 2 intensity. The LCD displays as follows:
User Manual
Version: 1.0
20!/!30!
!
6.6 Adjust the output intensity
Place the electrodes on the body parts, press the [+] button to increase output intensity.
It will be increased to a higher level after each press. The device has totally 40 levels of
output intensity. Please adjust the intensity to the condition that you feel comfortable. The
level of output intensity will be shown on the LCD:
If you feel it too strong, you can press [-] button to decrease the intensity to a lower
level after each press. When the output intensity of both channels decreases to zero, the
stimulator will return to the standby mode. The LCD displays as follows:
Caution:
If you feel or become uncomfortable, reduce the stimulation intensity to a more
comfortable level and consult with your medical practitioner if problems insist.
6.7 Stop the treatment and turn off the device
Press the [ON/OFF/M] button to stop treatment during the treating mode. Press the
[ON/OFF/M] button again to turn off the stimulator, and the LCD will be blank.
6.8 Load detection
It will automatically detect the load if the intensity is above level4.If it didn’t detect the load or
Other manuals for R-C3
1
Table of contents
Popular Medical Equipment manuals by other brands


Chattanooga Group
Chattanooga Group FLUIDC DHT 1480 Service manual

NightBalance
NightBalance NB-SPT-PX Quick manual

Globus
Globus Genesy 3000 manual

TRAUMA F/X
TRAUMA F/X EMITTTMU user guide

Portable Therapeutix
Portable Therapeutix SQUID Model One Instructions for use

Stryker
Stryker InTouch FL27 series Operation manual