Shining SH0701WF User manual
Family Pad
SH0701WF
User Manual


Contents
Noticefor use .1
About transportation safety .1
Noticefor use lithium battery .1
Productfeature .. ..2
Interface 2
Gettingstarted .3
Power on, poweroff, reset, unlockand hibernate .....................................................3
Viewingyourvideos ...3
Listening to your music ...4
Settings ...5
Wireless network ..6
InstallAPK .. .7
UninstallAPK .. .. 8
Factory datareset ....9
Productspecification .. .10
Accessory .. .... 10

1
Notice for use
1) Please keep the device awayfrom excess temperature (40 above), toocold
(-5 below) or wetplace.
2) Do not grievous hit the device or place somethingheavy on it.
3) Do not letforeign objects into the device.
4) Please keep the device away from benzene, diluents or other chemical.
5) Keep the device away from water.
6) The product shouldbe serviced by the professional serviceman, do not try to
service it byyourself.
7) Please unplug the power plug of the productwhen not in use for alongtimeor
during the rainstorm.
8) In orderto avoid damaging the touch panel, never place the heavy orsharp
objects on the touch panel when use or transportit.
9) Arrange all cables and cords so that people and pets are not likely to trip over
or accidentally pullon them move around or walkthrough the area. Do not
allow children to play with cables and cords.
About transportationsafety
1) Its very dangeroustouse earphone when riding bicycle or motorbike,and
may violating the traffic laws.
2) Please do not use the device on plane, atpetrolstation orthe hospital.
Notice for use lithium battery
1) Please use the specified lithium batteryand other accessories.
2) In order toavoidthe decrease of batteryperformance and workinglife, please
charge it regularly (atleast once a month).
3) Avoid causing the decrease of battery performance and standby time,please
charge the device at -5 to 40 .

2
Product feature
1) 7.0 inch, high definition, true color and multipointtouch screen.
2) Integration Wi-Fi,support wireless internet.
3) Support 3G,keyboard, mouse, hard disk,USB flash disk,printer andother
external device.
4) Google Android open source intelligent operating system.
5) Support gravity sensor,auto-rotate screen.
6) Power key,reset key, upgrade key.
7) Support the applicationdownload of games, office software and others.
8) Support 1080P, 720Pvideo playing,and support the mainstream video format
such as: RM, RMVB, AVI,MP4,MOV, VOB, PMP, FLV and WMV.
9) Support the mainstream audio format,such as: MP3, WMA, OGG,APE, AAC,
WAV and FLAC.
10)Support the picture format, such as:JPG, BMP,PNG and GIF.
11)Energy saving setting, brightness setting, interface background setting.
12)Support SD card, OTG application andextendstorage space.
13)USB2.0 high-speed transmission.

3
Size
Getting started
1) Insert the power lead into the DC socket, and then insert the other end into
the power socket.
2) Turn on the product byholding the power button for 3seconds, and then the
screen will show the starting logo.
3) Wait for about 30seconds and enter intomain interface.
Poweron, power off,reset,unlock and hibernate
1) Power on:turn onthedevice byholdingthe power button for3secondswhen
the product power off.
2) Power off:holdingthe power buttonfor 3 seconds and click ok to power off
when the product atworking status.
3) Reset: holding the powerbuttonfor 8 secondsto force turn off the product
when the product has system halted, or press the reset button torestartthe
4
product.
4) Short click todormantorawake the product when the productstandby.
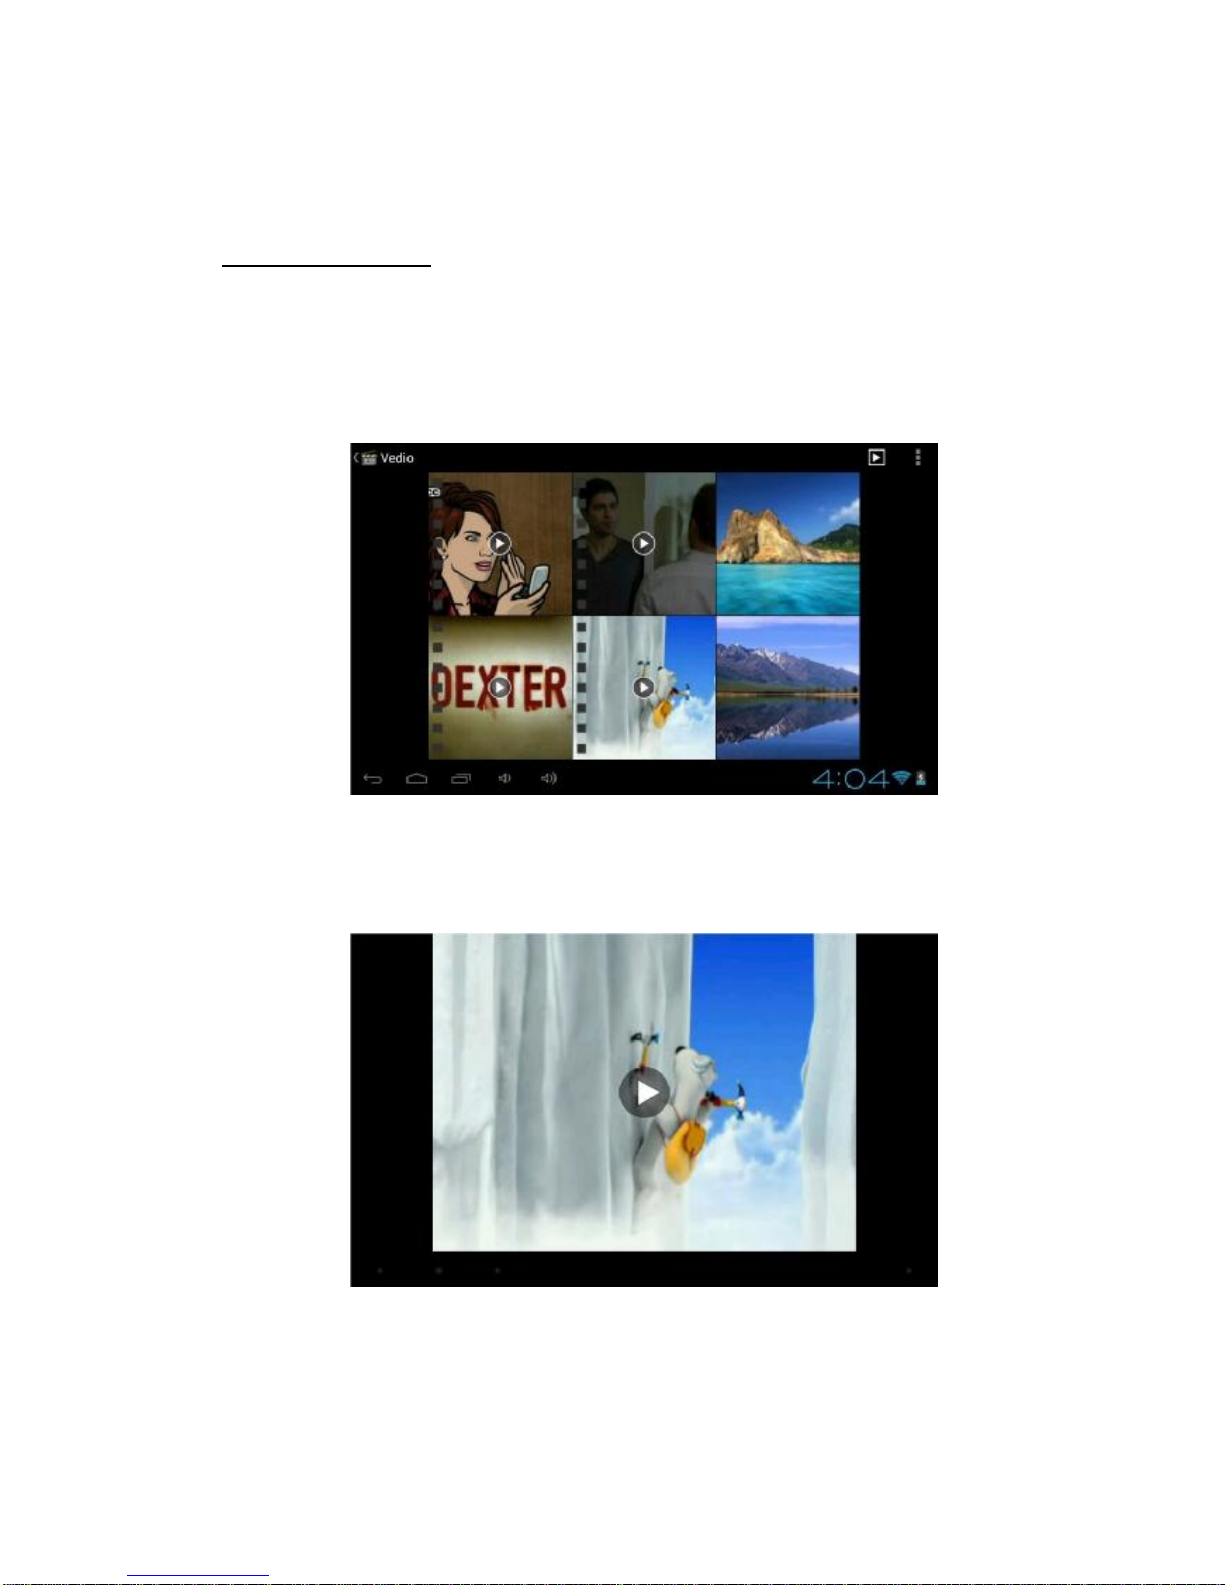
Viewingyour videos
1) Enter intothe APPS by clicking the upper rightcorner function button at the
main interface.
2) Click the ‘Super-HD Player to enter the listed files interface, as the following
picture:
3) Play interface, as the following picture:
Notice: the device cansupport1080Pvideo andmainstream videoformat.Butsome
videos cantbe played normally, because of the different of video format, coding

5
scheme, resolution and code streaming rate.
Listeningto your music
1) Enter intothe APPS by clicking the upper rightcorner function button at the
main interface.
2) Click the ‘Music to enter the listed files interface, as the followingpicture:
3) Music playinginterface, as the followingpicture:

6
Settings
Enter intothe apps byclicking theupperrightcorner function button atthe interface,
and click ‘Settings to enter the settingslist interface, as the following:
1) Wi-Fi: turn on or turn off the wireless network connections, set and managethe
wireless network access point.
2) Data usage: showthe data message when use a 3G communication card.
3) More: include airplane mode, Ethernet, VPN,portable hotspotand mobile
networks.
4) Sound: setthevolumes,silent mode, default notification, touch soundsand
screen lock sound.
5) Display: set the brightness, wallpaper, auto-rotate screen, sleep, font size,
accelerometer coordinate system,screen adaptionand smart backlight.
6) Storage: query the total space, usage space and available space of system disk,
internal storage andexternal SD card.
7) Battery:show the battery message and status.
8) Apps:query the downloaded apps, on SDcard apps, running apps, allapps.
9) Accounts &sync:userscan addaemail account tobackupthe important
message.
10)Location services:Googles location service, location & Google search.
11)Security: set the screen lock, owner info; encrypt tablet, unknown sources and
others.
12)Language &input:setthe system default language, inputmethods,
text-to-speech output and pointer speed.
13)Backup & reset: backup or reset the product data.
14)Date &time:automatic time zone or setbyyourself, use 24-hour formatand
select data format.
15)Accessibility:setthesystem large text,auto-rotatescreen, touch&holddelay
and install webscripts.
16)Developer options: set USB debug, pointer location, show touches and others.

7
17)About tablet: the information of system updates, status, legalinformation,
model number, androidversion, baseband version, kernel version and build
number.
Wireless internet
1) Enter into the settingsandturnonthe Wi-Fi,connect totheavailable networks.
2) Enter intothe APPSandclick the ‘Browser,then youwillgetintothe Google
homepage.
3) You can input the website on the top thatyoulike, or you can search the
interesting news and videos by the Google search.
8
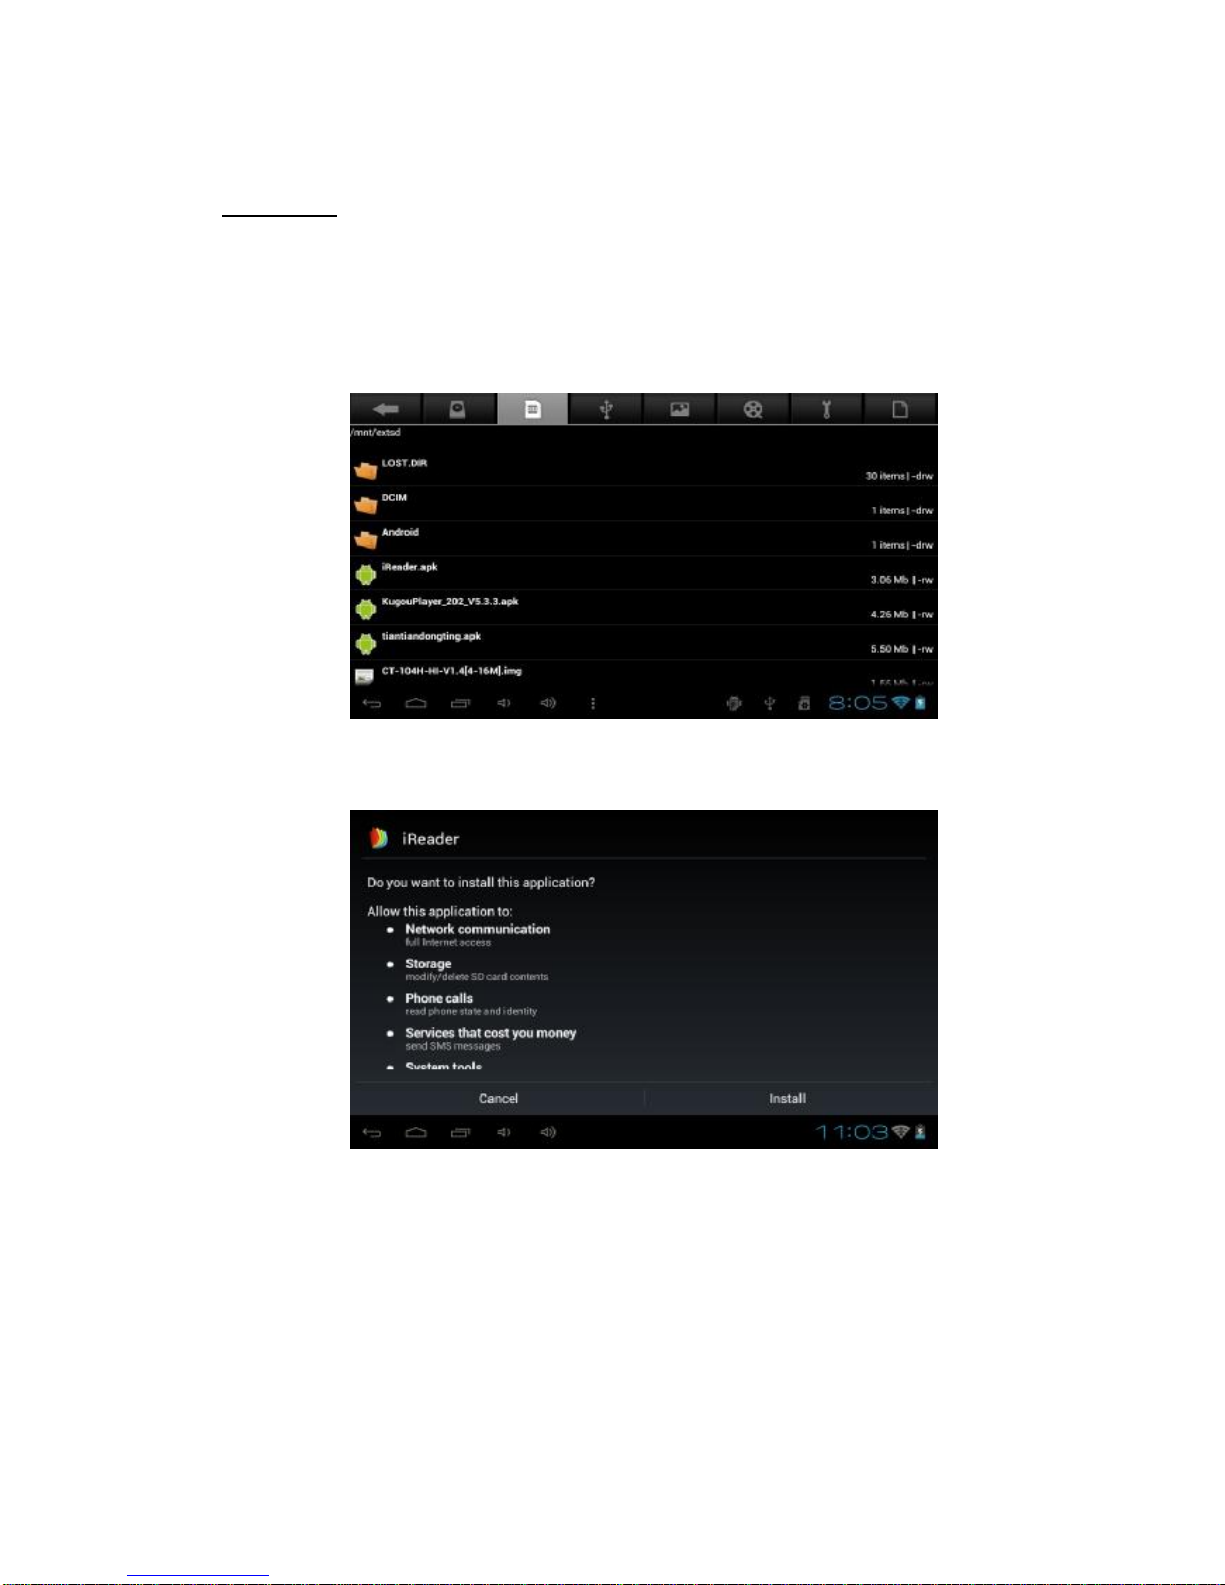
Install APK
1) Copy the file of APK format to your device or SD card.
2) Click the ‘File manager that in APPS,then youwillenter intothe ‘File Manager,
select which APK would you want to install, as the following picture:
3) Click the APKwhich you want to install, asthe following picture
After installingthe APK, you can click the APK icon in the appstoenjoythe application.

9
Uninstall APK
1) Click the ‘Settings in the APPS, enterinto ‘Settings à‘Apps à‘DOWNLOADED,
Select which application would youwant to uninstall, as the following picture:
2) Select and click the Uninstall button touninstall thisapplication, asthe
following picture:
10
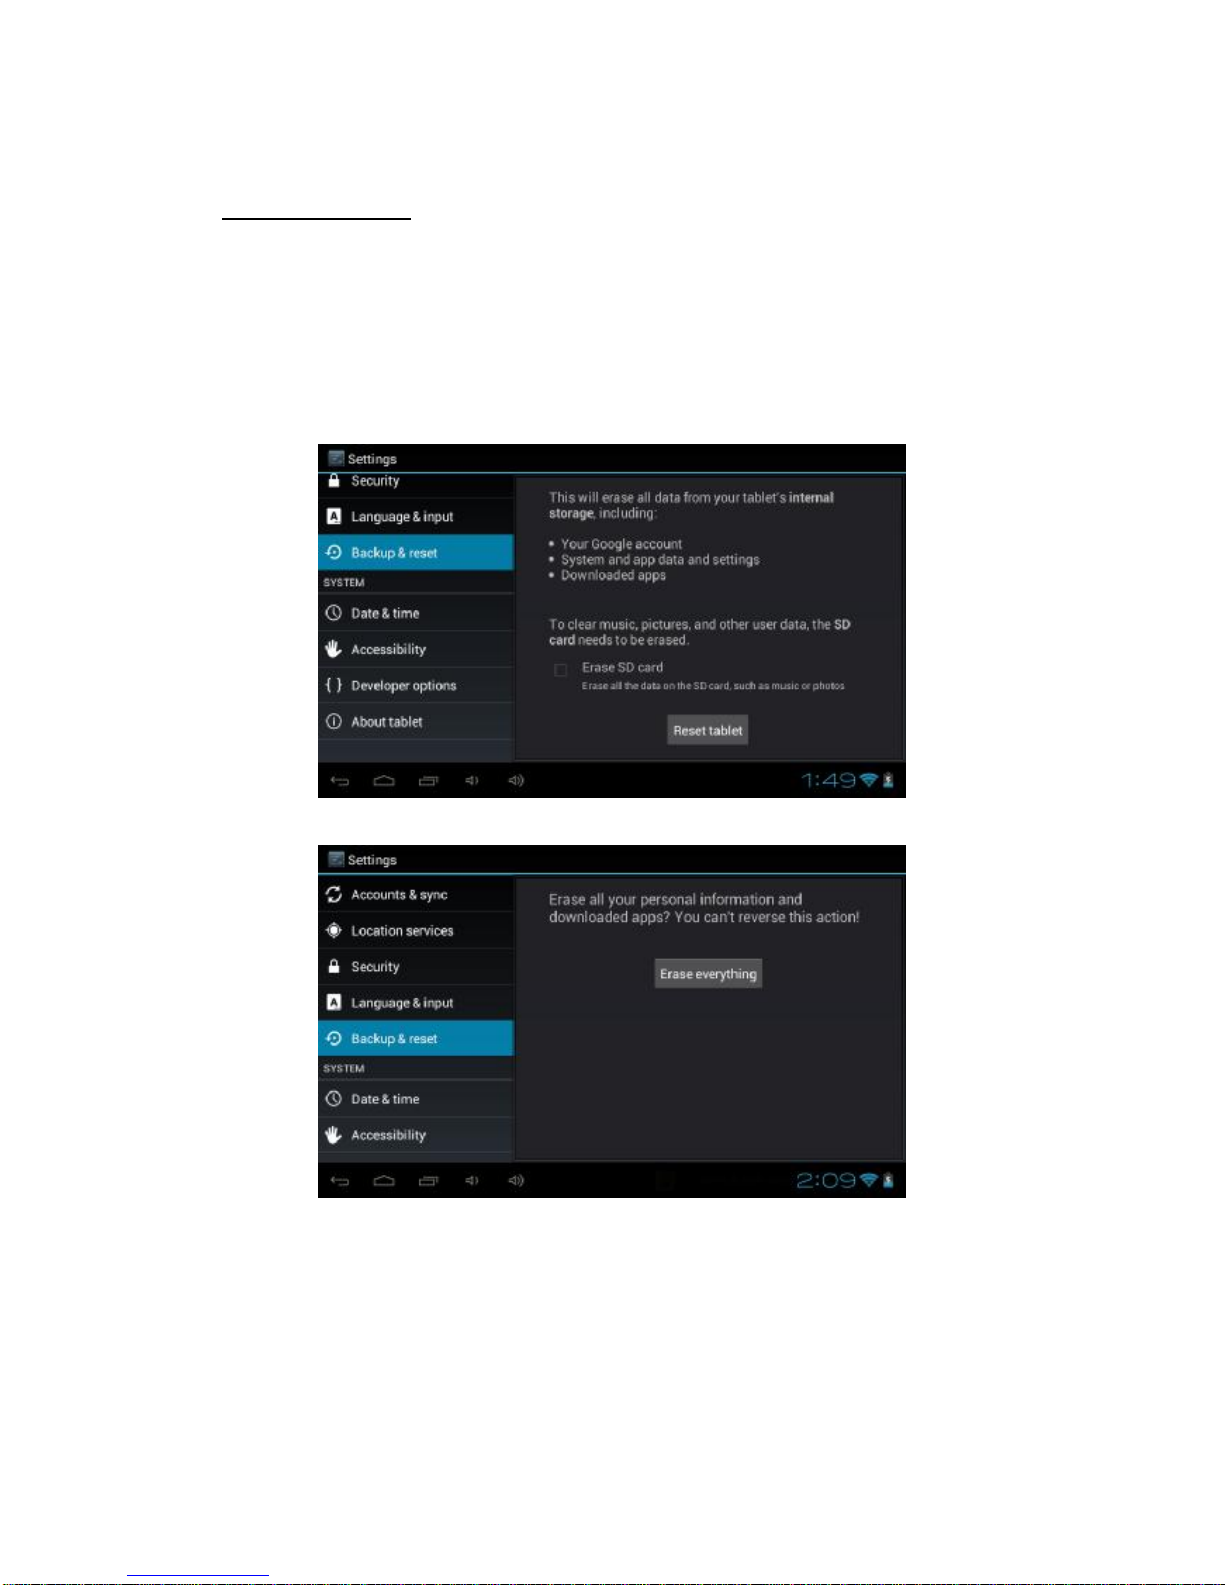
Factory data reset
Purpose:ifyourdevice has been contractedthevirus,orworkedunexpectedly by
installing third-partyapplications, then you can erase all data from yourdevice via
reset tablet.
Operation:click ‘Settings à‘Backup&reset à‘Factory data reset,thenclick the
‘Reset tablet and ‘Erase everything, as the following picture:

11
Product specification
Dominant frequency 1GHZ
CPU A13
RAM 512M DDRIII
Touch mode Multipoint capacitive touch
Button Power, Reset, Upgrade
LCD panel 7.0 inch, high definition
Internal memory 4GB
Wi-Fi 802.11 b/g/n
Battery capacity 2200mAH
External device 3G, Mouse, Keyboard, OTG
Operating system Google Android 4.0.4
Input method Android keyboard
Network application Browser, Online entertainment, Office
application, Game
Accessory
Power adapter 1 PCS
USB cable No
User manual 1 PCS
Notice:
1) This usermanual isforreferenceonly,product appearance and functionis
subject toreal device. Please forgivethatif there are some changes of
product specification and design without prior notice.
2) Please delete the third-party resource which related to the benefit and
copyrightwhen you scanor use it. The company has no legal liabilityfor it.
This manual suits for next models
1
Table of contents


