SHIVAUDYO Point Zero User manual
1
User Manual
Point Zero
S.C. Shivaudyo S.R.L.
Address: Calea Mosilor 199, Bucharest, Romania
e-mail:[email protected]
Internet: www.shivaudyo.com

2
Shivaudyo S.R.L. provides this document to its customers with a product purchase to
use in the product operation. Content of this document is copyright protected and any
reproduction of the whole or any part is strictly prohibited, except with the written
authorization from Shivaudyo.
All technical information in this document is for reference purposes only.
Please register your serial number on the webpage below in order to get full warranty
coverage and receive information by e-mail about upgrades and product news for your
Shivaudyo Point Zero.
Carefully following the instructions in this manual will ensure that your loudspeaker
system will give you many years of reliable and trouble-free operation.

3
Contents
Chapter
Page
Introduction
4
Safety information
5
WEEE Compliance
7
Intended use
7
Loudspeaker layout
8
Quick start
10
Installation
10
Software configuration
11
Operation
18
Measurements
21
Technical Data Sheet
23
Warranty
24
Troubleshooting
25

4
Introduction
Dear Valued Customer,
Congratulations, you have purchased high quality active monitor loudspeaker, which
can be used for mastering your songs, Atmos and home cinema implementation or
high-end home use.
Please read the safety instructions before installing or operating the loudspeaker.
Included in the box (for a pair of loudspeakers):
•Two active loudspeakers –each in one box;
•Power cord –two pieces;
•USB cable –one piece;
•USB stick with software (for Windows only) –one piece;
•Quick install guide;
•User Manual;
•Rubber feet –set of 4 pieces (one set for each loudspeaker).
Included in the box (for an Atmos Pack set –11 loudspeakers)
•Eleven active loudspeakers –each in one box;
•Power cord –11 pieces;
•USB cable –2 pieces;
•USB stick with software (for Windows only) –1 piece;
•Quick install guide;
•User Manual;
•Rubber feet –set of 4 pieces (one set for each loudspeaker);
•Mounting kit –2 pieces

5
Safety information
This product operates at mains voltage and carries hazardous voltages at accessible
parts. These parts may never be exposed to inadvertent touch.
Damage due to inappropriate handling is not covered by warranty. This product has no
user-serviceable parts.
Do not replace faulty components with commercial components. Although they may
look similar, the components used by Shivaudyo are custom made.
Warning: To reduce the risk of fire or electric shock, do not expose this device to rain or
moisture.
Attention: Observe precautions for handling electrostatic sensitive devices. This module
uses semiconductors that can be damaged by electrostatic discharge (ESD).
The lightning flash with arrowhead symbol within an equilateral triangle is intended to
alert the user to the presence of uninsulated “dangerous voltage” within the product’s
enclosure, that may be of significant magnitude to constitute a risk of electric shock to
persons.
The exclamation point within an equilateral triangle is intended to alert the user of the
presence of important operating and maintaining (servicing) instructions in the literature
accompanying the appliance.
This product must be earthed.
Apparatets stikprop skal tilsluttes en stikkontakt med jord, som giver forbindelse til
stikproppens jord.
Laite on liitettävä suojakoskettimilla varustettuun pistorasiaan.
Apparatet må tilkoples jordet stikkontakt.
Apparaten skall anslutas till jordat uttag.
Service or modifications by any person or persons other than by Shivaudyo authorized
personnel voids the warranty.
Read these instructions.
Keep these instructions.
Heed all warnings.
Follow all instructions.

6
Do not use this apparatus near water.
Clean only with a dry cloth.
Natural convection should not be impeded by covering the product (apart from the end
applications housing). Do not block any ventilation openings. Install in accordance with
the Shivaudyo instructions.
Do not install near any heat sources such as radiators, heat registers, stoves, or other
apparatus (including amplifiers) that produce heat.
Do not defeat the safety purpose of the protective earth/grounding mains inlet.
Protective earth is provided for your safety.
Protect the power cord from being walked on or pinched particularly at plugs,
convenience receptacles, and the point where they exit from the apparatus.
Only use attachments/accessories specified by the Shivaudyo.
Unplug this apparatus during lightning storms or when unused for long periods of time.
Refer all servicing to Shivaudyo support. Servicing is required when the apparatus has
been damaged in any way, such as power-supply cord or plug is damaged, liquid has
been spilled or objects have fallen into the apparatus, the apparatus has been exposed
to rain or moisture, does not operate normally, or has been dropped.
This apparatus shall not be exposed to dripping or splashing, and no object filled with
liquids, such as vases or beer glasses, shall be placed on the apparatus.
Do not overload wall outlets and extension cords as this can result in a risk of fire or
electric shock.
This apparatus must be connected to a mains socket outlet with a protective earthen
connection.
This apparatus has been equipped with a rocker-style AC mains power switch. This
switch is located on the rear panel and should remain readily accessible to the user.
The MAINS plug or an appliance coupler is used as the disconnect device, so the
disconnect device shall remain readily operable.
Do not run any cables across the top or the bottom of the product. Apply fixtures to
cables to ensure that this is not compromised.
Before using this product, ensure all cables are correctly connected and the power
cables are not damaged. If you detect any damage, do not use the product.
Changes or modifications not expressly approved by Shivaudyo will void compliance
and therefore the user's authority to operate the equipment.

7
WEEE Compliance
This product complies with Directive 2012/19/EU of the European Parliament and of the
Council of 4 July 2012 on waste electrical and electronic equipment (WEEE). It is
marked with the following symbol:
Intended use
The Point Zero active loudspeaker is used in professional audio, home cinema and hi-fi
applications. The amplifier within the loudspeaker enclosure is ideally matched to the
individual drivers, eliminating the need for each amplifier channel to operate in the entire
audio band pass.
It is used with an external computer software or external device.
Use for self-testing is excluded.
8
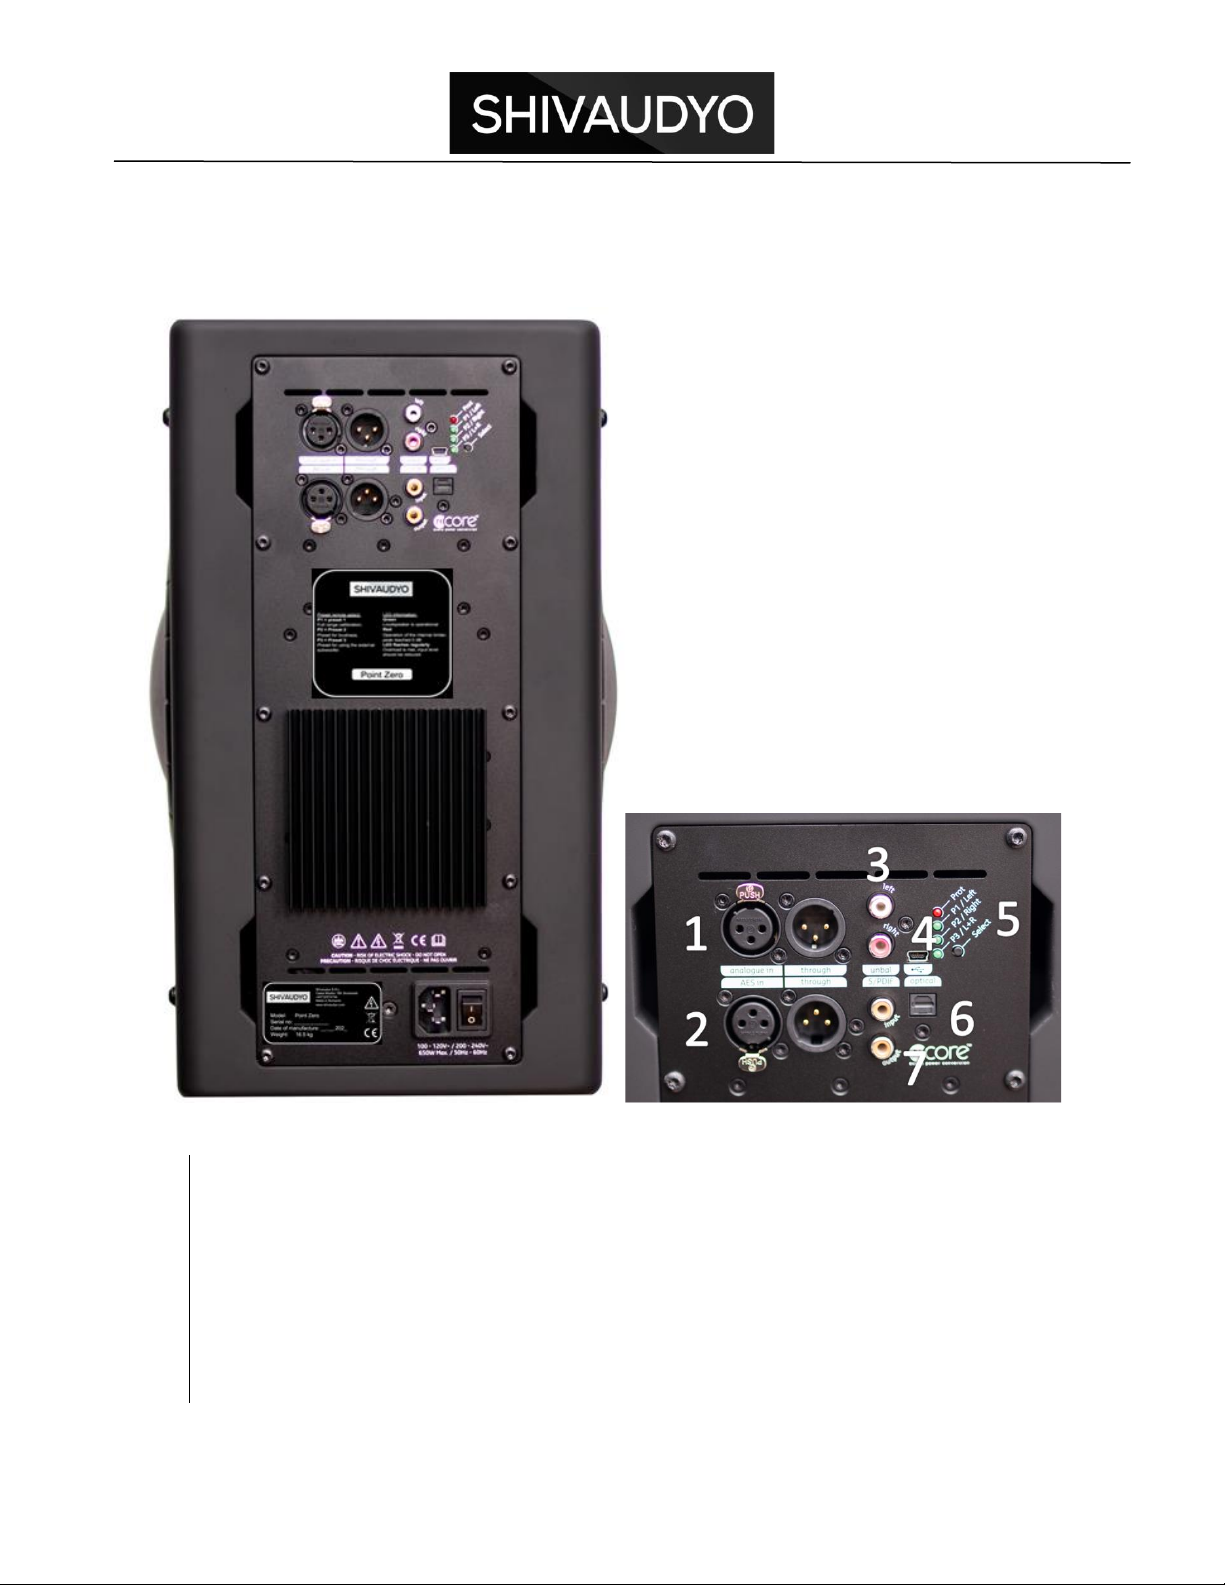
Loudspeaker Layout
Before you start
Special care has been taken in the packaging of your Shivaudyo Products.
Back plate layout
1
Balanced analogue input & output (XLR)
2
Balanced Digital input & output (AES/EBU)
3
Unbalanced analogue input & output (RCA)
4
Mini USB
5
LED indicators and preset button
6
Digital input (Optical Toslink)
7
Unbalanced digital input & output (S/PDIF)
8
IEC power socket
9
ON/OFF switch
8
9
9
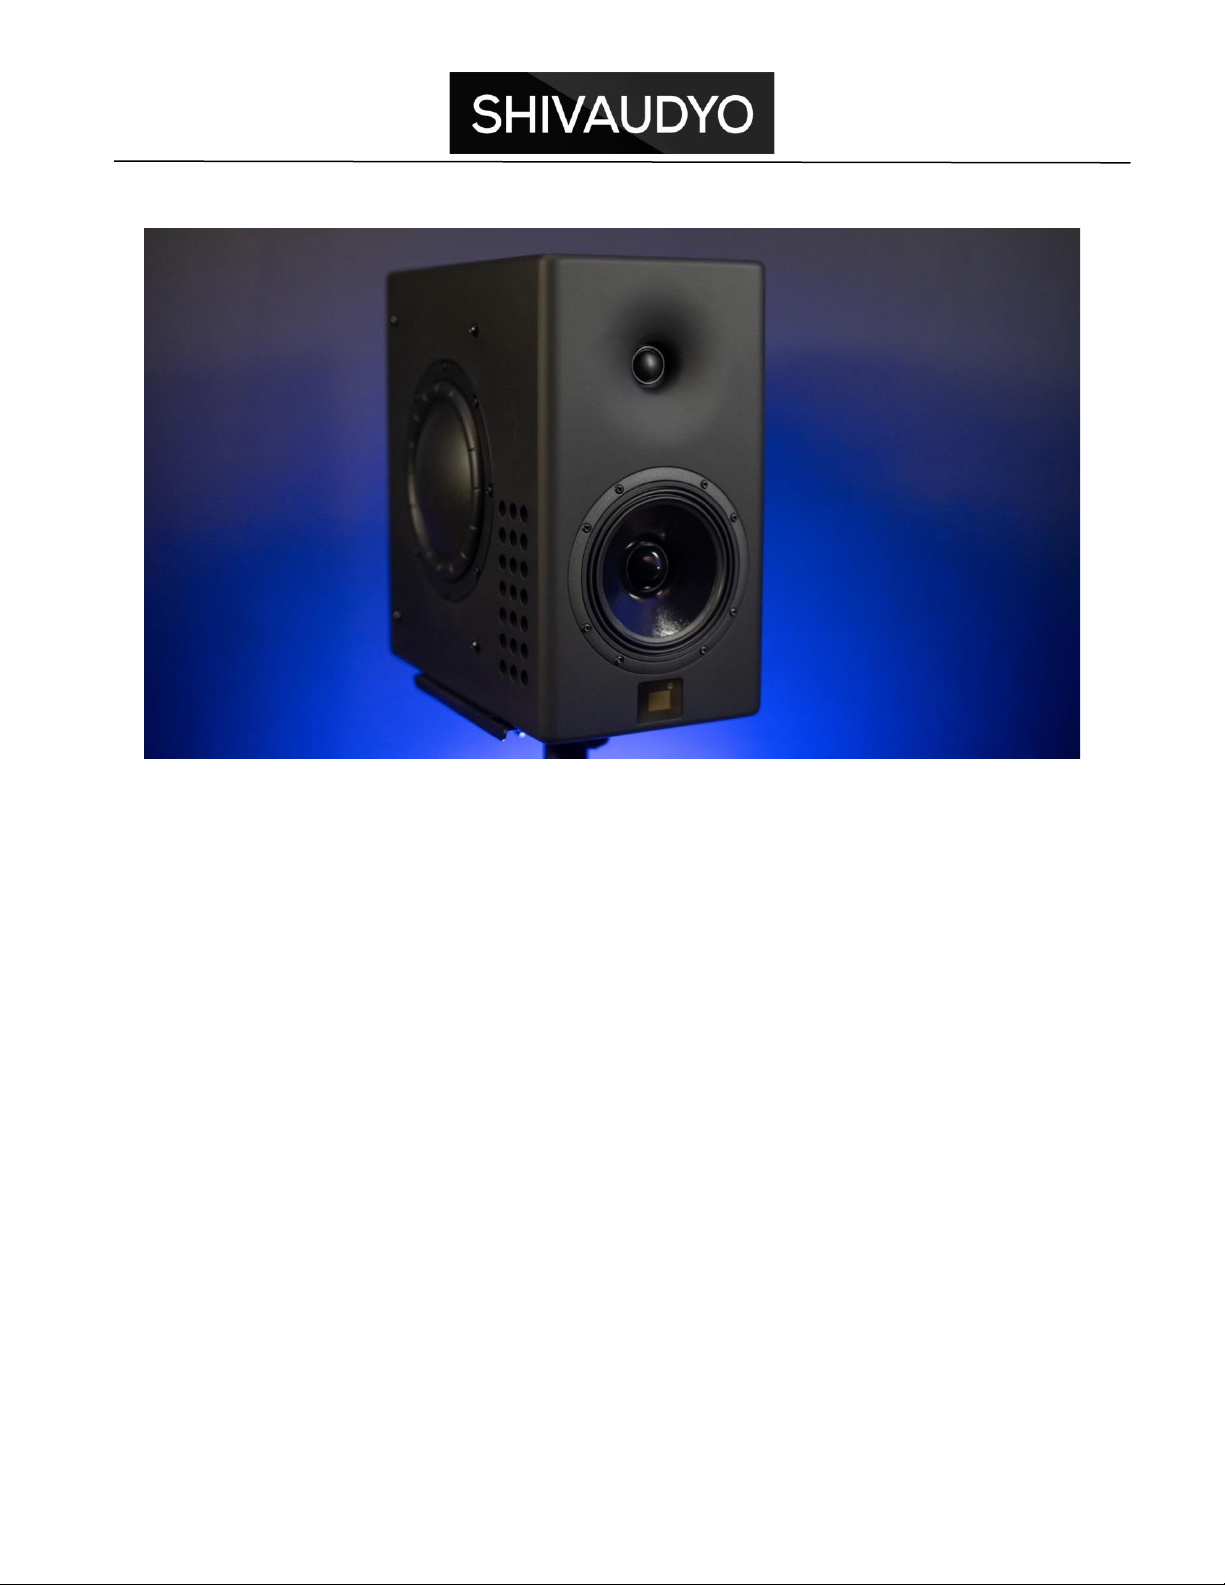
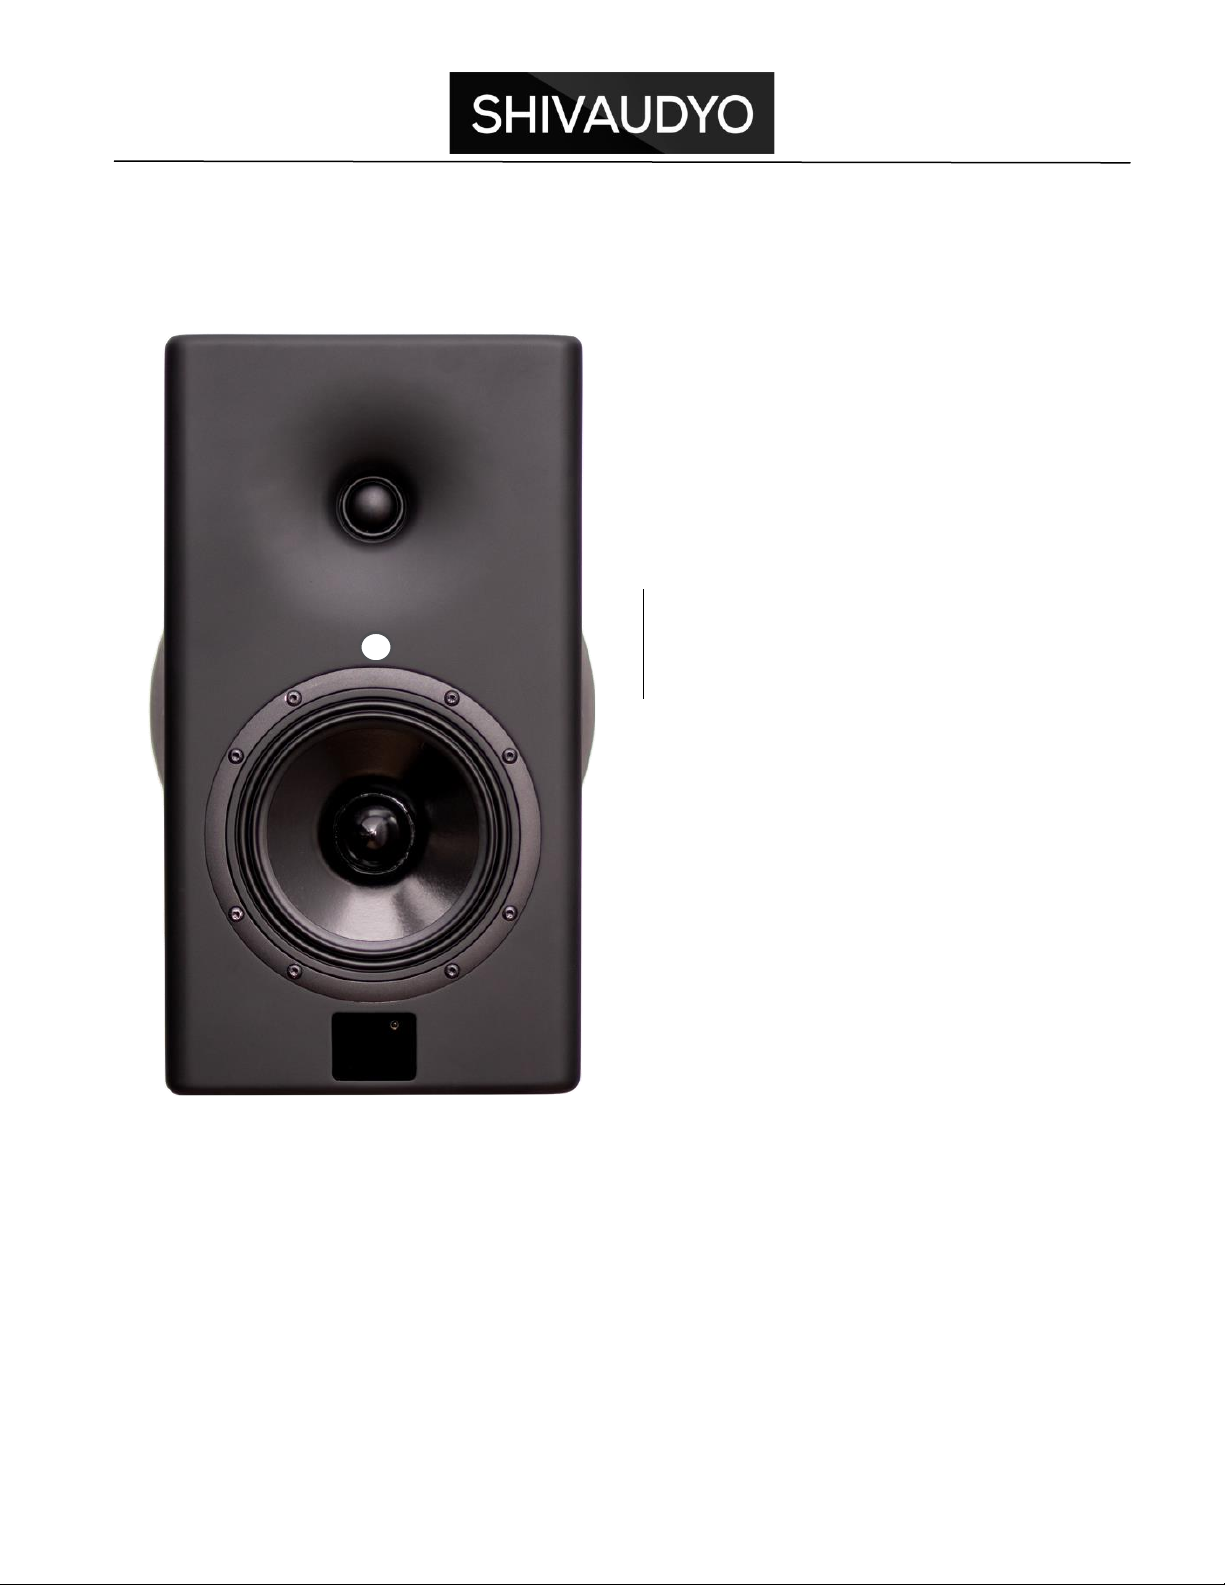
Front plate layout
1
Tweeter mounted in waveguide
2
Acoustic center of the speaker
3
Mid-woofer
4
Display + Remote sensor
1
2
3
4

10
Quick start
We recommend that you spend some time setting up your monitoring speaker system.
Setting up naturally takes a certain amount of time. However, in case you need to get
started quickly, please follow the quick set up guide. The rest of this manual will assist
you in setting up your loudspeaker system and calibrate it according to your listening
environment.
Connect the power cable into the IEC socket. Turn the power switch to ON. The Display
on the front panel will now illuminate. If no audio signal is present at the input for more
than 15 minutes the speaker will automatically go into standby mode.
Connect the audio source from your mixer, preamplifier or other equipment to the one
input connector at the rear.
Set the loudspeaker level at reasonable low level from Remote control or from software
with USB cable included.
Normal operating conditions will cause the red led to flash occasionally on peaks. We
draw your attention to the fact that this loudspeaker can produce pressure levels which
may be harmful. Shivaudyo declines all responsibility for eventual hearing loss caused
by the use of our loudspeakers.
Installation
Positioning
Shivaudyo loudspeakers are calibrated to give a flat response under anechoic room.
The acoustic environment will inevitably influence the overall performances of the
loudspeakers.
When using the loudspeaker in a typical room, the Roll-Off control allows the low
frequency response to be tailored according to the position of the loudspeaker. Placing
a speaker in a corner or near a wall will affect the bass response and this can be
compensated by the use of the calibration controller.

11
Next to the wall
Unlike conventional speakers, Point Zero are designed to be placed next to the wall.
The recommended distance from the wall is between 10cm. and 50cm.
Stereo Operation
Position the loudspeakers so that the position between the listener, the left and right
loudspeakers determine an equilateral triangle. The acoustic axis (see the Technical
datasheet of your Shivaudyo speakers) should be at ear height, or directed towards the
ear. This is valid for any music listening mode (stereo, multichannel, etc.).
Home Cinema Operation
Software Installation
To configure your Shivaudyo Point Zero, you need a PC with at least the following
requirements:
•Windows 7, 8, 9, or 10;
•A free USB 2.0 or higher port;
•USB drive with software (are included in the box).
Software configuration
Master / Slave configuration
The speakers can be used as two individual speakers, both set as Master channel or
they can be set as Master - Slave.
If you want to use the optional remote control, you need to use the Master - Slave
configuration.
The Point Zero can be used in a multi-device setting, for example a stereo setup. If you
connect the two devices (using SPDIF) and want to be able to adjust the master volume
on both devices, you must set one speaker as a master and the other as a slave.
The master speaker uses a remote sensor attached, adding the ability to control the
volume and choose a source or preset with a remote control. Under “Options” check
“Master unit” if the connected device is a master, uncheck it when this device is
connected to a master.
After selecting or deselecting the master function, check if the other functions have
remained unchanged.
Important: when mains are switched for both master and slave, be sure that they are
powered at the same time, or power up the slave first and then the master. If the master
is started before the slave unit is powered, the slave may not receive commands from
the master.
12
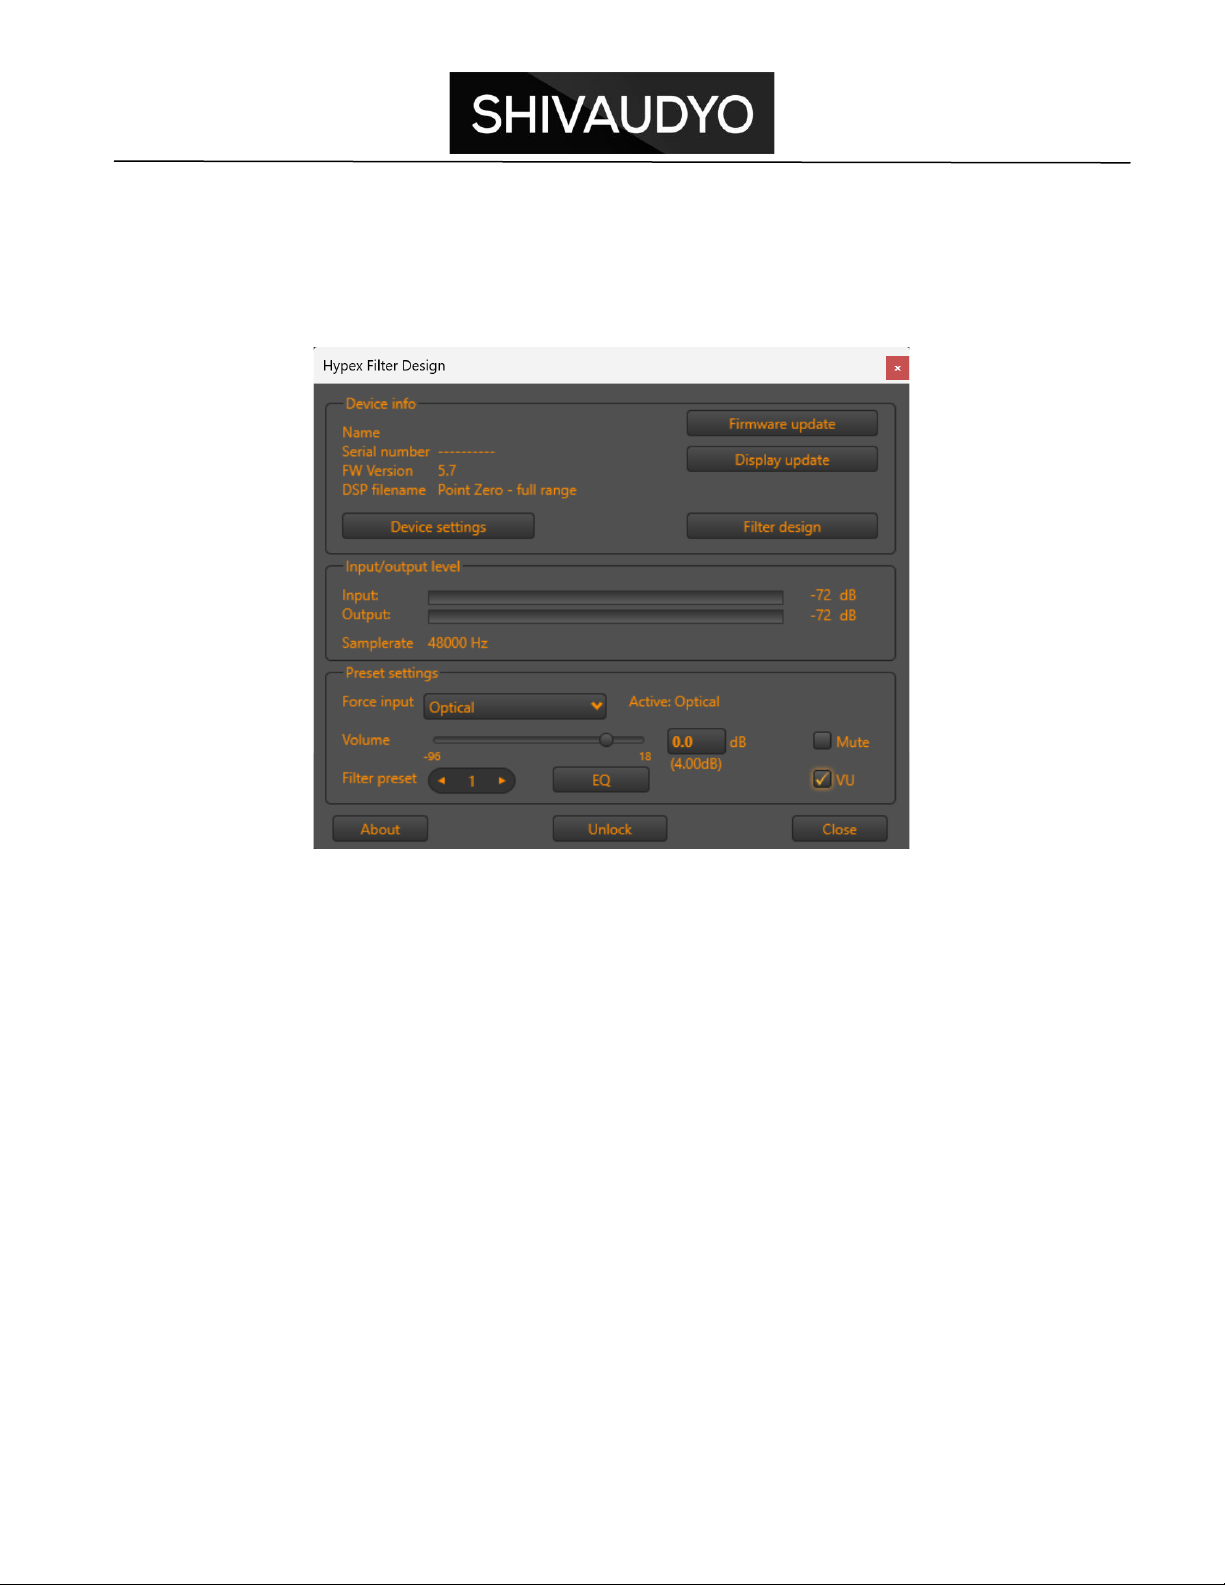
Main screen
When a speaker is connected to computer with software installed, the main screen
looks like in picture 1, will show the connected device information and the user can
change its volume, source and preset.
Device info
There are a few more parameters with which you can use to personalize your module.
To do so, click the “Device settings” button. A new window will pop up. More will be
explained in chapter 'Device settings'.
Preset settings
Force input
The sources you can select depend on the type of device that is connected to speaker.
“Autodetect” function needs a bit more explanation. See “Auto detect” for more
information.
Auto detect
When “Auto detect” is selected as a source, the speaker will not allow absence of audio
for more than 10 seconds. If no audio is present on the current source (you can see
what source is selected at the right of “Active:”), the speaker will scan all available
inputs for audio in the following priority:

13
•AES
•SPDIF
•Optical
•Analogue XLR
•Analogue RCA
On slave devices the input option “Auto detect” is removed. As slaves are set to follow
the same input as the controlling master device, “Auto detect” is not really needed.
Master devices still have the “Auto detect” input option available.
Volume
You can change the master volume in software in two ways: with the slider or by
entering a numeric value. The volume text beneath the numeric volume input indicates
the actual volume. ('Preset volume offset' is absolute') and added or subtracted to the
master volume.
Be careful when changing the volume up! it is very easy to set the volume level to a
high level, risking damaging your ears or your hardware. When you are using the slider,
it is also possible to change the volume up and down using the arrow keys of your
keyboard. This is the safest way to change the volume.
Mute
The mute option will mute all channels. The mute is cleared on any volume change or
when the mute-checkbox is unchecked.
VU Meter
When a speaker is connected to computer, it is possible to observe the input and output
level of the DSP. This will give you an indication whether you have the correct input

14
selected and audio is provided to the DSP. This will also indicate if you have set up the
DSP with the correct gain. If the DSP has input and no output, that the system has low
gain or even is muted. Use the ”VU” checkbox to toggle between level indication view
and no level indication. By default, this checkbox is unchecked.
Filter preset
Click on the arrows left or right Filter Preset section to select the desired preset. Each
preset can have his own forced input, EQ setting and volume setting. The volume offset
for each preset will be explained in chapter 'Preset volume offset'.
Equalizer
This Equalizer can be used for room compensation.
The equalizer is placed right after the input selection, before the signal is provided to the
three channels.
By default, all biquads are of type “BoostCut” with a gain of 0dB, making the equalizer to
pass audio without any alterations. Up to 9 biquads are available to prepare the signal,
before it is fed to the output router. Therefore, all three channels use the same
equalizer. The equalizer settings are stored in the preset settings, making that every
preset has its own equalizer.
After the equalizer is uploaded to the DSP, it is possible to make a copy of all three
equalizers (one per preset) of the connected speaker. Hit the “Copy” button to copy the
EQ parameters from the speaker. Software will remember them for you, even if the
speaker is disconnected. The parameters are NOT remembered after closing the
software.
When another speaker is connected and you have stored the EQ parameters, it is
possible to recall these parameters and writing them to the connected speaker. Hitting
“Write” will send the stored EQ parameters to the connected speaker. All three EQ
presets will be overwritten.
This feature comes in handy, when you want to copy the Equalizer settings from one
speaker to another (For example, master to slave).
After selecting the biquad of band 4, you may change its function. For example, we
want to make it a low shelf filter. Choose “ShelfLo” at the bottom-left.
15
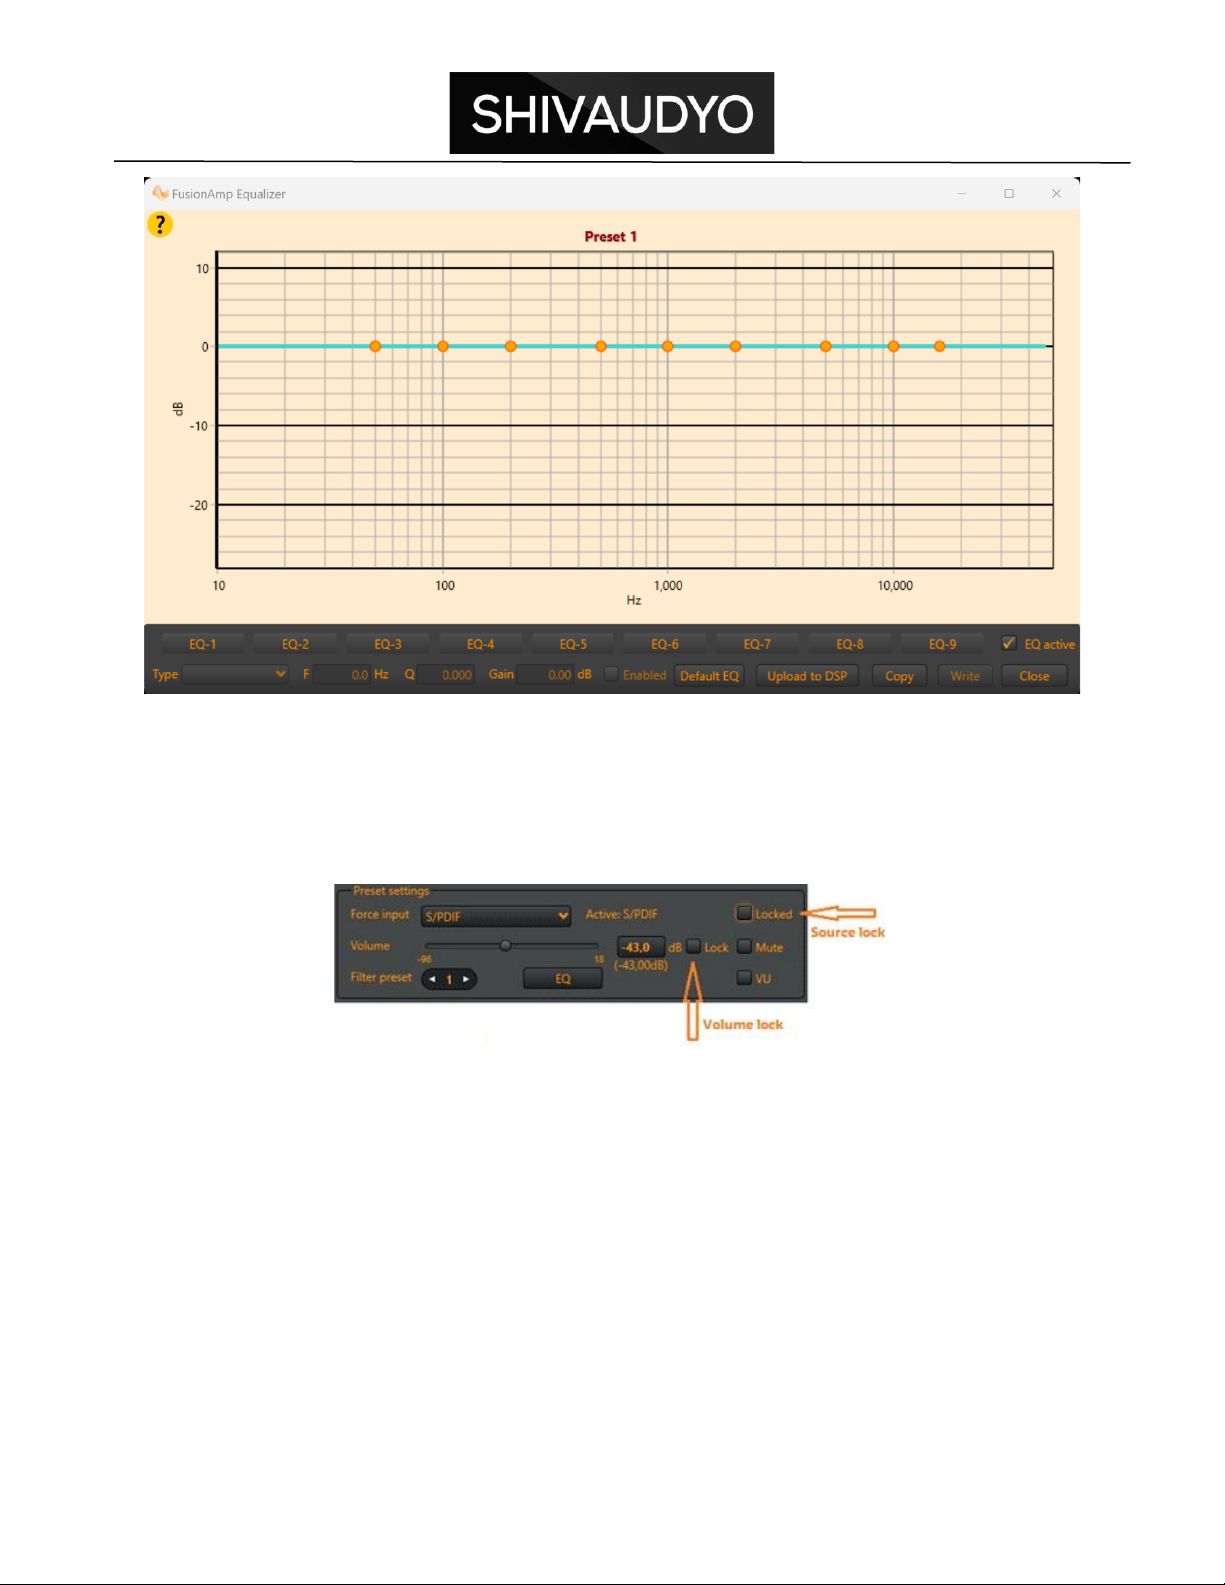
Extra slave options
When you have configured the speaker to act as a slave device (see 'Options' in 'Device
settings'), two extra settings become available on the main screen:
The lock functions are especially added for slaves that are connected to a master by
means of an S/PDIF cable. The slave receives audio from the master on its S/PDIF
source, but also control commands, like ON/OFF command, preset select, master-
volume setting or forced source select. Sometimes you want your slave to ignore the
source select command or the volume setting command. Both extra options are added
to the preset settings, so every preset can have its own source locked and volume
locked.
Volume lock
The first extra option of slave units is the volume lock. When checked, the master is not
able to change the volume of the slave.
16
This is useful when your slave's source is connected to an output which has its own
level control.
Source lock
A slave can lock its source, so it will not change when the master's source is changed.
For example, when the slave is connected to the master with an SPDIF cable, the
master source can be switched to Optical, SPDIF or AES, whereas the slave source
should always remain SPDIF. An exception is when SPDIF is locked and an analogue
source is selected on the master. In that case the slave will follow the master.
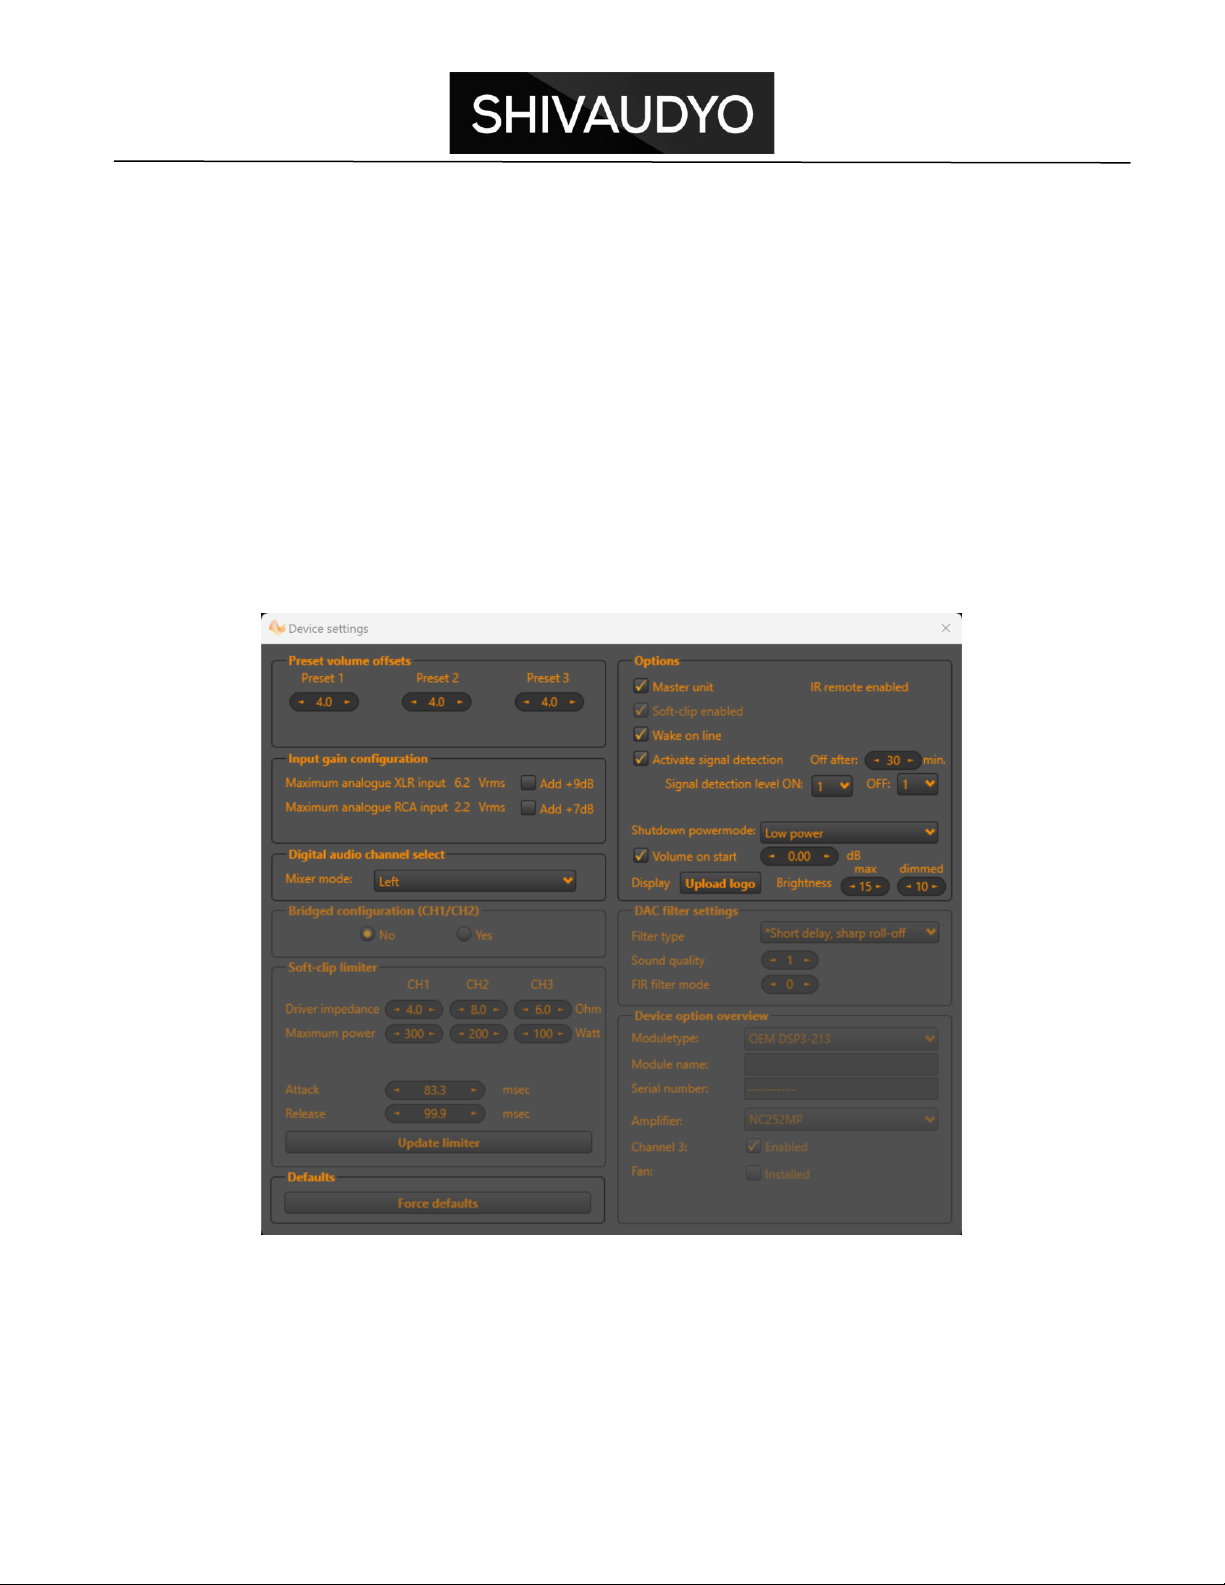
Device settings
Each module needs to be set up according to the application. On the main screen click
the “Device settings” button to open the screen shown below. In this chapter we will
explain the parameters, group by group.
Preset volume offsets
The preset volume is an offset relative to the master volume. This volume can be set for
each preset individually. This volume ranges from -24dB to +24dB.

17
Digital audio channel select
Select right or left depending on where the speaker is placed.
Wake on line
When checked, the Speaker will wake up immediately after mains power is applied.
When unchecked, the speaker will go into standby when it is connected to the mains
until it is triggered to wake up.
Activate signal detection
The Point Zero has two power-down modes: “Standby” and “Low power” (See 'Shut
down power-mode'). When the device is in any power-down mode, it can wake-up by an
analogue signal on the XLR or RCA input. If the device is in “Low-power” power-down
mode, it can also wake up by detecting audio on any digital input. If you want to enable
the signal detection, set it to “checked”.
When signal detection is enabled, it will also automatically enter the selected power-
down mode after a certain time of no audio, by default this is 15 minutes.
It is possible to set the level of sensitivity of the audio detection. Four levels are
available, range 1..4
Level 1 is the default value and the most sensitive one, it will trigger the speaker to
switch ON when the audio-level is about - 60dBand will trigger to switch off when the
audio level has dropped below -70dB.
If your Fusion speaker tends to switch on unexpectedly or will not turn off automatically
when you have signal detection enabled, you may try to change the sensitivity. Level 4
is the least sensitive one.
Each level is about 5dB different from the other. The sensitivity level is only available
for the analog inputs to trigger the speaker to switch ON. The digital inputs are fixed
at -60dB sensitivity.
It is possible to set a different level for switching ON and for switching OFF, but
do not select an OFF level that is less sensitive than the selected ON level, because in
that situation, your speaker will shut down at a certain point in time and could start a
gain immediately due to the fact that it's starting sensitivity is higher than its shutdown
sensitivity. Software will make sure that Level OFF is less or equal to Level ON.
The OFF-sensitivity level also applies to the “auto-source” detect. This implies that it is
possible to change the detection level for scanning for audio. When audio drops below
the selected level. For the detection of digital audio, a fixed level of -60dB is set.
Display brightness
The brightness of the display can be set between 0 and 15. 0 is very dimmed, 15 is
maximum brightness. The value under 'max' represents the brightness the display uses
when it is showing a new setting or alert (default 15). After a few seconds (if a new

18
setting was showed), the display will refresh and show Shivaudyo logo. At the same
time, the brightness will be the one which is selected under 'dimmed' (default value 10).
Some functions are locked by Shivaudyo to prevent the speaker from breaking if it is set
incorrectly by the user!
Operation
Power ON LED (Green)
The green LED on the back panel shows that the loudspeaker is operational. In the
event that this LED does not light up, verify that the loudspeaker is connected to the AC
power outlet and/or check the fuse.
Overload / Overheat LED (Red)
The red LED indicates the operation of the internal limiter and during normal operation,
the light flashes when the peak has reached 0dB. If the LED flashes regularly, this
means that overload conditions are met and you should reduce the input level.
Typical causes of overheat are lack of ventilation. Check that sufficient air flow is
available around your loudspeaker. Close proximity of overheated sources may also
cause overheating.
Do not leave any object less than 10 cm (3.9”) from the speaker to ensure good
ventilation.
Audio Signal Input Connectors
Balanced Analogue I/O on XLR connections
Unbalanced Analogue input on RCA connections
Balanced Digital I/O on XLR connections (AES-EBU format) (2-channel digital audio)
Unbalanced Digital I/O on RCA connector (S/PDIF format) (2-channel digital audio)
Digital Optic Input Toslink (2-channel digital audio)
Digital channel selection

19
Digital signal carries both left and right signal. Therefore, the desired channel can be
configured using Software.
When a digital source is selected, the current channel setting can be displayed by
holding the select button for 3 seconds until the selected channel mode starts blinking.
Left: Left digital channel selected
Right: Right digital channel selected
L/R: Both digital channels mixed into mono
To change the selected channel mode, hold the select button after the long press. Every
1.5 seconds, the channel mode is switched; (AES, S/PDIF, Optical)
Presets
P1: Preset 1 (Full-range calibration)
P2: Preset 2 (Loudness calibration)
P3: Preset 3 (Low cut @ 80Hz)
USB connection
USB connection can be used for speakers’ calibration. This connection does not
support USB audio.
Led indicators
Clip or Limit indication:
Random Blinking: Amplifier Limits
Steady ON: Fatal / DC Error
Blink once per second: High Temperature
Blink twice per second: Over-temperature
Remote control settings

20
Display notifications
Table of contents


