Shoe Systems Plus SUPREME MGP34 User manual

SUPREME MGP34
BENCH SANDER
Operator Manual
Shoe Systems Plus, Inc.
249 W Main St.
Goshen, NY 10924
www.shoesystemsplus.com
800-354-6278

MGP34 Operator Manual
Supreme Bench Sander
1
SUPREME MGP34 BENCH SANDER
INTRODUCTION
The Supreme Bench Sander is a compact, durable machine designed for fast,
complete finishing work. It will deliver efficient, dependable service when used
correctly and with care. As with any piece of specialized equipment, for best
performance the manufacturer’s instructions must be followed.
BEFORE USING THE SUPREME BENCH SANDER, BE AWARE OF THE
FOLLOWING SAFETY RULES:
WARNING: For your own safety, read operating instructions manual
before operating tool.
BE PREPARED FOR JOB
•Wear proper apparel. Do not wear loose clothing, gloves,
neckties, rings, bracelets or other jewelry which may get caught in
moving parts of machine.
•Wear protective hair covering to contain long hair.
•Wear safety shoes with non-slip soles.
•Wear safety glasses. Everyday glasses have only impact
resistant lenses. They are NOT safety glasses.
•Wear face mask or dust mask if operation is dusty.
•Be alert and think clearly. Never operate power tools when tired,
intoxicated or when taking medications that cause drowsiness.
PREPARE WORK AREA FOR JOB
•Keep work area clean. Cluttered work areas and work benches
invite accidents.
•Do not use power tools in dangerous environments. Do not use
power tools in damp or wet locations. Do not expose power tools
to rain.
•Work area should be properly lighted.
•Proper electrical plug should be plugged directly into properly
grounded, three-prong receptacle.
•Extension cords should have a grounding prong and the three
wires of the extension cord should be of the correct gauge.
•Keep visitors at a safe distance from work area.
•Keep children out of the workplace. Make workshop childproof.

MGP34 Operator Manual
Supreme Bench Sander
2
TOOL SHOULD BE MAINTAINED
•Always unplug tool prior to inspection.
•Consult manual for specific maintaining and adjusting
procedures.
•Keep tool clean for safest operation.
•Remove adjusting tools. Form habit of checking to see that
adjusting tools are removed before turning machine on.
•Keep all parts in working order. Check to determine that the
guard or other parts will operate properly and perform their
intended function.
•Check for damaged parts. Check for alignment of moving parts,
binding of moving parts, breakage of parts, mounting and any
other condition that may affect a tool’s operation.
•A guard or other part that is damaged should be properly repaired
or replaced. Do not perform makeshift repairs. (Use the parts list
to order replacement parts.)
KNOW HOW TO USE TOOL
•Use right tool for job. Do not force tool or attachment to do a job
for which it was not designed.
•Disconnect tool from power when changing accessories such as
grinding wheels, buffing wheels and the like.
•Avoid accidental start-up. Make sure that the switch is in the off
position before plugging in.
•Do not force tool. It will work most efficiently at the rate for which
it was designed.
•Keep hands away from moving parts and grinding surfaces.
•Never leave a tool running unattended. Turn the power off and
do not leave tool until it comes to a complete stop.
•Do not overreach. Keep proper footing and balance.
•Never stand on tool. Serious injury could occur if tool is tipped
over.
•Know your tool. Learn the tool’s operation, application and
specific limitations.
•Use recommended accessories. Understand and obey all safety
instructions supplied with accessories. The use of improper
accessories may cause risk of injury to persons.
•Always use guard.
Dust generated is FLAMMABLE – DO NOT SMOKE when using
Sander.

MGP34 Operator Manual
Supreme Bench Sander
3
DESCRIPTION
Supreme Bench Grinders are equipped with a totally enclosed ball bearing
motor. Armature assembly is dynamically balanced for smooth operation. Motor
housing is compact so long pieces of work can press against wheels without
touching the motor frame. Removable wheel guards allow for easy changing of
wheels.
UNPACKING
Check for shipping damage. If damage has occurred, a claim must be filed with
the carrier immediately. Check for completeness. Immediately report missing
parts to dealer.
SPECIFICATIONS
Horsepower.......................................................................0.75
Voltage...............................................................................120
Amperes..............................................................................7.0
Hertz ....................................................................................60
Phase............................................................................. Single
RPM.................................................................................3450
Rotation (viewed from left side)................................Clockwise
OPERATING THE SUPREME BENCH SANDER
WARNING: Eye protection should always be worn by the operator
and others in the work area when the Sander is in use.
Eye protection is required for protection from flying
debris and dust, which could cause eye injury.

MGP34 Operator Manual
Supreme Bench Sander
4
INSTALLATION
The Supreme Bench Sander should be located on a flat, firm surface, in an area
free of obstructions that could interfere with the safe operation of the equipment.
The Bench Sander should be positioned and leveled on a solid bench or stand to
obtain quiet operation with a minimum of vibration.
DUST COLLECTOR HOSE (on model with dust collecting system):
A dust collector hose has been provided with grinder. Mount the hose by sliding
both ends over the exhaust port and the exhaust on the side of the blower
housing. Tighten the hose collars.
DANGER: Be sure to empty dust bag frequently.
SANDING WHEEL ON BAYONET:
Install the sanding wheel on the motor shaft. Slide the narrow side of the
bayonet into the hole at the end of the motor shaft. The bayonet will lock in place
just by turning it in the motor shaft.
WARNING: All electrical work must be performed by a qualified
electrician and must conform to all state and local
ordinances.
Do not, under any circumstances, tamper with, modify,
or adapt the electrical plug and cord provided with this
machine.
GROUNDING INSTRUCTIONS
WARNING: Improper connection of equipment grounding conductor
can result in the risk of electrical shock. Equipment
should be grounded while in use to protect operator
from electrical shock.
•Check with a qualified electrician if grounding instructions are not
understood or if in doubt as to whether the tool is properly grounded.
MGP34 Operator Manual
Supreme Bench Sander
5
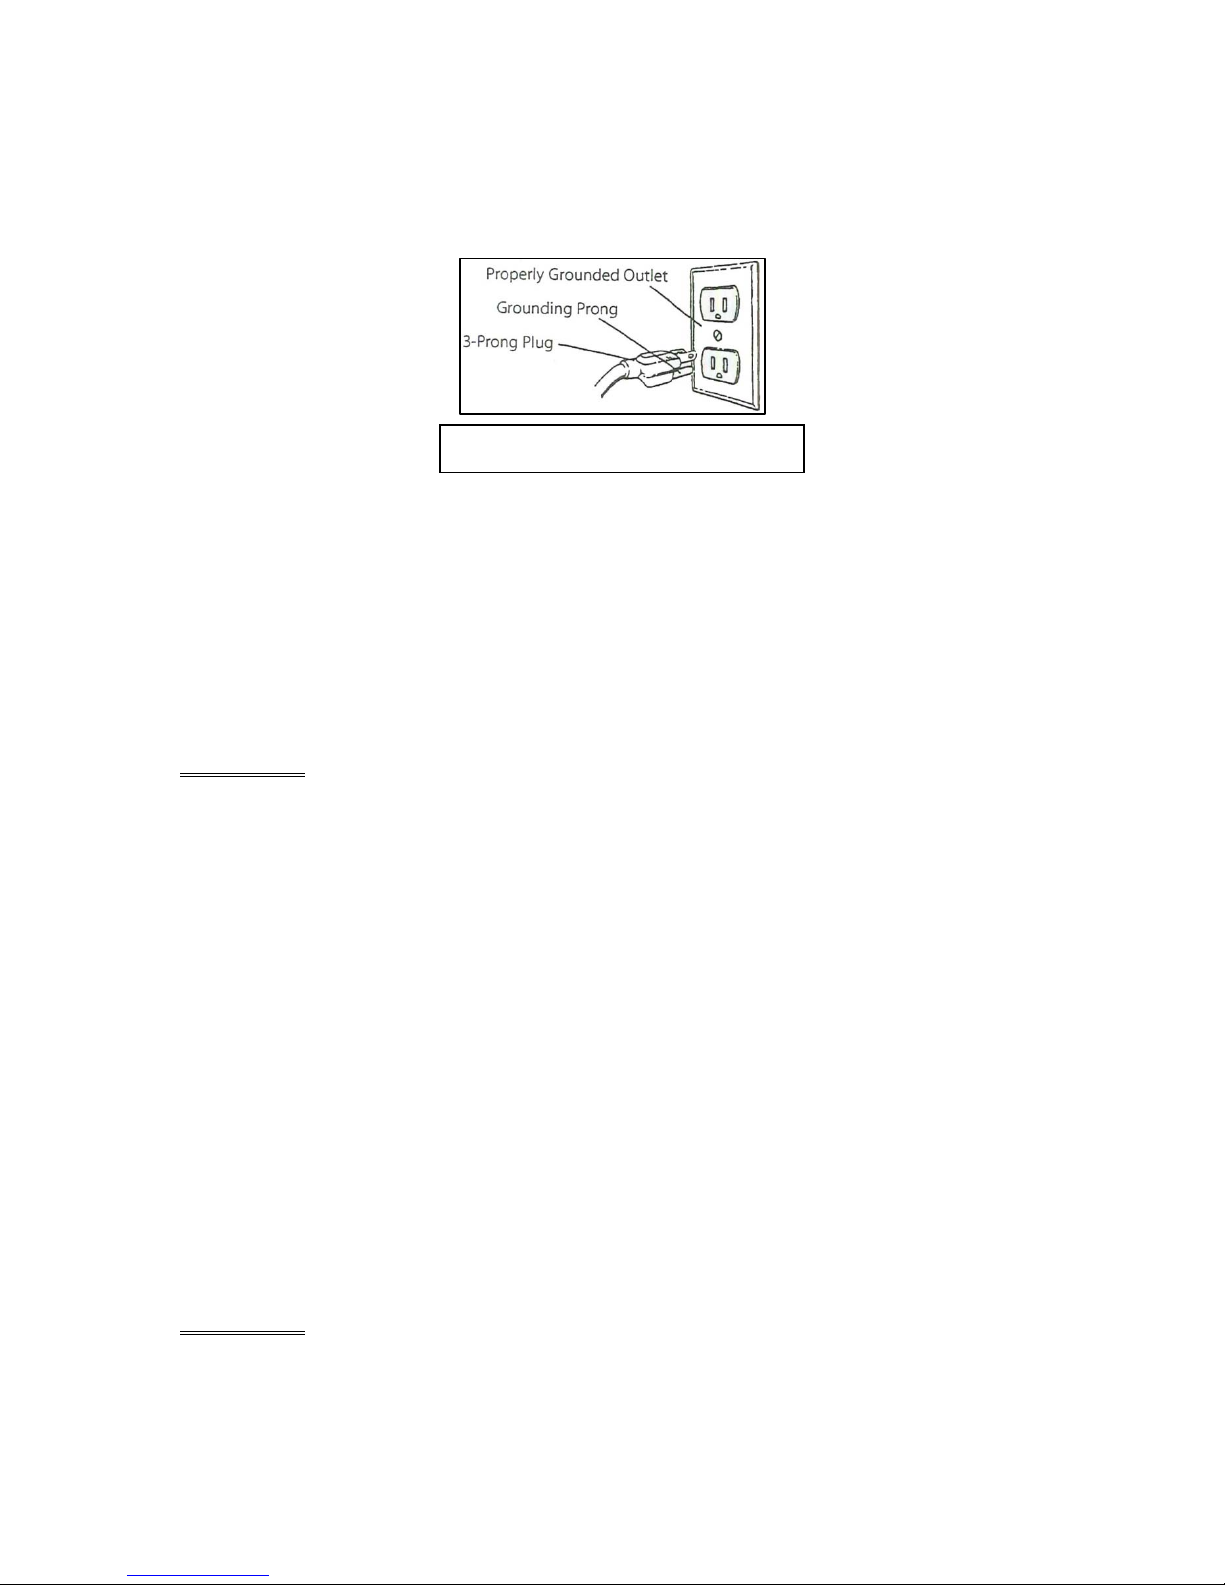
•This grinder is equipped with an approved 3-conductor cord rated at 300V
and a 3-prong, grounding type plug (See Figure 1) for your protection
against shock hazards.
•Grounding plug should be plugged directly into a properly installed and
grounded 3-prong grounding-type receptacle (See Figure 1).
•Do not remove or alter grounding prong in any manner. In the event of a
malfunction or breakdown, grounding provides a path of least resistance
for electrical shock.
WARNING: Do not permit fingers to touch the terminals of plug
when installing or removing from outlet.
•Plug must be plugged into matching outlet that is properly installed and
grounded in accordance with all local codes and ordinances. Do not
modify plug provided. If it will not fit in outlet, have proper outlet installed
by a qualified electrician.
•Inspect tool cords periodically, and, if damaged, have repaired by an
authorized service facility.
•Green (or green and yellow) conductor in cord is the grounding wire. If
repair or replacement of the electric cord or plug is necessary, do not
connect the green (or green and yellow) wire to a live terminal.
•Where a 2-prong wall receptacle is encountered, it must be replaced with
a properly grounded 3-prong receptacle installed in accordance with
National Electric Code and local codes and ordinances.
WARNING: This work should be performed by a qualified electrician.
Figure 1. 3-Prong Receptacle
MGP34 Operator Manual
Supreme Bench Sander
6
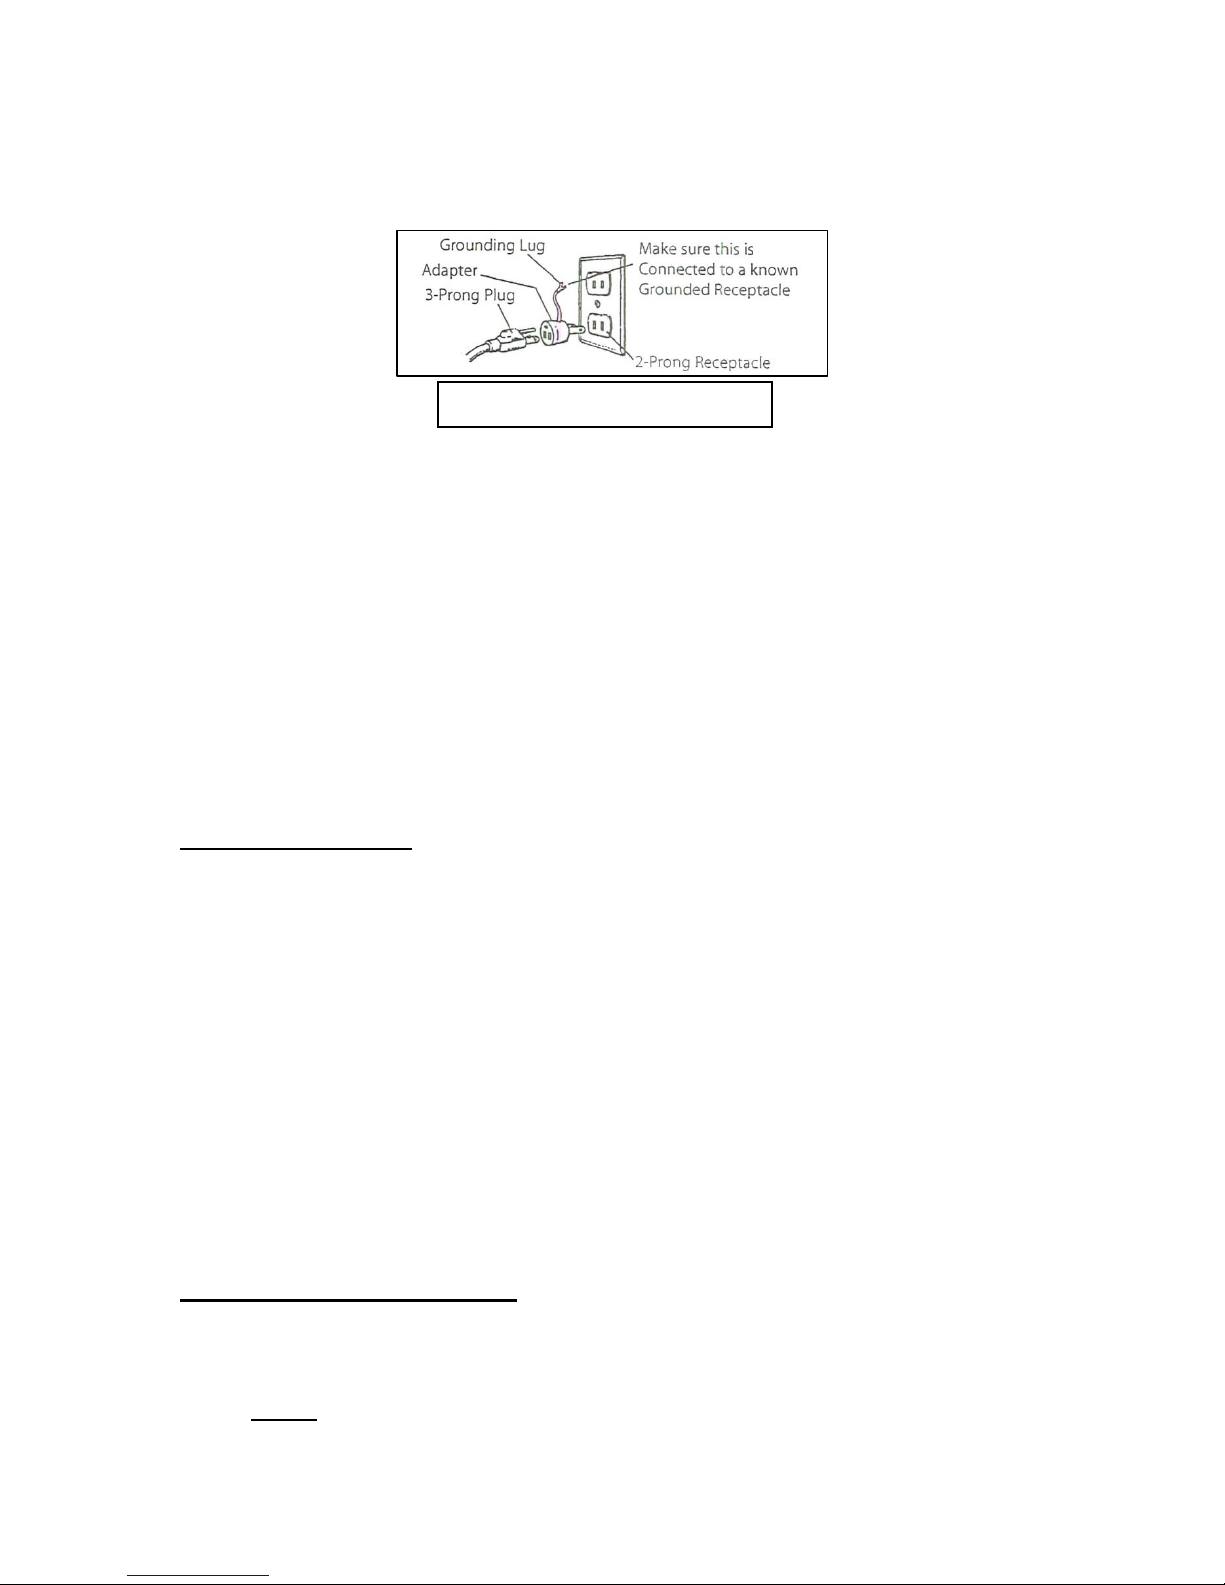
•A temporary 3-prong to 2-prong grounding adapter (See Figure 2) is
available for connecting plugs to a two pole outlet if it is properly
grounded.
•Do not use a 3-prong to 2-prong grounding adapter unless permitted by
local and national codes and ordinances.
(A 3-prong to 2-prong grounding adapter is not permitted in Canada.)
Where permitted, the rigid green tab or terminal on the side of the adapter
must be securely connected to a permanent electrical ground such as a
properly grounded water pipe, a properly grounded outlet box or a properly
grounded wire system.
•Many cover plate screws, water pipes and outlet boxes are not properly
grounded. To ensure proper ground, grounding means must be tested by
a qualified electrician.
EXTENSION CORDS
•The use of any extension cord will cause some drop in voltage and loss of
power.
•Wires of the extension cord must be of sufficient size to carry the current
and maintain adequate voltage.
•Running the unit on voltages which are not within ±10% of the specified
voltage may cause overheating and motor burn-out.
•Use the table to determine the minimum wire size (A.W.G.) extension
cord.
•Use only 3-wire extension cords having 3-prong grounding type plugs and
3-pole receptacles which accept the tool plug.
•If the extension cord is worn, cut or damaged in any way, replace it
immediately.
EXTENSION CORDS LENGTH
Wire Size.......................................................................A.W.G.
Up to 25 ft. (8 m) ..................................................................16
NOTE: Using extension cords over 25 ft. (8 m) long is not recommended.
Figure 2. 2-Prong Receptacle

MGP34 Operator Manual
Supreme Bench Sander
7
ELECTRICAL CONNECTIONS
WARNING: All electrical connections must be performed by a
qualified electrician. Make sure tool is off and
disconnected from power source while motor is
mounted, connected, reconnected or anytime wiring is
inspected.
WARNING: If the electrical cord, plug or wiring should become
frayed or damaged, replace it at once. Do not attempt to
operate the machine with faulty wiring as it could result
in severe injury or death.
WARNING: Do not start Sander before checking for proper
installation of the bayonet on the machine.

MGP34 Operator Manual
Supreme Bench Sander
8
START-UP
WARNING: Eye protection should always be worn by the operator
and others in the work area when setting up the
machine. Eye protection is required for protection from
flying debris and dust, which could cause eye injury.
Before shipment, your Supreme Sander was checked at the factory for proper
adjustment and operation. However, due to the possibility of jarring or damage
during handling and shipping, it is necessary to check that the machine is in
proper working order before use.
WARNING: Before initial start up, turn the motor shaft by hand to
ensure that all parts are free.
BEFORE CONNECTION TO AN ELECTRICAL POWER SUPPLY:
1. Check that the switch is off.
2. Check that the bayonet with the sanding wheel is locked in place on the
motor shaft.
WARNING: As with any piece of electrical equipment, there is an
ever present hazard of electrical shock when operating
or touching the Sander. Ensure the machine is properly
grounded at all times.
Do not force the equipment. It will do the job better and
safer at the rate for which it was designed.
SANDING BELT REPLACEMENT
WARNING: Eye protection should always be worn by the operator
and others in the work area when changing sanding belt.
Eye protection is required for protection from flying
debris and dust, which could cause eye injury.
(Sanding belts can be obtained in various grit to suit your needs and are easily
changed.)
WARNING: Some sanding belts are constructed to rotate in one
direction only. Check arrow inside sanding belt for
rotation. Incorrect installation can cause sudden belt
failure resulting in serious injury to operator and others
in the work area.

MGP34 Operator Manual
Supreme Bench Sander
9
To replace the belt:
1. Take off the bayoneted sanding wheel from the motor shaft.
2. Unscrew the nut at the end of the rubber wheel to release
pressure. You do not need to take it off. Only unscrew the nut.
3. Slide the sanding belt out of the rubber wheel.
4. Remove the sanding belt and replace with the new one.
5. Tighten the nut with enough pressure to avoid the sliding of the
sanding belt.
6. Install the bayonet on the motor shaft.
WARNING: Do not start Sander before checking for proper
installation of the bayonet on the motor shaft.
Never leave machine running while unattended. Turn it
off.

MGP34 Operator Manual
Supreme Bench Sander
10
ACCESSORIES
WARNING: Eye protection should always be worn by the operator
and others in the work area when using the accessories
supplied with the Supreme Sander. Eye protection is
required for protection from flying debris and dust,
which could cause eye injury.

MGP34 Operator Manual
Supreme Bench Sander
11

MGP34 Operator Manual
Supreme Bench Sander
12
MAINTENANCE
A properly maintained machine will give you years of satisfactory service,
whereas an abused machine will not. We strongly recommend that you observe
the following procedures for your own benefit and safety.
WARNING: Eye protection should always be worn by the operator
and others in the work area when servicing the machine.
Eye protection is required for protection from flying
debris and dust, which could cause eye injury.
DAILY AND WEEKLY MAINTENANCE
1. Clean your Supreme Bench Sander daily.
2. Shake dust bag and empty it daily.
The cleaner you keep the dust bag, the less likely you are to burn a hole in
them. Failure to shake the dust bag and empty it daily will only increase
this likelihood, but also cause a significant loss of dust extraction.
WARNING: Dust from Sander is combustible. Do not smoke while
cleaning the machine and dust collector.
Damaged dust bag will allow the escape of combustible
materials causing a fire hazard around the machine.
Check damaged parts. Before further use of a tool,
guard or other part that is damaged, check carefully to
determine that it will operate properly and perform its
intended function. Check for mounting or any other
condition that may affect its operation. A tool, guard or
other part that is harmfully damaged should be properly
repaired or replaced.
If the electrical cord, plug or wiring should become
frayed or damaged, replace it at once.
After making adjustments, remove all wrenches and
other tools before operating the Sander.
Use extra caution when starting the Sander for the first
time after installing a new tool or part.

MGP34 Operator Manual
Supreme Bench Sander
13
MONTHLY MAINTENANCE
1. Take off the hose from the blower housing and look at the fan to see if
there are small particles stuck to the fan.
N.B. Those small particles can create vibrations of the bench sander.
2. Clean your dust bag with a shop vac or a vacuum cleaner.
N.B. You should change your dust bag at least every 2 years to increase the
efficiency of the dust collector.
LUBRICATION
Your Supreme Sander is equipped with sealed bearings throughout, which
should be replaced if they ever wear out.
Other parts should not require any lubrication, only cleaning the parts is required.
Lubrication will only attract dust and would be more harmful than helpful.
MOTOR REPLACEMENT
WARNING: Motor replacement requires working with electrical
wiring and can be hazardous. If you are not familiar with
electrical procedures, please call a qualified electrician.
To remove the motor, these procedures should be followed:
1. Disconnect the electrical power supply.
2. Take off the back panel to have access to the motor.
3. From the bottom of the machine, remove the four (4) bolts holding the
motor.
4. Disconnect the wiring from the switch and from the electric cord.
5. Mark the electrical wires to the motor such that you will be ABSOLUTELY
CERTAIN where to reconnect them on the new motor.
6. Reassemble with new motor in reverse order to the above procedures.

MGP34 Operator Manual
Supreme Bench Sander
14
TROUBLESHOOTING
SYMPTOM POSSIBLE CAUSE(S) CORRECTIVE ACTION
Grinder won’t start
1. Blown line fuse or
tripped circuit
breaker
2. Low line voltage
3.
Material wedged between wheel
and guard
4. Defective switch
5. Defective, blown capacitor
1. If fuse is blown, replace with fuse
of proper size. If breaker tripped,
reset it.
2.
Check power supply for voltage
and correct as needed
3.
Turn grinder off and remove
material
4. Replace switch
5. Replace capacitor
Excessive vibration
1.
Improper mounting of grinder or
accessories
2. Grinding wheel out of balance
3.
Dust or particles clogged on the
fan
1. Remount
2. Replace wheels
3. Clean the fan
Motor overheating
1.
Excess pressure required to
grind material
2.
Motor not turning freely (without
power)
1.
Replace sandpaper with one of
proper grit.
2.
Clean around wheels and shaft
and/or replace bearings
Fuses are being blown
or circuit breakers are
being tripped
1. Overloading due to binding
2. Defective plug
3. Defective cord
4. Defective switch
5.
Motor wired for different line
voltage
1.
Clean around wheels and shaft
and/or replace bearings
2. Replace plug
3. Replace cord
4. Replace switch
5.
Rewire motor as per wiring
diagram
Motor does not develop
proper torque
1.
Motor wired for different line
voltage
1.
Rewire motor as per wiring
diagram
Lost of suction
1. Dust bag maybe full
2. Blower fan may be clogged
3. Suction hose jammed
1. Empty it
2. Clean it
3. Clean it

MGP34 Operator Manual
Supreme Bench Sander
15
LOST OF SUCTION IN DUST COLLECTION
1. Dust bag may be full. Empty it.
2. Blower fan may be clogged. Clean it. Take apart the side cover of the
blower housing to have access to the fan.
MOTOR STOPS WITH SWITCH ON
CAUTION: Turn switch off immediately.
1. Too many equipment operated on same electrical circuit where the bench
sander is connected. Check circuit breaker or fuse box
2. Electric switch is broken. Change the switch.

MGP34 Operator Manual
Supreme Bench Sander
16
ACCESSORIES FOR BENCH SANDER
PARTS # DESCRIPTION
SMAK060 BLACK HANDLE TO ADJUST DUST PORT SUPPORT
ASB
S
HAFT BUSHING WITH SLOT
(
INCLUDED STEEL BALL SPRING
AND SCREWS
31786BAYONET MALE BAYONET FOR RUBBER WHEEL FOR RIGHT SIDE
09130019 FAN FOR DUST COLLECTING SYSTEM
31786 RUBBER WHEEL 4’’ X 3’’ (100 X 75 MM)
WAMGT34 SILVER WASHER FOR RUBBER WHEEL
WNMGT34 BUSHING FOR WASHER WAMGT34
HS64 COLLAR FOR GREY HOSE
TB4
G
REY HOSE
4’,
(100
MM
)
DIAMETER FOR DUST COLLECTING
SYSTEM
CMGP346124 KEY TO CHANGE SANDPAPER ON 4’’ X 3’’ SANDING WHEEL
CCL SPANNER WRENCH FOR BAYONET
888443 VELCRO STRAP FOR DUST BAG
SPBGNS DUST BAG
493824 REPLACEMENT SANDING SLEEVE 34 GRIT
493840 REPLACEMENT SANDING SLEEVE 40 GRIT
4938100 REPLACEMENT SANDING SLEEVE 100 GRIT
12015 SEAL FOR DUST BAG ENTRY
0700285 ON/OFF SWITCH
CA18 ALLEN KEY FOR DUST BAG POLE SCREW
31786B RUBBER WHEEL 4’’ X 3’’ ASSEMBLY ON BAYONET

MGP34 Operator Manual
Supreme Bench Sander
17
# 09130019
MGP34
Table of contents


