Shot Navi W1-GL User manual

User’s Manual
v.1609

2
P9
Specication
Keys
Introduction
Contents
Introduction
Getting Started
Charge the Device
Contents
Important Safety and Product Information
P2
P6
P8
Precaution Information
P2
P7
List of Items
P4
P5
Thank you for choosing Shot Navi W1-GL. With design concept of
simplicity and lightness, this product is a wearable golf GPS. It timely
detects the distance from current location to the greens, along with
preloaded global golf courses data. It can measure the remaining distance
to the greens and hazard, shot distance, score, and can also use as an
everyday watch. With GPS rangefinder, it adds styles to golfing, and
provides tactical guidance for user to enjoy the pleasure of improvement
in accuracy and the score.

3
Score
FAQ
Warranty Terms
Log In the Location/Measure the Shot
Distance
Navigation Menu / About Receiving GPS
After Services
Contact Us
Warranty
Settings
Others
Manual
P12
P14
P23
P20
P24
P22
P26
P16
P17
P18,19
P25
P27
P28
Upgrade・SCO Record
Navigation Mode
Simplied Mode P13
Hazard Mode
About the Product
Time Mode
Turn On
Search for Golf Course
P10
P10
P11

4
Important Safety and Product Information
For first time user, it is recommended to read the manual thoroughly
prior operating W1-GL for accuracy and safety purposes. Please preserve
the manual with care for easy access afterward. Please follow below
precautions for safe operation. In addition, reproduction of this user
manual is strongly prohibited.
■ The operating temperature is 32 ℉ ~122 ℉ (0 ℃ ~50 ℃ ). Please operate the
device within this range. As product is of high precision, please keep it away from
sudden temperature shock even in operating temperature range.
■ Do not drop or smash the product with force.
If dropped or smashed with force, it can cause serious damages to the
product.
■ When using or storing the product, please keep the product away from
machine with strong electronic waves/ radiation or magnetic elds.
■ If not using the product for a period of time, please preserve it in a cool
and dry location. For long storage, it is recommended to store it in a dried
container and avoid the following environments:
1. Humid and poorly ventilated location.
2. Inside a car where exposed excessively to sunlight.
3. Location with humidity over 90%.
4. When stored away, please keep the battery around 50% charged.
Being fully charged or no power will deteriorate the battery sooner.
■ Please do not expose the product to direct sunlight,high or low
temperature over long period of time (for example: place the product
inside the cart bag, in which stored in the car).

5
Precaution Information
Do not attempt to disassemble, modify and/or repair the product.
Device can be damaged from above actions, in which may invalidate the
terms of warranty.
■ Do not use the product in extreme cold, hot or humid conditions to
prevent malfunction.
■ The product is water-resistant level specied for its operation. Please do not
fully submerge it under the water.
■ The charging part of the product is made of stainless steel, but it can still
rust due to residue of sweats and other substances to surface. Please wipe it
clean with dry cloth after use.
■ Do not place the product near re to prevent shape-deformation and
malfunction.
■ Do not use the product in highly dusty sites to prevent malfunction.
Please prevent from direct exposure of sunlight when storage.
The functionality will deteriorate is change to stored above 104℉(40℃ ).
If storing for more than a month, please ensure the battery level is kept
around 50%.
※ If stored with no power, it can cause damage to the Lithium-polymer
battery. Although the protective circuit inside the battery can prevent it
from overly charged or zero power, it can still reach to zero power due
to natural discharging of electricity over the period of long storage. To
prevent mentioned situation from occurring, please ensure the battery
level is kept around 50%. In addition, please do not keep battery as fully
charged to avoid malfunction as well. Please do not connect the charger
with the device during long storage. When battery is overly charged, it
may cause chemical reactions for battery to expanding, heating up, and
re.

6
List of Items
ShotNavi W1-GL Device
Charger
※ USB AC adapter is not included with the
package. Please purchase it separately. (P23)
User's Manual

7
Charge the Device
As shown in left picture, plug the USB cable
into charger and connect the cable to PC
port or USB-AC adapter to charge the device.
Charger’s red indicator will light up while
charging.
【Checking Charging Status】
The device can be charged even when it
is power off. Please turn on the device to
examine the balance of battery and the
status of the charging.
【Display of Charging】
When charging, the
screen displays the
“Charging” sign to
indicate the device is
under charging.
【Completion of Charging】
Once the charging is
completed, the screen
will display “Battery Full”
sign.

8
Keys
Backlight Button
Press the button to turn on the LCD
backlight. Long press the button to turn
on/o the power.
Up Button
It moves the cursor up. In navigation
screen, long press it to record the number
of strokes.
Down Button
It moves the cursor down. In navigation
screen, long press it to enter the screen to
edit the number of strokes.
Menu/Return Button
It can display the menu or to return to
previous screen. In navigation screen, long
press it to turn on the navigation mode.
Conrmation Button
It confirms the selection. Long press the
button to record the location.
LCD
Display the time, navigation screen and
etc.
①
①
⑤
⑤
②②
③
③
④
④
⑥
⑥

9
Specication
Size Φ 1.87" × 0.68” (47.5 mm × 17.5mm)
(excluding straps)
Weight 2.65oz (75g)
Display 96 × 80 pixels (black and white LCD)
Battery Rechargeable Lithium-polimer battery
Water Resistant 5 ATM
Complete Charging Time 6 hours (by PC); 4 hours (by AC adapter)
Continuous Operation Time Up to 8 hours (with GPS mode)
(The continuous operation time can be shortening depending on the
frequency and duration of usage.)

10
Turn On the Power
Time Mode
Using the GPS to calibrate the time is
optional.
Setting time from menu option for device is
optional (P20 ).
A long press to turn
on/o the power
Long press the on/
off button for 7
seconds, in which
2 beeping sounds
will ring during the
process.
(during time mode)
A short press to display
the menu
※ When using GPS to calibrate the time,
please operate the device at outdoor area of
open space. If environment is poor for GPS
to receive signal, it could take longer time or
possibly unable to calibrate the time.

11
If using different types of green, it will display “Greens
Selection”. Please select the appropriate Greens to use.
After locating the golf course, it will start to navigate and
display the remaining distance.
“Start navigation”
※ If multiple golf course are nearby, please select the
appropriate one with the up and down buttons. And press
“con rm”.
Only support selected golf courses. Not yet support all
the golf courses. Will provide support to all courses later on
chronologically.
Search for Golf Course
When in time mode, press the menu button to display the
menu.
(When in menu option, press the menu button again to go
back to display time).
Use the up and down buttons to move the cursor to “start
navigation”. Press “enter” to see “satellite searching” icon.
Upon receiving GPS signal, it will provide the closest golf
course near to your location.
Display Menu
Up
Down
Con rm
Playing of golf with W1-GL

12
Navigation Mode
Short press bottom
right button: change
target (front/center/back
of the green )
Long press bottom
left button: navigation
menu
Long press bottom right
button: stroke record (use
up and down buttons to
modify score)
Long press bottom
left button: switch to
other mode
Long press center right
button: record the location
Short press upper right
button: change target
(front/center/back of the
green )
Short press upper left button:
display current hole number/
time/ backlight
Long press upper right
button: plus 1 to score
13
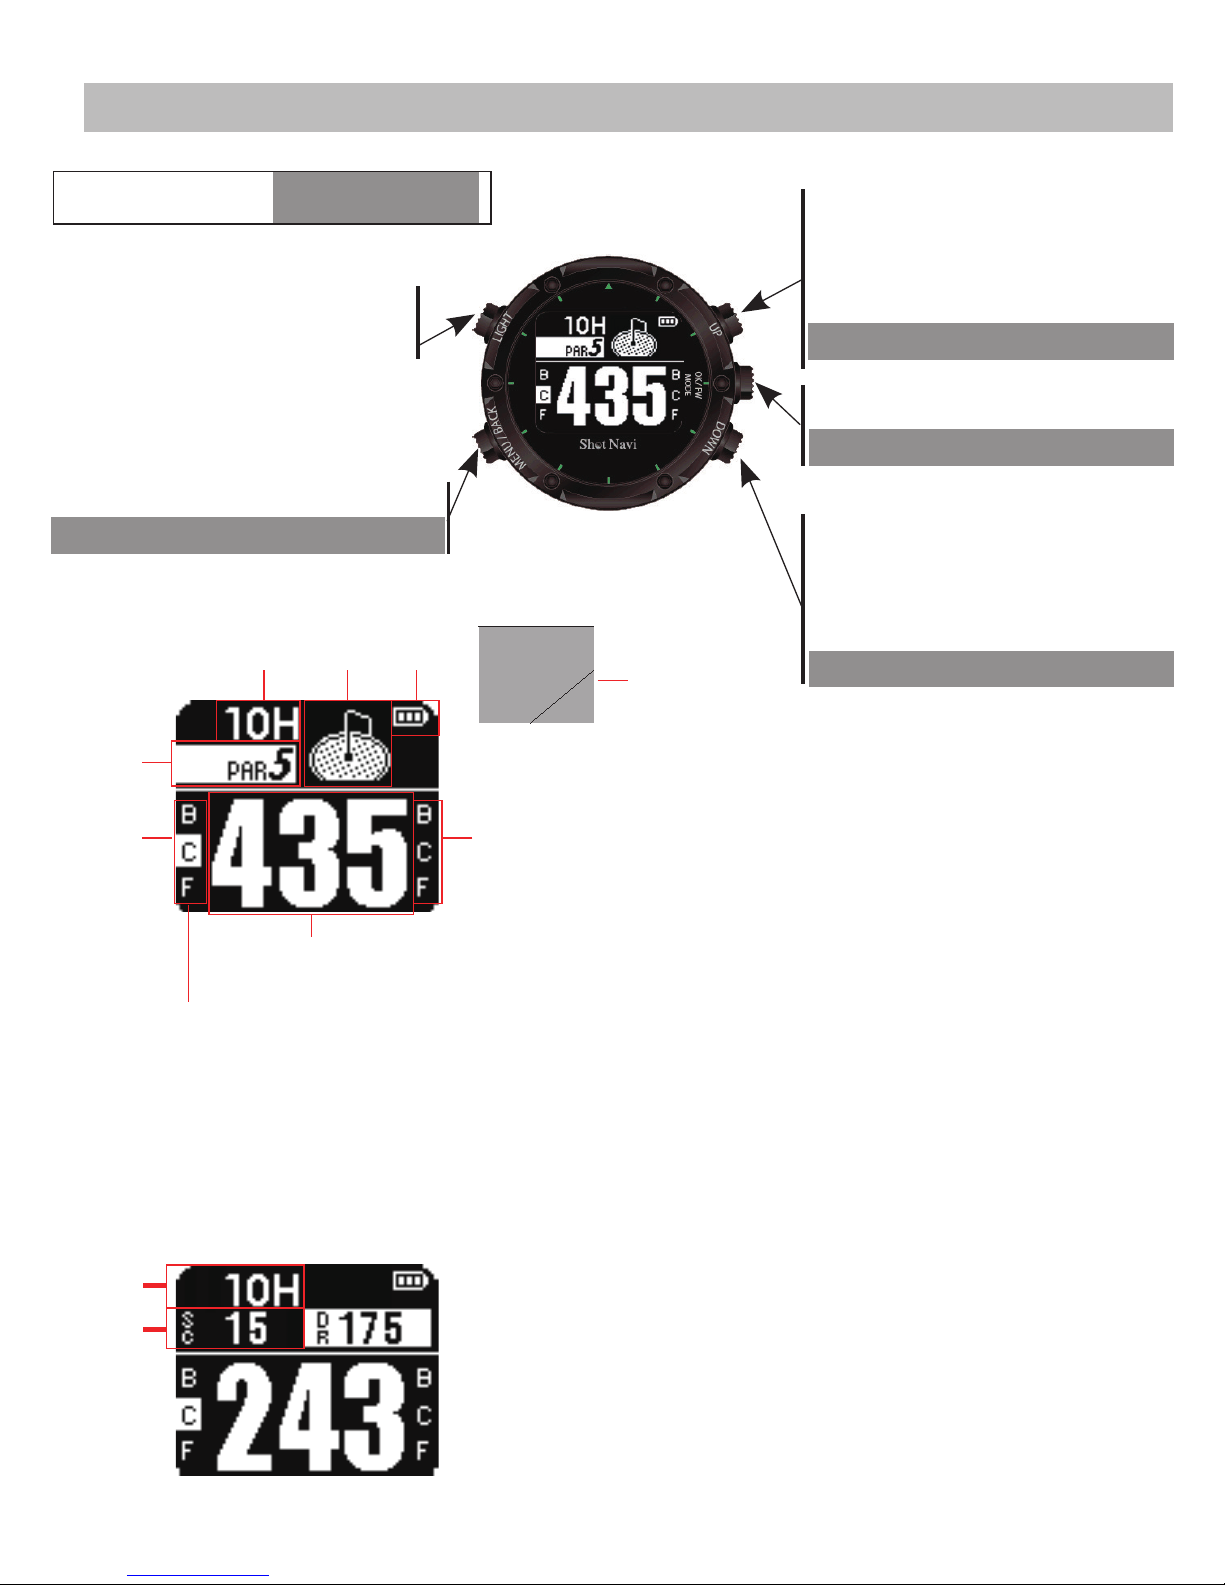
Simplied Mode
① , ② indicate whether the remaining distance
to the designate point .
① Left side of green. ② Right side of green.
B: Back of the green
C: Center of the green
F: Front of the green
③ PAR of present hole.
⑥ Battery level.
⑧ Record the score and instantly display the
score.
※ Use the up and down buttons to
show the distance to the front, center
and back of the greens.
In this picture, it shows the distance
to center of the left green.
⑦ Remaining distance to the designated
green.
⑨ Shot distance once you log into the location.
(P17)
④ Number of present hole.
⑤ Image of the green upon entering “start
navigation” mode.
①
⑤⑥
⑦
②
③
⑧
④
⑨
S: display navigation menu
S: backlight/ current
round/ time display
L: switch to hazard mode
S: Short Press / L: Long Press S: switch target to left,
right, front, center, and
back of green
S: switch target to left,
right, front, center, and
back of green
L: set +1 to score
L: record location
L: switch to score mode
⑤
14
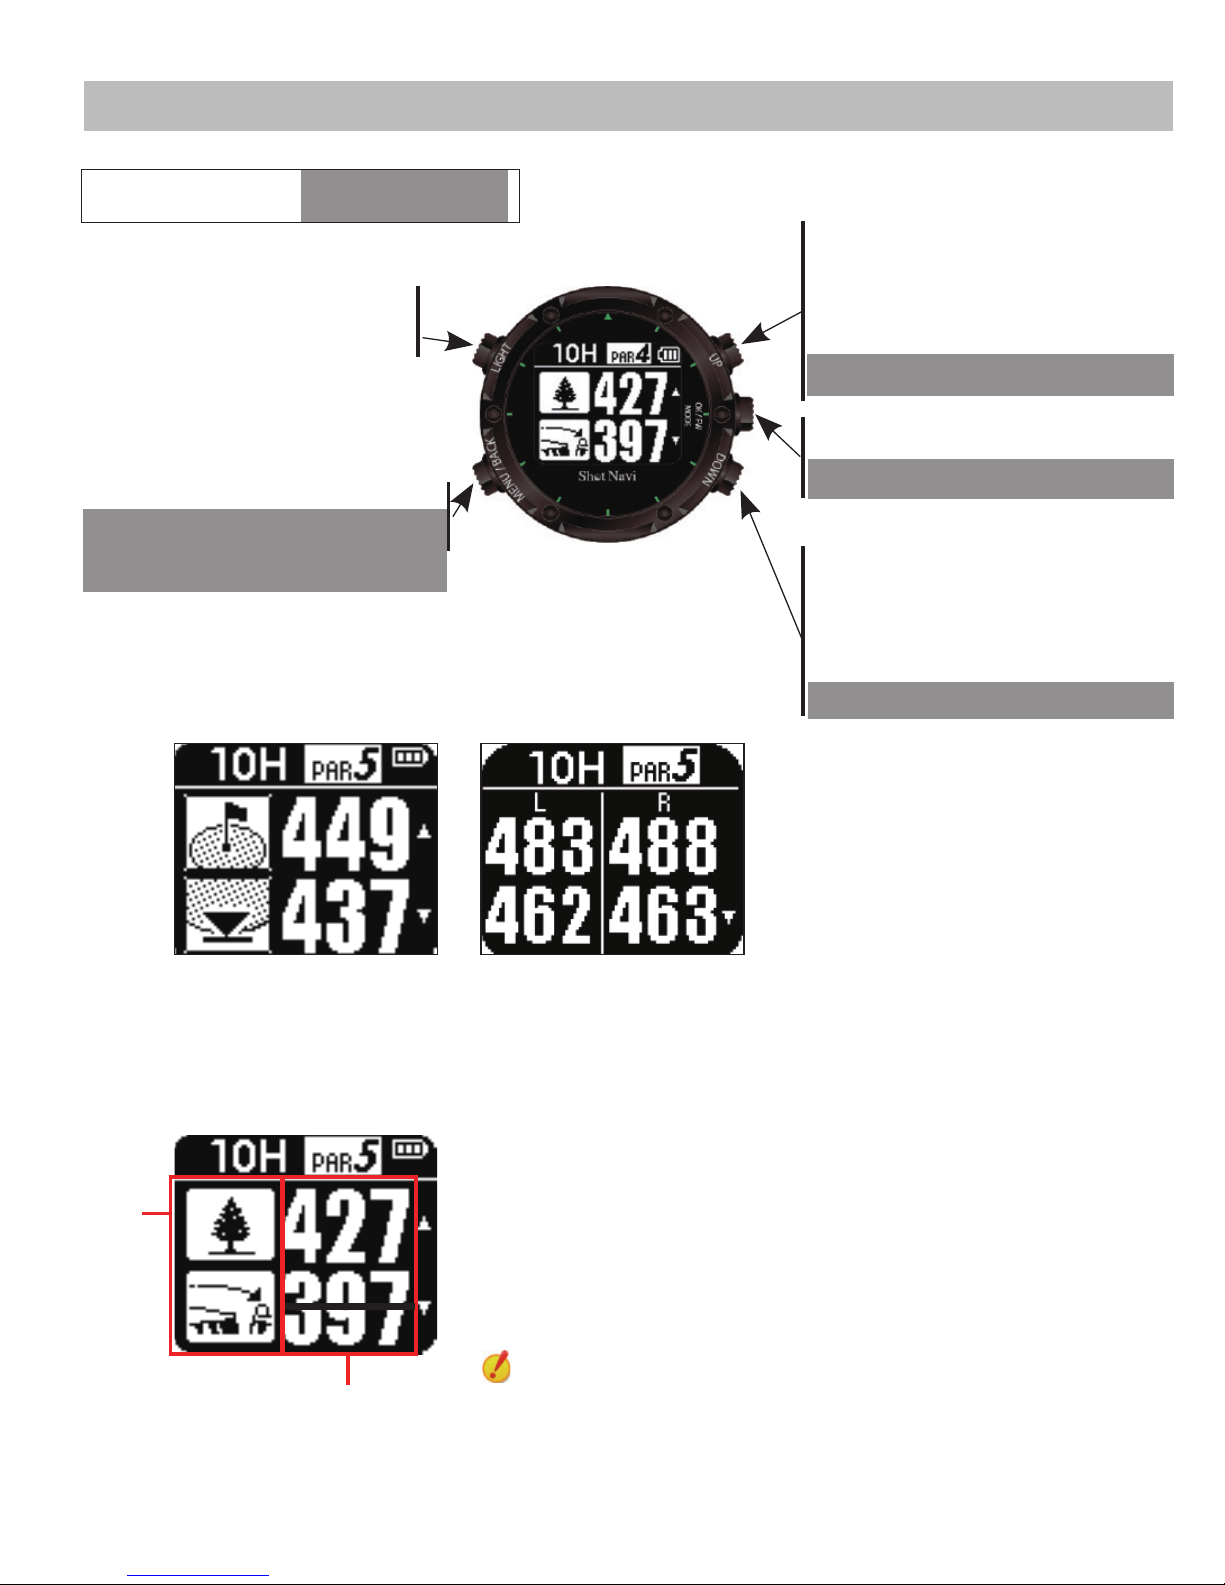
Hazard Mode
① Indicate the type of hazards. (P15)
② The distance to the designate hazard.
The remaining distance to the hazard of tee-o site
will be crossed off once location detected is moved
close to the hazard.
One green Two greens
In hazard mode, it shows the
previous distance to the green.
If there are two greens, it will
simultaneously show the
distances to the left and right
greens. Roll down the screen
with down button to see
hazard(s).
①
②
S: Backlight/ current
round/ time display
S: Backlight/ current
round/ time display
L: Switch to simplify
mode
S: Switch to hazard zone
and from top of green
S: Switch to hazard zone
and from bottom of
green
L: Set +1 to score
L: Record location
L: Switch to score mode
S: Short Press / L: Long Press

15
Hazard Type
Front of hazard Front of middle
bunker
Before the
trees
Right side pond Bunker at right
side to the
green
IP 1
Overpass the
hazard
Overpass
middle bunker
Overpass trees
Left side pond Bunker at
center to the
green
IP 2
Curve point of
left dogleg
Front of left
bunker
Right OB
Front of pond Bunker at left
side to the
green
Center of green Front of right
bunker
Tree in the
middle
Curve point of
right dogleg
Overpass left
bunker
Left OB
Overpass the
pond
Tree on the
right
Front of green
Back of green
Overpass right
bunker
Tree on the left

16
Score
In navigation mode, long press the upper
right button to set the score as +1. To switch
to score mode, long press the bottom right
button. In score mode, use the up and down
buttons to adjust the scores.
Supernumerary: Strokes taken to par on current
hole.
Total score: The total strokes over the current hole.
Supernumerary: Strokes taken to par in current
round.
S: set the score as +1
S: backlight
S: switch to
navigation menu S: switch to preliminary
status
S: set the score as -1
L: set the number of hole
as +1
L: switch to
preliminary status L: set the number of hole
as -1
Score mode
S: Short Press / L: Long Press
Total score: The total strokes over the current
round.

17
Log In the Location/Measure the Shot Distance
When logging in the location, please keep
pressing the right center button. Press the right
center button again when nished.
Upon log in, it will automatically detect the shot
distance.
Example:
1. Log in the tee-o location.
2. Log in the location where the ball landed from
the rst tee-o to display the shot distance.
The score and shot distance will be displayed at
top of the screen.
After record the location, score is set as +1.
Long press: Log in the location
and show the shot distance
since second press.
Navigating

18
Navigation Menu
Pause navigation
Pausing navigating can switch back to the clock, but
it can be restarted.
If the restart option is preset, it will pop out a notice
10 minutes prior the set time. And will restart
navigating per scheduled. Please use it when half
round is ended.
When using navigation mode during golfing
and wishing to change hole number, round
or time mode, you can press the bottom left
button to access the menu.
Change the hole
You can change the hole under navigation during
the round. If you want to change the hole in another
round, please change the round rst.
Change the round
Change the navigated round.
Navigating

19
About Receiving GPS
Terminate the navigation
Terminate the navigation and go back to time mode.
If “---” is displayed,
then GPS signal
cannot be received.
Please move to
open field and
retry.
If the number
999 is displayed,
it means the
remaining distance
is over 1000 yards.
Please confirm all
the selections are
properly set.
Mode alternation
Select simplied mode, hazard mode and score mode for alternation.
Change the green
If green information is stored, it can be changed.
※ If not stored, then it will not display on the menu.
Reset
Reset the score.

20
Distance unit
Yard and meter are available as units for measuring
distance.
Delete information
Delete the location information recorded in the
device.
It is recommended to upload the information to SCO
log before deleting records. The maximum capacity is
1000 location records.
Navigation Setting
Backlight
It can be turned on by pressing any button.
Time indication
Choose from 12-hour or 24-hour system.
Mute mode
Mute the sound when pressing buttons.
Automatic calibration of date and time
Use GPS to set the date and time.
Settings
Settings the Device
Table of contents
Other Shot Navi GPS manuals


