ShowTex EASYDRAPE User manual

01/12/2023 16:47
EasyDrape
https://www.showtex.com/files/manuals/temporary-wall-and-backdrop-systems/easydrape/installation-manual-general-easydrape.html
1/13
EASYDRAPE
General
I STALLATIO MA UAL

01/12/2023 16:47
EasyDrape
https://www.showtex.com/files/manuals/temporary-wall-and-backdrop-systems/easydrape/installation-manual-general-easydrape.html
2/13
1Disclaimer & Copyright
2Introduction
3Technical Specifications
3.1 Components
3.2 Necessary Tools
4Assembly
4.1 Preparing the Base Plates
4.2 Placing the Uprights
4.3 Placing the Horizontal Drape Support
4.4 Placing the Supports
4.5 Hanging the Drapes
5Contact & support
1 DISCLAIMER & COPYRIGHT
No part of this publication may be duplicated or edited in any form or by any means, including any type of electronic or mechanical
method without prior written permission from ShowTex.
ShowTex and its employees are fully aware of their task to provide a reliable edition of this document. Nevertheless, they cannot accept any form
of liability for the direct or indirect consequences of imperfections that might remain in this edition. The material in this manual is subject to
change without notice.
ShowTex warrants that its mechanical and technical products, when delivered in new condition, in original packing, sold directly and used in
normal conditions are free from any defects in manufacturing, materials and workmanship. For more information about your local warranty
terms, please check our website or contact your local ShowTex office.
All products from the ShowTex Rental range are supposed to be returned in the same state as they were rented. Please treat our products with
care, allowing the next user to enjoy the products as much as you did. The rented products are internally checked according to the general rental
conditions. Be sure to check our rental guidelines on our website before installing and using this product: ShowTex rental guidelines
Read and understand this user manual before installing and or operating the system. Failure to follow the instructions in this
document could result in serious injury!
Following the guidelines of this manual will reduce the risk of damaging the equipment or injuring yourself and the people around
you. Nevertheless, ShowTex cannot be held accountable for any use or misuse of the equipment and supplies.
Damage to the system caused by any other method of installation than the one shown in this manual can only be repaired or fixed
at the customer’s expense.
As a result of the above warning, any ShowTex product must be installed and operated by a qualified technician who knows its
capabilities as well as its limitations.
In case you are uncertain about the eligibility of any hardware in your product, please get in touch with your local ShowTex office to
receive additional guidance.
2 INTRODUCTION
Thank you for choosing for ShowTex and purchasing one of our products. We want to ensure that your experience is as smooth and safe as
possible, so we kindly request that you take a few moments to carefully read this manual before installing your new system.
This manual contains important information that will help you comply with health and safety regulations, as well as provide guidance on how to
safely install, operate and maintain your product. Our team has taken great care to ensure that this manual is easy to understand and follow,
using straightforward language and clear illustrations.
If you have any questions or concerns regarding the installation or use of your product, please feel free to contact your local ShowTex office. Our
knowledgeable team members are always available to assist you and answer any questions you may have.
3 TECHNICAL SPECIFICATIONS
3.1 Components
CO TE TS

01/12/2023 16:47
EasyDrape
https://www.showtex.com/files/manuals/temporary-wall-and-backdrop-systems/easydrape/installation-manual-general-easydrape.html
3/13
Telescopic Upright Front of
House
Article
number Colour Weight Length
8750 2306
1307 Black 1.45
kg 0.80
m -
1.46
m
Telescopic Upright 3 m
Article
number Colour Weight Length
8750 2306
3377 Black 2.95
kg 1.80
m -
3.37
m
Telescopic Upright 5 m
Article
number Colour Weight Length
8750 2306
5057 Black 4.60
kg 1.80
m -
5.03
m
Base Plate Front of House
Article number Colour Weight
8750 2000 0057 Black 5.00
kg
Base Plate
Article number Colour Weight
8750 2000 0147 Black 14.00
kg
Base Plate Coupler
Article number Colour Weight
8750 2306 0017 Black 0.22
kg
Horizontal Drape Support
Article
number Colour Weight Length
8750 2309
0907 Black 1.55
kg 0.90
m -
1.20
m
8750 2309
1207 Black 2.03
kg 1.20
m -
1.80
m
8750 2309
1807 Black 2.94
kg 1.80
m -
3.00
m
Support for Uprights
Article
number Colour Weight Length
8750 2306
5067 Black 1.60
kg 1.25
m
Upright Turn Button
Article number Colour Weight
8750 2270 0017 Black 0.02
kg
Horizontal Turn Button
Article number Colour Weight
8750 2309 0057 Black 0.02
kg
Coupler Turn Button
Article number Colour Weight
8750 2270 0007 Black 0.02
kg
Swivel
Article number Colour Weight
8750 2309 0007 Black 0.01
kg
Plastic Washer
Article number Colour Weight
8750 2309 0067 Black 0.01
kg
MAIN COMPONENTSSPARE PARTS
01/12/2023 16:47
EasyDrape
https://www.showtex.com/files/manuals/temporary-wall-and-backdrop-systems/easydrape/installation-manual-general-easydrape.html
4/13
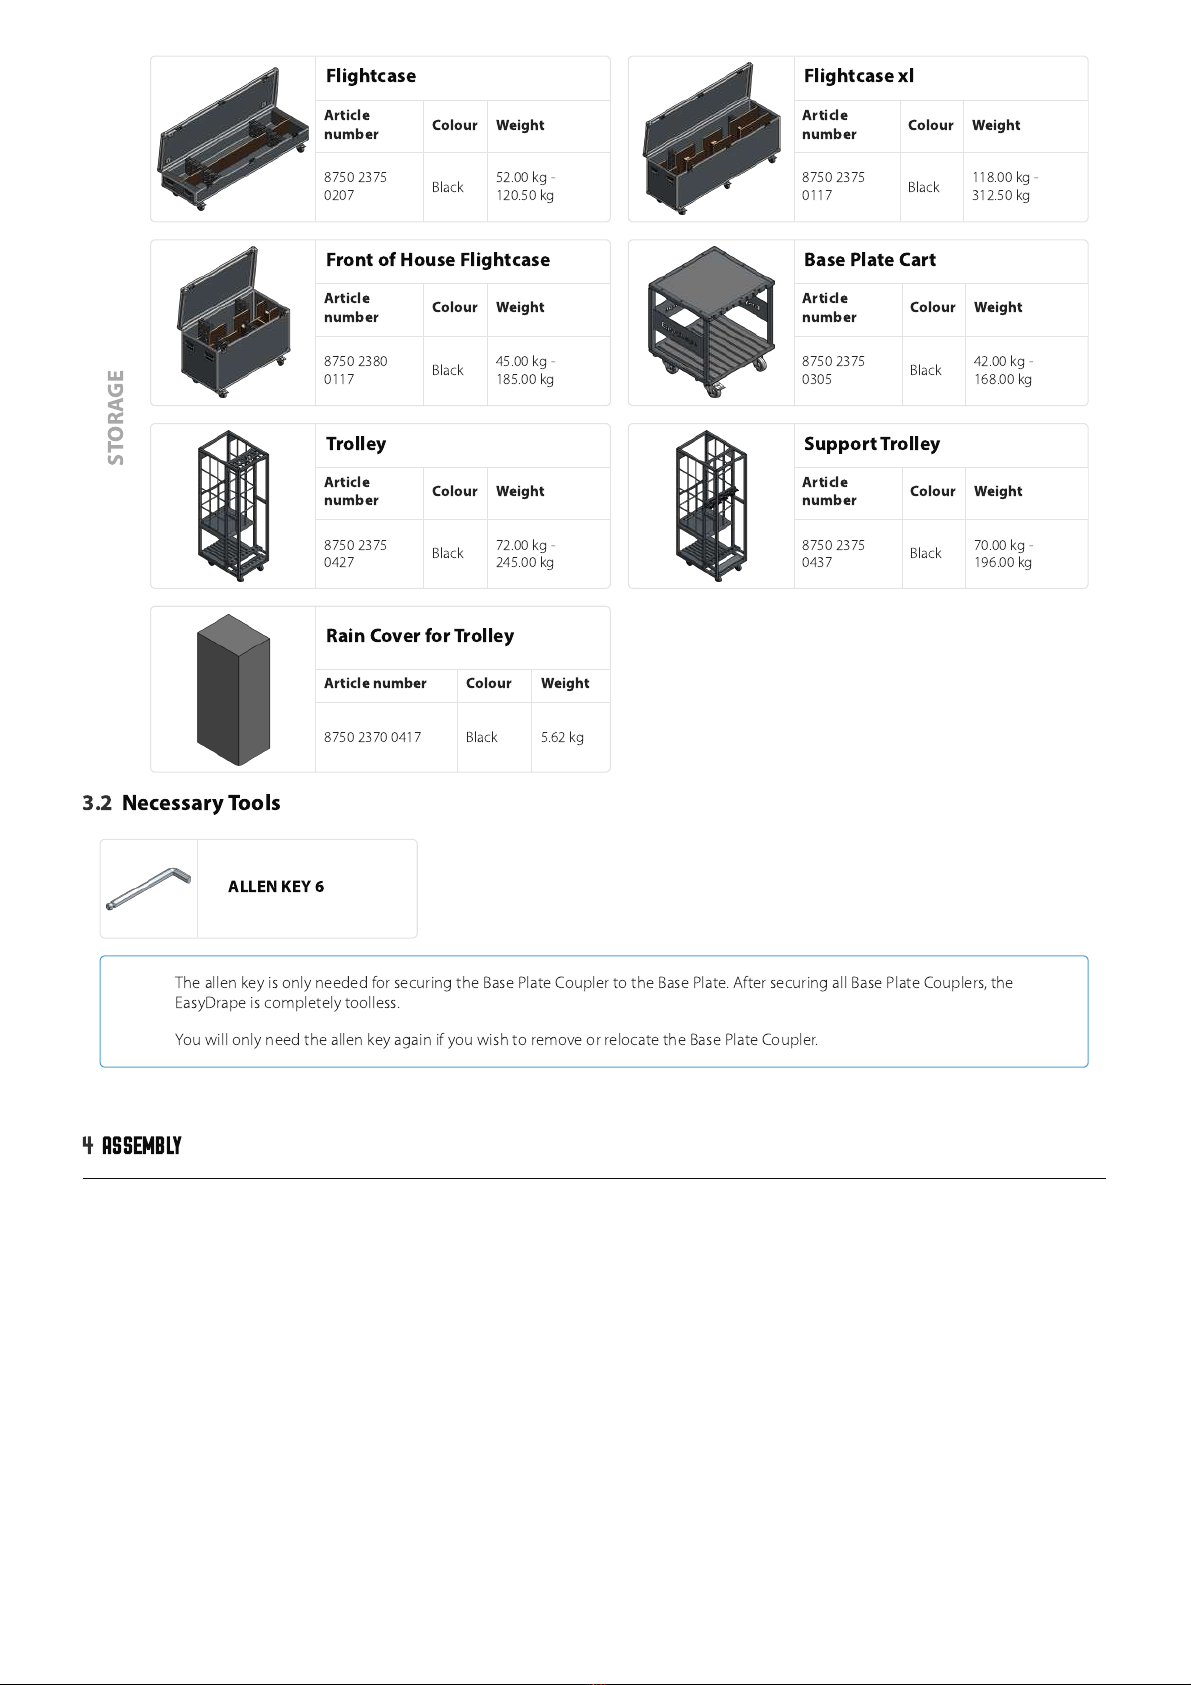
Flightcase
Article
number Colour Weight
8750 2375
0207 Black 52.00
kg -
120.50
kg
Flightcase xl
Article
number Colour Weight
8750 2375
0117 Black 118.00
kg -
312.50
kg
Front of House Flightcase
Article
number Colour Weight
8750 2380
0117 Black 45.00
kg -
185.00
kg
Base Plate Cart
Article
number Colour Weight
8750 2375
0305 Black 42.00
kg -
168.00
kg
Trolley
Article
number Colour Weight
8750 2375
0427 Black 72.00
kg -
245.00
kg
Support Trolley
Article
number Colour Weight
8750 2375
0437 Black 70.00
kg -
196.00
kg
Rain Cover for Trolley
Article number Colour Weight
8750 2370 0417 Black 5.62
kg
3.2 Necessary Tools
ALLEN KEY 6
The allen key is only needed for securing the Base Plate Coupler to the Base Plate. After securing all Base Plate Couplers, the
EasyDrape is completely toolless.
You will only need the allen key again if you wish to remove or relocate the Base Plate Coupler.
4 ASSEMBLY
STORAGE
01/12/2023 16:47
EasyDrape
https://www.showtex.com/files/manuals/temporary-wall-and-backdrop-systems/easydrape/installation-manual-general-easydrape.html
5/13
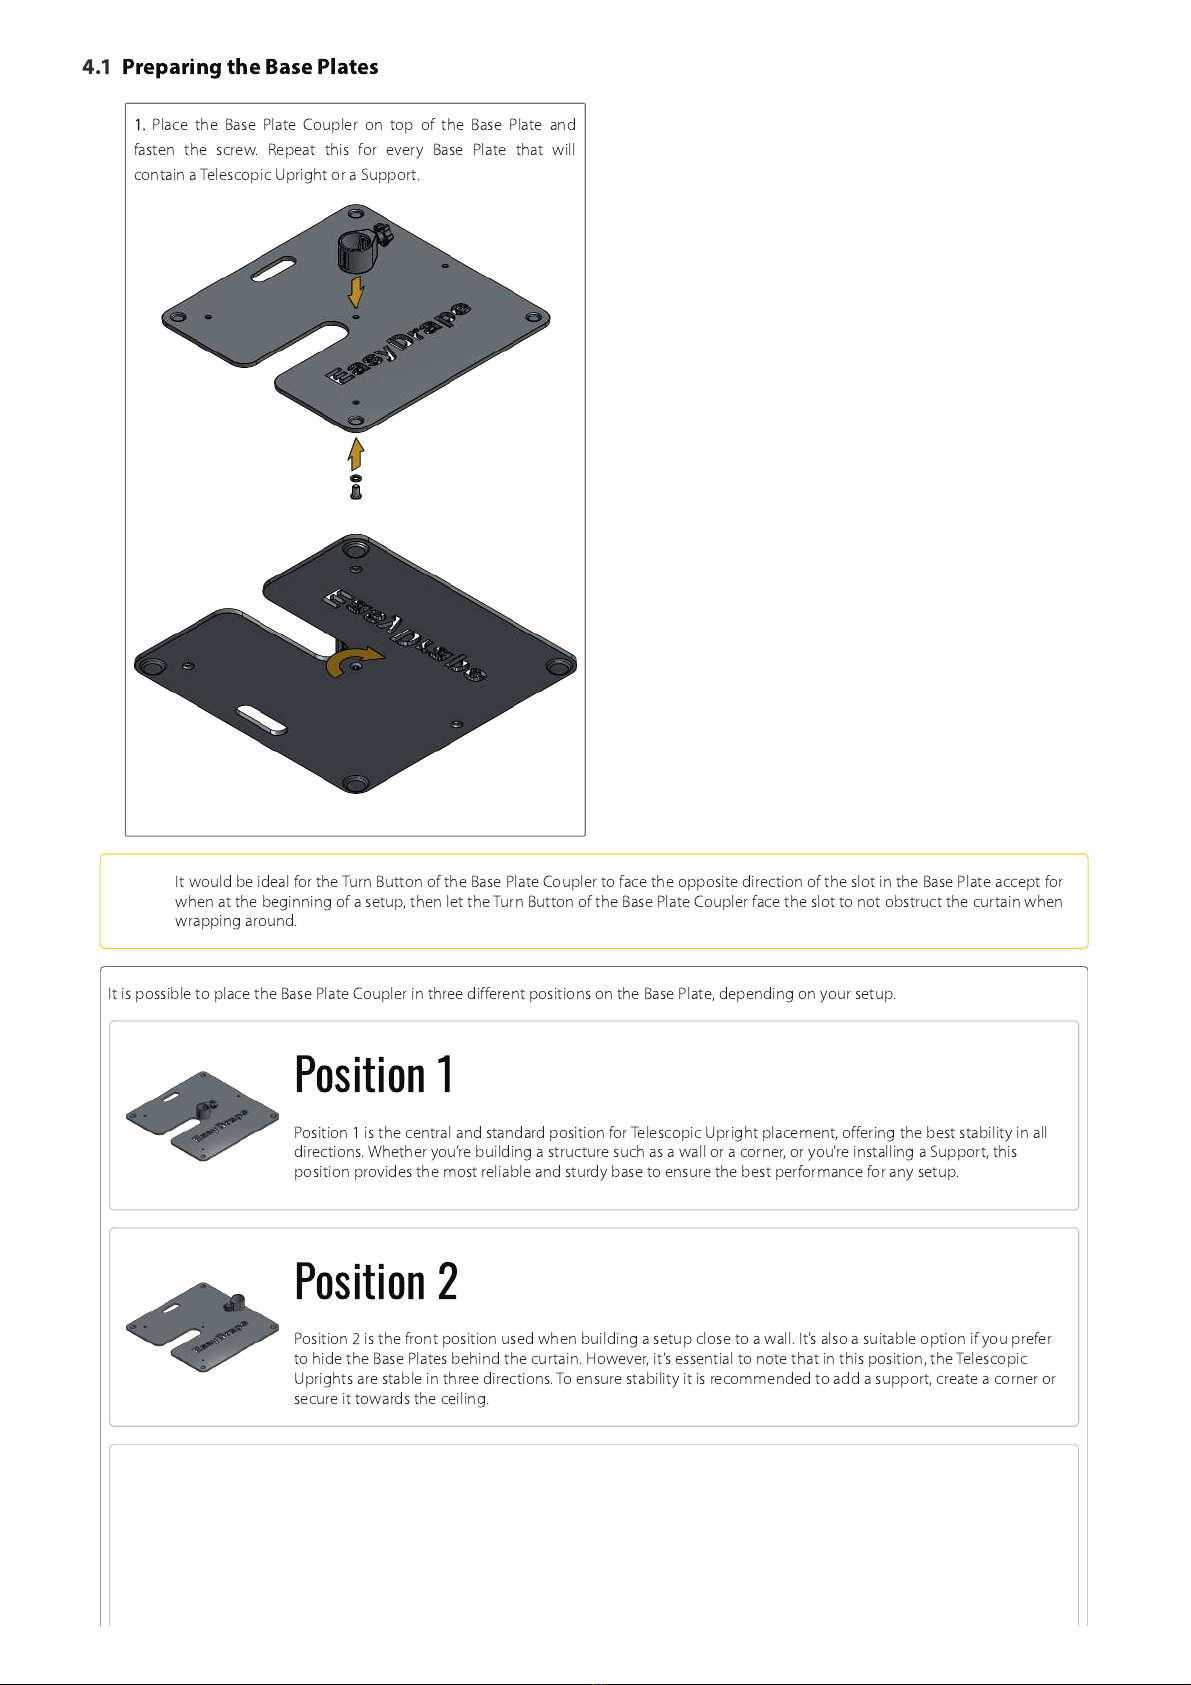
4.1 Preparing the Base Plates
1. Place the Base Plate Coupler on top of the Base Plate and
fasten the screw. Repeat this for every Base Plate that will
contain a Telescopic Upright or a Support.
It would be ideal for the Turn Button of the Base Plate Coupler to face the opposite direction of the slot in the Base Plate accept for
when at the beginning of a setup, then let the Turn Button of the Base Plate Coupler face the slot to not obstruct the curtain when
wrapping around.
It is possible to place the Base Plate Coupler in three different positions on the Base Plate, depending on your setup.
Position 1
Position 1 is the central and standard position for Telescopic Upright placement, offering the best stability in all
directions. Whether you’re building a structure such as a wall or a corner, or you’re installing a Support, this
position provides the most reliable and sturdy base to ensure the best performance for any setup.
Position 2
Position 2 is the front position used when building a setup close to a wall. It’s also a suitable option if you prefer
to hide the Base Plates behind the curtain. However, it’s essential to note that in this position, the Telescopic
Uprights are stable in three directions. To ensure stability it is recommended to add a support, create a corner or
secure it towards the ceiling.
Other manuals for EASYDRAPE
4
Popular Indoor Furnishing manuals by other brands

Regency
Regency LWMS3015 Assembly instructions

Furniture of America
Furniture of America CM7751C Assembly instructions

Safavieh Furniture
Safavieh Furniture Estella CNS5731 manual

PLACES OF STYLE
PLACES OF STYLE Ovalfuss Assembly instruction

Trasman
Trasman 1138 Bo1 Assembly manual

Costway
Costway JV10856 manual


