Siefken KUNST MEiSTER KM515 User manual

3 YEARS
LIMITED WARRANTY
KUNST MEiSTER
LiJADORA ROTO ORBiTAL
km515
Modelo:
Instrucciones
Antes de usar esta herramienta, por favor lea cuidadosamente las INSTRUCCIONES DE USO. Asegúrese
de saber cómo funciona la máquina y cómo debe ser operada. Mantenga la herramienta de acuerdo a
estas instrucciones y asegúrese de que la maquina funcione correctamente, por favor guarde estas
instrucciones y otros documentos que vengan junto con la herramienta.

3 YEARS
LIMITED WARRANTY
Contenido
ADVERTENCIAS GENERALES DE SEGURIDAD DE LA
HERRAMIENTA ELÉCTRICA
1) Seguridad en el área de trabajo
2. seguridad eléctrica
3. Seguridad personal
4. Uso y cuidado de herramientas eléctricas
5. Servicio
HERRAMIENTA ADVERTENCIAS ESPECÍFICAS DE
SEGURIDAD
Reglas de seguridad adicionales para Lijadoras
LISTA DE COMPONENTES
DATOS TÉCNICOS
INSTRUCCIONES DE OPERACIÓN
Uso previsto
Interruptor de alimentación
Cambiar una hoja de lija
Ajuste de velocidad
Succión de polvo
Adaptador de vacío
Lijado de superficies
Lijado áspero
Lijado Fino
Lijado Orbital
Selección del grado correcto de papel de lija
Mantenimiento
Transporte y almacenamiento
Garantía
1
1
1
2
2
3
3
3
4
4
4
5
5
5
5
5
5
5
5
6
6
6
6
6
7
3 YEARS
LIMITED WARRANTY
Built to Exceed
1
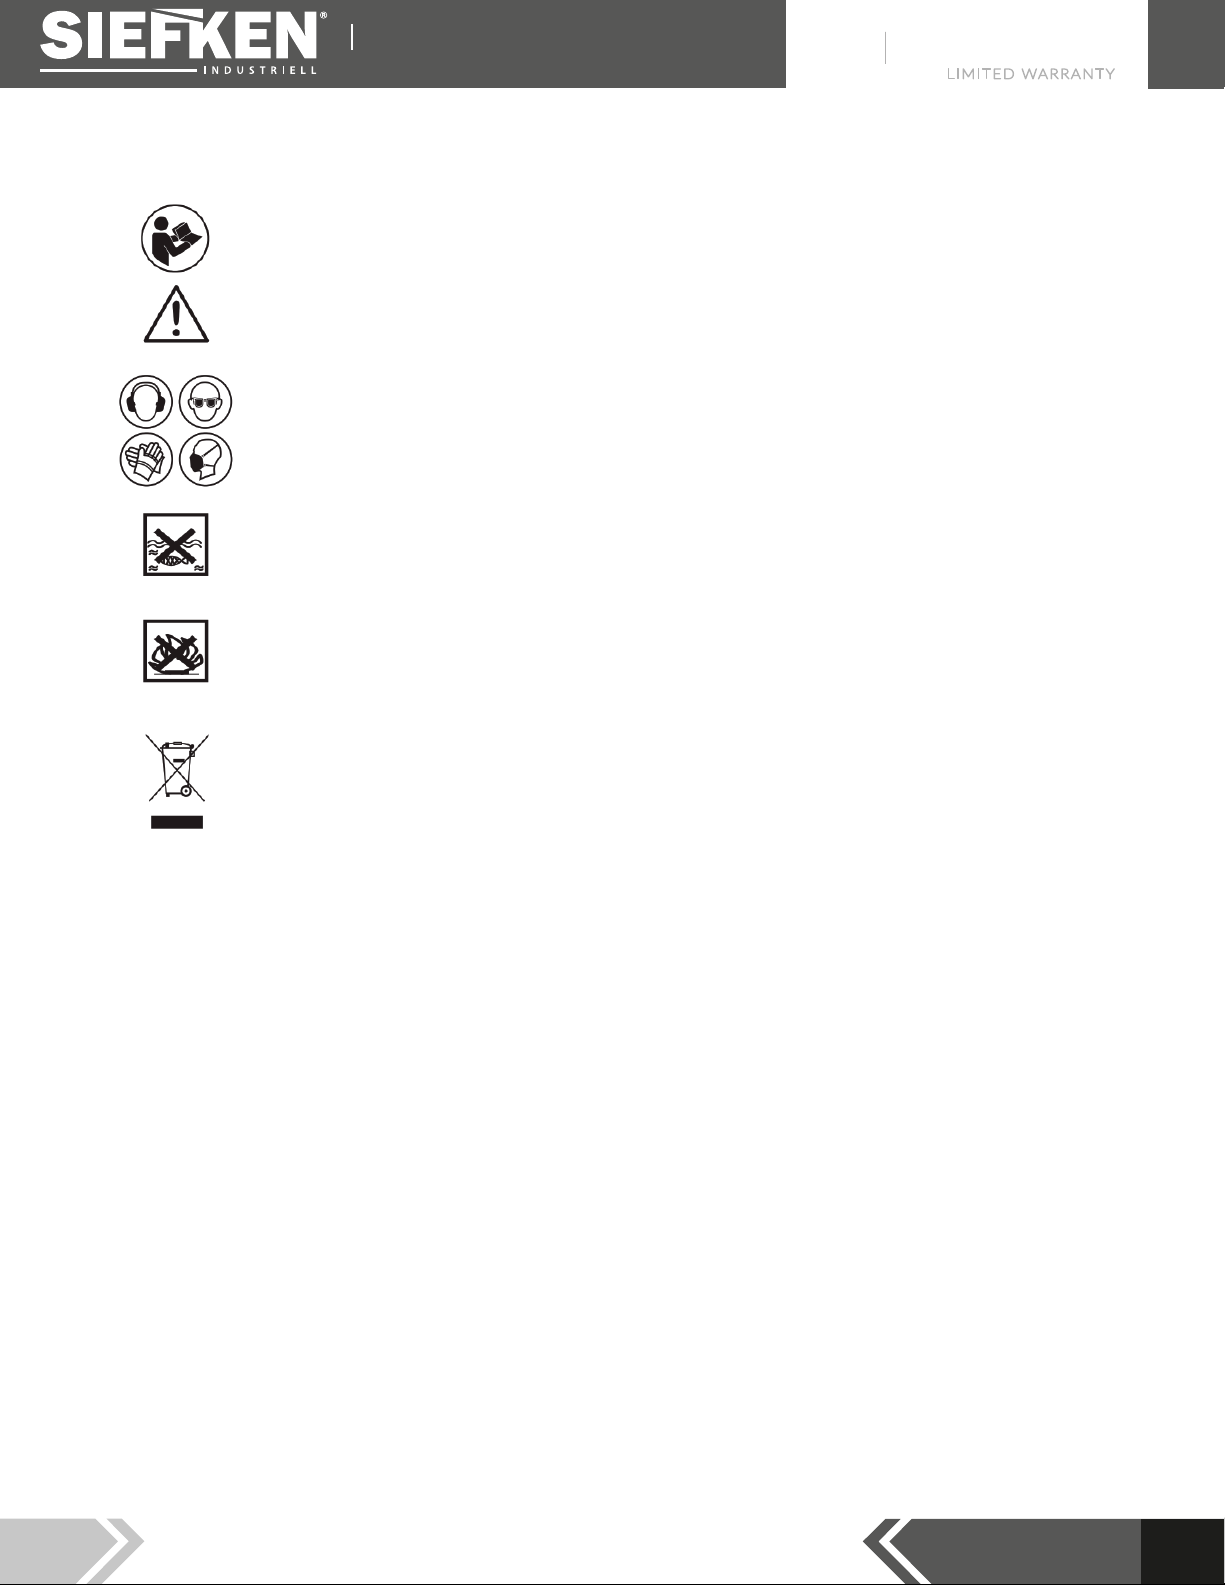
Advertencias generales y eliminación
Para reducir el riesgo de lesiones, el usuario debe leer el manual de instrucciones.
Este símbolo se utiliza en todo este manual para advertir al usuario sobre posibles
riesgos. Lea y comprenda estas secciones antes de usar el dispositivo.
El equipo de protección personal (P.P.E.), Como protectores para los oídos, protec-
ción para los ojos, guantes de seguridad y máscara antipolvo, debe estar en condi-
ciones de operar el dispositivo.
El dispositivo no debe exponerse a la lluvia ni sumergirse en agua.
No permita que ninguna parte del dispositivo entre en contacto con llamas o se
incendie.
Este producto ha sido marcado con un símbolo relacionado con la eliminación de
desechos eléctricos y electrónicos. El producto no debe desecharse con la basura
doméstica, sino que debe devolverse a un sistema de recolección, luego será recicla-
do o desmantelado para reducir el impacto en el medio ambiente. Los equipos eléc-
tricos y electrónicos pueden ser peligrosos para el medio ambiente y la salud
humana, ya que contienen sustancias peligrosas.
Advertencias generales de seguridad de herramientas
ADVERTENCIA
Lea todas las advertencias de seguridad. Instrucciones y especificaciones especificadas con esta
herramienta. El incumplimiento de las instrucciones au enumeradas a continuación puede provocar
descargas eléctricas, incendios y / o lesiones graves. Guarde todas las advertencias e instrucciones para
futuras referencias.
El término "herramienta eléctrica en las advertencias se refiere a la herramienta eléctrica que funciona
con la red (con cable) o la herramienta eléctrica que funciona con batería (sin cable).
I. Seguridad en el área de trabajo
> Mantenga el área de trabajo limpia y bien iluminada. Las áreas desordenadas u oscuras provocan
accidentes.
> No opere herramientas eléctricas en atmósferas explosivas, como en presencia de líquidos
inflamables, gases o polvo. Las herramientas eléctricas crean chispas que pueden encender el polvo o
los humos.
> Mantenga alejados a los niños y transeúntes mientras utiliza una herramienta eléctrica. Las
distracciones pueden hacer que pierda el control.

3 YEARS
LIMITED WARRANTY
Built to Exceed
2
2) Seguridad eléctrica
a) Los enchufes de las herramientas eléctricas deben coincidir con el tomacorriente. Nunca modifi-
que el enchufe de ninguna manera. No utilice enchufes adaptadores con herramientas eléctricas
conectadas a tierra. Los enchufes sin modificar y los enchufes correspondientes reducirán el riesgo de
descarga eléctrica.
b) Evite el contacto corporal con superficies conectadas a tierra, como tuberías, radiadores, cocinas y
refrigeradores. Existe un mayor riesgo de descarga eléctrica si su cuerpo está conectado a tierra.
c) No exponga las herramientas eléctricas a la lluvia ni a condiciones de humedad. El agua que ingresa
a una herramienta eléctrica aumentará el riesgo de descarga eléctrica.
d) No abuse del cable. No utilice nunca el cable para transportar, tirar o desenchufar la herramienta
eléctrica. Mantenga el cable alejado del calor, aceite, bordes afilados o piezas móviles. Los cables dañados
o enredados aumentan el riesgo de descarga eléctrica.
e) Cuando opere una herramienta eléctrica al aire libre, use un cable de extensión adecuado para uso
en exteriores. El uso de un cable adecuado para uso en exteriores reduce el riesgo de descarga eléctrica.
f) Si es inevitable utilizar una herramienta eléctrica en un lugar húmedo, utilice un suministro prote-
gido por dispositivo de corriente residual (RCD). El uso de un RCD reduce el riesgo de descarga eléctrica.
NOTA El término "dispositivo de corriente residual (RCD)" se puede reemplazar por el término "interruptor
de circuito de falla a tierra (GFCI)" o "interruptor de circuito de fuga a tierra (ELCB)".
3) Seguridad personal
a) Manténgase alerta, observe lo que está haciendo y use el sentido común al operar una herramien-
ta eléctrica. No utilice una herramienta eléctrica si está cansado o bajo la influencia de drogas, alco-
hol o medicamentos. Un momento de falta de atención mientras se utilizan herramientas eléctricas puede
provocar lesiones personales graves.
b) Utilice equipo de protección personal. Utilice siempre protección para los ojos. El equipo de protec-
ción, como una máscara antipolvo, zapatos de seguridad antideslizantes, casco o protección auditiva utiliza-
dos para las condiciones adecuadas, reducirá las lesiones personales.
c) Evite el arranque involuntario. Asegúrese de que el interruptor esté en la posición de apagado
antes de conectarlo a la fuente de alimentación y / o al paquete de baterías, levantar o transportar la
herramienta. Llevar herramientas eléctricas con el dedo en el interruptor o energizar herramientas eléctri-
cas que tienen el interruptor encendido puede provocar accidentes.
d) Retire cualquier llave de ajuste o llave inglesa antes de encender la herramienta eléctrica. Una llave
inglesa o una llave colocada en una parte giratoria de la herramienta eléctrica pueden provocar lesiones
personales.
e) No se extralimite. Mantenga la postura y el equilibrio en todo momento. Esto permite un mejor con-
trol de la herramienta eléctrica en situaciones inesperadas.
f) Vístase adecuadamente. No use ropa holgada ni joyas. Mantenga su cabello y ropa alejados de las
piezas móviles. La ropa holgada, las joyas o el cabello largo pueden quedar atrapados en las piezas móviles.
g) Si se proporcionan dispositivos para la conexión de instalaciones de extracción y recolección de
polvo, asegúrese de que estén conectados y se utilicen correctamente. El uso de recolección de polvo
puede reducir los peligros relacionados con el polvo.
h) No permita que la familiaridad obtenida con el uso frecuente de herramientas le permita volverse
complaciente e ignorar los principios de seguridad de las herramientas. Una acción descuidada puede
causar lesiones graves en una fracción de segundo.

3 YEARS
LIMITED WARRANTY
Built to Exceed
3
4) Uso y cuidado de herramientas eléctricas
a) No fuerce la herramienta eléctrica. Utilice la herramienta eléctrica adecuada para su aplicación.
La herramienta eléctrica correcta hará el trabajo mejor y con mayor seguridad a la velocidad para la que
fue diseñada.
b) No utilice la herramienta eléctrica si el interruptor no la enciende y apaga. Cualquier herramien-
ta eléctrica que no se pueda controlar con el interruptor es peligrosa y debe repararse.
c) Desconecte el enchufe de la fuente de alimentación y / o retire el paquete de baterías, si es
extraíble, de la herramienta eléctrica antes de realizar cualquier ajuste, cambiar accesorios o
almacenar herramientas eléctricas. Estas medidas de seguridad preventivas reducen el riesgo de
poner en marcha accidentalmente la herramienta eléctrica.
d) Guarde las herramientas eléctricas inactivas fuera del alcance de los niños y no permita que
personas que no estén familiarizadas con la herramienta eléctrica o con estas instrucciones la
utilicen. Las herramientas eléctricas son peligrosas en manos de usuarios inexpertos.
e) Mantener herramientas y accesorios eléctricos. Compruebe si hay desalineación o atascamien-
to de las piezas móviles, rotura de piezas y cualquier otra condición que pueda afectar el funcio-
namiento de la herramienta eléctrica. Si está dañada, haga reparar la herramienta eléctrica antes
de usarla. Muchos accidentes son causados por herramientas eléctricas mal mantenidas.
f) Mantenga las herramientas de corte afiladas y limpias. Las herramientas de corte debidamente
mantenidas con bordes cortantes afilados tienen menos probabilidades de atascarse y son más fáciles
de controlar.
g) Utilice la herramienta eléctrica, accesorios y brocas, etc. de acuerdo con estas instrucciones,
teniendo en cuenta las condiciones de trabajo y el trabajo a realizar. El uso de la herramienta eléctri-
ca para operaciones diferentes a las previstas podría resultar en una situación peligrosa.
h) Mantenga los mangos y las superficies de agarre secos, limpios y libres de aceite y grasa. Los
mangos resbaladizos y las superficies de agarre no permiten un manejo y control seguros de la herra-
mienta en situaciones inesperadas.
5. Servicio
> Haga que un técnico calificado repare su herramienta eléctrica utilizando solo piezas de repues-
to idénticas. Esto asegurará que se mantenga la seguridad de la herramienta eléctrica.
ADVERTENCIA DE SEGURIDAD DE LA HERRAMIENTA LIJADORA
> Use protectores auditivos. La exposición al ruido puede causar pérdida de audición.
> Use protección para los ojos. Use gafas para evitar que los ojos se expongan a partículas voladoras.
> Use mascarilla contra el polvo. Tomar medidas de protección contra la inhalación de polvo. Algunos
materiales pueden contener materiales tóxicos. También trabaje con extracción de polvo / astillas
cuando se pueda conectar.
3 YEARS
LIMITED WARRANTY
Built to Exceed
4
Reglas de seguridad adicionales para herramientas de lijadora
> También se recomiendan guantes de seguridad adecuados.
> Use la herramienta solo para lijado en seco.
> Use abrazaderas o un tornillo de banco para asegurar su trabajo siempre que sea posible.
> Utilice papel de lija perforado de velcro con las dimensiones prescritas.
> Una hoja de lijado que se haya usado para metal no debe usarse en otros materiales.
> No haga funcionar la máquina con ninguna parte de la carcasa faltante o dañada.
> Nunca encienda la carga inferior de la lijadora y colóquela solo después de que el cabezal se haya
detenido por completo.
> Las vibraciones pueden dañar los nervios de las manos y los brazos. Mantenga la exposición a las
vibraciones lo más corta posible. Al realizar el trabajo. siempre asegúrese de tener una posición estable
de pie.
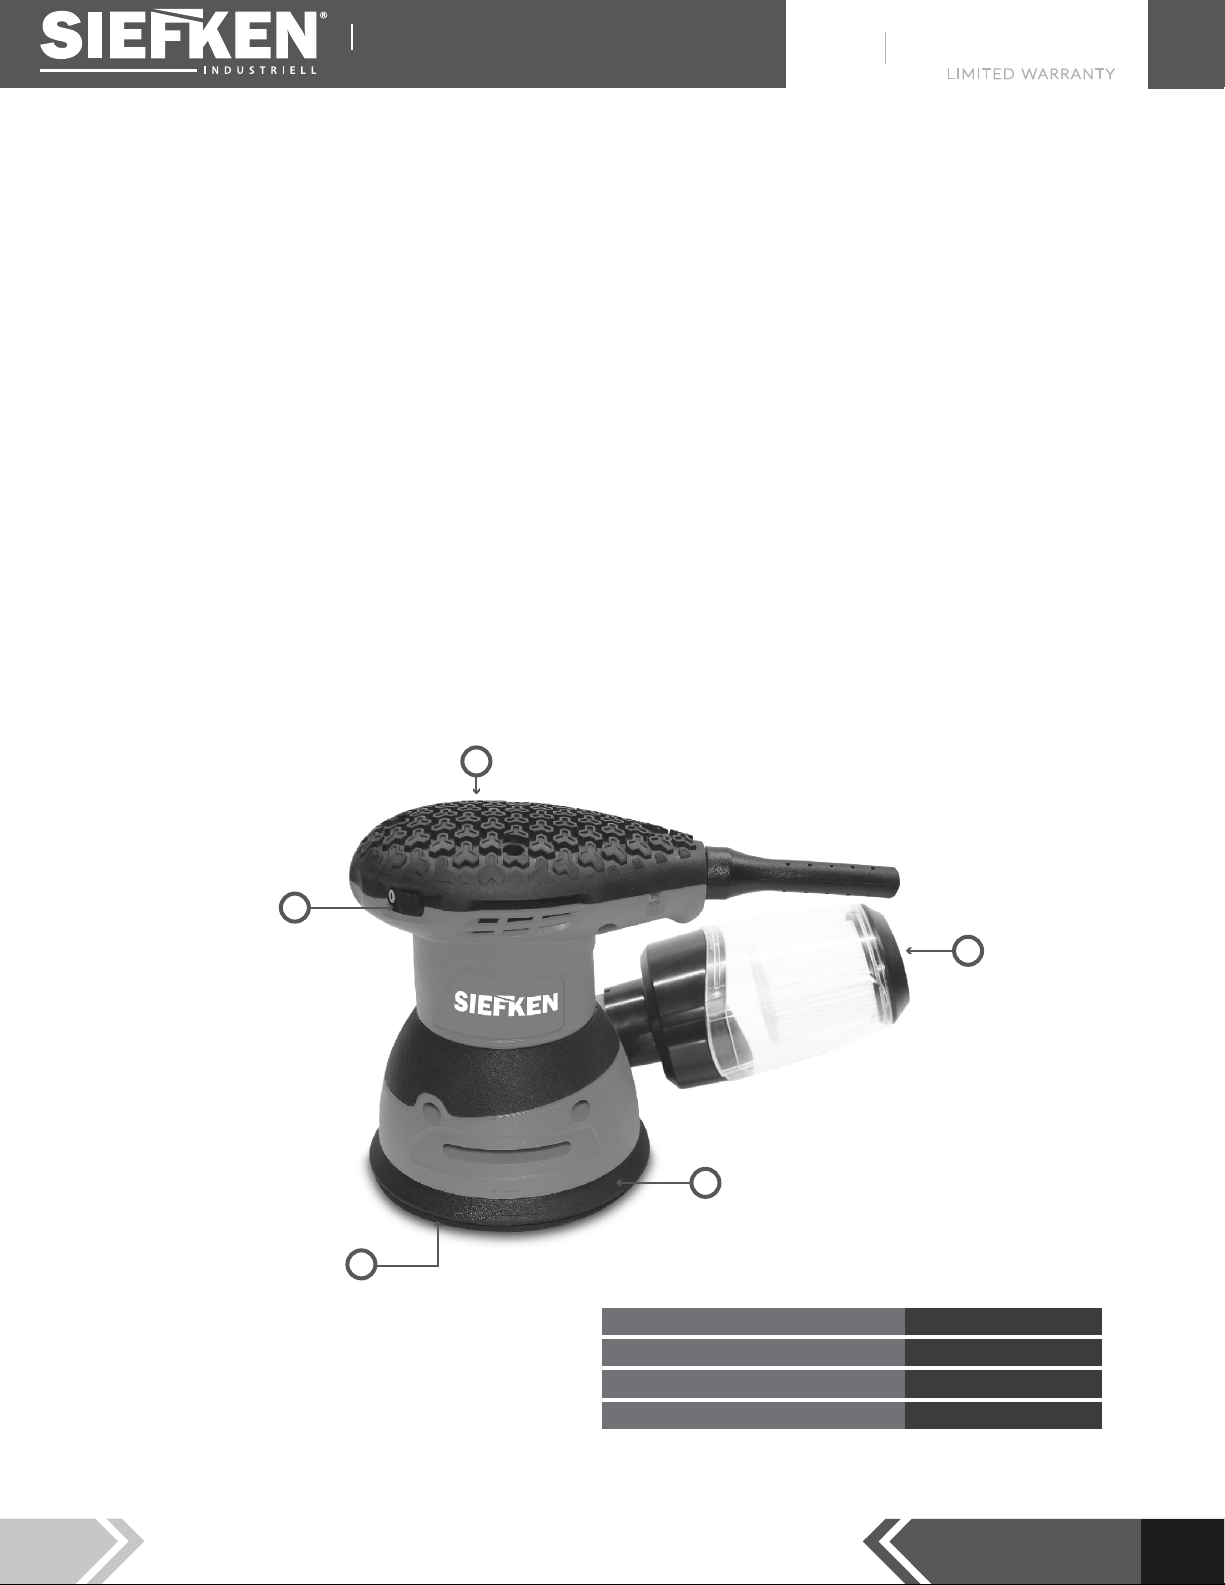
Lista de componentes - Datos técnicos
1. HOJA ABRASIVA
2. DISCO DE LIJADO
3. INTERRUPTOR DE ENCENDIDO / APAGADO
4. RUEDA DE AJUSTE DE VELOCIDADES
5. EXTRACTOR DE POLVO
1
2
3
4
5
Leistung // Potencia 320W
Geschwindigkeit //Velocidad 6.000-12.500 Opm
Basisdurchmesser // Base ø 125mm
Stromspannung //Voltaje 110V - 60 Hz

3 YEARS
LIMITED WARRANTY
Built to Exceed
5
Uso previsto
Esta lijadora orbital está destinada al lijado en seco de madera, plástico, metal y materiales de relleno, así
como a superficies pintadas.
La herramienta no debe modificarse ni utilizarse para ningún otro propósito que los descritos en estas
instrucciones.
Interruptor de alimentación
> Activado: Cambie el control deslizante del interruptor de ENCENDIDO / APAGADO a la posición "I".
> Apagado: cambie el control deslizante del interruptor de ENCENDIDO / APAGADO a la posición "O".
Cambiar una hoja de lija
La hoja de lijado y la almohadilla de lijado están provistas de un sistema de fijación de gancho y bucle para
permitir un cambio rápido y fácil de las hojas de lijado y pulido.
Para adjuntar una nueva hoja:
> Alinee el borde del disco con el borde de la almohadilla y asegúrese de que la hoja esté centrada en la
placa.
> Aplique presión al disco, asegurándose de que esté bien fijado en toda la almohadilla de lijado.
Para quitar un disco:
> Levante una esquina del disco de lijado y retírelo de la almohadilla de lijado.
Ajuste de velocidad
> La velocidad del disco se puede variar girando la rueda de ajuste de velocidad.
> La rueda permite un control preciso entre las velocidades mínima (6,000 rpm) y máxima (12,500 rpm).
Succión de polvo
> La eficiencia y la durabilidad del papel de lija mejoran mucho con la succión de polvo a través de las
aberturas del disco y el papel de lija.
> El colector de polvo debe vaciarse regularmente.
Adaptador de vacío
> El adaptador garantiza el acoplamiento a la aspiradora en caso de aumento de la generación de polvo.
> Desmontar el colector y sujetar la herramienta a una aspiradora.
Lijado de superficies
> Coloque la máquina plana sobre la pieza de trabajo, asegurándose de que toda la placa haga contacto
uniforme.
> Encienda la lijadora.
> Aplique una presión de lijado uniforme.
> Ajuste la velocidad y la presión de la herramienta para adaptarla al trabajo según sea necesario.
Lijado áspero
> Adjunte un papel de lija con grano grueso.
> Aplique solo alta presión de lijado para lograr una mayor eliminación de material.

3 YEARS
LIMITED WARRANTY
Built to Exceed
6
Lijado Fino
> Adjunte un papel de lija con grano fino.
> Con presión moderada, mueva la máquina en un patrón circular o alternativamente en direcciones
longitudinales y transversales sobre la pieza de trabajo.
NOTA
No incline la máquina durante el funcionamiento. Esto aplicará una presión desigual y puede causar daños
a la pieza de trabajo (por ejemplo, al lijar chapa).
Lijado Orbital
> Guíe su lijadora paralela a la superficie de trabajo y muévala en círculos o en un patrón cruzado.
> La velocidad del movimiento orbital de la almohadilla de lijado se reduce a medida que aumenta la
presión aplicada.
Selección del grado correcto de papel de lija
> Use granos gruesos para lijar acabados ásperos. Grano medio para alisar thewor1 <y grano fino para
terminar.
> Cuanto mayor sea el número de grado. cuanto más fina es la arena.
> Para trabajos duros, comience con un grado bajo o grano (por ejemplo, grano 60) y cambie a un grado
más alto y fino (por ejemplo, 1 grano 20) para terminar.
> Si utiliza un grado fino para superficies rugosas, se obstruirá y deberá cambiarse con más frecuencia.
Mantenimiento
> Limpie la herramienta con un paño seco o húmedo. No use un paño mojado. No use detergentes que
contengan solventes o aditivos corrosivos y abrasivos. Esto corre el riesgo de dañar las superficies de la
herramienta.
> Limpie las rejillas de ventilación de la herramienta y el soporte accesorio de polvo y suciedad después
de cada uso.
No limpie los orificios de ventilación insertando objetos afilados en ellos, como destornilladores y otros
objetos similares.
> La contaminación persistente en áreas de difícil acceso puede eliminarse con aire comprimido (máx. 3
bares).
> Verifique regularmente todos los sujetadores, tornillos y pernos para asegurarse de que estén apreta-
dos.
Apriete los tornillos sueltos de inmediato o podrían producirse lesiones graves.
> Si el cable de alimentación se daña y es necesario reemplazarlo, esto debe ser realizado por un agente
de garantía autorizado.
>Las herramientas que son trabajadas en ambientes de polvo y alta contaminación por partículas que
tengan contaminación interna, se recomienda su eliminación con aire comprimido (máx. 3 bares).
Transporte y almacenamiento
> Si la herramienta no se utiliza durante un período de tiempo prolongado, debe almacenarse en el
embalaje original.
> Almacene la herramienta en un lugar seco y sin escarcha. Lugar bien ventilado.
> Mantenga todas las herramientas fuera del alcance de los niños.
> Apague siempre la herramienta y desconéctela de la fuente de alimentación (retire la batería / desen-
chufe el cable de alimentación) antes del transporte.
> Lleve siempre la herramienta con el asa diseñada específicamente.
> Asegúrese de que la herramienta no corra el riesgo de volcar o exponerse a vibraciones y golpes excesi-
vos durante el transporte, especialmente si la herramienta será transportada e n automóvil u otro vehículo.

3 YEARS
LIMITED WARRANTY
Built to Exceed
7
GARANTÍA
Inmejorable
Unübertrefflich Garantie
3
AÑOS
SERVICIO
sin costo
Service ohne Kosten
SATISFACCIÓN
TOTAL
Total Zufrieden
SERVICIO SIN COSTO
SIEFKEN incluye en sus herramientas 5 mantenimientos
preventivos gratuitosdurante elprimer año.
Además cualquier reparación correctiva tendrá garantía
de 1año. (No aplica para reparacioneshechaspor
alguien diferente alpersonalde SIEFKEN , así como
dañospor uso incorrecto, alteraciones, abuso, desgaste
naturalo accidentes)
SATISFACCIÓN TOTAL
Si la herramienta SIEFKEN no satisface la necesidad de trabajo, dentro de los
30 días posteriores a su compra podrá cambiarla por una del mismo tipo
con mayor capacidad solo abonando la diferencia.
Para hacer válida esta garantía deberá presentar la póliza de garantía
sellada y/o su factura original y devolver el producto completo, sin daños,
con sus accesorios y en su empaque originalde compra a tráves de la red
de Distribuidoreso Centrosde Servicio.
3 AÑOS DE GARANTÍA
Cada herramienta SIEFKEN Industriell tiene garantía alcomprador originalde estar libre de defectosen materiales y mano de obra.
Sujeto a ciertas excepciones, SIEFKEN reparará o remplazará cualquier parte de alguna herramienta eléctrica, luego de que examinada,
sea determinada por SIEFKEN como defectuosa en materiales o mano de obra por un periodo de un (3) años*, después de la fecha de
la compra, a menos que otra cosa ea señalada. Se debe devolver la herramienta eléctrica a la ubicación del centro de servicio SIEFKEN o
a la estación de servicios autorizados de SIEFKEN, mediante envío pagado y asegurado. Se debe incluir una copia de la prueba de
compra con el producto devuelto. Esta garantía no aplica a daños que SIEFKEN determine como provenientes de reparaciones hechas
por alguien diferente al personal de SIEFKEN , así como por uso inco abuso, desgaste naturalo accidentes
*Se excluye de este tipo de garantía a los compresores y aspiradoras de
marca Siefken, los cuales gozarán de 1 año de garantía*
Para más información visita muestro wedsite:
www.siefkentools.com
3 YEARS
LIMITED WARRANTY
Built to Exceed
KUNST MEiSTER
ORBITAL SANDER
km515
Modelo:
Instructions
Before using this tool, please read the INSTRUCTIONS FOR USE carefully. Make sure you know how the
machine works and how it should be operated. Keep the tool according to these instructions and make
sure the machine is working properly, please keep these instructions and other documents that come
with the tool.

3 YEARS
LIMITED WARRANTY
Built to Exceed
Contents
GENERAL POWER TOOL SAFETY WARNINGS
1 . Work area safety
2. Electrical safety
3. Personalsafety
4. Power tool use and care
5. Service
TOOL SPECIFIC SAFETY WARNINGS
Additional Safety Rules For SanderTools
COMPONENT LIST
TECHNICAL DATA
OPERATING INSTRUCTIONS
Intended Use
Power Switch
Changing a Sanding Sheet
Adjusting Speed
Dust Suction
Vacuum Adaptor
Sanding Surfaces
Rough Sanding
Fine Sanding
Orbital Sanding
Selecting the Right Grade of Sandpaper
Maintenance
Transport and Storage
Warranty
1
1
1
2
2
3
3
3
4
4
4
5
5
5
5
5
5
5
5
6
6
6
6
6
7
3 YEARS
LIMITED WARRANTY
Built to Exceed
1
General warnings and disposal
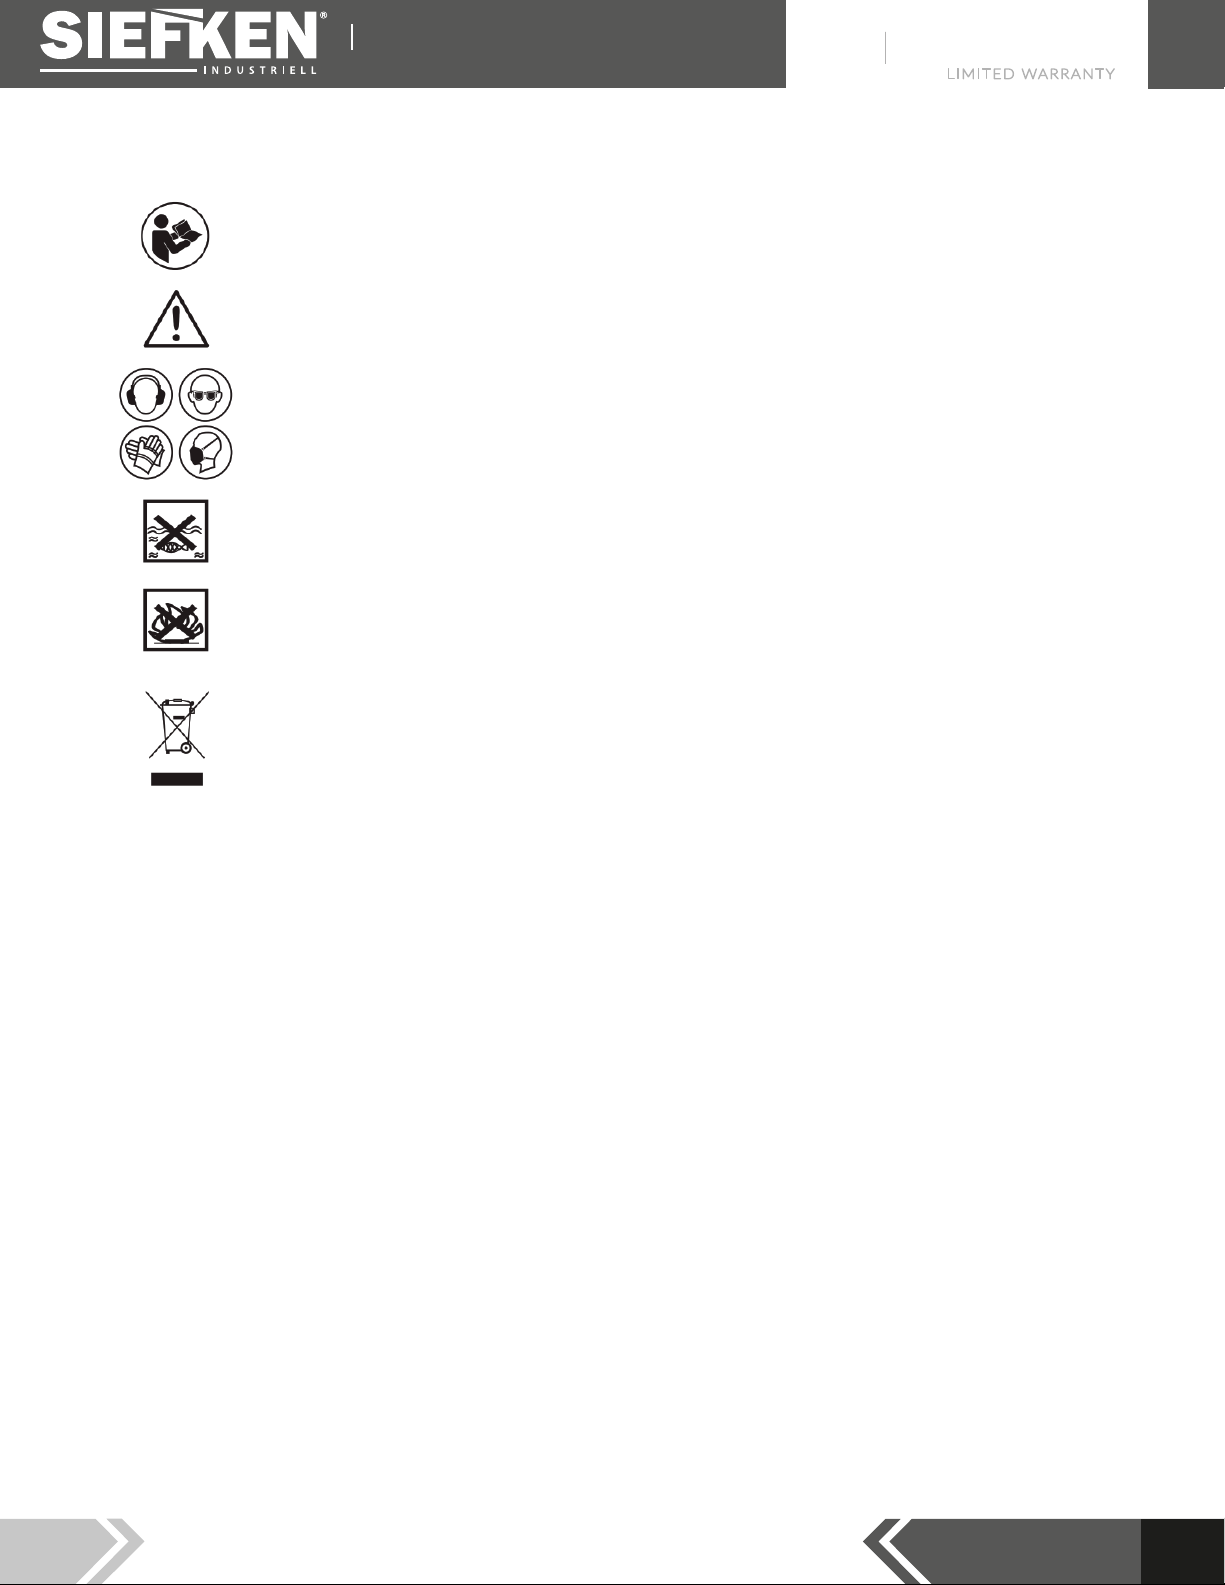
To reduce the risk of injury,the user must read the instruction manual.
This symbolis used throughout this manual to warnthe user about potential risks.
Please read & understand these sections before using the device.
PersonalProtective Equipment (P.P.E.).such as eardefenders, eye protection, safety
gloves anda dust mask, must be wornduring the operation of the device.
The device must not be exposed to rain or immersed in water.
Do not allow any part of the device to come into contact with flames, or to catch fire.
This product has been marked with a symbol relating to removing electric and elec-
tronic waste. The product should not be discarded with household waste but must
be returned to a collection system.It willthen be recycled ordismantled in order to
reduce the impact on the environment. Electric and electronic equipment can be
hazardous for the environment andfor human health since they contain hazardous
substances.
General power tool safety warnings
WARNING Read all safety warnings, instructions, illustrations and specifications provided with
this power tool. Failure to follow all instructions listed below may result in electric shock, fire and/or
serious injury.
Save all warnings and instructions for future reference.
The term "power tool" in the warnings refers to your mains-operated (corded) power tool or
battery-operated (cordless) power tool.
1) Work area safety
a) Keep work area clean and well lit. Cluttered or dark areas invite accidents.
b) Do not operate power tools in explosive atmospheres, such as in the presence of flammable
liquids, gases or dust. Power tools create sparks which may ignite the dust or fumes.
c) Keep children and bystanders away while operating a power tool. Distractions can cause you to
lose control.

3 YEARS
LIMITED WARRANTY
Built to Exceed
2) Electrical safety
a) Power tool plugs must match the outlet. Never modify the plug in any way. Do not use any
adapter plugs with earthed (grounded) power tools. Unmodified plugs and matching outlets will
reduce risk of electric shock.
b) Avoid body contact with earthed or grounded surfaces, such as pipes, radiators, ranges and
refrigerators. There is an increased risk of electric shock if your body is earthed or grounded.
c) Do not expose power tools to rain or wet conditions. Water entering a power tool will increase the
risk of electric shock.
d) Do not abuse the cord. Never use the cord for carrying, pulling or unplugging the power tool.
Keep cord away from heat, oil, sharp edges or moving parts. Damaged or entangled cords increase
the risk of electric shock.
e) When operating a power tool outdoors, use an extension cord suitable for outdoor use. Use of
a cord suitable for outdoor use reduces the risk of electric shock.
f) If operating a power tool in a damp location is unavoidable, use a residual current device (RCD)
protected supply. Use of an RCD reduces the risk of electric shock.
NOTE The term “residual current device (RCD)” can be replaced by the term “ground fault circuit
interrupter (GFCI)”or“earth leakage circuit breaker (ELCB)”.
3) Personal safety
a) Stay alert, watch what you are doing and use common sense when operating a power tool. Do
not use a power tool while you are tired or under the influence of drugs, alcohol or medication.
A moment of inattention while operating power tools may result in serious personal injury.
b) Use personal protective equipment. Always wear eye protection. Protective equipment such as a
dust mask, non-skid safety shoes, hard hat or hearing protection used for appropriate conditions will
reduce personal injuries.
c) Prevent unintentional starting. Ensure the switch is in the off-position before connecting to
power source and/or battery pack, picking up or carrying the tool. Carrying power tools with your
finger on the switch or energising power tools that have the switch on invites accidents.
d) Remove any adjusting key or wrench before turning the power tool on. A wrench or a key left
attached to a rotating part of the power tool may result in personal injury.
e) Do not overreach. Keep proper footing and balance at all times. This enables better control of the
power tool in unexpected situations.
f) Dress properly. Do not wear loose clothing or jewellery. Keep your hair and clothing away from
moving parts. Loose clothes, jewellery or long hair can be caught in moving parts.
g) If devices are provided for the connection of dust extraction and collection facilities, ensure
these are connected and properly used. Use of dust collection can reduce dust-related hazards.
h) Do not let familiarity gained from frequent use of tools allow you to become complacent and
ignore tool safety principles. A careless action can cause severe injury within a fraction of a second.
2

3 YEARS
LIMITED WARRANTY
Built to Exceed
4) Power tool use and care
a) Do not force the power tool. Use the correct power tool for your application. The correct power
tool will do the job better and safer at the rate for which it was designed.
b) Do not use the power tool if the switch does not turn it on and off. Any power tool that cannot
be controlled with the switch is dangerous and must be repaired.
c) Disconnect the plug from the power source and/or remove the battery pack, if detachable,
from the power tool before making any adjustments, changing accessories, or storing power
tools. Such preventive safety measures reduce the risk of starting the power tool accidentally.
d) Store idle power tools out of the reach of children and do not allow persons unfamiliar with
the power tool or these instructions to operate the power tool. Power tools are dangerous in the
hands of untrained users.
e) Maintain power tools and accessories. Check for misalignment or binding of moving parts,
breakage of parts and any other condition that may affect the power tool’s operation. If dama-
ged, have the power tool repaired before use. Many accidents are caused by poorly maintained
power tools.
f) Keep cutting tools sharp and clean. Properly maintained cutting tools with sharp cutting edges are
less likely to bind and are easier to control.
g) Use the power tool, accessories and tool bits etc. in accordance with these instructions, taking
into account the working conditions and the work to be performed. Use of the power tool for ope-
rations different from those intended could result in a hazardous situation.
h) Keep handles and grasping surfaces dry, clean and free from oil and grease. Slippery handles
and grasping surfaces do not allow for safe handling and control of the tool in unexpected situations.
5. Service
> Have your power tool serviced by a qualified repair person using only identical replacement
parts. This will ensure that the safety of the power tool is maintained.
SANDER TOOL SAFETY WARNINGS
> Wear ear protectors. Exposure to noise can cause hearing loss.
> Wear eye protection. Wear goggles to prevent eyes from exposure to flying particles.
> Wear dust mask. Take protective measures against inhalation of dust. Some materials can contain
toxic materials. Also work with dust/ chip extraction when connectable.
3

3 YEARS
LIMITED WARRANTY
Built to Exceed
Additional Safety Rules for sander Tools
> Proper safety gloves are also recommended.
> Use the tool for dry sanding only.
> Use clamps or a vice to secure your work whenever possible.
> Use perforated hook-and-loop sandpaper with the prescribed dimensions.
> A sanding sheet that has been used for metal should not be used on other materials.
> Do not run the machine with any part of the casing missing or damaged.
> Never switch on the sander underload and place it down only after the head has come to a complete
stop.
> Vibrations can injure the nerves in hands & arms. Keep exposure to vibrations as short as possible.
When carrying out work. always ensure that you have a stable standing position.
Component list - Technical data
4
1
2
3
4
5
Leistung // Power 320W
Geschwindigkeit // Speed 6.000-12.500 Opm
Basisdurchmesser // Base ø 125mm
Stromspannung //Voltage 110V - 60 Hz

3 YEARS
LIMITED WARRANTY
Built to Exceed
5
Intended Use
This orbital sander i s intended for dry sanding of wood, plastic, metal and filler materials well as painted
surfaces.
The tool must not be modified or used for any other purposes than the ones described in these instruc-
tions.
Power Switch
> On: Shift the ON/OFF switch slider to "I" position.
> Off: Shift the ON/OFF switch slider to "O" position.
Changing A Sanding Sheet
The sanding sheet and sanding pad are provided with a hook and loop attachment system to allow
quick and easy changing of sanding and polishing sheets.
To attach a new sheet:
> Align the edge of the disc with the edge of the pad, and ensure the sheet is centered in the plate.
> Apply pressure to the disc, ensuring it is securely fixed across the entire sanding pad.
To remove a disc:
> Lift one comer of the sanding disc and pull off from the sanding pad.
Adjusting Speed
> Disc speed can be varied by rotating the speed adjustment wheel.
> The wheel allows fine control between minimum (6.000rpm) and maximum (12.500rpm) speeds.
Dust Suction
> Efficiency and durability of sandpaper are much improved by dust suction through the apertures in the
disc and sandpaper.
> Dust collector must be emptied regularly.
Vacuum Adaptor
> The adaptor ensures coupling to vacuum cleaner in case of increased dust generation.
> Dismount the collector and fasten the tool to a vacuum cleaner.
Sanding Surfaces
> Place the machine flat on the work piece, ensuring the entire plate makes even contact.
> Turn on the sander.
> Apply uniform sanding pressure.
> Adjust the tool speed & pressure to suit the work as required.

3 YEARS
LIMITED WARRANTY
Built to Exceed
6
Rough Sanding
> Attach a sand paper with coarse grain.
> Apply only high sanding pressure to achieve increased material removal.
Fine Sanding
> Attach a sand paper with fine grain.
> With moderate pressure, move the machine in a circular pattern or alternately in lengthwise and
crosswise directions over the work piece.
> Turn on the sander.
NOTE
Do not tilt the machine during operation. This will apply uneven pressure, and may cause damage to the
work piece (e.g. When sanding veneer).
Orbital Sanding
> Guide your sander parallel to the working surface and move it in circles or a cross pattern.
> The speed of the orbital motion of the sanding pad is reduced as applied pressure increases.
Selecting The Right Grade Of Sandpaper
> Use coarse grits to sand down rough finishes. Medium grit to smooth thewor1< and fine grit to finish
off.
> The higher the grade number. the finer the grit.
> For rough work start with a low grade or grit.(e.g. 60 grit) and change to a higher, finer grade (e.g. 1
20 grit) for finishing.
> If you use a fine grade for rough surfaces it will clog and need changing more frequently.
Maintenance
> Wipe the tool with a dry or damp cloth. Do not use a wet cloth. Do not use detergent that contains
solvent or corrosive, abrasive additives. This risks damaging the surfaces of the tool.
> Clear the tool vents and the accessory mount of dust and dirt after each use.
Do not clean ventilation holes by inserting sharp objects in them, such as screwdrivers and other similar
objects.
> Stubborn contamination in areas hard to access can be removed with compressed air (max 3.bar).
> Regularly check all fasteners, screws and bolts to make sure that they are tight. Tighten any loose
screws immediately or serious injury could occur.
> If the power cord becomes damaged and replacement is necessary, this must be carried out by an
authorized warranty agent.
>Tools that are used in dusty environments and high contamination by particles and as result have inter-
nal dirt, it is recommended to remove them with compressed air (max. 3 bar).
Transport and Storage
> If the tool will remain unused for any length of time, it should be stored in the original packaging.
> Store the tool in a dry, frost-free. well ventilated place.
> Keep all tools out of the reach of children.
> Always switch off the tool and disconnect it from the power supply (remove the battery/ unplug the
power cord) before transport.
> Always carry the tool using the purpose- designed handle.
> Ensure that the tool is not at risk of tipping over or exposed to excessive vibration and shocks during
transport, especially if the tool will be transported by car or other vehicle.

3 YEARS
LIMITED WARRANTY
Built to Exceed
7
free service
SIEFKEN includes in its tools 5 free preventive mainte-
nance during the first year.
In addition, any corrective repair will have a 1year
warranty. (Doesnot apply to repairs made by someone
other than SIEFKEN staff, aswell asdamage due to
improper use, alterations, abuse, naturalwearor
accidents)
TOTAL SATISFACTION
f the SIEFKEN tool does not satisfy the need for work, within 30 days after
its purchase you can change it for one of the same type with greater
capacity only by paying the difference.
To make this guarantee valid, you must present the sealed warranty
policy and / or your original invoice and return the complete product,
without damage, with its accessories and in its originalpurchase
packaging through the Distributor network or Service Centers.
3 YEARs WARRANTY
Each SIEFKEN Industriell tool is guaranteed to the originalpurchaser to be free from defects in materials and workmanship.
Subject to certain exceptions, SIEFKEN will repair or replace any part of any power tool, after it is examined, it is determined by SIEFKEN
as defective in materials or workmanship for a period of (3) years *, after the date of purchase , unless otherwise noted. The power tool
must be returned to the SIEFKEN service center location or to the SIEFKEN authorized service station, by paid and insured shipping. A copy
of the proof of purchase must be included with the returned product. This warranty does not apply to damages that SIEFKEN determines
as coming from repairs made by someone other than SIEFKEN personnel, aswell asby improper use, alterations, abuse, naturalwear or
accidents.
*Generators, compressors, pressure washers and vacuum cleaners of the SIEFKEN
brand, which will have a 1 year warranty, are excluded from this warranty*
For more information visited our wedsite
www.siefkentools.com
WARRANTY
Unbeatable
Unübertrefflich Garantie
3
YEAR S
SERVICE
FREE OF CHARGE
Service ohne Kosten
TOTAL
SATISFACTION
Total Zufrieden

Table of contents
Languages:
Other Siefken Sander manuals

Popular Sander manuals by other brands


Meister
Meister MFS320-1 Translation of the original instructions

Far Tools
Far Tools MR 900-SP Original instructions

EZ-ON
EZ-ON 86Y quick start guide

Central Pneumatic
Central Pneumatic 96573 Set up and operating instructions

Red Stone
Red Stone RS 1200EPB Original instructions

Far Tools
Far Tools TBS 1300 Original manual translation