Signat TRIP D110Bi Quick start guide

V~~I
CI\..IUIIClI l IClIIU.CI'1
CAR DVD/VCD/CD/MP3/MP4 PLAYER
Section
-
Before
YouStart
IMPORTANT SAFEGUARDS
1. Besure to connect the color coded
leads according to the diagram.
Incorrect connections may cause
the unit to malfunction or damage
the
vehlcle
s electrical system.
2. Besure to connect the speaker (-)
leads to the speaker (-) terminal.
Never connect the lett and right
channel speaker cables each other
or to the vehicle body.
3. Make sure all the connections are
completely correct before turning
on your unit.
4. When replacing the fuse(s), the re-
placement must be of the same am-
perage as shown on the fuse holder.
s.
Do not block vents or radiator pa-
nels. Blocking them will cause heat
to build up inside and may result in
fire.
6. After completing the installation and
beginning to play the unit(including
replacing the battery), please remove
the front panel at first, and then press
RESETbutton on the basewith
pointed object (such as ball-poirrt
pen) to set the unit to initial status.
About this manual
This unit features a nurnber of sophisti-
cated functions ensuring superior
operation. All the functions have been
designed for the easiest possible use,
but many are not self-explanatory. This
manual will help you und erstand the
functions and operations of the unit.
This manual main explains remote
controI operation. However, in
addition to those functions related with
DVDNCD/CD/MP3 etc. operation that
can only be operated by the remote co-
ntrol, there are also functions can be
operated by the buttons provided for the
main unit.
~ __B_en_o_re__
Yo_u__
S_m_r_t
PRECAUTIONS
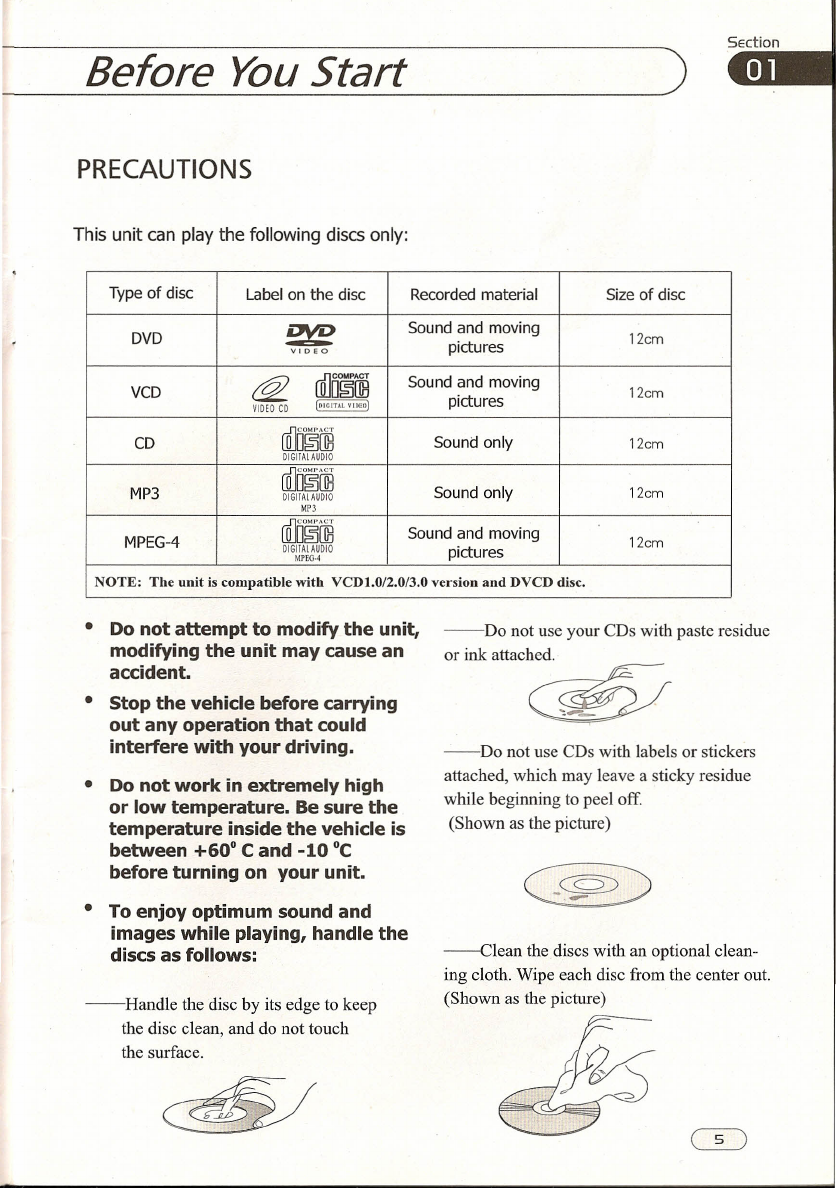
This unit can play the following discs only:
Type of disc Label on the disc Recorded material Size of disc
DVD
2Ye Sound and moving 12cm
VIDEO
pictures
VCD
@.
WJD~~
Sound and moving 12cm
VIDEO CD
[IlICJTAl.ytDEO] pictures
CD
lillO~1]3
Sound only 12cm
DIGllAlAUDIO
MP3
illlD~1]3
Sound only 12cm
DIGllAlAUDIO
MP3
MPEG-4
illlD~1]3
Sound and moving 12cm
DIGIiAlAUDIO
pictures
MPEG-4
NOTE: The unit is compatible with VCD1.0/2.0/3.0 version and DVCD disc.
• Do not attempt to modify the unit,
modifying the unit may cause an
accident.
• Stop the vehicle before carrying
out any operation that could
interfere with your driving.
• Do not work in extremely high
or low temperature. Be sure the
temperature inside the vehicle is
between +60
0
eand -10
oe
before turning on your unit.
• To enjoy optimum sound and
images while playing, handle the
discs as folIows:
--Handle the disc by its edge to keep
the disc clean, and da not touch
the surface.
--Do not use your CDs with paste residue
or ink attached.
0ifti/
--Da not use CDs with labels or stickers
attached, which may leave a sticky residue
while beginning to peel off.
(Shown as the picture)
--Clean the discs with an optional clean-
ing cloth. Wipe each disc from the center out.
(Shown as the picture)

5ection
1mB (Befare YauStart
Maintenänce
Replacing the Fuse
Make sure the amperage matches the
specified value when replacing the fu-
ses. Ifthefuse isblown, check the po-
wer connection and replace with a n-
ew one. Ifthe same problem occurs,
itwould besubjected tothe malfun-
ction. In such cases, please consuIt
to the nearest service dealer.
AWarning
Never use the fuse with the rated
amperage mare than that supplied ta
yaur unit, atherwise it will damage the
unit:
Replacing the Battery
When the range of the operation of the
card remote contral becomes short or no
functions while operating. Replacethe
lithium battery with a new button cell
(CR2025). Make sure the battery polarity
before replace.
Gently pul out the Battery Holder while
pressing the Stopper.
Put the button-type battery with mark( +)
upward into the Battery Holder.
Insert the Battery Holder into the Remote
Control.
Precautionson Using Lithium
Battery
Always keep the lithium battery beyond
children' sreach. In case
swallowed, see a doctor immediately.
Cleaningthe batterywith a dry cloth,
to ensure its perfeet connected.
Make sure the properpolarity when
loading with the battery.
Toprevent short circuit, do not use
metal tweezer to clip the battery.
A
Warning
Improper handle with the battery may
lead to explosion.
Itcannot becharged, disassembled
or
thrown into a
Iire.
___ B_e_fc_o_re__
yo_u__
S_m_r_t ~
Location of the Controls
Front Panel
98
~
\
~
j
II~MOTE
~
0-
~
n~
PREV
PLAV/PAUSE NEXT
m
ses
l '" I
~I
I .~ I
6
1/
\'
756324
J
CD
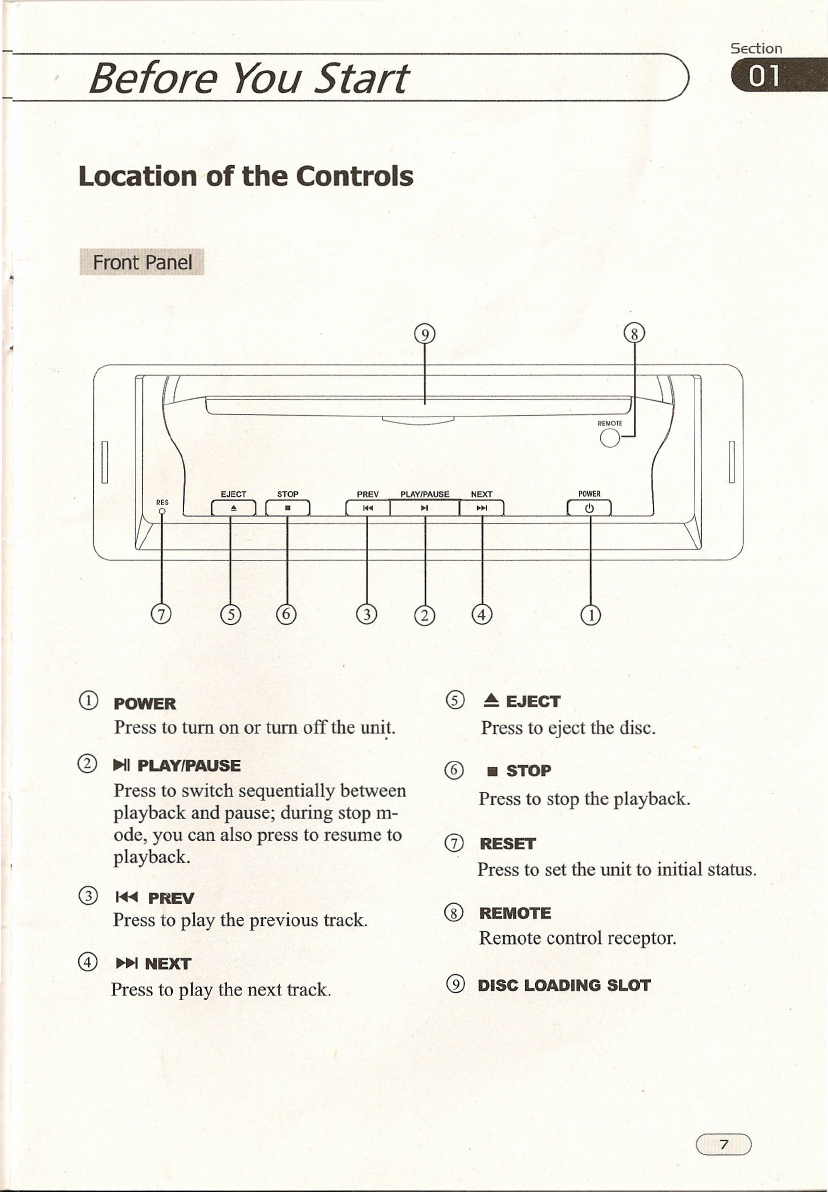
POWER
®
~ EJECT
Press to turn on or turn offthe unit. Press to eject the disc.
0
~I
PLAY/PAUSE
®
.STOP
Press to switch sequentially between Press to stop the playback.
playback and pause; during stop m-
ode, you can also press to resume to 0)
RESET
playback. Press to set the unit to initial status.
G)
~ PREV
®
Press to play the previous track.
REMOTE
Remote control receptor.
@
~I
NEXT
Press to play the next track.
@DISC LOADING SLOT
CD

Section
--
(Before YouStart
Card Remote Control
r = e
==-tIllil
Tips:
For more information as to replacing battery, please refer to ReDlacing the Battery.
~
I
___ B_e_n_o~_e__Yo_u_S_t_a_r_t
••
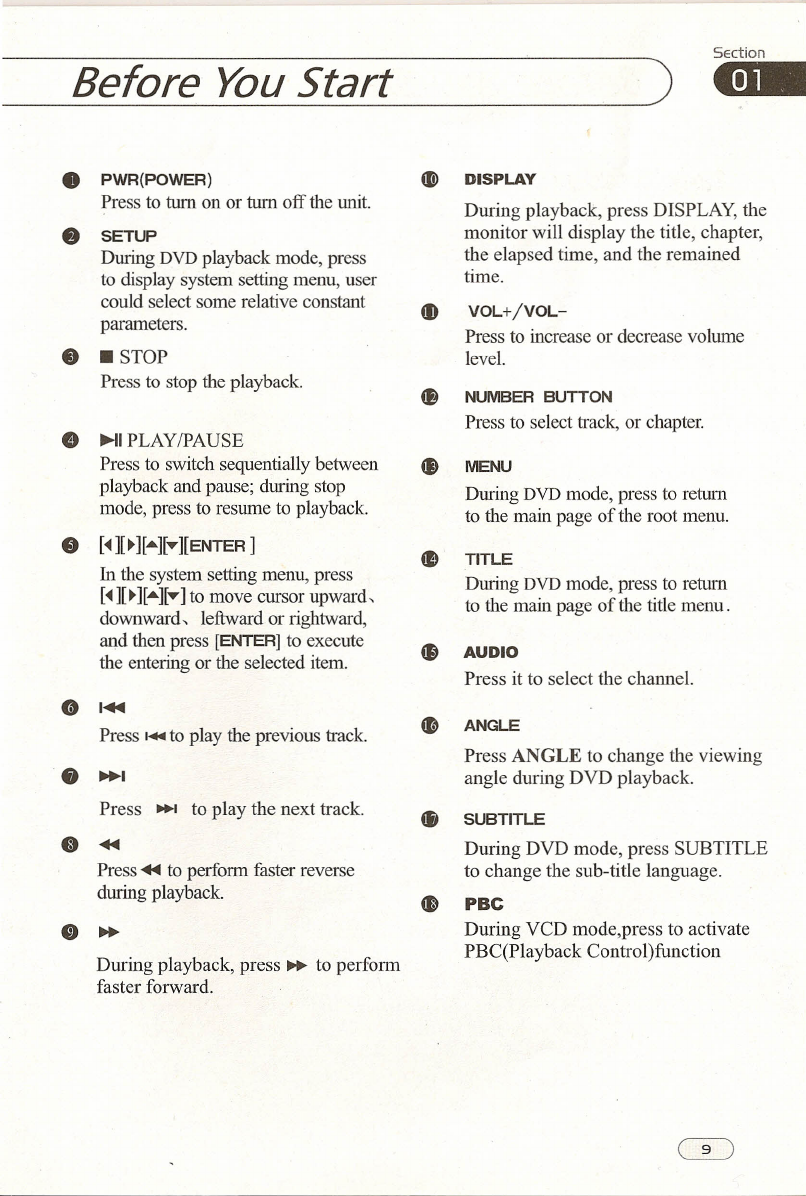
PWR(POWER)
~
DISPLAY
Press to turn on or turn off the unit. During playback, press DISPLAY, the
f)
SETUP
monitor will display the title, chapter,
During
DVD
playback mode, press the elapsed time, and the remained
to display system setting menu, user time.
could select some relative constant ~
VOL+/VOL-
parameters. Press to increase or decrease volume
e
• STOP level.
Press to stop the playback.
fB
NUMBER BUTTON
e
Press to select track, or chapter.
~I
PLAY/PAUSE
Press to switch sequentially between
••
MENU
playback and pause; during stop During
DVD
mode, press to return
mode, press to resume to playback. to the main page of the root menu.
9
[~][~]["']["'][ENTER]
e
TITLE
In the system setting menu, press During
DVD
mode, press to return
[~][~U.•.][.•.]
to move cursor upward , to the main page of the title menu.
downward , leftward or rightward,
and then press
[ENTER]
to execute •
AUDIO
the entering or the selected item. Press it to select the channel.
0
1..-
Press
1.-
to play the previous track.
4D
ANGLE
Press ANGLE to change the viewing
•
~I
angle during DVD playback.
Press I to play the next track. •
SUBTITLE
G
•••
During DVD mode, press SUBTITLE
Press-es to perforrn faster reverse to change the sub-title language.
during playback.
e
PBC
"~During VCD mode,press to activate
During playback, press ~ to perform PBC(Playback Control)function
faster forward.

Section
-
Installation
Installation Method 1
Installation Method 2
Installation Method 2
To install tbe unit firstly,
tben put tbe unit into tbe outer trim frame after
tear tbe double-face rubberized fabric off.
Bend these c1aws
outward for a tight fit,
if necessary
CD
1 2
3 4
b

___ l_n_st_a_M_a_Uo_n
Detach the Unit (for Installation Method2)
SEction
--
1. Remove the outer trim fi·ame.
CD
Mounting Sieeve
xl
2. Insert the keys supplied with the unit
at both sides ofthe unit as shown in fi-
gure until they dick. Pulling the keys
makes it possible to remove the unit
from the dashboard.
(2)
Rear Mounting Bolt
xl
(3)
Harness Rubber
xl
or
Metallic Lath x I
@
Key x2
@
Bracket
@
Outer Trim Frame
xl
Section
-
Common Operations
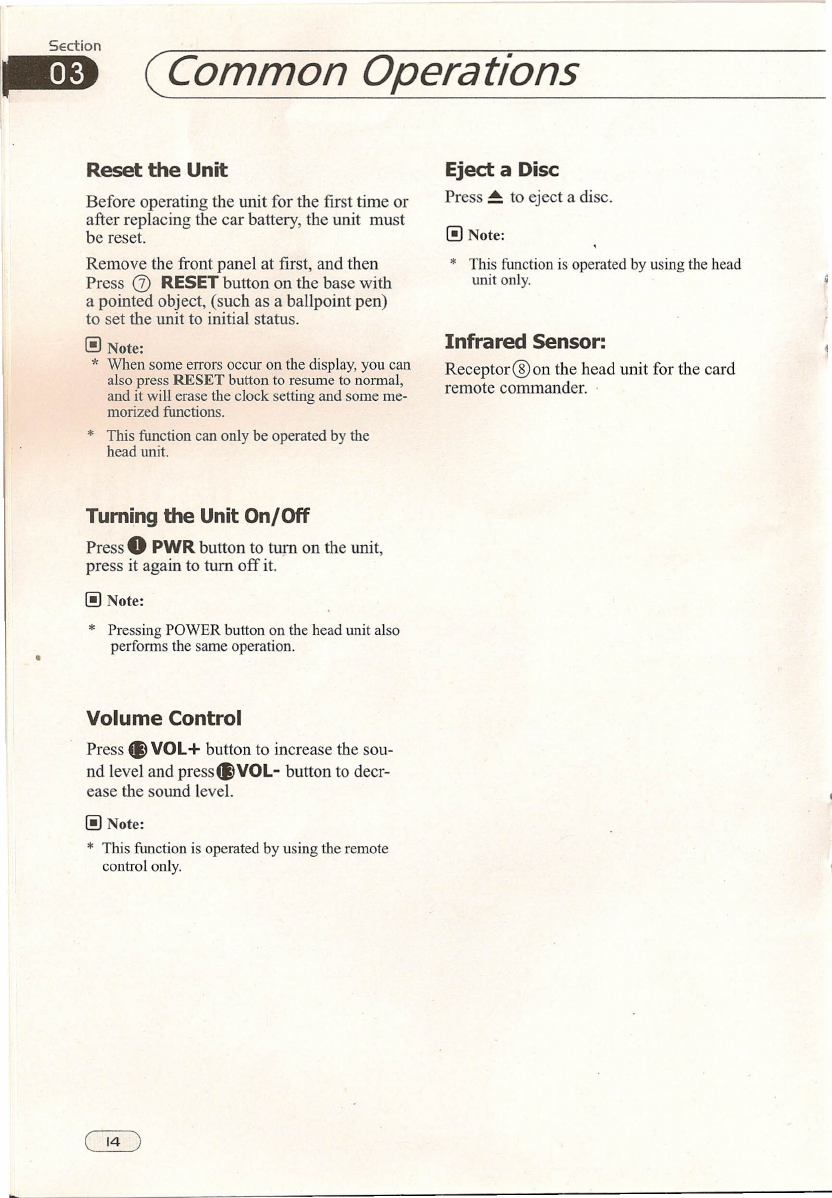
Reset the Unit
Before operating the unit for the first time or
after replacing the car battery, the unit must
be reset.
Remove the front panel at first, and then
Press
G)
RESET button on the base with
a pointed object, (such as a ballpoint pen)
to set the unit to initial status.
( )
Note:
*When some errors occur on the display, you can
also press RESET button to resume to normal,
and it will erase the clock setting and some me-
morized functions.
• This function can only be operated by the
head unit,
Turning the Unit On/Off
Press. PWR
button to turn on the unit,
press it aga in to turn off it.
( )
Note:
*
Pressing POWER button on the head unit also
performs the same operation.
Volume Control
Press. VOL+
button to increase the sou-
nd level and
press.VOL-
button to decr-
ease the sound level.
( )
Note:
*
This function is operated by using the remote
control only.
Eject a Disc
Press ~ to eject a disc.
( )
Note:
*
This function is operated by using the head
uni only.
Infrared Sensor:
Receptor@on the head unit for the card
remote commander.
Section
___ D_VD ~
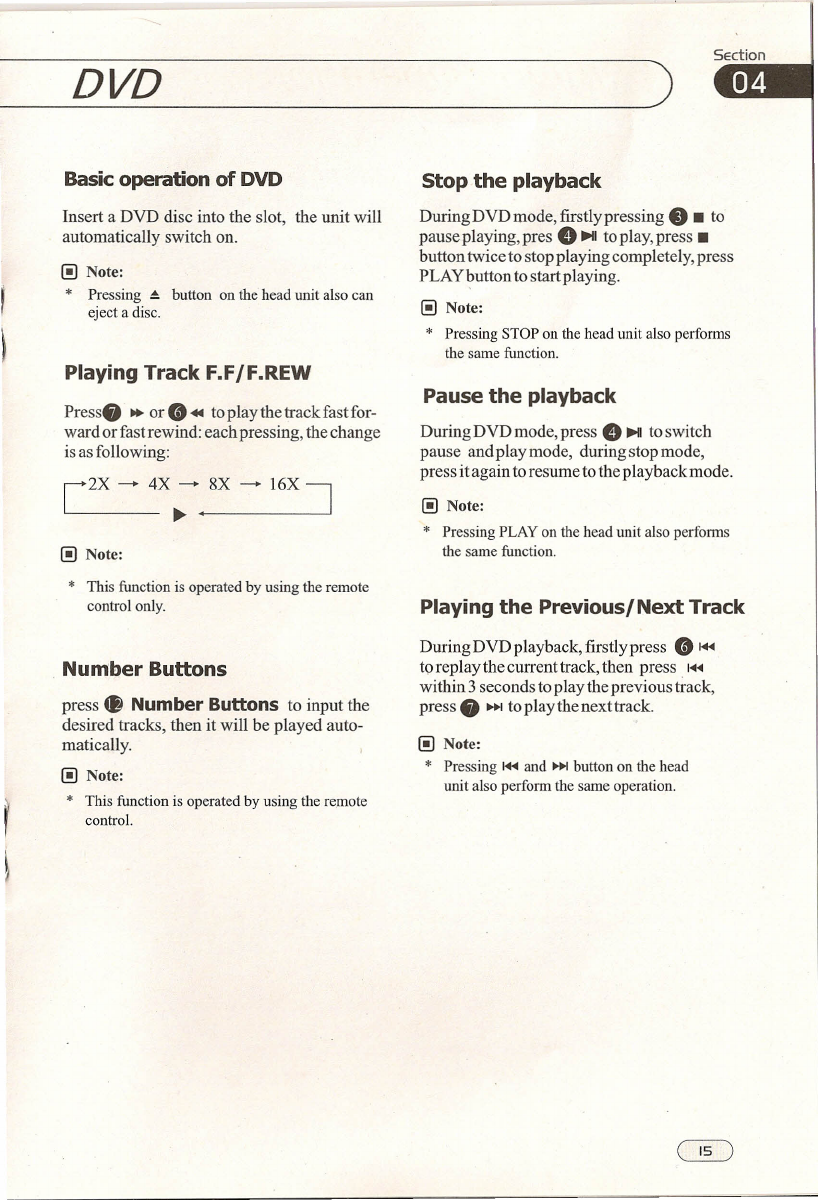
Basic operation of DVD
Insert a DVD disc into the slot, the unit will
automatically switch on.
[ )
Note:
*
Pressing ~ button on the head unit also can
eject a disc.
Playing Track
F.F/F.REW
Press. ~ or8 •. toplaythe trackfastfor-
ward or fast rewind: each pressing, the change
is as following:
[2X - 4X; •.., 8_X_-__ 16_X_~_
[ )
Note:
*
This function is operated by using the remote
control only.
Num·ber Buttons
press ~ Number Buttons to input the
desired tracks, then it will be played auto-
matically.
[ )
Note:
*
This function is operated by using the remote
control.
Stop the playback
During DVD mode, firstly pressing •• to
pause playing, pres
e
~I
to play, press.
button twice to stop playing completely, press
PLAY~)Uttonto start playing.
[ )
Note:
*
Pressing STOP on the head unit also perfonns
the same function.
Pause the playback
During DVD mode, press
e
~I
toswitch
pause andplaymode, duringstopmode,
press it again to resume to the playback mode.
[ )
Note:
*
Pressing PLAY on the head unit also performs
the same function.
Playing the Previous/Next Track
DuringDVDplayback,firstlypress 81+4
to replay the current track, then press
I.••.••
within 3 seconds to play the previous track,
press. ~ toplaythenexttrack.
[ )
Note:
*
Pressing
I.••.••
and ~ button on the head
unit also perform the same operation.

~n
~
(DVD
On-screen display
During DVD playback, press ~ DISPLAY,
the monitor shows:
r
Title eiapsed time - Title remain time ~
L
OFF
+---
chap~er.
+--
Chapter .
....J
remam time elapsed time
( )
Note:
*
This function is operated by using the remote
contro .
Chan9ing the viewing angle
(Multi-angle)
With DVDs featuring multi-angle (scenes
shot from multiple angles) recordings, then
press ~ ANGLE to switch among viewing
angles during playback.
Selection options switch as follows:
ANGLE 1-- ANGLE 2 -- ANGLE 3
( )
Note:
*
This function is operated by using the remote
contro .
*
This function is only operated by DVD with
multi-angle recordings.
*
This
ffi:J
mark on a DVD package indicates
it features multi-angles scenes,
The number in the
ffi:J
mark indicates the
number of angles from which scenes were slot.
*
If you press ANGLE during fast forward/fast
reverse or pause, fast forward/fast reverse or
pause is canceled and normal playback resumes
but the viewing angle does not change .
...
Chan9ing the subtitle language
(Multl-subtitle)
With DVDs featuring multi-subtitle recor-
dings. Then
press.
SUBTITLE to switch
between subtitle languages during playback.
Selection options switch as follows:
Subtitles 1 - Subtitles 2 - Subtitles OFF
( )
Note:
*
This function is operated by using the remote
contro .
*
This function is only operated by DVDs with
multi-subtitle recordings.
*
The number in the
(b)
mark on a DVDs package
indicates the number of recorded subtitle languages.

DVD
SEction
••
Selecting Different Menu/Title
Under DVD playback mode, press ~ MENU
or
4Il
TITLE to return to the root menu or
the title menu, the monitor display a11the
chapters or a11titles. You can press
8and
•• Number Buttons on the remote co-
ntrol to select different chapter or title.
@
Note:
*
This function is operated by using the remote
control.
SET UP MENU
During DVD playback, press8SETUP ,
the screen will display system setting pic-
ture, the usercan select some relative con-
stant parameters. The user also can set it as
needed by moving the cursor and using 8
[.&.][T][<IIII][~
1
buttons, and thenpress8
ENTER to execute the se1ecting or enter-
ing item.
@
Note:
*Ifthe disc that is inserted does not have the
preferred option then the discs own pre-
ference will be used.
*
Regarding SETUP MENU, please refer to
pages 18-23 for more details.
*Some functions varies depending on the types
of models or forrnats of the disco

~
~DVD
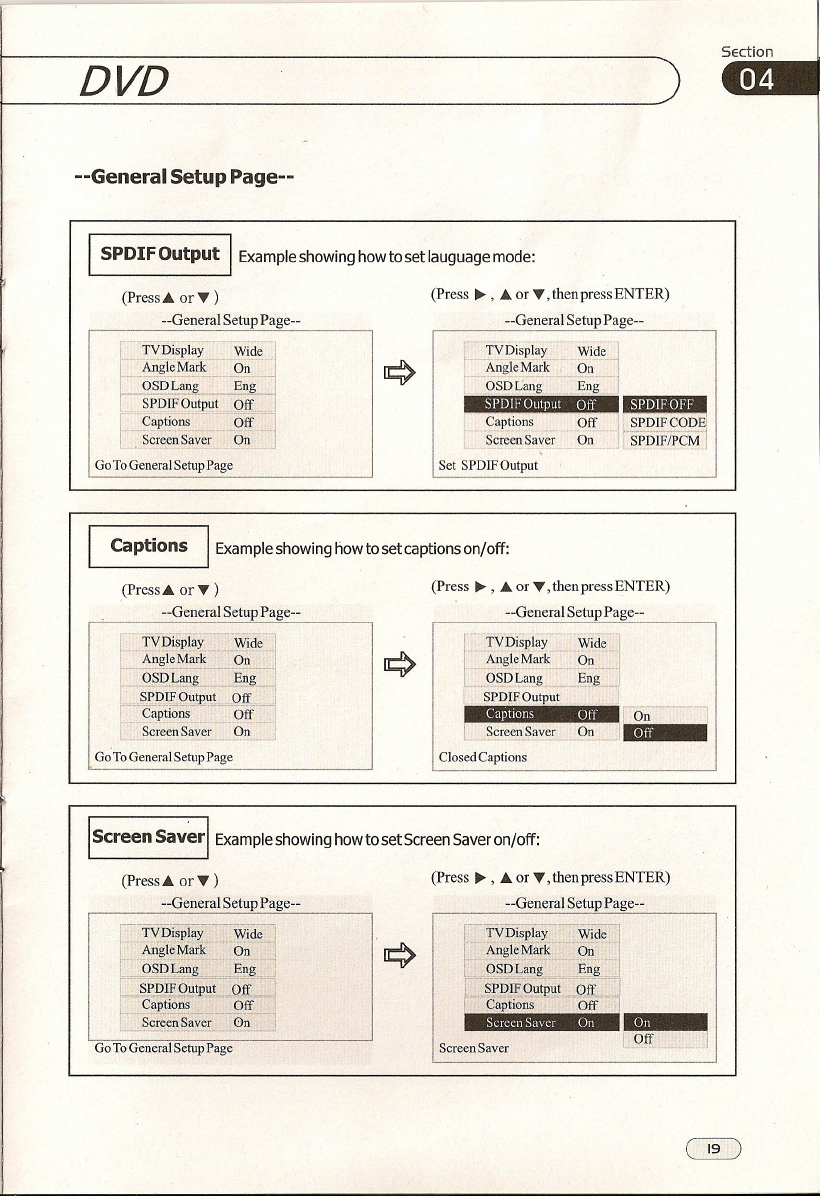
--General Setup Page--
TV Display
I
Example showing how to setTV Display mode:
(Press A
or '" )
(press ~ , A or '" ,then press ENTER)
--General Setup Page-- --General Setup Page--
TVDisplay
Angle Mark
OSDLang
SPDIFOutput
Captions
Screen Saver
Wide
On
Eng
Off
Off
On
_ht.'
I
Angle Mark
OSDLang
SPDIF Output
Captions
Screen Saver
M'-
NorrnallPS
On
jll
NormaVLB
1
Eng
.MIl'.IWa i •••
Off
Off
On
Go To General Setup Page SetTV Display mode
I
Angle Mark
I
Example showing how to set picture mode:
(Press A or v ) (Press ~ , A or '" ,then press ENTER)
--General Setup Page-- . --General Setup Page--
TVDisplay
Angle Mark
OSDLang
SPDlFOutput
Captions
Screen Saver
TVDisplay
Wide
On
Eng
Off
Off
On
Wide
Angle Mark On
pi
Eng
Off
Off
On
Off
OSDLang
SPDlFOu ut
>-----cäption~
~ScreenSaver
SetAngle Mark
Go To General Setup Page
OSO Lang
I
Example showing how to set language mode:
(Press A or'" ) (Press ~ , A or "', then press ENTER)
--General Setup Page-- --General Setup Page--
TVDisplay
AngieMark
OSDLang
SPDIF Output
Caprions
Screen Saver
TVDisplay
AngleMark ~On
Wide
On
Eng
Off
Off
On
OSDLang Eng
MId,
SPDlFOutput Off
Captions Off
Screen Saver On
Go To General Setup Page SetOSD Language
DVD
--General Setup Page--
_S_P_D_I_F_O_u_t_p_u_t....J1
Example showing how to set lauguage mode:
(Press ~ , .•. or T, then press ENTER)
(Press
a
or T )
--General Setup Page-- =General Setup Page--
Set SPDlF Output
rTVDisplay
t.
~ngle Mark
.QSDLang
r
t.,
'w' .
TVIiisPia
Y-··W.-.
id;j
An~leMark .._._On.j
OSD L~ Eng-.j
SPDlF Output Off
I
l.~~~~~~~~~L_J~
J
Go To General Setup Page
SPDlF Output
orr
Captions
Sereen Saver
Captions
I
Example showing how to set captions on/cff:
(Press .•. or T ) (Press ~ , .•. or T, then press ENTER)
--General Setup Page-- --General Setup Page--
fr~~~~~f~~-~d~=1
[-'~~~~l:~'-
~~d~
1
1
r-üsm:;;;;g
--E~j
rc::>
I
"OSDLang
--E;;g-
.. SP])IF.OutputJJfC]
r
SPDIFOutput
~~~i ~~;~:=~gf::
r :~ter_.
~ ~
.~1
"'
G~To General Setup Page Closed Captions
L ~
I
Screen
sav~rl
Example showing how to set Screen Saver on/off:
(Press .•. or T ) (Press ~ , .•. or T, then press ENTER)
--General Setup Page-- --General Setup Page--
r-'Tv-Dispiay-=:=~&i
r
Angle Mark On. .1
[=()§DLa~g-:=~-= i~~]
1'='~~I~~~iR1
-~%~"'1
't"
L2rt:.__.._..._..
1
Screen Savei On
Go To General Setup Page Sereen Saver
Section

Section
1mB
DVD
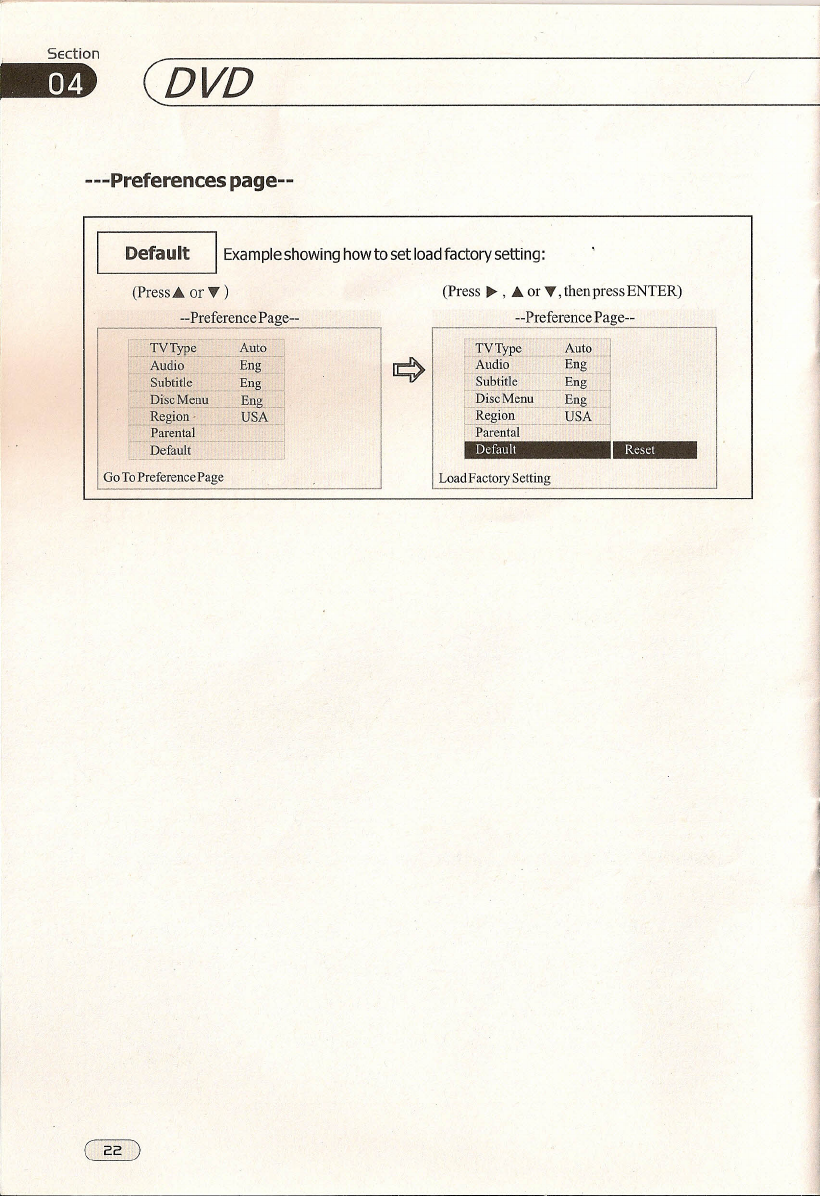
---Preferences page--
TVType
I
Exampleshowing howtosetTVtype:
(Press. or
T )
(press ~ , • or
T,
then press ENTER)
--Preference Page----Preference Page--
TVT e AutoTVType
Audio
Subtitle
DiscMenu
Region
Parental
Default
Auto
Eng
Eng
Eng
USA
PAL
-iblt
Eng
Eng
Eng
USA
Audio
Subtitle
DiscMenu
Region
Parental
Default
NTSC
Go To Preference Page SetTV Standard
Audio
I
Exampleshowing how to setAudio language:
(Press. or
T )
(Press ~ , • or
T,
then press ENTER)
--Preference Page--
--Preference Page--
umm,
TVType
Audio
Subtitle
Disc Menu
Region
Parental
Default
Auto
Eng
Eng
Eng
USA
TVType Auto
Audio Eng French
Spanish
Chinese
Japanese
Korean
Russian
Thai --
Subtitle
DiscMenu
Region
Parental
Default
Eng
Eng
USA
Go To Preference Page PreferredAudio Language
I
Subtitle
I
Example showing how to set subtitle language:
(press. or
T)
(Press ~ , • or
T,
thenpressENTER)
--PreferencePage-- --PreferencePage--
TVType
Audio
Subtitle
DiscMenu
Region
Parental
Default
-Auto-
"_-Enll
Eng
Eng
USA
Im'"
TVType
Audio Auto
Eng French
Spanish
Eng
USA
j,
Chinese
Japanese
-.-Korean ~
Russian
Tbai
DiscMenu
Region
Parental
Default
Go To Preference Page Preferred subtitle Language

___ D_VD
---Preferences page--
Disc Menu
I
Example showing how to set DiscMenu Language:
(Press
ä
or T ) (Press ~ , .•• or T, then press ENTER)
--Preference Page-- --Preference Page--
TV}ype
Audio
Subtitle
Auto
Enjl
Eng
TVT)'pe~._._ ...
Audio
Subtitle
DiscMenu
Region
Parental
Default
~:~o
'~I
~:~I
USAJ
.J
DISCMenu Eng
I:
Region
Parental
Default
USA
Go To Preference Page Preferred Menu
Language
Region
I
Exampleshowing howtosetregion:
(Press
ä,
or T ) (Press ~ , .•• or T, then press ENTER)
--Preference Page-- =Preference Page--
I:-TVType ~ Äut-;;:- ~ "China •.
:I
f'
Audio ,ßn~ ,~ ...Eran~~.
i'
Subtitle Eng Hongkong ,
Disc Menu 'Eng
~.1aQ"'I ._
• '
I
Taiwan
I
I
Britain
C.
P3'rent,,1
I
Thailand
I
Default
lliäii.i
L --
."'14
Set Region
~~~~~~":~~~=f~~
j
I B;~~~:~;..~
i:~
.j
'Region USA
Parental ,--,.'
'I
-Öefallit .J
Go To Preference Page
Parental
I
Example showing how to set parental control:
(Press
ä
or T ) (Press ~ , .•• or T, then press ENTER)
=Preference Page--
Auto
1
Eng
Eng
Eng
USA
[' TVType~-
I
Audio
r
'~'S~b;itle
i' .
r5iscM~;;u"
r~l~l~~l
L_,~~all~
Go To Preference Page Set Parental Control
, Section
--
(DVD
---Preferences page--
Default
I
Example showing how to set load factory setting:
(Press
a
or T ) (Press ~ , ..•.or T, then press ENTER)
--Preference Page-- --Preference Page--
il~-.
TY"Type
i
Audio
i-
-Subt;tl~-
Auto
En~
Eng
Parental
-Defa~lt
.fYIYI'e_: __
·=~~~~~~l
Audio. Eng
_.~~~:~~:_:~-_J:f-
i
Region USA
)--_
...
-----_.,
--
--
._----"
--
--'--
i
Parental
Default
I;M
Go To Preference Page Load Factory Setting

DVD
---Password Setup page---
Password Mode Exampleshowing howtosetpassword mode:
(Press
ä
or v )
--Password Setup Page--
l-'
Password On
Go ToPassword Setup Page
(Press" , .•. or ", then press ENTER)
--Password Setup Page--
Password
I
Example showing how to change the password: Thedefaultpasswordis8888.
(Press .•. or v ) (Press" , .•. or ", then press ENTER)
--Password Setup Page-- --Password Setup Page--
Go ToPassword Setup Page
Password Mode
Change Password

Section
11m)
Stop the playback
(VCD/CD/MP3
Basicoperation of Discs
Playing VCD/CD/MP3 Insert a disc
into the slot, the unit will automatically sw-
itch on.
( )
Note:
*
Pressing ~ button on the head unit also can
eject a disc.
Playing the Previous/Next Track
DuringMp3 playback, press •
1+4
toplay
the previous track, press.
»I
to play the
nexttrack.
During VCD/CD playback, firstly pressing
1+4
to replay the current track, press
1+4
within 3 seconds to play the previous track,
press
~~I
toplaythenexttrack.
( )
Note:
*
Pressing
I.••.••
and
~~I
button on the head
unit also perform the same operation.
Playing Track F.F/F.REW
Press. ~ or
0 •.•
toplaythetrackfast-
forward or fast backward: each pressing, the
change is as following:
C2X-+4X-+8X-+ 16Xi
~+-.----~
( )
Note:
*
This function is operated by using the remote
control only.
During MP3 mode, press
Cl •
topause
playing, press it again,to play the current track.
During VCD/CD mode, firstlypressing • to
pause playing, presse
~I
to play, press •
button twice to stop playing completely, press
PLAYbutton to start playing.
( )
Note:
*
Pressing STOP on the head unit also perforrns
the same function.
Pause the Playback
During playback, press
e
~I
button to
suspend the playback, Press it again to
retum to normal playback.
( )
Note:
*
Pressing PLAY on the head unit also performs
the same function.
Table of contents


