Silent Gliss SG 11429 User manual

Installation and User Manual
March 2020
Single Channel Timer Remote
SG 11429
EN
Page 1 of 12
EN

EN
Page 2 of 12
Contents
Features .....................................................................................................................................................3
Screen Display & Button Functions ...........................................................................................................4
Technical Data............................................................................................................................................5
General Operation......................................................................................................................................5
Installation ..................................................................................................................................................6
Timer Set-up ..............................................................................................................................................7
Step 1 Timer unit activation .......................................................................................................................7
Step 2 Addressing Timer Unit to Motor .....................................................................................................8
Changing Direction.....................................................................................................................................8
Step 3 Setting the Clock (time of Day) .......................................................................................................9
Step 4 Setting the Timer – (open and close) ............................................................................................10
Turn Off Timer Function............................................................................................................................11
Turn On Timer Function............................................................................................................................11
Troubleshooting........................................................................................................................................11
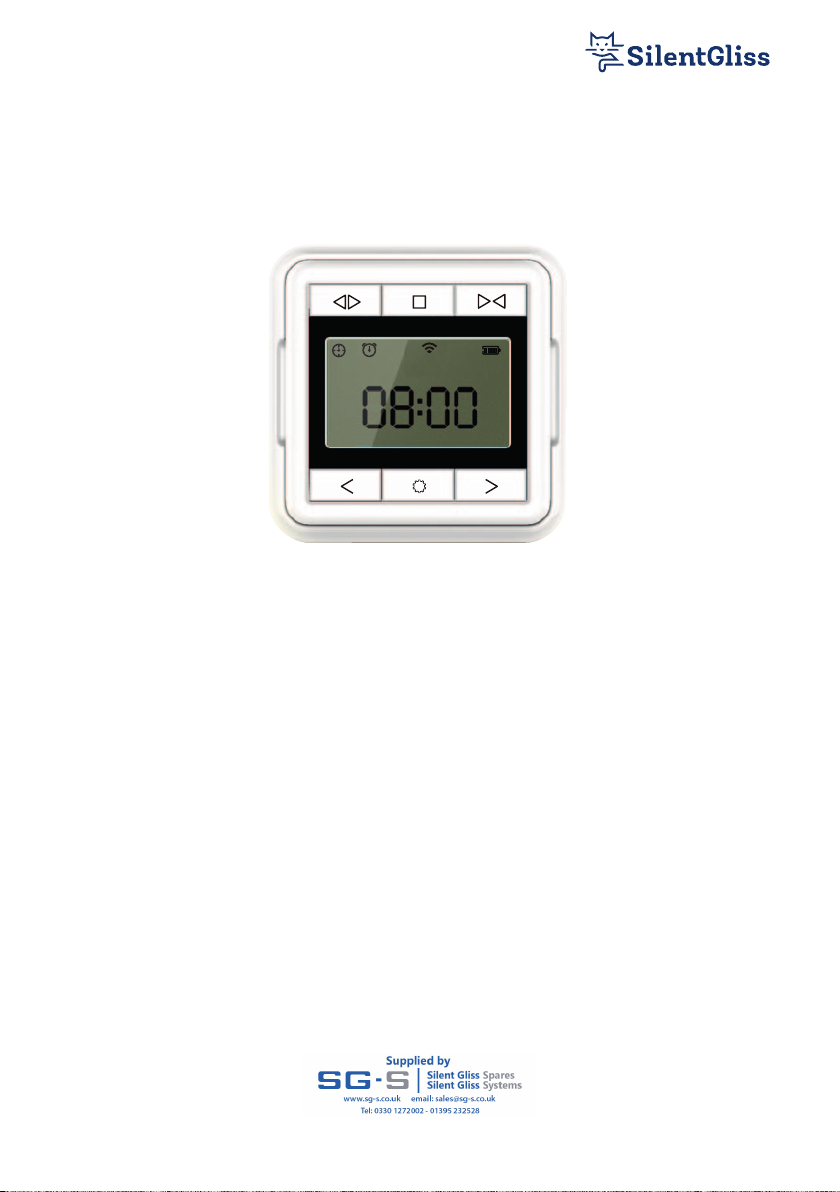
Features
Radio control
Battery operated
LCD display
Manual click buttons
Timer function – one single open / close time applied to every day
Manual override function
CR2450 battery (Lithium Cell)
Surface mounted back box with magnetic holder
EN
Page 3 of 12

Open Close
Stop
Battery Status
Time
Signal Status
On / Off button
Shift RightShift Left
Timer
Clock
Setting
Screen Display & Button Functions
EN
Page 4 of 12
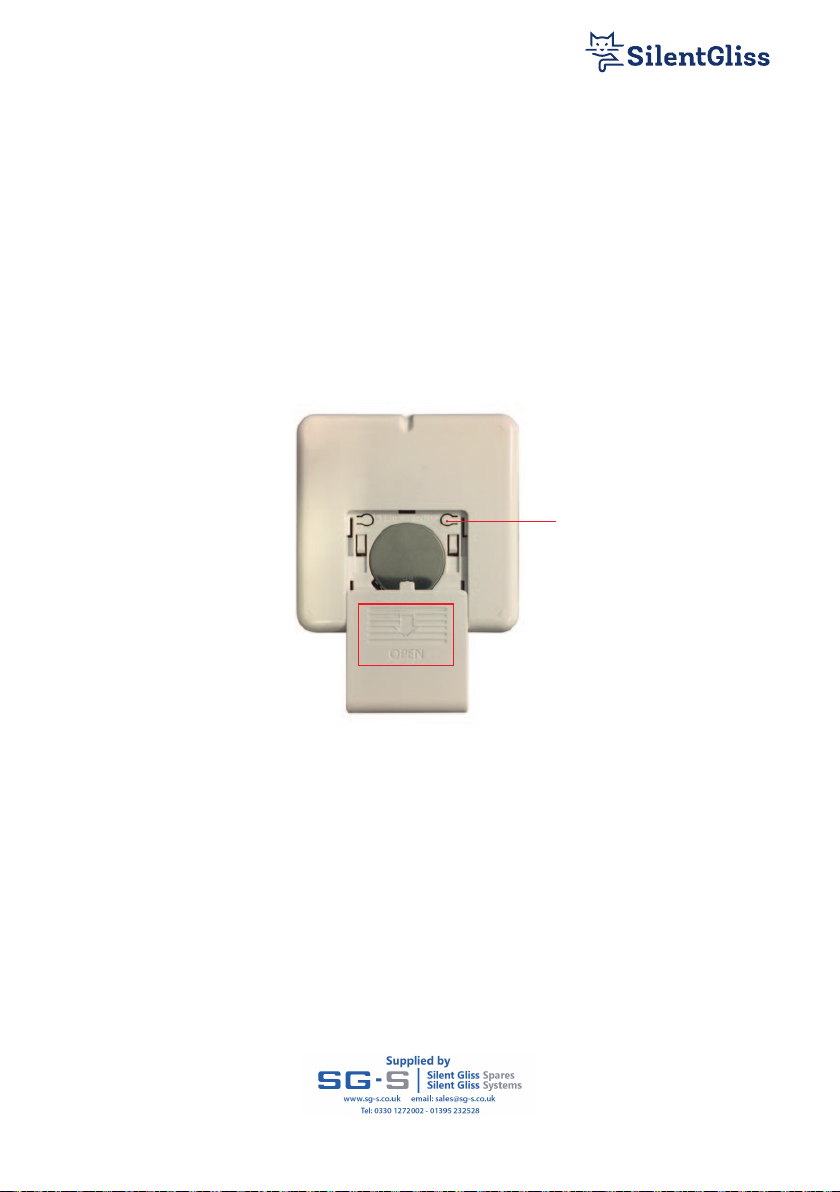
Rear View

EN
Page 5 of 12
Technical Data
Part Number SG 11429
Power supply CR 2450 (3v) battery
Power < 10 mW
Stand-by Current ≤5uA
Working Current ≤10mW
Radio Frequency 433.92 MHz
Working Temperature -20°C~+55°C
General Operation
The SG 11429 can be used to control a single motor OR operate multiple motors, however if controlling
multiple motors all will work simultaneously at the programmed times or from the manual buttons.
The SG 11429 can be used in either a timer mode - 1 open operation and 1 close operation can be
programmed per day / 24 hour cycle, the timer function can be turned on or turned off and in either
mode still operated as a manual wall switch.
Once open and close times have been set in the timer, these times will be retained in the memory even
if the timer is switched off, the unit is turned off or if the battery has fully drained.

EN
Page 6 of 12
B) Installation with screw – available for wall.
Wall
1) Position and Insert fixings into the wall
2) Fix surface mounted back box – ensure fitted the correct way up
3) Place unit in back box (secured in place with magnetic holder)
1 2 3
Installation
A) Installation with adhesive – available for glass and smooth tile.
3M adhesive
3M adhesive
Glass or smooth tile
1 ) Remove cover from adhesive strips
2 ) Position on tile or glass and apply pressure
1 2
EN
Page 7 of 12
Timer Set-up
Step 1
Timer unit activation
Remove from surface holder, turn over to view the rear of the unit.
Open battery cover and activate unit by pressing on / off button – LCD
display screen on front will activate.
Rear View
Press to turn on

EN
Page 8 of 12
1. — Push PROGRAMMING button on motor with a pin for 1s
2. — LED on motor blinks red
3. — Press OPEN button on timer within the next 10s
4. — Blue light on motor flashes 3 times
1. — Press STOP on the timer for 5s
2. — LED on motor flashes red slowly
3. — Release STOP and re-press within 10s
4. — LED on motor flashes blue x 3 - direction changed
Addressing Timer Unit to Motor
Changing Direction
Warning
If at this point the operation of the track is in reverse to the button direction, follow the instructions
below.
1 2 43
1 2 43
Step 2

EN
Page 9 of 12
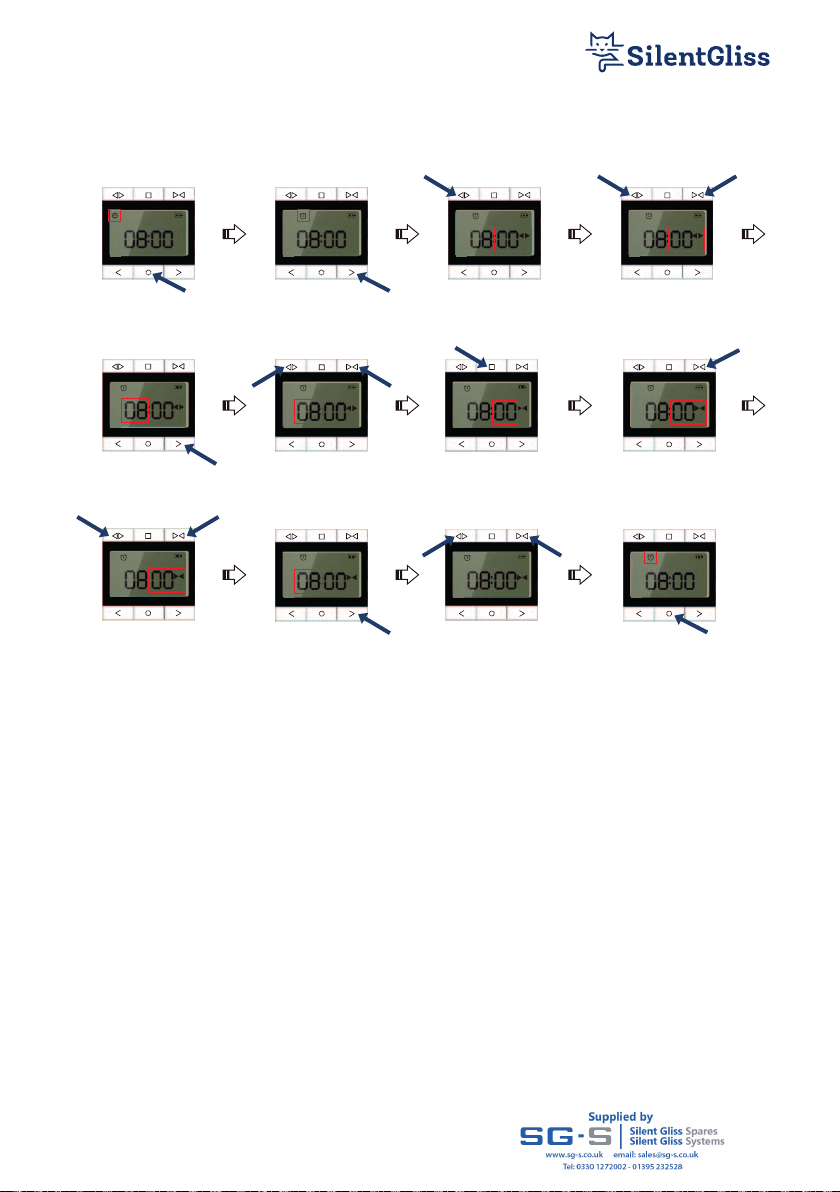
Setting the Clock (time of Day)
Step 3
1. — Press SETTING button and hold for 3 seconds, the clock appears top left and flashes
2. — Press STOP button, the hour number flashes
3. — To set the correct hour - Press OPEN to increase the hours or CLOSE to decrease the hours
4. — Press SHIFT RIGHT now to move to the minutes – the minutes now flash
5. — To set the correct minute – Press OPEN to increase the minutes or Press CLOSE to decrease
the minutes.
6. — Press SETTING button and hold for 3 seconds to finish setting the correct time
Note:
i) When setting the clock – press OPEN to increase the hours / minutes, press CLOSE to decrease the hours /
minutes. If you hold either the OPEN or CLOSE buttons for longer than 2 seconds and the digits will scroll
rapidly whilst held.
ii) When setting the clock SHIFT LEFT and SHIFT RIGHT move between the minutes and hours.
iii) If during setting you wish to abort the process – Press and hold STOP for 3 seconds, the screen will revert to
the control screen without saving any changes.
123
456
EN
Page 10 of 12
1. — Press SETTING button for 1 second and release – the clock symbol appears on screen top left.
2. — Press SHIFT RIGHT – the clock will disappear, and the timer symbol will flash.
3. — Press OPEN the minutes will flash and the open symbol appears on the right of the screen.
4. — To set the correct minute – Press OPEN to increase the minutes or Press CLOSE to decrease
the minutes.
5. — Press SHIFT RIGHT now to move to the hours – the hours now flash.
6. — To set the correct hour – Press OPEN to increase the hours or Press CLOSE to decrease
the hours.
7. — Press STOP the close symbol will appear on the screen
8. — Press CLOSE and the minutes will flash – the close symbol remains on the screen.
9. — To set the correct minute – Press OPEN to increase the minutes or Press CLOSE to decrease
the minutes.
10. — Press SHIFT RIGHT now to move to the hours – the hours now flash.
11. — To set the correct hour – Press OPEN to increase the hours or Press CLOSE to decrease
the hours.
12. — Press and hold SETTING for 3 seconds this will set the timer and the timer symbol will stay solid.
9 10 11
1 2 3
567
12
4
8
Setting the Timer – (open and close)
Step 4

EN
Page 11 of 12
Troubleshooting
Problem Reason Solution
If screen is incomplete Battery level low Change battery
and not clear
Poor remote sensitivity Check installation position Re-position unit
for metal obstructions
No response after 1. Screen is frozen 1. remove the battery
pressing buttons and replace
Turn Off Timer Function
1). With the timer function symbol on screen and timer function on - to now turn off
Press and hold both SHIFT left and SHIFT right together and hold for 3 seconds - the timer symbol will
dissappear and the timer function is now switched off.
1
Turn On Timer Function
2). With the timer function off and no timer symbol on the screen – to now turn on without changing the
open / close times.
Press and hold both SHIFT left and SHIFT right together and hold for 3 seconds - the timer symbol will
re-appear and the timer function is now switched back on.
2

EN
Page 12 of 12
www.silentgliss.co.uk
Table of contents
Popular Remote Control manuals by other brands


LEGRAND
LEGRAND 0 882 32 manual

Genius
Genius coralis CRH-15-00 operating instructions

Viessmann
Viessmann VITOTROL 100-E operating instructions

Multiplex
Multiplex COCKPIT SX instruction manual

Advanced Engineering
Advanced Engineering Mimic quick start guide

Bay Products
Bay Products Tek Partner BW-0561-RD user manual