Silhouette Select DOAR154SSST Assembly instructions

OUTDOOR ALL REFRIGERATOR
RÉFRIGÉRATEUR EXTÉRIEUR
Owner’s Use and Care Guide
Guide d’utilisation et soin de Propriètaire
Model • Modèle
DOAR154SSST
V3.05.11.DM

OUTDOOR ALL REFRIGERATOR
Owner’s Use and Care Guide .......................................1-10
• Safety Instructions
• Before Use
• Installation Instructions - Built In
• Installation Instructions - Outdoor Use
• Features
• Operating Instructions
• Care and Maintenance
• Troubleshooting
• Warranty
RÉFRIGÉRATEUR EXTÉRIEUR
Guide d’utiliser et soin de propriètaire ......................11-20
• Consignes de sécurité
• Avant l’utilisation
• Notice d’installation - Encastré
• Notice d’installation - Utilisation extérieure
• Caractéristiques
• Opération
• Soins et entretien
• Dépannage
• Garantie
CONTENTS
CAUTION
Read and follow all safety rules and operat-
ing instructions before first use of this prod-
uct.
Veuillez lire attentivement les consignes de
sécurité et les instructions d’utilisation avant
l’utilisation initiale de ce produit.
PRECAUTION
Model • Modèle
DOAR154SSST

GROUNDING
INSTRUCTIONS
To avoid installation/operation difficulties, read
these instructions thoroughly.
•This appliance must be grounded. Connect only to a
properly grounded outlet. See “Grounding Instructions”
section.
•Do not operate this appliance if it has a damaged power
cord or plug, if it is not working properly, or if the
appliance has been damaged or dropped.
•Never allow children to operate, play with, or crawl
inside the appliance.
•Never clean appliance parts with flammable fluids. The
fumes can create a fire hazard or explosion.
•Do not store or use gasoline or any other flammable
vapors or liquids in the vicinity of this or any other
appliance. The fumes can create a fire hazard or
explosion.
•Do not splice the power cord that is equipped with this
appliance.
•Keep power cord away from heated surfaces.
•Do not immerse power cord plug or the appliance itself
in water.
•Do not use this product near water-for example, in a wet
basement, near a swimming pool or near a sink.
•Do not use corrosive chemicals or vapors in this
appliance.
•Use this appliance only for its intended use, as
described in this manual.
•Store beverages in sealed containers only.
•See door surface cleaning instructions in the Care and
Cleaning section(s) of this manual.
•Do not cover or block any openings on the appliance.
•This appliance is designed to be built in or for outdoor
use.
•This appliance should be serviced only by qualified
service personnel. Contact the nearest authorized
service facility for examination, repair or adjustment.
• This appliance must be grounded. In the event of an
electrical short circuit, grounding reduces the risk of
electric shock by providing an escape wire for the
electric current.
• This appliance is equipped with a power cord having a
grounding wire with a grounding plug. The plug must be
plugged into an outlet that is properly installed and
grounded.
• Consult a qualified electrician or service technician if the
grounding instructions are not completely understood, or
if doubt exists as to whether the appliance is properly
grounded.
• If the outlet is a standard 2-prong wall outlet, it is your
personal responsibility and obligation to have it replaced
with a properly grounded 3-prong wall outlet.
• For best operation, plug this appliance into its own
electrical outlet to prevent flickering of lights, blowing of
fuse or tripping of circuit breaker.
• Do not under any circumstances cut or remove the third
(ground) prong from the power cord.
• Do not use an adapter plug with this appliance.
• Do not use an extension cord with this appliance. If the
power cord is too short, have a qualified electrician or
service technician install an outlet near the appliance.
IMPORTANT SAFETY INFORMATION
PRECAUTIONS GROUNDING INSTRUCTIONS
WARNING:
Improper use of the grounding plug can result in a
risk of electric shock.
SAVE THESE INSTRUCTIONS
An empty refrigerator is a very dangerous attraction to children. Remove either the gasket, latches, lids, lock and/or
doors from unused or discarded appliances, or take some other action to guarantee it harmless.
DONT WAIT DO IT NOW!
1
READ ALL SAFETY INFORMATION BEFORE USING
WARNING: RISK OF CHILD ENTRAPMENT

2
BEFORE USE
BEFOR USING YOUR
ALL REFRIGERATOR
INSTALLATION OF YOUR
ALL REFRIGERATOR
• Remove the exterior and interior packing.
• Before connecting the refrigerator to the power source,
let it stand upright for approximately 2 hours. This will
reduce the possibility of a malfunction in the cooling
system from handling during transportation.
• Clean the interior surface with lukewarm water using a
soft cloth.
• When disposing your appliance, please choose an
authorized disposal site.
• Place your refrigerator on a floor that is strong enough to
support it when it is fully loaded. To level your outdoor all
refrigerator, adjust the front leveling leg at the bottom of
the unit.
• Locate the refrigerator away from direct sunlight and
sources of heat (stove, heater, radiator, etc.). Direct
sunlight may affect the exterior and heat sources may
increase electrical consumption. Extreme cold ambient
temperatures may also cause the unit not to perform
properly.
• Do not splash water from a hose on the refrigerator!
Doing so may cause an electrical shock, which may result
in severe injury or death.
• This unit should not, under any circumstances, be
ungrounded.
• Plug the refrigerator into an exclusive, properly installed
grounded wall outlet. Do not under any circumstances cut
or remove the third (ground) prong from the power cord.
Any questions concerning power and/or grounding should
be directed toward a certified electrician or an authorized
service center.
ATTENTION
• Store beverage in sealed containers
• In order for the cabinet to remain efficient do not over
load it
• Do not open the door unless necessary
• Do not cover shelves with aluminum foil or any other
shelf material which may prevent air circulation
• Should the refrigerator be stored without use for long
periods it is suggested, after a careful cleaning, to leave
the door ajar to allow air to circulate inside the cabinet in
order to avoid possible formations of condensation,
mold or odors
• Do not leave the unit outside during the winter months
(5°C/ 41°F day time high). Please store the unit inside
during cold weather. The appliance can be left out during
precipitation under a canopy.
LOCATION
• Selecting the proper location will ensure peak
performance levels of your appliance. Choose a location
where the unit will not be exposed to heat emitting
sources (e.g a fireplace or a barbeque).
• The outdoor all refrigerator should not be exposed to
direct sunlight. Keep the refrigerator shaded. Prolonged
exposure to direct sunlight may increase cooling time
and electricity consumption (energy costs).
• Do not use product near water, for example : in a wet
basement, near a swimming pool or sink.
INSTALLATION INSTRUCTIONS - BUILT IN
*NOTE: Your outdoor all refrigerator can be built in. The unit may not be energy star compliant once built in.
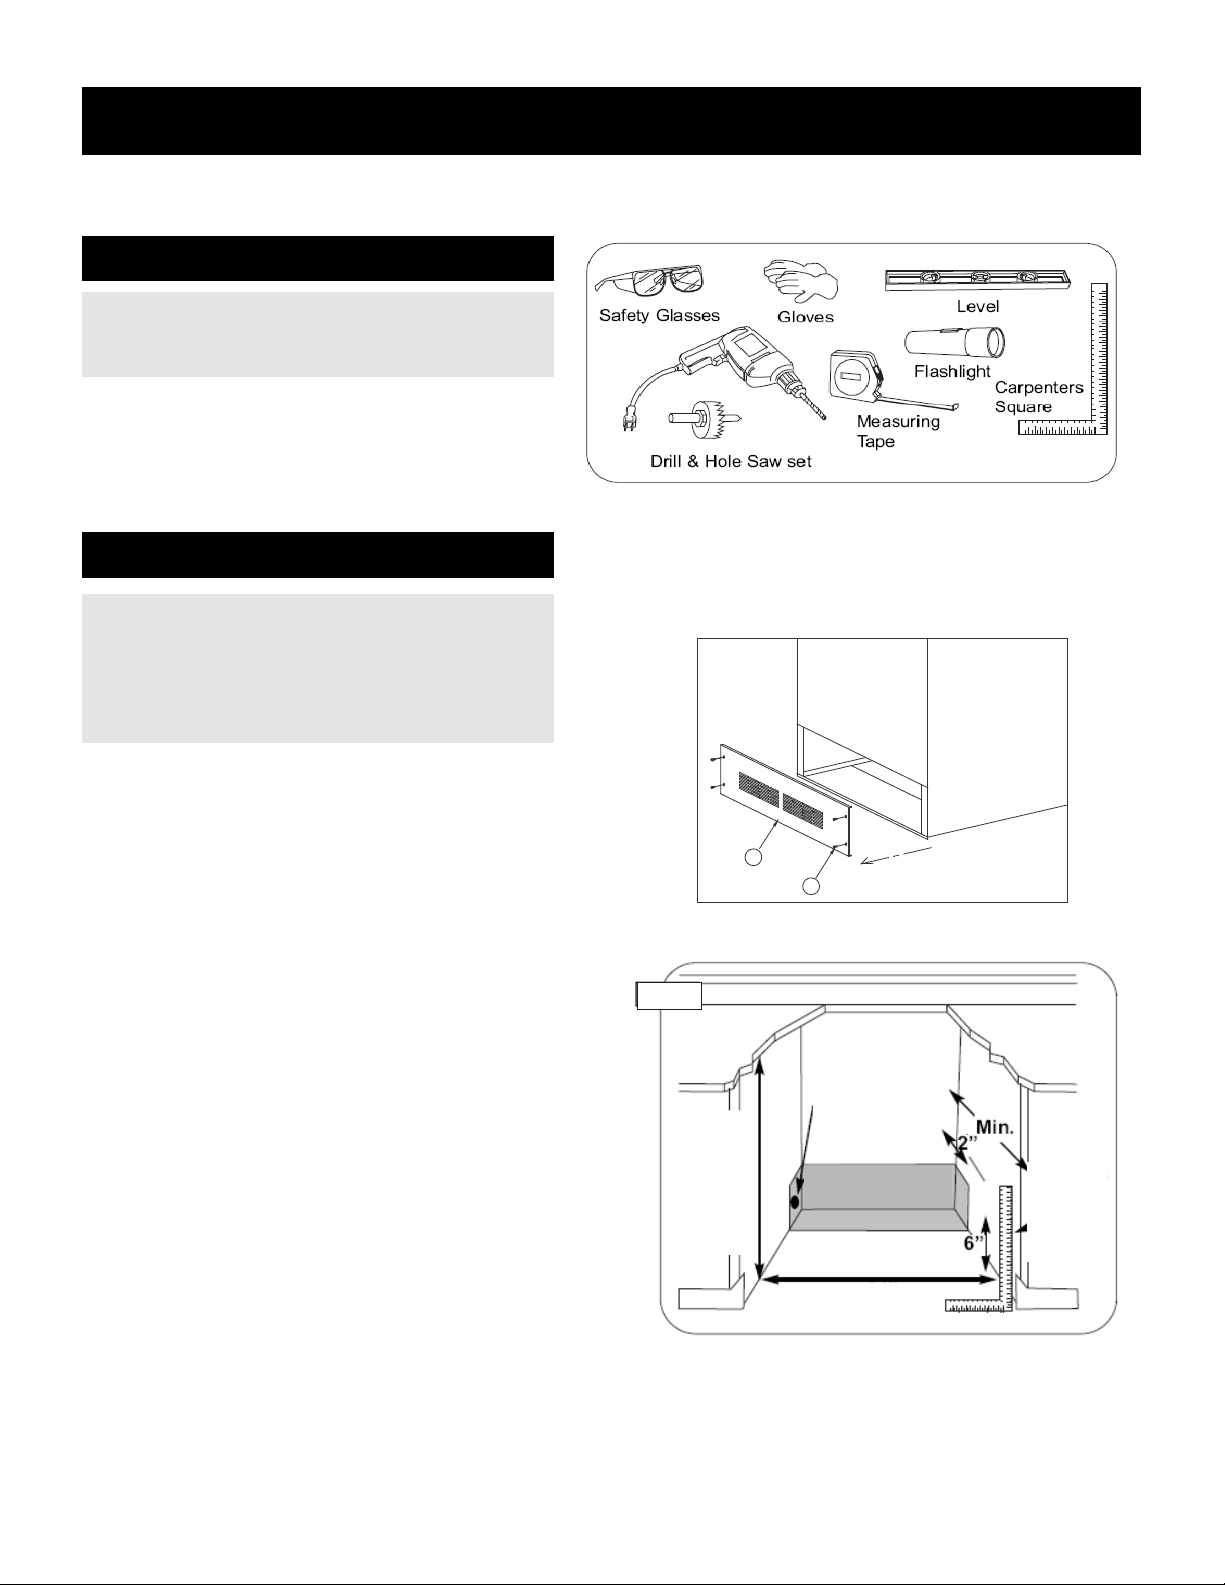
TOOLS YOU WILL NEED
11
/2”d iam.hole
*Ifelectricalout-
letisinadjacent
cabinetry.
343
/4” from
underside
of
countertop
tofloor
Cabinets
square
and
plumb
FigA
24”
34 2/4” from
underside of
countertop to
floor. Cabinets
square
and plumb
1 1/2” diam. hole
* If electrical outlet
is in adjacent
cabinetry.
Electrical Access
Fig.2
While performing installations described in
this section gloves and safety glasses or
goggles should be worn.
PREPARING THE ENCLOSURE
• Remove the screws (see Fig.1. number (2) 4
screws total) from the compressor back cover and
take out the compressor cover (see Fig.1. number 1)
before installing the unit. Please keep all components
that you take out from the back of the unit. (Fig.1)
• Keep the spare caster
• It is recommended that you do not install the outdoor
all refrigerator into a corner (i.e. directly beside a
wall). This is to allow the door(s) to have a greater
then 90° opening swing. A limited door swing will
prevent the shelves from sliding out as intended, and
may lead to damaging the door gasket(s).
• The rough cabinet opening must be on a level floor
area and at least 26” deep by 24” wide. The
opening should also have a height of at least
34 2/4”.
• The electrical outlet may be positioned from within
either side of the adjacent cabinetry, or the rear of
the shaded area (as shown in Fig 2.).
• If the electrical outlet is located inside the adjacent
cabinetry, cut a 1-1/2” diameter hole to admit
the power cord. If the cabinet wall is metal, the hole
edge must be covered with a bushing or grommet.
ELECTRICAL REQUIREMENTS
The appliance must be connected to an
individual, properly grounded electrical
outlet protected by a 15 or 20 ampere circuit
breaker or time delay fuse.
26”
1
2
BACK
Fig.1
BACK
3

INSTALLATION INSTRUCTIONS - OUTDOOR USE
CASTER ROLLER
INSTALLATION
Fig.1
Fig.2
Fig.3
2x
2x
4x
8x
a) Tilt the unit on it’s back on a level ground and remove
the 4 cabinet legs (Fig.3 number 4). Reserve the
cabinet legs.
b) Assemble the casters with brake (Fig.3 number 1) on
the cabinet front bottom and the other 2 casters (Fig.3
number 2) at the cabinet rear bottom.
c) Assemble each caster to the bottom of the unit with (2)
M5x10 screws with a star or Phillips screwdriver (Fig.3).
d) The caster brake (Fig.3 number 1) at the front bottom
of the cabinet comes with a braking function. When
brake handle is “ON” (Fig.2) unit wont roll, when brake
handle is “OFF” (released) it will roll. (Fig.2)
•Unplug the powercord and release the brake before
moving the cabinet.
•Do not put any goods on top of the cabinet and avoid
slanting the cabinet when moving it.
• Push the cabinet from the rear making sure the door
does not open.
•Please do not use the cabinet in bad weather to avoid
short circuits. Position the cabinet under a canopy.
• Do not let children climb the cabinet or move
the cabinet to another location.
• Keep the caster brake in “ON” position while in
desired location.
• The cabinet must be put on a level ground.
• The cabinet will reach it’s cooling effciency after one
hour.
WARNING
4

5
FEATURES
11
1. Control panel : For viewing and regulating the
temperature for the refrigerator.
2. Full glass shelf with white trim.
3. Small glass shelf with white trim.
4. Leveling Legs
5. Interior Light Toggle Switch: To control the light. Turns
on when the door is open and turns off when the door is
closed.
6. Door Storage (upper door shelves).
7. Baffle plate
8. Door Shelf (tall bottle storage)
9. Stainless steel door that is fully insulated.
10. Stainless steel handle.
11. Casters

6
OPERATING INSTRUCTIONS
Please use the appliance between 41-90°F (5-32°C) ambient temperature. If the ambient temperature is
higher than or lower than this temperature it will cause temperature fluctuation in the cabinet.
CONTROL PANEL
INSTRUCTIONS
Indicator light illuminates to signify the cooling mode
is currently in operation.
Control the interior light ON/OFF.
To turn appliance on/off (press and hold this button
for approximately 3 seconds).
Used to raise(warm) the temperature by 1°
increments.
Used to lower (cool) the temperature by 1°
increments.
(°C / °F) Adjacent indicator light denotes which scale of
temperature is displayed.
SETTING THE TEMPERATURE
CONTROLS
• The temperature range can be set as low as 36 °F
(2°C) or as high as 50°F (10°C) to suit your specific
storage requirements. Each depression of the
buttons will allow you adjust the temperature in 1°
increments within the aforementioned range.
• To switch the display between the Fahrenheit (°F) and
Celsius (°C) scale, depress the
simultaneously for approximately 3-5 seconds.
buttons
Temperature Memory Function
• If power is lost the set temperature will be saved by the
unit. Once the power is back on the unit will return to the
same set temperature.
Door Ajar Function
• If door is not fully closed, there will be a warning alarm
after 5 minutes.
Temperature Alarm Function
• If inner temperature is higher than 73°F (23°C), “HI” is
shown in display panel and the alarm will sound after
one hour. It is to inform you that the inner temperature is
too high, please check the reason.
• If inner temperature is lower than 34°F (1°C), “LO” is
shown in display panel and the alarm will sound and the
malfunction indicator light will appear at the same time.
FUNCTIONS
IMPORTANT!
Do not cover the gap on the glass shelves with alu-
minum foil or any other material that will prevent ade-
quate air circulation within the cabinet.
SHELVES
When removing any of these shelves out of the rail com-
partment, you must first disassemble and remove the
plastic posts then remove the Lock screws that hold each
post in place.(Fig A)
To re-install, ensure the shelf is resting securely on the
support brackets and push shelf inward until it locks into
place.
Fig A.
Lock
Screws
Plastic
Posts
Gaps
When you plug in your refrigerator for the first time the
temperature will automatically be set to 41 °F (5°C) and
will be displayed in the Fahrenheit scale (°F). (Default
setting)

7
OPERATING INSTRUCTIONS
BEVERAGE STORAGE
The unit can store a maximum of 123/330ml beverage
cans, 2 two gallon bottles. Detail storage method please
see Fig.B.
• Location A: each full glass shelf can hold 35 (330ml)
beverage cans
• Location B: small glass shelf can hold 28 (330ml)
beverage cans.
• Location C: bottom of the unit can hold 13 (330ml)
beverage cans
• Location D: each storage box can hold 6 (330ml)
beverage cans
• Location E: door box can hold 2 two gallon bottles or 2
litre beverage bottles, please see Fig.C.
WARNING:
Do not put tall bottles in the door shelf without the
baffle plate in place to avoid bottles falling out.
>If you need to store a 2 gallon bottle, please take out
the block board as shown below (see Fig. C) and keep
the block board out of reach of children.
>If you need to store a 2 litre beverage bottle, put the
block board back in place.
E
D
C
B
A
Fig. C
Fig. B

CARE AND MAINTENANCE
CLEANING YOUR ALL
REFRIGERATOR
• Turn off the power, unplug the appliance, and remove all
items including shelves and rack.
• Wash the inside surfaces with a warm water and baking
soda solution. The solution should be about 2
tablespoons of baking soda to a quart of water.
• Wash the shelves with a mild detergent solution.
• Wring excess water out of the sponge or cloth when
cleaning area of the controls, or any electrical parts.
• Wash the outside cabinet with warm water and mild
liquid detergent. Rinse well and wipe dry with a clean
soft cloth.
POWER FAILURE
• Most power failures are corrected within a few hours and
should not affect the temperature of your appliance if you
minimize the number of times the door is opened. If the
power is going to be off for a longer period of time, you
need to take the proper steps to protect your contents.
VACATION TIME
• Short vacations: Leave the refrigerator operating
during vacations of less than three weeks.
• Long vacations: If the appliance will not be used for
several months, remove all items and turn off the
appliance. Clean and dry the interior thoroughly. To
prevent odor and mold growth, leave the door open
slightly: blocking it open if necessary.
MOVING YOUR ALL
REFRIGERATOR
• Remove all items.
• Securely tape down all loose items (shelves) inside your
appliance.
• Turn the adjustable leg up to the base to avoid damage.
• Tape the door shut.
• Be sure the appliance stays secure in the upright
position during transportation. Also protect outside of
appliance with a blanket, or similar item.
ENERGY SAVING TIPS
• The refrigerator should be located in the coolest area
away from heat producing appliances, and out of direct
sunlight.
8

1) The refrigerator does
not operate.
2) The refrigerator is
not cold enough.
3) Turns on and off
frequently.
4) The light does not
work.
5) Vibrations.
6) The refrigerator
seems to make too
much noise.
• Not plugged in
• The appliance is turned off
• The circuit breaker tripped or fuse has
been blown.
• Check the temperature control setting
• External environment may require a
higher setting.
• The door is opened too often
• The door is not closed completely
• The door gasket does not seal properly
• The temperature is hotter than normal.
• A large amount of items have been
added to the refrigerator.
• The door is opened too often
• The door is not closed completely
• The temperature control is not set
correctly
• The door gasket does not seal properly
• Not plugged in
• The circuit breaker tripped or a blown
fuse
• The light button is “OFF”
• Ensure that the refrigerator is level.
• The rattling noise may come from the
flow of the refrigerant, which is normal.
As each cycle ends, you may hear
gurgling sounds caused by the flow of
refrigerant in your refrigerator.
• Contraction and expansion of the inside
walls may cause popping and crackling
noises.
• The refrigerator is not level
• Plug in the unit.
• Press the ON button.
• Reset circuit breaker; check
fuses.
• Adjust setting as needed.
• Adjust setting as needed.
• Limit open door duration.
• Close door securely.
• Ensure the gasket is clean.
• This is normal.
• Limit amount of warm
items introduced at one time.
• Limit amout of door openings.
• Close door securely.
• Adjust setting as needed.
• Ensure the gasket is clean.
• Plug in the unit.
• Reset circuit breaker; check
fuses.
• Switch light button to “ON”.
• Make sure it’s on a flat surface.
• This is normal.
• This is normal.
• Make sure it’s on a flat surface.
TROUBLESHOOTING
SOLUTIONS
POSSIBLE CAUSE
PROBLEM
Occasionally, a problem is minor and a service call may not be necessary- use this troubleshooting guide for a possible
solution. If the unit continues to operate improperly, call an authorized service depot or Danby’s Toll Free Number
1-800-263-2629 for assistance.
9

LIMITED IN-HOME APPLIANCE WARRANTY
This quality product is warranted to be free from manufacturer’s defects in material and workmanship, provided that the unit is used under the normal operating
conditions intended by the manufacturer.
This warranty is available only to the person to whom the unit was originally sold by Danby Products Limited (Canada) or Danby Products Inc. (U.S.A.) (hereafter
“Danby”) or by an authorized distributor of Danby, and is non-transferable.
TERMS OF WARRANTY
Plastic parts, are warranted for thirty (30) days only from purchase date, with no extensions provided.
First 24 Months
During the first twenty four (24) months, any functional parts of this product found to be defective, will be repaired or replaced, at warran-
tor’s option, at no charge to the ORIGINAL purchaser.
To obtain
Danby reserves the right to limit the boundaries of “In Home Service” to the proximity of an Authorized Service Depot. Any appliance
Service
requiring service outside the limited boundaries of “In Home Service” ,it will be the consumer’s responsibility to transport the appliance
(at their own expense) to the original retailer (point of purchase) or a service depot for repair. See “Boundaries of In Home Service”
below. Contact your dealer from whom your unit was purchased, or contact your nearest authorized Danby service depot, where service
must be performed by a qualified service technician.
If service is performed on the unit by anyone other than an authorized service depot, or the unit is used for commercial application, all
obligations of Danby under this warranty shall be void.
Boundaries of
If the appliance is installed in a location that is 100 kilometers (62 miles) or more from the nearest service center your unit must be
In Home Service
delivered to the nearest authorized Danby Service Depot, as service must only be performed by a technician qualified and certified for
warranty service by Danby. Transportation charges to and from the service location are not protected by this warranty and are the
responsibility of the purchaser.
Nothing within this warranty shall imply that Danby will be responsible or liable for any spoilage or damage to food or other contents of this appliance, whether
due to any defect of the appliance, or its use, whether proper or improper.
EXCLUSIONS
Save as herein provided, Danby, there are no other warranties, conditions, representations or guarantees, express or implied, made or intended by Danby or its
authorized distributors and all other warranties, conditions, representations or guarantees, including any warranties, conditions, representations or guarantees
under any Sale of Goods Act or like legislation or statue is hereby expressly excluded. Save as herein provided, Danby shall not be responsible for any damages
to persons or property, including the unit itself, howsoever caused or any consequential damages arising from the malfunction of the unit and by the purchase of
the unit, the purchaser does hereby agree to indemnify and hold harmless Danby from any claim for damages to persons or property caused by the unit.
GENERAL PROVISIONS
No warranty or insurance herein contained or set out shall apply when damage or repair is caused by any of the following:
1) Power failure.
2) Damage in transit or when moving the appliance.
3) Improper power supply such as low voltage, defective house wiring or inadequate fuses.
4) Accident, alteration, abuse or misuse of the appliance such as inadequate air circulation in the room or abnormal operating conditions
(extremely high or low room temperature).
5) Use for commercial or industrial purposes (ie. If the appliance is not installed in a domestic residence).
6) Fire, water damage, theft, war, riot, hostility, acts of God such as hurricanes, floods etc.
7) Service calls resulting in customer education.
8) Improper Installation (ie. Building-in of a free standing appliance or using an appliance outdoors that is not approved for outdoor application).
Proof of purchase date will be required for warranty claims; so, please retain bills of sale. In the event warranty service is required, present this document to our
AUTHORIZED SERVICE DEPOT.
Danby Products Limited
PO Box 1778, Guelph, Ontario, Canada N1H 6Z9
Telephone: (519) 837-0920 FAX: (519) 837-0449
Danby Products Inc.
PO Box 669, Findlay, Ohio, U.S.A. 45840
Telephone: (419) 425-8627 FAX: (419) 425-8629
04/09
1-800-263-2629
Warranty Service
In-home

11
GROUNDING
INSTRUCTIONS
Cet appareil est conçu pour un usage domestique à
l’intérieur seulement. N’entreposez ni n’utilisez pas cet
appareil à l’extérieur.
• Cet appareil doit être mis à la terre. Branchez le
seulement dans une prise correctement mise à la terre.
Référez-vous au chapitre “Instructions de mise à la
terre”.
• Ne faites pas fonctionner cet appareil s’il a un cordon ou
fiche électrique endommagé, s’il ne fonctionne pas
correctement, ou si l’appareil a été endommagé ou
échappé.
• N'épissez pas le cordon électrique.
• Ne permettez jamais à un enfant de faire fonctionner
l’appareil, de jouer avec ou de ramper à l’intérieur.
• Ne nettoyez jamais des pièces de l’appareil avec un
liquide inflammable. Les vapeurs peuvent constituer un
risque d’incendie ou provoquer une explosion.
• N’entreposez et n’utilisez pas d’essence ou d’autres
liquides ou vapeurs inflammables à proximité de cet
appareil ou de tout autre appareil. Les vapeurs peuvent
constituer un risque d’incendie ou provoquer une
explosion.Gardez le cordon électriqueéloigné des
sources de chaleur.
• N’immersez pas le cordon ou sa fiche dans aucun
liquide.
• N’utilisez pas cet appareil près de bassins d’eau, par
exemple dans un sous-sol détrempé, près d’une piscine
ou d’un évier.
• N’utilisez pas de produits chimiques ou vapeurs
corrosives dans/près de cet appareil.
• N’utilisez cet appareil que pour les fins aux quelles il est
conçu comme indiqué dans ce guide.
• Référez-vous aux instructions de nettoyage du fini de la
porte se trouvant au chapitre de Soins et nettoyage de
ce guide.
• Ne recouvrez pas ou n’obstruez aucune ouverture de
l’appareil.
• Cet appareil ne devrait être réparé que par du personnel
qualifié. Pour tout examen, réparation ou réglage,
contactez votre centre de service le plus rapproché.
•Cet appareil est conçu pour être installé de façon
autonome, encastré ou utilisé à l’extérieur.
• Cet appareil doit être mis à la terre. Dans l’éventualité
d’un court-circuit, la mise à la terre procure un chemin
direct decontournement du courant pour prévenir
l’électrocution des manipulateurs de l’appareil.
• Cet appareil est muni d’un cordon comprenant une fiche
et fil de mise à la terre.
• La fiche doit être branchée dans une prise correctement
installée et mise à la terre.
• Si les directives de mise à la terre ne sont pas tout à fait
comprises ou en cas de tout doute relatif à la mise à la
terre appropriée de l’appareil, faites appel à un
électricien ou à un technicien qualifié.
• Si la prise murale est une prise à 2 branches, c’est votre
obligation, et la responsabilité vous en incombe, de la
faire remplacer par une prise à trois branches
adéquatement mise à la terre.
• Pour un meilleur rendement et pour éviter que les
ampoules d’éclairage de la résidence soient affectées
d’un affaissement de tension, ou que le fusible ou
disjoncteur du circuit ne grille ou ne se déclenche,
dédiez un circuit individuel d’alimentation à la machine à
glaçons (prise (double) unique sur le circuit).
• Sous aucun prétexte il est permis de couper ou
d’enlever la troisième branche (mise à la terre) de la
fiche du cordon électrique.
• N’utilisez pas d’adaptateur de fiche avec cet appareil.
• N’utilisez pas de cordon de rallonge avec cet appareil. Si
le cordon électrique de l’appareil ne rejoint pas la prise
murale, faites installer une prise plus rapprochée par un
électricien ou un technicien qualifié.
CONSIGNES DE SÉCURITÉ IMPORTANTES
DIRECTIVES DE RANGEMENT MISE À LA TERRE
SAUVEGARDE CES INSTRUCTIONS
Un vide tout réfrigérateur est une attraction dangereuse aux enfants. Enlever les joints étanches, les loquets, les
couvercles ou les porte des appareils qui ne sont pas utiliser, ou faites de soit que l’appareil ne présente aucun
danger.
N’ATTENDEZ PAS! FAITES-LE IMMEDIATEMENT!
LISEZ TOUTES LES INFORMATIONS DE SÉCURITÉ AVANT DE FAIRE FONCTIONNER L’APPAREIL.
ADVERTISSEMENT: RISQUE DES DENFANTS DEVIENNENT COINCERADANS L’APPAREIL.
utilisation incorrecte de la prise de terre peut
entraîner un risque de choc électrique.
ADVERTISSEMENT

12
AVANT L’UTILISATION
AVANT D’UTILISER VOTRE
TOUT RÉFRIGÉRATEUR INSTALLATION DE VOTRE
TOUT RÉFRIGÉRATEUR
• Enlevez l’emballage extérieur et intérieur.
• Avant de brancher la tout réfrigérateur sur la source
d’alimentation, laissez-la reposer à la verticale pendant
environ 2 heures. Cela réduira le risque que le système
de refroidissement subisse une défaillance causée par
la manutention lors du transport.
• Nettoyez la surface intérieure à l’eau tiède, au moyen
d’un chiffon doux.
• Lors de la vidange de votre appareil, choisissez un site
d’élimination autorisé.
• Placez votre tout réfrigérateur sur un sol suffisamment
solide pour la supporter une fois pleine. Pour mettre
votre tout réfrigérateur au niveau, ajustez la patte de
nivellement avant, située au bas de l’appareil.
• Installez la unité à l’abri des rayons directs du soleil et
de toute source de chaleur (four, appareil de chauffage,
radiateur, etc.). Les rayons directs du soleil peuvent
endommager l'extérieur de l’appareil; quant aux
sources de chaleur, elles peuvent entraîner une
augmentation de sa consommation électrique. Les
températures extrêmement basses peuvent peuvent
provoquer un mauvais fonctionnement de l’appareil.
• Ne pas laver l’appareil avec un boyau d’arrosage
puisque le jet peut causer une charge électrique
résultant à des dommages matériels et/ou corporels.
• La fiche de branchement doit être branchée sur une
prise de courant convenablement installée et reliée à la
terre.
• Branchez l’appareil dans une prise murale exclusive,
bien installée et mise à la terre. Sous aucun prétexte,
vous ne devez couper ou enlever la troisième broche
(mise à la terre) de la fiche du cordon électrique. Pour
toute question relative à l’alimentation ou à la mise à la
terre, faites appel à un électricien qualifié ou à un
centre de service autorisé.
ATTENTION
• N’ouvrez la porte qu’en cas de besoin
• Lorsque la tout réfrigérateur est entreposée pour une
longue période sans être utilisée, on recommande,
après un nettoyage minutieux, de laisser la porte
ouverte afin de faire circuler l’air à l’intérieur, de façon à
éviter l’apparition de condensation, de moisissure ou
d’odeurs
• Ne pas couvrir les tablettes avec un papier d’aluminium
ou tout autre matériel qui pourrait prévenir la circulation
de l’air
• Pour fonction maximale de l’appareil il est préférable de
ne pas surcharger les tablettes
• Ne pas laisser l’appareil dehors s’il fait froid et durant
l’hiver (5. C / 41.F) S’il vous plaît entreposer l’appareil à
l’intérieur durant les mois d’hiver. L’appareil peut-être
laissé à l’extérieur dans les temps de pluie sous un dais.

DIRECTIVES D’INSTALLATION - ENCASTRÉ
Prend Note: Votre tout réfrigérateur d’ extérieur peut être construit en L 'appareil peut ne pas être conforme à
ENERGY STAR fois construit po.
OUTILS DONT VOUS AUREZ
BESOIN
11
/2”d iam.hole
*Ifelectricalout-
letisinadjacent
cabinetry.
343
/4” from
underside
of
countertop
tofloor
Cabinets
square
and
plumb
FigA
Fig.2
Min
Lorsque vous procédez aux installations
décrites dans cette section, vous devez
porter des gants, des lunettes protectrices et
des lunettes étanches.
PRÉPARATION DE
L’ENCEINTE
• Veuillez ôter les vis (voir fig. 1. numéro (2) 4 vis au
total) du panneau arrière du compresseur et
enlever le cache du compresseur (voir fig. 1.
numéro 1) avant d’installer l’appareil. Veuillez
conserver toutes les pièces que vous ôtez de
l’arrière de l’appareil. (Fig. 1)
• Veuillez conserver la roulette de rechange
• Nous vous recommandons de ne pas installer le
réfrigérateur Outdoor All dans un coin (c.-à-d.
directement contre un mur). Cela afin que l’angle
d’ouverture de la ou des portes soit supérieur à
90°. Une ouverture de porte limitée empêchera les
étagères de sortir comme prévu, et peut
endommager le ou les joints de la porte.
• L’ouverture brute de l’enceinte doit être sur une
surface de plancher plane et avoir au moins 66 cm
(26 po) de profondeur par 60.96 cm (24 po) de
largeur. L’ouverture doit également avoir une
hauteur d’au moins 87.63 cm (34 2/4 po).
• La prise électrique peut être placée de l’intérieur
sur l’un des côtés des armoires adjacentes ou à
l’arrière dans la zone en gris (tel qu’illustré sur la
figure 2).
• Si la prise électrique se trouve dans l’armoire
adjacente, percez un trou de 3.8 cm (1 1/2 po) de
diamètre pour faire passer le cordon d’alimentation.
Si la paroi de l’enceinte est métallique, le contour
du trou doit être recouvert à l’aide d’un coussinet
ou d’un passe câble.
EXIGENCES ÉLECTRIQUES
L’appareil doit être raccordé à une prise
individuelle correctement installée et mise à la
terre, protégée par un disjoncteur ou un fusible
temporisé de 15 ou 20 ampères.
1
2
BACK
Fig.1
ARRIÈRE
13
Lunettes
protectrices Gants Niveau
Perceuse et embout
scie-cloche
Ruban à
mesurer
Lampe de
poche Équerre de
charpente
60.96 cm (24 po)
87.63 cm (34
2/4 po) du
dessous du
comptoir au
sol Armoires
d’aplomb
et à angle
droit
Trou de 3.8 cm (1 1/2
po) hole
*Si la prise est dans
une armoire
adjacente.
Accès à
l’alimentation
électrique
66 cm
(26 po)

14
SPÉCIFICATIONS RELATIVES À L’INSTALLATION -
UTILISATION EXTÉRIEURE
INSTALLATION DES ROUES
PIVOTANTES
Fig.1
Fig.2
Fig.3
2x
2x
4x
8x
a) Placer l'unité sur son dos sur un sol plat et retirez
les 4 pieds (Fig.3 numéro 4). Réserve les jambes.
b) Installez les roulettes munies d’un frein (fig.3 numéro
1) à l’avant, au bas de l’appareil, et les 2 autres
roulettes (fig.3 numéro 2) à l’arrière, au bas de
l’appareil.
c) Fixez chaque roulette au bas de l’appareil avec des
vis M5x10 (2) et un tournevis cruciforme (fig. 3).
d) Le frein de la roulette (fig. 3 numéro 1) à l’avant, au
bas de l’appareil, dispose d’une fonction de freinage.
Le levier du frein est en position activée (« ON ») ce
qui engage la fonction de freinage; quand le levier du
frein est en position inactivée (« OFF »), la fonction
de freinage n’est pas engagée (fig. 2).
•Veuillez débrancher le cordon d’alimentation et
désactiver le frein avant de déplacer l’appareil.
•Veuillez ne rien déposer sur le dessus de l’appareil et
évitez de l’incliner quand vous le déplacez.
• Veuillez pousser l’appareil de l’arrière et vous méfier
des terrains en pente, que vous montiez ou
descendiez, la porte pourrait s’ouvrir et heurter
quelqu’un ou quelque chose.
•N’utilisez pas l’appareil à l’extérieur par mauvais
temps afin d’éviter les courts-circuits.
• Ne laissez pas les enfants monter sur l’appareil ou le
déplacer ailleurs.
• À moins que vous ne déplaciez l’appareil, veuillez
garder le frein de la roulette enclenché (position « ON
») afin d’éviter les accidents.
• L’appareil doit être installé sur une surface plane.
• L’appareil assurera sa fonction de refroidissement
après une heure.
ATTENTION

15
CARACTÉRISTIQUES
11
1. Panneau de commande : permet de voir et de régler la
température du tout réfrigérateur
2. Tablette en verre pleine largeur avec garniture blanche.
3. Petite tablette en verre avec garniture blanche
4. Roue Pivotante
5. Interrupteur à bascule de l’éclairage intérieur : Pour
contrôler la lumière. S’allume quand la porte s’ouvre et
s’éteint quand la porte se ferme.
6. Espace de rangement dans la contre-porte (tablettes
supérieures de la porte).
7. Déflecteur
8. Balconnet (pour accueillir les grandes bouteilles)
9. Porte en acier inoxydable entièrement garnie de
mousse.
10. Poignée en acier inoxydable
11. Roulettes

16
Le témoin lumineux s’allume pour indiquer que le
mode de refroidissement est en cours de
fonctionnement.
Contrôle de l’éclairage intérieur
ALLUMER/ÉTEINDRE.
Pour allumer ou éteindre l’appareil, appuyez sur ce
bouton et maintenez-le enfoncé pendant environ 3
secondes.
Augmente la température de 1° par incréments.
Diminue la température de 1° par incréments.
(°C/°F) Témoin lumineux adjacent qui indique l’échelle de
la température affichée.
Fig A.
Veuillez utilisez l’appareil à une température ambiante oscillant entre 5 et 32 ºC (41 et 90 °F) Si la température
ambiante va au delà ou est en deça de cette température, cela provoquera des fluctuations de température
dans l’appareil.
DIRECTIVES RELATIVES AU
PANNEAU DE COMMANDE Fonction de mémorisation de la température
• La température réglée est sauvegardée par l’appareil en
cas de perte de courant; lorsque le courant revient,
l’appareil revient à la même température.
Fonction de rappel de porte ouverte
• Lorsque vous oubliez de fermer la porte ou lorsqu’elle
n’est pas complètement fermée, une alarme
d’avertissement se déclenche au bout de 5 minutes.
Fonction alarme de température
• Si la température interne atteint plus de 73°F (23°C),
<HI> apparaît sur le panneau d’affichage et la sonnerie
s’allume au bout d’une heure. Cela nous informe que la
température interne de l’appareil est trop élevée, s’il
vous plaît vérifier l’appareil et régler le problème.
• Si la température interne est moins de 32°F (0°C), <LO>
apparaît sur le panneau d’affichage. De plus, l’alarme et
le témoin d’anomalie s’allument en même temps.
FONCTIONS
IMPORTANT!
Ne recouvrez pas l’espace sur les tablettes en verre d’une
feuille d’aluminium ou de quelque autre matériau, cela pour
ne pas nuire à la circulation adéquate de l’air dans l’enceinte.
TABLETTES
Lorsque vous retirez l’une de ces tablettes du compartiment
coulissant, vous devez d’abord démonter et enlever les
supports en plastique, puis enlever les vis de blocage qui
maintiennent chaque support en place.(schéma A)
Pour réinstaller la tablette, assurez-vous qu’elle est bien
posée sur les pattes de support, et poussez-la vers l’arrière
jusqu’à ce qu’elle se verrouille en position.
Lorsque vous branchez votre tout réfrigérateur pour la
première fois, la température est réglée automatiquement
à 41 °F (5 °C) et est affichée en degrés Fahrenheit (°F).
• La plage de température peut être réglée à 36 °F (2 °C)
au minimum ou à 50 °F (10 °C) au maximum pour
répondre à vos besoins spécifiques d’entreposage.
Chaque pression sur les boutons vous permet
de régler la température par paliers de 1° dans la plage
susmentionnée.
• Pour permuter l’affichage entre les degrés Fahrenheit
(°F) et les degrés Celsius (°C), maintenez les boutons
enfoncés simultanément pendant environ 3 à 5
secondes. Vis de
blocage
Supports
en
plastique
Lacunes
RÉGLAGE DES COMMANDES
DE TEMPÉRATURE
OPÉRATION

17
OPÉRATION
WARNING:
E
D
C
B
A
Fig. C
Fig. B
RANGEMENT DES BOISSONS
L’appareil peut conserver un maximum de 123 cannettes
de 330 ml et 2 bouteilles de 2 gallons de lait. Pour obtenir
la méthode détaillée de rangement, veuillez vous reporter
au schéma B.
• Emplacement A : 35 cannettes de 330 ml peuvent être
rangées sur chaque plateau
• Emplacement B : 28 cannettes de 330 ml peuvent être
rangées sur chaque plateau
• Emplacement C : 13 cannettes de 330 ml peuvent être
rangées dans le fond de l’unité
• Emplacement D : 6 cannettes de 330 ml peuvent être
rangées dans chaque bac de rangement
• Emplacement E : 2 bouteilles de 2 gallons de lait ou 2
bouteilles de boissons de 2 litres peuvent être rangées
dans le bac pour bouteilles de lait Schéma C.
Ne placez pas de grandes bouteilles dans le balconnet
sans la barre d’arrêt afin d’éviter qu’elles ne tombent.
>Si vous devez conserver une bouteille de lait de 2
gallons, veuillez enlever le morceau de blocage tel
qu’illustré ci-dessous (voir le schéma C) et gardez-le à
un endroit où les enfants ne peuvent pas y toucher afin
d’éviter les blessures.
>Si vous devez conserver une bouteille de boissons de
2 litres, remettez le morceau de blocage en place.
ATTENTION

SOINS ET ENTRETIEN
18
• Mettre le unité hors tension et le débrancher, puis retirez
tout ce qu’il y a sur les tablettes et les supports.
• Lavez les surfaces internes avec une solution d’eau
chaude et de bicarbonate de sodium. La solution doit
contenir 2 cuillérées à table de bicarbonate de sodium
dans un litre d’eau.
• Lavez les étagères avec une solution de détergent doux.
• Essorez l’éponge ou le chiffon pour en retirer l’excès
d’eau lorsque vous nettoyez la zone des commandes ou
des pièces électriques.
• Lavez l’extérieur du tout réfrigérateur avec de l’eau
chaude et un détergent liquide doux. Rincez bien et
essuyez avec un chiffon doux propre et sec.
PANNE DE COURANT
• La plupart des pannes de courant ne durent que
quelques heures et ne devraient pas modifier la
température de votre tout réfrigérateur si vous réduisez
au maximum le nombre de fois où la porte est ouverte.
Si le courant reste coupé pendant une longue période,
il faut prendre des mesures de protection du contenu
de l’appareil.
PÉRIODE DE VACANCES
• Courtes vacances : Laissez le unité fonctionner
pendant les vacances durant moins de trois semaines.
• Longues vacances : Si le unité ne doit pas être utilisé
pendant plusieurs mois, retirez tout ce qu’il contient et
mettez-le hors tension. Nettoyez et asséchez à fond
l’intérieur. Pour éviter les odeurs et le développement
de moisissures, laissez la porte entrouverte: la coincer
au besoin.
NETTOYAGE DE VOTRE TOUT
RÉFRIGÉRATEUR
• Retirez tout ce qu’il contient.
• Immobilisez avec du ruban-cache tout ce qui est mobile
(tablettes) dans l’appareil.
• Tournez la patte réglable pour la relever dans la base et
éviter tout dommage.
• Maintenez la porte fermée avec du ruban-cache.
• Assurez-vous que le tout réfrigérateur reste bien en
position verticale pendant son transport. Protégez aussi
l’extérieur du tout réfrigérateur avec une couverture ou
l’équivalent.
• Le tout réfrigérateur devrait être installé dans l’endroit le
plus frais de la pièce, loin des sources de chauffage et
des rayons directs du soleil.
DÉPLACEMENT DE VOTRE
TOUT RÉFRIGÉRATEUR
CONSEILS POUR ÉCONOMISER
L'ÉNERGIE
Le réfrigérateur devrait être localisé dans le secteur le
plus frais de la pièce loin de chaleur produire les appareils
et de la lumière du soleil directe.
Other manuals for DOAR154SSST
1
Table of contents
Languages:
Other Silhouette Select Refrigerator manuals


