Silk'n Pro User manual
www.silkn.com
IT
PT
RU
DA
FI
SV
EN
DE
ES
FR
NL
NO
GR
INSTRUCTIONS FOR USE
BEDIENUNGSANLEITUNG
MODE D’EMPLOI
GEBRUIKSAANWIJZING
INSTRUCCIONES DE USO
ΟΔΗΓΙΕΣ ΧΡΗΣΗΣ
BRUKSANVISNING
KÄYTTÖOHJE
BRUKSANVISNING
BRUGSVEJLEDNING
ИНСТРУКЦИЯ ПО ПРИМЕНЕНИЮ
INSTRUÇÕES DE UTILIZAÇÃO
ISTRUZIONI PER L’USO

1
English
Quick Start
Plan your Silk’n Pro™ hair removal for best results
Treatments 1-4 – plan two weeks apart
Treatments 5-7 – plan four weeks apart
Treatments 8 + – treat as needed, until desired results are achieved.
Set up Silk’n Pro!
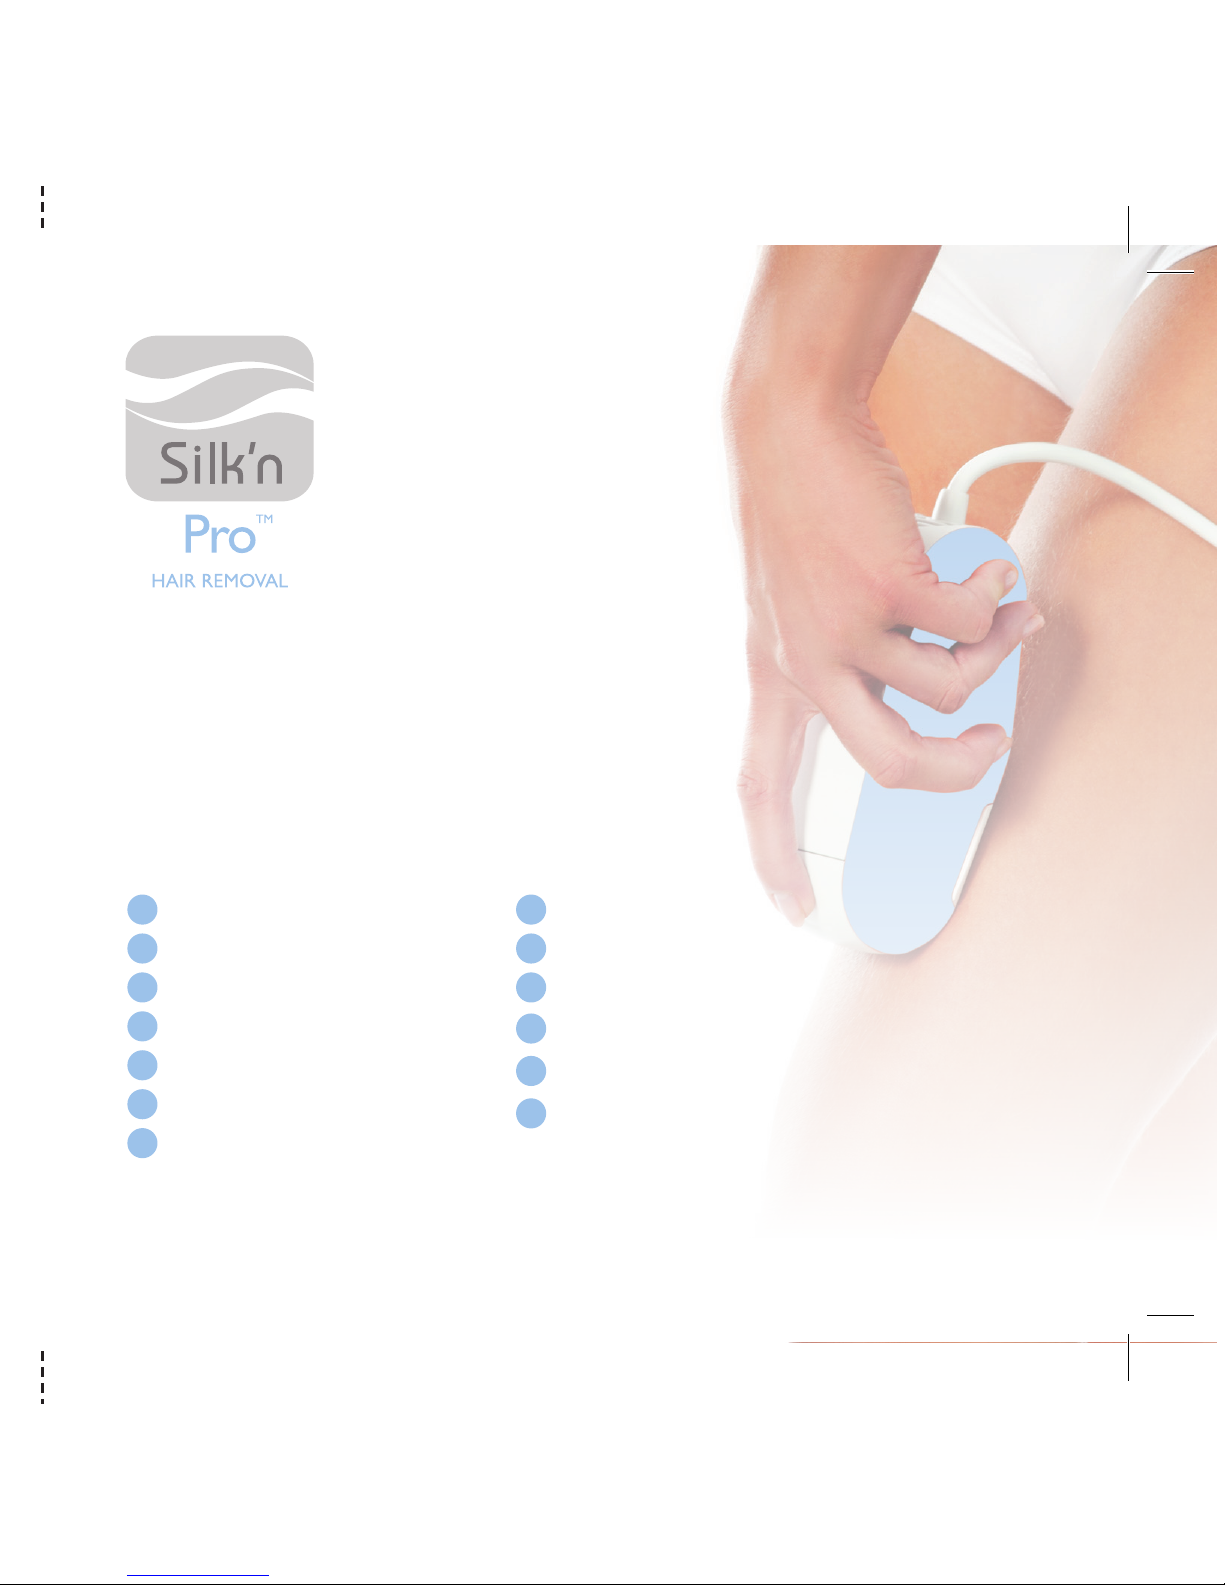
1. Remove Pro™ BASE UNIT, APPLICATOR and other components from box.
2. Verify that the DISPOSABLE LAMP CARTRIDGE is inserted properly at the tip of the APPLICATOR.
3. Plug the power cord into the Pro™ BASE UNIT socket.
4. Plug the other end of the power cord into an electrical outlet. The STAND BY INDICATOR LIGHT will
turn on.
Your Silk’n Pro™ is now ready to start.
Treat with Silk’n Pro safely and properly!
5. Choose areas to treat that have not had recent exposure to the sun.
6. The skin of the treatment areas should be shaved, clean, dry and free of any powders, antiperspirants or
deodorants.
Do not wax, pluck or tweeze the hair out. Shaving is an important step to get the results you want!
7. Press the ON/STBY SWITCH. The POWER ON INDICATOR LIGHT (orange) will turn on and a fan
sound (similar to the sound of a hairdryer) will start.
8. Approximately 3.5 seconds after pressing the ON/STBY SWITCH, the READY INDICATOR LIGHT
(green) will turn on. The device is then ready for you to trigger the first pulse at the lowest energy level.
9. If this is your first treatment - Choose the energy level.
Pro oers 5 levels of energy from 1 (the lowest) to 5 (the highest).
To choose the right energy level for your first treatment, test each treatment area separately:
Place theTREATMENT SURFACE on the skin and press the PULSE BUTTON to deliver one pulse.
If you did not experience abnormal discomfort press the + button once and deliver one pulse on a
dierent spot at energy level 2.
Continue testing at increased energy levels until you have reached the highest level that you feel
comfortable with. If within one hour you experience no adverse eects, you can start your full
treatment at that energy level.
Repeat this test for each body part you intend to treat.

2
English
10. Set the energy level. If the energy level should be higher than the lowest, press the ENERGY LEVEL
SETTING BUTTONS using the “-“ or “+” to respectively decrease or increase the energy level, until
the desired energy level is set and represented by 3 energy level indicator lights (For details see “Energy
Level” chapter inside this user manual).
11. Apply the TREATMENT SURFACE to the skin, making sure the skin is spread evenly and smoothly. As
soon as the TREATMENT SURFACE is in full contact with the skin, the READY INDICATOR LIGHT will
start blinking.
12. Press the PULSE BUTTON. The device will first determine the color of your skin. If the color of the skin
is light enough for safe application, the device will flash a pulse of light onto your skin, and the READY
INDICATOR LIGHT will turn o. You will see a bright flash of light and simultaneously hear a subtle pop
sound, which is a normal noise for the device. You will feel a mild sensation of warmth and tingling.
Silk’n Pro™ will immediately recharge for the next pulse. After 3.5 seconds the READY INDICATOR
LIGHT will turn on again.
13. Remove the TREATMENT SURFACE from the treated area of skin.
14. Move the TREATMENT SURFACE to another area of skin. Use the pressure marks the device just
made on your skin to guide you for proper positioning of the next pulse, avoiding both gaps and overlaps
between pulses.
If your skin blisters or burns, STOP USE IMMEDIATELY!
Try to avoid overlapping pulses!
Warning: Do not treat the same area of skin more than
once per hair removal session!
Treating the same area of skin more than once per session
increases the likelihood of adverse eects.
15. Repeat the process until the entire treatment area is covered.

3
English
Copyright 2011 © Home Skinovations Ltd. All rights reserved.
Print date: May 2011
Home Skinovations Ltd. reserves the right to make changes to its products or specifications to improve performance,
reliability, or manufacturability. Information furnished by Home Skinovations Ltd. Is believed to be accurate and reliable at
the time of publication. However, Home Skinovations Ltd. assumes no responsibility for its use. No license is granted by its
implication or otherwise under any patent or patent rights of Home Skinovations Ltd. No part of this document may be
reproduced or transmitted in any form or by any means, electronic or mechanical, for any purpose, without the express
written permission of Home Skinovations Ltd. Data is subject to change without notification.
Home Skinovations Ltd. has patents and pending patent applications, trademarks, copyrights, or other intellectual property
rights covering subject matter in this document. The furnishing of this document does not give you any license to these
patents, trademarks, copyrights, or other intellectual property rights except as expressly provided in any written agreement
from Home Skinovations Ltd. Specifications are subject to change without notice.
Home Skinovations Ltd. Tavor Building, Shaar Yokneam POB 533, Yokneam 20692, ISRAEL www.silkn.com, inf[email protected]
1. Before You Start................................................................................................................................................................................................................. 4
1.1 Silk’n Pro™ device description ...................................................................................................................................................................................... 4
1.2. Package contents .............................................................................................................................................................................................................. 4
1.3. The Disposable Lamp Cartridge .................................................................................................................................................................................5
2. Silk’n Pro™ Intended Use ........................................................................................................................................................................................... 5
3. Safety with Silk’n Pro™ ......................................................................................................................................................................................................5
4. Contraindications ................................................................................................................................................................................................................ 6
5. Do not use Silk’n Pro™ if:...............................................................................................................................................................................................8
6. Avoid using Silk’n Pro™ if any of the following applies:.......................................................................................................................... 9
7. Possible Side Eects using Silk’n Pro™............................................................................................................................................................... 10
8. Long Term Hair Removal the Silk’n Pro™ Way ............................................................................................................................................ 11
9. Get Started!.......................................................................................................................................................................................................................... 12
9.1. What to Expect when treating with Silk’n Pro™? .................................................................................................................................15
9.2. After treating with Silk’n Pro™............................................................................................................................................................................15
10. Maintenance of Silk’n Pro™.............................................................................................................................................................................. 16
10.1. Cleaning Silk’n Pro™................................................................................................................................................................................................ 16
10.2. Replacing the LAMP CARTRIDGE ................................................................................................................................................................... 16
11. Troubleshooting ............................................................................................................................................................................................................. 17
11.1. “My Silk’n Pro™ does not start.”........................................................................................................................................................................17
11.2. “A light pulse is not emitted when I press the PULSE SWITCH”.........................................................................................................17
12. Customer Service ....................................................................................................................................................................................................... 18
13. Specifications ..................................................................................................................................................................................................................... 18
Labeling ...................................................................................................................................................................................................................................... 235
Table of Contents
3

4
English
1. Before You Start
Before using Silk’n Pro™ for the rst time, please read this User Manual in its entirety. Pay particular
attention to sections on device use procedures, device operation, and after-use procedures. We
recommend you re-familiarize yourself with this User Manual before each use of Silk’n Pro™.
Silk’n Pro™ is a powerful electrical device. As such, it should be used with special attention
to safety. This device may be used by young people between the ages of 14 to 18 years
under adult supervision. Persons with reduced physical, sensory or mental capabilities
may undergo treatment only if performed on them by another person with suitable use
experience. In all of the above cases the users must be fully instructed of the results and
understand the possible risks. Please read all warnings and safety precautions before use, and
strictly follow them when using Silk’n Pro™
Silk’n Pro™ is a light-based device for permanent hair reduction designed for home-use.
1.1. Silk’n Pro™ device description
Your Silk’n Pro™ consists of a BASE UNIT with a CONTROL PANEL, an APPLICATOR and a DISPOSABLE
LAMP CARTRIDGE.
On the Silk’n Pro™ APPLICATOR you can nd the PULSE BUTTON and a DISPOSABLE LAMP
CARTRIDGE with a TREATMENT SURFACE.
Base unit
Control panel
Applicator
Disposable lamp cartridge
1
4
2
3
Power on/standby switch
Stand by indicator light
Power on indicator light
Ready indicator light
6
5
8
7
Energy level setting buttons
Energy level indicator lights
Replace cartridge indicator light
Skin tone warning indicator light
9
11
12
10
System warning indicator light
Pulse button
Treatment surface
Disposable lamp cartridge
15
16
14
13
1.2. Package contents
Upon opening the Silk’n Pro™ package, you will nd the following parts:
Silk’n Pro™ BASE UNIT and APPLICATOR
1
4
235
6
7
8
9
10
11
12
13
14
16
15

5
English
1.3. The Disposable Lamp Cartridge
The Silk’n Pro™ all-purpose DISPOSABLE LAMP CARTRIDGE can re a limited and pre-set number of
light pulses (regardless of the energy level of these pulses).
For your information - A complete series of full-body treatments typically require 5,000-7,000 light pulses.
2. Silk’n Pro™ Intended Use
Silk’n Pro™ may be used to remove unwanted body hair.
Ideal body areas for Silk’n Pro™ use include the underarms, bikini line, arms, legs, face, back shoulders and chest.
Silk’n Pro™ is intended for removal of unwanted hair.
3. Safety with Silk’n Pro™
With Silk’n Pro™ Safety Comes First.
HPL™ technology in Silk’n Pro™ - Superior safety with lower energy level: Home Pulsed Light™
technology is able to achieve long-term hair removal results at a fraction of the energy level used in other
light-based hair removal equipment. The low energy used in Silk’n Pro™ reduces its potential to cause
harm or complications, and contributes to your overall safety.
Silk’n Pro™ protects your skin: Light based hair removal is not suitable for naturally darker skin tones
or tanned skin. Silk’n Pro™ comes with a built-in SKIN COLOR SENSOR that is designed to measure
the complexion of the applied surface and enable application only on suitable skin complexions. This
unique safety feature will not let you treat where your skin is too dark or too tanned Furthermore, The
2X3cm² TREATMENT SURFACE through which pulses of light are delivered is recessed inside the LAMP
CARTRIDGE at the TREATMENT SURFACE. This enables Silk’n Pro™ to protect your skin by avoiding
direct contact between the TREATMENT SURFACE and the skin.
Silk’n Pro™ protects your eyes: The Silk’n Pro™ APPLICATOR has a built-in safety feature for eye
protection. It has been designed so that a light pulse can not be emitted when the APPLICATOR is facing
open air. The safety switch is activated only when the TREATMENT SURFACE is in contact with the tissue.
An AC cord
This User’s Manual
An Instructional DVD

6
English
4. Contraindications
Important Safety Information – Read Before Use!
Silk’n Pro™ is not designed for everyone. Please read and consider the information in the following section
before use. For further information and personalized advice you may also visit www.silkn.com or your local
Silk’n™ domain.
Warning Possible results SafetyTip
Do not use Silk’n Pro™
on naturally dark skin
complexion.
See color skin chart on the
package.
Treating dark skin with Silk’n
Pro™ can result in adverse
effects such as redness and skin
discomfort
A unique SKIN COLOR SENSOR is
embedded in Silk’n Pro™ to measure
the treated skin complexion at the
beginning of each session and oc-
casionally during the session. The SKIN
COLOR SENSOR ensures that pulses
will only be emitted on suitable skin
tones.
Do not use Silk’n Pro™ on
tanned skin or after recent
sun exposure (including
articial tanning machines).
Do not expose treated areas
to the sun.
Treating with
Silk’n Pro™
before
or after any sun exposure can result
in adverse effects such as redness
and skin discomfort. Tanned skin
particularly following sun exposure,
contains large quantities of the
pigment Melanin. all skin types
and complexions, including those
which don’t seem to tan quickly.
The presence of large quantities of
Melanin exposes the skin to higher
risk when using any method of light
based hair removal.
Avoid exposure to the sun for 4 weeks
before your Silk’n Pro™ treatment!
Sun exposure includes unprotected
exposure to direct sunlight of over
15 minutes constantly, or unprotected
exposure to diffused sunlight of over
1 hour constantly. To protect recently
treated skin when exposed to sunlight,
be sure to thoroughly apply sunscreen
SPF 30 or higher, for 2 weeks after
each hair removal session.
Never use Silk’n Pro™
around or near the eyes. Although Silk’n Pro™ can be
used for the treatment of facial
hair, extra caution should be used
on the face to avoid the eyes.
Silk’n Pro™ has a built-in safety feature for
eye protection. It has been designed so that
a light pulse can not be emitted when the
TREATMENT SURFACE is facing open air.
The safety switch enables treatment only
when the TREATMENT SURFACE is in
contact with the tissue.
Not Safe!

7
English
Warning Possible results SafetyTip
Do not treat on tattoos or
permanent makeup, dark brown
or black spots, (such as large
freckles, birth marks, moles or
warts), nipples, genitals or lips.
Treating any area with the Silk’n
Pro™ that is dark in color or
has more pigment can result in
adverse effects such as burns,
blisters, and skin color changes
(hyper- or hypopigmentation).
Cover area with material that will not
absorb the light such as a white cloth
or white medical tape.
Do not treat on active eczema,
psoriasis, lesions, open wounds
or infections (cold sores),
abonormal skin conditions
caused by systemic or metabolic
deseases (diabetes for example)
Light based treatments can
cause adverse reactions on
already sensitive areas.
Wait for the effected area to heal
before using Silk’n Pro™.
A treatment area that has a
history of herpes outbreaks.
Light based treatments can
cause adverse reactions on
already sensitive areas.
Consult your physician to receive
preventative treatment before using
Silk’n Pro™.
Do not treat with Silk’n Pro™
if you are pregnant or nursing.
Hormonal changes during pregnancy
could increase skin sensitivity
and the risk of adverse effects.
Do not treat on areas where
you may want hair to grow. Results are permanent.
Keep Silk’n Pro™ away from
water! Do not place or store
Silk’n Pro™ where it can fall,
be pushed or placed into a
tub, sink or any other vessel
containing water.
This may cause severe
electrocution.
Do not use Silk’n Pro™: while bathing
or if it becomes damp or wet. Unplug
immediately if it has fallen into water.
Do not attempt to open or
repair your Silk’n Pro™ device. Opening Silk’n Pro™ may expose
you to dangerous electrical
components and to pulsed light
energy, either of which may cause
serious bodily damage and/or
permanent eye injury. It may also
damage your device and will void
your warranty.
Please contact Silk’n™ Customer
Service if you have a broken or dam-
aged device in need of repair.

8
English
The DISPOSABLE LAMP
CARTRIDGE is damaged, or if
itsTREATMENT SURFACE is
cracked, chipped or missing.
Stop use immediately and contact
Silk’n™ Customer Service.
The attachments or accessories
are not recommended by
Home Skinovations Ltd.
Stop use immediately and contact
Silk’n™ Customer Service.
It has a damaged cord or plug.
Keep the power cord away
from heated surfaces. Stop use immediately and contact
Silk’n™ Customer Service.
You see or smell smoke when
it is in use. Stop use immediately and contact
Silk’n™ Customer Service.
It is not working properly or if
it appears damaged.
Stop use immediately and contact
Silk’n™ Customer Service.
Its SKIN COLOR SENSOR is
cracked, or broken. Stop use immediately and contact
Silk’n™ Customer Service.
The outer shell is cracked or
is coming apart. Stop use immediately and contact
Silk’n™ Customer Service.
5. Do not use Silk’n Pro™ if:

9
English
If you have a history of kelodial scar formation.
Consult with your physician prior to
using the Silk’n Pro™.
If you suffer from epilepsy.
If you have a disease related to photosensitivity, such as
porphyria, polymorphic light eruption, solar urticaria, lupus, etc.
If you have a history of skin cancer or areas of potential skin
malignancies.
If you have received radiation therapy or chemotherapy
treatments within the past 3 months.
If you have any other condition which in your physician’s
opinion would make it unsafe for you to be treated.
If your skin was treated with a physician-prescribed drug within
the past 6 months, please consult with your physician.
6. Avoid using Pro™ if any of the following applies:

10
English
7. Possible side effects using Silk’n Pro™
When used according to the instructions, side effects and complications associated with use of Silk’n Pro™
are uncommon. However every cosmetic procedure, including those designed for home use, involves some
degree of risk. Therefore it is important that you understand and accept the risks and complications that can
occur with pulsed light hair removal systems designed for home use.
Adverse Reaction
Degree of Risk
Minor Skin Discomfort –
Although home pulsed light hair removal is generally
very well-tolerated, most users do feel some mild discomfort during use, usually
described as being a mild stinging sensation on the treated skin areas. The
stinging sensation usually lasts during the time of the application itself or for a
few minutes thereafter. Anything beyond this minor discomfort is abnormal and
means that either you should not continue to use Silk’n Pro™ because you are
unable to tolerate the hair removal application, or that the energy level setting is
too high.
Minor
Skin Redness – Your skin may become red right after using Silk’n Pro™ or within
24 hours of using Silk’n Pro™. Redness generally clears up within 24 hours. See
your doctor if redness does not go away within 2 to 3 days.
Minor
Increased Sensitivity to Skin –
The skin of the treated area is more sensitive so you
may encounter dryness or aking of the skin.
Minor
Pigment Changes –
Silk’n Pro™ targets the hair shaft, in particular the pigmented
cells in the hair follicle and the hair follicle itself. Nevertheless there is risk of
temporary hyperpigmentation (increased pigment or brown discoloration) or
hypopigmentation (whitening) to the surrounding skin. This risk of changes in skin
pigmentation is higher for people with darker skin tones. Usually discoloration or
changes to skin pigment are temporary and permanent hyperpigmentation or
hypopigmentation rarely occur.
Rare
Excessive Redness and Swelling –
In rare cases treated skin may become
very red and swollen. This is more common in sensitive areas of the body. The
redness and swelling should subside within 2 to 7 days and should be treated
with frequent applications of ice. Gentle cleansing is OK, but one should avoid
exposure to sun.
Rare

11
English
8. Long Term Hair Removal the Silk’n Pro™ Way
A typical full hair growth cycle may take 18-24 months. During this time multiple Pro™ sessions may be required
in order to achieve permanent hair removal.
The efciency of hair removal varies from person to person according to body area, hair color, and how Silk’n
Pro™ is used.
Typical Silk’n Pro™ hair removal plan during a full hair growth cycle:
Treatments 1-4 – plan two weeks apart
Treatments 5-7 – plan four weeks apart
Treatments 8 + – treat as needed, until desired results are achieved.
Expected Treatment Outcome for Hair Removal
1. Individual response depends on hair type as well as biological factors that may aect hair growth patterns. Some users may respond quicker or slower than
the average number of treatments.
2. One cannot expect permanent epilation in a single or even double treatment sessions. The duration of the resting period for hair follicles also depends
on the body area.
Fitzpatrick
skin type Hair Color Light Fluence
[J/cm2]Anatomic area
of the body2Average Number of
Treatments1
Eectiveness (% of hair
removal/regrowth)1
I-IV Light brown to
brown 3-4.5
Lower or upper legs 60% Hair reduction
Arms Session 10-12, approx. 50% Hair reduction
Bikini Line four weeks apart. 60% Hair reduction
Axilla 55% Hair reduction
I-IV Brown to black 3-4.5
Lower or upper legs 70% Hair reduction
Arms Session 8-10, approx. 60% Hair reduction
Bikini Line four weeks apart. 70% Hair reduction
Axilla 65% Hair reduction

12
English
9. Get Started!
1. Remove Pro™ BASE UNIT, APPLICATOR and other components from box.
2. Verify that the DISPOSABLE LAMP CARTRIDGE is inserted properly at the tip of the APPLICATOR and
that it is not damaged.
3. Plug the POWER CORD into the Pro™ BASE UNIT socket.
4. Plug the other end of the POWER CORD into an electrical outlet. The STAND BY INDICATOR LIGHT
(green) will turn on.
Your Silk’n Pro™ is now ready to start.
Treat with Silk’n Pro™ safely and properly!
Choose areas to treat that have not had recent exposure to the sun.
5. The skin of the treatment areas should be shaved, clean, dry and free of any powders, antiperspirants or
deodorants. Do not wax, pluck or tweeze the hair out. Shaving is an important step to get the results you want!
6. Press the ON/STBY SWITCH. The POWER ON INDICATOR LIGHT (orange) will turn on and a fan sound
(similar to the sound of a hairdryer) will start.
7. Approximately 3.5 seconds after pressing the ON/ STBY SWITCH, the READY INDICATOR LIGHT
(green) will turn on. The device is then ready for you to trigger the rst pulse at the lowest energy level.
8. If this is your rst treatment - Choose the energy level. Pro™ offers 5 levels of energy from 1 (the lowest) to
5 (the highest). To choose the right energy level for your rst treatment, test each treatment area separately:
9. Set the energy level. If the energy level should be higher than the lowest, press the ENERGY LEVEL SETTING
BUTTONS using the “-“ or “+” to respectively decrease or increase the energy level, until the desired energy level is
set and represented by 3 energy level indicator lights (For details see “Energy Level” chapter inside this user manual).
Place the TREATMENT SURFACE on the skin and press the PULSE BUTTON to deliver one pulse.
If you did not experience abnormal discomfort press the + button once and deliver one pulse on a
different spot at energy level 2.
Continue testing at increased energy levels until you have reached the highest level that you feel
comfortable with. If within one hour you experience no adverse effects, you can start your full
treatment at that energy level.
Repeat this test for each body part you intend to treat.

13
English
10. Apply the TREATMENT SURFACE to the skin, making sure the skin is spread evenly and smoothly. As soon as
the TREATMENT SURFACE is in full contact with the skin, the READY INDICATOR LIGHT will start blinking.
11. Press the PULSE BUTTON. The device will rst determine the color of your skin. If the color of the skin
is light enough for safe application, the device will ash a pulse of light onto your skin, and the READY
INDICATOR LIGHT will turn off. You will see a bright ash of light and simultaneously hear a subtle pop
sound, which is a normal noise for the device. You will feel a mild sensation of warmth and tingling.
Silk’n Pro™ will immediately recharge for the next pulse.
After 3.5 seconds the READY INDICATOR LIGHT will turn on again.
12. Remove the TREATMENT SURFACE from the treated area of skin.
13. Move the TREATMENT SURFACE to another area of skin. Use the pressure marks the device just made
on your skin to guide you for proper positioning of the next pulse, avoiding both gaps and overlaps between
pulses.
Silk’n Pro™ pulses should be administered in rows, starting at one end of each row and progressing
sequentially towards the other end.This technique allows better control of skin coverage,and helps you
avoid treating the same area more than once or overlapping skin areas.
When applied to the skin, the Silk’n Pro™ TREATMENT SURFACE is designed to create temporary
pressure marks on the treated area. These visible marks can be used for proper positioning of the
next pulse.
Try to avoid overlapping pulses!
If your skin blisters or burns, STOP USE IMMEDIATELY!
Warning: Do not treat the same area of skin more than once per hair removal session!
Treating the same area of skin more than once per session increases the likelihood of
adverse effects.
14. Repeat the process until the entire treatment area is covered.

14
English
The Skin Color Sensor
Light-based hair removal on darker skin tones can result in adverse effects such as burns, blisters, and skin
color changes (hyper- or hypo-pigmentation). To prevent such misuse, a unique SKIN COLOR SENSOR
in Silk’n Pro™ measures the treated skin complexion at the beginning of each session and occasionally
during the session. If the SKIN COLOR SENSOR detects a skin tone that is too dark for Silk’n Pro™
application, the device will automatically stop emitting pulses. If you see no light pulse and the SKIN
TONE WARNING INDICATOR LIGHT blinks, this is an indication that your skin tone, measured by the
SKIN COLOR SENSOR, is too dark for safe application. Try using the device on a different body part or
contact the Silk’n support.
Covering skin areas
Silk’n Pro™ pulses should be administered in rows, starting at one end of each row and
progressing sequentially towards the other end. This technique allows better control of skin
coverage, and helps you avoid treating the same area more than once or overlapping skin
areas. When applied to the skin, the Silk’n Pro™ TREATMENT SURFACE is designed to
create temporary pressure marks on the treated area. These visible marks can be used for
proper positioning of the next pulse.
Energy Level
Energy level determines the intensity of the Silk’n Pro™ light pulse delivered to your skin, from the
lowest level (-) to the highest level (+). Corresponding INDICATOR LIGHTS on the CONTROL PANEL
represent the increases in energy. As energy level increases, so does hair removal results as well as
the risk of possible side effects and complications. Whenever Silk’n Pro™ is turned on its energy level
will automatically be reset to the lowest energy level. Only one ENERGY LEVEL INDICATOR LIGHT
will be on. To set the energy level, press the ENERGY LEVEL SETTING BUTTONS using “-“ or “+”
to respectively decrease or increase the energy level. The number of ENERGY LEVEL INDICATOR
LIGHTS will coincide with the change in energy level.
Try to avoid overlapping pulses!
Do not treat the same area of skin more than once per hair removal session!
If your skin blisters or burns, STOP USE IMMEDIATELY!

15
English
9.2. After treating with Silk’n Pro™
When Silk’n Pro™ session has been completed turn Silk’n Pro™ off by pressing the POWER ON/OFF
SWITCH. (Be sure to remember the last energy level setting you used, as it will not be restored when turning
Silk’n Pro™ on again.)
Unplug the power cord from the electrical outlet.
After each hair removal session it is recommended that you clean your Silk’n Pro™ device, especially the
TREATMENT SURFACE (See: “Cleaning Silk’n Pro™”).
After cleaning, it is recommended to store your Silk’n Pro™ device in its original box, and keep it away
from water.
9.1.What to Expect when treating with Silk’n Pro™?
For many people, using Silk’n Pro™ may be their rst experience with a light-based device designed for home
use. Silk’n Pro™ is simple to use, and hair removal sessions go by quickly. During a Silk’n Pro™ session it is
normal to experience and feel:
A Fan Noise – The cooling fan in Silk’n Pro™ makes noise similar to a hairdryer. This is normal.
A Pop Sound with Each Pulse – When a pulse of HPL™ light is activated, it is normal to hear a subtle pop
sound simultaneously with the ash of light.
Moderate Pressure of the APPLICATOR – This is necessary and helpful for placement of adjacent pulses
of light, and is part of the unique safety feature of Silk’n Pro™.
A Sensation of Warmth and Tingling – During each pulse of light it is normal to feel a mild sensation of
warmth and tingling from the light energy.
Remember it is important to always use low energy settings for initial hair removal sessions. You may feel
some warmth for up to an hour after your Silk’n Pro™ session.
Some Mild Red or Pink Color – During and just after your Silk’n Pro™ session it is not uncommon to
see some very mild, pink-like color of the skin. This is usually most noticeable around the hairs themselves.
However if you see full redness of the skin, blistering or burns stop use of Silk’n Pro™ immediately.
Skin care following hair removal session
Do not expose treated areas of skin to the sun. Be sure to carefully protect the treated
skin with sunscreen, throughout the hair removal period and for at least 2 weeks
following the last Silk’n Pro™ session.
16
English
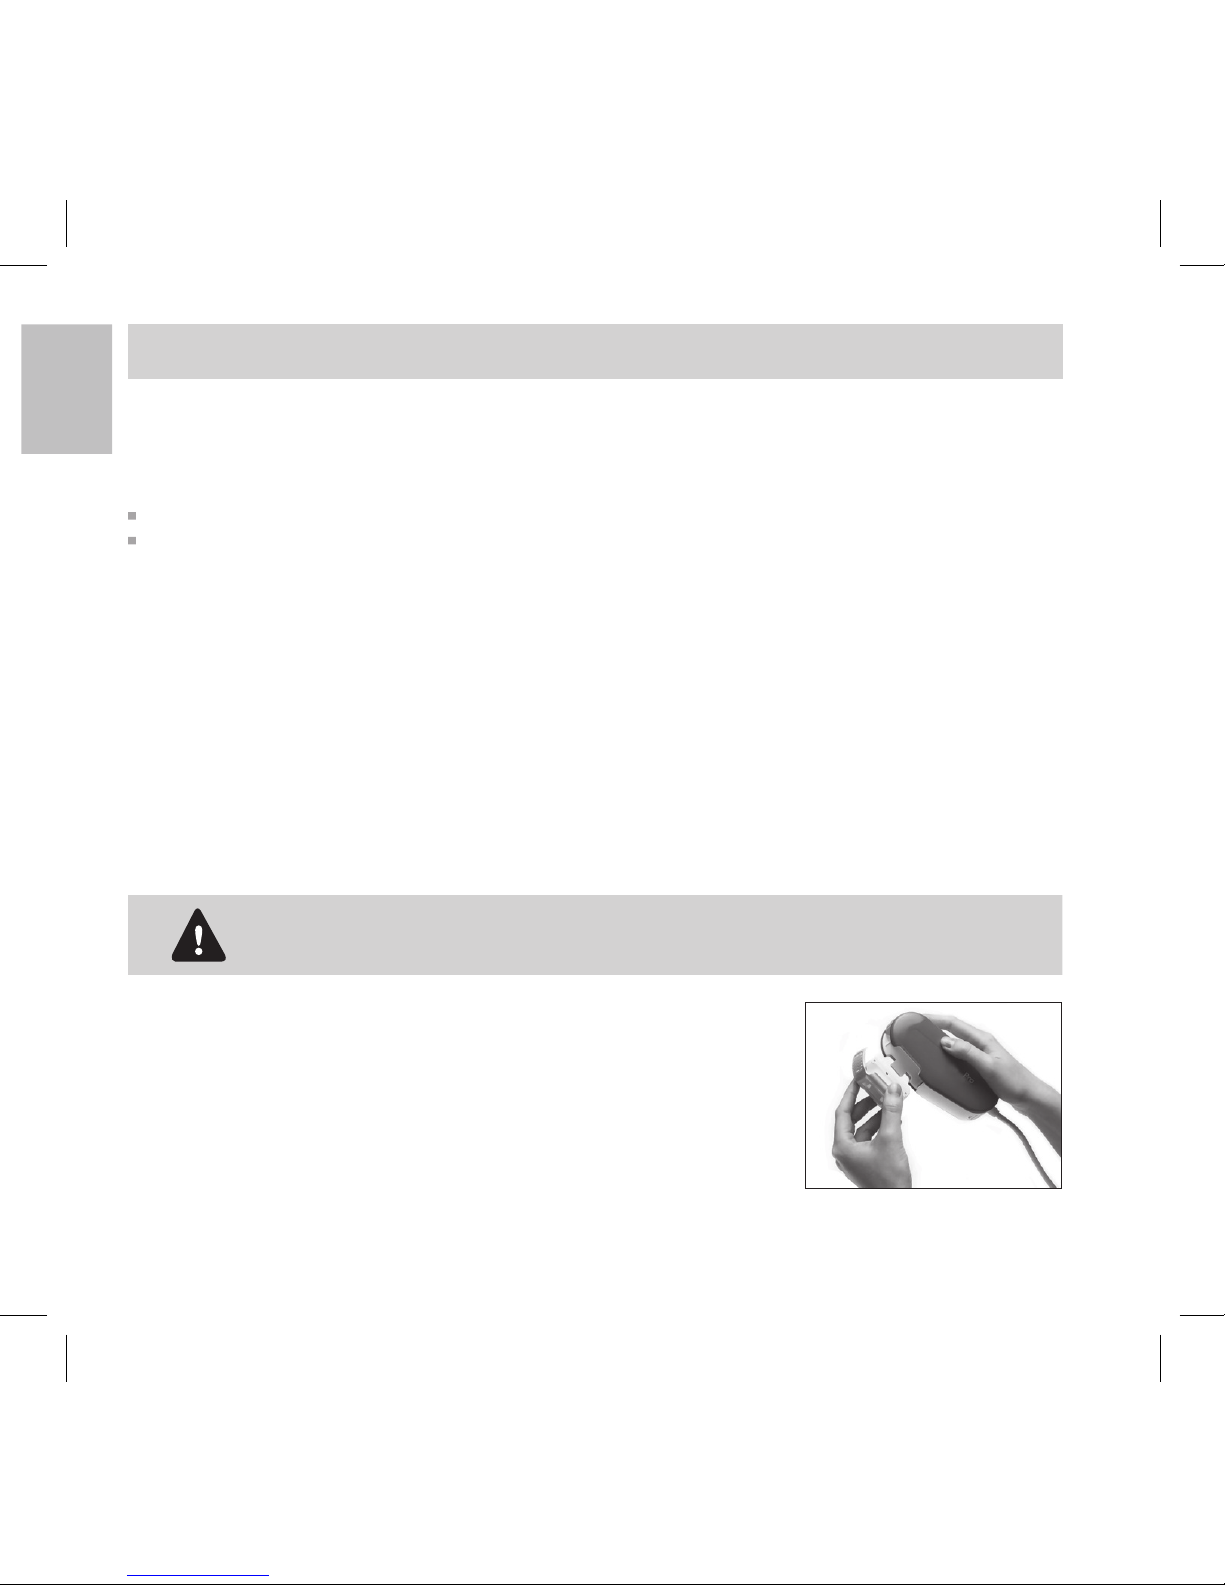
To replace a DISPOSABLE LAMP CARTRIDGE:
1. Press the ON/STBY SWITCH to turn Silk’n Pro™ to STBY mode.
2. Unplug the power adaptor from the electrical outlet.
3. Grasp the used DISPOSABLE LAMP CARTRIDGE on both sides, pull it out
of the socket and discard with normal trash.
4. Unwrap a new DISPOSABLE LAMP CARTRIDGE.
5. Push the new DISPOSABLE LAMP CARTRIDGE gently into place.
If correctly installed, the DISPOSABLE LAMP CARTRIDGE will spring back
when pushed in and released.
Note:A DISPOSABLE LAMP CARTRIDGE should also be replaced if large spots
appear inside it or if its TREATMENT SURFACE is broken.
10.2. Replacing the LAMP CARTRIDGE
10. Maintenance of Silk’n Pro™
10.1. Cleaning Silk’n Pro™
After each hair removal session, it is recommended to clean your Silk’n Pro™ device, and especially the
TREATMENT SURFACE.
Unplug Silk’n Pro™ before cleaning.
Use a dry, clean cloth and a specially formulated cleaner for electronic equipment to gently wipe Silk’n
Pro™ surface, and especially the TREATMENT SURFACE.
Never immerse Silk’n Pro™ or any of its parts in water!
The Silk’n Pro™ DISPOSABLE LAMP CARTRIDGE can re a pre-set and limited number of light pulses. Pulse
intensity is determined only according to the energy level setting of the device. There is no decrease of energy
during the usable lifetime of the LAMP CARTRIDGE.
When only 100 light pulses remain in the DISPOSABLE LAMP CARTRIDGE, the REPLACE CARTRIDGE
INDICATOR LIGHT on the CONTROL PANEL will start blinking, indicating that the DISPOSABLE LAMP
CARTRIDGE should soon be replaced. As the number of light pulses in the DISPOSABLE LAMP CARTRIDGE
further decreases, the REPLACE CARTRIDGE INDICATOR LIGHT blinking will grow faster. Once all the
pulses in a DISPOSABLE LAMP CARTRIDGE have been used, the REPLACE CARTRIDGE INDICATOR
LIGHT will remain steadily on, indicating that further pulses cannot be emitted. In order to continue the hair
removal session, it will now be necessary to replace the DISPOSABLE LAMP CARTRIDGE.

17
English
Do not attempt to open or repair your Silk’n Pro™ device. Only authorized Silk’n™
repair centers are permitted to perform repairs.
Opening Silk’n Pro™ may expose you to dangerous electrical components and to pulsed light energy, either
of which may cause serious bodily damage and/or permanent eye injury.
Trying to open Silk’n Pro™ may also damage the device and will void your warranty.
Please contact Silk’n™ Customer Service if you have a broken or damaged device in need or repair.
11.2.“A light pulse is not emitted when I press the PULSE BUTTON
Make sure that you have good contact with the skin and that the TRETMENT SURFACE is evenly and rmly
pressed to the skin. For your safety, the PULSE BUTTON will activate a pulse only if the TRETMENT SURFACE
is rmly pressed against the skin.
Check the CONTROL PANEL. If the SKIN TONE WARNING INDICATOR LIGHT blink for 3 seconds, this
is an indication that your skin tone, measured by the SKIN COLOR SENSOR, is too dark for safe application.
Try using the device on a different body part or contact the Silk’n Pro™ support.
Check the REPLACE CARTRIDGE INDICATOR LIGHT. If it is on, disconnect Silk’n Pro™ and replace the
DISPOSABLE LAMP CARTRIDGE.
Make sure that the READY INDICATOR is on.
If within 10 seconds the READY INDICATOR remains off turn Silk’n Pro™ off and back on by
pressing the ON/STBY SWITCH twice.
If the problem persists, contact your local Silk’n™ Customer Service Center.
Check the SYSTEM WARNING INDICATOR LIGHT.
If the light is on turn Silk’n Pro™ off and back on by pressing the ON/STBY SWITCH twice.
If the problem persists, contact your local Silk’n™ Customer Service Center.
11. Troubleshooting
11.1. “My Silk’n Pro™ does not start.”
Make sure the POWER ADAPTOR is properly connected to the Pro™ device.
Make sure the POWER ADAPTOR is plugged into an electrical outlet on the wall.
Note! After replacing the disposable lamp cartridge with a new one, always set the
energy to be one level lower than your normal setting. Raise the energy level back,
only if you do not experience abnormal discomfort during or after the treatment.

18
English
13. Specifications
Spot Size 2cm x 3cm [6cm2]
Speed 1 pulse every 3.5 second: 1.7 cm²/sec
Technology Home Pulsed Light™
Max Energy Level Max 5J/cm²
Wavelength 475-1200nm
Charging Time/Power Source Continuous operation
Electrical Requirements 100-240VAC,2A
Time Needed to Treat Lower Legs 30 minutes
Operation and Safety New Skin Color Sensor ensures use only on suitable skin complexions. Safety
sensor tip enables maximum safety & control. Easy to use.
Package Size 22cm x 22cm x 14cm
Temperature Operating 10 to 35°C
Storage -40 to +70°C
Relative Humidity Operating 30 to 75%rH
Storage 10 to 90%rH
Atmospheric pressure Operating 700 to 1060hPa
Storage 500 to 1060hPa
12. Customer Service
For more information about Silk’n™ products please enter your local Silk’n™ website, www.silkn.eu or www.
silkn.com.
If your device is broken, damaged, in need of repair, or for any other user assistance, please contact your local
Silk’n™ Customer Service:
For USA and Canada customers: 1-877-DO-SILKN / 1-877-367-4556, [email protected]
For customers in other countries: [email protected]
Under EC Directive 2002/96/EC this device is to be orderly disposed of when reaching End of Life stage. In this way, the
device’s valuable materials are recycled and the environmental burden avoided. Deliver your old equipment to the nearest
electronic waste collection point for safe and efcient disposal

Deutsch
19
Kurzanleitung
Planen Sie Ihre Silk’n Pro™ Haarentfernung für beste Resultate!
Behandlungen 1-4 – zwei Wochen Zeitabstand
Behandlungen 5-7 – vier Wochen Zeitabstand
Behandlungen 8 + – wie erforderlich, bis die gewünschten Resultate erreicht sind.
Vorbereitung Ihres Silk’n Pro!
1. Nehmen Sie die Pro™-BASISEINHEIT, den APPLIKATOR und die anderen Teile aus der Schachtel.
2. Vergewissern Sie sich, dass der EINWEGLICHTEINSATZ richtig in die Spitze des Gerätes eingesetzt ist.
3. Stecken Sie das Netzkabel in die dafür vorgesehene Buchse in der Pro™-BASISEINHEIT.
4. Verbinden Sie das andere Ende des Netzkabels mit einer Steckdose. Die STANDBY-KONTROLLLAMPE
wird aufleuchten.
Ihr Silk’n Pro™ ist jetzt einsatzbereit.
Sichere und vorschriftsmäßige Behandlung mit Silk’n Pro!
5. Wählen Sie nur solche Behandlungsbereiche, die nicht kurz zuvor der Sonne ausgesetzt waren.
6. Die Haut im Behandlungsbereich sollte rasiert, sauber, trocken und frei von jeglichen Antiperspirantien
oder Deodorants sein. Die Haare dürfen nicht mit Wachs entfernt, herausgerissen oder mit einer Pinzette
ausgezupft werden. Die Rasur ist eine wichtige Voraussetzung, um die gewünschten Resultate zu erzielen!
7. Drücken Sie den NETZSCHALTER FÜR EIN/BETRIEBSBEREIT. Die BETRIEBSANZEIGE (orange) wird
sich begleitet von einem Geräusch (ähnelt dem Geräusch eines Föns) einschalten.
8. Nach ungefähr 3,5 Sekunden, nachdem Sie den NETZSCHALTER FÜR EIN/BETRIEBSBEREIT gedrückt
haben, wird die BEREITSCHAFTSANZEIGE (grün) aufleuchten. Das Gerät ist dann für die Versendung des
ersten Pulses auf niedrigster Energiestufe bereit.
9. Falls dies Ihre erste Behandlung ist – Wählen Sie die Energiestufe.
Pro bietet 5 Energiestufen von 1 (am
niedrigsten) bis 5 (am höchsten). Zur Auswahl der passenden Energiestufe testen Sie jeden Behandlungsbereich einzeln:
Legen Sie die BEHANDLUNGSOBERFLÄCHE auf die Haut und drücken Sie die IMPULS-TASTE um
einen Impuls auszulösen.
Wenn Sie wenig oder keine Schmerzen verspüren, drücken Sie einmal auf dieTaste + und versenden
an einer neuen Stelle einen Puls der Energiestufe 2.
Setzen Sie diesen Test mit höheren Energiestufen fort, bis Sie die höchste Energiestufe, auf der eine
Behandlung für Sie noch angenehm ist, erreichen.Wenn innerhalb einer Stunde nach der Behandlung
keine Beschwerden auftreten, können Sie die volle Behandlung mit dieser Energiestufe fortsetzen.
Wiederholen Sie diesenTest für jeden Körperbereich, den Sie behandeln möchten.
Other manuals for Pro
1
Table of contents
Languages:
Other Silk'n Electric Shaver manuals


