SilverCloud Voyager S1200 User manual

DVR auto FullHD
SilverCloud Voyager S1200
Manual de utilizare
1
Introducere
DVR-ul auto este un dispozitiv ce inregistreaza informatiile video si audio din
trafic ce va pot servi drept proba in cazul unui accident auto.
Acest produs a fost proiectat respectand cele mai noi tehnologii, si poate fi
utilizat nu doar ca un DVR auto profesional dar si ca o camera web, odata conectat la un
calculator.
NOTA: Pentru a utiliza corect produsul va rugam sa cititi cu atentie acest manual inainte
de utilizare.
Atentionari inainte de utilizare
1. Va rugam sa utilizati carduri de memorie clasa 10 pentru inregistrarea informatiilor,
altfel pot aparea probleme in utilizare
2. Va recomandam formatarea cardului de memorie atunci cand il introduceti prima
data in dispozitiv
3. Atentie la directia de introducere a cardului, altfel puteti defecta cardul sau
dispozitivul
4. Va recomandam sa introduceti mai intai cardul apoi sa porniti dispozitivul
5. Dispozitivul suporta carduri de memorie de pana la 32 GB
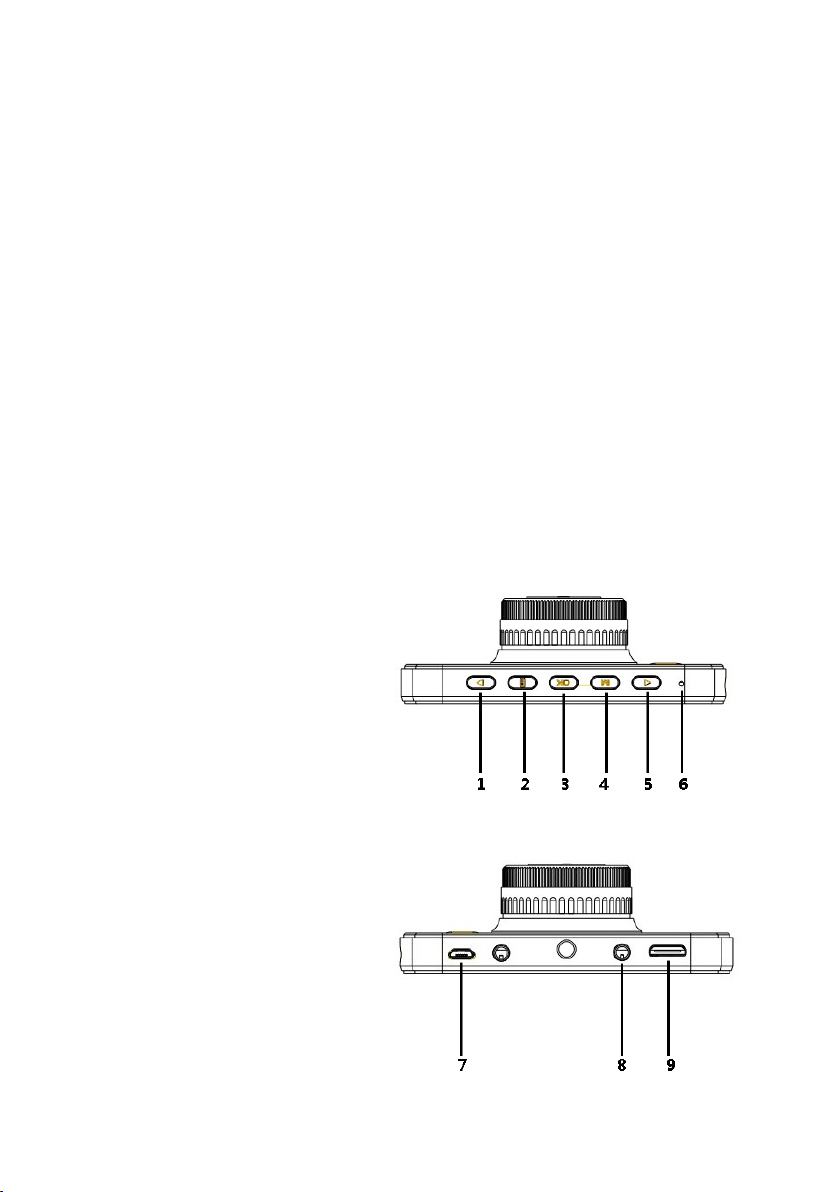
Descrierea produsului
1,5 - Butoane navigare prin meniu
2 - Buton schimbare mod de functionare:
video/foto/vizualizare inregistrari/foto
3 - Buton confirmare selectie
4 - Buton accesare/iesire din meniu
6 - Buton reset
7 - Slot microUSB
8 - Iesire AV
9 - Slot mini HDMI

2
Buton pornire/oprire
Pornire/oprire dispozitiv:
- apasati butonul ilus mai sus timp de 1 sec pentru a porni dispozitivultrat
- apasati timp de 3 sec pentru a opri dispozitivul butonul ilustrat mai sus
Daca ati introdus un card de memorie, la pornire dispozitivul va intra direct in
modul .video
Incarcarea bateriei
Conectati dispozitivul la incarcatorul auto sau la un calculator prin mufa
m USB. Acesta va porni automat si va incepe . Daca il inchideti va icro incarcarea bateriei
continua sa se incarce.
In timpul incarcarii LED-ul indicator va fi rosu. Cand bateria este incarcata
complet LED-ul se va stinge.
NOTA: Produsul nu este conceput pentru a functiona pe baterie, aceasta este utilizata
pentru a pastra setarile interne ale produsului.
Inregistrare
Cand este selectat modul video, in coltul din stanga sus a ecranului va aparea
iconita . Apasati butonul “OK” pentru a porni/opri inregistrarea.
Fotografiere
Apasati butonul “▓” pentru a selecta modul foto. In coltul din stanga sus a
ecranului va aparea iconita .
Apasati butonul “OK” pentru a realiza o fotografie.
In timpul fotografierii mentineti camera cat mai stabila posibil pentru a obtine o
imagine clara.
Vizualizare inregistrari si fotografii salvate
Apasati butonul “ ” pentru a selecta modul de vizualizare. Pe ecran va aparea ▓
o lista cu fisierele din memorie. Utilizati butoanele ►◄ pentru a naviga prin lista.
Selectati fisierul dorit apoi apasati butonul “OK” pentru a-l vizualiza.
Daca ati selectat un fisier si apasati butonul “Menu” alege stergerea puteti
(Delete) sau protejarea fisierului de la stergere (Protection lock). Apasati butonul “OK”
pentru a confirma dorita.optiunea
Apasati lung butonul “OK” pentru a schimba intre vizualizare pe tot ecranul sau
vizualizare normala.
Probleme si solutii
1. Dispozitivul nu inregistreaza si nici nu efectueaza fotografii
- verificati daca mai aveti spatiu disponibil pe cardul de memorie
- verificati cardul sa nu fie blocat pentru scriere

3
2. Pe ecran apare mesajul “File error” cand incercati sa vizualizati un fisier din memorie
- formatati cardul inainte de utilizare
3. Dispozitivul nu mai functioneaza corespunzator
- resetati dispozitivul apasand butonul “RESET”
4. Inregistrarea video este neclara
- verificati ca lentilele sa fie curate si fara amprente
Ne rezervam dreptul de a modifica produsul fara preaviz.
Ecran
Camera
Unghi de vizibilitate
Rezolutie video
Rezolutie foto
Format video
Format foto
Difuzor incorporat
Microfon incorporat
Procesor
Baterie
Iluminare nocturna
Limba meniu
Functii
Alimentare
Dimensiuni
Greutate
TFT LCD 3 inch
12 MP
170°
1080P 1920x1080@30fps / 720P 1280x720@60fps
WVGA 840x480@60fps / VGA 640x480@60fps
12M 4000x3000 / 10M 3648x2736 / 8M 3264x2448
MOV
JPEG
Da
Da
NTK 96650
180 mAh Li-Polymer
1xLED
Engleza, Italiana, Spaniola, Portugheza etc
Protejare fisier / Detectie miscare / G-Sensor /
Inregistrare ciclica / Inregistrare audio /
Pornire/oprire automata / Imprimare date/ora
5V/1A
100 x 54 x 12 mm
110 g
- incarcator auto 12V/24V -> 5V
- suport parbriz
- cablu de date microUSB -> USB
- manual de utilizare
Specificatii tehnice
Continutul pachetului:
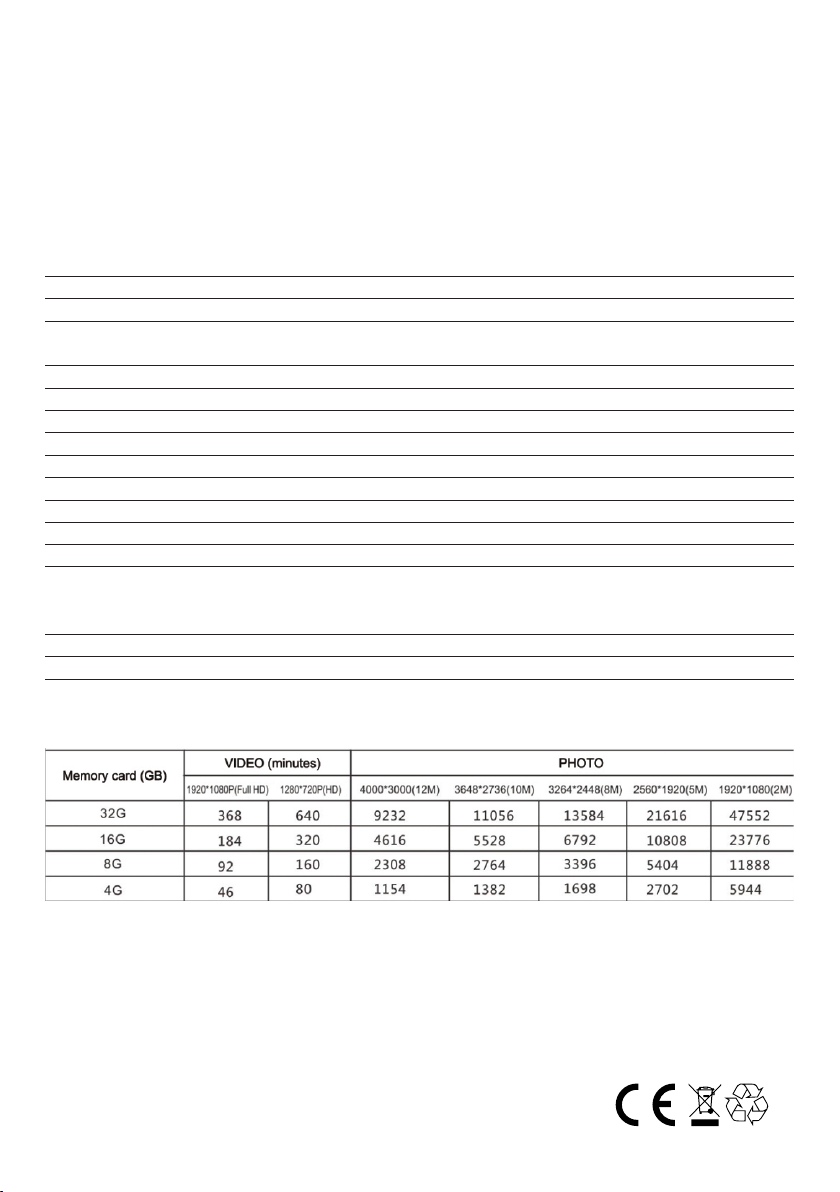
Perioada inregistrare si numar de fotografii in functie de capacitatea cardului de
memorie

4
Full HD car DVR
SilverCloud Voyager S1200
User manual

5
Introduction
The car DVR is a device used to record video and audio information while
driving that you can use as evidence in case of an accident.
This product was designed using the latest technologies and it can be used as
a car DVR or web camera for your PC.
NOTA: For a better understanding of the product please read this user manual before
use.
Notice before use
1. Please use an original high-speed class 10 TF card for storage, otherwise you can
experience problems with the product .
2. Please format your TF card before using it with the device.
3. Pay attention to the insert direction of the card. If it is inserted the wrong wayitmay
damagethedeviceorTFcard.
4. Please insert the card first then start the device.
5. The device works with memory cards up to la 32 GB.
Device introduction
1,5 - Menu navigation buttons
2 - Mode selection button:
video/photo/playback
3 - OK button
4 - Menu button
6 - Reset button
7 - Micro USB port
8 - AV out
9 - Mini HDMI port
5

6
Power on/off:
- press the on/off button for 1 sec to turn on the device
- press the on/off button for 3 sec to turn off the device
If you inserted a memory card already, the device will enter after turning on.
Battery charge
Connect the device to the car charger or a PC through the micro USB port. The
device will automatically start charging. If you turn it off it will continue charging.
While charging the LED will be red. When the battery is full the LED will turn off.
NOTE: The product is not designed to run on battery power, the battery is used to
preserve the product's internal settings.
Recording
In video mode you will see the icon in the upper left corner of the screen.
Press “OK” button to start/stop recording.
Photo
Press “▓” button to select photo mode. You will see the icon in the upper
left corner of the screen. Press “OK” button to take a picture.
NOTA: To obtain a clear image keep the device as still as possible.
Playback
Press “ ” button to select playback mode. On the screen you will see a list of ▓
the files stored on the memory card. Use ►◄ buttons to navigate through the list.
Select the desired file and press “OK” to view it.
If you select a file and press the menu button you can select to erase it or
protecting it from erasing (Protection lock). Press “OK” button to confirm your choice.
Long press “OK” button to change between full-screen and normal view.
Troubleshooting
1. The device doesn’t record or take photos
- check if you have enough space on the memory card
- check if the memory card is read only
2. The message “File error” appears on the screen when trying to view a file
- format the memory card before use
ON/OFF button
6
7
3. The device is not working properly
- reset the device by pressing the reset button
4. The recorded image is not clear
- check the lens to be clean and without fingerprints on them
We reserve the right to modify the product without notice.
7
Technical specifications
Display
Camera
View angle
Video resolution
Photo resolution
Video format
Photo format
Built-in speaker
Built-in microphone
Chipset
Battery
Night light
Menu language
Functions
Power
Size
Weight
3 inch TFT LCD
12 MP
170°
1080P 1920x1080@30fps / 720P 1280x720@60fps
WVGA 840x480@60fps / VGA 640x480@60fps
12M 4000x3000 / 10M 3648x2736 / 8M 3264x2448
MOV
JPEG
Yes
Yes
NTK 96650
180 mAh Li-Polymer
1xLED
English, Italian, Spanish, Portugues etc
File Locking / Motion detection / G-Sensor /
Cycle Recording / Audio Recording /
Auto Power ON/OFF / Date/time stamp
5V/1A
100 x 54 x 12 mm
110 g
Package content:
Recording time and number of photos according to memory card capacity
- car charger 12V/24V -> 5V
- windshield support
- USB cable
- user manual
Other manuals for Voyager S1200
1
Table of contents
Languages:
Other SilverCloud Dashcam manuals


