Silverline Hi-Spec 1600W User manual

Users Manual
Hi-SpecTM 1600W Chainsaw
Product Code 112113
© September 2006
• This guarantee becomes effective at the date of retail purchase.
PLEASE KEEP YOUR RECEIPT.
• If this product develops a fault within 30 days of purchase, return it to the
stockist where it was purchased, with your receipt, stating details of the fault.
You will receive a replacement or refund.
• If this product develops a fault within 3 years of purchase return it to;
Silverline Tools Service Centre
PO Box 2988
Yeovil
BA21 1WU
Include your original receipt, details of the fault, your name and address, place and
date of purchase. We do not refund carriage. All product should be in a suitably
clean and safe state for repair, and should be packaged carefully to prevent damage
or injury during transportation. We may reject unsuitable or unsafe deliveries.
• You must provide proof of purchase before any work can be carried out.
• All work will be carried out by Silverline Tools or its authorised repair agents.
• Any parts which are replaced will become the property of Silverline Tools.
• The repair or replacement of the product will not extend the period of guarantee.
• The repair or replacement of your product under guarantee provides benefits which
are additional to and do not affect your statutory rights as a consumer.
What is covered:
• The repair of the product, if found to be defective due to faulty materials or workmanship
within 3 years of purchase. If any part is no longer available or out of manufacture,
Silverline Tools will replace it with a functional replacement part.
• Use of the product in the UK.
What is not covered:
Silverline Tools does not guarantee repairs required as a result of:
• Normal wear and tear Eg blades, brushes, belts, bulbs, batteries etc.
• Accidental damage, faults caused by negligent use or care,
misuse, neglect, careless operation or handling of the product.
• Use of the product for anything other than normal domestic purposes.
• Change or modification of the product in any way.
• Use of parts and accessories which are not Silverline Tools genuine components.
• Faulty installation (except installed by Silverline Tools).
• Repairs or alterations carried out by parties other than
Silverline Tools or its authorised repair agents.
Silverline Tools 3 Year Guarantee
Thankyou for choosing this product

Product Familiarisation
Hi-SpecTM 1600W Chainsaw
1. Protection guard
2. Chain
3. Guide bar
4. Switch
5. Oil cap
6. Chain oil flow control
7. Oil level indicator
WARNING: - THIS MACHINE CAN CAUSE DEATH OR
SERIOUS INJURY. FOLLOW THE SAFETY INSTRUCTIONS IN
THIS BOOKLET AT ALL TIMES
ALWAYS WEAR THE CORRECT PERSONAL PROTECTIVE
EQUIPMENT FOR THIS PRODUCT. MAKE SURE BEFORE
USE THAT ALL PROTECTIVE EQUIPMENT IS IN A GOOD
WORKING ORDER AND FREE OF ANY DEFECTS.
ADDITIONAL SAFETY INSTRUCTIONS FOR HI-SPECTM
CHAIN SAW
• Before using this saw, familiarise yourself with all its controls
and how to use it correctly prior to use.
• If using this saw outside only use extension reels and cables
suitable for outdoor use.
• This tool must never be left unattended.
• Keep out of the reach of children at all times.
• Never attempt to use this saw if it is not fully equipped, or if it
has been subject to any unauthorised modifications.
SPECIFICATION
Motor: 1600W
Input power: 230V/50Hz
Weight: 6.5kgs
No load speed: 660m/min
Guide bar length: 405mm
Chain: Orgeon® Extra Guard3/8"*
*Orgeon® is a registered trademark of Blount International Inc
• Never use this machine when other people are in close vicinity.
• Always ensure that when using this chain saw you are on a safe
stable surface and in a safe working position.
• Do not use this product if the chain is broken or excessively
worn.
• This machine should be firmly held in both hands at all times.
• Always be aware of the rotating blade and the direction you are
cutting in.
• Beware of rebounds/kickback.
• The chain saw must be unplugged before moving it from one
location to another, when cleaning it, before carrying out any
maintenance and before putting it away.
• Do not attempt to repair this machine.
• When carrying the chain saw always make sure that it is held
by the front handle with the chain directed backwards. The
protective guard is in place. Never carry this product by the
power cable.
Weight vibration: 5.71m/s2
Sound pressure: 98dB
Sound power: 112dB
Double insulated:
Fuse rating: 13A
1
2
36
5
4
Introduction
Carefully read and understand this manual and any label attached
to the tool before use. Keep these instructions with the product for
future reference. Ensure all persons who use and service this
product are acquainted with this manual.
Electrical Safety Information
• The wires in this product are coloured:
Blue Neutral (N)
Brown Live (L)
Green & Yellow Earth (E)
• As the colours may not correspond with the coloured markings
identifying the terminals in your plug, proceed as follows.
• The wire which is coloured blue must be connected to the
terminal which is marked with the letter N or coloured black, the
wire which is coloured brown must be connected to the terminal
which is marked L or coloured red.
• This appliance must be protected by a suitable fuse.
• To prevent fire or shock hazard, do not expose this product to
rain/water or moisture. There are no user serviceable parts inside
except those referred to in this manual. Always refer servicing to
qualified service personnel. Never remove any part of the casing
unless qualified to do so; this unit contains dangerous voltages.
• Use of a residual current device (RCD) will reduce the risk of
electric shock.
NEVER CONNECT THE BROWN OR BLUE WIRE TO THE
EARTH PIN OF THE 13 AMP PLUG. IF IN DOUBT CONSULT A
QUALIFIED ELECTRICIAN
General Safety Instructions
Even when used as prescribed it is not possible to eliminate all
residual risk factors. Use with caution.
Keep guards in position
• Always keep guards in position, in good working order, correctly
adjusted and aligned. Never attempt to use a power tool without
any guard supplied with it.
Remove adjusting keys
• Always check to see that keys and adjusting wrenches are
removed from power tool before turning on.
Clean work area
• Accidents occur where benches and work areas are cluttered
or dirty, floors must be kept clear, avoid working where the floor is
slippery.
Dangerous environment
• Do not use power tools in damp or wet conditions, or expose
them to rain. Provide adequate surrounding work space and keep
area well lit. Do not use power tools where there is a risk of
explosion or fire from combustible material, flammable liquids,
flammable gases or dust of an explosive nature. When using
power tools avoid contact with any earthed items such as pipes,
radiators, cookers, refrigerators, metal baths and taps.
Children & pets
• Children and pets should always be kept at a safe distance from
your workshop child-proof. Lock tool away where children can't get
access to them. Remove batteries from cordless tools.
Use the correct power tool
• Don't force, or attempt to use a power tool for a purpose it was
not designed for. Do not use a small tool to do the job of a heavy
duty tool.
Wear correct clothing and footwear.
• Don't wear loose clothing, neckties or jewellery or other items
which may get caught in moving parts. Wear non-slip footwear,
cover or tie back long hair. Use safety footwear if necessary.
Protect your head
• Wear safety goggles at all times, every day glasses are not
sufficient for eye protection, as lenses are not impact resistant
and could shatter. Use an approved face or dust mask when
operation creates dust. Ensure dust extraction equipment is
functioning and correctly used. Hearing protection should be used
if the sound intensity level for the operator could exceed 85dB(A).
Use a hard hat where there is a risk of falling objects or striking
your head on low level obstructions.
Protect yourself from vibration.
• Hand held power tools may produce vibration. Vibration can
cause disease. Gloves to keep the operator warm and dry and
therefore maintain good blood circulation in the fingers may help.
This tool has not been designed for extended or industrial
operation.
Secure work
• Always secure work. Where practical use a clamp or vice, it will
allow you to use both hands to operate your power tool.
Keep your balance
• Don't over reach, keep proper footing at all times to ensure
correct balance.
Maintain your power tool
• Keep your power tool in good working order, keep tools sharp and
clean for best and safest performance. Ensure ventilation holes
are kept clean and unrestricted at all times.
Always disconnect.
• Before changing tools, always ensure they are disconnected from
the power source.
Accessories
• The use of any attachment or accessory other than those
mentioned in this manual could result in damage or injury. The
use of improper accessories could be dangerous.
Never stand on your power tool
• Standing on your power tool or its stand could cause serious
injury if the tool is tipped or if the cutting tool is accidentally
contacted. Do not store materials above or near the tool so that it
is necessary to stand on the tool or its stand to reach them.
Switch off before connecting.
• Ensure the power tool is switched off before connecting to the
power source. If the power tool stops unexpectedly turn the power
switch to off.
Do not abuse the power cord.
• Be sure your cable/extension cable is properly wired and in good
condition. Always replace a damaged cable/extension cable or
have it repaired by a qualified person before using it. Never yank
or pull the cable to disconnect it from the power socket. Never
carry your power tool by it’s cable. Keep the cable away from
damp, heat, oil, solvents, and sharp edges.
Check for damaged or missing parts.
• Before each use check if any part of the power tool is damaged or
missing, check carefully that it will operate properly and perform
its intended function. Check alignment of moving parts for binding.
Any guard or other part that is damaged should be correctly
repaired or replaced. Do not use if the power switch does not turn
the power on and off. Check any other condition that may affect
the safety of the power tool. DO NOT USE IF DEFECTIVE.
Direction of feed
• Feed work into a blade or cutter against the direction of rotation of
the blade or cutter only.
Don’t leave the tool running unattended
• Always wait until your power tool has come to a complete stop
before leaving it and then disconnect from power source.
FUSE
BROWN
(Live)
BLUE
(Neutral)
E
L
N
FUSE
GREEN/YELLOW
OR GREEN
FUSE
BROWN
(Live)
BLUE
(Neutral)
E
L
N
FUSE
Double Insulated Earthed
7

PRIOR TO USE
Points to check before starting the machine
Note: - Before using this machine a check should be
performed on all of the points listed below. It is important
before use to check the chainsaw is in good working order.
If any defects are detected then the machine should not be
used.
• Check the tension of the chain along the guide bar. A major
cause of problems with chainsaws comes as a direct result of
the tension in the chain. A loose chain will cause excessive
friction, causing wear and damage.
• Make sure the chain is well oiled. Before every use check the
oil level in the chain saw. The saw requires the chain to be well
lubricated in order to pass freely through the guide bar. This unit
requires Chainsaw Oil SAE 30. The oil level should be checked
very regularly to help reduce wear on the saw chain and guide
bar. This chainsaw is self-lubricating.
• Make sure the teeth are sharp.
• Check the power lead is in good condition.
OPERATING INSTRUCTIONS
Fitting The Guide Bar, Chain And Setting The Tension
• Make sure the chainsaw is not plugged in prior to fitting the
guide bar and chain.
NOTE: - Suitable gloves should be worn at all times when
handling the chain.
• Lay the chainsaw on its motor casing; handle side facing down.
Make sure that the chainsaw is in a stable position before going
any further.
• Remove the locking nut and plastic housing covering the drive
sprocket and locating pin.
Diagram 1
• Holding the guide bar vertically with the head at the top, insert
the chain onto the guide bar. Make sure that the chain runs
through the groove on the guide bar along both sides.
• Place the guide bar and chain onto the chainsaw body as per
the diagram below. Make sure that the guide bar is properly
positioned over the locating pin and that the tensioning pin is
also in the correct position.
Diagram 2
• With the chain and guide bar now in place run the chain around
the drive sprocket. Make sure that the direction of the blades
matches the direction of rotation of the chainsaw.
• Whilst holding the guide bar in place to stop the chain from
moving replace the plastic housing covering the drive sprocket
and tighten the locking nut. Do not over tighten.
Diagram 3
• Using a Phillips screwdriver adjust the chain tension by
screwing in a clockwise direction. This will pull the chain taught
to the guide bar.
Diagram 4
• The chain has been correctly tensioned when you can rotate the
chain by hand and it is running around the guide bar closely.
Note: - A new chain is liable to be lacking tension at first,
and will require adjusting occasionally for the first few times
in use. Over tensioning the chain will lead to premature wear.
A saw chain, which is too slack, runs the risk of
jumping out of the guide and can cause severe damage to
the machine and possibly the user.
Safe Working Practice
When using this chainsaw it is very important that all points listed
in this section be adhered to at all times. These points are listed
for the users safety and the safety of others in the surrounding
area.
Clothing And Protective Equipment
NOTE: - All of the following must be worn at all times when
using this machine
• Protective jacket conforming to prEN381 – 11 Class 0. To
provide extra protection across the shoulders, arms and front
yoke area.
• Protective trousers conforming to EN381-5 Class 1
• Chainsaw gloves conforming to EN381-7 Class O. These gloves
help prevent slippage and incorporate a special anti cut material
on the back of the hand.
• Hard hat with full face shield and ear defenders.
• Protective chainsaw boots with steel midsole and toecap.
Gaiters to provide extra protection around the shin.
Safety Rules For Making A Cut
• Ensure the protection guard (1) is in the forward position before
starting.
• Use a right hand grip to hold the chainsaw. Right hand on the
trigger and left hand on the front handle.
• Keep the left arm straight at all times for better control of the
machine.
• Hold the chainsaw firmly in both hands keeping the thumb
locked around the front handle.
• Stand to the side of the chainsaw. NEVER STAND BEHIND IT.
• Run the engine at full throttle.
• Use a low kickback saw chain and a reduced kick back
guide bar.
• Keep the chainsaw, chain, guide bar and drive sprocket properly
maintained.
• Always stand with feet well braced and your body balanced.
• Cut only wood with this chainsaw.
• Keep yourself clear of the work. Before making a cut assess the
environment. Calculate how the object being cut will fall.
Determine if the saw may be thrown unexpectedly by the
movement of the cut material.
• Never cut above shoulder level.
• Never make a cut while in a tree, or on a ladder.
• Keep others away from the cutting area. Do not allow others to
hold the wood during cutting.
Checking The Automatic Oil function
Important: the chainsaw will not operate unless the oil tank
is filled
The chain oil flow control (6) adjusts the amount of oil received
by the chain. When the hole in the knob is at the top, it is at
maximum flow and vice versa.
To check that you are getting automatic oil flow, point the tip of
the switched-on chainsaw towards a piece of paper on the floor,
if a patch of oil appears and gets larger the automatic oil flow
is working.
If the automatic oil flow is not working you need to clean the oil
way. Remove the chain bar and clean out the oil way which is the
black hole located above the thread to the left.
Kickback
Kickback is the violent backward and / or upward motion of the
chainsaw guide bar. It occurs when the chain near the tip of the
guide bar contacts on object, such as another log or branch, or
when the wood closes in and pinches the saw chain in the cut.
Kickback can be very dangerous. Be alert at all times, to guard
against a possible kickback reaction. Always be aware of the
position of the tip of the guide bar when making any cuts. The
Oregon®* chain supplied with the chainsaw has been designed
with kickback reducing features. However this does not mean that
kickback will not occur and the user should be aware of possible
kickback at all times.
Cutting In Cold Weather Conditions
Cutting frozen wood will cause rapid wear and breakage around
the rear rivet hole of cutters. Following the steps as outlined
below will help to keep the cold weather wear on the rivets to a
minimum.
• Dilute the saw chain oil 25% with clean kerosene. It is important
that in these conditions the chain is receiving oil from the saw.
• Keep the tension in the chain constant. It should be checked
and adjusted on a regular basis.
• Keep the cutters sharp. The teeth should be touched up every
hour, more often if needed. A dull chain will cause excessive
wear on the guide bar and cause the links to break very quickly.
• Check and adjust the depth gauge on the cutters every time the
saw chain is sharpened.
• Keep the guide bar clean and the oil hole open. The guide bar
is symmetrical and as such should be turned over regularly to
equalise the rail wear.
MAINTENANCE
Running In A New Chain
When this machine is supplied the chain is ready for use.
However it is possible to extend the life of the chain by following
a few simple rules.
• Soak the chain in chainsaw oil SAE 30 overnight. This will allow
the oil to penetrate all the chain components.
• Never run a chain, especially a new one, on a worn drive
sprocket. The drive sprocket system should be replaced once
every 2 chains.
• Once a new chain has been fitted run the saw at half throttle for
a couple of minute without making any cuts. This will allow the
oil to reach all parts of the guide bar and chain. It will also allow
the drive sprocket, guide bar and chain to warm up properly.
• A new chain will lose tension quickly until it is worn in
sufficiently. Keep checking and adjusting the tension for the first
few times the new chain is used.
• Do not ask too much from the new chain. Keep the first several
cuts light. Too much workload on a new chain from the start will
reduce the overall life of the chain.
Sharpening The Chain
In order to extend the saw chains life and the efficiency of the
saw the teeth should be sharpening regularly. Use a round file
with a 4mm diameter to sharpen the teeth. Always sharpen the
teeth in accordance with the original angles.
• When sharpening teeth all blades must be the same length. To
keep all teeth the same shape and size always start with the
most worn blade and file the other blades to match the length.
• Always file the blades on the same side and in the same
direction by pushing from the inside to the outside of the teeth.
In order to avoid cuts when handling the chain always wear
gloves.
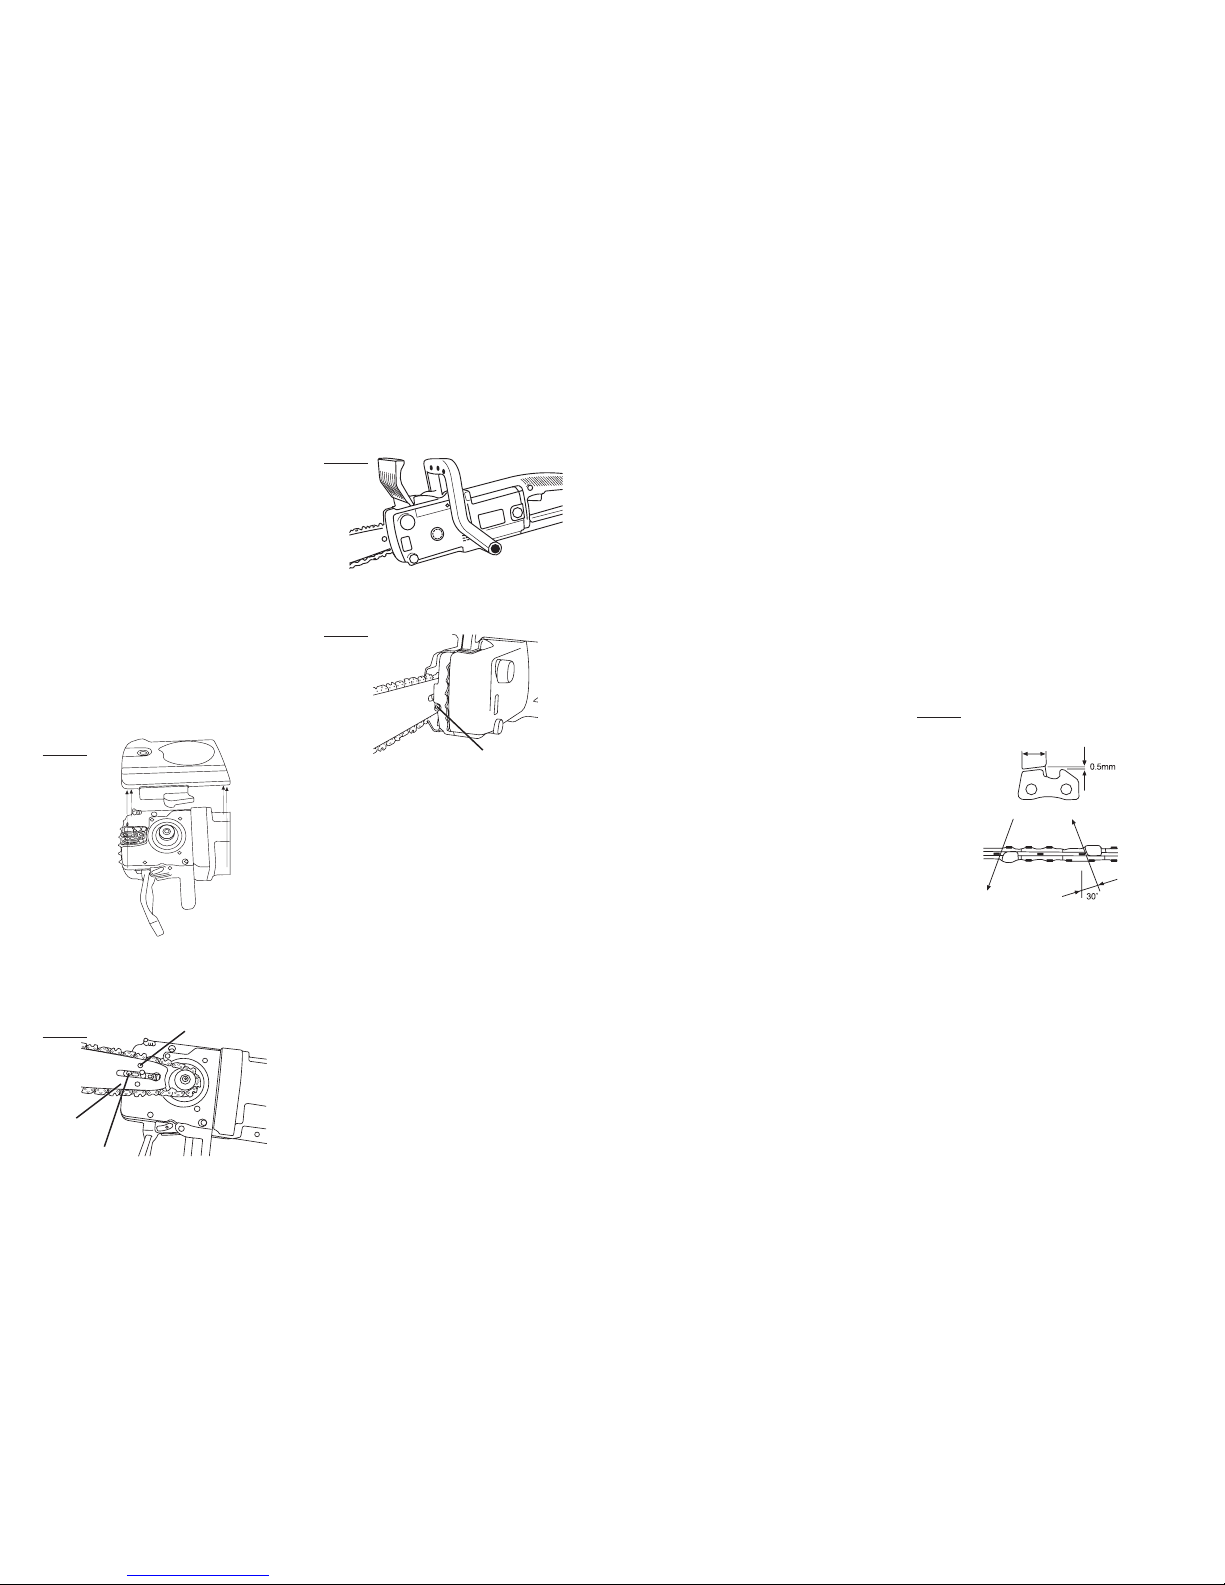
• Every 3 times the blades are sharpened check the height of the
depth limiters. The depth limiters spacing is 0.5mm. Adjust the
height of the depth limiters by using a flat file. Make sure when
filing the depth limiters to follow the angle of the front angle in
order to maintain the shape of the blade.
Diagram 5
TROUBLESHOOTING
Poor performance of this chainsaw when making cuts can be as
a direct result of any of the points as listed below.
• Incorrectly sharpened chain angles.
• A dull chain.
• Excessive chain depth-gauge settings.
• Incorrect chain depth settings.
• Loose chain tension.
• Incorrectly installed chain links.
• Loose rivets, or cracks and breaks in any chain link.
• An overly worn drive sprocket.
• A worn guide bar.
• An under lubricated chain, guide bar and drive sprocket.
Tensioning Pin
Guide Bar
Locating Pin
Chain Tensioning Screw
*Oregon® is a registered trademark of Blount International Inc.
This manual suits for next models
1
Other Silverline Chainsaw manuals
Popular Chainsaw manuals by other brands

Husqvarna
Husqvarna T540 XP II Operator's manual

Craftsman
Craftsman 358.341190 Operator's manual

Husqvarna
Husqvarna 327P4 Operator's manual

Husqvarna
Husqvarna K970 II Chain Operator's manual

Hurricane
Hurricane PS 40 operating instructions

Scheppach
Scheppach CSE2600 Translation of the original instruction manual