Silvey RAZUR SHARP II User manual

RAZUR SHARP II
THE ‘R2’ SQUARE CHISEL
CHAIN GRINDER
OWNERS MANUAL
MANUFACTURED BY:
4007 CRATER LAKE HIGHWAY
MEDFORD, OR 97504
Phone: 541-734-4118
Fax: 541-734-2324
E-mail: info@silveychaingrinder.com
www.silveychaingrinder.com

~ 2 ~
RAZUR SHARP II® -Table of Contents
Before You Begin................................................................. Page 3
Why to save R2 box, how to assemble the stand.
Basic Instructions............................................................... Page 4
Step by step, guide for sharpening your square chisel saw chain
with the Razur Sharp II®for the first time.
Read completely before using this grinder.
Sharpening For the First Time.............................................. Page 6
Maintenance and Tips..........................................................Page 7
This section covers replacing diamond dressers, maintenance, changing
and care of your grinding wheel.
Compensating for Wheel Wear…..........................................Page 8
This section covers fine-tuning and reshaping the grinding wheel
Reshaping the wheel...........................................................Page 9
Changing angles of the top plate.
Tips on grinding..................................................................Page 10
"Secrets" of master chisel chain grinding.
Other Tips on grinding........................................................Page 11
Razur Sharp II® - Exploded View..........................................Page 12
Razur Sharp II®- Parts List..................................................Page 13
Razur Sharp II®- Stand....................................................... Page 14

~ 3 ~
RAZUR SHARP II ® -
Before you Begin
The following instructions are condensed because you
probably already know how to sharpen square chisel bit saw
chain.
Your Razur Sharp II has been set,
tested, and adjusted before it left Silvey.
The R2 is also shipped with a
Silvey®SNO21-H wheel that has been dressed.
Inspect the grinder for damage before you use it.
Rough handling by shippers can result in bent or
broken parts.
Also, check the grinding wheel for cracks and chips. If the wheel is cracked, chipped or out of
balance, it may break apart when you turn the grinder on and could cause injury to you or the
grinder.
Please: Read all of the operating instructions thoroughly before you start to use your grinder.
You may contact us directly for additional help.
If you purchased and picked up your Razur Sharp II®grinder from a shop, your grinder is
probably assembled and mounted on the stand. If you ordered your Razur Sharp II®and had
it sent to you, this section will be helpful.
RAZUR SHARP II®-
Unpacking & Assembling the Grinder
Open the top of the box - DO NOT destroy it. You may need to use the
box and packing materials in the future. For example, if you need to
send it in for repairs or to be rebuilt.
In the shipping box there was:
Razur Sharp II grinder
Instructions
1) Stand Base #261-T
3) Stand Legs #263-T
Bolt Bag: 1) Stand Mount Bolt # 258-T
1) Stand Height Adjustment Bolt # 259-T
6) Leg Bolts # 260-T
Larger view of stand on page 14.
The Stand Extension Pole was shipped in a separate box.
~ 4 ~
RAZUR SHARP II®
- Basic Operating Instructions
1) Check to be sure that nothing is touching the grinding wheel.
Retract the wheel dressers and move anything else that may come in
contact with the wheel. Locate the large handle lever on the bottom
front of the grinder. Move this handle until the chain bar assembly is
away from wheel.
2) Find the toggle switch on top of the motor. The motor is reversible and the switch has three
positions: back, middle and forward. One position makes the grinding wheel rotate clockwise,
the middle positition is off and the other positition makes the grinding wheel rotate counter -
clockwise.
Turn the grinder to one of the ON positions. Check the rotation of the wheel.
You want the grinding stone to be rotating counter-clockwise before you dress the wheel.
If you grind with wheel rotating clockwise the momentum of the wheel tends to pull the
dresser pivot into the motor mount.
If the wheel is going in the wrong direction turn the motor off . Allow the wheel to stop turning
before you turn it back on in the opposite direction. Do not try to change rotation while the
wheel is rotating even if the motor is turned off. Do not put any thing in contact with the wheel
to slow it down –Allow it to stop on it's own.
3) Find the switch on the lamp and turn it on. The lamp is
mounted on a flexible arm. Move the lamp to a position
where you can easily see the corner of the stone. This is
done by shinning the light on the top side of the stone so the
leading edge is slightly shadowed. The light bulb you use
is no more than 50 Watts MAX!
4) Find the diamond tipped wheel dressers.
They are located on the motor mount that covers the
grinding wheel.
These dressers pivot on their mounts and are used for shaping the grinding wheel;
adjust the diamond dressers so the dresser tips barely touch the grinding wheel when
pivoted in their mounts.
5) Turn the grinder ON so that the motor runs counter - clockwise.
Pivot the diamond dressers on their mounts and remove a small
amount of material, making easy and complete passes.
Tighten the diamond dressers in small increments to increase their depth.
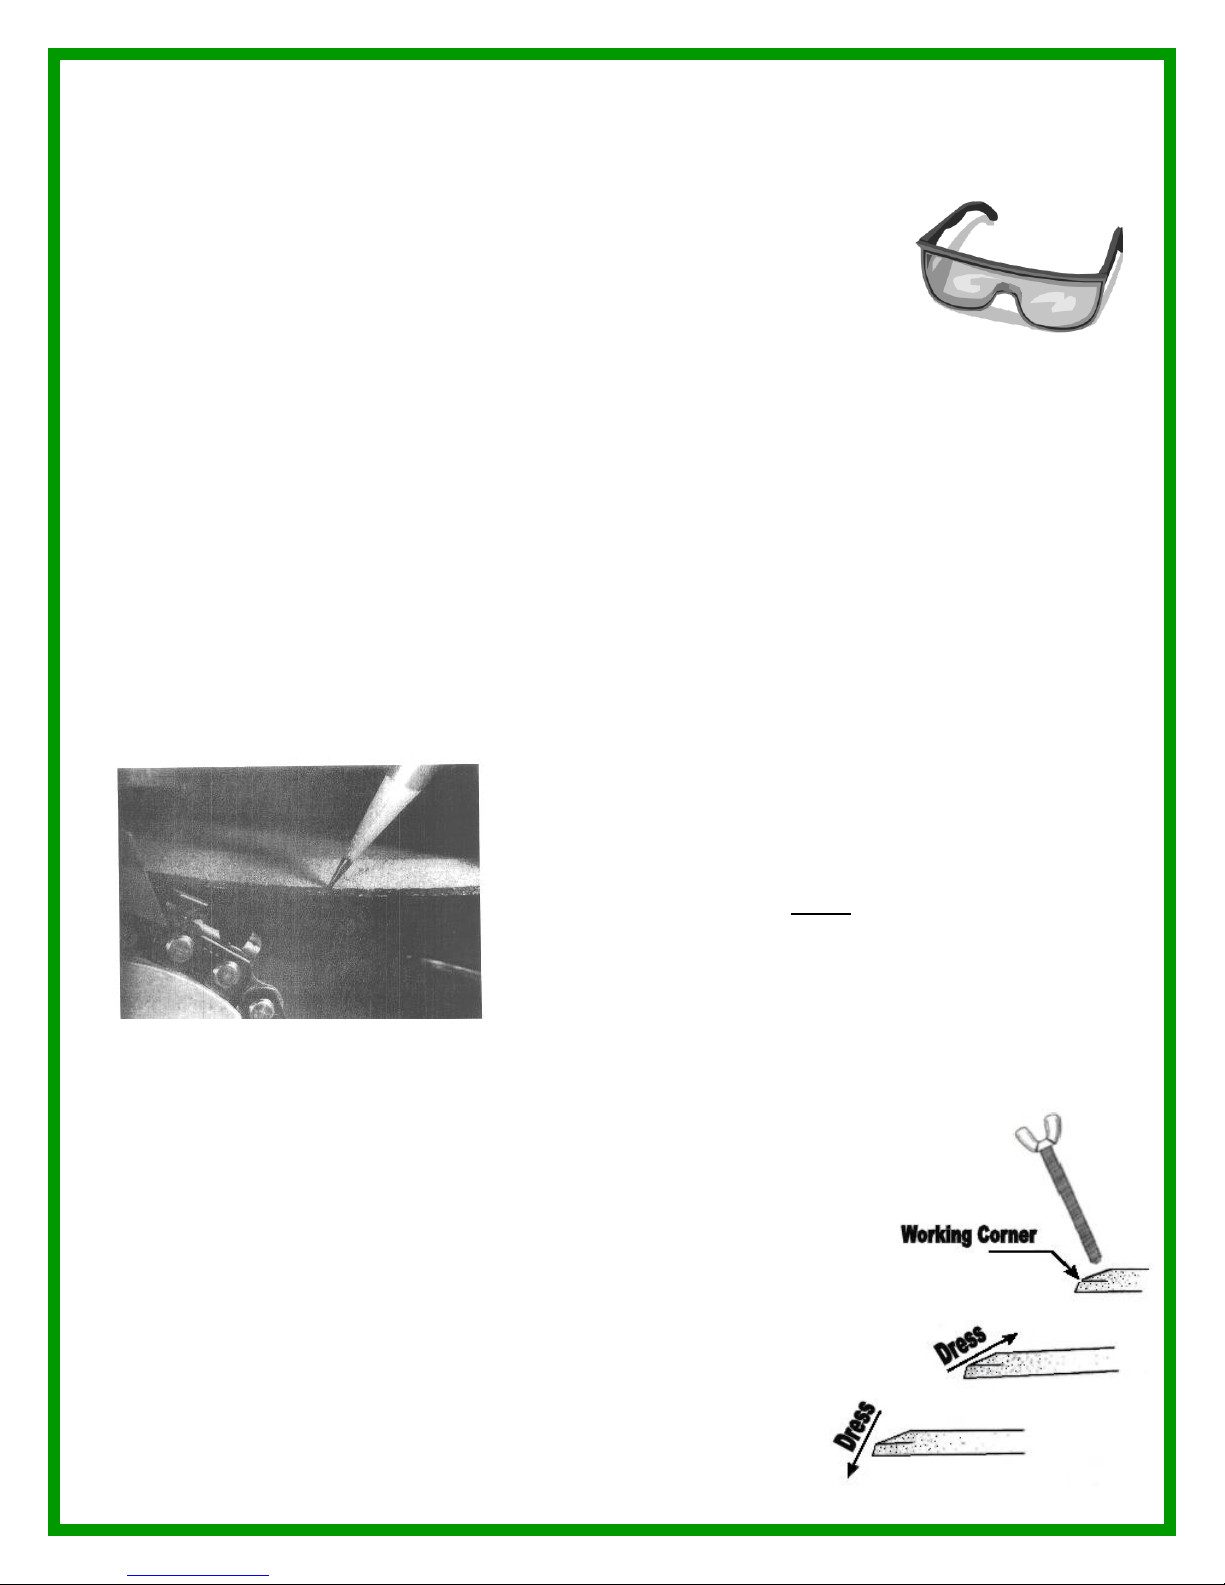
Slowly shape the wheel like the drawings. Do not overload the diamond
dressers, forcing them to make hard cuts will shorten their life.
Dressing the stone restores the working corner. It also cuts away dull
abrasive material and exposes a fresh surface for grinding.

~ 5 ~
RAZUR SHARP II®
- Basic Operating Instructions
WARNING: Dressing out large amounts of wheel material in one pass
may cause the wheel to chip or break while it is spinning.
This could injure you and damage your grinder.
Always dress away from the working corner of the wheel.
This keeps the corner from crumbling. Once the wheel is shaped, it will require light dressings
between chain sharpening. If a chain is very dull, the stone may need to be dressed more
often.
6) With the motor off and the stone stops turning. Place the chain in the holder with the teeth
facing INTO the leading edge of the stone.
7) Advance the chain on the holder and place a cutter tooth in front of the chain stop. The
cutter should be facing the stone with its open side in. Locate the feed arm and slide the
appropriate cutter tooth close to the grinding wheel. Do not hit or force the chain into the
wheel as the grinding wheels are very brittle. A crack or chip may cause it to blow apart when
the grinder is turned ON again which can cause injury.
8) Find the two black thumbscrews. Use the thumbscrew that adjusts the stop on the cutter's
heel and the thumbscrew that stops the slide depth to align the corner in the grinding wheel
with the corner of the chisel cutter.
9) At the tip of the pencil shown below, the edge of the
stone aligns perfectly with the corner of the chisel cutter.
Proper positioning should look like this.
10) Move the feed arm so the cutter slides away from the
grinding wheel. Double check and make sure nothing is touching the wheel. Turn the motor
ON and watch the rotation of the grinding wheel, it should rotate so the wheel is turning into
the cutter tooth. If it is not turning into the tooth, turn the motor off letting the wheel stop
turning on it's own and turn the motor back on so the wheel is turning into the tooth. Not only
does grinding INTO the tooth keep the bur on the inside of the tooth, it directs the sparks into
the shroud area of the grinder.

~ 6 ~
RAZUR SHARP II®
- Sharpening for the First time
11) Grinding INTO the tooth will NOT splinter the chrome allowing the tooth to stay sharper
longer. The chrome is the hardest part of the tooth, if it is
splintered, it will not hold an edge very long. Which is the
reason why Silvey®chisel & round grinders have two (2)
direction motors.
12) Begin sharpening the first tooth, ALWAYS grinding into
the tooth. Grind a little at a time, to be sure you don't burn the
tooth.
Remember
Brown discoloration = Tooth too hot
Blue discoloration = Tooth way too HOT!
If the chain is really "Rocked", do not try to take it all off at one time. Go around the chain as
many times as needed to take off the discoloration, taking a little of each time. If the working
edge of the stone is dark and the teeth are heating up, the stone may need to be dressed to
expose sharper abrasive material.
13) Make final adjustments using the cutter stop and depth screw. Slide the chain away from
the stone and check to be sure the corners line up and all of the dull material is removed. All
of the material must be removed for the chain to be properly sharpened.
14) Once the first tooth is sharpened to your satisfaction, proceed to the next cutter tooth
that is on the same side of the chain. Continue to sharpen every other tooth in sequence until
all the cutting teeth on that side are sharpened.
15)Remove the chain from the chain holder and put it in the holder on the other side.
Start the steps over starting with Step 6. When one tooth is ground on that side has been
ground check to be sure that the sharpened cutter on this side is equal in length with the
sharpened cutters on the other side.
16) Although both teeth are sharp, if both teeth are NOT of equal length,
the chain will not cut straight. To perform at its best a chain needs to have
all of its teeth the same length. When you are satisfied with this tooth,
proceed to the next cutter on the same side. Continue until all teeth on that
side are sharpened.
17) All of the cutter teeth should be sharp now.
You may want to remove the gullet material and check
the rider depth gauges before installing this chain back
onto your saw. This is also a good time to look the
chain over for any cracks, breaks, bends or unusual
wear. The cutter pictured needs to have its gullet removed and it's riders checked.
~ 7 ~
RAZUR SHARP II®
- Maintenance & Tips
Your grinder should be stored inside out of the weather. Although it doesn't appear to be,
your grinder is a delicate tool and should be treated with care.
The grinder dust that is made when sharpening chain is composed of small particles of metal
and wheel abrasive. The grinder should be kept clean at all times and the motor and switch
should be kept free from this conductive dust.
Lubrication of moving parts should be done with graphite or another dry lubricant. Oil or wet
lubricants DO NOT work because they attract grinder grit (dust).
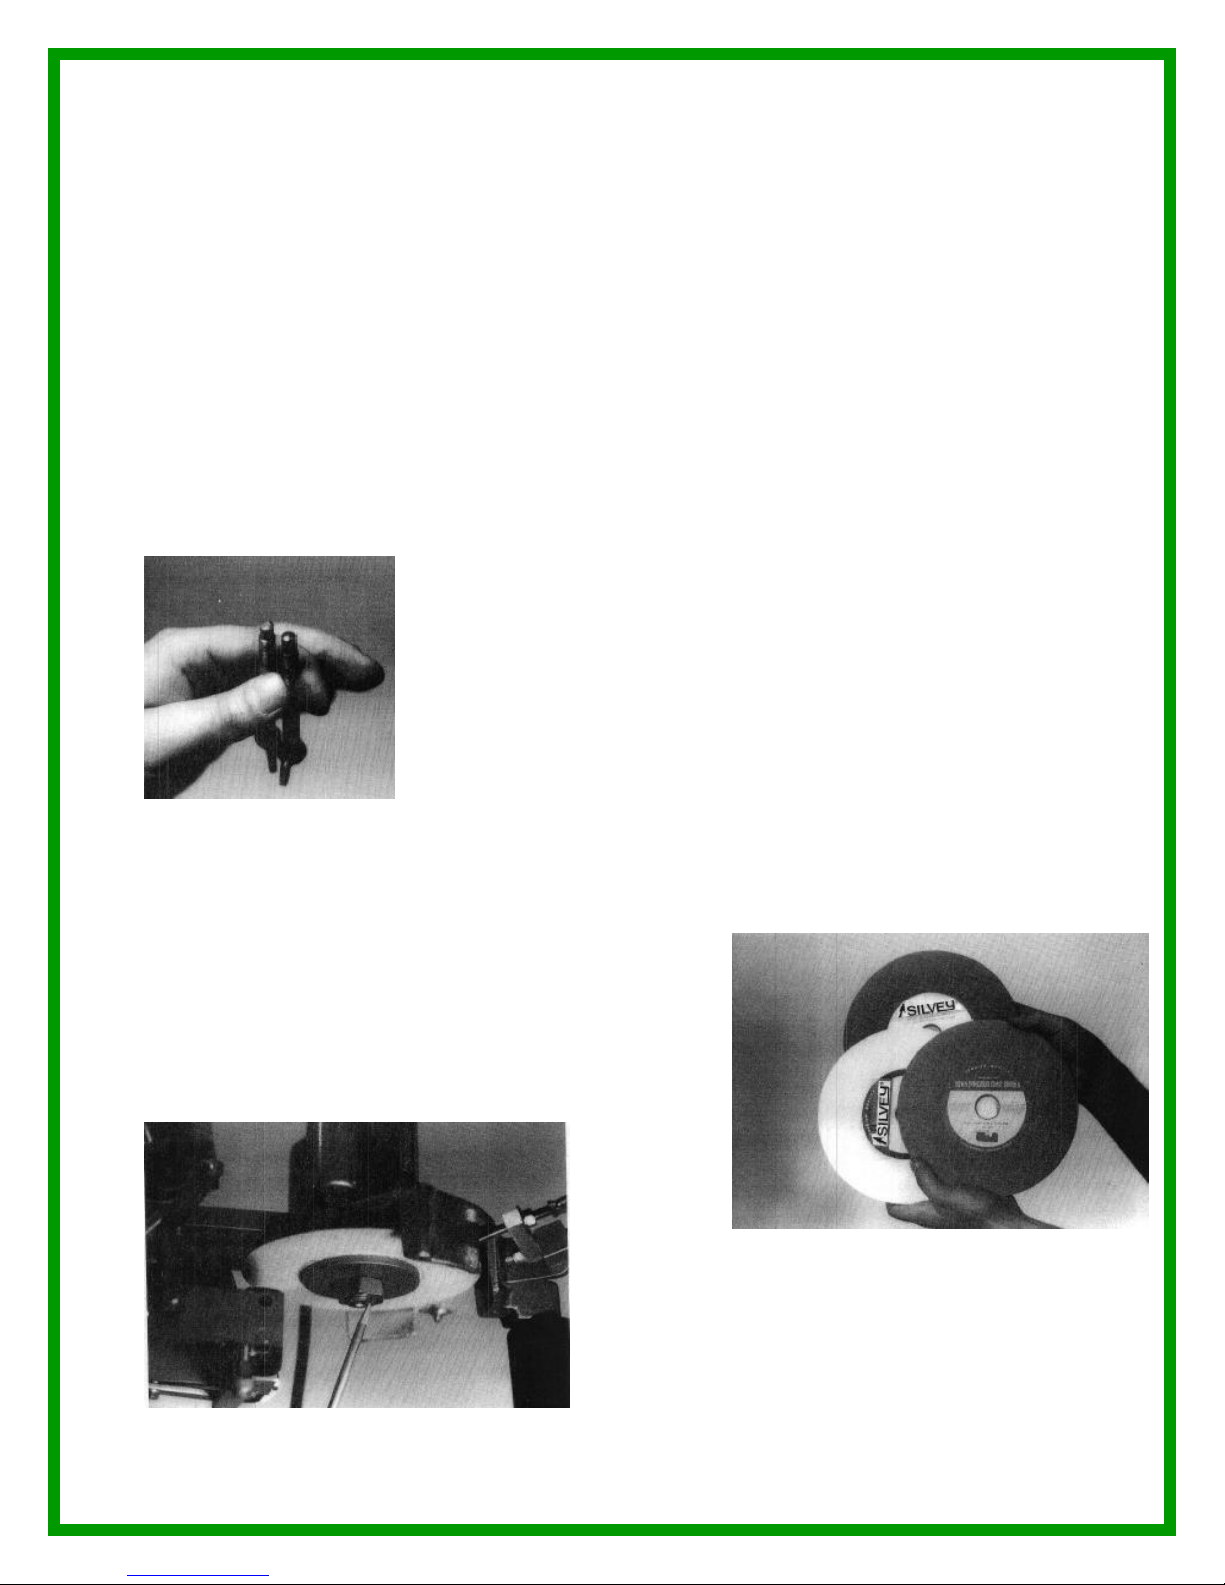
Diamond Dressers
Diamond dresser tips will wear and the diamonds will wear out.
The multi-point dressers will slough off diamonds as they get dull
about ¼" down. The single point dressers only have one diamond
and will need to be replaced when it gets dull.
When you see 'sparks' while dressing your wheel, the diamonds are
probably gone and the dresser needs to be replaced. Just unscrew
the old diamond dresser and thread in a new one.
Multi-point stone dressers allow the operator to make a smooth
stone surface and crisp working corner. Since the grinding wheelsurface determinesthe ultimate
shape and finish on the cutter tooth, it is extremely important that the wheel be smooth and well
shaped.
Replacing the Grinding Wheel
The Silvey®SNO21-H wheel has been specifically
formulated to the optimum specifications of grit, bond
and motor RPM for Silvey®grinders.
The grinding wheel can be reached by
removing the wheel cover which is held in place by
two screws. Be sure to replace the arbor nut, flange
washer and wheel cover before operating the
grinder again.
~ 8 ~
RAZUR SHARP II®
- Maintenance& Tips
Compensating for Wheel Wear
Your grinding wheel will gradually become smaller in diameter as you dress the stone with
the diamond dresser and sharpen chain. This can be compensated for by sliding the chain
carriage assembly closer to the grinding wheel.
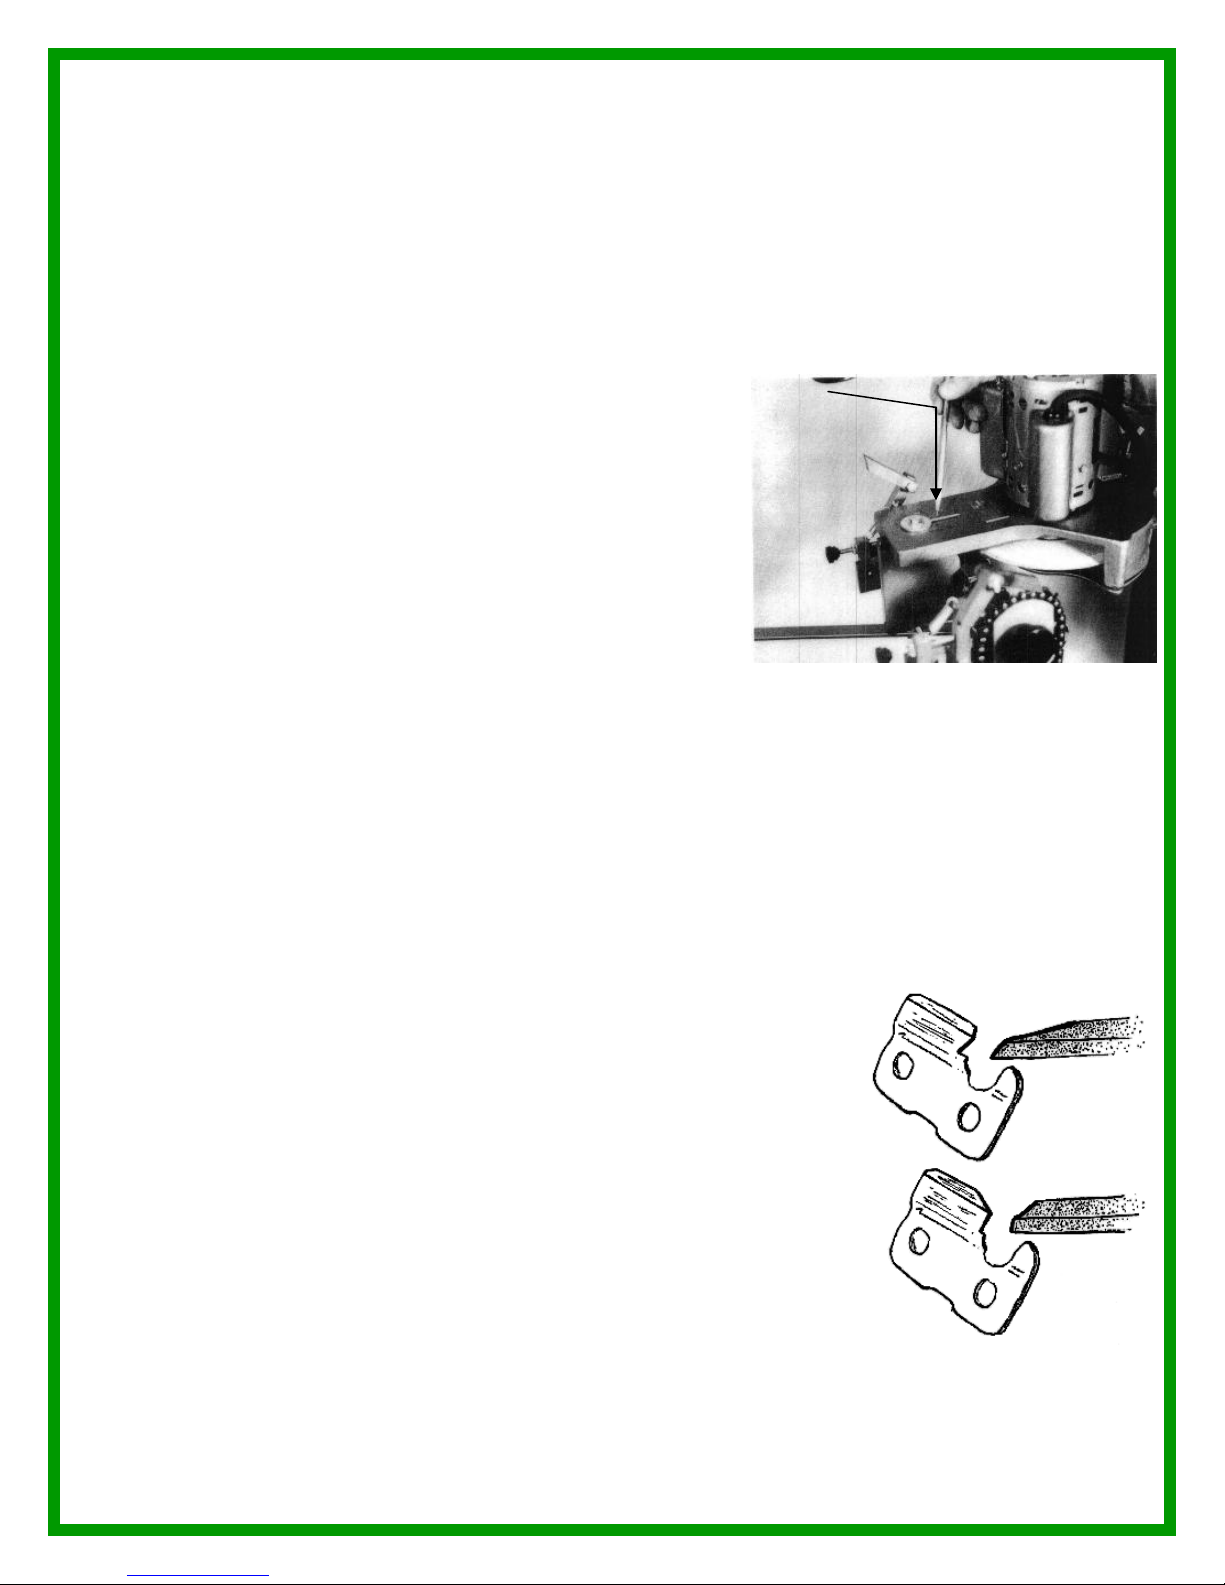
This adjustment slot is located on the grinder housing pictured.
Use the diameter scale on the topof the grinder to determine
the size of the stone. Use the scale and pointer under the
grinder to match chain holder mechanism with the wheel
diameter.
This adjustment allows the operator to keep the location
where the cutter tooth comes in contact with the arch of
the grinding wheel the same, even though the wheel
diameter wears smaller.
If you like your top angle blunt, lag behind the scale when compensating for wear.
If you like your top angle greater, lead the scale a little.
Fine Tuning
There is not one formula for sharpening chisel chain on which all Professional filers
would agree is best. Everyone who runs and grinds chisel chain has their own grinding style.
Some of the factors that determine the type of grind that will work for you are size and type of
wood being cut, the kind and size of saw that is being run and so on.
Outlined in the next section are some guidelines that will hopefully give you a place to start in
developing your own grinding style.
Reshaping the grinding wheel
1)The mounting blocks for the diamond dressers for the wheel may
be pivoted. This will change the grinding wheel shape by changing the
path of the diamond dressers.
2) The shape of the chain's cutter face is greatly affected by the
shape of the grinding wheel. The angle of the outer edge of the
wheel is a determining factor in the angle ground into the cutter's side
plate.
The angle of upper dressed surface of the wheel is a determining factor of the inner angle
ground into the cutter's top plate and also determines the outer top plate angle.
~ 9 ~
RAZUR SHARP II®
- Reshaping the grinding wheel
The diameter of the grinding wheel and the location on the arch of the wheel where the cutter
tooth comes in contact with the grinding surface are also determining factors on the angles
ground into the cutter tooth.
(See: Compensating for Wheel Wear. In the Maintanence section)
When changing the angles of the mounting blocks, move them only a small amount, redress
the grinding wheel and then test grind.
A little change has a big effect on the grind in the cutter tooth.
3) Make sure that the leading edge of the stone is thick enough to remove some of the gullet
area but don't make it so thick that it cuts deeply into the tie strap under the cutter, this
weakens the tie straps. Surface strength is important to the cutter chassis.
Chain breakage, that would otherwise not develop, often occurs on tie straps that have been
ground into.
Changing the Inner Angle of the Top Plate
1) The inner angle of the top plate is changed by lowering or raising the grinding stone
holder. To raise or lower the grinding stone you must first remove the lower shroud guard
and the nut and support washer that hold the stone onto the holder.
There is an allen head set screw located in the thread area of this holder.
You probably noticed it when you changed
grinding wheels.
This set screw can be loosened and the holder
will slide on the motor shaft.
Adjustments to the stone should be made a little
at a time, as small changes make big differences
in the grind on the cutter tooth. Be sure to tighten
all screw and replace the guard before operating
the grinder again.
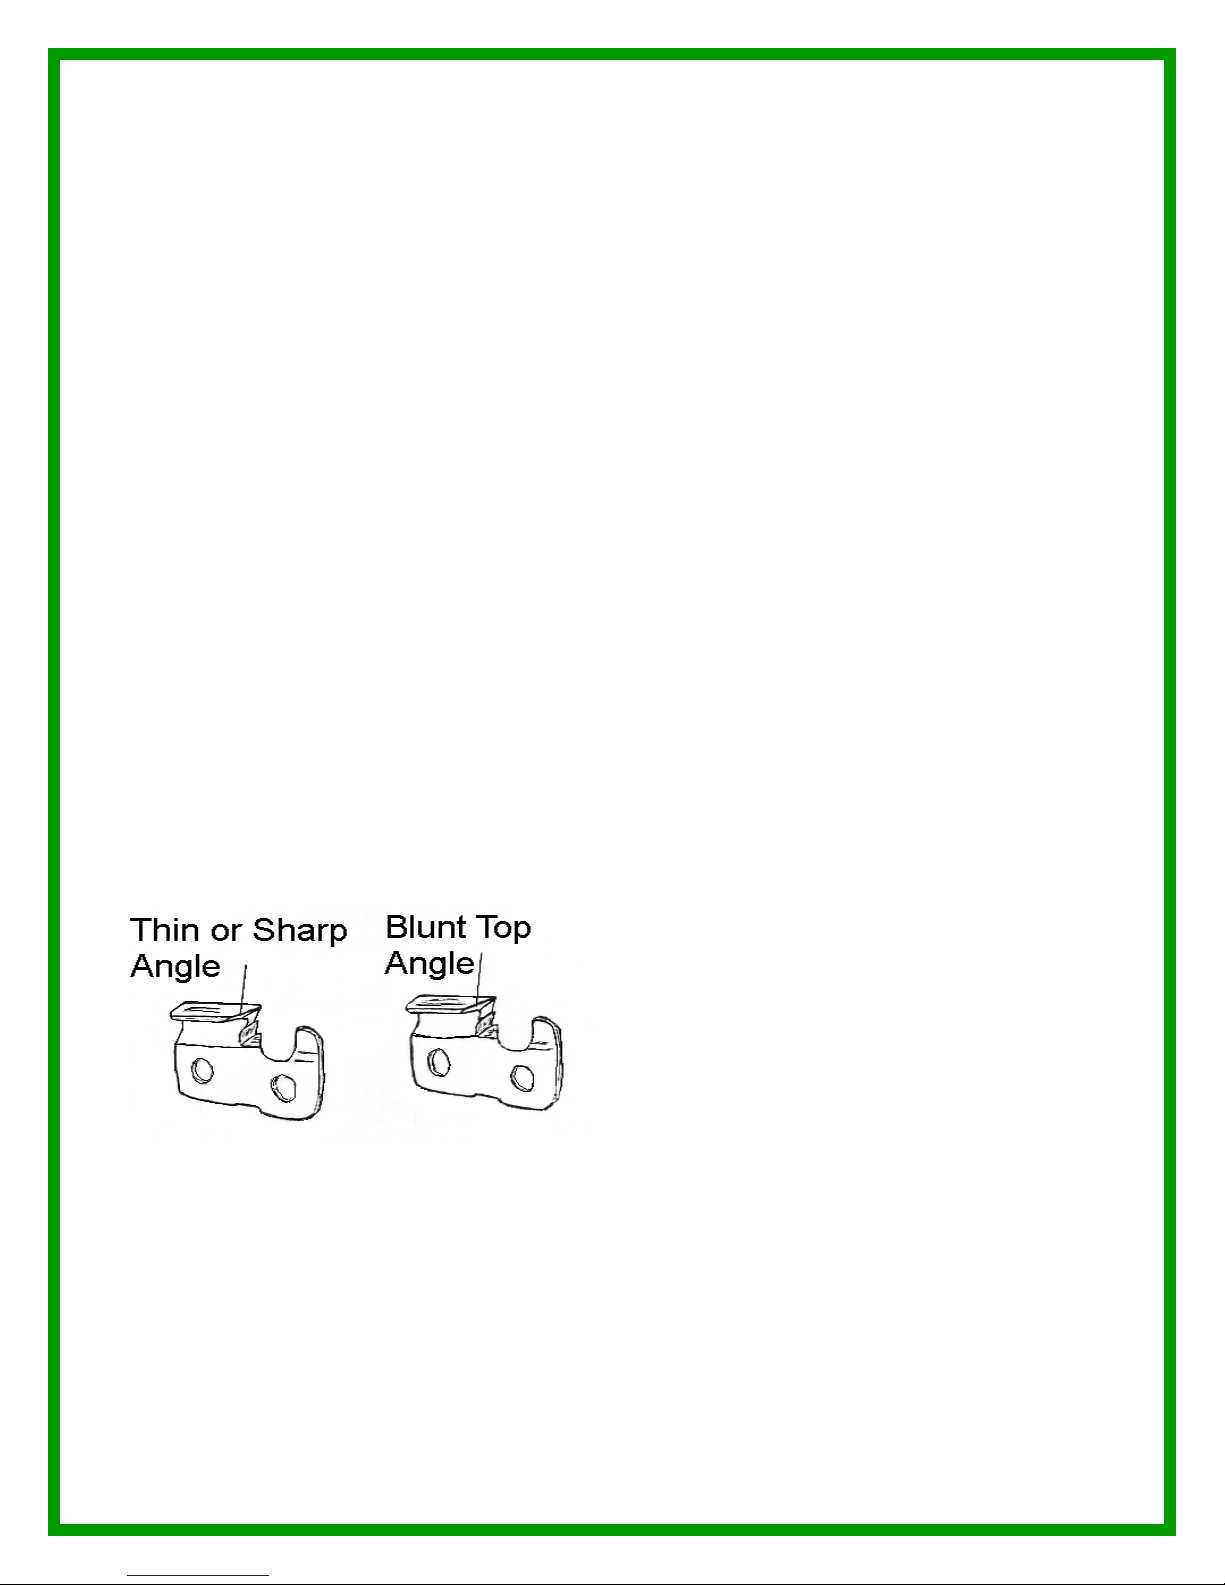
2) Generally, a thicker inner top plate angle will keep its edge a little longer. A thinner angle
will cut better but will get dull faster.
This grinder will grind thicker top plate as the cutter plate tooth becomes shorter. You may
want to adjust for this if you have a series of chains with short cutters to grind.
If you prefer thicker inner angles on new chains, lowering the grinding wheel will cause the
grinder to cut thicker top plates.

~ 10 ~
RAZUR SHARP II®-
Tips on Grinding
TIP: Do not overheat the tooth when grinding.
You do not need a thermometer tomonitor heat, simplywatch the surface of the cutter tooth. If the
tooth starts to discolor, you are getting it too hot. If you heat a toothto the point that it turns blue,
you have ruined it. The blue color indicates the temper of the steel in the cutter tooth has
changed.
Blue teeth occurwhen you aretrying to grind too fast orwhen you are sharpening a "rocked"
or extremely dull chain.When you grind out extensive tooth damage, you will be inclined to
remove it faster than you should.
Trysetting the grinder to remove onlyhalf of the damage oneach tooth.When you have
ground all the cuttersand are back to where you started, reset the feed stop and grind out the
rest of the damage on a second pass. By limiting the amount of material, you remove each
pass you may reduce heating potential. Anotheradvantageof "double"grindingisthatthe teeth
getachancetocool between the first and second grind.
Another cause of overheating is a dull grinding wheel.When the working comer of the stone
and the areaaround itbegins to darken, it is getting dull. A dull stone does not grind welland
an inexperienced operatormaybe inclined to increase grinding pressure. To sharpen the
wheel, run the dressers over it until the dark spots are gone. This will clean the wheel and
expose fresh abrasive material.
TIP: Align the corner of the tooth with the working corner of
the stone.
The key to successful chisel chain grinding can be summed up with
this tip.
To obtain maximum "stay sharp" ability and cutting speed, these
two corners should be aligned perfectly. If you grind "high" or above
the corner, the chain will perform badly. It may look sharp to you but
it will act as if it is dull. If you grind too "low" below the corner, the
chain will cut but won't stay sharp very long.
If you look at a low chain closely, it will have a "bird's beak" edge on
the corner of the tooth. This edge has little support and will become
dull easily. In fact, even hitting a knot will dull a "low" ground chain.
The best rule to remember is:
Align the corners perfectly but if you need to allow for a little error:
Be a little low.

~ 11 ~
OTHER GRINDING TIPS - Dos & Don'ts
Do not grind with the corner or the stone high into the tooth; this makes a chain perform very
poorly.
Do not leave a long and/or tall gullet.
•Do not grind into the side straps.
•Do not try to adjust your grinder to corner both on the top side of the cutter and
on the inside or the tooth.
This ‘corner to corner" grind is almost impossible to get with an assembled chain.
Most of the time you want a thinner top plate than a “corner to corner” grind would
get you anyway.
•Do not make big adjustments to the stone dressing blocks or the stone holder at one
time.
•Do not change more than one thing at a time when you are trying to change how your
grinder is set up; these are sensitive adjustments.
•Do always wear eye protection.
•Do grind a little at a time: even if it means going around the chain twice or more.
•Do check your chains for damage or breaks when you have them off for sharpening.
•Do make the cutter teeth equal in length on both sides.
•Do grind away all of the dull cutter tooth so the corner chrome has a clean sharp edge.
•Do keep your grinder clean and well maintained.
•Do mark where your dressing blocks are before you move them so you can “find your
way back” if the changes you made were wrong.
•Do always try to make a better chain: There is not one best way or formula for grinding
chisel chain.
•Do call, write, email or stop in if you have a question or problem with your grinder.

~ 12 ~
~ 13 ~
Razur Sharp II Parts List
ILLUS# DESCRIPTION PART# ILLUS# DESCRIPTION PART #
SN
Serial Number Location
11
152
Cross Slide Mount
152-R
1
Motor
1-R
153
Cross Slide Extrusion
153-R
3
Motor Cord
3-R
154
Cross Slide Bar
154-R
4
Arbor
4-R
155
Chain Bar Mount
155-R
5
Arbor Flange
5-R
156
Chain Bar Mount Screw
156-R
6
Motor Mount Screw
6-R
157
Stop Mount Bracket
157-R
6B
Motor Lock Washers
6B-R
158
Handle
158-R
7
Switch
7-R
159
Handle Link
159-R
8
Arbor Nut
8-R
160
Handle Mount Spacer - Lg.
160-R
9C
Gib (Side)
9C-R
161
Handle Bushing.
161-R
9D
Gib (Small)
9D-R
R - 2 Handle Assembly
181-R
15
Lamp Assembly
15-R
Oil Plug
182-R
16
Boot
16-R
162
Dresser Block
162-R
17
Spring (Small)
17-R
163
Dresser Arm
163-R
18C
Wheel Cover
18C-R
164
Dresser Arm Bolt
164-R
19C
Motor Mount & Wheel Guard
19C-R
165
Lock Nut
165-R
24B
Stop Pawl
24B-R
166
Dresser Block Bolt.
166-R
27
Chain Bar Screw
27-R
167
Fiber Washer
167-R
39
Chain Bar Stop Screw & Knob
39-R
168
Plastic Lock Washer
168-R
39B
Tooth Length Adj. Screw & Knob
39B-R
169
Cross Slide Mounting Bolt
169-R
Cord Lock
46B
170
Washer
170-R
53C
Tooth Length Adj. Screw Mount
53C-R
171
Fender Washer
171-R
57
Handle Mount Bushing
57-R
172
Cross Slide Assy Mount Bolt
172-R
63
Diamond Dresser
63-R
173
Handle Bolt
173-R
89
Handle Connector Bolt
89-R
174
Stop Mount Bracket Bolt
174-R
91
Tie Down
91-R
175
Handle Mount Bolt
175-R
92
Foam Tape
92-R
176
Aluminum Spacer
176-R
101
Nut
101-R
258
Stand Mount Bolt
258-RT
103A
Gib Adjustment Screw & Nut (Front)
103A-R
259
Stand Height Adj. Bolt
259-RT
103B
Gib Adj ustment Screw & Nut (Bottom)
103B-R
260
Leg Bolt
260-RT
108
Nut
108-R
261
Stand Base
261-RT
111
Arbor Set Screw
111-R
262
Stand Extension
262-RT
112
Wheel Cover Screw
112-R
263
Stand Leg (Price Each Leg)
263-RT
114
Grinding Wheel **( SNO21-H )
114C-R
Tripod Stand Complete
300-RT
Motor Bearings (Front End - Shaft)
146-A
Cross Slide Assembly
177-R
Motor Bearings (Back End)
146-B
R - 2 Handle Assembly
181-R
151A
Chain Bar
151A-R
Oil Plug
182-R
151B
Chain Bar 50 / 63
151B-R

~14~
Table of contents
Other Silvey Grinder manuals


