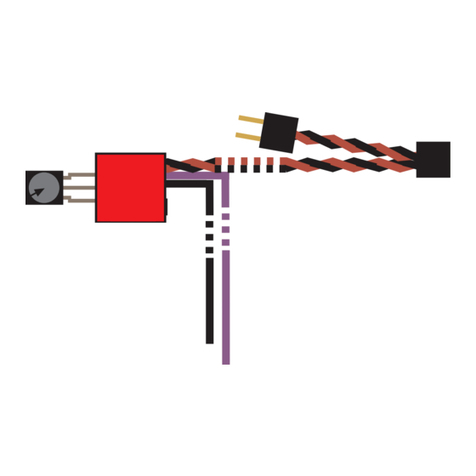
SIMEREC PCS-2 User manual

PCS-2
General Description
The PCS-2 allows you to switch your PC / HTPC on-off with your existing TV or universal infrared (IR) remote.
Single button mode allows switching the PC on/off with a single IR remote button.
Dual button mode allows the PC to be switched on with any IR remote button, and off with any second button.
Forced shutdown option.
No soldering required. Splicer is included for connecting the PCS-2 to PC power supply (ATX).
Auto-detect feature makes electrical connections a snap.
Requirements
PC with an ATX power supply. (Most PCs are ATX.)
The PCS-2 is designed to fit behind a 3/8” hole that the user must drill into their PC case.
Copyright SIMEREC
Universal Infrared Remote PC Power Switch

Installation Steps
Caution! Before beginning the installation, unplug the AC power from your PC.
The following installation steps assume that the PCS-2 module will be installed onto the inside of the front cover plate of
the PC. However, you can install it on any side you see fit.
Typical installation:
1. Locate a spot on the front of your PC case where you will drill the hole for the IR receiver.
Note that this must be in a location that is unobstructed during normal PC operation.
2. Verify that your PC is disconnected from AC power.
3. Remove the cover of your PC so that you can access the motherboard and ATX power supply.
4. If possible, remove the front cover of the PC for drilling the hole.
5. It’s recommended that you start with a 1/8” drill bit, then finish with 1/4”. This will make for a hole with a smooth edge.
6. Once the hole is drilled, remove the red backing of the tape on the PCS-2 module.
7. (See the diagram on the next page for alignment details.) On the inside of the front panel, place the IR receiver behind
hole you drilled, and carefully press the PCS-2 module against the inside face so that the tape sticks.
8. Disconnect the PC power button cable from the motherboard and connect it to the 2-pin connector located near the end
of the twisted-wire pair of the PCS-2. The polarity does not matter, as the PCS-2 will auto-detect. Plug the end of the
twisted-wire pair from the PCS-2 module onto the 2-pin power switch connector on the motherboard. Again, polarity
doesn’t matter.
9. Refer to the diagram on the next page for connecting the power wires.
Caution: Be very careful to connect the purple wire correctly to the power supply.
Failure to do so will damage the PCS-2 module and possibly your PC.
Copyright SIMEREC

PCS-2 Back View
PCS-2 Front View
(no wiring shown)
Copyright SIMEREC
Caution: Be very careful to connect the purple wire correctly to the power
supply. Failure to do so will damage the PCS-2 module and possibly your PC.
Place this behind the hole
drilled into PC case.
Remove the red backing from the
gray adhesive tape, and stick the
HTPC module against the inner wall
of the PC case.
Plug PC power switch onto this
2-pin connector. (The polarity
does not matter.)
PC power switch connector from the
power switch on the front of the PC.
Plug this onto the 2-pin
motherboard power switch
connector. (The polarity does
not matter)
Use one of the red
splicers to connect this
purple wire to the purple
wire of the ATX power
supply.
Pushbutton
LED under corner edge.
IR detector (Back side)
Connect any 4-pin power
plug from the power supply
to here.
This 4-pin pass-through connector
is free to connect to a hard drive
or other internal device.
Twisted-wire pair
Twisted-wire pair

IMPORTANT: Before continuing, verify your wiring.
Programming the PCS-2
The following is for programming the PCS-2 to recognize 2 different IR codes from your remote
control. The first IR code will switch your PC on, and the second IR code will switch your PC
off. If you want to be able to switch your PC on/off with a single IR code, then simply program
the same IR code (ie same button on your remote) for both “on“ and “off“.
1. Select the button(s) on the IR remote that you wish to use for switching the PC on/off -- typically
button(s) not being used for anything else.
2. Connect the PC to AC power. If your ATX power supply has a switch, make sure that it is on.
3. Press the button on the PCS-2, and the PCS-2 LED should light.
4. While holding the IR remote at least 15” (38cm) away from the receiver and aiming at the receiver,
press the IR remote button that you want to switch the PC “on”. When the LED goes out, release
the remote button. The LED will re-light.
Repeat step 4 three more times.
5. After the above steps are completed, the LED will flash several times, then stay on. This indicates
that the first IR code is learned.
Now program the second IR code for switching the PC “off”...
6. While holding the IR remote at least 15” (38cm) away from the receiver and aiming at the receiver,
press the IR remote button that you want to switch the PC “off”. When the LED goes out, release
the remote button. The LED will re-light.
Repeat step 6 three more times.
7. After the above steps are completed, the LED will flash continuously. Press and hold the power
switch on the front of the PC until the LED turns completely off.
The LED should be off, and programming the PCS-2 is complete.
You can test the programming at this point by letting the PC boot completely, then pressing the button
on the IR remote that you selected for “off.“ This should cause the PC to shutdown/hibernate/standby,
depending on how your system is configured.
Copyright SIMEREC

Forced Shutdown Option
When the forced shutdown option is enabled, the PCS-2 will force the PC to shutdown if it has not
already shut itself down within 1 minute of the user requesting that the system shut down. This is
especially useful if your system has a background application that tends to prevent the system from
automatically shutting down.
By default forced shutdown is disabled.
To enable forced shutdown, hold down on the PCS-2 button until the LED flashes several times.
Note that forced shutdown will only work if the 4 second power-down option is enable in the PC BIOS.
(This is enabled by default on virtually all PCs.)
Copyright SIMEREC

How to Properly Splice the Power Wire
Purple power wire from the PCS-2 module.
Purple wire from the ATX power supply.
Insert until wire is past the metal splicing tab,
and the tip of the wire is against the stop.
Insert into side slot of splicer.
Copyright SIMEREC
This dashed line shows how far the wire should
be held against the inner stop, until splicing is
completed as described on the next page.

To complete the splice, it is now necessary to use pliers to press the metal tab into the
two wires. It is important that the pliers are aligned with the metal tab before applying
pressure. Below are the incorrect and correct alignments. (Note: For purposes of
clearer illustration, that the wires are not shown in the splicer below.)
INCORRECT ALIGNMENT
This can result in the wire from the PCS-2 module not being properly captured.
The pliers
should be set to
the wider setting
here.
The angle of the
pliers is not directly
on top of the metal
splicer tab here.
CORRECT ALIGNMENT
The pliers
are set to
the wider
setting
here.
The pliers are directly
on top of the metal
splicer tab here.
Complete the Splice
Once alignment is correct as above, squeeze the pliers until the metal tab is flush with the plastic housing.
The metal tab should not be above the housing at all.
Lastly, fold the plastic cover over the metal tab slot so that it clicks securely. The final product will look
like this:
Copyright SIMEREC

If you do not see a purple wire on your ATX power connector, then the below
images are provided to indicate which wire is the standby power wire to be spliced
to the purple PCS-2 wire. First determine if you have a 20-pin or 24-pinATX power
connector.
Copyright SIMEREC
This is the location of the wire to splice.
(20-pin ATX connector)
In this image, the wire is purple, but
your wire might not be.
The splice can be anywhere on the
wire.
ATX 20-pin
ATX 24-pin
This is the location of the wire to splice.
(24-pin ATX connector)
In this image, the wire is purple, but
your wire might not be.
The splice can be anywhere on the
wire.
Other SIMEREC Switch manuals
Popular Switch manuals by other brands
Digitus
Digitus DN-50012-1 user manual

Flic
Flic Hub Mini user manual
Edimax
Edimax EK-PAK2 Quick installation guide

Endress+Hauser
Endress+Hauser Thermophant T TTR31 operating manual

PureTools
PureTools PT-HDBT-703-TXWP user manual
Brocade Communications Systems
Brocade Communications Systems G620 Hardware installation guide
