Simmons SDPC1 User manual
The SDPC1 Pro Click Metronome is a powerful rhythm producer, capable of creating a wide range of
sounds and tempos for the professional drummer. Here are its specific functions:
• Tempo: 30-280 BPM
• Beat: 0, 1, 2, 3, 4, 5, 6, 7, 8, 9
• Rhythm Types:
• Main Volume: Controlled via the Master Volume knob.
• Main Rhythm: Controlled via several Rhythm knobs.
• Timbres: Metro1 and Metro2 each have preset timbres, while Metro3 (in advanced mode) gives you
the option of programming your own timbre from 10 unique options.
• Two LED lights: Each light shows a red color for an accented beat, or green color for all other beats.
• Metronome: Audible via clicks or human voice.
• Timer Function: Lasts for up to 90 minutes. When the time has expired, the LED turns red and the speaker
will beep for one minute; press the [START/TAP] button to stop.
• [START/TAP] button: Starts/stops the metronome.
• Remote Control Function: Starts/stops the metronome by using a remote control pedal linked to the
remote control jack. The pedal acts as the [START/TAP] button.
• Sound Signal: After connecting to a Line Out jack, the sound signal can now be sent to an amplifier.
• Tap Tempo Function: Tap the [START/TAP] button while in your tempo, as the tempo of your tapping
will reveal itself in the LCD Display. Tempo ranges from 30-280 beats/min.
• Variation Function: Set up to four sections of rhythm variation, freeing up the beat, tempo, and bars in
each section. Press the [START/TAP] button to begin the sequence demonstration.
• Programming Function: You can program/store your own rhythm by setting a beat, tempo, and timbre
(while Prog00 is a fixed rhythm, Progs1-31 are available).
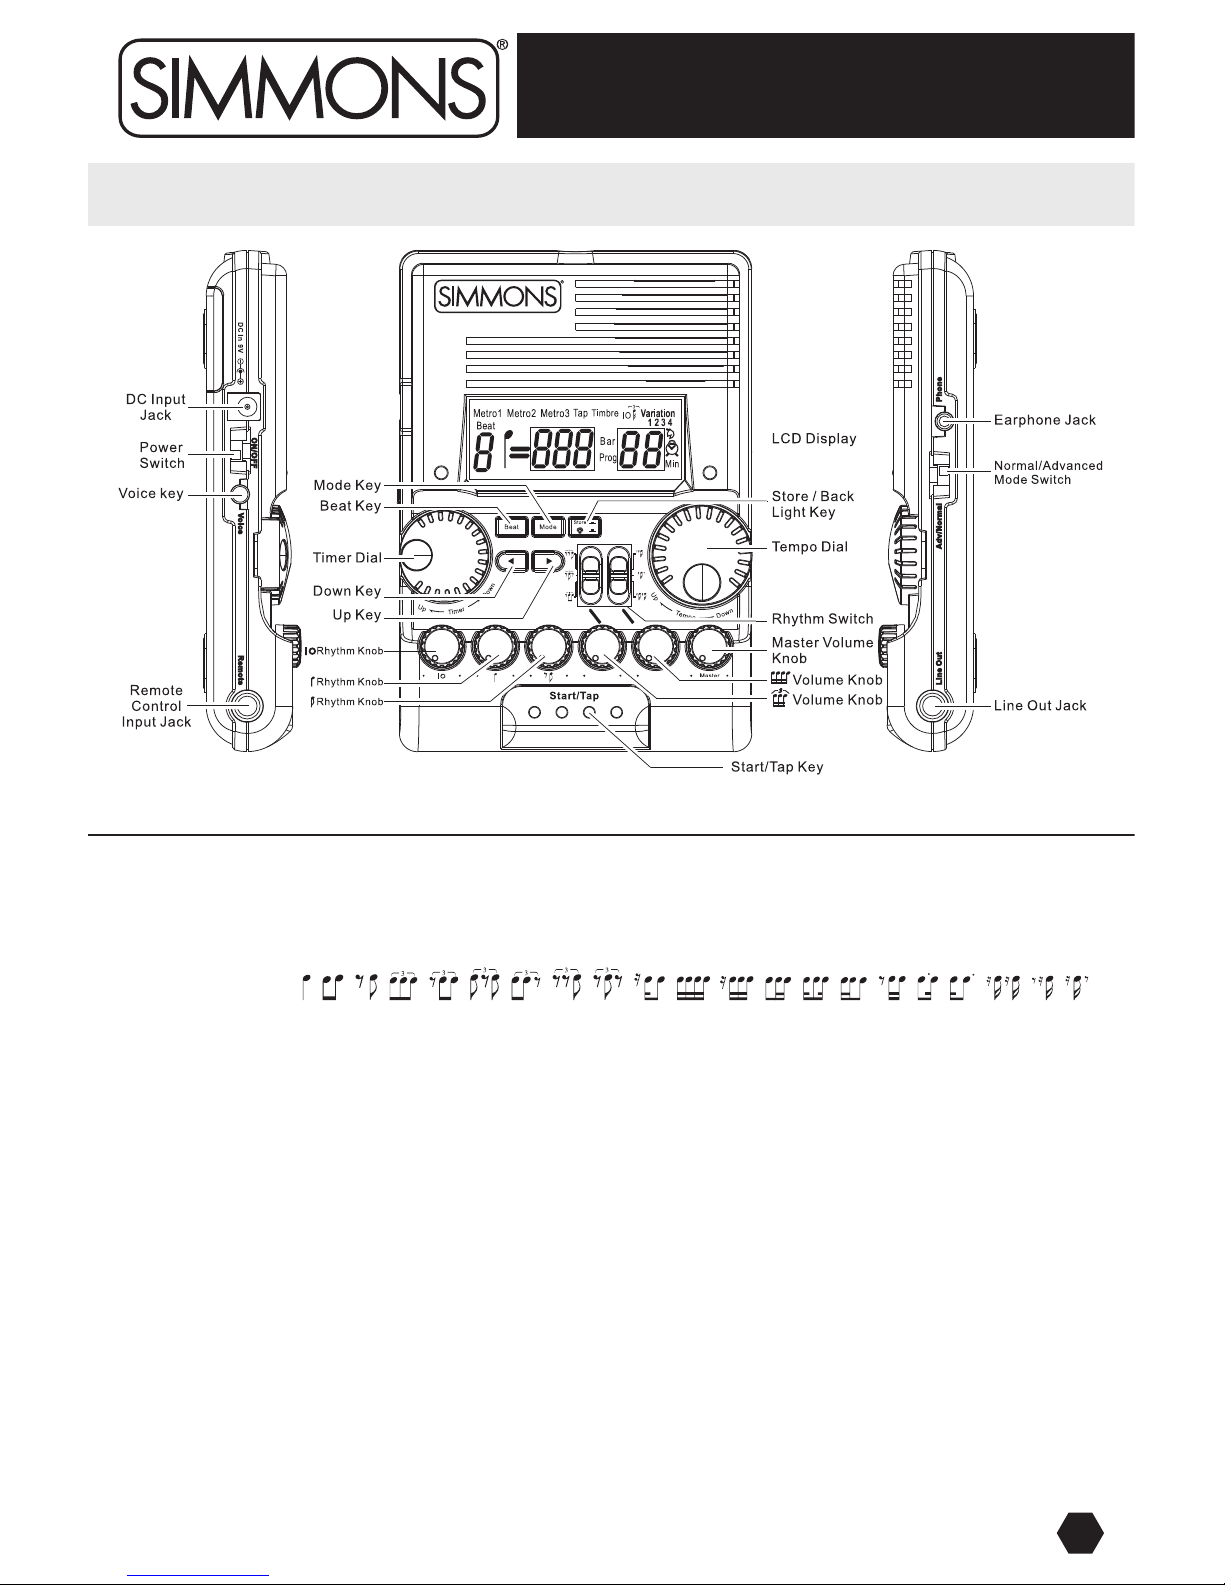
Operation Overview
Congratulations on your purchase of Simmons’ SDPC1 Pro Click Metronome. It is recommended that
you read this manual once through to get a feel for the unit, and refer to back to it when necessary.
1
PRO CLICK
SDPC1
SDPC1
Pro Click Metronome
www.simmonsdrums.net
Operating Instructions
Powering The Unit
Toggle the power switch to ON to turn on, and OFF to turn off. If “BAT” flashes during battery use, the power is
insufficient for proper use. If “BAT” is displayed (without flashing) the power is low. Consequently, if “BAT” does
not display, power is sufficient for use. When using the DC adapter, double check to make sure all connections are
correct.
Normal Mode
Toggle the Adv/Normal switch to Normal. Press the [BEAT] button to set the Beat type. Next, turn the Tempo dial to
determine your ideal tempo. Now press the [START/TAP] button to begin play.
Timbre Selection
Press the [MODE] button to select your timbre setting. Remember, Metro1 and Metro2 are the fixed set of timbres,
while Metro3 is your own timbre set (in Advanced mode).
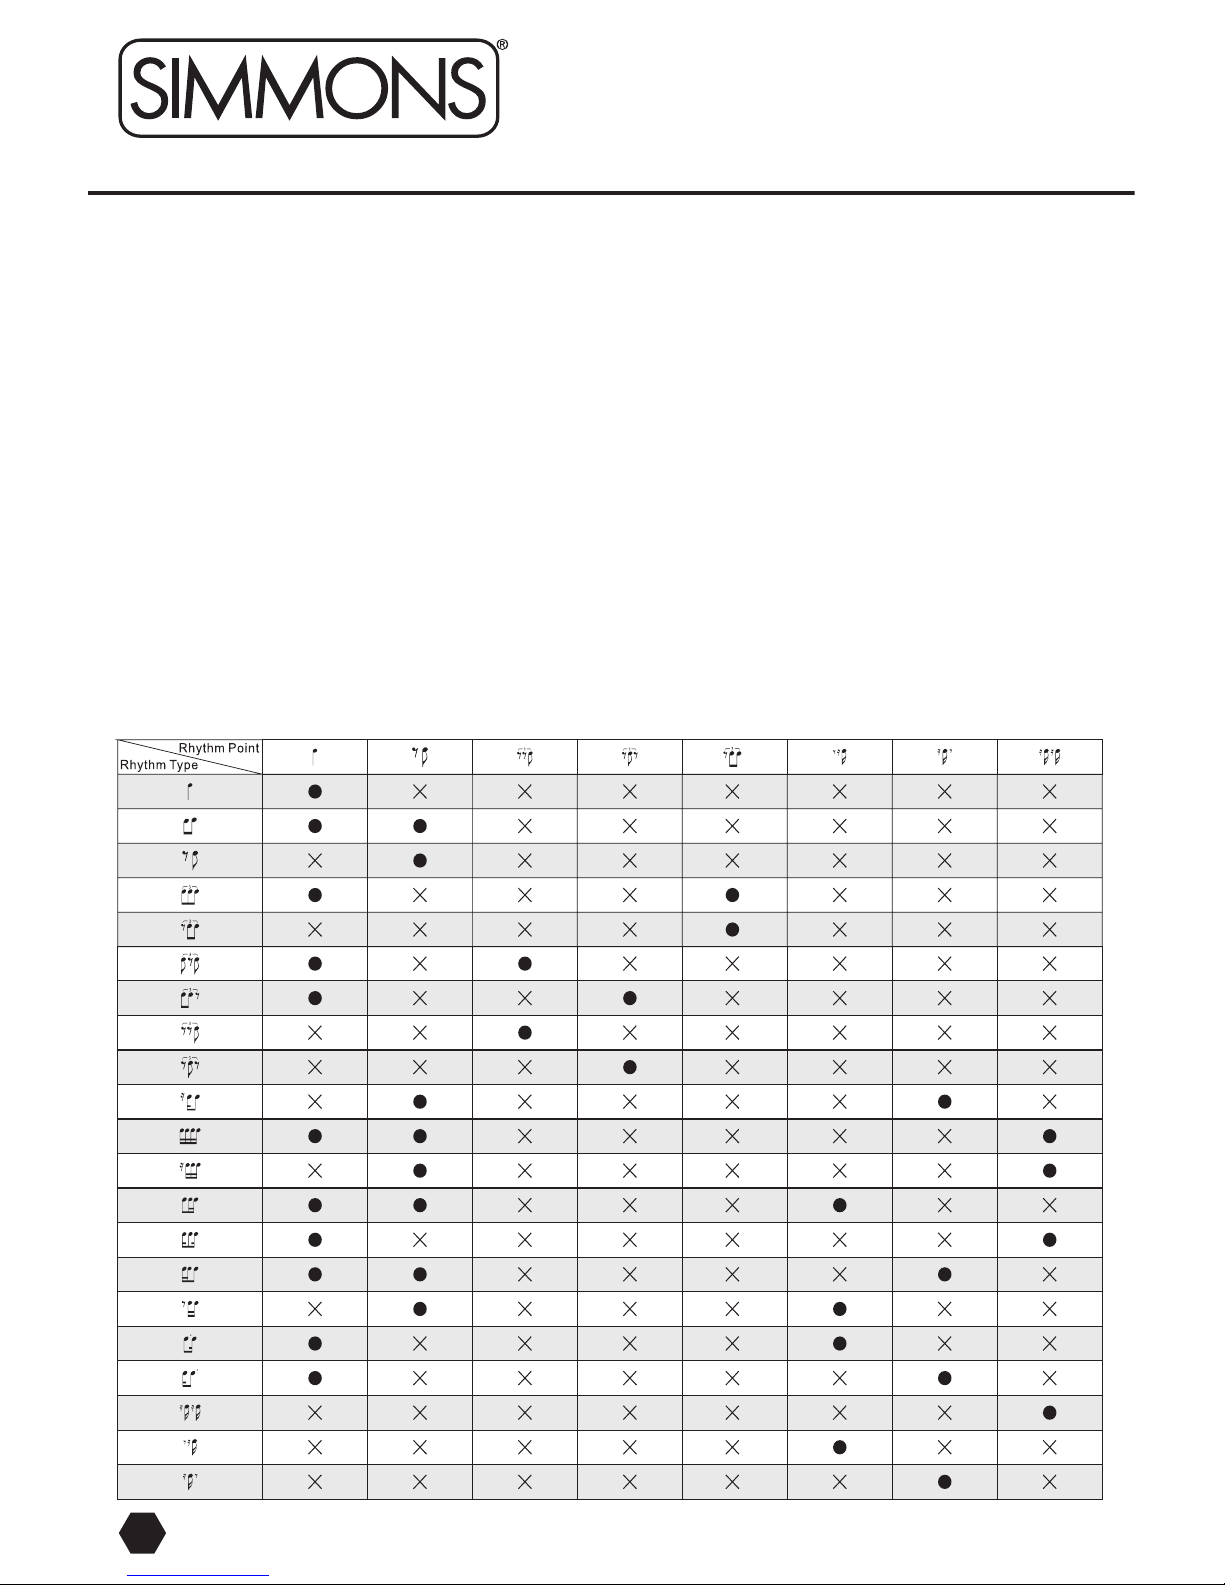
Rhythm Type Selection
Access different rhythms by opening or closing the corresponding rhythm points (see table below). 0 indicates an
open rhythm point; X indicates a closed rhythm point.
After finding your rhythm type, adjust the rhythm’s volume by opening the rhythm knob, so that the first rhythm point
is the accent rhythm.
2
Pro Click
www.simmonsdrums.net
3
Rhythm Switches/Knobs
Miscellaneous Functions
• [MODE] button: Chooses Timbre mode or Variation mode.
• [KEY] button: Changes beat types.
• [STORE]button (Short Press): In Timbre mode — Stores the timbre selected for any one of the five rhythm items.
In Variation mode — Stores your selected section.
• [STORE] button (Long Press): Turns the back light on/off.
• [UP/DOWN] button: In Timbre mode — Shows the ten available timbres for selection.
In Variation Mode — Shows the 0-99 bars available to set.
• [START/TAP] button: In Timbre mode — No function.
In Variation mode — Starts/stops play during the four variation sections.
• [VOICE] button: Starts/stops voice counting. In its initial state, [VOICE] button is off.
Advanced Mode Functions
• Timer Dial (Up-Timer-Down): Clockwise — Increases timer length, up to 90 minutes.
Counterclockwise — Reduces timer length, down from 90 minutes.
• Tempo Dial (Up-Tempo-Down): Clockwise — Increases tempo, ranging from 30-280 BPM.
Counterclockwise — Reduces tempo, down from 280 BPM.
• Normal/Advanced mode switch: Toggles between normal/advanced modes.
Normal Mode Functions
• [MODE] button: Chooses Metro1, Metro2, Metro3 and Tap. Metro1 and Metro2 are fixed sets of timbre,
while Metro3’s timbre can be set by the user. Tap is used to measure the tap tempo.
• [BEAT] button: Changes beat types.
• [STORE] button (Short Press): Stores the beat, tempo, and timbre set by the user to Prog1-31.
• [STORE] button (Long Press): Turns the back light on/off.
• [UP/DOWN] button: Selects and views Progs 1-31 to reset/play.
• [START/TAP] button: In Metro1, Metro2, Metro3 modes, press to start/stop playing. In Tap mode, press
to measure your tapping tempo.
• [VOICE] button: Starts/stops voice counting. In its initial state, [VOICE] button is off.
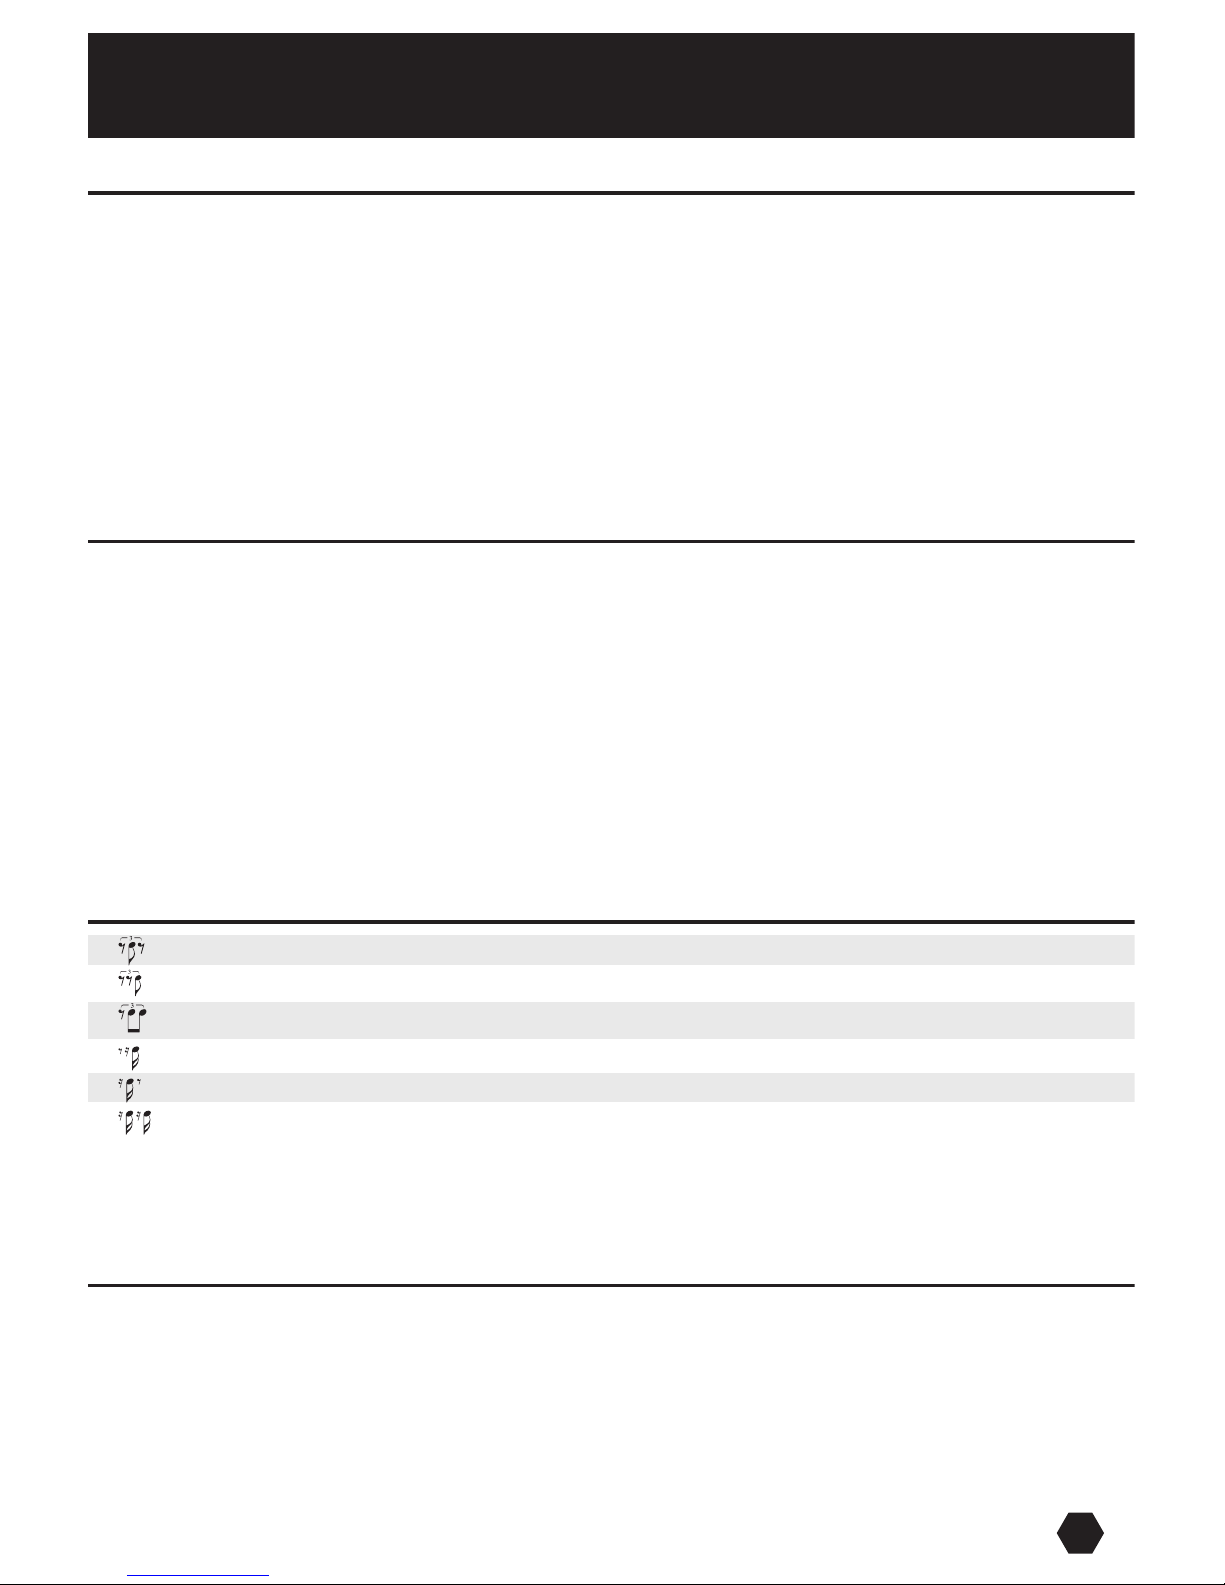
One quarter note is divided into triplets, sounding off the 2nd note.
One quarter note is divided into triplets, sounding off the 3rd note.
One quarter note is divided into 3 triplets, sounding off the 2nd and 3rd notes.
One quarter note is divided into 4 sixteenth notes, sounding off the 4th sixteenth note.
One quarter note is divided into 4 sixteenth notes, sounding off the 2nd sixteenth note.
One quarter note is divided into 4 sixteenth notes, sounding off the 2nd and 4th sixteenth notes.
Master Volume Knob/Rhythm Knobs: Turning the rhythm knob allows you to control the volume of each
tone. Turn clockwise to increase volume, counterclockwise to
reduce volume.
www.simmonsdrums.net
Metronome

Voice Counting
Press the [VOICE] button to start/stop voice counting.
Once you have your own rhythm set, store it via Progs1-31. Press the [UP/DOWN] buttons to view each
Program’s information.
Backlight
Press and hold the [STORE/TAP] button for two seconds to turn on/off the backlight.
Tap Tempo Measuring
Press the [MODE] button to access Tap mode.
Advanced Mode
The Advanced mode has two functions. One is its Timbre function, so you can set your timbres for Metro3. The
other is its Variation function, to access the four individual rhythm sections.
Timbre Function
Set the Adv/Normal switch to ADV, then press the [MODE] button to enter the Timbre function. Press the
[UP/DOWN] buttons to select the ideal timbre for one of the rhythm points in Metro3, revealed next to
“Timbre” on the LCD display. Press the [STORE] button to store your timbre, and repeat this process for the
other rhythm points.
NOTE: Both LEDs will turn red to indicate that your timbre has been stored.
After all your rhythm points have been stored, open the rhythm volume by turning the rhythm knobs. These
timbres will be stored in Metro3. You can test this setting by returning to Normal mode and playing Metro3.
Variation Function
In Advanced mode, press the [MODE] button to enter the Variation function. Press the [BEAT] button to find
your beat, and turn the Tempo dial to select your ideal tempo. Now, press the [UP/DOWN] buttons to set
the bars for each of the four Variation sections. Press the [STORE] button to store your setting, as both LEDs
will turn red to indicate that your setting has been stored. Repeat for each Variation section.
NOTE: If you want to play only two of the four sections, set the bars in the 3rd section to 00.
4
One (1) Year Limited Warranty: Subject to the limitations set forth below, Simmons® hereby represents and warrants that the components of this
product shall be free from defects in workmanship and materials, including implied warranties of merchantability or fitness for a particular purpose,
subject to normal use and service, for one (1) year to the original owner from the date of purchase.
Limits of Liability: Retailer and manufacturer shall not be liable for damages based upon inconvenience, loss of use of product, loss of time,
interrupted operation or commercial loss or any other incidental or consequential damages including but not limited to lost profits, downtime,
goodwill, damage to or replacement of equipment and property, and any costs of recovering, reprogramming, or reproducing any program or
data stored in equipment that is used with Simmons® products. This guarantee gives you specific legal rights. You may have other legal rights which
vary from state to state. Some states do not allow limitations on how long an implied warranty lasts, so the above limitation may not apply to you.
FCC Statements
1. Caution: Changes or modifications to this unit not expressly approved by the party responsible for compliance could void the user’s authority to
operate the equipment.
2. Note: This equipment has been tested and found to comply with the limits for a Class B digital device, pursuant to Part 15 of the FCC Rules. These
limits are designed to provide reasonable protection against harmful interference in a residential installation. This equipment generates, uses, and
can radiate radio frequency energy and, if not installed and used in accordance with the instructions, may cause harmful interference to radio
communications. However, there is no guarantee that interference will not occur in a particular installation. If this equipment does cause harmful
interference to radio or television reception, which can be determined by turning the equipment off and on, the user is encouraged to try to correct the
interference by one or more of the following measures:
•Reorientorrelocatethereceivingantenna.
•Increasetheseparationbetweentheequipmentandreceiver.
California Prop 65 Warning
This product may contain a chemical(s) known to the state of California to cause cancer or birth defects or other reproductive harm.
All trademarks and registered trademarks mentioned herein are recognized as the property of their respective holders.
For questions, comments and more information, go to www.simmonsdrums.net
•Connecttheequipmentintoanoutletonadifferentcircuit.
•Consultanexperiencedradio/TVtechnicianforhelp.
SDPC1
Pro Click Metronome
www.simmonsdrums.net
Table of contents
Other Simmons Musical Instrument manuals


