Simply Automated SimplyBrilliant US22-40 User manual

UPB Dual Output, Universal Dimming Transceiver Base
Model US22-40
Provides two ON/OFF, dimming and Timed OFF outputs for:
•Incandescent lighting
Simply Automated, Incorporated
6108 Avenida Encinas, Suite B, Carlsbad, CA 92011 USA
Technical Support: www.simply-automated.com or 800-630-9234
452-0022-0101 Rev. A Revised: November 22, 2008
•Magnetic low-voltage lighting
•
Halogen lighting
IMPORTANT!
Read This Before Installing!
•This incandescent dimmer cannot be used to dim
FLUORESCENT, ELECTRONIC LOW-VOLTAGE or METAL HALIDE
lighting, unless specifically allowed by the lighting manufacturer.
Please see instructions to configure this product for ON/OFF
operation (dimming disabled) with these types of lighting.
•DO NOT WIRE HOT! Permanent damage may result. Improper
installation voids the warranty.
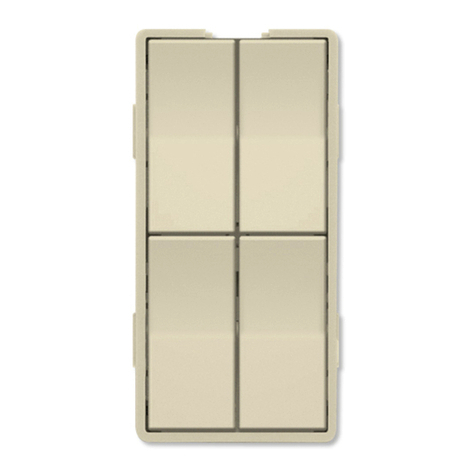
Model US22-40 shown with
actuator faceplate (sold
separately)
FUNCTION
The SimplyBrilliant™ UPB Dual
Output, Universal Dimming
Transceiver Base, model US22-40,
provides two direct load controls and
remote control of permanently-
installed new or existing lighting fixtures, lamps and other electrical devices
connected to UPB devices. Incandescent lamps can be turned ON or OFF,
and can also be dimmed and brightened. The US22 can be configured to
turn other types of non-dimmable loads ON and OFF. The timer function
can be preset and automatically turn OFF loads, like bathroom lights, fans
or heat lamps. Actuator faceplates, model ZSXX series, available in rocker
and pushbutton styles, are interchangeable on the US22 base. The US22
can be configured to control two loads of up to 600W each (see table 1) and
provide scene control. Load control can be configured to any rocker or
button on the various actuator faceplates. All switch actuators may act as
transmitters of UPB lighting scene-links, communicating with other UPB
devices - individually or collectively.
IMPORTANT SAFETY INSTRUCTIONS
When using electrical products, basic safety precautions should always be
followed, including the following:
1. READ AND FOLLOW ALL SAFETY INSTRUCTIONS.
2. Installation should be performed by a qualified electrician.
3. Keep away from water. If product comes into contact with water or
other liquid, disconnect immediately.
4. Never use products that have been dropped or damaged.
5. Do not use this product outdoors.
6. Do not use this product for other than its intended use.
7. Do not connect multiple lamps that, when combined, exceed the
maximum load rating of the product, de-rated for multi-gang boxes.
8. Do not install in areas that can exceed 120°F (e.g., in an attic).
9. To avoid the risk of overheating and possible damage to other
equipment, do not use this product to control a receptacle.
10. Do not cover the product with any material when in use.
11. SAVE THESE INSTRUCTIONS.
INSTALLATION
The SimplyBrilliant™ UPB Dual Output, Universal Dimming Transceiver
Base (US22-40) is designed to be installed in a junction box that is wired to
a readily accessible over-current protection device in the building wiring per
NEC and CEC electrical codes.
CAUTION: The default switch configuration operates as a dimmer for
incandescent lamps. It will also dim magnetic low-voltage and halogen
lamps. To control fluorescent, electronic low-voltage or metal halide
lamps, or motor-operated appliances, transformer-supplied appliances
or fans, the switch must be reconfigured for ON/OFF operation
(dimming disabled) prior to use. Refer to the section on Configuration.
CAUTION: DO NOT WIRE THIS DEVICE WITH POWER
CONNECTED. Injury or permanent damage to the device may
result. Improper installation voids the product warranty.
1. Locate the existing wall switch for the lighting to be controlled.
Note that the lamp rating (or the combined rating of all
connected lamps) must not exceed what is shown in the de-
rating table below.
Number of Dimmers in J-box
Table 1: *Ganging
Derating 123+
1800W -- --
21000W 700W --
Number
of J-box
Gangs 3+ 1200W 900W 700W
*Total watts – both channels; not to exceed 600W per channel.
2. Disconnect power at the circuit breaker.
3. Remove the existing wall switch hardware. Disconnect the
wires to the switch.
4. Using a wire nut, connect all white (Neutral) wires together
including white wire of US22.
5. Using wire nuts, connect the US22’s BROWN channel 1
(output load) wire to the black wire of the first device load and
RED channel 2 (load output) wire to the black wire of second
device load to be controlled. DO NOT CONNECT BOTH
BROWN AND RED LOAD WIRES TOGETHER; ONE
CHANNEL MAY OVERLOAD.
6. IF THIS IS TO BE A 3- OR MORE-WAY INSTALLATION, use
a wire nut to connect the brown/white “REMOTE 1” wire or
red/white “REMOTE 2” wire if there is a second 3-way switch
traveler. Refer to the wiring diagrams on pages 3 and 4.
7. Using a wire nut, connect the black (Line) wire of the US22-40
switch to the black (Line) power wire.
8. Mount the switch inside the J-box using captive screws. DO
NOT OVER TIGHTEN THE SCREWS.
9. Reconnect power at the circuit breaker.
CONFIGURATION
Configuration requires UPB setup/configuration software and a model UMC
Computer Interface Module. Before using UPStart configuration software,
be sure to download the latest version from the Simply Automated website.
First time users should also download and follow the Quick Start Guide and
use the Installation Wizard available in UPStart to save time.
The US22-40 default settings are preconfigured for a ZS24 (quad rocker)
faceplate. The default settings ensure that both loads will operate locally
with most faceplate. To utilize essential functions, the UPB settings should
be configured by the installer for the specific faceplate. Any rocker or button
can be configured to control the local load (Link #241 channel 1, Link #242
channel 2). When using UPStart, this is done by selecting the faceplate
“device type” when adding the device to the network.

Universal Dimming Transceiver Base Model US22-40
Simply Automated, Incorporated
SETUP MODE
When configuring a UPB system, it is often necessary to place the US22 in
SETUP mode in order to initiate self-identification on the powerline. To
place the US22 in SETUP mode, tap any rocker/pushbutton exactly 5 times
consecutively. The LED indicator will repeatedly pause and blink 2 times
GREEN when the unit is in SETUP mode. Module will stay in SETUP mode
for five minutes. Once the US22 has been added to the powerline network,
UPStart will put the US22 back into Normal mode. To EXIT SETUP mode
manually, and enter NORMAL mode, tap any rocker/pushbutton five times.
OPERATION
Unless otherwise configured, rocker actuators behave as follows:
Dimmer Action
Rocker Event Top Rocker Bottom Rocker
Single-Tap Brighten to 100% at
Default Rate Fade to 0% at
Default Rate
Double-Tap Snap to 100% Snap to 0%
Hold Start brightening to
100% at Default Rate Start fading to 0%
at Default Rate
Release Stop brightening and
hold current level Stop fading and
hold current level
The US22 is factory configured to accept a
dual-short rocker (ZS22), or a quad-rocker
(ZS24) faceplate, where the top-left (#1) and
bottom-left (#2) rockers provide ON/OFF and
dimming control functions for the channel 1
and channel 2 connected light fixtures (local
loads), respectively. The local loads may be
assigned to ANY rockers or buttons using a
lighting scene-link, which must be present in
both the transmit and receive tables of the device, accessible via UPStart.
The factory default scene-links for channel 1 and channel 2 local load
controls are ‘Link 241’ and ‘Link 242’ respectively, with the transmit options
disabled. The other rockers / buttons function as scene-link transmitters
communicating with other UPB devices. Local loads may be included in any
scene using the scene-link feature in UPStart. See illustration above for
actuator numbering and functional examples below.
1. Using a rocker configured scene-link on a US22 to control a (non-
dimming) UPB Receptacle, Appliance Module or Fixture Relay Module,
the Receptacle/Module’s connected load can be turned ON by tapping
the top rocker and OFF by tapping the bottom rocker. Pushbuttons
can be configured for ‘multi-button’ mode (recommended) where
single-tap is ON and double-tap is off, or toggle the load ON and OFF
with one button push each (toggle mode - not recommended if more
than one button controls the same scene). Fan motors and water
pumps are usually controlled with ON/OFF switching instead of
dimming (i.e. dimming disabled).
2. Using a rocker configured scene-link to control a (dimming) UPB
Dimmer Switch, Lamp or Fixture Dimmer Module, the connected load
can be controlled according to the table above. Pushbuttons can be
configured as a “Super Multi-Button” where a single-tap is ON, double-
tap is off and press and hold dims up and down alternately.
A ‘auto-off’ timer function is available for each channel of the in the US22.
Scene-links or rocker taps can turn ON the load and preset the timer period.
The US22 automatically turns OFF at the end of the period. The available
preset times are: 1 Sec., 5 Sec., 30 Sec., 1 Min., 2 Min., 4 Min., 10 Min., 20
Min., 30 Min., 40 Min., 50 Min., 1 Hr., 2 Hrs. 3 Hrs. and 4 Hrs. The default
setting is: Timer Off.
To turn lights on faster, local response time adjustments are available (300,
450, 600 and the default 750 mSec) and configured with UPStart
configuration software. Local response time is the time from rocker press to
load response. Fast 300mSec response works well with rockers, toggle
buttons and separate ON/OFF buttons; however switches with double tap
functions (e.g. multi-button mode) may need to be set at a slower speed
(e.g. 450mS) allowing users who tap slowly to utilize the function.
POWER DISCONNECTION
To disconnect power to the connected lamp fixture, depress the top of the
rocker switch, grab the underside of the clear plastic (green/blue) indicator
tab with your fingernail, pull the tab out about 0.2” until it stays in place. The
LED indicator will extinguish to show that power is now disconnected. To
reconnect power, simply push the tab back into its normal position.
OVERLOAD PROTECTION
The US22 contains a thermal sensor that automatically turns off the
connected load if the switch becomes too hot. This can occur when the
load exceeds the power rating of the switch, or when dimming incompatible
loads or if the switch is in an environment that exceeds the maximum
operating temperature (120°F). If the load begins to turn OFF and ON
repeatedly without command or actuation, then the load must be reduced.
INSTALLING/CHANGING FACEPLATES
SimplyBrilliant Dimming Wall Switches are designed with removable
actuator faceplates, making it possible to upgrade functionality and change
color in the field without disconnecting the switch from the wall. Changing
faceplate function types requires re-configuration via UPStart.
To install a faceplate assembly, do the following:
1. Hold the actuator faceplate assembly so that clear plastic light pipe
(LED) on the switch fits nicely into the recess on the top of the
faceplate.
2. Align the four prongs on the side of the faceplate assembly with the
four slots on the switch body.
3. While squeezing the prongs on both sides, press the faceplate into the
switch body. Ensure that all four prongs are fully inserted and latched
into the switch body. If all four prongs are not fully latched, the
rocker/button plungers may not function properly.
4. Exercise each rocker/button several times to ensure proper seating
and operation. If the rocker or button doesn’t operate properly, remove
and re-install the faceplate to check proper seating and operation.
To remove the faceplate assembly, upgrading functionality or
to changing color, do the following:
1. Remove the wall plate from the switch.
2. Using the thumb and index finger, press the top two prongs of the
rocker faceplate assembly inward so that they unlatch from the switch
body. This will release the top of the rocker assembly.
3. Press the two lower prongs inward, and pull the faceplate assembly
away and slightly downward from the switch body, moving it away from
the clear plastic light pipe.
4. Once the old faceplate is removed, follow steps 1-4 above for
instructions on installing a new rocker faceplate assembly.
To change faceplate labeling, do the following:
1. Remove the clear plastic label cover on the oval or thin-bar button
faceplate by lifting the side with a finger nail or small screwdriver.
2. Flip label over to hide switch numbers, or
3. If custom labels are preferred, order the custom label kit,
(Model ZLK-01, specify color) to print your own labels.
6108 Avenida Encinas, Suite B, Carlsbad, CA 92011 USA
Technical Support: www.simply-automated.com or 800-630-9234
452-0022-0101 Rev. A Revised: November 22, 2008

Universal Dimming Transceiver Base Model US22-40
Simply Automated, Incorporated
UPB FACTORY DEFAULT SETTINGS
To restore the following default settings, place the US22 in
SETUP mode (5 tap) and then tap any actuator exactly 10 times. The
indicator will pause then blink BLUE two times repeatedly.
Tap the actuator 5 times again to finish.
Network Name “Network 1”
Room Name “New Room Name”
Device Name “New US22-40”
Unit ID 62
Network ID 255
Network Password 0000
Rocker 1 Top Transmit Link 241 (internal)
Rocker 1 Bottom Transmit Link 241 (internal)
Rocker 2 Top Transmit Link 242 (internal)
Rocker 2 Bottom Transmit Link 242 (internal)
Rocker 3 Top & Bottom Transmit Link 1 (transmit enabled)
Rocker 4 Top & Bottom Transmit Link 2 (transmit enabled)
Receive Links 241 and 242 (internal)
6108 Avenida Encinas, Suite B, Carlsbad, CA 92011 USA
Technical Support: www.simply-automated.com or 800-630-9234
452-0022-0101 Rev. A Revised: November 22, 2008

Universal Dimming Transceiver Base Model US22-40
MANUAL SCENE MODIFICATION
Once the US22-40 has been initially configured, it is possible to make scene
changes (e.g. default scene-link 1 and 2) without configuration software.
1. To modify a scene-link for one of a transmitting device’s actuators, set
all scene devices to the desired light levels and then place them in
SETUP mode. Tap the scene actuator (e.g. button 1) on the
transmitting device exactly 7 times to create the scene and store the
light levels.
2. To add a device other than a US22 to an existing scene, activate the
scene and set the light level on the device to be added. Place the
device in SETUP mode and tap the scene actuator on the transmitting
device exactly 7 times to modify the scene.
3. To add a US22 to an existing scene, activate the scene and set the
light level of the US22 channel(s) to be added. Place the US22 in
setup mode and then to add specific channel(s)…add channel 1 by
tapping the US22 1 time – wait 3 seconds and tap 1 more time
(green/blue LED flash) ; or add channel 2 by tapping the US22 1 time
(blue/green LED); or add channels 1 and 2 by tapping the US22 2
times – wait 3 seconds and tap 2 more times (green/blue LED); all
followed by tapping the transmitting device’s actuator button 7 times.
4. To remove a device from an existing scene, place the device to be
removed in SETUP mode. Tap the scene actuator on the transmitting
device exactly 8 times to modify the scene.
5. To change light levels on an existing scene, set the levels as desired
and tap the scene actuator on the transmitting device exactly 7 times
to modify the scene.
TROUBLESHOOTING
PROBLEM PROBABLE CAUSE SOLUTION
Push light pipe (LED indicator) back into position flush with faceplate
assembly housing.
Master switch is wired
properly but has no power
(e.g. LED indicator is OFF).
Air gap power disconnect may be disengaged (pulled
out). Test buttons without faceplate with appropriately-sized non-metallic
object such as a toothpick or golf tee
3-way remote switch actuator may be binding,
causing the switch to be stuck ON or OFF. Loosen mounting screws on remote switch and/or wallplate to relieve
pressure on housing.
Actuator faceplate may not be seated properly on the
switch body.
Exercise actuator several times to ensure proper seating and operation.
If necessary, remove and replace faceplate to ensure proper seating and
operation.
Master switch actuator doesn’t
turn load ON and/or OFF (e.g.
LED indicator is ON). Switch faceplate may be incorrectly selected in
UPStart Select the correct faceplate in UPStart
Mounting screws may be too tight or j-box may be
deformed, causing the switch body to warp. Loosen mounting screws to relieve pressure on the switch housing.
Buttons and/or rockers stick or
don’t actuate properly when
pressed. Actuator faceplate may not be seated properly on the
switch body.
Exercise actuator several times to ensure proper seating and operation.
If necessary, remove and replace faceplate to ensure proper seating and
operation.
Switch is overloaded. Reduce the power load by removing bulbs from the circuit.
Load turns ON and OFF
regularly without actuation or
command. Switch is dimming a load that is not rated for use
with incandescent dimmers. Reconfigure the switch for ON/OFF operation with no dimming (using
UPStart, for example).
Communication or switched
links to other UPB devices are
intermittent.
Linked UPB devices are on other phase of the
homes’ 2 phase power.
Install an inverting phase coupler at each breaker panel. Perform
UPStart ‘Communications Test” tool to measure signal strength and
presence of noise.
Simply Automated, Incorporated
6108 Avenida Encinas, Suite B, Carlsbad, CA 92011 USA
Technical Support: www.simply-automated.com or 800-630-9234
452-0022-0101 Rev. A Revised: November 22, 2008
Other Simply Automated Transceiver manuals
