Sincreative AFT05017E User manual

Rev 1.0
HOUSEHOLD USE ONLY
Please read all instructions carefully before using the product
Scan the QR code for
bonus warranty.
INSTRUCTION MANUAL
8 in 1 Air Fryer
love · life
Model: AFT05017E

Contents
Introduction .................................................................................................. 01
Specifications ................................................................................................ 01
Important Safeguards .................................................................................. 02
Know Your Air Fryer ..................................................................................... 03
Control Screen .............................................................................................. 04
Before First Use ............................................................................................. 05
Using Your Air Fryer .................................................................................... 05
Air Frying ................................................................................................ 06-07
Useful Tips ..................................................................................................... 07
More Functions ............................................................................................. 08
Cleaning & Maintenance .............................................................................. 09
Troubleshooting ............................................................................................ 10
Warranty Information................................................................................... 11

Introduction
Thank you for your purchase. Please read this entire manual carefully BEFORE using the air fryer.
�Simple to use controls for cooking quick, healthy meals.
�Generous 5L/5.3QT frying capacity.
�Rapid air circulation system to cook food quickly and save energy.
�Healthy alternative to frying food without the need for oil.
�Air fried food retains its nutritional value, but still tastes like delicious fried food.
Specifications
01
180-400℉
1-60 MINUTES
15.71*8.98*11.1 IN
7.77 LBS
AFT05017E
5L/5.3QT
120V~ 60Hz
1500W
Temperature Range
Time Range
Dimensions
Net Weight
Model
Capacity
Rated Voltage
Power

Important Safeguards
01. This appliance is not intended for use by persons (including children younger than 8) with reduced physical, sensory or mental
capabilities, or lack of experience and knowledge, unless they have supervision.
02. Check if the voltage indicated on the appliance corresponds to the local main voltage before you connect the appliance.
03. Do not use the appliance if the plug, the main cord, or the appliance itself is damaged. Always make sure that the plug is
inserted properly into a wall outlet.
04. Close supervision is necessary when any appliance is used by or near children. Children should be supervised to ensure that
they do not play with the appliance. Cleaning and maintenance shall not be done by children under the age of 8, and only with
supervision.
05. Do not let the cord hang over the edge of table or counter or touch hot surfaces.
06. To protect against electric shock do not immerse cord, plugs, or appliance in water or other any liquid. Do not plug the
appliance in or operate the control panel with wet hands.
07. To avoid a hazard never connect this appliance to an external timer switch or separate remote-control system. To disconnect,
turn o the appliance, then remove plug from the wall outlet.
08. Do not place the appliance on or near combustible materials such as a tablecloth or curtain. The accessible surfaces may
become hot during use. Do not place on or near a hot gas or electric burner, or in a heated oven.
09. Do not place the appliance against a wall or against other appliances. Leave at least 4 inches of free space on the back and sides
and 4 inches of free space above the appliance. Do not place anything on top of the appliance.
10. Do not use the appliance for any other purpose other than those described in this manual. The use of accessory attachments
not recommended by the appliance manufacturer may cause injuries.
11. Do not leave the appliance unattended. Extreme caution must be used when moving an appliance containing hot oil or other
hot liquids.
12. Do not use outdoors.
13. Do not touch the hot surfaces; use handle. During hot air frying, hot steam is released through the air outlet openings. Keep
your hands and face at a safe distance from the steam and from the air outlet openings. Also, be careful of hot steam and air
when you remove the pan from the appliance.
14. After using the appliance, the metal cover inside will be very hot, avoid contact with the hot metal after cooking. Unplug from
outlet when not in use and before cleaning. Allow to cool before putting on or taking o parts, and before cleaning the appliance.
15. Immediately unplug the appliance if you see dark smoke coming out of the appliance. Wait for the smoke emission to stop,
before you remove the pan from the appliance.
FOR HOUSEHOLD USE ONLY.
02
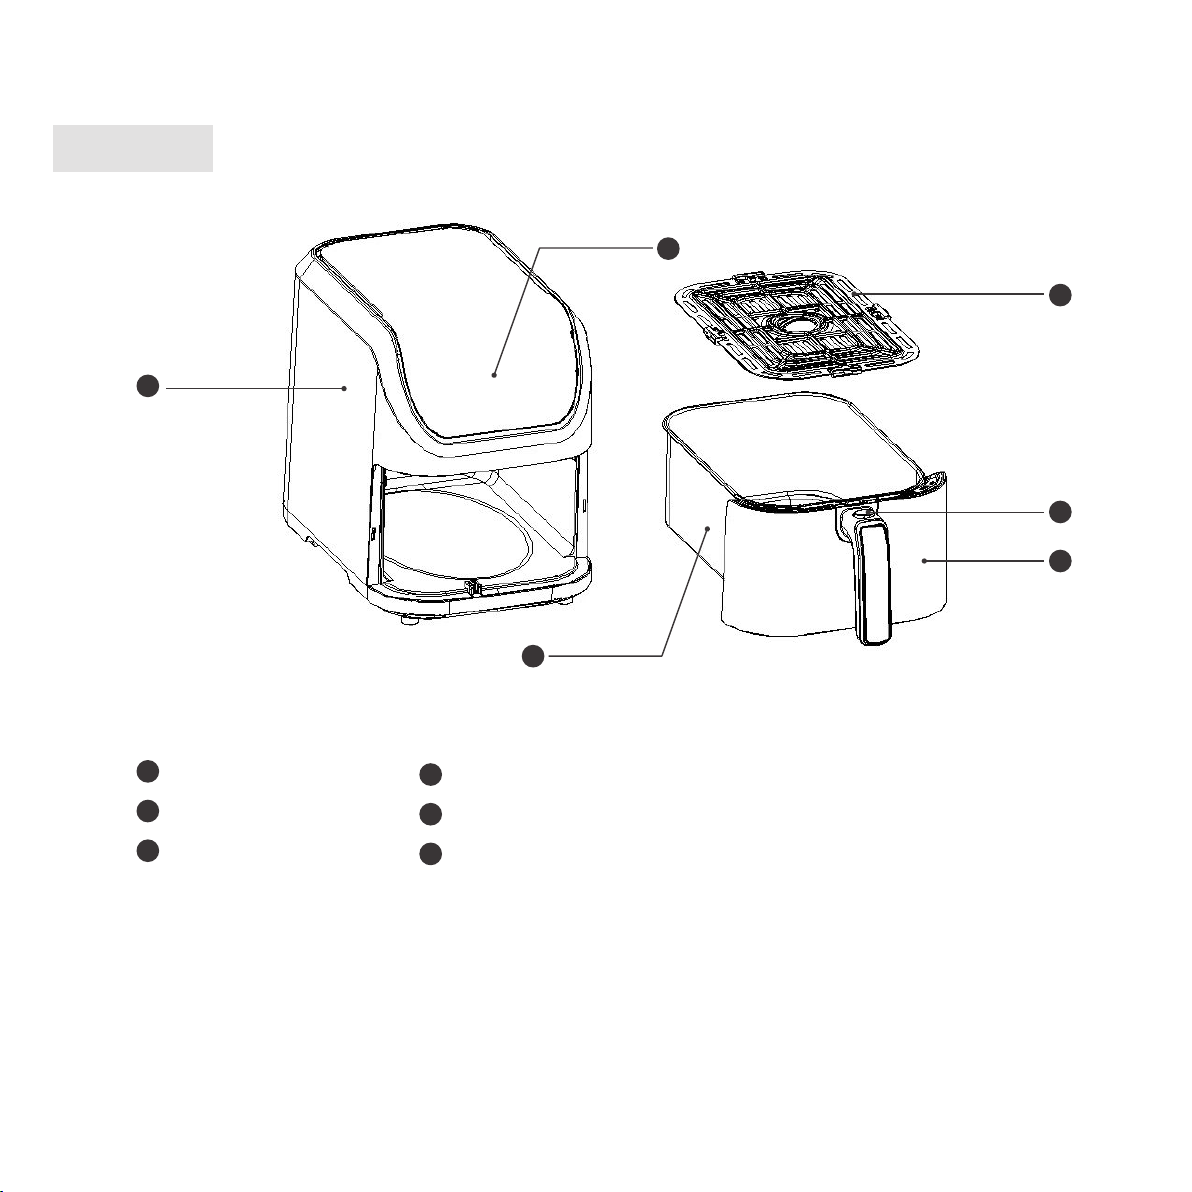
Know Your Air Fryer
NOTE:
Do not try to open the top of the air fryer. This is not a lid.
03
Air Fryer Main Body Basket
Control Screen Basket Release Button
Crisper Plate Basket Handle
1
2
3
5
6
4
36
25
14
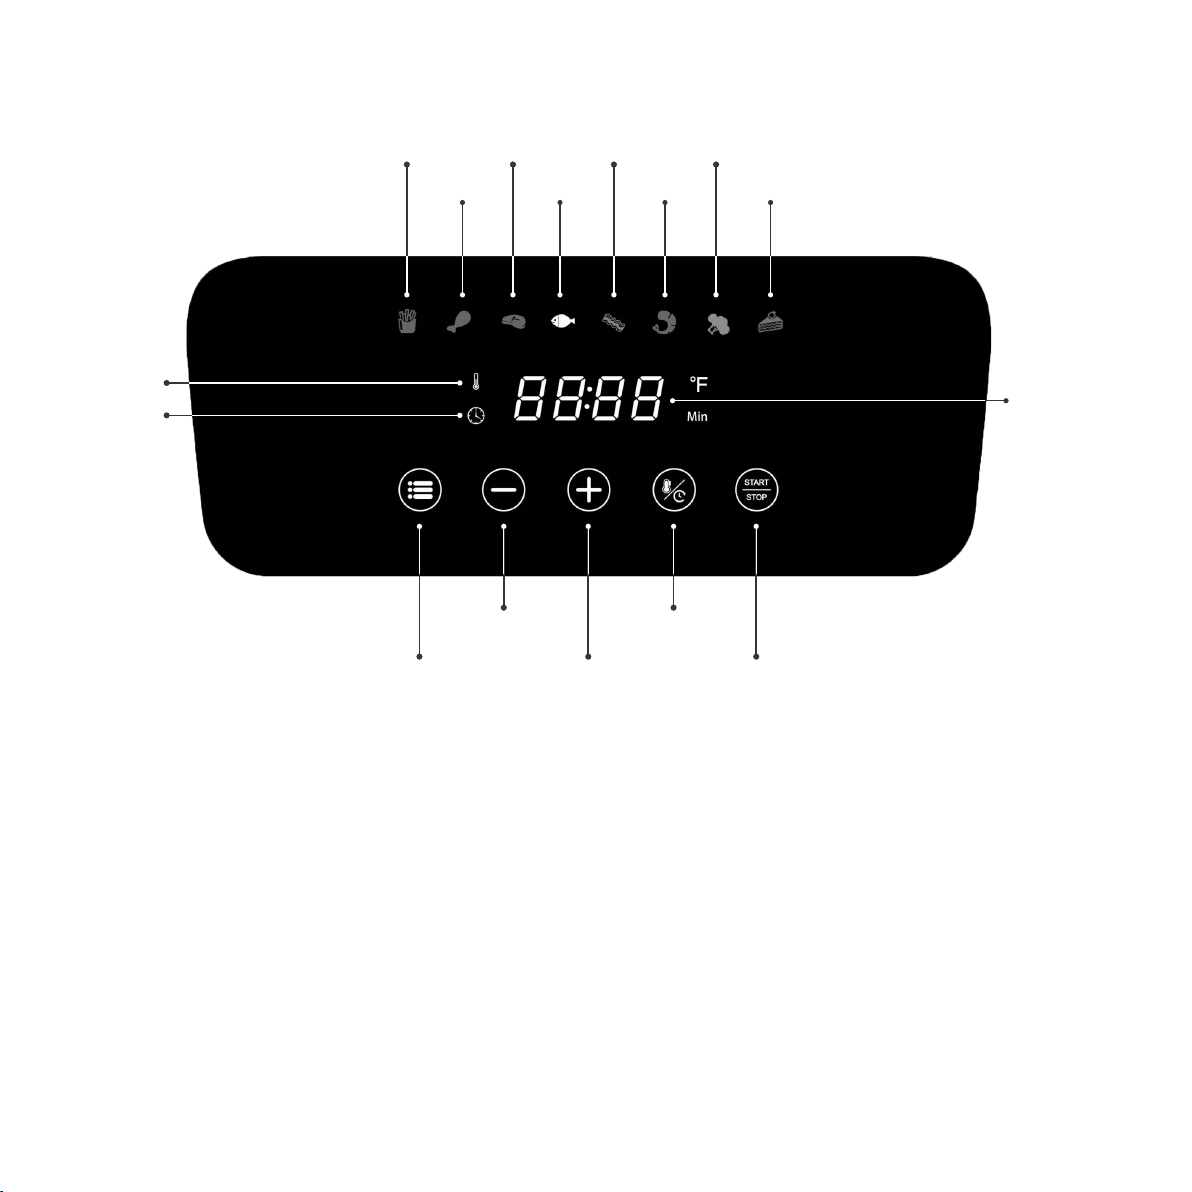
Function of buttons:
Control Screen
Preset Button: Press the Preset Button to choose the preset you want.
Decrease Button: Press the Decrease Button to decrease the temperature or time.
Increase Button: Press the Increase Button to increase the temperature or time.
Temp &Time Button: Press the Temp &Time Button to switch between showing temperature or time.
04
Bacon VegetablesFrench Fries Steak
Chicken Fish Shrimp Cake
Temp & Time
Display
Temp lcon
Time lcon
Preset Button lncrease Button Start/Stop Button
Decrease Button Temp & Time Button
Before First Use
Using Your Air Fryer
Preheating
We recommend preheating before placing food inside the air fryer, unless your air fryer is already hot. Food will not cook thoroughly
without preheating.
01. Plug the appliance in. The air fryer will beep 1 time. The display screen will light up momentarily and then turn o.
02. Press the Start/Stop Button to activate the air fryer, all the lights will turn on and the air fryer will go into standby mode.
03. Press the Temp/Time Button once, then press the Increase Button to set the temperature to 400℉.
04. Press the Temp/Time Button again, then press the Increase or Decrease Button to set the time to 4minutes.
05. Press the Start/Stop Button to begin preheating.
06. When preheating is done, the air fryer will beep 5times. The display screen will turn o.
05
01. Remove all packaging from the air fryer, including any stickers or labels.
02. Place the air fryer on a stable, level, heat resistant surface. Keep away from areas that can be damaged by steam
(such as walls or cupboards).
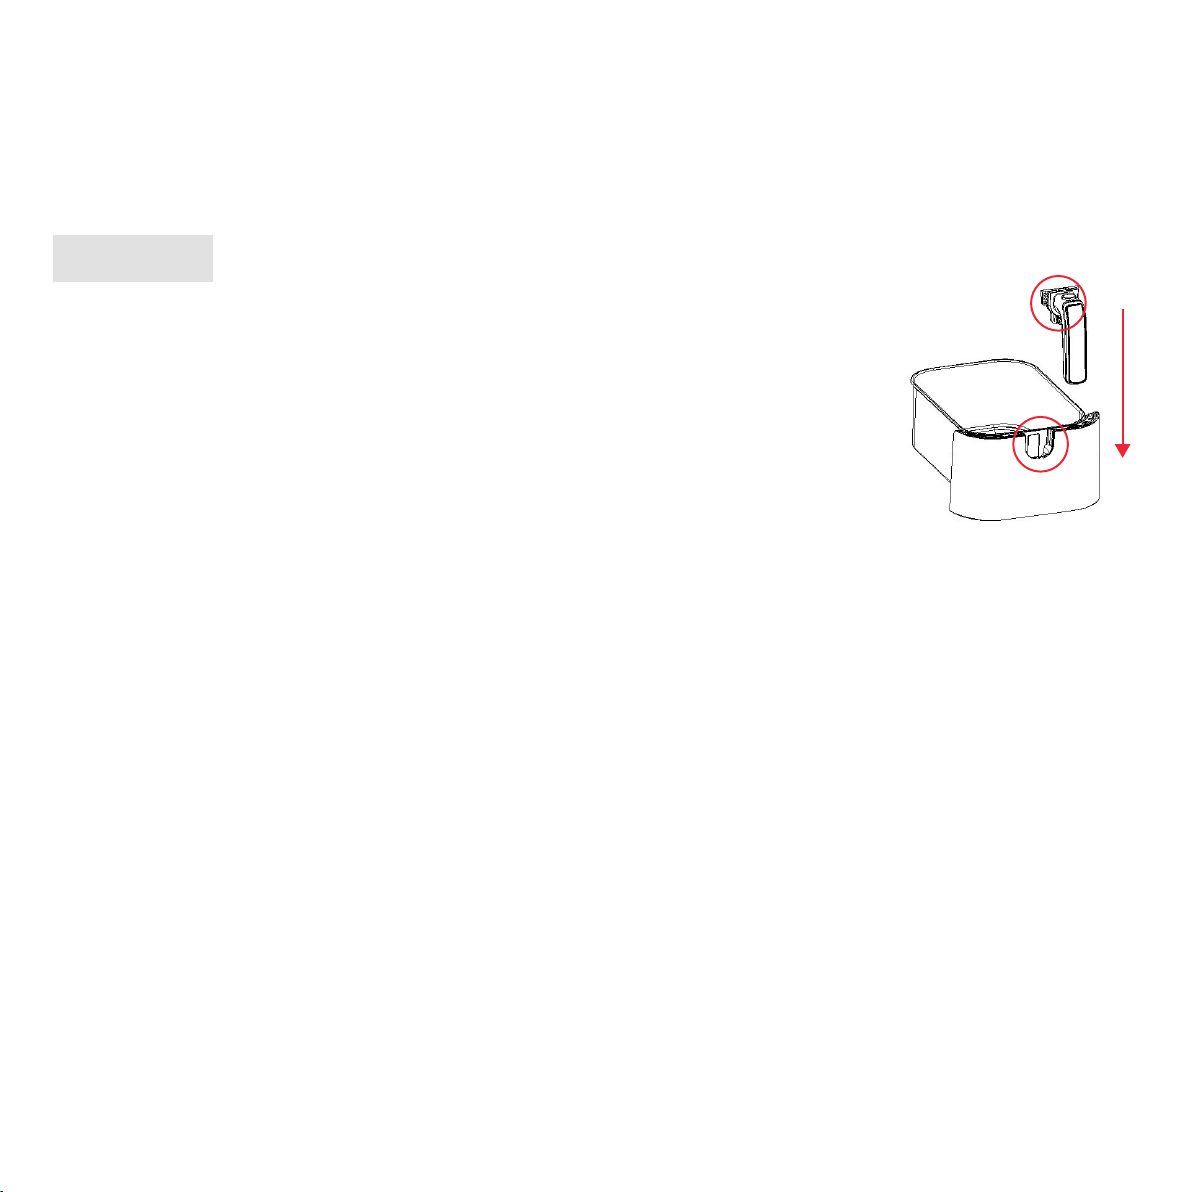
03. Take the Basket out, and attach the Basket Handle to the Basket as shown below. (see image.1)
04. Wash both the basket and crisper plate thoroughly, using either a dishwasher or
a non-abrasive sponge.
05. Wipe the inside and outside of the air fryer with a slightly moist cloth. Dry with a towel.
06. Insert the crisper plate back into the basket, and place the basket inside the air fryer.
07. We recommend doing a test run with one of the presets before cooking. It will help you become
familiar with your air fryer, ensure that it’s working correctly, and clean it of possible residue.
NOTE:
Leave 5inches / 13 cm of space behind and above the air fryer. Leave enough room in front of the air
fryer to remove the basket.
image.1
Air Frying
Preset Function
Using a preset function is the easiest way to air fry. The preset functions are programmed with an ideal time and temperature for
cooking certain foods.
01. Press the Preset Button to select the desired preset. The air fryer will automatically change to the preset default settings.
02. You can change a preset time (1-60 minutes) and temperature (180℉-400℉).
03. Press and hold the + or - button to rapidly increase or decrease the time or temperature.
04. To go back to a preset default setting, press the Preset Button again.
NOTE:
Results will vary depending on food items. Check out your Recipe Book for a guide to using preset
functions for perfect results.
06
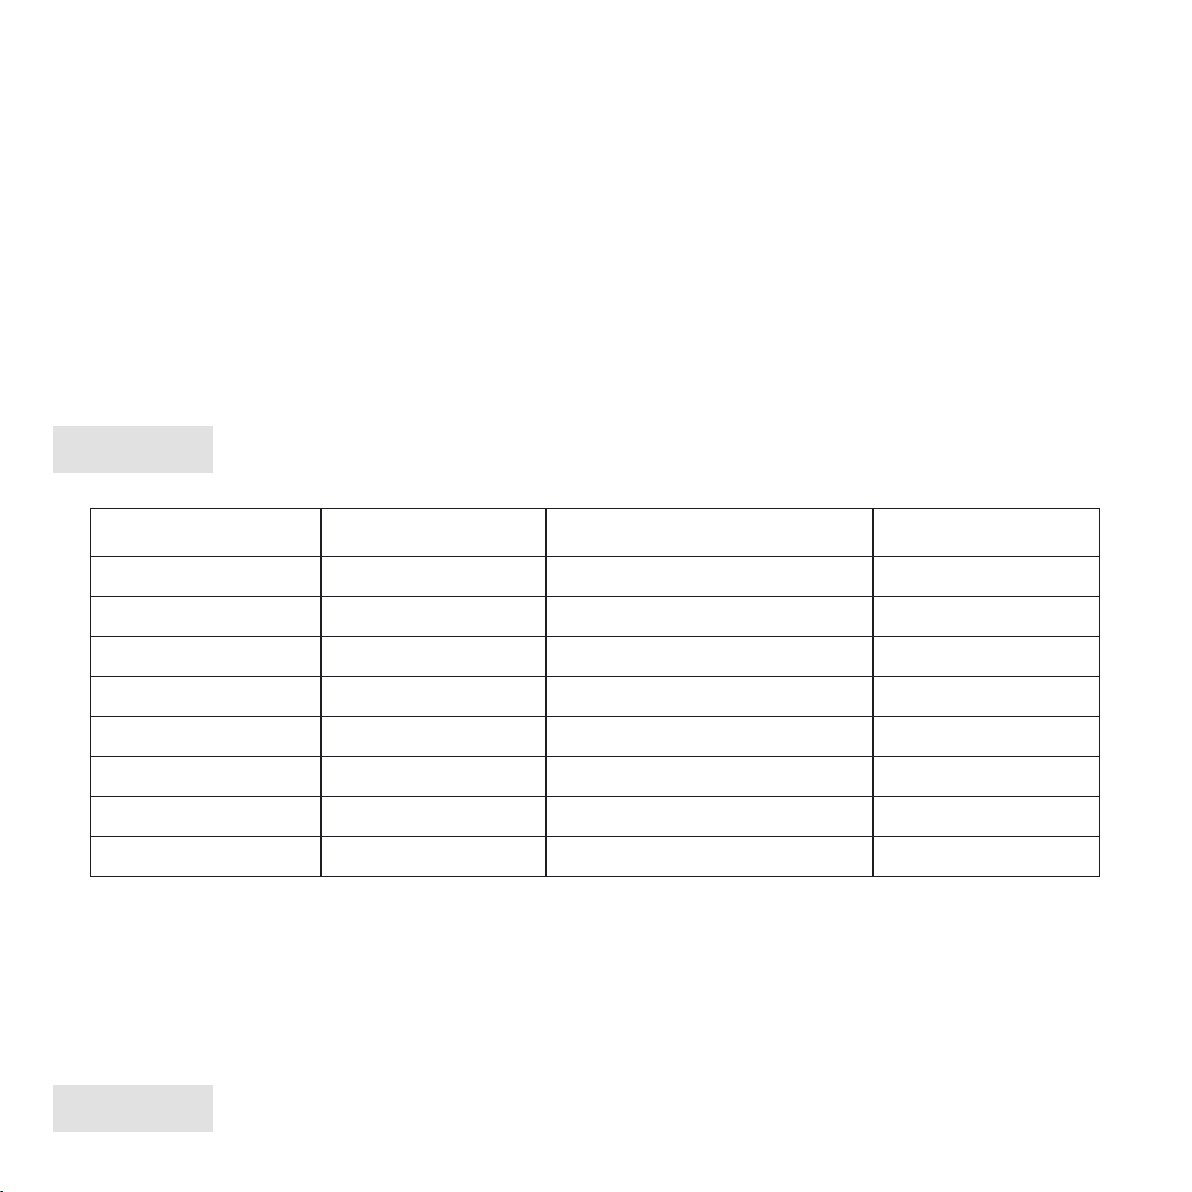
Default Time min Default Temp ℉ Need To Shake?Preset
-
shake
shake
-
-
32015
-
-
shake
320
320
360
360
400
400
400
10
8
8
10
10
25
20
Cake
Vegetables
Shrimp
Bacon
Fish
Steak
Chicken
French Fries
NOTE:
Preset functions are programmed with an ideal time and temperature for cooking certain foods.
You can also set a custom time and temperature without choosing a preset function.
Air Frying
01. Preheat the air fryer.
02. Place the Crisper Plate in the Basket, place food items in the Basket.
03. Select a preset function.

04. You can also change the temperature and time. You can do this anytime during cooking.
A. Press the + or – buttons to change the temperature (180℉-400℉) or time (1–60 minutes).
B. To rapidly increase or decrease time or temperature, press and hold the + or – buttons.
05. Press the Start/Stop Button to begin air frying.
06. The air fryer will beep 3 times when finished. The display screen will turn o, and the air fryer will go into standby mode.
07. Press the Release Button to take the Basket out of the air fryer.
08. Allow the Basket to cool before cleaning.
Useful Tips
Overfilling
If the basket is overfilled, food will cook unevenly.
Using Oil
•Adding a small amount of oil to your food will make it crispier, especially french fries. Use no more than 2US tbsp / 30mL of oil.
•Oil sprays are excellent for applying small amounts of oil evenly to all food items.
Food Tips
•You can air fry any frozen foods or items that can be baked in an oven.
•To make cakes, hand pies, or any food with filling or batter, place food in a heat-safe container before placing in the basket.
•Air frying high-fat foods will cause fat to drip to the bottom of the basket. To avoid excess smoke while cooking, pour out fat
drippings after cooking.
•Liquid-marinated foods create splatter and excess smoke. Pat these foods dry before air frying.
CAUTION:
Be careful of the hot steam!
07

08
More Functions
Pausing
01. Press the Start/Stop Button to pause cooking. The air fryer will stop heating, and the Start/Stop Button will turn green until
you press the Start/Stop Button again to resume cooking.
02. After 30 minutes of inactivity, the air fryer will turn o.
03. This function allows you to pause the cooking program without removing the Basket from the air fryer.
Automatic Shuto
•If the air fryer has no active cooking programs, the air fryer will clear all settings and turn o after 3minutes of inactivity.
Overheat Protection
•If the air fryer overheats, it will automatically shut down as a safety feature.
•Let the air fryer cool down completely before using it again.

•Always clean the air fryer basket and crisper plate after each use.
•Lining the basket with foil (not the crisper plate) may make cleanup easier.
01. Turn o and unplug the air fryer. Allow it to cool completely before cleaning. Pull out the basket for faster cooling.
02. Wipe the outside of the air fryer with a moist cloth, if necessary.
03. The basket and crisper plate are dishwasher safe. You can also wash the basket and crisper plate with hot, soapy water and a
non-abrasive sponge. Soak if necessary.
04. Clean the inside of the air fryer with a slightly moist, non-abrasive sponge or cloth. If needed, clean the heating coil to remove
food debris.
05. Dry before using.
Cleaning & Maintenance
NOTE:
The basket and crisper plate have a nonstick coating. Avoid using metal utensils and abrasive
cleaning materials.
NOTE:
Do not immerse in water.
NOTE:
Make sure the heating coil is completely dry before turning on the air fryer.
09

NOTE:
If your problem is not listed, please contact Customer Support.
Possible SolutionProblem
Place smaller batches of food items into the basket. If the basket is overstued, then foods will be
undercooked.
Push the basket securely into the air fryer.
Make sure the basket is not overfilled with food.
The air fryer may produce some white smoke or steam when you use it for the first time or
during cooking. This is normal.
Make sure the basket and the inside of the air fryer are cleaned properly and not greasy.
Cooking greasy foods will cause oil to collect beneath the crisper plate. This oil will produce
white smoke, and the basket may be hotter than usual. This is normal, and should not aect
cooking. Handle the basket with care.
Immediately unplug your air fryer. Dark smoke means that food is burning or there is a circuit
problem. Wait for smoke to clear before pulling the basket out. If the cause was not burnt food,
contact Customer Support.
Basket will not slide into the air fryer
securely.
White smoke or steam is coming out
of the air fryer.
Dark smoke is coming out of the air
fryer.
Spraying or brushing a small amount of oil on foods can increase crispiness.
Foods are not crispy after air frying.
Foods that are stacked on top of each other or close to each other need to be shaken or flipped
during cooking.
Make sure the air fryer is plugged in.
Push the basket securely into the air fryer.
The air fryer will not turn on.
Foods are not completely cooked.
Foods are cooked unevenly.
There is an open circuit in the temperature monitor. Unplug the air fryer and then plug it back
in. If this does not solve the problem, please contact Customer Support.
The air fryer's overheat protection has activated. Turn o and unplug the air fryer and allow it to
cool completely. If the display continues to show "E3", contact Customer Support.
The air fryer stops working, and
display shows Error Code "E3".
There is a short circuit in the temperature monitor. Unplug the air fryer and then plug it back in.
If this does not solve the problem, please contact Customer Support.
Any air fryer may have a plastic smell from the manufacturing process. This is normal. Follow
the instructions for a Test Run to get rid of the plastic smell. If a plastic smell is still present,
please contact Customer Support.
The air fryer has a plastic smell.
The air fryer stops working, and
display shows Error Code "E1".
The air fryer stops working, and
display shows Error Code "E2".
Troubleshooting
10

Warranty Information
The manufacturer provides warranty in accordance with the legislation of the customer's own country of residence, with a minimum
of 12 months, starting from the date on which the appliance is sold to the end user.
The warranty only covers defects in material or workmanship.
The warranty will not apply in cases of:
- Normal wear and tear.
- Incorrect use, e.g. overloading of the appliance, use of non-approved accessories.
- Use of force, damage caused by external influences.
- Damage caused by non-observance of the user manual, e.g. connection to an unsuitable mains supply or non-compliance with the
installation instructions.
- Partially or completely dismantled appliances.
Customer Support
If you have any questions or concerns about your new product, please contact our helpful Customer Support Team.
Contact our team by email:
Support@sincreative.com
Or scan the QR code for an additional recipe book and more support.
•Please have your invoice and order ID ready before contacting Customer Support.
11

NOTES

NOTES

1
Sincreative Brands Inc
20947 Currier Rd, Unit C,
Walnut, CA 91789,
United States of America
support@sincreative.com
www.sincreative.com
Table of contents
Other Sincreative Fryer manuals

Popular Fryer manuals by other brands


BOMANN
BOMANN FFR 1290 CB instruction manual

Keating Of Chicago
Keating Of Chicago 10x11CM BB E Specification sheet

CARTER-HOFFMANN
CARTER-HOFFMANN CNH14 Operator's manual

Thinkkitchen
Thinkkitchen 10574286 instructions

T-Fal
T-Fal Ultimate EZ Clean Instructions for use

Moulinex
Moulinex FRIDELYS M11 owner's manual


