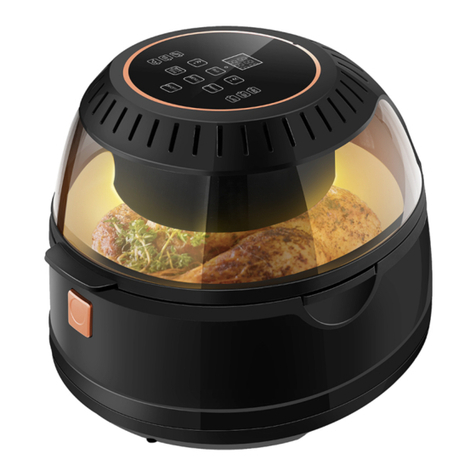
smith+nobel SN-KAF-8441 User manual


TABLE OF CONTENTS
IMPORTANT SAFEGUARDS
Parts & Accessories
Using the Control Panel
Instructions for Use
General Cooking Guidelines
Troubleshooting
Frequently Asked Questions
Cleaning & Storage

IMPORTANT SAFEGUARDS
WARNING
PREVENT INJURIES! –CAREFULLY READ
ALL INSTRUCTIONS BEFORE USE!
When using electrical appliances, always follow
these basic safety precautions.
1.
READ AND FOLLOW allinstructionscarefully.
2.
NEVER immersetheMainUnitHousing,whichcontains
electricalcomponents andheatingelements,in water.Do
notrinse underthetap.
3.
THIS APPLIANCE IS NOT INTENDED FOR use by
persons with reduced physical, sensory, or mental
capabilities or lack of experience and knowledge unless
theyareunderthesupervisionof aresponsiblepersonor
havebeen givenproperinstructionin usingtheappliance.
Thisapplianceis notintendedforuseby children.
4.
TOAVOIDELECTRICALSHOCK,donotputliquid
of any kind into the Main Unit Housing containing
the electricalcomponents.
5.
THIS APPLIANCE HAS A POLARIZED PLUG
If it does not fit, contact a qualified electrician. Do not
attempt to modify the plug in anyway.
6.
MAKE SURE theapplianceispluggedintoawallsocket.
Always make sure that the plug is inserted into the wall
socketproperly.
7.
DO NOT use outdoors.
8.
DO NOT place the appliance onthe stove top.
Placeonaflat,horizontalsurfacewithadequatespace
for air flow. Do not place other appliances within
15cm of theappliance.
9.
TOPREVENTfoodcontactwiththeheatingelements,
do notoverfill.
10.
DO NOT cover theAirIntakeVentor HotAir Outlet Vent
while the appliance is operating. Doing so will prevent
evencookingandmaydamagetheapplianceorcauseit
tooverheat.
11.
NEVER pouroilintotheBasket.Fireandpersonalinjury
couldresult.
12.
WHILE COOKING,theinternaltemperatureofthe
appliancereachesseveralhundreddegrees.Toavoid
personal injury, never place hands inside the
appliance unless it is thoroughly cooled down.
13.
DO NOT usethis applianceif theplug,thepower cord,
orthe applianceitself is damagedin any way.
14.
IFTHEPOWERCORDISDAMAGED,youmusthaveit
replacedbythe manufacturer,itsserviceagent,or
a similarly qualified person in order to avoid hazard.
15.
KEEP theapplianceand itspowercordout ofthe
reachof childrenwhen it is in operationor in the cooling
downprocess.
16.
KEEP the power cord away from hot surfaces. Do not
plug in the power cord or operate the appliancecontrols
with wethands.
17.
NEVER connectthisappliancetoanexternaltimerswitch
orseparateremote-controlsystem.
18.
NEVER usethisappliancewithanextensioncordof
any kind.A short power-supply cord (or detachable
power-supply cord) is provided to reduce the risk of
becoming entangled in or tripping over a longer cord.
19.
DO NOT let cord hang over the edge of table or
countersurfaces.
20.
DO NOT operate the appliance on or near combustible
materials,suchastablecloths,papertowels,orcurtains.
21.
WHEN COOKING, do not place the appliance against
awalloragainstotherappliances.Leaveatleast15cm.
free space on the back and sides and above the
appliance. Donot placeanythingon top of the
appliance.
22.
DO NOT USE theapplianceforany purposeotherthan
describedinthismanual.
23.
THEUSEOFACCESSORYATTACHMENTS
not recommended by the appliance manufacturer may
cause injuries.
24.
NEVER operatetheapplianceunattended.
25.
WHEN IN OPERATION, hot air and steam is released
through the Hot Air Outlet Vent. Keep yourhands
andfaceata safedistancefromtheHotAirOutletVent.
Also avoid the hot steam and air while removingthe
BasketandFryTrayfromtheappliance.
26.
THEAPPLIANCE'SOUTERSURFACESmaybecome
hotduringuse. TheBasketandFryTraywillbehot.
Wear oven mitts when handling hot components or
touching hotsurfaces.
27.
Before using your new appliance on any countertop
surface, CHECK with your countertop manufacturer or
installer for recommendations about using applianceson
yoursurfaces.Somemanufacturersandinstallersmay
recommend protecting your surface by placing a hot
pad or trivet under the appliance for heat protection.
Your manufacturer or installer may recommend that hot
pans, pots, or electrical appliances should not be used
directly ontop of thecountertop.If you are unsure, place
a trivet or hot pad under the appliance before using it.
28.
The appliances are not intended to be operated
by means of an external timer or separate
remote-control system.
29.
DO NOT placeyourapplianceona hotcooktopbecause
it could cause a fire or damage the appliance, your
cooktop,andyourhome.
30.
SHOULDTHEAPPLIANCEEMITBLACKSMOKE,
unplug immediately and wait for smoking to stop.Allow
the appliance to cool and wipe out excess oil and
greasefromtheappliance.
31.
Extremecautionmustbeusedwhenmovingan
appliance containing hot oil or other hotliquids.
32.
USEEXTREMECAUTIONwhenremovingtrayor
disposingof hot grease.
33.
DO NOT clean with metal scouring pads. Pieces can
breakoffthepad andtouchelectricalparts,creatingrisks
of electricshock.
34.
This appliances is intended to be used in household
and similar applications such as:
-staff kitchen areas in shops, offices and others
working environments;
-farm houses;
-by clients in hotels, motels and other residential type
environments; -bed and breakfast type environments.
SAVE THESEINSTRUCTIONS–FORHOUSEHOLDUSEONLY
CAUTION
•
Always operate the appliance on a horizontal
surfacethatislevel,stable,andnoncombustible.
•
This appliance is intended for normal household
use only.It is notintended for use in commercial or
retail environments.
•
If the appliance is used improperly or for
professional or semi-professional purposes or if it
is notused according tothe instructions inthe user
manual, the guarantee becomes invalid and the
manufacturer will not be held liable for damages.
•
Always unplug the appliance after use.
•
When the cooking time has completed, cooking
will stop and the fan will continue running for
10 seconds. to cool down the appliance.
•
Let the appliance cool down for approximately
30minutes.beforehandling, cleaning,or
storing.
•
The appliance is equipped with an internal
microswitchthatautomaticallyshutsdownthefanand
heatingelementwhen theBasketisremoved.
Overheating Protection
Should the inner temperature control system fail, the
overheating protection system will be activated and the
appliance will not function. Should this happen, unplug
the appliance. Allow time for the appliance to cool
completely before restarting orstoring.
Automatic Shut-Off
The appliance has a built-in shut-off device that will
automatically shut off the appliance when the cooking
time has completed. Youcan manually switch off the
appliance by pressing the Power Button. The fan will
continue running for 10seconds. to cool down the
appliance.
Electric Power
The appliance should be operated on a dedicated
electrical outlet.If the electrical outlet isbeing used by
other appliances, your newAppliance may notoperate
properly.
Electromagnetic Fields
This appliance complies with all standardsregarding
electromagnetic fields. If handled properly and
accordingtothe instructions inthis usermanual,the
applianceissafetousebasedonscientificevidence
available today.

PARTS & ACCESSORIES
3
2
4
1
7
6
5
6 8
7

1. MAIN UNITHOUSING
2.
CONTROLPANEL
3.
AIR INLETVENT
4.
HOT AIR OUTLETVENT
5.
POWER CABLE
6.
BASKET
7.
HANDLE
8.
FRYTRAY
9.
RUBBER BUMPERS*
NOTE:
Unpackalllistedcontentsfromthe
packaging.Contentsvarybymodel.Please
removeanyclear or blue protective film on
thecomponentsbeforeuse.
*Removing bumpers is not recommended.
CAUTION:
Appliance may be hot. Be careful not to touch
the appliance while in use. Keep the appliance away from other objects.
IMPORTANT:
Pleasemakesurethatyourappliancehasbeenshippedwiththecomponents
thatyouordered(someaccessoriesmaybesoldseparately).Checkeverythingcarefullybefore
use.Ifanypartismissingordamaged,contactcustomer service.
Technical Specifications
Model
Number
Supply
Power
Rated
Power
Capacity
Temperature
SA-KAF8441
220-240V~
50-60Hz
1800W
8 Litre
80°C–200°C
8
9

USINGTHECONTROLPANEL
1. Power Button
OncetheBasketandFryTrayareproperly placed
inthe Main Unit Housing,the Control Panel willbe
illuminated. Pressing the Power Button once will
set the appliance to a default cooking temperature.
Pressing the Power Button a second time will start
the cooking process. Pressing the Power Button
during the cooking cyclewill turn the appliance off.
2. CookingPresets
Press thecooking presetbuttonsto choosefrom
uptoeightcooking presets.SeethePresetChart
below for the cooking times and temperatures
associated with eachpreset.
NOTE: The running lights on the ControlPanelwill
illuminate when the cooking cycle begins and
willstay illuminated for up to 20 seconds after the
cooking cycle iscomplete.
3. Temperature ControlButtons
The + and − symbols enable you to increase
ordecrease cookingtemperature 5° C at a time.
Keeping a button held down will rapidly change
the temperature. Temperature control range:
80°C–200°C).
4. Timer ControlButtons
The + and − symbols enable you to increase or
decrease cooking time 1 minute. at a time. Keeping
the Button held down will rapidly change the time.
Time control range: 1–60 minutes.
5. Timeand Temperature Display
This display will keep track of the temperature
and remaining cooking time.

Preset Chart
Once you are familiar with theappliance,youmaywant to experiment with your ownrecipes. Simply choose the time and
temperature that suitsyourpersonaltaste.
Function
Default cooking time
Default cooking
temperature
Adjustable
time range
Adjustable
temperature range
Chips
20 mins
200
℃
1-60 mins
80
℃
-200
℃
Drumstick
25 mins
180
℃
1-60 mins
80
℃
-200
℃
Shrimp
20 mins
160
℃
1-60 mins
80
℃
-200
℃
Cake
25 mins
160
℃
1-60 mins
80
℃
-200
℃
Beef steak
20 mins
160
℃
1-60 mins
80
℃
-200
℃
Fish
20 mins
180
℃
1-60 mins
80
℃
-200
℃
Rib
15 mins
180
℃
1-60 mins
80
℃
-200
℃
Keep Warm
120 mins
90
℃
1-120 mins
60
℃
-90
℃

INSTRUCTIONS FOR USE
Before First Use
1.
Removeallthepackagingmaterial.
2.
Removeanystickersorlabelsfrom theappliance.
3.
Beforeinitial use,wipe the inside andoutsideof
the appliance with a warm,moist cloth and mild
detergent.Hand washallcookingaccessories.
4.
Before cooking food,preheat the appliance for
a few minutes to allow the appliance to burn
offthemanufacturer’s protective coating ofoil.
Wipetheappliance withwarm,soapywateranda
washclothafterthisburn-incycle.
5.
Place the appliance ona stable,horizontal,and
level surface. Do not place the appliance on
a surface that is not heat resistant. Ensure that
the appliance is used in an area with good air
circulation and awayfromhotsurfacesandany
combustible materials. Do not place on the
stove top.
6.
PlacetheFryTray intheBasket.Slidethe
Basket into the appliance. If the Basket is
placed properly,itwillclickintoplace.
NOTE:
Thisappliance cooksusinghotair.Donotfill
the Basket with oil or frying fat. Do not put anything
ontopoftheappliance.Thisdisruptstheairflowand
affectsthecookingresults.
Using the Appliance
1.
Plug the appliance into a grounded wall socket.
2.
To preheat,push the Power Button.
3.
PresstheTemperatureIncreaseorDecrease
Buttons to set the cooking temperature.
4.
Press the Time Decrease Button to set the
preheat time to 3 minutes. When the preheat
cycle finishes, carefully pull the Basket out of
the appliance and place the ingredients inside.
NOTE:
Forbetterperformance,alwaysuse
the Fry Traywith the Basket.
5.
Donot touch the Basket directly because
the Basket becomes very hot during operation.
Only hold the Basket by its handle.
6.
Press the Power Button. Set the appropriate
time and temperature for the ingredientsyou
are cooking.
7.
When thetimer beeps five times,theset cooking
time has elapsed. Pull the Basket out of the
applianceandplaceitonaheat-resistantsurface.
8.
If the food is fully cooked, use tongs to
remove food.
CAUTION:
Do not turn the Basket upside down
because any excess oil that has collected on
the bottom of the basket will leak onto the
ingredients.
9.
If the food is not fully cooked, simply slide
the Basket back into the appliance and add a
few minutes to the cooking time.
10.
The appliance isinstantly ready for preparing
another batch.

Shaking
To ensure even cooking, some foods require
shaking during the cooking process. Remove
the Basketfrom the appliance. Gentlyshake the
contents asneeded andplace them back in the
appliance to continuecooking.
CAUTION:
TheBasketwillbehot.Wearanovenmitt
during thisprocedure.
1.
PlacetheBasketonaheat-resistantsurface.
2.
ShaketheingredientsintheBasket.
3.
ReturntheBaskettotheappliancetofinish
cooking.
Tips
•
Foodsthataresmallerinsizeusuallyrequire
a slightly shorter cooking time than larger foods.
•
Large quantities of food only require a longer
cookingtimethansmallerquantities.
•
Shaking smaller-sized foods halfway through
thecookingprocessensuresthatallthepieces
are friedevenly.
•
Addinga bitof vegetableoil to fresh potatoes
issuggested for a crispierresult.Whenaddingoil,
do so just before cooking and add only a small
amountonto thepotato.
•
Snacksnormallycookedinanovencanalso
becookedinthisappliance.
•
Use premade dough to prepare filled snacks
quicklyandeasily.Premadedoughalsorequires
a shorter cooking time than homemade dough.
•
Youcanusethisappliance toreheatfoods.
Simply set the temperature and time to
however warmyouwantyourfood.

TROUBLE SHOOTING
Symptom
Possible Cause
Solution
The appliance does not
work
The appliance is not plugged in.
Plug the Power Cable into a wall socket.
You have not turned the appliance on
by setting the preparation time and temperature.
Press the Power Button. Select a time
and temperature. Press the Power
Button again and cooking will begin.
You have probably turned off the appliance. If
you press the Power Button while the appliance
is cooking, you will trigger the Auto Shut-Off
mode.
Press the PowerButton. Select a time
and temperature. Pressthe Power
Button again and cooking will begin.
The Basket is overloaded.
Use smaller batches for more even frying.
Food is not cooked
The temperature is set too low.
Raise temperature and continue cooking.
Food is not fried evenly
Some foods need to be shaken
during the cooking process.
See "Shaking" in the
"Instructions for Use" section.
The Basket is overloaded.
Do not fill the Basket above the maximum
line.
Basket will not slide into
appliance properly
Gently push the Fry Tray
into the Basket until it
clicks.
The Fry Tray is not placed in the Basket correctly.
White smoke coming from
appliance
Too much oil is being used.
Wipe down to remove excess oil.
The Basket has grease residue
from the previous operation.
Clean the basket after each use.
Potatoes are not prepped properly.
Consult a recipe for potato type and prep.
Fries are not cut evenly.
Cut fries thinner or reshape fries.
French fries are not fried
evenly
Fries are too crowded.
Spread fries out or cook a smaller batch.
Potatoes are not rinsed properly during
preparation.
Pat dry to remove excess starch.
Dry potato sticks properly before misting oil.
Fries are not crispy
Raw fries have too much water.
Cut sticks smaller.
Add a bit more oil.

FREQUENTLY ASKED QUESTIONS
1.
Can I prepare foods other than fried dishes with
my appliance? Youcan prepare a variety of dishes,
including steaks, chops, burgers, and bakedgoods.
2.
Is the appliance good for making or reheating
soupsandsauces? Nevercookorreheatliquidsin
theappliance.
3.
Isitpossibletoshutofftheapplianceatanytime?
Press the PowerButton once or remove the Basket.
4.
What do I do if the appliance shuts off while
cooking? Asasafetyfeature,theappliancehasan
Auto Shut-Off device that prevents damage from
overheating.RemovetheBasketandsetitonaheat-
resistant surface. Allow the appliance to cool down.
RemovethePowerCablefromtheoutlet.Oncecool,
plugthePowerCablebackintothesocket.Restartby
pressingthePowerButton.
5.
Does theapplianceneedtimetoheatup?
If youarecookingfroma cold start,add3
minutes tothecookingtimetocompensate.
6.
Can I check the food during the cooking process?
Youcan remove the Basket at any time while cooking is
in progress. During this time, you can shakethe contents
intheBasketif needed toensureevencooking.
7.
Isthe appliance dishwashersafe? OnlytheFryTray
is dishwashersafe.Theapplianceitself,whichcontains
theheating coil and electronics, should never be
submerged in liquid of any kind or cleaned with
anythingmore than a warm,moistclothornonabrasive
sponge witha small amount of milddetergent.
8.
Whathappensiftheappliancestilldoesnot
workafterIhavetriedallthetroubleshooting
suggestions? Never attempt a home repair. Contact
customer service and follow the procedures set forth
by the guarantee. Failure to do so could render your
guarantee null and void.
Cleaning
Clean the appliance after each use. The Basket and the Fry
Tray are coated with a special nonstick surface. Neveruse
abrasive cleaning materials or utensils on thesesurfaces.
1.
Remove the Power Cable from the wall socket and
be certain the appliance is thoroughly cooled before
cleaning.
2.
Wipetheoutsideof the appliancewitha warm,moist
cloth and mild detergent.
3.
Clean the Basket and the Fry Traywithhot water,
a mild detergent, and a nonabrasive sponge.
NOTE:TheFryTrayisdishwashersafe.
TIP: ShouldtheFryTraycontaindifficult-to-removefood
particles,soakinhot,soapywaterfor10minutes.
NOTE: Therubberbumpers onthe FryTrayare part
oftheFryTrayandshouldgenerallynot beremoved.
However,if the rubber bumpers need to be cleaned,
theycanberemovedandreattached:Toremove
the rubber bumpers, locate the capped end of the
bumpers and pushthecappedendoffof theFryTray.
There will be some resistance, but keep pushing until
the rubber bumpers come off of the Fry Tray. Take
noteof the slotonwhichthebumpersweresitting.To
reattachthe rubber bumpers,alignthehole inthe rubber
bumpers with the slotsfrom which the rubber bumpers
were removed. Slide the rubber bumpers all the way
backontotheslotontheFryTray.
4.
Clean theinside of the appliancewithhotwater, a mild
detergent,and a nonabrasivesponge.
5.
Ifnecessary,removeunwantedfoodresiduefrom
theheatingelementwitha soft cleaningbrush.
Storage
1.
Unplug the appliance and let it cool down thoroughly.
2.
Makesureallcomponentsarecleananddry.
3.
Placethe applianceina clean,dryplace.

One Year Warranty Statement
Smith+Nobel offer a 1 year warranty from the date of purchase. Please keep your receipt
as proof of purchase for this product warranty. This warranty covers manufacturing
defects and abnormal deterioration when the product is used in normal domestic use and
in accordance with the care and use instructions provided. It does not cover normal wear
and tear, negligence or misuse of the product. Should you have to make a claim under this
warranty please cease using the product and return it to your nearest Harris Scarfe store at
your expense with your proof of purchase. The store will arrange for the product to be
assessed. This assessment may be completed in-store or may involve sending the product
to an external assessor. If the product is deemed to have a manufacturing defect or
abnormal deterioration the item will be replaced or refunded.
This warranty is provided in addition to any other rights and remedies you may have
under the Australian Consumer Law.
Our goods come with guarantees that cannot be excluded under the Australian Consumer
Law. You are entitled to a replacement or refund for a major failure and compensation for
any other reasonably foreseeable loss or damage. You are also entitled to have the goods
repaired or replaced if the goods fail to be of acceptable quality and the failure does not
amount to a major failure.
DS Opco Pty Ltd
Level 4, 111 Cecil Street, South Melbourne, Victoria 3205, Australia
Ph: 1300 304 505 Email: [email protected]
Table of contents
Other smith+nobel Fryer manuals

smith+nobel
smith+nobel SNAFO20 User manual

smith+nobel
smith+nobel TH-AFO30BL User manual

smith+nobel
smith+nobel SNDF275R User manual

smith+nobel
smith+nobel SNAFS10 User manual

smith+nobel
smith+nobel SNAF999B User manual

smith+nobel
smith+nobel TH-AF05BL User manual

smith+nobel
smith+nobel IA4126 User manual

smith+nobel
smith+nobel TM-AF1056B User manual

smith+nobel
smith+nobel SNAFRB1 User manual

smith+nobel
smith+nobel IA4125 User manual