PRIXTON COOK ORGANICS COMPACT PRO 5L User manual
FREIDORA DE AIRE AIR FRYER
COOK ORGANICS
COMPACT PRO 5L

ES
ADVERTENCIAS DE SEGURIDAD - General
• Lea atentamente estas instrucciones y consérvelas para futuras consultas.
• Utilice este aparato únicamente conforme a estas instrucciones.
• Este aparato no está diseñado para ser utilizado por personas (incluidos niños) con
capacidades físicas sensoriales o mentales reducidas, o falta de experiencia y conocimien-
to, a menos que una persona responsable de su seguridad les haya dado la supervisión o
instrucciones apropiadas respecto al uso del aparato.
• Los niños necesitan supervisión; no deben jugar con el aparato.
• La limpieza y el mantenimiento del aparato solo deben realizarla los niños si son mayores
de 8 años, y siempre bajo supervisión.
• Mantenga siempre el aparato y el cable fuera del alcance de los niños menores de 8 años.
• Todas las reparaciones deben llevarse a cabo por un electricista cualificado. Nunca
intente reparar el aparato usted mismo.
No se debe colocar el aparato en una zona donde pueda caerle agua.
No limpie el dispositivo rociándolo con agua.
En caso de cualquier mal funcionamiento o daño en alguna de las partes, no intente
reparar el dispositivo usted mismo. Visite el servicio técnico autorizado más cercano o
acuda a un experto.
Este aparato no está diseñado para ser puesto en funcionamiento por medio de un
temporizador externo o un sistema de control remoto independiente.
La freidora está diseñada solo para uso doméstico o similar como, por ejemplo:
– zonas de cocina/comedor para empleados en tiendas, oficinas u otras actividades
laborales;
– casas de campo;
– uso de clientes en hoteles, hostales y otros tipos de alojamiento;
– regímenes de estancia de alojamiento y desayuno.
Este aparato pueden utilizarlo niños con edad de 8 o más años y personas con capaci-
dades físicas, sensoriales o mentales reducidas, o falta de experiencia y conocimiento si se
les ha dado la supervisión o instrucciones apropiadas respecto al uso del aparato y
entienden los peligros que conlleva. Los niños no deben jugar con el aparato. Los niños
solo deben realizar la limpieza y el mantenimiento del aparato si son mayores de 8 años y
bajo la supervisión de un adulto.
16- Mantenga el aparato y su cable fuera del alcance de niños menores de 8 años.
ADVERTENCIAS DE SEGURIDAD - Electricidad y calor
Algunas partes del aparato pueden calentarse. No lo toque para evitar quemaduras.
Antes de utilizar el aparato, compruebe que la tensión de red es la misma que la indicada
en la placa de características de la freidora.
• Asegúrese siempre de enchufar el aparato a un enchufe de pared con toma de tierra.
• Desconecte siempre el enchufe de la toma de corriente cuando el aparato no esté en uso.
• El aparato, el cable de alimentación y el enchufe no deben nunca entrar en contacto con
el agua.
• Para desconectar el aparato de la toma de corriente, tire del enchufe, no del cable.
• Revise regularmente el cable de alimentación del aparato para detectar cualquier daño.
No utilice el aparato si el cable de alimentación está dañado. En caso de presentarlo, debe
ser sustituido por un servicio técnico cualificado.
• Si utiliza un cable de extensión, asegúrese siempre de que todo el cable esté desenrolla-
do del carrete.
• Utilice exclusivamente cables de extensión certificados.
• Algunas partes del aparato pueden calentarse. No toque estas partes para evitar
quemaduras.
2

• El aparato necesita espacio para permitir que salga el calor y evitar así el riesgo de
incendio. Asegúrese de que la freidora tenga suficiente espacio a su alrededor y no entre
en contacto con ningún material inflamable. No se debe cubrir el aparato. Asegúrese de
que las salidas de aire no estén cubiertas o bloqueadas.
• Nunca utilice el aparato cerca de materiales inflamables.
• No coloque el aparato, el cable de alimentación o el enchufe en contacto con superficies
calientes como placas de cocina o llamas vivas.
ADVERTENCIAS DE SEGURIDAD - Uso
• Nunca utilice el aparato al aire libre.
• Nunca utilice el aparato en ambientes húmedos.
• Coloque siempre el aparato sobre una superficie estable, plana y resistente al calor donde
no pueda caerse.
• No deje que el cable de alimentación cuelgue sobre el borde del escurridor, la encimera o
la mesa.
• Siempre que toque el aparato, el cable de alimentación o el enchufe, hágalo con las
manos secas.
• No coja el aparato si cae al agua. Retire el enchufe de la toma de corriente inmediata-
mente y no vuelva a utilizar el aparato.
• Apague el aparato y desconecte el enchufe de la toma de corriente en caso de mal
funcionamiento durante el uso, y antes de limpiar la freidora, poner o quitar un accesorio,
o guardar la freidora después de su uso.
• Nunca deje el aparato desatendido cuando esté en funcionamiento.
• Nunca sumerja la carcasa, el cable de alimentación o el enchufe en agua u otros líquidos.
• Asegúrese de que el aparato tenga suficiente ventilación durante el uso.
• Nunca mueva el aparato cuando esté encendido o todavía esté caliente. Apague el
aparato y espere hasta que se haya enfriado antes de moverlo.
• No coloque demasiados alimentos la vez en el cesto.
• Limpie a fondo el exterior del aparato después de su uso.
• Este aparato no debe ponerse en funcionamiento por medio de un temporizador externo
o un mando a distancia.
• No ponga alimentos en la freidora durante el precalentamiento.
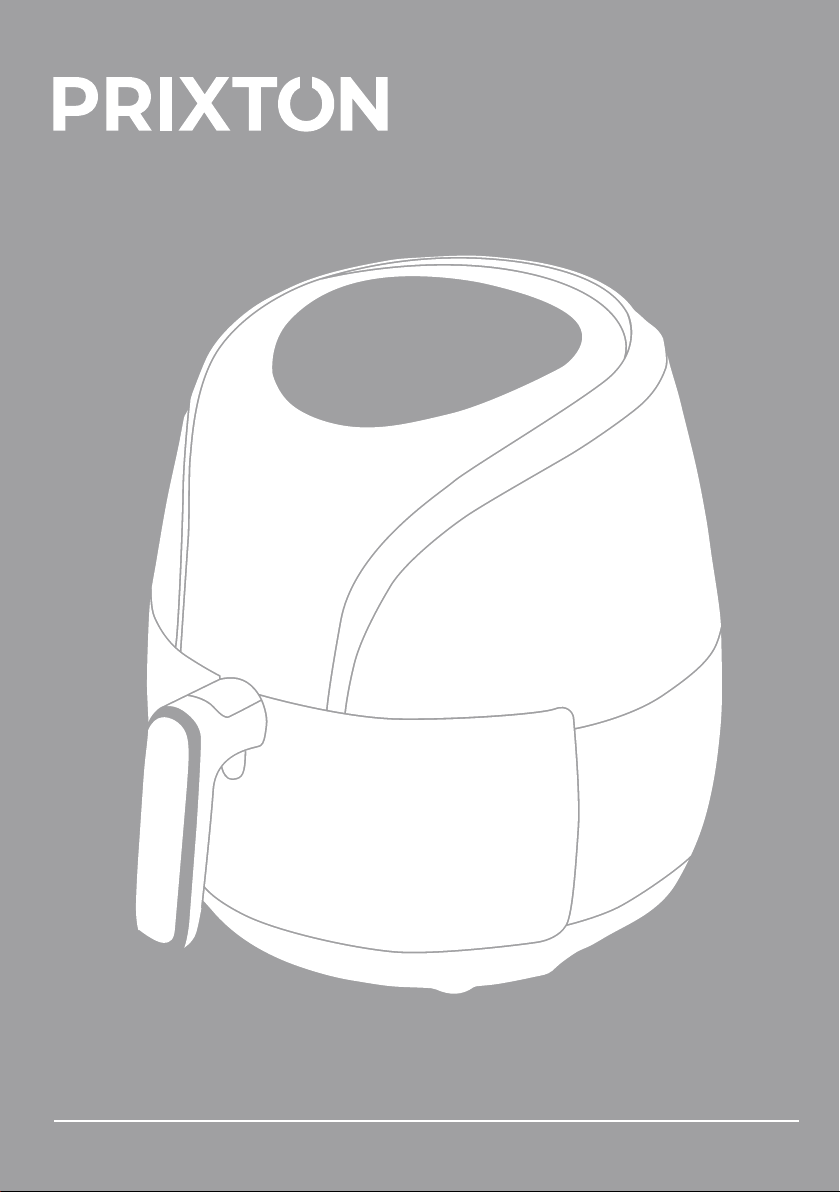
Descripcíon general (Fig.1)
1.Panel de control
2.Tapa superior
3.Estructura superior
4. Freidora
5. Cesta
6. Botón de liberación de la cesta
7. Mango de la cesta
8. Sartén externa
9. Salida de aire
10 Cable de alimentación
3

Uso del aparato
La freidora de aire permite la preparación de una amplia gama de ingredientes.
Freír con aire caliente
1. Conectar el enchufe del cable de alimentación a una toma de corriente a tierra.
2. Retirar cuidadosamente la sartén de la freidora de aire caliente (Fig.6).
3. Poner los ingredientes en la cesta. (Fig.5)
4. Deslizar la sartén de nuevo en la freidora de aire caliente. (Fig.4)
Alinearla cuidadosamente con las guías en el cuerpo de la freidora.
Nunca usar la sartén sin la cesta.
Precaución: No tocar la sartén durante y algún tiempo después del uso, ya que se pone
muy caliente. Solo sostenga la sartén por el mango.
5. Determinarr el tiempo de preparación requerido para el ingrediente (vea la sección
'Ajustes'
en este capítulo).
6. Algunos ingredientes requieren ser agitados a la mitad del tiempo de preparación (ver
sección "Ajustes" en este capítulo). Para agitar los ingredientes, sacar la sartén del aparato
por el mango y agitar. Luego deslizar de nuevo la sartén en la freidora
Precaución: No presionar el botón del mango cuando se agite. (Fig.3)
Consejo: Para reducir el peso, puede quitar la cesta de la sartén y agitar la cesta solo. Para
ello, tire de la bandeja del aparato, colóquela en una superficie resistente al calor y
presione el botón del mango y levante la cesta de la sartén
Consejo: Al programar el temporizador a la mitad del tiempo de preparación, se escucha la
alarma del temporizador cuando se tienen que agitar los ingredientes. Sin embargo, esto
significa que debe volver a ajustar el temporizador al tiempo de preparación restante
después de agitar.
7. Cuando escuche la alarma del temporizador, el tiempo de preparación establecido ha
terminado. Saque la bandeja del aparato y colóquela en la estructura de prueba.
Nota: También puede apagar el aparato manualmente. Para ello, gire el mando de control
de tiempo a 0.
8. Comprueba si los ingredientes están listos.
Si los ingredientes aún no están listos, simplemente deslice la sartén de nuevo en el
aparato y ajuste el temporizador añadiendo unos minutos adicionales.
9. Para retirar los ingredientes (p. ej., patatas fritas), saque la sartén de la freidora de aire
caliente y colóquela en la estructura de prueba, presione el botón de liberación de la cesta
y levante la cesta de la sartén.
No voltee la cesta al revés con la sartén todavía pegada a ella, ya que cualquier exceso de
aceite que se haya acumulado en la parte inferior de la sartén se filtrará sobre los ingredi-
entes.
La sartén y los ingredientes están calientes así como la freidora. Dependiendo del tipo de
ingredientes en la freidora, se puede escapar vapor de la sartén.
4

Instrucciones de funcionamiento:
Botón 1 – Botón de encendido
Una vez la cesta exterior y la cesta de fritura colocadas correctamente en la estructura de
la unidad principal, se iluminará el botón de encendido. Seleccionar el botón de encendido
durante 3 segundos hará que la temperatura predeterminada de la unidad sea de 200,
mientras que el tiempo de cocción se establecerá en 15 minutos. Al seleccionar el botón de
encendido por segunda vez, se iniciará el proceso de cocción. Presionar el botón de
encendido durante 3 segundos para cerrar todo el dispositivo durante la cocción. Todas las
luces se apagan, el ventilador deja de funcionar.
Nota: Durante la cocción, puede tocar el botón para controlar la pausa y el inicio de la
cocción.
Botón 2 – Botón de preselección
Al seleccionar el botón de preselección “ ” puede descubrir 8 opciones de alimentos
populares. Una vez seleccionado, comienza la función de tiempo y temperatura de cocción
predeterminada.
Botones 3 y 4 – Botones de control de temperatura
Los símbolos + y - permiten agregar o disminuir la temperatura de cocción de 5°C a la vez.
Mantener el botón presionado cambiará rápidamente la temperatura. Rango de control de
temperatura: 80°C -200°C.
Botones 5 y 6 – Botones de control de temporizador
Los símbolos + y - permiten añadir o disminuir el tiempo de cocción, un minuto a la vez.
Mantener el botón pulsado cambiará rápidamente el tiempo.
10. Vacíe la cesta en un recipiente o en un plato.
Consejo: Para sacar los ingredientes grandes o frágiles de la cesta, use un par de pinzas
11. Cuando un grupo de ingredientes está listo, la freidora de aire caliente está preparada al
instante para freír otro grupo.
Instrucciones del panel de control
5

Ajustes
Esta tabla le ayudará a seleccionar los ajustes básicos para los ingredientes. Nota: Tenga en
cuenta que estos ajustes son indicaciones. Como los ingredientes difieren en origen,
tamaño, forma y marca, no podemos garantizar el mejor ajuste para sus ingredientes.
Puesto que la tecnología Rapid Air recalienta instantáneamente el aire dentro del aparato,
tirar de la sartén brevemente fuera del aparato durante la fritura con aire caliente apenas
perturba el proceso.
Consejos.
-Los ingredientes más pequeños generalmente requieren un tiempo de preparación
ligeramente más corto que los ingredientes más grandes.
-Una mayor cantidad de ingredientes requiere un tiempo de preparación ligeramente más
largo, una menor cantidad de ingredientes requiere un tiempo de preparación ligera-
mente más corto.
-Agitar los ingredientes más pequeños a la mitad del tiempo de preparación optimiza el
resultado final y puede ayudar a prevenir que los ingredientes se fríen de manera desigual.
-Añadir un poco de aceite a las patatas frescas para un resultado crujiente. Freír los
ingredientes en la freidora de aire caliente unos minutos después de agregar el aceite.
-No preparar ingredientes extremadamente grasosos como salchichas en la freidora de
aire caliente.
-Los aperitivos que se pueden preparar en un horno también se pueden preparar en la
freidora de aire caliente.
-La cantidad óptima para preparar patatas fritas crujientes es de 500 gramos.
-Utilizar la masa pre-hecha para preparar aperitivos rellenos rápida y fácilmente. La masa
pre-hecha también requiere un tiempo de preparación más corto que la masa hecha en
casa.
-Colocar un molde para hornear o un plato de horno en la cesta de la freidora de aire
caliente si desea hornear un pastel o quiché o si desea freír ingredientes frágiles o ingredi-
entes rellenos
-También puede utilizar la freidora de aire caliente para recalentar los ingredientes. Para
recalentar los ingredientes, ajuste la temperatura a 150°C durante un máximo de 10
minutos.
Luz indicadora " 7 "
Indicador de calor
Luz indicadora “ 8 ”
Indicador de ventilación
Luz indicadora “ 9 ”
Indicador de temperatura
Luz indicadora “ 10 ”
Indicador de temporizador
Luz indicadora “ 11-18 ”
Indicador de receta
6

Cuidado & Limpieza
Limpie el aparato después de cada uso.
El cuenco, la cesta y la rejilla de la parrilla (opcional) tienen un revestimiento. No utilice
utensilios de cocina metálicos o materiales de limpieza abrasivos para limpiarlos, ya que
esto puede dañar el revestimiento, y hacer que pierda sus propiedades.
1-Retire el enchufe de red de la toma de corriente y deje que el aparato se enfríe.
Nota: Retire el cuenco para que la freidora se enfríe más rápidamente.
2-Limpie el exterior del aparato con un paño húmedo.
3-Limpiar el cuenco y la cesta con agua caliente, un lavavajillas o una esponja no abrasiva.
Puede utilizar un líquido desengrasante para eliminar la suciedad restante.
Nota: El cuenco y la cesta son aptos para lavavajillas.
Consejo: si hay suciedad adherida a la canasta o al fondo del cuenco, llénelo con agua
caliente con un poco de detergente. Coloque la canasta en el cuenco y deje que se
remojen durante aproximadamente 10 minutos.
4-Limpie el interior del aparato con agua caliente y una esponja no abrasiva.
5-Limpie el elemento calefactor con un cepillo de limpieza para eliminar cualquier residuo
de comida.
6-Asegúrese de que todas las piezas estén limpias y secas.
7-Retire el cable de alimentación y guárdelo con la freidora.
Nota: Agregar 3 minutos al tiempo de preparación al comenzar a freír mientras la freidora
de aire caliente todavía está fría.
Cantidad
minima/
máxima
(g)
Tiempo
(min.)
Temperatura
(℃)
Agitar
Información
adicional
Patatas y patatas fritas
Patatas fritas finas
congeladas
400-500
18-20
200
agitar
Patatas fritas gruesas
congeladas
400-500
20-25
200
agitar
Patatas gratinadas
600
20-25
200
agitar
Carnes y aves
Filete
100-600
10-15
180
Chuletas de cerdo
100-600
10-15
180
Hamburguesa
100-600
10-15
180
Rollito de salchicha
100-600
13-15
200
Muslos
100-600
25-30
180
Pechuga de pollo
100-600
15-20
180
Aperitivos
Rollos de primavera
100-500
8-10
200
agitar
Apto para el horno
Nuggets de pollo
congelado
100-600 6-10 200 agitar Apto para el horno
Palitos de pescado
congelado
100-500 6-10 200 Apto para el horno
Palitos de queso
congelado
100-500 8-10 180 Apto para el horno
Verduras rellenas
100-500
10
160
Horneado
Pastel
400
20-25
160
Usar molde
Quiche 500 20-22 180
Usar molde para
hornear
Muffins
400
15-18
200
Use molde
Aperitivos dulces 500 20 160
Usar molde para
hornear
7

Guía para resolver problemas
Problema
Causa potencial
Posible solución
La freidora no se
enciende
La freidora de aire no está
enchufada correctamente.
Enchufe la freidora de aire a la toma de corriente
y enciéndala.
Se ha disparado un
interruptor. Revise y reinicie el interruptor.
La comida no se ha
cocinado
completamente.
Se ha superado la
capacidad de alimentos.
Retire parte de la comida y cocine nuevamente
en lotes separados. Esto cocinará los alimentos
de manera más uniforme y completa.
La temperatura se fijó
demasiado baja.
Aumente manualmente la temperatura
establecida.
El tiempo de cocción no fue
suficiente.
Aumente manualmente el tiempo de cocción
establecido.
La comida se ha
cocinado de manera
desigual.
Es posible que sea
necesario agitar ciertos
tipos de alimentos a la
mitad del proceso de
cocción.
Consulte la sección de pautas de cocción y, si es
necesario, agite los alimentos a la mitad del
proceso de cocción.
El ensamblaje de la
bandeja no se desliza
correctamente dentro de
la carcasa
Demasiada comida en la
canasta.
Si hay demasiada comida en la canasta, retire
parte de la comida y vuelva a intentarlo.
Bandeja no alineada
correctamente
Alinee correctamente la bandeja con las ranuras
ubicadas en el interior de la carcasa de la
freidora de aire.
Se emite humo blanco
durante la cocción.
La comida que contiene
puede ser bastante
grasienta.
Los alimentos grasosos emitirán grasa / aceite
en la bandeja de la freidora y, cuando se
calientan, pueden emitir un humo blanco. Trate
de evitar cocinar alimentos grasosos en la
freidora de aire. El humo blanco no afecta el
proceso de cocción.
La bandeja aún puede
contener grasa/aceite de un
uso anterior.
Asegúrese de que la bandeja esté
completamente limpia después de cada uso.
Las patatas fritas no se
cocinan uniformemente
en la freidora
Las patatas no se lavaron
adecuadamente antes de
cocinarlas.
Lave bien las patatas fritas (para eliminar el
almidón) y déjelas secar antes de cocinarlas.
Las patatas fritas no
están crujientes
Puede haber falta de aceite
o demasiada agua.
Asegúrese de que las patatas se sequen
después de lavarlas con agua. Agregue un poco
más de aceite a las patatas fritas antes de
cocinarlas.
El tamaño de la patata
puede ser demasiado
grande.
Intente cortar la patata en trozos más pequeños
para obtener un resultado más crujiente.
8

Eliminación respetuosa con el medio ambiente
• Deseche el material de embalaje, como plásticos y cajas, en los contenedores de reciclaje
correspondientes.
• Cuando este producto llegue al final de su vida útil, no lo deseche colocándolo en un
cubo de basura; entréguelo en un punto de recogida para la reutilización de equipos
eléctricos y electrónicos. Por favor
Consulte los símbolos del producto y las instrucciones del usuario o el embalaje.
• Los materiales se pueden reutilizar como se especifica. Su colaboración con la
reutilización, el reciclaje u otras formas de aprovechamiento de equipos eléctricos usados
será una importante contribución a la protección del medio ambiente.
• Esta marca indica que este producto no debe desecharse junto con otros residuos
domésticos. Con objeto de evitar posibles daños al medio ambiente o a la salud humana
provocados por la eliminación incontrolada de residuos, recicle su aparato de manera
responsable para fomentar la reutilización sostenible de los recursos materiales. Para
devolver el dispositivo utilizado, utilice los sistemas de devolución y recogida o póngase en
contacto con el establecimiento en el que adquirió el producto. Ellos se encargarán de
reciclar este producto de forma segura para el medio ambiente.
Política de Garantía
En cumplimiento de lo establecido en el art. 16.7 del Real Decreto-ley 7/2021, de 27 de abril.
Ref. BOE-A-2021-6872, se pone a disposición de los interesados, accediendo a www.prix-
ton.com, cuanta información sea necesaria para ejercer los derechos de desistimiento
atendiendo a los supuestos que recoge dicha ley, dando por cumplidas las exigencias que
esta demanda de la parte vendedora en el contrato de venta.
Las características técnicas y eléctricas que aquí se brindan corresponden a unidades
típicas y podrían cambiarse sin previo aviso con el fin de proveer un mejor equipo.
Declaración UE de Conformidad Simplificada
Por la presente, La Trastienda Digital SL como propietaria de la marca comercial Prixton,
ubicada en Avenida Cervantes 49, módulo 25, Basauri 48970, Bizkaia, declara que el tipo de
equipo radioeléctrico que a continuación se expone:
Es conforme con la Directiva 2014/53/UE del Parlamento Europeo y del consejo de 16 de
abril de 2014.
El texto completo de la declaración UE de conformidad está disponible en la dirección de
Internet siguiente:
www.prixton.com
LA TRASTIENDA DIGITAL
Especificaciones
Voltaje:220-240V~50Hz
Potencia: 2000 vatios
Capacidad de la cesta:5.0 Litros
Temperatura regulable: 80ºC—200ºC
Temporizador (0-60 min)
MARCA
MODELO
DESCRIPCIÓN
CATEGORIA
Prixton Cook Organics
Compact Pro 5l Freidora de aire caliente Hogar
9

EN
SAFETY INSTRUCTIONS - General
• Please read these instructions carefully and retain them for future reference.
• Use this appliance solely in accordance with these instructions.
• This appliance is not intended for use by persons (including children) with reduced
physical,
sensory or mental capabilities, or lack of experience and knowledge, unless they have
been given
supervision or instruction concerning use of the appliance by a person responsible for
their safety.
• Children should be supervised to ensure that they do not play with the appliance.
• Cleaning and maintenance must not be done by children, except if they are older than 8
years
and supervised.
• Keep the appliance and the cable out of reach of children under 8 years.
• Have any repairs carried out solely by a qualified electrician. Never try to repair the
appliance yourself.
The device is not suitable to be installed in an area that can be used where water spray.
Do not clean the device by spraying water.
In the event of any malfunction or damage in one of the parts. Do not repair the device by
yourself, please visit the nearest Certified service center or specialized experts.
The appliances are not intended to be operated by means of an external timer or separate
remote-control system.
This appliance is intended to be used in household and similar applications such as:– staff
kitchen areas in shops, offices and other working environments;
– farm houses;
– by clients in hotels, motels and other residential type environments;
– bed and breakfast type environments.
This appliance can be used by children aged from 8 years and above and persons with
reduced physical, sensory or mental capabilities or lack of experience and knowledge if
they have
been given supervision or instruction concerning use of the appliance in a safe way and
understand the hazards involved. Children shall not play with the appliance. Cleaning and
user
maintenance shall not be made by children unless they are older than 8 and supervised.
16- Keep the appliance and its cord out of reach of children less than 8 years.
SAFETY INSTRUCTIONS - Electricity and heat
Certain parts of the machine may be hot. Do not touch it to avoid burns.
• Verify that the mains voltage is the same as that indicated on the type plate on the
appliance before use.
• Make sure that you always use an grounded wall socket to connect the appliance.
• Always remove the plug from the socket when the appliance is not in use.
• Make sure that the appliance, the power cord and plug do not make contact with water.
• Remove the plug from the wall socket by pulling the plug, not the power cord.
• Check the appliance’s power cord regularly to make sure it is not damaged.
Do not use the appliance if the power cord is damaged. Have a damaged power cord
replaced by a qualified repair service.
• When using an extension lead always make sure that the entire cable is unwound from
the reel.
• Use solely approved extension leads.
• Certain parts of the appliance may get hot. Do not touch these parts to prevent burning
yourself.
10

• The appliance needs space to allow heat to escape, thereby preventing the risk of fire.
Make
sure that the appliance has sufficient space around it, and does not come in contact with
flammable material. The appliance must not be covered. Make sure the air vents are not
covered or blocked.
• Never use the appliance in the vicinity of flammable materials.
• Make sure that the appliance, the power cord or the plug do not make contact with hot
surfaces, such as a hot hob or naked flame.
SAFETY INSTRUCTIONS - Use
• Never use the appliance outdoors.
• Never use the appliance in humid rooms.
• Place the appliance on a stable, flat, heat-resistant surface where it can’t fall.
• Do not let the power cord hang over the edge of the draining board, worktop or table.
• Make sure that your hands are dry when you touch the appliance, the power cord or the
plug.
• Do not pick up the appliance if it falls into water. Remove the plug from the wall socket
immediately. Do not use the appliance any more.
• Switch off the appliance and remove the plug from the wall socket in the event of a
malfunction during use, and before cleaning the appliance, fitting or removing an
accessory, or
storing the appliance after use.
• Never leave the appliance unattended when in use.
• Never immerse the housing, the power cord or the plug in water or other liquids.
• Make sure that the appliance has sufficient ventilation whilst in use.
• Never move the appliance when it is switched on or is still hot. Switch off the appliance
and
wait until it has cooled down before moving it.
• Do not put too much food in the frying basket at one time.
• Thoroughly clean the exterior of the appliance after use.
• This appliance may not be used through an external timer or by means of a remote
control.
• Do not fill the appliance with food during pre-heating.
General description (Fig.1)
1. Control panel
2. Top cap
3. Upper housing
4. Air fryer
5. Basket
6. Basket release button
7. Basket handle
8. Outer pot
9. Power cord
10. Air outlet
11

Using the appliance
The air fryer can prepare a large range of ingredients.
Hot air frying
1. Connect the mains plug into an earthed wall socket.
2. Carefully pull the pan out of the Hot-air fryer (Fig.6)
3. Put the ingredients in the basket. (Fig.5)
4. Slide the pan back into the Hot-air fryer (Fig 4)
Noting to carefully align with the guides in the body of the fryer.
Never use the pan without the basket in it.
Caution: Do not touch the pan during and some time after use, as it gets very hot. Only
hold the pan by the handle.
5.Determine the required preparation time for the ingredient ( see section ‘Settings’ in this
chapter).
6.Some ingredients require shaking halfway through the preparation time (see section
“Settings” in this chapter). To shake the ingredients, pull the pan out of the appliance by
the handle and shake it. Then slide the pan back into the I fryer
caution: Do not press the button the handle during shaking. (Fig.3)
Tip: To reduce the weight, you can remove the basket from the pan and shake the basket
only. To do so, pull the pan out of the appliance, place it on a heat-resistant surface and
press the button of handle. and lift the basket out of the pan
Tip: If you set the timer to half the preparation time, you hear the timer bell when you have
to shake the ingredients. However, this means that you have to set the timer again to the
remaining preparation time after shaking.
7. When you hear the timer bell, the set preparation time has elapsed. Pull the pan out of
the appliance and place it on a the trial framework.
Note: You can also switch off the appliance manually. To do this, turn the time control knob
to 0.
8. Check if the ingredients are ready.
If the ingredients are not ready yet, simply slide the pan back into the appliance and set
the timer to a few extra minutes.
9. To remove ingredients (e.g. fries), pull the pan out of the Hot-air fryer and place it on trial
framework, and press the basket release button and lift the basket out of the pan.
Do not turn the basket upside down with the pan still attached to it, as any excess oil that
has collected on the bottom of the pan will leak onto the ingredients.
the pan and the ingredients are hot and hot fryer. Depending on the type of the ingredi-
ents in the I fryer, steam may escape from the pan.
10. Empty the basket into a bowl or onto a plate.
Tip: To remove large or fragile ingredients, lift the ingredients out of the basket by a pair of
tongs
11. When a batch of ingredients is ready, the Hot-air fryer is instantly ready for preparing
another batch.
12

Control panel instructions
Operation Instructions:
Button 1 –Power Button
Once the Outer Basket and Fry Basket are properly placed in the main Unit housing, the
Power Button will be illuminated. Selecting the power button for 3 seconds will make the
unit's default temperature 200, while the cooking time will be set to 15 minutes. Selecting
the Power Button a second time will start the cooking process. Pressing the power button
for 3 seconds to close the entire device during cooking. All the lights go out, the fan stops
working.
Note: During cooking, you can touch the button to control the pause and start of cooking.
Button 2 –Preset Button
Selecting the “ ” Preset Button enables you to scroll through the 8 popular food
choices. Once selected, the predetermined time and cooking temperature function
begins.
Button 3&4 –Temperature Control Buttons
The + and – symbols enable you to add or decrease cooking temperature 5°C at a time.
Keeping the button held down will rapidly change the temperature. Temperature Control
range: 80°C-200°C.
Button 5&6 –Timer Control Buttons
The + and – symbols enable you to add or decrease cooking time, one minute at a time.
Keeping the button held down will rapidly change the time.
13

Settings
This table below will help you to select the basic settings for the ingredients.
Note: Keep in mind that these settings are indications. As ingredients differ in origin, size,
shape as well as brand, we cannot guarantee the best setting for your ingredients.
Because the Rapid Air technology instantly reheats the air inside the appliance instantly
Pull the pan briefly out of the appliance during hot air frying barely disturbs the process.
Tips
-Smaller ingredients usually require a slightly shorter preparation time than larger
ingredients.
-A larger amount of ingredients only requires a slightly longer preparation time, a smaller
amount of ingredients only requires a slightly shorter preparation time.
-Shaking smaller ingredients halfway through the preparation time optimizes the end
result and can help prevent unevenly fried ingredients.
-Add some oil to fresh potatoes for a crispy result. Fry your ingredients in the Hot-air fryer
within a few minutes after you added the oil.
-Do not prepare extremely greasy ingredients such as sausages in the Hot-air fryer .
-Snacks that can be prepared in a oven can also be prepared in the Hot-air fryer
-The optimal amount for preparing crispy fries is 500 grams.
-Use pre-made dough to prepare filled snacks quickly and easily. Pre-made dough also
requires a shorter preparation time than home-made dough.
-Place a baking tin or oven dish in the Hot-air fryer basket if you want to bake a cake or
quiche or if you want to fry fragile ingredients or filled ingredients
-You can also use the Hot-air fryer to reheat ingredients. To reheat ingredients, set the
temperature to 150°C for up to 10 minutes.
Indicator light “ 7 ”
Heating indicator
Indicator light “ 8 ”
Fan indicator
Indicator light “ 9 ”
Temperature indicator
Indicator light “ 10 ”
Timer indicator
Indicator light “ 11-18 ”
Recipe indicator
14

Care & Cleaning
Clean the appliance after every use.
The pot, basket and grill net(optional) have a coating. Do not use metal kitchen utensils or
abrasive cleaning materials to clean them, as this may damage the coating.
1- Remove the mains plug from the wall socket and let the appliance cool down.
Note: Remove the pot to let the fryer cool down more quickly.
2- Wipe the outside of the appliance with a moist cloth.
3- Clean the pot, basket with hot water, some washing-up liquid and a non-abrasive
sponge. You can use a degreasing liquid to remove any remaining dirt.
Note: The pot and basket are dishwasher-proof.
Tip: If dirt is stuck to the basket, or the bottom of the pot, fill the pot with hot water with
some washing-up liquid. Put the basket in the pot and let the pot and the basket soak for
approximately 10 minutes.
4- Clean the inside of the appliance with hot water and a non-abrasive sponge.
5- Clean the heating element with a cleaning brush to remove any food residues.
6- Make sure all parts are clean and dry.
7- Remove the power cord and store it with the fryer.
Note: Add 3 minutes to the preparation time when you start frying while the Hot-air fryer
is still cold.
Min-max
Amount
(g)
Time
(min.)
Temperat
ure
(
℃
)
Shake
Extra information
Potato & fries
Thin frozen fries
400-500
18-20
200
shake
Thick frozen fries
400-500
20-25
200
shake
Potato gratin
600
20-25
200
shake
Meat & Poultry
Steak
100-600
10-15
180
Pork chops
100-600
10-15
180
Hamburger
100-600
10-15
180
Sausage roll
100-600
13-15
200
Drumsticks
100-600
25-30
180
Chicken breast
100-600
15-20
180
Snacks
Spring rolls
100-500
8-10
200
shake
Use oven-ready
Frozen chicken nuggets
100-600
6-10
200
shake
Use oven-ready
Frozen fish fingers
100-500
6-10
200
Use oven-ready
Frozen bread crumbed
cheese snacks
100-500 8-10 180
Use oven-ready
Stuffed vegetables
100-500
10
160
Baking
Cake
400
20-25
160
Use baking tin
Quiche 500 20-22 180
Use baking tin/oven
dish
Muffins
400
15-18
200
Use baking tin
Sweet snacks 500 20 160
Use baking tin/oven
dish
15

Troubleshooting Guide
Problem
Potential Cause
Possible Solution
The Air Fryer will not
turn ON
The Air Fryer is not
plugged in correctly.
Plug the Air Fryer in to the mains power source and
switch ON.
A circuit breaker has been
tripped. Check and reset the circuit breaker.
The food has not
been cooked
thoroughly
Food capacity has been
exceeded.
Remove some of the food and cook again in separate
batches. This will cook food more evenly and
thoroughly.
The temperature was set
too low.
Manually increase set temperature.
The cooking time was not
long enough.
Manually increase set cooking time.
The food has been
cooked unevenly
Certain types of food may
need to be shaken mid -
way through the cooking
process.
Refer to the cooking guidelines section and if require
shake food mid-way through the cooking process.
The Pan Assembly
will not slide back into
the housing properly
Too much food in the
basket.
If there is too much food in the basket, please remov
e
some of the food and retry.
Pan not aligned correctly. Correctly align the pot with the grooves located on the
inside of the Air Fryer housing.
White smoke is being
emitted during
cooking
The food contained within
may be quite greasy or
fatty.
Greasy or fatty food will emit fat/oil into the pot of the
Air Fryer and when heated it may emit a white smoke.
Try to avoid cooking greasy/fatty foods in the Air
Fryer. The white smoke does not affect the cooking
process.
The pot may still contain
fat/oil from previous use.
Ensure that the pot is thoroughly cleaned after each
use.
Chips are not cooking
evenly in the Fryer
Chips were not rinsed
adequately before
cooking.
Rinse chips thoroughly (to remove starch) and allow
them to dry before cooking.
Chips are not crispy
There may be a lack of oil
or too much water.
Ensure chips are dried after rinsing with water.
Possibly add a little more oil to the chips before
cooking.
Chip size may be too
large.
Try cutting the potato into smaller pieces for a crispier
result.
You may be using
incorrect type of potato.
When making home-made chips/fries, the best type
of potato to use are the floury varieties (Kennebec,
King Edward, Golden Delight or Sebago).
16

The environment
• Dispose of packaging material, such as plastic and boxes, in the appropriate waste
containers.
• When this product reaches the end of its useful life do not dispose of it by putting it in a
dustbin; hand it in at a collection point for the reuse of electrical and electronic equip-
ment. Please refer to the symbols on the product, the user’s instructions or the packing.
• The materials can be re-used as indicated. Your help in the re-use, recycling or other
means of
making use of old electrical equipment will make an important contribution to the
protection of the environment.
• This marking indicates that this product should not be disposed with other household
wastes. To prevent possible harm to the environment or human health from uncontrolled
waste disposal, recycle it responsibly to promote the sustainable reuse of material resourc-
es. To return your used device, please use the return and collection systems or contact the
retailer where the product was purchased. They can take this product fro the environmen-
tal safe recycling.
Warranty Policy
This product is guaranteed for 2 years from the date of purchase. When you have a
problem that you can not solve, you must access the web www.prixton.com and click on
the contact option to send us your assistance form.
These technical and electrical specifications are those of typical units and may be changed
without prior notice in order to provide improved equipment.
Simplified EU Declaration of Conformity
We, La Trastienda Digital located in Avenida Cervantes 49, módulo 25, Basauri 48970,
Bizkaia hereby declare that the following goods, imported and selling at European market:
Are in compliance with the EC Council Directive of 2014/53/EU (EM DIRECTIVE) and
harmonized standards and with the board of the 16th of April 2014.
The complete text of the UE Declaration of conformity is available anytime at this website
address:
www.prixton.com
LA TRASTIENDA DIGITAL
Specification &Feature:
Voltage:220-240V~50Hz
Wattage: 2000 Watts
Capacity of basket:5.0Litre
Adjustable temperature:80ºC—200ºC
Timer (0-60 min)
BRAND
MODEL
DESCRIPTION
CATEGORY
Prixton Cook Organics
Compact Pro 5l Air fryer Home
17

FR
Utilisation de l’appareil
La friteuse à air chaud permet de préparer un large éventail d’ingrédients.
Friteuse à air chaud
1. Branchez la fiche secteur dans une prise murale raccordée à la terre.
2. Sortez délicatement la cuve de la friteuse. (Fig.6)
3. Déposez les ingrédients dans le panier. (Fig.5)
4. Insérez à nouveau la cuve dans la friteuse à air chaud (Fig.4)
Prenez soin de l’aligner aux rails du corps de la friteuse.
N’utilisez jamais la cuve sans le panier.
Attention : ne touchez pas la cuve pendant et après son utilisation, car celle-ci devient très
chaude. Tenez la cuve uniquement par la poignée.
5. Définissez le temps de préparation requis pour l’ingrédient à cuire (voir la section «
Réglages » de ce manuel).
6. Certains ingrédients doivent être secoués à la moitié du temps de préparation (voir la
section « Réglages » de ce manuel). Pour secouer les ingrédients, sortez la cuve de
l’appareil par la poignée et secouez-la. Remettez ensuite la cuve dans la friteuse.
Description générale (Fig. 1)
1. Panneau de contrôle
2. Couvercle supérieur
3. Compartiment supérieur
4. Friteuse à air chaud
5. Panier
6. Bouton de déverrouillage du panier
7. Poignée du panier
8. Cuve extérieure
9. Cordon d’alimentation
10. Sortie d'air
Attention : n’appuyez pas sur le bouton de la poignée lorsque vous secouez les aliments.
(Fig.3)
Conseil : pour réduire le poids, vous pouvez retirer le panier de la cuve et secouer unique-
ment le panier. Pour ce faire, sortez la cuve de l’appareil, placez-la sur une surface résistan-
te à la chaleur et appuyez sur le bouton de la poignée. Soulevez ensuite le panier pour
l’extraire de la cuve.
Conseil : si vous réglez le minuteur sur la moitié du temps de préparation, la sonnerie du
minuteur retentira lorsque vous devrez secouer les ingrédients. Toutefois, cela signifie que
vous devrez régler à nouveau le minuteur sur le temps de préparation restant après avoir
secoué les aliments.
18

7. La sonnerie du minuteur indique que le temps de préparation défini est écoulé. Sortez la
cuve de l’appareil et posez-la sur un plan de travail.
Remarque : vous pouvez également éteindre l’appareil manuellement. Pour ce faire,
tournez le bouton de réglage du temps sur « 0 ».
8. Vérifiez si les ingrédients sont prêts.
Si les ingrédients ne sont pas encore prêts, remettez simplement la cuve dans l’appareil et
ajoutez quelques minutes supplémentaires au minuteur.
9. Pour retirer les ingrédients (par exemple, des frites), sortez la cuve de la friteuse à air
chaud et placez-la sur un plan de travail, puis appuyez sur le bouton de dégagement du
panier et soulevez le panier de la cuve.
Ne retournez pas le panier avec la cuve encore attachée à celui-ci, auquel cas l’excès
d'huile accumulé au fond de la cuve se répandrait sur les ingrédients.
La cuve et les ingrédients sont chauds. Selon le type d’ingrédients contenus dans la
friteuse, de la vapeur peut s’échapper de la cuve.
10. Videz le panier dans un bol ou sur une assiette.
Conseil : pour retirer les ingrédients volumineux ou fragiles, soulevez les ingrédients du
panier à l’aide d'une pince.
11. Dès qu’une portion d'ingrédients est prête, la friteuse à air chaud est instantanément
fonctionnelle pour préparer une autre portion.
Instructions du panneau de contrôle
Consignes d’utilisation :
Bouton 1 –Bouton Marche/Arrêt
Une fois que le panier extérieur et le panier à friture sont correctement placés dans le
compartiment principal de l’appareil, le bouton Marche/Arrêt s’allume. En appuyant sur le
bouton Marche/Arrêt pendant 3 secondes, vous obtiendrez une température et un temps
de cuisson par défaut programmés sur 200°C/15 minutes. En appuyant une deuxième fois
sur le bouton Marche/Arrêt, le cycle de cuisson démarre. En appuyant sur le bouton
Marche/Arrêt pendant 3 secondes, l’appareil se fermera entièrement pendant la cuisson.
Tous les voyants s’éteignent, le ventilateur s'arrête.
Remarque : pendant la cuisson, vous pouvez utiliser le bouton pour contrôler la mise en
pause et le démarrage de la cuisson.
19

Réglages
Le tableau ci-dessous vous aidera à sélectionner les réglages de base pour les ingrédients.
Remarque : veuillez noter que ces réglages sont donnés à titre indicatif. Les ingrédients
étant différents en termes d’origine, de taille, de forme ou de marque, nous ne sommes
pas en mesure de garantir le réglage le plus adapté à vos ingrédients.
Parce que la technologie Rapid Air réchauffe instantanément l’air à l’intérieur de l’appareil,
sortir brièvement la cuve de l’appareil pendant le cycle de friture à air chaud perturbe très
peu le processus.
Conseils
-Les quantités plus petites nécessitent généralement un temps de préparation légère-
ment plus court que les plus grosses quantités.
-Une plus grande quantité d'ingrédients ne nécessite qu'un temps de préparation
légèrement plus long, une plus petite quantité d'ingrédients ne nécessite qu'un temps de
préparation légèrement plus court.
-Secouer les petits ingrédients à la moitié du temps de préparation optimise le résultat
final et peut contribuer à éviter que les ingrédients soient frits de manière non uniforme.
-Ajoutez un peu d'huile aux pommes de terre fraîches pour obtenir un résultat croustillant.
Faites frire vos ingrédients dans la friteuse à air chaud quelques minutes après avoir ajouté
l’huile.
-Ne cuisez pas d’ingrédients trop gras, comme des saucisses, dans la friteuse à air chaud.
-Les snacks qui peuvent se préparer au four peuvent également être cuits dans la friteuse
à air chaud.
-Pour obtenir des frites aussi croustillantes que possible, il est préférable de les faire cuire
par portions de 500 g.
Bouton 2 –Bouton de présélection
En sélectionnant le bouton de présélection « », vous pouvez faire défiler les 8 choix
d’aliments les plus courants. Une fois sélectionné, la fonction de temps et de température
de cuisson prédéterminés s’enclenche.
Boutons 3 et 4 – Boutons de contrôle de la température
Les symboles « + » et « - » vous permettent d’ajouter ou de réduire la température de
cuisson de 5 C en une seule fois. Maintenir le bouton enfoncé permet de modifier rapide-
ment la température. Plage de contrôle de la température : 80 ºC-200 ºC.
Boutons 5 et 6 – Boutons de contrôle du temps
Les symboles « + » et « - » vous permettent d’ajouter ou de réduire le temps de cuisson, une
minute après l’autre. Maintenir le bouton enfoncé permet de modifier rapidement le
temps.
Voyant lumineux « 7 »
Indicateur de chauffe
Voyant lumineux « 8 »
Indicateur du ventilateur
Voyant lumineux « 9 »
Indicateur de température
Voyant lumineux « 10 »
Indicateur de temps
Voyant lumineux « 11-18 »
Indicateur de recettes
20
Table of contents
Languages:
Other PRIXTON Fryer manuals


