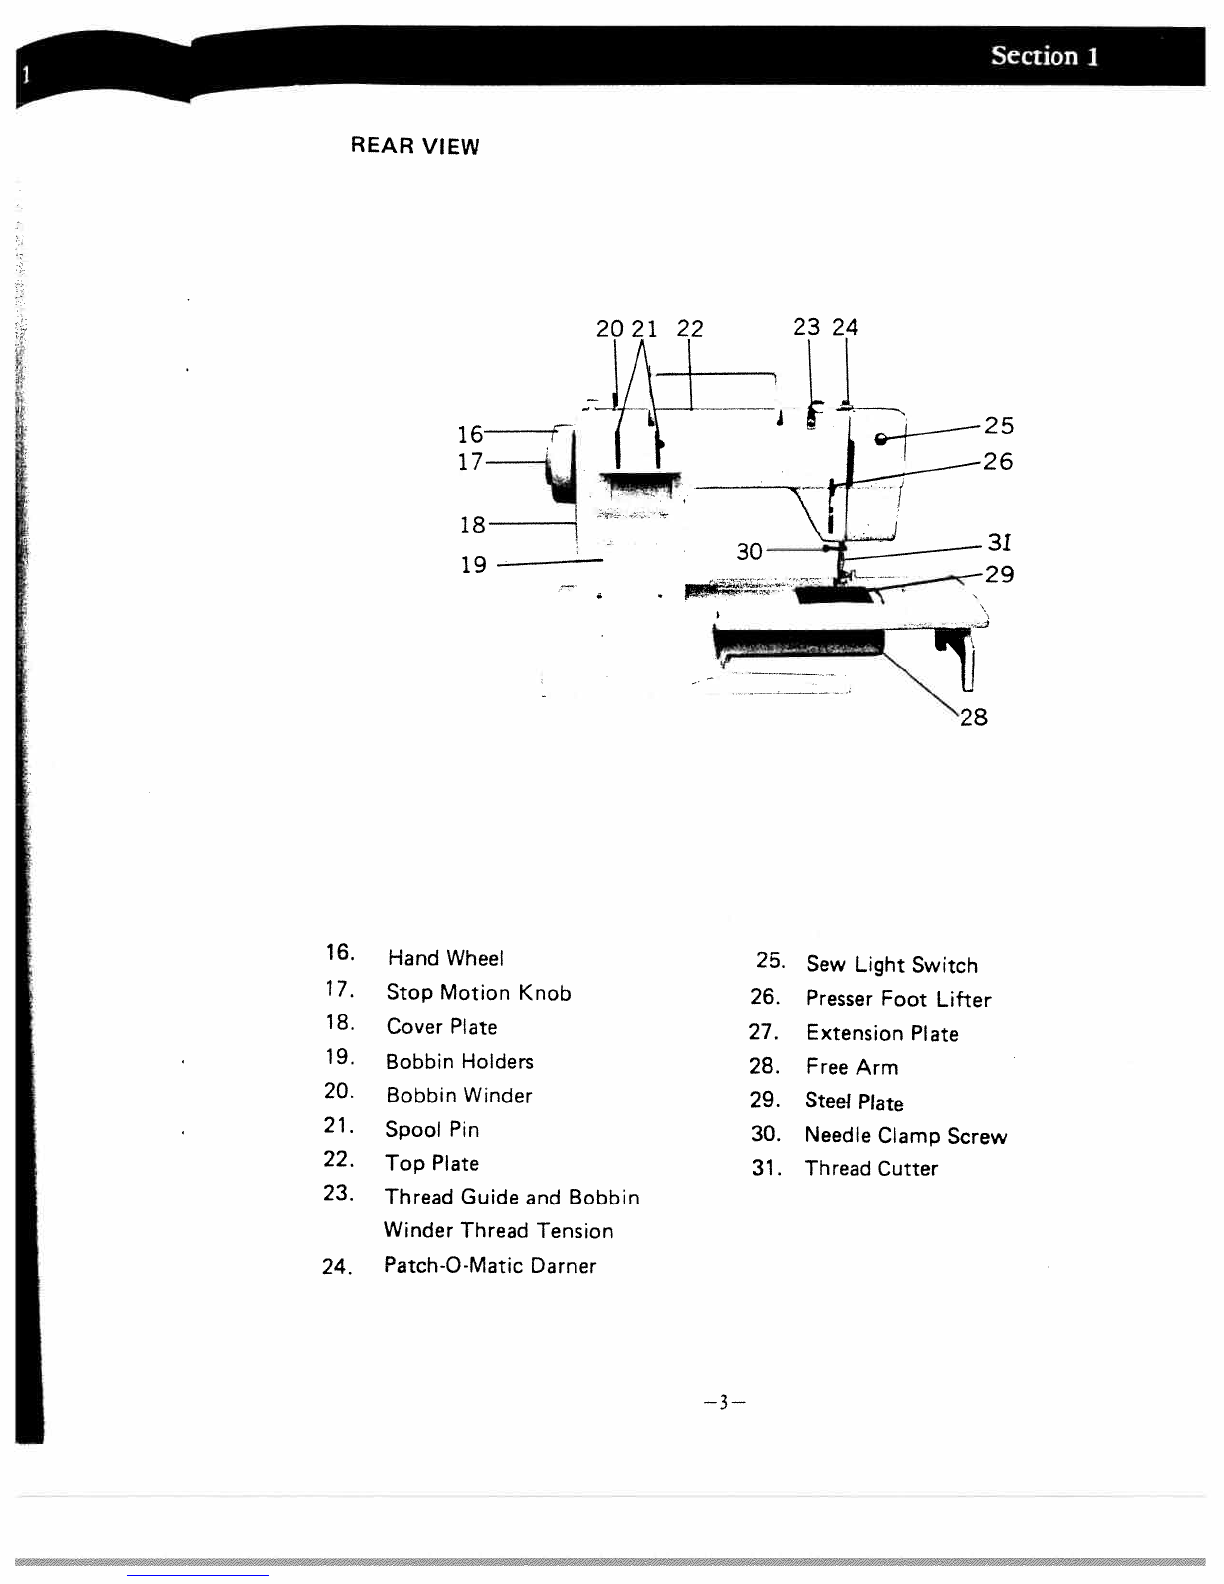
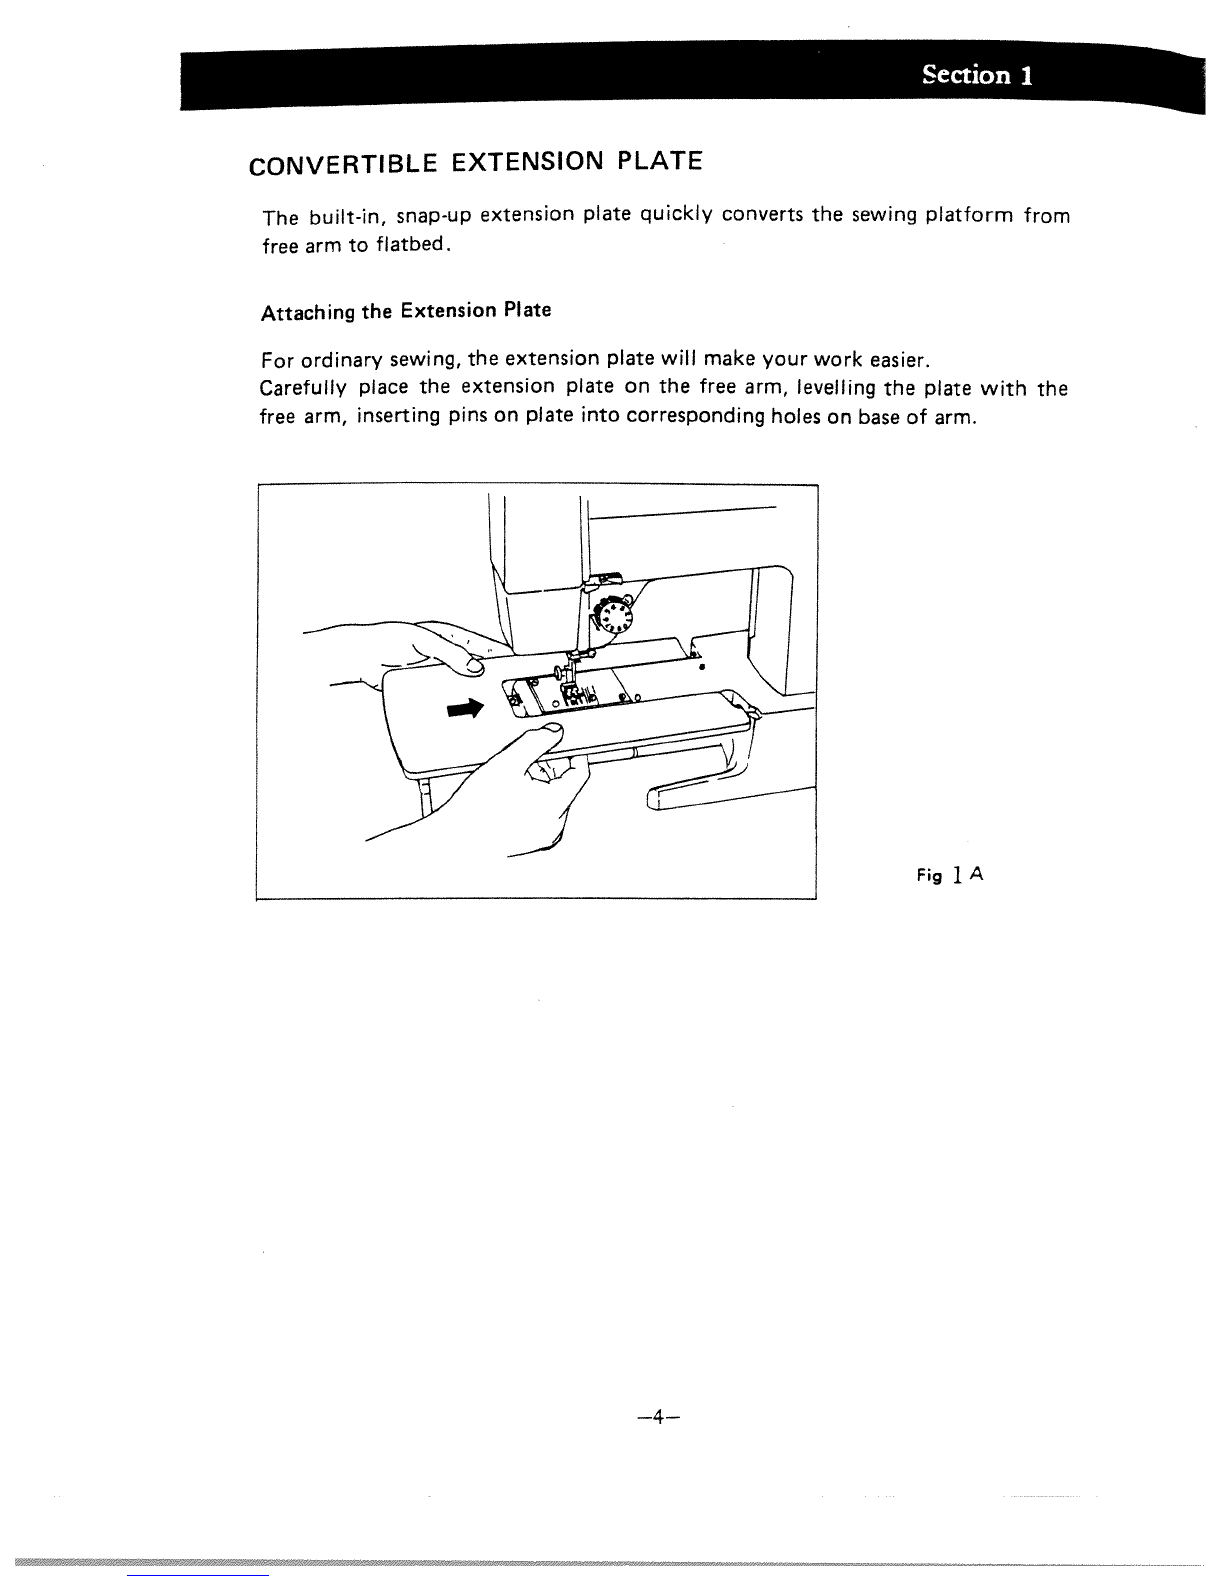
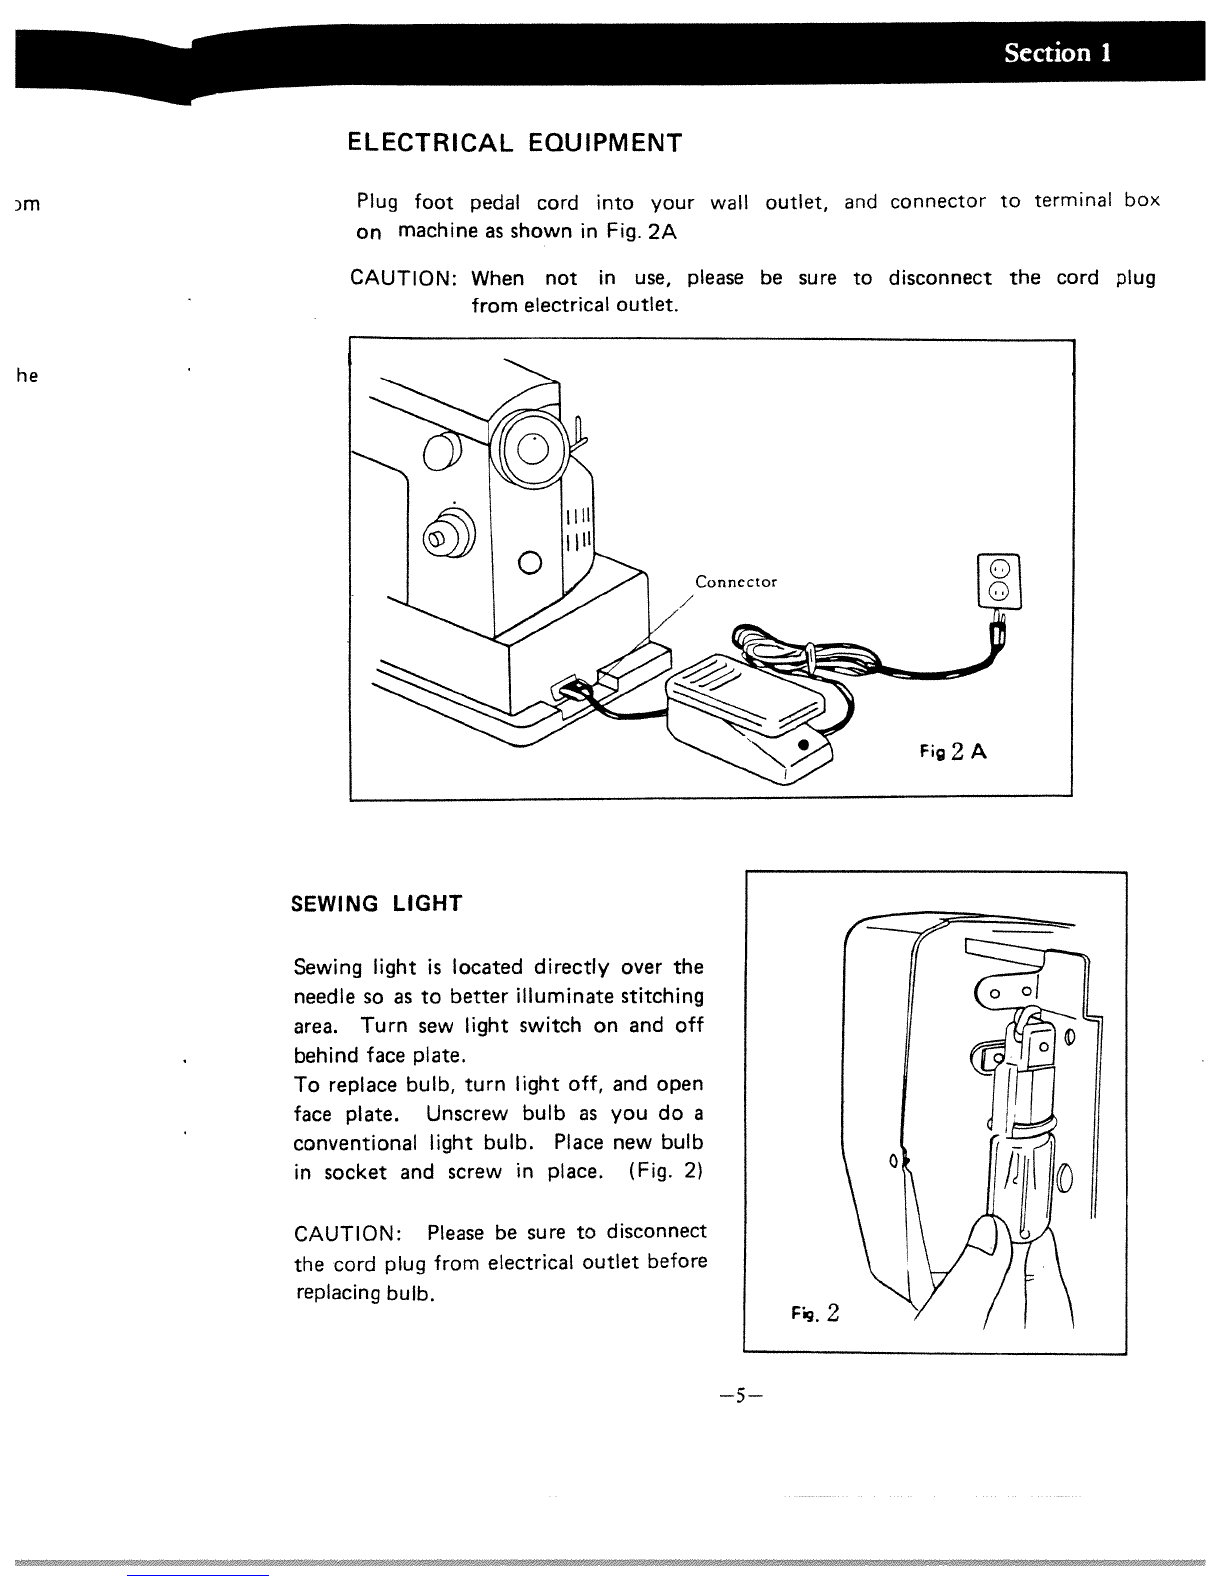
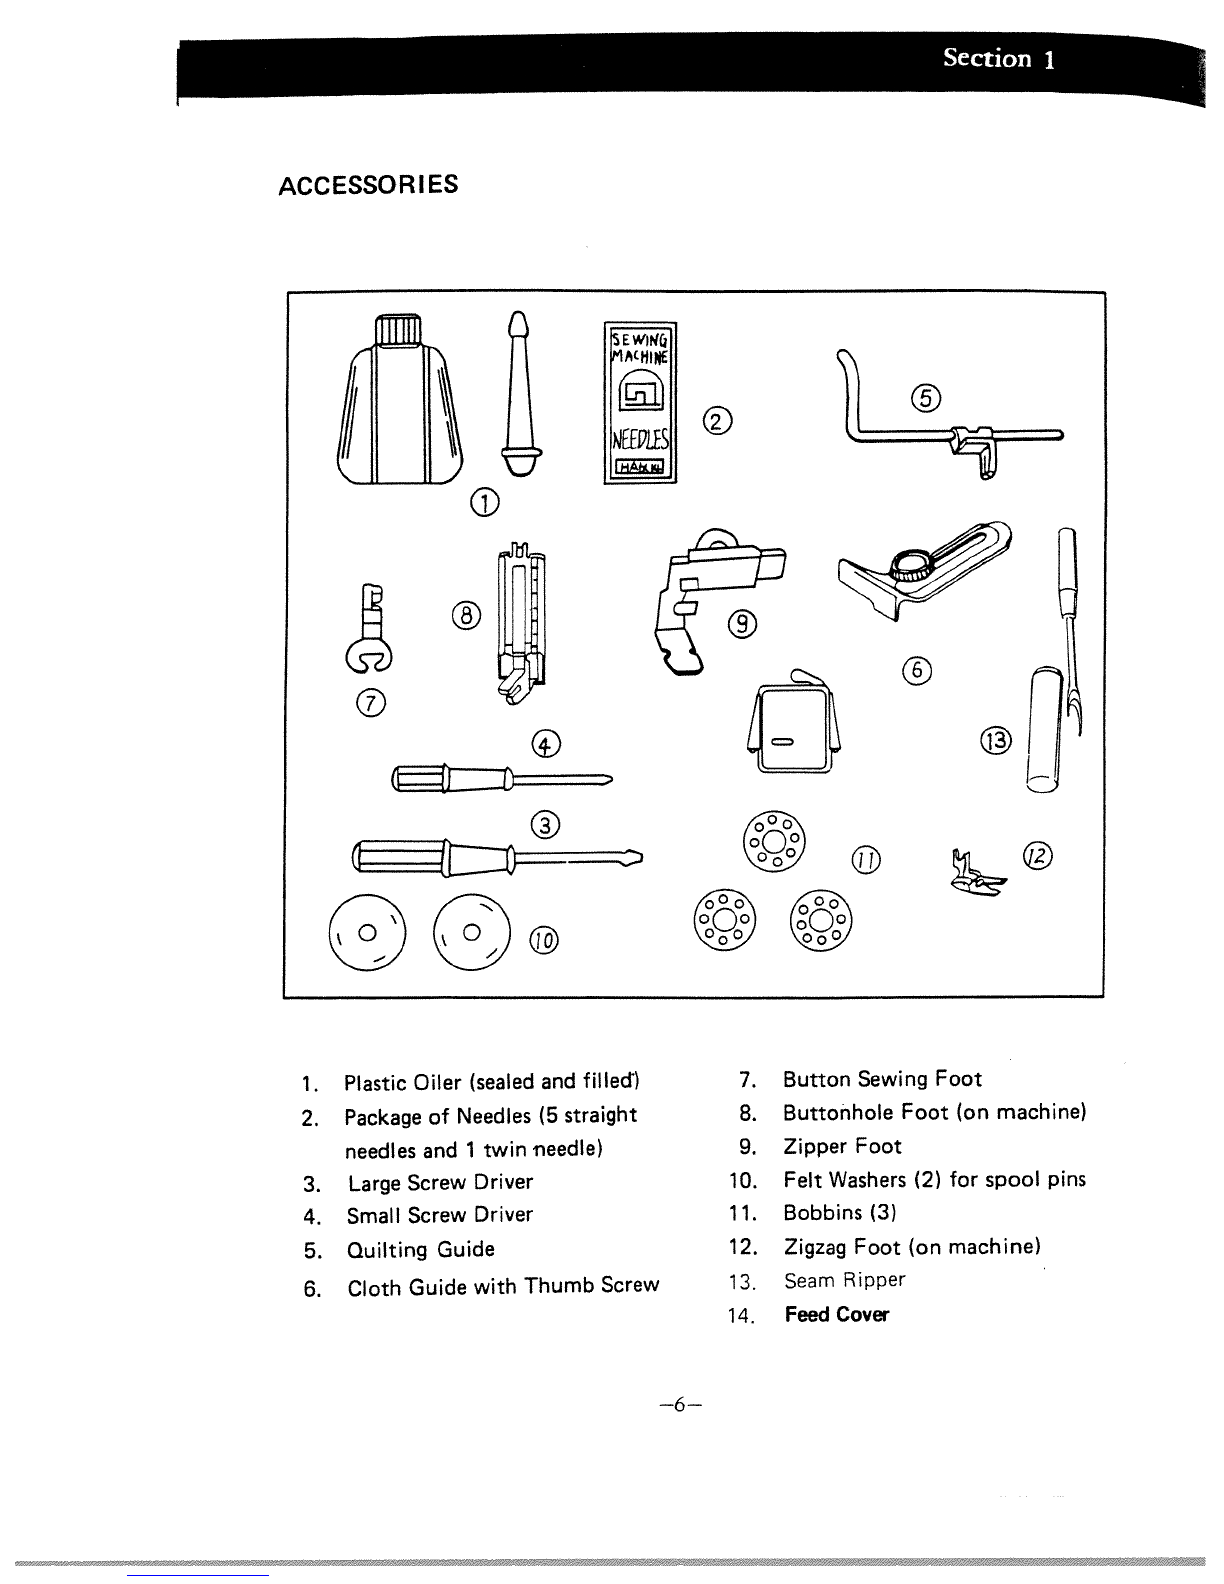
Singer 1640 User manual

INSTRUCTION
MANUAL
FOR
SEWING
MACHINE
FREE-ARM
MODEL
1640

INDEX
Section
1.
FEATURES
AND
PARTS
Front
View
2
Rear
View
3
Convertible
Extension
Plate
4
Attaching
Extension
Plate
4
Electrical
Equipment
5
Sewing
Light
5
Accessories
6
Section
2.
BASIC
INFORMATION
Needle.
Thread
and
Fabric
Chart
7
Changing
Presser
Foot
8
Changing Needle
8
Removing
Needle
Plate
9
Removing Bobbin
Case
9
Section
3.
THREADING
MACHINE
Winding
Bobbin
10
Threading
Bobbin
Case
11
Inserting
Bobbin
Case
11
Threading
Upper Thread
12
Bringing
Up
Lower
Thread
13
Twin
Needle
Upper
Threading
and
Sewing
13
Rewinding
Bobbin
When
Machine
Is
Threaded
14
Section
4.
CONTROLS
Checking Tension
of
Upper
Thread
15
Checking
Tension of
Lower
Thread
16
Feed
Cover
17
Adjusting
Pressure
For
Regular
Sewing
17
Adjusting
Pressure
For
Embroidery,
Darning
and
Sewing
on
Buttons
.
17
Stitch
Length
18
Reverse
Stitching
18

Section
5.
SEWING
Preparing
To
Sew
Stitching
Tips
Keeping
Stitching
Straight
Pin
Basting
Straight and
Zigzag
Sewing
Stretch
and Decorative
Stitches
Instructions
For
Sewing
On
Stretch
Materials
21
Multiple
Zigzag
Stitch
21
Scallop
Stitch
Double
Overlock
Stitch
21
Satin
Stitch
22
Triple
Seam
Stitch and
Rickrack
Stitch Stretchable
Blindstitch
.
.
.
22
Smocking
Stitch,
Overcast
Stitch
Box
Stitch
22A
Super
Stitches
(Swan,
Tlip,
Dog)
22A
Section
6.
FINISHES
Buttonholes
Blindstitching
(Hems)
Sewing
on
Buttons
Adjustable
Cording
and
Zipper
Foot
Cloth
Guide
Quilting
Guide
Section
7.
CARE
AND
MAINTENANCE
Cleaning
Shuttle
Hook
and
Race
.
Oiling
23
24
25
26
26
26
27
.
27,28
Section
8.
PROBLEMS AND
PROBABLE
CAUSES 29
19
19A
20
20
20
—1A—

FEATURES
AND
PARTS
Section
1
FRONT
VIEW
6
1.
Face
Plate
2.
Thread
TakeUp
Lever
3.
Pattern
Panel
4,
Stitch
Selector
Dial
5.
Stitch
Width
Dial
6
Stitch
Length
Dial
&
Reverse
Push
Button
7.
Handle
On
Top
Cover
Hook
Cover
Thread
Tension
Dial
Tension
Check Spring
Thread
Guide
(G)
Needle
Bar
Thread Guide
Presser
Foot
Thumb
Screw
Presser
Foot
Needle
Plate
8.
9.
10.
11.
12.
13.
14.
15.
—2—

16.
Hand
Wheel
17.
Stop
Motion
Knob
18.
Cover
Plate
19.
Bobbin Holders
20
Bobbin
Winder
21.
Spool
Pin
22.
Top
Plate
23.
Thread
Guide
and
Bobbin
Winder
Thread
Tension
24.
Patch-O-Matic Darner
Sew
Light
Switch
Presser
Foot
Lifter
Extension
Plate
Free
Arm
Steel
Plate
Needle
Clamp
Screw
Thread
Cutter
Section
1
I
REAR
VIEW
2021
24
1
18
5
19
—
31
29
25.
26.
27.
28.
29.
30.
31.
—3—

Section
1
CONVERTIBLE
EXTENSION
PLATE
The
built-in,
snap-up
extension
plate
quickly
converts
the
sewing
platform
from
free
arm
to
flatbed.
Attach
ing
the
Extension
Plate
For
ordinary
sewing,
the extension
plate
will
make
your
work
easier.
Carefully
place
the
extension
plate
on
the
free
arm,
levelling
the
plate
with
the
free
arm, inserting
pins
on
plate
into corresponding
holes on
base
of
arm.
Fg
1
A
—4.--

Section
1
he
ELECTRICAL
EQUIPMENT
Plug
foot
pedal
cord into
your
wall
outlet,
and
connector
to
terminal
box
on
machine
as
shown
in
Fig.
2A
CAUTION:
When
not
in
use,
please
be
sure
to
disconnect
the
cord
plug
from
electrical
outlet.
SEWING
LIGHT
Sewing
light
is
located
directly
over
the
needle
so
as
to
better
illuminate stitching
area.
Turn
sew
light
switch on
and
off
behind
face
plate.
To
replace
bulb,
turn
light
off,
and
open
face
plate.
Unscrew
bulb
as
you do
a
conventional
light
bulb.
Place
new
bulb
in
socket
and
screw
in
place.
(Fig.
2)
CAUTION:
Please
be
sure
to
disconnect
the
cord
plug
from
electrical
outlet
before
replacing
bulb.
Fig.
2
—5—

Section
1
ACCESSORI
ES
1.
Plastic Oiler
(sealed and
filled)
2.
Package
of
Needles
(5
straight
needles and
1
twin
needle)
3.
Large
Screw
Driver
4.
Small
Screw
Driver
5.
Quilting
Guide
6.
Cloth Guide
with
Thumb
Screw
Button
Sewing
Foot
Buttonhole
Foot
(on
machine)
Zipper
Foot
Felt
Washers
(2)
for
spool
pins
Bobbins
(3)
Zigzag
Foot
(on
machine)
Seam
Ripper
Feed
Cover
E
WWc
IACHINE
iffPLES
a
I
7
7.
8.
9.
10.
11.
12.
13.
14.
—6—

The
needle
and
thread
you choose
depends
upon
the
fabric
you
are
stitching.
The
correct
needle
size
is
important to
avoid damaging
the
fibers of
light
weight
or
tightly
woven
fabrics
and
to
prevent
needle
breakage
when
stitching
heavy
or
stiff
fabrics.
Needle
size
Thread
Fabric
•
polyester chiffon,
fine
silk,
tricot,
lingerie
9
•
cotton
covered
polyester
fabrics,
sheer
lace,
net,
voile,
fine
•
fine
mercerized
cotton
(70-100) organdy
•
silk
A
•
polyester
light
weight
knits
and
jersey,
silk,
1
1
•
cotton
covered
polyester
batiste,
taffeta,
satin,
lace,
crepe
light
•
mercerized
cotton
(50-60)
•
silk
A
•
polyester
double knits,
linen,
poplin,
gingham,
14
•
cotton
covered
polyester
pique,
seersucker,
velveteen,
light
medium
•
mercerized
cotton
(50)
weight wools,
fine
corduroy
•
silk
A
•
polyester
heavy
wools,
corduroy,
felt,
16
•
cotton
covered
polyester
terrycloth,
canvas,
upholstery,
h
•
heavy
duty
mercerized
(40)
and
drapery
fabrics
eavy
•
silk
D
(buttonhold
twist
for
topstitching)
Use
only style
15
x
1
(European equivalent
705>
on
this machine.
This
style
or
system
is
the
most
commonly
used
on
household
sewing
machines.
•
Always
use
same
type
and
size
of
thread
in
both
needle
and
bobbin.
•
Always
use
a
sharp
needle.
A
blunt
point
can
cause
skipped
stitches
or
snag
the
fabric.
Chemical finishes
and
man-made
fibers
blunt
the
needle
faster.
•
Never use
a
bent
needle.
•
If
your
machine
is
skipping
stitches,
replace
the
needle
before
looking
for
trouble
elsewhere.
Special
Needles
with
blue shaft
or
ballpoint
are
particularly
designed
to
sew
knits
and
stretch
fabrics.
Such
special
needles
can
prevent
sewing
from
skipping
stitches
and
damaging
stretch
fabrics.
Available
in
size
9,
11,
14
and
16.
NEEDLE,
THREAD
AND
FABRIC
CHART
—7—

Section
2
CHANGING
PRESSER
FOOT
Raise
needle
to
its
highest
position
by
turning
hand
wheel
toward
you.
Raise
presser
foot
by
lifting Presser
Foot
Lifter
located
on
back
of
machine.
Loosen
thumb
screw
and
remove
foot.
Place
grooved
side
of
selected
presser
foot
against presser
bar.
Tighten
screw
securely with
screwdriver.
Do
not
operate
machine
with
presser
foot
lowered
unless
fabric
is
between
presser
foot
and
fabric
feed.
CHANGING
NEEDLE
Raise
needle
to
its
highest
position
by
turning
hand
wheel
toward
you.
Loosen Needle
Clamp
Screw
and
remove
needle.
Place
new
needle
so
its
flat
side
faces
back.
Push
up
into
needle
clamp
as
far
as
possible.
Tighten
screw
with
a
screwdriver.
Turn
hand
wheel
toward
you
ona
com
plete
rotation
to
be
sure
needle
is
correctly positioned.
Fg
3A
Fig
3
B
—8—

REMOVING
BOBBIN
CASE
Raise
needle
to
its
highest
position
by
turning
hand
wheel
toward
you.
Open
Hook
Cover.
Lift
open
hinged
latch
of
bobbin
case (Fig.
10)
and
pull
case
straight
out
of
machine
(Fig.
11).
Bobbin
will
remain
in
case
as
long
as
latch
is
open.
To
remove
bobbin,
hold
bobbin
case
down,
close
latch,
and
bobbin
will
fall
out.
(Fig.
12)
REMOVING
NEEDLE
PLATE
(NOTE:
If
extension
plate
is
on
machine, remove
it.)
a)
Raise
Needle
to
its
highest
position
by
turning
hand
wheel
toward
you.
b)
Op
.
the
hook
cover
towards
you
c)
Remove
the
screws
from needle
plate.
Then
remove
needle
plate.
,
5
ltiOfl
bY
Raise
Foot
remove
d
pre5
jghtefl
r.
presser
,tween
itiOfl
by
j
you.
w
and
e
faces
mp
as
with
a
a
corn
dle
is
—9—

THREADING
MACHINE
Section
3
WINDING
BOBBIN
Place
spool
of
thread
on
spool
pin
and
thread
as
shown
in
illustration.
Be
sure
thread
goes
under
tension
disc
on
Bobbin Winder
Thread
Tension.
(Fig.
1)
Put
thread
through
one
ot
the
holes
in
empty
bobbin
from
inside
to
outside.
Push
bobbin
down
firmly
on
bobbin
spindle
at
top
of
machine
with
slot
in
bobbin fitting
into
spring
on
bobbin
spindle.
Push
bobbin
and
spindle
to
the
right.
(Fig.
2)
Release sewing
mechanism
by
holding
Hand
Wheel
and
turning
Stop
Motion
Knob
toward
you
(Fig.
3).
Hold
end
of
thread
and
press
down
on
foot
pedal
as
when
sewing.
Release
end
of
thread
as
soon
as
winding
starts.
Run
machine
slowly
to
wind bobbin
evenly.
Bobbin
winder
will
stop
itself
when
bobbin
is
full.
Pull
bobbin
and
spindle
back
to
the
left
until
a
click
is
heard.
(Fig.
4)
Break
off
thread
and
remove
bobbin.
Tighten
Stop
Motion
Knob.
Winding
Bobbin
Evenly
If
bobbin
winds
unevenly,
adjust
thread
guide
by
loosening
screw
at
base
of
guide:
•
if
more
thread
winds
at
top
of
bobbin,
shift
thread
guide
slightly
downward.
•
if
more
thread
winds at
bottom
of
bobbin,
shift
thread
guide
slightly
upward.
(Fig.
5)
•
after adjustment
tighten
screw.
Bobbin
Winder
Stop
For
a
fully
wound
bobbin,
the
knob
should
just slightly
overlap
edge
of
bobbin.
If
too
far
out,
thread
will
extend
beyond
bobbin. Loosen
screw
at
top
of
knob
and
turn
plastic
knob
to
adjust;
tighten
screw.
Knob can
also
be
adjusted
to
ex
tend
farther
into
bobbin
for
less
amount
of
thread.
(Fig.
6)
Rear
View
of
Machine
—10—

place
bobbin
in
case
without
turning
it
around.
Slide
thread
into
slot
in
edge
of
case and
draw
spring.
(Fig.
14)
pull
out
thread
to
check
that
bobbin
turns
clockwise.
(Fig.
15)
INSERTING
BOBBIN CASE
Be
sure
that
6
inches
of
thread
extends
out
of
bobbin.
Hold
bobbin
case
so
long
finger
on
case
points
up.
Open latch.
(Fig. 16)
Slip case
over
center
pin
in
shuttle
and
press
in
place
until
long
finger
enters
notch.
Release
latch,
and
press
down.
(Fig.
17)
THREADING
BOBBIN
CASE
Hold
bobbin
as
shown
in
Fig. 13
so
that
thread
goes
over
top
of
bob
bin
and
away
from
you.
thread
under
tension
Fig
13
Fg14
Figl5
Close
Hook
Cover.
1
1

Section
3
THREADING
UPPER
THREAD
Raise
presser
foot
and
needle
to
their
highest
position
by
turning hand
wheel
toward
you.
Place
thread
on
spool pin
at
back
of
machine.
Pass
thread
through
slots
of
two
top
thread
guides
(A),
then
down
behind
arm
thread
guide
(B>
(Fig.
7)
Place
thread
around
bottom
of
Thread
Tension
Dial
(C)
and
slide
it
up between
tension
discs
(Fig.
8).
Hold
thread stationary
with right
hand
and
pull
thread
with
left
hand
until
check
spring
wire
loop
(D)
goes
up
above
top
hook
(E).
Release
thread
so
wire
loop
will
spring
back
into
place
and
thread
will
slip
into
hook.
Lower
presser
foot.
Place
thread
behind
arm
thread
guide
(B),
up
through
hole
in
take-up
lever (F)
theading
from
right
to
left,
and
back
down
behind
arm
thread
guide
(B)
again.
Draw
thread
down
through
thread
guide
(G>
and
needle
bar
thread
guide
(H). Thread
needle from
front
to
back.
Pull
thread
towards
rear
about
6
inches.
Side
view
of
thread
passing
through
tension
discs
for
single
(or
normal>
needle.
INCORRECT
CORRECT
—
Thread
Side
view
of
thread
passing
through
tension
discs
for
twin
needle.
INCORRECT
CORRECT
:—
Threads
F1g8
A
F
C
H
Fig
7
—
Thread
H—
Threads

BRINGING
UP
LOWER
THREAD
Raise
presser
foot.
Hold
needle thread
loosely
with
your
left
hand.
Turn
hand
wheel
toward
you
until
needle
moves
down
and
then
up again
to
its
highest
position,
catching
bobbin
thread
and
bringing
it
up
through
hole
in
needle
plate.
(Fig.
18)
To
prevent
thread
from
slipping
out
of
needle
when
you
begin
sewing,
pull
both
threads
out
about
6
inches
and
place under
presser
foot
toward
rear
of
machine.
(Fig.
19)
TWIN
NEEDLE-UPPER
THREADING
AND
SEWING
1.
Attach
zigzag
presser
foot
if
not
already
on
machine.
2.
Follow
threading instructions
for
single
needle
with
these
exceptions:
A
—
Place
thread,
matching
or
contrasting
in
color,
on
both
spool
pins.
B
—
Pass
threads
through
arm
thread
guide.
C
—
Down
around
tension
discs
with
one thread
passing
between
the
back
discs
and
the
other
between
the
front
discs.
D
—
Treat both
threads
as
one,
until
you
reach
the
needle.
E
—
Pass
one
thread
through
each
needle
eye.
(Fig.
20)
3.
Set
Zigzag
Stitch
Dial
in
middle of
indication
marks
(Fig.
21)
otherwise
needle
will
break.
Turn
hand
wheel
slowly
toward
you
to
make
certain
twin
needle dows
not
hit
needle
plate.
4.
All
normal
stitches
and
all
stretch
stitches
can be
made
with
the
Twin Needle.
—13—
Fg
21

SECTION
3
RE-WINDING
BOBBIN
WHEN
MACHINE
IS
THREADED
If
bobbin
runs
out
of
thread
while
sewing,
it
is
not
necessary
to
completely
unthread
machine
to
re-wind
bobbin.
Simply
bring
thread
from
needle
up
through
top
thread
guide
in
front
of
machine
(Fig.
9).
Insert
end
of
thread
from
inside
to
outside
in
one
of
the
holes
of
empty
boddin.
Proceed
according
to instructions
starting
in
paragraph
2,
page
10
section
3
(Winding
Bobbin).
If
you
wish
to
wind
a
bobbin
while
sewing,
here
is
another
method:
Place
spool
of
thread
on
second
spool
pin
and
proceed
as
shown
in
illustration
on
page
10
Section
3
(Winding
Bobbin).
DO
NOT
RELEASE
SEWING
MECHANISM
by
turning
stop
motion
knob
toward you.
In
this
way,
while you
continue to
sew,
bobbin
will
be
filled.
Fg
9
—14—

An
important
point
when
sewing
is
to
make
sure
that
the
thread tension
is
correct.
The
Thread
Tension
Dial
is
marked
with
0
to
9.
Normal
thread
tension
is
obtained
by
setting
the
Dial
at
5
against
the
top
hook.
Your
machine
has
been
tested
using
the
thread
supplied, and with
the
Dial
set
at
5.
It
might
prove
necessary
to
adjust
the tension
slightly
when
using
threads
or
fabrics
of
different
thick
ness.
By
Turning
Thread
Tension
Dial
counterclockwise
close
to
0,
upper
thread
will
be
pulled
down
below
and
lower
thread
lies
straight.
By
turning
dial
clockwise
close
to
9,
upper
thread
will
be
straight
and
lower
N
thread
forms
loops
on
the top
side.
(Fig.
22)
Thread
tension
is
correct
when
stitch
Tighter
knots
occur
in
the
mid-layer
of
ma
terial.
Before
sewing
garment,
try
to
make
a
sample
on
a
double
folded
scrap
of
material
with
which
to
test
various
tensions
by
sewing
to
make
certain
tension
is
correct.
A
TENSION
OF
UPPER
THREAD
Correct
Stitch
Upper
Thread
Tension
too
strong
Upper
Thread
Tension
too weak
Fig.
22
—15—

Section
4
CHECKING
TENSION
OF
LOWER
THREAD
If
you
are
unable
to
balance
the
stitch
by
adjusting
tension
on
the
upper
thread,
you
may
have
to
make
a
slight
adjustment
in
the
bobbin
tension.
Take
out
bobbin
case,
remove
bobbin
and clean
out
any
dust
or
lint
which
has
collected
around
the
case.
Turn
screw
on
bobbin
case
slightly
in
either
direction
using
the
small
screw-driver
(Fig.
24):
To
increase
tension
—
turn
screw
slightly
to
the
right
(clockwise).
To
decrease
tension
—
turn
screw
slightly
to
the
left
(counter
clockwise)
If
stitch
is
satisfactory
but the
seam
is
puckered,
it
may
be
necessary
to
loosen
tension
on
both
top
and
bottom
threads.
An
easy
test
for
checking
tension
balance:
Fold
fabric
on
the
bias
and
stitch
(12
stitches/inch)
4”
in
from
fold.
Grasp
stitching
and
pull
with
a
snap
(Fig.
25)
•
if
both
threads
break
(even
though
not
at
tensions
are
balanced.
•
if
upper thread
breaks
—
loosen
top
tension.
•
if
lower
thread
breaks
—
tighten
top
tension.
*
E
Fg
25
CHECKING
TENSIONS
to
make
threads
break.
the
same
place)
—
—16—

(A)
Fig
27
Fig
28
Fig
29
JSTING
PRESSURE
FOR
REGULAR
SEWING
)ressure
of
the
presser
foot
must
be
regulated
for
different
types
of
fabric
to
,
proper
feeding.
To
adjust
pressure
push
down
outer
ring
(A;
Fig.
27)
tch-OMatic
Darner
with
thumb
and
forefinger.
The
center
button
(B,
!7)
will
spring
up and
then
the
pressure
can
be
easily
adjusted by
being
d
down partially
for
light
fabrics
(Fig.
28),
or
all
the
way
down
for
medium
vy
fabrics
(Fig.
29).
STING
PRESSURE
FOR
EMBROIDERY, DARNING
AND
SEWING
ON
BUTTONS
the
outer
ring
(A,
Fig.
27)
down
with
thumb
and
index
finger
and
the
button
(B,
Fig.
27)
will
pop
up. The
pressure
will
be
completely
released.
acCe5505
there
is
a
feed
cover,
to
sew
mebroidery,
darning,
mond
x
wing
On
buttons
which
need
no
feeding
to
fabrics,
use
this
“FEED
or
cover
or)
needle
plate
le
to
its
highest
position.
•
needft.
0
studs
and
one
back
stud
into
holes
on
needle
plate,
as
shown
in
-(
two
26.
be
sure
normal
sewings,
should
always
take
this
feed
cover,
that
is,
without
—17--

Section
4
STITCH LENGTH
Length of
the
stitch
is
regulated
by
Stitch
Length
Dial
(Fig.
30)
Turn
the
dial
to
right
to
lengthen
and
to
left
to
shorten
the
stitch.
Near
point
A
Fig.
30
is
the
shortest
stitch
and
near
point
B
Fig.
30
is
the
longest.
In
general,
short
stitches
are
best
for
light
weight
fabrics;
longer
ones
for
heavy
fabrics.
Most
normal
sewing
is
done with
stitch
length set
about
12
stitches
per
inch.
Stitch
Length
(Approximate)
Marks
on
dial
-
—
—
—
—
—
(
point
A
)
(
Point
B
Number
of
stitches
per
inch
No
Feeding
36 20
12
9
7
REVERSE
STITCHING
Press
in
center
button
of
Stitch
Length
Dial
(Fig.
30)
and
hold
for reverse
stitching.
Fabric
will
immediately
start
feeding
backwards.
Release
button
and
machine
will
resume normal
forward
stitching.
A
few
reverse
stitches
are
very
useful
for
fastening
beginning
or
end
of
seams
and
darts
without
having
to
tie
threads.
V
Fig3
—18—
Table of contents
Other Singer Sewing Machine manuals

Singer
Singer 154W101 Quick start guide

Singer
Singer 111W114 Quick start guide

Singer
Singer 14T967DC QuantumLock Operation instructions

Singer
Singer 400W15 User manual

Singer
Singer 6550 User manual

Singer
Singer M1500 User manual

Singer
Singer 92-20 User manual

Singer
Singer 114-55 User manual

Singer
Singer 71-107 Quick start guide

Singer
Singer QUANTUM L-500 User manual