Singer HD 6800C User manual

INSTRUCTION MANUAL
HD 6800C • HD 6805C

This household sewing machine is designed to comply with IEC/EN 60335-2-28 and UL1594.
IMPORTANT SAFETY INSTRUCTIONS
When using an electrical appliance, basic safety precautions should always be followed, including the
following:
Read all instructions before using this household sewing machine. Keep the instructions at a suitable place
close to the machine. Make sure to hand them over if the machine is given to a third party.
DANGER –TO REDUCE THE RISK OF ELECTRIC SHOCK:
• A sewing machine should never be left unattended when plugged in. The electrical socket, to which the
machine is plugged in should be easily accessible. Always unplug this sewing machine from the electric
outlet immediately after using and before cleaning, removing covers, lubricating or when making any other
user servicing adjustments mentioned in the instruction manual.
WARNING –TO REDUCE THE RISK OF BURNS, FIRE,
ELECTRIC SHOCK, OR INJURY TO PERSON:
• Do not allow to be used as a toy. Close attention is necessary when this sewing machine is used by or near
children.
• Use this sewing machine only for its intended use as described in this manual. Use only attachments
recommended by the manufacturer as contained in this manual.
• Never operate this sewing machine if it has a damaged cord or plug, if it is not working properly, if it has
been dropped or damaged, or dropped into water. Return the sewing machine to the nearest authorized
dealer or service center for examination, repair, electrical or mechanical adjustment.
• Never operate the sewing machine with any air openings blocked. Keep ventilation openings of the sewing
machine and foot control free from the accumulation of lint, dust, and loose cloth.
• Keep fingers away from all moving parts. Special care is required around the sewing machine needle.
• Always use the proper needle plate. The wrong plate can cause the needle to break.
• Do not use bent needles.
• Do not pull or push fabric while stitching. It may deflect the needle causing it to break.
• Wear safety glasses.
• Switch the sewing machine off (“0”) when making any adjustment in the needle area, such as threading
needle, changing needle, threading bobbin, or changing presser foot, etc.
• Never drop or insert any object into any opening.
• Do not use outdoors.
• Do not operate where aerosol (spray) products are being used or where oxygen is being administrated.
• To disconnect, turn all controls to the off (“0”) position, then remove plug from outlet.
• Do not unplug by pulling on cord. To unplug, grasp the plug, not the cord.
• The foot control is used to operate the machine. Never place other objects on the foot control.
• Do not use the machine if it is wet.
• If the LED lamp is damaged or broken, it must be replaced by the manufacturer or its service agent or a
similarly qualified person, in order to avoid a hazard.

• If the cord connected with the foot control is damaged, it must be replaced by the manufacturer or its
service agent or a similarly qualified person, in order to avoid a hazard.
• This sewing machine is provided with double insulation. Use only identical replacement parts. See
instructions for Servicing of Double-Insulated Appliances.
SAVE THESE INSTRUCTIONS
FOR CENELEC COUNTRIES ONLY:
This appliance can be used by children aged from 8 years and above and persons with reduced physical,
sensory or mental capabilities or lack of experience and knowledge if they have been given supervision or
instruction concerning use of the appliance in a safe way and understand the hazards involved. Children shall
not play with the appliance. Cleaning and user maintenance shall not be made by children without supervision.
The noise level under normal operating conditions is less than 80 dB.
The machine must only be used with foot control of type C-8000 manufactured by Zeng Hsing, Taiwan.
FOR NON CENELEC COUNTRIES:
This sewing machine is not intended for use by persons (including children) with reduced physical, sensory or
mental capabilities, or lack of experience and knowledge, unless they have been given supervision or
instruction concerning use of the sewing machine by a person responsible for their safety. Children should be
supervised to ensure that they do not play with the sewing machine.
The noise level under normal operating conditions is less than 80 dB.
The machine must only be used with foot control of type C-8000 manufactured by Zeng Hsing, Taiwan.
SERVICING OF DOUBLE INSULATED PRODUCTS
In a double-insulated product, two systems of insulation are provided instead of grounding. No ground means
is provided on a double-insulated product, nor should a means for grounding be added to the product.
Servicing of a double-insulated product requires extreme care and knowledge of the system and should be
done only by qualified service personnel. Replacement parts for a double-insulated product must be identical
to those parts in the product. A double-insulated product is marked with the words ‘DOUBLE INSULATION’
or ‘DOUBLE INSULATED’.

TABLE OF CONTENTS
INTRODUCTION .................................................. 1
Intended Use...............................................................1
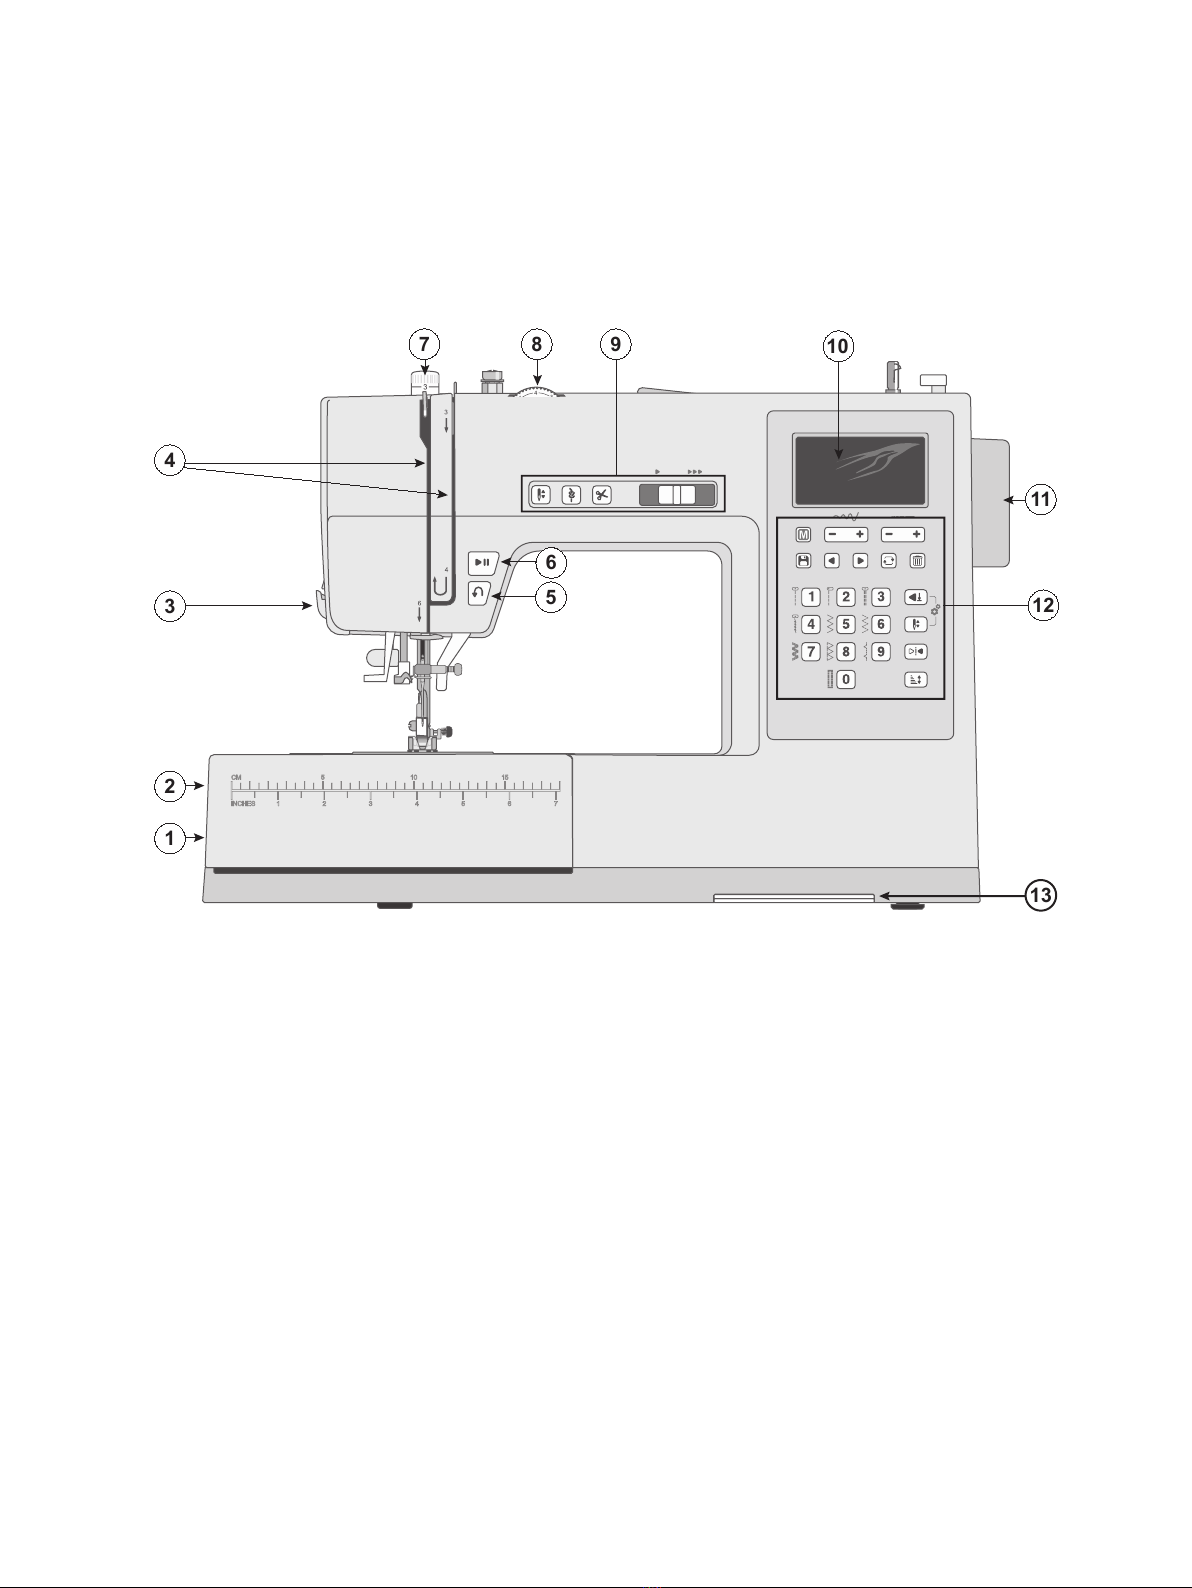
Machine Overview .......................................................1
Needle Area Overview .................................................2
Top of Machine............................................................2
Overview Accessories..................................................3
Included Accessories (Not Pictured)...............................3
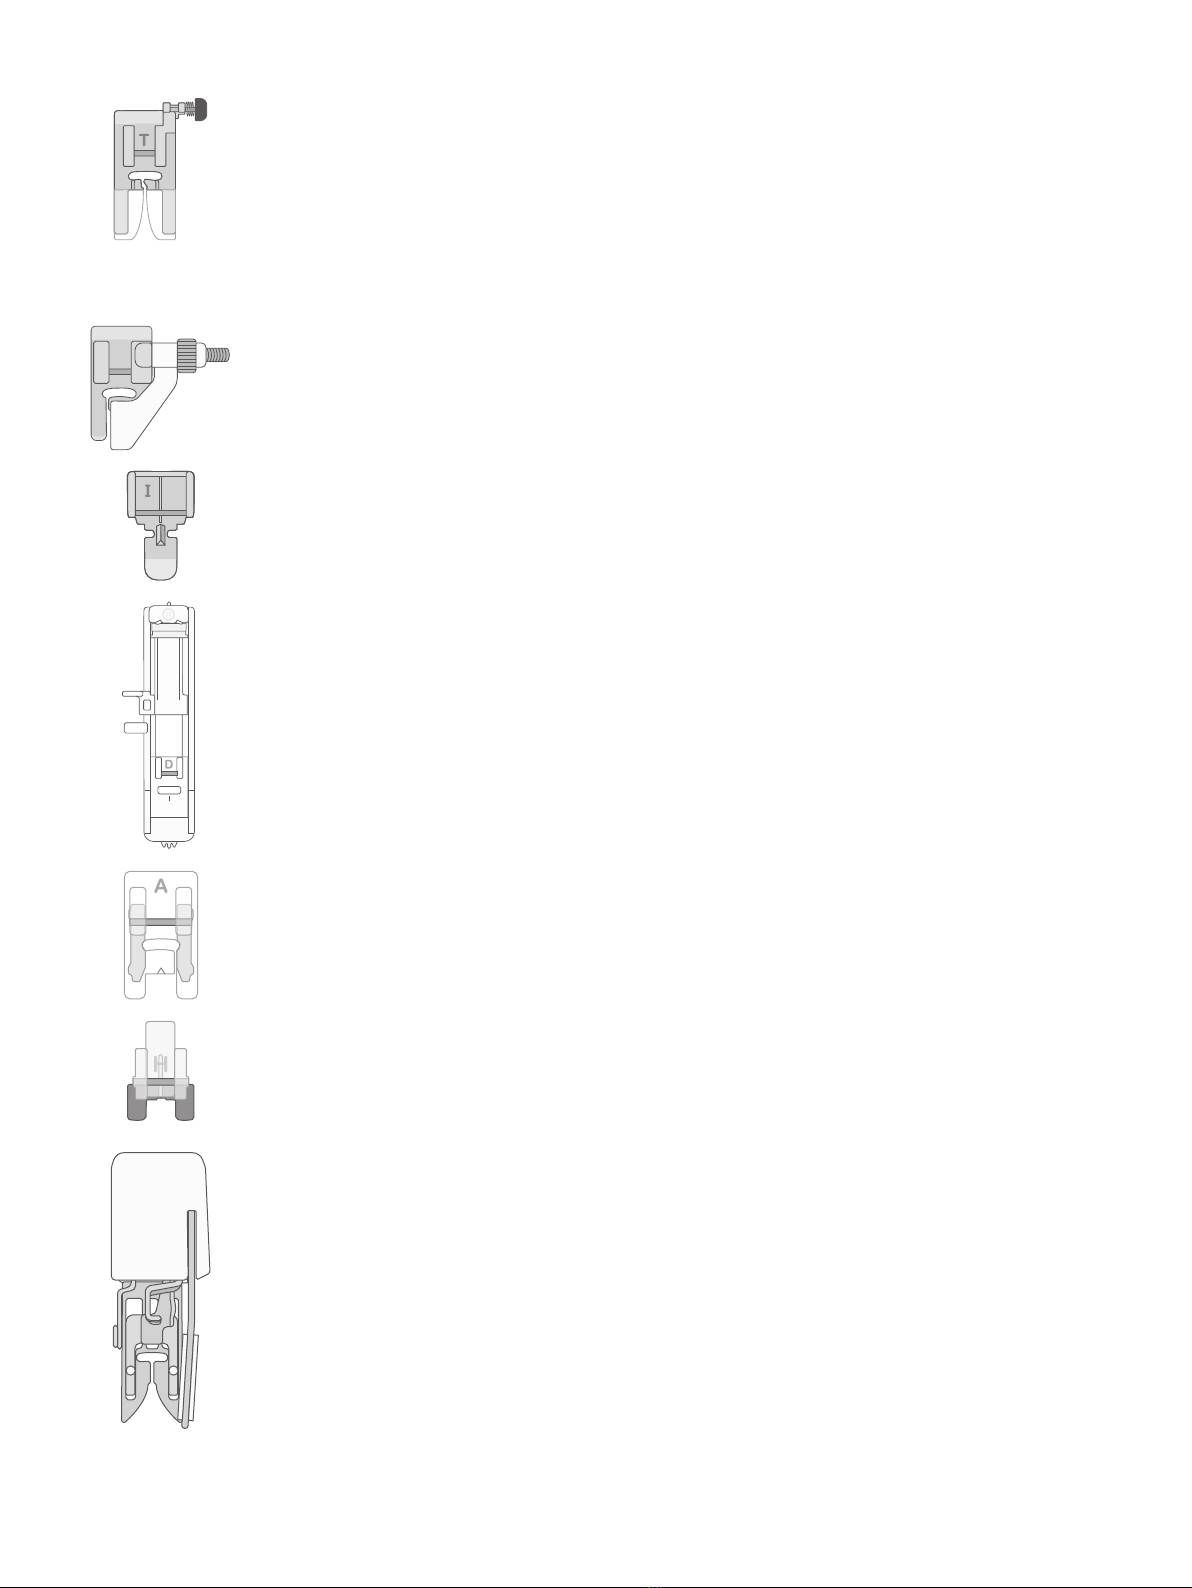
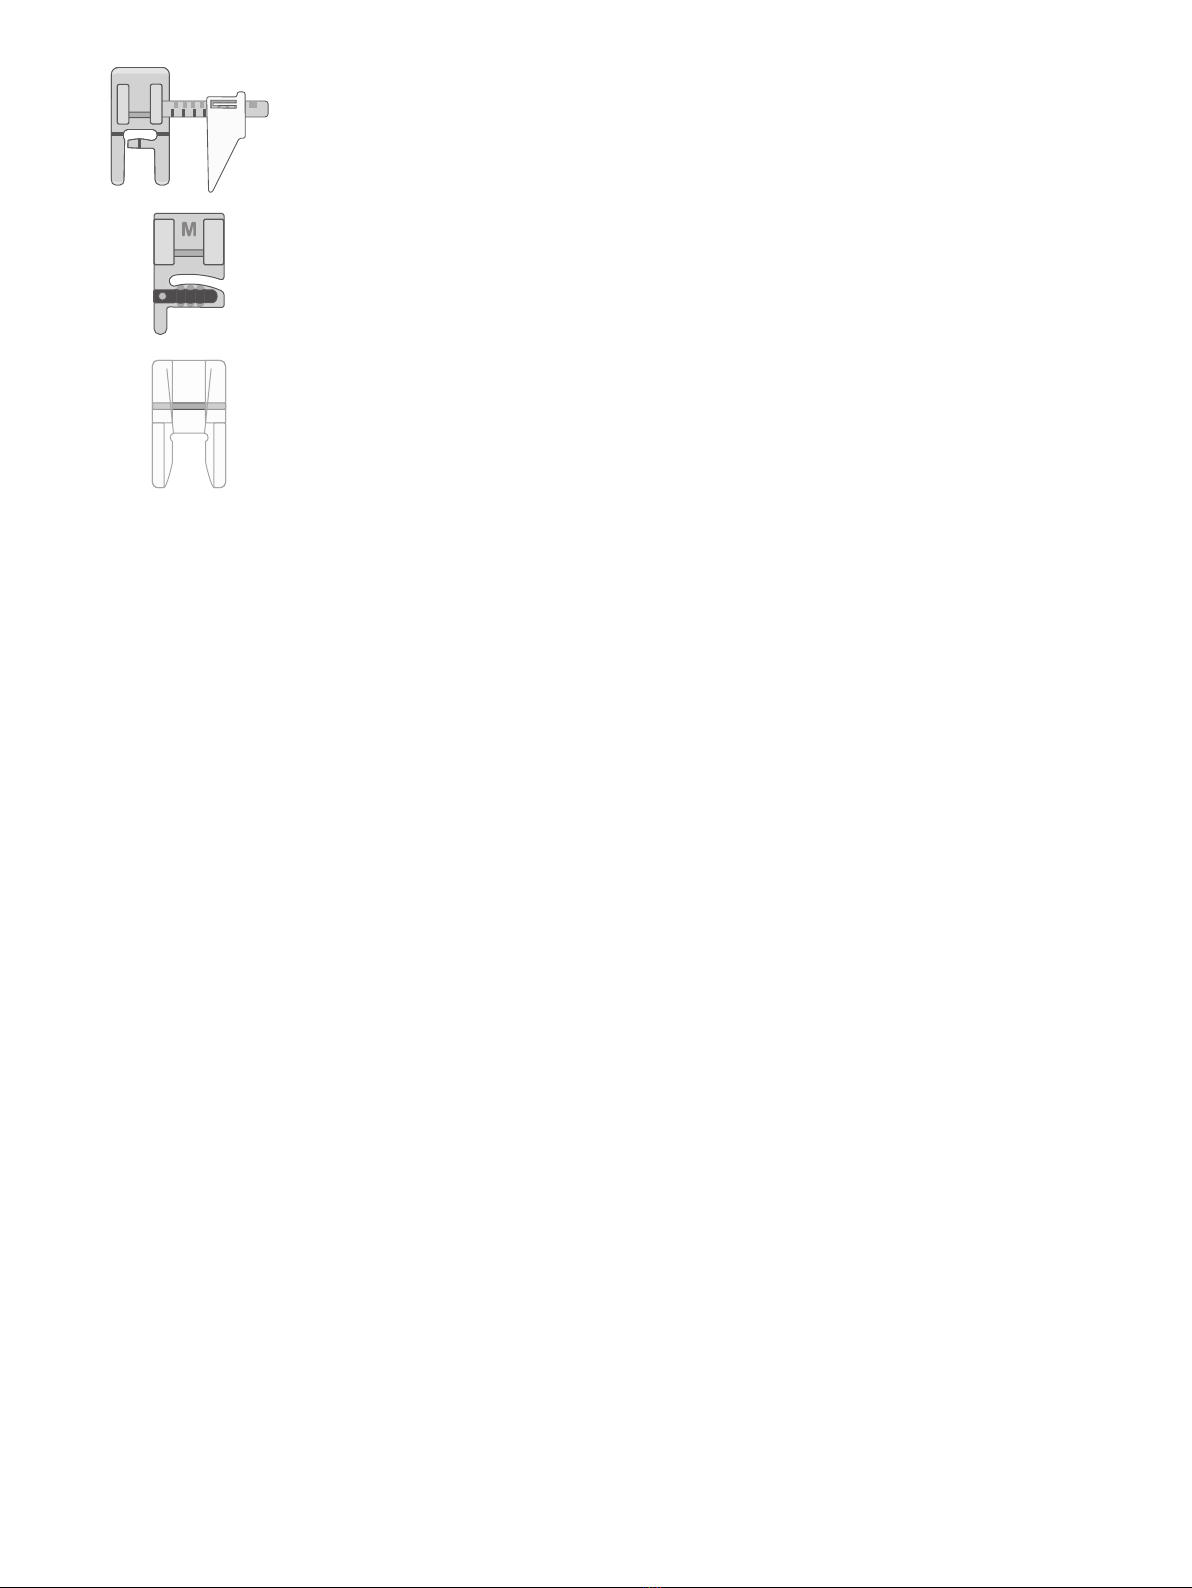
Presser Feet ...............................................................4
Optional Accessories...................................................5
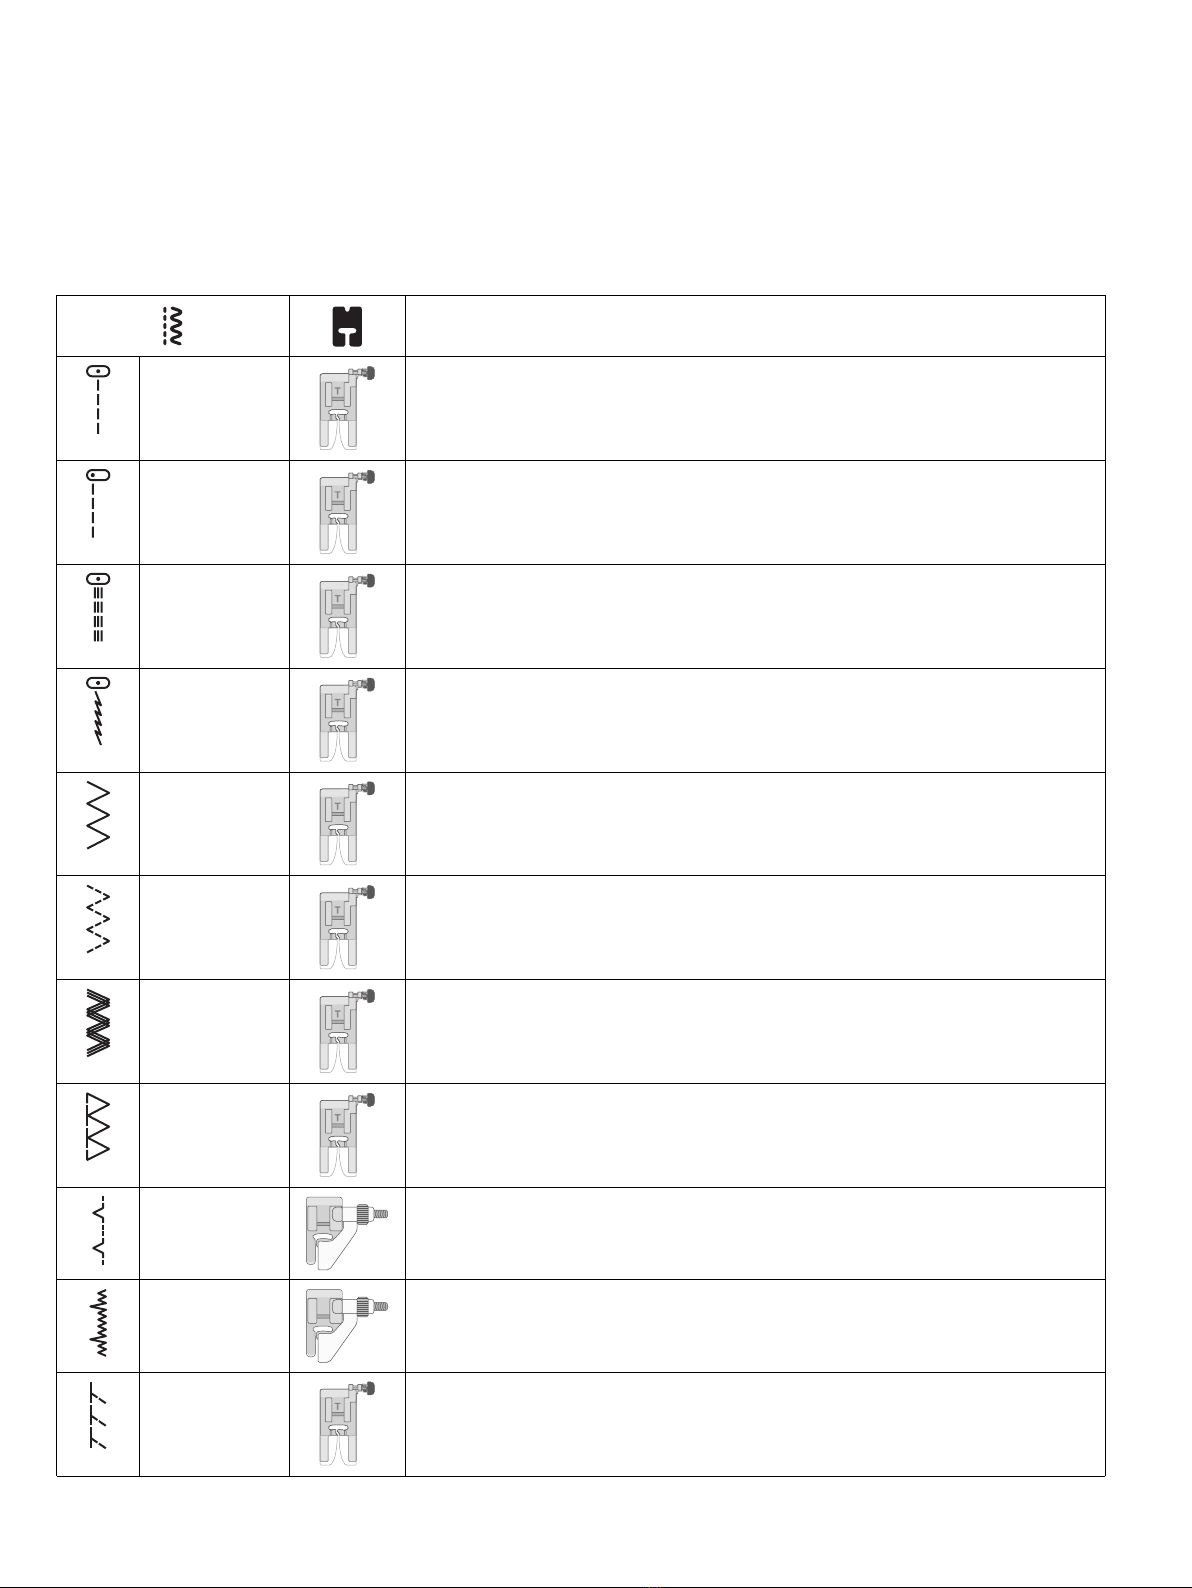
Stitch Overview ...........................................................6
Utility Stitches...........................................................6
Decorative Stitches .....................................................8
PREPARATIONS .................................................. 9
Unpacking the Machine................................................9
Connect to the Power Supply .......................................9
Packing Machine after Sewing......................................9
Free Arm/Removable Accessory Tray .........................10
Presser Foot Lifter .....................................................10
Thread Knife .............................................................10
Spool Pin .................................................................. 11
Wind the Bobbin ........................................................12
Insert the Bobbin .......................................................12
Thread the Machine...................................................13
Needle Threader .......................................................14
Needles ....................................................................14
Important Needle Information ..................................... 15
Selection Guide — Needle Size, Fabric, Thread ............. 15
Change the Needle....................................................15
Thread Tension .........................................................16
Sew without Feed Teeth .............................................16
Presser Foot Pressure ...............................................16
Change the Presser Foot ...........................................17
OPERATING YOUR MACHINE ....................... 18
Machine Operation Controls .......................................18
Reverse Button ........................................................ 18
Start/Stop................................................................ 18
Needle Up/Down...................................................... 18
Tie-Off................................................................... 18
Automatic Thread Cutter............................................ 18
Speed Control Lever ................................................. 18
Stitch Control Panel ...................................................19
Display................................................................... 19
Stitch Menu / Sound On/Off ....................................... 19
Stitch Width / Needle Position .................................... 19
Stitch Length........................................................... 19
Stitch Selection Buttons............................................. 19
Sequence Controls.................................................... 20
Automatic Stop Setting.............................................. 20
Needle Up/Down Setting ........................................... 20
Mirror Side to Side ................................................... 20
Elongation .............................................................. 20
Sewing Mode ............................................................20
Display — Sewing Mode ........................................... 20
Select a Stitch .......................................................... 21
Sequence Mode ........................................................22
Display in Sequence Mode ......................................... 22
Create a Sequence .................................................... 22
Sew Out a Sequence.................................................. 23
SEWING............................................................... 24
Sewing .....................................................................24
Start to Sew – Straight Stitch ......................................24
Change Needle Position............................................. 24
Change Sewing Direction...........................................25
Finish Sewing............................................................25
Straight Stretch Stitch ................................................25
Multi-Step Zigzag Stitch .............................................26
Slant Overedge Stitch ................................................26
Closed Overlock Stitch...............................................27
Blind Hems ...............................................................27
Darning and Mending.................................................28
Repair Large Holes ................................................... 28
Repair Tears ............................................................ 28
Repair Small Holes................................................... 29
Jeans Hem................................................................29
Button Sewing...........................................................30
One-Step Buttonhole .................................................31
Sew Zippers..............................................................32
Centered Zipper ....................................................... 32
Hand-Look Quilt Stitch ...............................................33
MAINTENANCE.................................................. 34
Cleaning the Machine ................................................34
Cleaning the Bobbin Area...........................................34
Cleaning under the Bobbin Area .................................34
Troubleshooting.........................................................35
Technical Specification...............................................38

INTRODUCTION
Intended Use
Optimal use and maintenance are described in these instructions. This product is not intended for industrial use.
Additional assistance, by region, may be found on the web at www.singer.com.
Machine Overview
3
1
5
6
10
987
4
12
11
2
13
1. Feed Teeth Lever — move from side to side to engage or
disengage the feed teeth. Positioned at the back of the free
arm.
2. Accessory Tray / Free Arm — provides a flat surface
when sewing and allows storage for your accessories.
Remove the accessory tray to use the free arm which
makes it easier to sew, e.g., trouser hems and sleeves.
3. Thread Knife — for trimming thread ends at the end of
sewing.
4. Threading Slots — thread paths with tension discs and
take up lever.
5. Reverse Button — Press and hold to sew in reverse, e.g.,
when securing the beginning or ending of a seam.
6. Start/Stop Button — Press to start and stop sewing
without using the foot control.
7. Presser Foot Pressure — controls the pressure the presser
foot exerts onto the fabric.
8. Thread Tension Dial — set the right tension for your
stitch, thread and fabric.
9. Machine Operation Controls — functions used to make
your sewing more convenient (see page 18).
10. Display — Current stitch and settings are displayed.
11. Hand Wheel — used to manually control the movement of
the needle and the thread take-up lever.
12. Stitch Control Panel — Choose stitch menu, select stitch
and adjust your stitch settings with these buttons. Here you
also find functions for sequencing, mirroring and
elongation (see page 19).
13. Stitch Charts — Slide forward and view all stitches
available on your machine.
Introduction – 1
English

Needle Area Overview
11
9
2
7
3
1
4
5
6
8
12
10
13 14
1. Needle Plate — provides a flat area around presser foot
for sewing. Guide lines make it easy to guide the fabric
straight when sewing.
2. Feed Teeth — feed the fabric under the presser foot when
sewing.
3. Presser Foot — holds fabric against feed teeth which
draws fabric under the presser foot as you sew.
4. Presser Foot Holder Screw — loosen the screw to
remove the presser foot holder.
5. Presser Foot Holder — holds the presser foot.
6. Presser Foot Release Lever — press this lever to release
the presser foot from the holder.
7. Buttonhole Lever — used for buttonhole sewing.
8. Built-in Needle Threader — thread the needle quickly
and easily.
9. Presser Foot Bar — accommodates the presser foot
holder.
10. Needle Clamp Screw — secures the needle.
11. Thread Guide — helps maintain thread flow when sewing.
12. Needle Thread Guide — helps maintain thread flow
when sewing.
13. Bobbin Cover — protects the bobbin while sewing.
14. Bobbin Cover Release Button — push to open the bobbin
cover.
Top of Machine
6
542 7
9 8
1
3
1. Bobbin winding tension disc
2. Thread guides
3. Handle
4. Spool pin
5. Hole for auxiliary spool pin
6. Bobbin winding spindle
7. Bobbin winding stopper
8. Thread tension discs
9. Thread take-up lever
2 – Introduction
English

Overview Accessories
Bobbin x4 — Only use the type of transparent bobbins delivered with your machine (SINGER®
Class 15 transparent bobbins). One of the bobbins is inserted in the machine upon delivery.
Felt Pad — Used to cushion the spool of thread when using the Auxiliary Spool Pin.
Spool Cap — Two sizes (large and small) for various thread spool styles.
Auxiliary Spool Pin — For sewing with large thread spools or when using specialty threads.
Brush and Seam Ripper — Used to remove stitches/brush off lint.
L-Screwdriver — Used to remove the needle plate, presser foot holder or needle screw.
Edge/Quilting Guide — Used for straight and accurate sewing, e.g., when quilting. Insert the guide
into the slot at the back of the presser foot holder. Adjust the position to fit your project.
Included Accessories
(Not Pictured)
• Needles
• Foot control
• Power cord
• Soft cover
Introduction – 3
English

Presser Feet
All Purpose Foot (T)
(attached on the machine upon delivery)
This foot is used for general sewing on most types of fabric. The bottom of the foot is flat, so that the
fabric is held down firmly against the feed teeth while sewing. It also has a wide slot so that the needle
can move from left to right, depending on which stitch you sew.
The foot has a “lock in place” button, the button is pushed to lock the foot in horizontal position when
sewing over thick seams (see page 29).
F
Blind Hem Foot (F)
The Blind Hem Foot is used for sewing blind hems in fashions and home decor. There is an adjustable
guide with an extension at the front, used to guide the fold of the hem while stitching.
Zipper Foot (I)
This foot is used for inserting zippers. Attach the foot to the presser foot holder on either side of the
foot, depending on which side of the zipper is being sewn. The Zipper Foot can also be used to create
and insert piping.
One–Step Buttonhole Foot (D)
This foot allows you to make perfectly sized buttonholes for your button. It has a space at the back for
a button, used to set the size of the buttonhole. The machine will automatically sew a buttonhole to fit
that button size.
Satin Stitch Foot (A)
This foot is used for satin stitches and other decorative stitches.
H
Button Sewing Foot (H)
The Button Sewing Foot quickly and neatly sews on buttons, eliminating the need to sew them
manually.
The foot sits on top of the button, with the opening positioned around the holes.
Even Feed Foot
The Even Feed Foot, sometimes called a Walking Foot, is used for sewing several layers of fabric,
especially when quilting. It is also great for sewing fabrics with nap or pile to keep them from shifting
as you sew.
4 – Introduction
English

Sew Easy Foot
This foot has a guide to help you sew the most accurate seams every time. The foot has an extension
marked with the most popular seam allowances and a movable fabric guide that can be set wherever
you want for the project you are making.
Cording Foot
The Cording Foot is mainly used to add surface embellishment to fabrics. Lightweight cords are
guided by grooves on top of the foot during stitching. Use a single cord in center as a method for
gathering firmer fabrics.
Open Toe Foot
The Open Toe Foot is used for satin stitch appliqués and other decorative sewing.
Optional Accessories
Additional optional accessories are available for your machine. Visit the SINGER® website for more information.
Introduction – 5
English

Stitch Overview
Utility Stitches
The stitches described in the below chart are utility stitches, used mainly for utility sewing.
The most frequently used stitches are printed next to the stitch selection buttons on the front of the machine (Stitch Menu 1). Those
stitches are selected by touching the corresponding button (if Menu 1 is active). Stitches on menu 2–4 are printed on the Stitch
Charts that can be pulled out at the bottom of the machine.
When sewing, use a thread tension between 3–5. Always test sew on a piece of scrap fabric, and adjust the tension if necessary.
Application
Straight Stitch
Center Position
The basic stitch used for sewing. The most common use for a straight stitch is to sew
two pieces of fabric together.
Straight Stitch
Left Position
For all types of sewing.
Straight Stretch
Stitch
Stronger than a regular straight stitch, on stretch knit fabrics, because it locks three
times — forward, backward and forward again. Use it to reinforce seams of
sportswear and for curved seams which take a lot of strain.
Stretch Stitch For seams in tricot and stretch fabrics.
Zigzag Stitch A very versatile stitch for decorative sewing, applique and attaching ribbons and
trims.
Multi-Step
Zigzag Stitch
Finish seam allowances to prevent the fabric from unravelling. When seam finishing,
the smaller step of the stitches will help keep fabric more flat than a regular zigzag.
It can also be used for mending tears and sewing elastic.
Reinforced
Zigzag Stitch
For joining fabric edge to edge or overlapping in leather. For decorative sewing.
Overlock Stitch Sew seam and overcast in one step along the edge or trim later. For medium and
medium/heavy stretch fabrics.
Blind Hem
Stitch
F
Sew hems that are practically invisible from the right side of the fabric. It is used for
skirts, dresses, trousers, curtains etc, made with non-stretch fabrics.
Stretch Blind
Hem Stitch
F
Sew hems that are practically invisible from the right side of the fabric. It is used for
garments and other projects made with stretch knit fabrics.
Slant Overedge
Stitch
Seam and overcast in one step along the edge or trim later. For medium and heavy
stretch fabrics.
6 – Introduction
English

Closed
Overlock Stitch
Sew decorative hems and overlapped seams, belts and bands. For medium/heavy
stretch fabrics.
Honeycomb
Stitch
For elastic insertion, decorative stitching, smocking, couching and hemming.
Seam/Overcast
Stitch
F
Seam and overcast in one step along the edge or trim later. For light stretch and non-
stretch fabrics.
Buttonhole Sew buttonholes on home decór, garments, crafts and more.
Rounded
Bartack
Buttonhole
For light weight fabrics.
Rounded
Bartack
Buttonhole,
Reinforced
For light weight fabrics.
Keyhole
Buttonhole
Square end for tailored jackets, coats, etc.
Keyhole
Buttonhole,
Reinforced
Square end for tailored jackets, coats, etc.
Keyhole
Buttonhole,
Tapered
Tapered end for tailored garments.
Keyhole
Buttonhole,
Rounded
For blouses and children’s garments.
Heavy Duty
Buttonhole
For medium and heavy fabrics.
Stretch
Buttonhole
For stretch fabrics.
Bartack Stitch Reinforce pockets, shirt openings, belt loops as well as at lower end of a zipper.
Introduction – 7
English

Darning Stitch Darn and mend small holes in work clothes, jeans, tablecloths and linen towels.
Eyelet For belts, laces, etc.
Button Sewing
Stitch
H
For sewing on buttons.
Decorative Stitches
Your machine also features decorative stitches. The stitches not described in the previous chart are decorative stitches. When
sewing the decorative stitches, make sure to use a stabilizer underneath the fabric for better appearance. Use a thread tension
between 3–5. Always test sew on a piece of scrap fabric, and adjust the tension if necessary.
Stitch Menu 2
Stitch Menu 3 and 4 — Block and Outline Font
8 – Introduction
English

PREPARATIONS
Unpacking the Machine
1. Place the box on a steady, flat surface. Lift the machine out of the box, and remove the packaging.
2. Remove all outer packing material and the plastic bag.
3. Wipe off the machine with a dry cloth to remove any lint and/or excess oil around the needle area.
Note: Your sewing machine is adjusted to provide the best stitch result at normal room temperature. Extreme hot and cold
temperatures can affect the sewn result.
Connect to the Power Supply
A
B
C
For the USA and Canada
This sewing machine has a polarized plug (one blade wider
than the other). To reduce the risk of electric shock, this plug
is intended to fit in a polarized outlet only one way. If the
plug does not fit fully in the outlet, reverse the plug. If it still
does not fit, contact a qualified electrician to install the
proper outlet. Do not modify the plug in any way.
Among the accessories you will find the power cord and the
foot control.
Note: Consult a qualified electrician if in doubt as how to
connect the machine to the power source. Unplug the power
cord when the machine is not in use.
For this sewing machine, foot control model C-8000
manufactured by Zeng Hsing, Taiwan must be used.
On the bottom right side of the sewing machine, you find the
connecting sockets and the ON/OFF button.
1. Connect the foot control cord to the front socket on the
bottom right side of the machine (A).
2. Connect the power cord to the rear socket on the bottom
right side of the machine (B). Plug the cord into the wall
socket.
3. Press the ON/OFF switch (C) to "I" to turn on power and
light.
The sewing speed is regulated by pressing the foot control.
Note: After turning off the machine, residual power may
remain in the machine. This could cause the light to stay on for
a few seconds while the power is consumed. This is normal for
an energy efficient appliance.
Packing Machine after Sewing
1. Switch the main switch off. After switching off, residual power may still remain in the machine. This may cause the light to
stay on for a few seconds while the power is consumed. This is normal behavior for an energy efficient appliance.
2. Unplug the cord from the wall socket and then from the machine.
3. Wind the cord around the foot control for easy storage.
4. Place all accessories in the accessory tray. Slide the tray on to the machine around the free arm.
5. Place the foot control and cord in the space above the free arm.
6. Place the soft cover on the machine to help protect it from dust and lint.
Preparations – 9
English

Free Arm/Removable Accessory Tray
A
Store presser feet, bobbins, needles and other accessories in
the accessory tray so that they are easily accessible.
Keep the accessory tray on the machine to provide a larger, flat
work surface.
Use the free arm to facilitate sewing trouser legs and sleeve
hems. To use the free arm, slide off the accessory tray. When
attached, a hook keeps the accessory tray securely attached to
the machine. Remove the tray by sliding it to the left.
When the accessory tray is removed from the machine, open
the door by putting a finger in the groove at the left side of the
accessory box (A) and carefully pull it open. Push the door
closed before putting the tray back onto the machine.
Presser Foot Lifter
The presser foot lever is located at the right side of the sewing
machine head. The lever is used to raise and lower the presser
foot. Raise the lever up for machine threading, lower it for
sewing.
By raising the presser foot lever and then pressing it farther
upwards, the lift height of the presser foot is increased to an
extra height allowing you to slide very thick projects under the
foot.
Thread Knife
To use the thread knife, pull the thread from back to front as
illustrated. Doing this will leave the thread ends long enough
so that the needle doesn't become unthreaded when you start to
sew again.
10 – Preparations
English

Spool Pin
Your machine has two spool pins, a main spool pin and an Auxiliary Spool Pin. The spool pins are designed for all types of thread.
The main spool pin is used in a horizontal position (the thread reels off the spool) and the Auxiliary Spool Pin in a vertical position
(the thread spool rotates). Use the horizontal position for normal threads and the vertical position for large spools or specialty
threads.
Main Spool Pin
A
B
Place the thread spool on the spool pin. Make sure that the
thread reels off the spool counter clockwise and slide on a
spool cap. Use a spool cap slightly larger than the thread spool.
For narrow thread spools (A), use a smaller spool cap in front
of the spool. For large thread spools (B), use a larger spool cap
in front of the spool. The flat side of the spool cap should be
pressed firmly against the spool. There should be no space
between the spool cap and the thread spool.
Note: Not all thread spools are manufactured in the same way.
If you experience problems with the thread, turn it in the
opposite way or use the vertical position.
Auxiliary Spool Pin
The Auxiliary Spool Pin is used when winding a bobbin thread
from a second spool of thread or when sewing with large
spools or with specialty threads. Insert the Auxiliary Spool Pin
into the designated hole at the top of the machine. Place a felt
pad under the thread spool. This is to prevent the thread from
reeling off too fast. Do not place a spool cap on top of the
spool pin as that would prevent the spool from rotating.
Preparations – 11
English

Wind the Bobbin
A
B
C
1. Place the thread spool on the spool pin. Slide a spool cap
firmly against the spool.
2. Place the thread into the thread guide (A) from front to the
back. Bring the thread clockwise around the bobbin
winding tension disc, making sure that the thread is pulled
snuggly between the discs.
3. Thread through the hole in the bobbin (C) from the inside
to the outside.
4. Place the bobbin on the bobbin winding spindle. Make sure
the bobbin is pushed down firmly.
5. Push the bobbin winding spindle to the right. Hold the
thread end, and press the foot control to start winding.
After a few turns, take your foot off the foot control to stop
winding. Cut the excess thread tail above the bobbin,
making sure to trim it close to the bobbin. Step on the foot
control to resume winding. When the bobbin is full, the
bobbin winding will slow down and stop automatically.
Note: You can also start the winding by long pressing the
start/stop button.
When the winding spindle is pushed to the right, a bobbin
winding icon is shown on the display (D).
6. Push the bobbin winding spindle to the left. Remove the
bobbin and cut the thread.
Note: When the bobbin winding spindle is pushed to the right, the machine will not sew. Make sure to push the bobbin spindle back
to the sewing position (left) before sewing.
Insert the Bobbin
A
B
1 2
3
C D
4
5
E
Note: Make sure that the needle is fully raised and the
machine is turned off before inserting or removing the bobbin.
1. Remove the bobbin cover (A) by pushing the small button
to the right of the cover (B) towards the right.
2. Insert the bobbin in the bobbin case with the thread
running in a counterclockwise direction.
3. With the tip of your finger on the bobbin, pull the thread
slightly to the right and under the guide (C) then towards
the left. Continue guiding the thread up toward the left and
around the curve (D). Bring it down the channel toward the
front and into the bobbin thread knife (E).
4. Replace the bobbin cover and pull the thread to the right to
cut off the excess thread.
12 – Preparations
English

Thread the Machine
C
A
D
B
Machine from above
E
F
Machine from front
Important! Make sure that the presser foot is raised and the
needle is in its highest position by turning the handwheel
toward you. This is very important to help ensure that the
machine is correctly threaded. Not doing so can result in poor
stitch quality when you start to sew.
1. Place the thread on the spool pin and fit the appropriately
sized spool cap.
2. Pull the thread into the thread guide (A) from front to the
back and thread guide (B) from back to front. Pull the
thread between the tension discs (C).
3. Continue bringing the thread down through the right
threading slot, around the U-turn, then back upwards
through the left threading slot.
4. Bring the thread from the right into the take-up lever (D)
and down in the left-hand threading slot, into the lower
thread guide (E) and to the needle thread guide (F).
5. Thread the needle from front to back.
Preparations – 13
English

Needle Threader
C
A
B
D
The built-in needle threader allows you to thread the needle
quickly and easily.
The needle must be in its highest position to use the built-in
needle threader. Turn the hand wheel towards you until the
needle is in its highest position, or press the needle up/down
button. It is also recommended that you lower the presser foot.
• Use the handle (A) to pull the needle threader all the way
down. The metal flanges cover the needle. A small hook
will pass through the needle eye (B).
• Place the thread from the back over the thread guide (C)
and under the small hook (D).
• Let the needle threader gently swing back. The hook pulls
the thread through the needle eye and forms a loop behind
the needle. Pull the thread loop out behind the needle.
• Raise the presser foot and place the thread under it.
• Pull out about 6–8” (15–20cm) of thread beyond the needle
eye. This will prevent the machine from coming unthreaded
when you start to sew.
Note: The needle threader is designed to be used for size 70-
110 needles. You cannot use the needle threader for size 60
needles or smaller, wing needles or twin needles. There are
also some optional accessories that require manual threading
of the needle. When threading the needle manually, make sure
that the needle is threaded from front to back.
Needles
The sewing machine needle plays an important role in successful sewing. Use only quality needles. We recommend needles of
system 130/705H. The needle package included with your machine contains needles of the most frequently used sizes.
Be sure to match the needle to the thread you are using. Heavier threads require a needle with a larger needle eye. If the
needle eye is too small for the thread the needle threader may not work properly.
Universal Needle
Universal needles have a slightly rounded point and come in a variety of sizes. For general sewing in a
variety of fabric types and weights.
Stretch Needle
Stretch needles have a ball point and a special scarf to eliminate skipped stitches when there is a flex
in the fabric. For knits, swimwear, fleece, synthetic suedes and leathers.
Denim Needle
Denim needles have a sharp point to penetrate tightly woven fabrics without deflecting the needle. For
canvas, denim, microfibers.
Embroidery Needle
Embroidery needles have a special scarf, a slightly rounded point and a slightly larger eye to avoid
damage to thread and materials. Use with metallic and other specialty threads for embroidery and
decorative sewing.
Wing Needle
Wing needles have wide extensions on each side of the needle to poke holes in the fabric when sewing
entredeux and other hemstitches on natural fiber fabrics.
14 – Preparations
English

Important Needle Information
A
B
C
Change the needle often. As a general rule,
needles should be changed every 6-8 hours of
actual stitching time.
Always use a straight needle with a sharp point and make sure
the point is not bent or damaged (A).
A damaged needle (B) can cause skipped stitches, breakage or
snapping of the thread. It can also damage the needle plate.
Do not use asymmetrical twin needles (C), they can damage
your sewing machine.
Selection Guide — Needle Size, Fabric, Thread
Needle Size Fabric Thread
70–80 (9–11) Lightweight fabrics: Fine cotton, voile, silk, muslin,
interlock, tricot, jersey, crepe, polyester, chiffon, organza,
organdy
Light duty all purpose thread
80-90 (11-14 ) Medium weight fabrics: Quilting cotton, satin, double knit,
lightweight wool, rayon, polyester, lightweight linen
Use polyester threads on synthetic fabrics and
all-purpose or cotton thread on natural fabrics
for best results.
90 (14) Medium weight fabrics: Firm woven, medium weight
linen, cotton/polyester blend, terrycloth, chambray,
double knit
100 (16) Heavy weight fabrics: Canvas, wool, denim, home decor,
fleece, heavy knit
110 (18) Heavy weight fabrics: Coat weight wool, upholstery
fabrics
Heavy duty thread for needle, with all-purpose
thread for the bobbin.
Change the Needle
1 2
3 4
Note: Before you begin changing the needle, it can be helpful
to place a small piece of paper or fabric underneath the needle
area, over the hole in the needle plate, so that the needle
doesn't accidentally fall down into the machine.
1. Loosen the needle clamp screw. If it feels tight, use the
screwdriver from your accessories to aid with loosening
the screw.
2. Remove the needle.
3. Push the new needle upwards into the needle clamp with
the flat side away from you.
4. When the needle will go up no further, tighten the screw
securely.
Preparations – 15
English

Thread Tension
A
B
C
To set the thread tension, turn the dial on top of the machine.
Depending on the fabric, thread, etc, the tension may need to
be adjusted. For the best stitch appearance and durability,
make sure the needle thread tension is correctly adjusted. For
general sewing, the threads evenly meet between the two
layers of fabric (A).
If the bobbin thread is visible on the top side of the fabric, the
needle thread tension is too tight (B). Reduce the needle thread
tension.
If top thread is visible on the underside of the fabric, the
needle thread tension is too loose (C). Increase the needle
thread tension.
For decorative stitches and buttonholes, the top thread should
be visible on the underside of the fabric.
Make a few tests on a scrap piece of the fabric you are going to
sew and check the tension.
Sew without Feed Teeth
21
When sewing on buttons or doing other sewing techniques
where you don't want the fabric to feed, you need to lower the
feed teeth.
The feed teeth lever is found at the back of the free arm.
1. Lower the feed teeth by moving the lever to the “Feed
Teeth Down” position.
2. Raise the feed teeth by moving the lever to the “Feed Teeth
Up” position.
Note: The feed teeth will not raise immediately when the lever
is switched. Turn the hand wheel toward you one full turn or
start sewing to re-engage the feed teeth.
Presser Foot Pressure
3
The presser foot pressure is used to control the amount of
pressure that the presser foot exerts onto the fabric, to ensure
smooth feeding of the fabric while sewing. The presser foot
pressure has been pre-set to the standard value "2". Though it
needs no adjustment for most fabrics, it can be adjusted for
very thick or very thin fabric - increase for heavy weight
fabrics, decrease for lightweight fabrics.
Note: If the dial is turned counterclockwise too much, it could
come off. If this happens, simply replace the dial and turn it
clockwise until it stays in place.
Note: If the dial is turned clockwise until it comes to a stop, it
has reached the maximum pressure available. Do not try to
turn the dial any further!
16 – Preparations
English
This manual suits for next models
1
Table of contents
Other Singer Sewing Machine manuals

Singer
Singer 69-23 User manual

Singer
Singer 518 Manual

Singer
Singer Initiale User manual

Singer
Singer SewQuick User manual

Singer
Singer 99W86 User manual

Singer
Singer 1371A1 Setup guide

Singer
Singer 107W50 Quick start guide

Singer
Singer 331K1 User manual

Singer
Singer 153W102 Quick start guide

Singer
Singer 1507WC User manual

Singer
Singer 28W User manual

Singer
Singer 457U505 User manual

Singer
Singer CG-590 User manual

Singer
Singer 71-30 User manual

Singer
Singer 51W51 Quick start guide

Singer
Singer 300U294A Setup guide

Singer
Singer Stylist 7258 User manual

Singer
Singer 630 User manual

Singer
Singer 2932 User manual

Singer
Singer 66-6 User manual