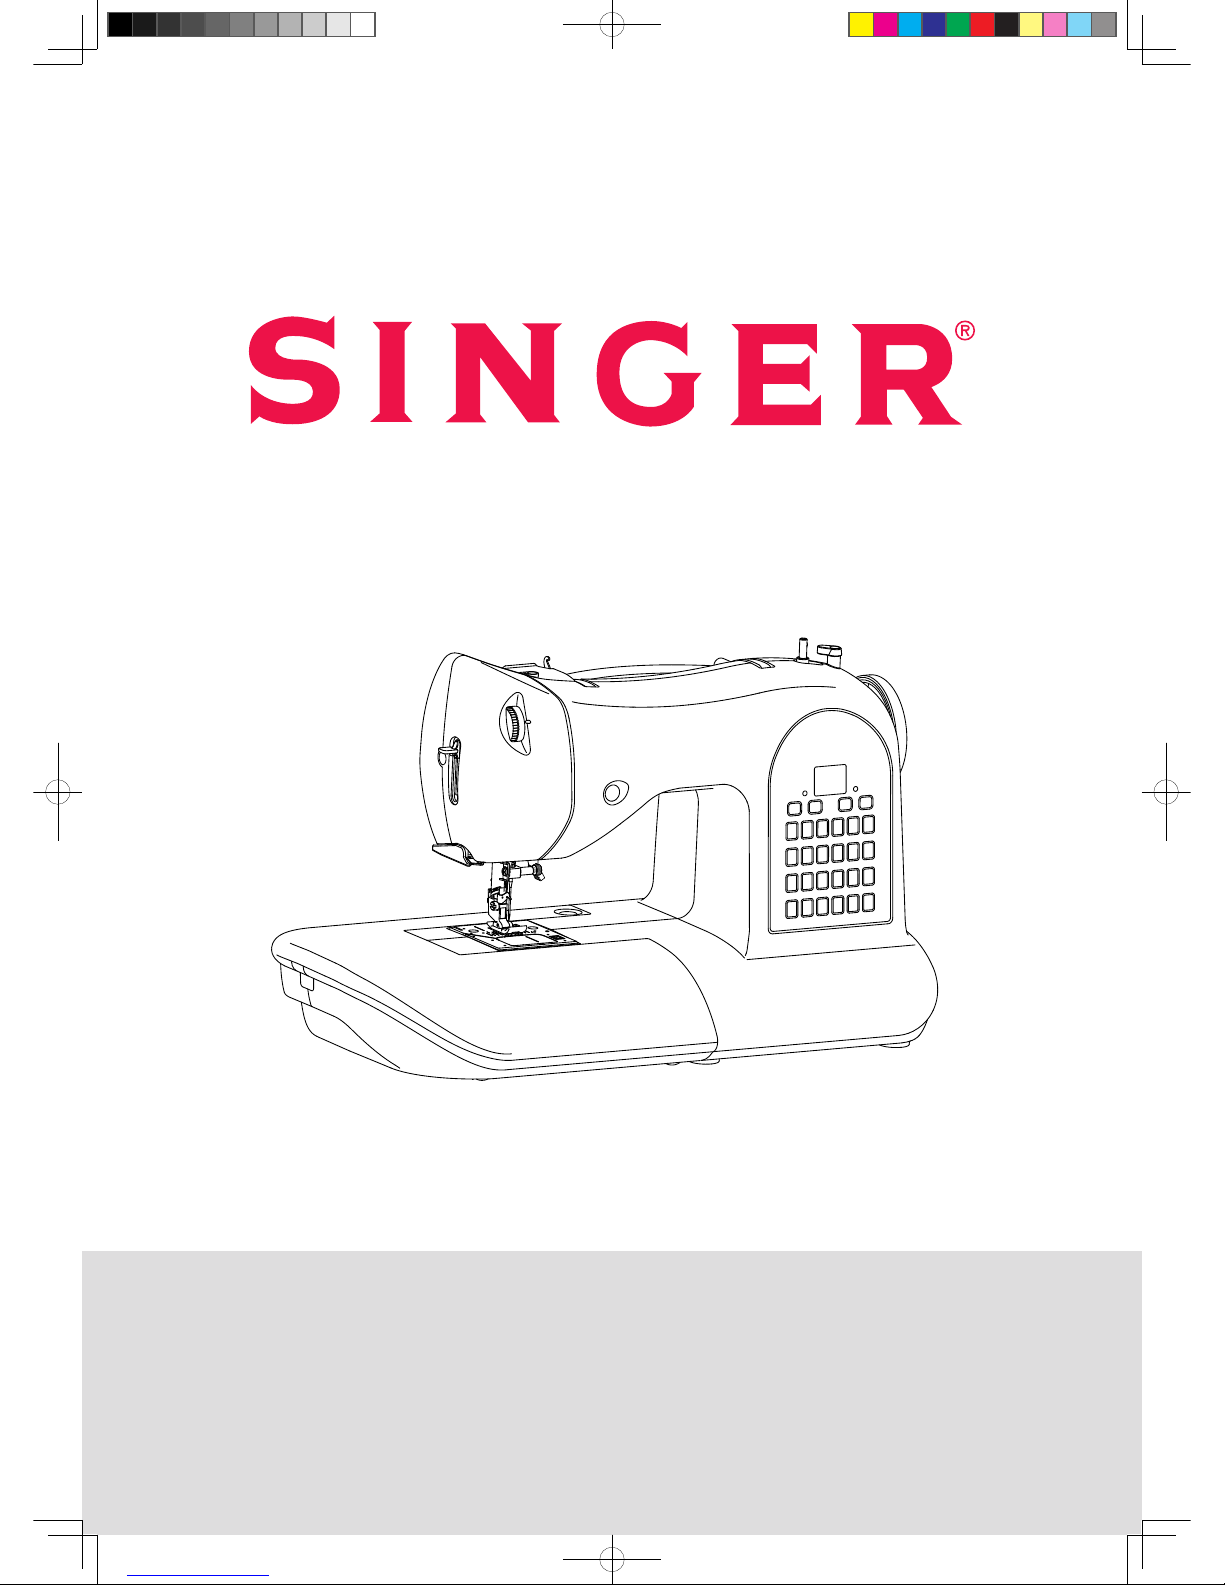
Singer One User manual

INSTRUCTION MANUAL
MANUEL D’INSTRUCTION
HANDLEIDING
1
F-1

F-2
“IMPORTANT SAFETY INSTRUCTIONS”
“WARNING
-
To reduce the risk of burns, re, electric shock, or injury to persons: ”
1. “Do not allow to be used as a toy. Close attention is necessary when this sewing machine is used by or near children.”
2. “ This appliance is not intended for use by persons (including children) with reduced physical, sensory or mental capabilities,
or lack of experience and knowledge, unless they have been given supervision or instruction concerning use of the appliance
by a person responsible for their safety. Children should be supervised to ensure that they do not play with the appliance.”
3. “ Use this sewing machine only for its intended use as described in this manual. Use only attachments recommended by the
manufacturer as contained in this manual.”
4. “ Never operate this sewing machine if it has a damaged cord or plug, if it is not working properly, if it has been dropped
or damaged, or dropped into water. Return the sewing machine to the nearest authorized dealer or service center for
examination, repair, electrical or mechanical adjustment.”
5. “ If the supply cord is damaged, it must be replaced by the manufacturer, its service agent or similarly qualied persons in
order to avoid a hazard.”
6. “ Never operate the sewing machine with any air openings blocked. Keep ventilation openings of the sewing machine and foot
control free from the accumulation of lint, dust, and loose cloth.”
7. “Never drop or insert any object into any opening.”
8. “Indoors use only.”
9. “Do not operate where aerosol (spray) products are being used or where oxygen is being administered.”
10. “To disconnect, turn switch to the off (“0“) position, then remove plug from outlet.”
11. “ Switch off or unplug the appliance when leaving it unattended, unplug the appliance before carrying out maintenance or
replacing lamps.”
12. “Do not unplug by pulling on cord. To unplug, grasp the plug, not the cord.”
13. “Keep ngers away from all moving parts. Special care is required around the sewing machine needle.”
14. “Never sew with a damaged needle plate as this can cause needle to break.”
15. “Do not use bent needles.”
16. “Do not pull or push fabric while stitching. It may deect the needle causing it to break.”
17. “ Switch the sewing machine off (“0”) when making any adjustments in the needle area, such as threading needle, changing
needle, threading bobbin, or changing presser foot, etc.”
18. “ Always unplug sewing machine from the electrical outlet when removing covers, lubricating, or when making any other user
servicing adjustments mentioned in the instruction manual.”
19. “ To avoid electrical shock never put the machine nor the mains cable or mains plug into water or other liquids.”
20. “ The LED lamp maximum power is 0.3W, maximum voltage is DC 5V, if the LED lamp is damaged, you should not use the
product and send it to the manufacture or service agent to repair or replace at once.”
21. “Caution - to avoid injury:
- Unplug the foot controller of the appliance when leaving it unattended:
- Unplug the foot controller of the appliance before carrying out any maintenance.”
“SAVE THESE INSTRUCTIONS”
“This product is for household use, or equivalent.”
“When using an electrical appliance, basic safety precautions should always be followed, including the following.”
“Read all instructions before using this sewing machine.”
“DANGER
-
-To reduce the risk of electric shock:”
1. “ This sewing machine should never be left unattended when plugged in. Always unplug this sewing machine from the electric
outlet immediately after using and before cleaning.”
FOOT CONTROL (USA & Canada only)
Use Model YC-485 EC or Model JF-1000 with this sewing machine.
POLARIZED PLUGS CAUTION (USA & Canada only)
This appliance has a polarized plug (one blade wider than the other). To reduce the risk of electric shock, this plug is intended
to t in a polarized outlet only one way. If the plug does not t fully in the outlet, reverse the plug. If it still does not t, contact a
qualied electrician to install the proper outlet. Do not modify the plug in any way.
“CAUTION
-
-Moving parts - To reduce risk of injury, switch off before servicing. Close cover before operating
machine.”
This appliance complies with EEC Directive 2004/108/EC covering the electromagnetic compatibility.
Please note that on disposal, this product must be safely recycled in accordance with relevant national legislation
relating to electrical/electronic products. If in doubt, please contact your retailer for guidance.
SINGER is the exclusive trademark of The Singer Company Limited S.à r.l. or its Afliates.
©2011 The Singer Company Limited S.à r.l. or its Afliates. All rights reserved.

1
1. Cette machine à coudre ne devrait jamais être laissée sans surveillance lorsque branchée. Toujours la débrancher
immédiatement après l’avoir utilisée ou avant de la nettoyer.”
Toujours faire preuve de prudence en utilisant un appareil électromécanique.
Lire toutes les instructions avant d’utiliser cette machine à coudre.
DANGER
-
IMPORTANTES CONSIGNES DE SÉCURITÉ
AVERTISSEMENT-
1. Ne pas utiliser comme jouet. Une surveillance attentive est nécessaire lorsque cette machine est utilisée par ou près des
enfants.
2. Cet appareil n’est pas conçu pour des personnes (incluant les enfants) ayant un handicap physique, sensoriel ou mental,
ni par des personnes inexpérimentées, à moins qu’elles soient supervisées ou formées adéquatement par une personne
responsable de leur sécurité. Les enfants doivent être surveillés pour éviter qu’ils ne jouent avec l’appareil.
3. N’utiliser cet appareil qu’aux fins mentionnées dans ce manuel et n’utiliser que des accessoires recommandés par le
fabricant.
4. Ne jamais faire fonctionner l’appareil si le cordon ou la che est endommagé, s’il ne fonctionne pas adéquatement, s’il a été
échappé, endommagé ou s’il est tombé dans l’au. Retourner la machine à un détaillant autorisé ou un centre de service le
plus près pour inspection, réparation, ajustement électrique ou mécanique.
5. Si le cordon est endommagé, il doit être remplacé par le fabricant, un représentant autorisé ou toute autre personne qualiée
pour éviter tout danger.
6. Ne jamais utiliser la machine à coudre si les ventilateurs sont bloqués. Garder toutes les ouvertures et le rhéostat exempts
d’accumulation de peluches, de poussières ou de pièces de tissu.
7. Ne jamais laisser tomber ni insérer d’objet quelconque dans les ouvertures.
8. Utiliser à l’intérieur seulement.
9. Ne pas faire fonctionner là où des produits en aérosol sont vaporisés ou de l’oxygène est administré.
10. Pour débrancher, fermer l’interrupteur (OFF), puis retirer la che de la prise.
11. Fermer l’interrupteur ou débrancher l’appareil, lorsqu’il est laissé sans surveillance, avant de faire un entretien ou de
remplacer des ampoules.
12. Ne pas débrancher en tirant sur le cordon. Utiliser plutôt la che.
13. Garder les doigts éloignés de toute pièce mobile. L’aiguille doit faire l’objet d’une attention particulière.
14. Ne jamais coudre si la plaque d’aiguille est endommagée, car elle pourrait briser l’aiguille.
15. Ne pas utiliser d’aiguille gauchies.
16. Ne pas tirer ni pousser le tissu en cousant. Il pourrait faire dévier l’aiguille et la briser.
17. Fermer l’interrupteur (OFF) avant de faire un quelconque ajustement autour de l’aiguille, comme enler l’aiguille, la changer,
embobiner du l ou changer de pied sur le rhéostat, etc.
18. Toujours débrancher la machine à coudre de la prise pour retirer des couverts, lubrier la machine ou pour faire tout autre
ajustement mentionné dans ce manuel.
19. Pour éviter toute décharge électrique, ne jamais mettre la machine, ni les câbles principaux, ni les ches dans l’eau ou tout
autre liquide.
20. La puissance maximum des ampoules DEL est de 0,3 W, le voltage CC est de 5 V. Si l’ampoule DEL est endommagée, ne
pas utiliser l’appareil et l’envoyer immédiatement au fabricant ou à un représentant pour réparation ou remplacement.
21. Pour éviter toute blessure, débrancher le rhéostat :
a. lorsque l’appareil est laissé sans surveillance.
b. avant de le transporter pour effectuer un entretien.
ATTENTION
-
Pièces mobiles. Pour réduire le risque de blessures, fermer l’interrupteur avant d’effectuer un
entretien. Fermer le couvercle avant de faire fonctionner la machine.
CONSERVER CES INSTRUCTIONS
Ce produit est conçu pour une utilisation domestique seulement (ou l’équivalent).
Pour réduire le risque de brûlures, de feu, de choc électrique ou de blessures,
suivre ce qui suit:
Pour réduire le risque de décharge électrique,
suivre ce qui suit:
RHÉOSTAT (États-Unis et Canada seulement).
Avec cette machine à coudre, utilisez le modèle YC-485 EC ou JF-1000.
Cet appareil est conforme à la norme CEE 2004/108/EC concernant les normes
électromagnétiques.
INFORMATIONS CONCERNANT LES FICHES POLARISÉES(États-Unis et Canada seulement)
Cet appareil est équipé d'une che polarisé (une lame est plus large que I’autre). Pour réduire les risques de décharge électrique,
cette che ne peut être branchée dans la prise que d’une seule façon. Si la che ne peut pas être insérée entièrement dans
la prise, tournez la che. Si la che ne peut toujours pas entrer dans la prise, veuillez contacter un électricien qualié an qu'il
installe la prise murale appropriée. Ne modiez la che en aucun cas.
Veuillez noter qu’avant de mettre au rebus, ce produit doit être recyclé conformément à la législation nationale
applicable aux produits électriques/électroniques. En cas de doute, veuillez communiquer avec le détaillant.
SINGER est une marque exclusive de The Singer Company Limited S.à r.l. ou de ses Afliés.
© 2011 The Singer Company Limited S.à r.l. ou de ses Afliés. Tous Droits Réservés.

2
BELANGRIJKE VEILIGHEIDSINSTRUCTIES
Wanneer u een elektrisch apparaat gebruikt, dienen de fundamentele veiligheidsvoorschriften altijd te worden nageleefd, met
inbegrip van de volgende punten. Lees alle instructies goed door voordat u de machine gebruikt.
GEVAAR - Om het risico van elektrische schokken te verminderen:
1. La máquina no debe dejarse nunca desatendida mientras esté conectada. Desconectar la máquina de la red eléctrica
inmediatamente después de su uso y antes de limpiarla.
WAARSCHUWING
-
1. “Laat dit apparaat niet als speelgoed gebruiken. Let goed op als u dit apparaat in de buurt van kinderen gebruikt.”
2. “Dit apparaat is niet bestemd voor gebruik door personen (inclusief kinderen) met verminderde lichamelijke, zintuiglijke of
geestelijke vermogens, of gebrek aan ervaring en kennis, tenzij hen toezicht of instructie over het gebruik van het apparaat
door een persoon die verantwoordelijk is voor hun veiligheid is gegeven. Kinderen moeten begeleid worden om ervoor te
zorgen dat ze niet spelen met het apparaat.”
3. “Gebruik het apparaat alleen voor de doelen waarvoor het gemaakt is, zoals beschreven in deze gebruiksaanwijzing. Gebruik
alleen toebehoren aanbevolen door de fabrikant en beschreven in deze gebruiksaanwijzing.”
4. “Gebruik dit apparaat nooit als de snoeren of de stekker beschadigd zijn, het niet goed functioneert, is gevallen of beschadigd
of nat geworden is. Laat het apparaat nakijken bij de dichtstbijzijnde dealer of service punt voor onderzoek en reparatie.”
5. “Als het netsnoer is beschadigd, moet het worden vervangen door de fabrikant, de service agent of personen met
vergelijkbare kwalicaties om gevaar te voorkomen.”
6. “Gebruik het apparaat nooit met geblokkeerde luchtopeningen. Hou de ventilatieopeningen van de machine en de voetpedaal
vrij van stof, kleding en afval.”
7. “Stop niets in welke opening dan ook.”
8. “Alleen voor gebruik binnenshuis.”
9. “Gebruik de machine niet terwijl er spuitbussen of zuurstof gebruikt worden.”
10. “Om de machine uit te zetten, zet de schakelaar uit (“0”) en haal de stekker uit het stopcontact.”
11. “Haal de stekker van het apparaat altijd uit het stopcontact bij het onbeheerd laten van de machine, bij het openen van de
machine, of onderhoudswerkzaamheden zoals het smeren of verwisselen van het lampje.”
12. “Trek aan de stekker, niet aan het snoer.”
13. “Hou uw vingers weg bij bewegende delen. Let vooral op in de buurt van de naald.”
14. “Gebruik altijd de juiste steekplaat. Een verkeerde of beschadigde steekplaat kan naaldbreuk veroorzaken.”
15. “Gebruik geen scheve naalden.”
16. “Duw of trek niet aan de stof terwijl u naait. Hierdoor kan de naald verbuigen en breken.”
17. “Schakel de machine uit “O” als u aanpassingen uitvoert in de buurt van de naald, zoals naald verwisselen of draad inrijgen
van de naald, of bij het verwisselen van de naaivoet en dergelijke.”
18. “Haal altijd de stekker uit het stopcontact wanneer u de machine openmaakt, smeert, of wanneer u andere
onderhoudswerkzaamheden uitvoert zoals genoemd in deze handleiding.”
19. “Om elektrische schokken te voorkomen, zet de machine noch het netsnoer of de stekker in water of andere vloeistoffen.”
20. “Maximum vermogen van de LED lamp is 0,3W, de maximale spanning is 5V DC. Als de LED lamp beschadigd is, moet
je het product niet gebruiken en stuur je het naar de hersteldienst of omruildienst van de lampen of naar de betreffende
servicedienst.”
21. “Let op het volgende om letsel te voorkomen:
- Ontkoppel de voetcontroller van het toestel bij het verlaten van uw werkplek:
- Ontkoppel de voetcontroller van het toestel voor het aanvangen van de onderhoudswerken.”
Om het risico van brand, vuur, elektrische schokken of verwondingen
van personen te verminderen:
BEWAAR DEZE INSTRUCTIES
Deze naaimachine is bestemd voor huishoudelijk gebruik en dergelijke.
VOETPEDAAL (Alleen USA & Canada) Gebruik Model YC-485EC of JF-1000 met deze naaimachine.
Deze machine voldoet aan de Elektromagnetische Compatibiliteit Richtlijn 2004/108/EG.
GEPOOLDE NETSTEKKER (alleen USA & Canada)
Deze machine is met een gepoolde netstekker uitgevoerd, d.w.z dat de stekkerpennen een verschillende breedte hebben. Ter
voorkoming van elektrische schokken kan deze netstekker slechts in één richting in het stopcontact worden gestoken. Wanneer
de stekker niet in het stopcontact past, dient de stekker te worden gedraaid. Wanneer de stekker dan nog steeds niet past, neem
dan contact op met een elektricien voor de installatie van een geschikt stopcontact. Wijzig de stekker in geen geval.
Let op! Dit product moet op een veilige manier gerecycled worden volgens de geldende nationale wetgeving voor
elektrische/ elektronische producten. Raadpleeg bij twijfel uw leverancier voor advies.
SINGER is een geregistreerd handelsmerk van The Singer Company Limited of partners.
©2010 The Singer Company Limited of partners. Alle rechten voorbehouden.
Gevaar door bewegende onderdelen – ter voorkoming van gevaren voor verwondingen moet de
machine worden uitgeschakeld alsvorens er onderhoudswerkzaamheden uitgevoerd worden. Men
dient alles dicht te maken voor het gebruik van de machine.
PAS OP -

3
1. KNOWING YOUR SEWING MACHINE
Machine identication ------------------------------------------------6 - 7
Accessories -------------------------------------------------------------8 - 9
Setting up your machine -----------------------------------------10 - 11
Spool pins ----------------------------------------------------------- 12 - 13
Presser foot lifter, Feed dog control -------------------------- 12 - 13
Converting to free-arm sewing -------------------------------- 12 - 13
Winding the bobbin ----------------------------------------------- 14 - 15
Threading the bobbin thread ----------------------------------- 16 - 17
Threading the top thread ---------------------------------------- 18 - 19
Using automatic needle threader ----------------------------- 20 - 21
Needle, thread and fabric chart ------------------------------------- 22
Changing the needle---------------------------------------------------- 23
Adjusting top thread tension ----------------------------------- 24 - 25
Changing presser foot ------------------------------------------- 24 - 25
Control panel functions ------------------------------------------ 26 - 27
Reverse operation button --------------------------------------- 28 - 29
2. STARTING TO SEW
Quick reference table of stitch length and width ---------- 30 - 31
Straight stitching -------------------------------------------------- 32 - 35
Keeping seams straight, Inserting zippers and piping
Hand-look quilt stitch --------------------------------------------- 34 - 35
Zigzag stitching ---------------------------------------------------- 36 - 37
Adjusting stitch width and length, Satin stitch
Placement of patterns
TABLE OF CONTENTS
For European version
Blindhem stitch, Multi-stitch zig zag -------------------------- 38 - 39
Stretch and Decorative Stitches ------------------------------- 40 - 45
Straight stretch stitch, Ric-rac stitch, Honeycomb stitch,
Overedge stitch, Feather stitch, Pin stitch, Blanket stitch,
Ladder
stitch,
Slant overedge stitch, Entredeux stitch
Decorative Patterns ---------------------------------------------- 44 - 45
Ideas on design stitching
Continuous patterns, Sewing on a button ------------------ 44 - 45
Sewing a buttonhole --------------------------------------------- 46 - 49
Using buttonhole foot, Procedure, Corded buttonholes,
Buttonholing with hard-to-sew fabrics
3. CARING FOR YOUR MACHINE
Cleaning hook area and feed dogs --------------------------- 50 - 51
Cleaning the sewing machine and foot controller
4. OTHER INFORMATION
Satin stitch foot ---------------------------------------------------- 52 - 53
Twin needle --------------------------------------------------------- 52 - 53
Threading the twin needle
Straight stitch needle position ---------------------------------- 52 - 53
5. PERFORMANCE CHECKLIST ------------------------ 54 - 55
Helpful messages, System error------------------------------- 56 - 57
Dimensions: 33 cm x 26 cm x 54.5 cm
Mass of the equipment: 8.3 kg
Rated Voltage: 230 V ~
Rated Frequency: 50 Hz
Rated input: 75 W
Using ambient temperature: Normal temperature
Acoustic noise level: less than 70 db(A)

4
Version pour l’Europe
1. DESCRIPTION DE LA MACHINE À COUDRE
Description --------------------------------------------------------------6 - 7
Accessoires -------------------------------------------------------------8 - 9
Préparation de la machine ---------------------------------------10 - 11
Porte-bobine -------------------------------------------------------- 12 - 13
Levier du pied presseur ------------------------------------------ 12 - 13
Contrôle des griffes ----------------------------------------------- 12 - 13
Utilisation du bras libre ------------------------------------------ 12 - 13
Préparation de la canette --------------------------------------- 14 - 15
Enlage du l de la canette ------------------------------------- 16 - 17
Enlage du l supérieur ----------------------------------------- 18 - 19
Utilisation de l’enleur de chas d’aiguille -------------------- 20 - 21
Tableau des tissus, du ls et des aiguilles ------------------------ 22
Changement d’aiguille-------------------------------------------------- 23
Réglage de la tension du l supérieur ----------------------- 24 - 25
Remplacement du pied presseur ----------------------------- 24 - 25
Fonctions du panneau de commande ----------------------- 26 - 27
Bouton d’opération du point de marche arrière ----------- 28 - 29
2. POUR COUDRE
Tableau de référence rapide des
longueurs et largeurs de points --------------------------- 30 - 31
Point droit ----------------------------------------------------------- 32 - 35
Pour garder la couture droite,
Insérer un fermeture à glissière ou un passepoil
Point de matelassage d’apparence fait à la main --------- 34 - 35
Point zigzag -------------------------------------------------------- 36 - 37
Réglage de la largeur et de la longueur du point,
Point bourdon, Positionnement des motifs
Point invisible, Zigzag multi-point ----------------------------- 38 - 39
TABLE DES MATIÈRES
Point décoratifs et points extensibles ------------------------ 40 - 45
Point droit extensible, Point ric-rac, Nid d’abeille,
Point surjet extensible, Point plume, Point épingle,
Point de languette, Point d’échelle, Point épingle oblique,
Point entredeux
Points décoratifs -------------------------------------------------- 44 - 45
Idées sur les points décoratifs
Motifs en continus, Pose de boutons ------------------------ 44 - 45
Confection des boutonnières ---------------------------------- 46 - 49
Boutonnière automatique, Procedure,
Boutonnière gansées (renforcées),
Boutonnière sur des tissus difcile à coudre
3. ENTRETIENT DE LA MACHINE
Nettoyage des griffes et autour du crochet------------------ 50 - 51
Nettoyage de la machine à coudre et du rhéostat
4. RENSEIGNEMENTS ADDITIONNELLES
Pied point bourdon ------------------------------------------------ 52 - 53
Aiguille jumelée (optionnel) ------------------------------------- 52 - 53
Enlage de l’aiguille jumelée
Réglage de la position d’aiguille pour le point droit ------- 52 - 53
5. VÉRIFICATION DES PROBLÈMES
MINEUR DE COUTURE ---------------------------------- 54 - 55
Messages D’aide, Erreur du système ------------------------ 56 - 57
Dimensions: 33 cm x 26 cm x 54.5 cm
Poids de l’équipement: 8.3 kg
Tension nominale: 230 V ~
Fréquence nominale: 50 Hz
Entrée nominale: 75 W
Utilisation de la
température ambiante: température normale
Niveau de bruit acoustique: moins de 70 db(A)

5
Voor Europese versie
1. UW NAIMACHINE STELT ZICH VOOR
Benaming van de onderdelen --------------------------------------6 - 7
Accessoires -------------------------------------------------------------8 - 9
Instellen van uw machine ----------------------------------------10 - 11
Garenpennen ------------------------------------------------------ 12 - 13
Persvoethevel, Transporteur-afdekplaat -------------------- 12 - 13
Vrije-arm naaien --------------------------------------------------- 12 - 13
Spoelen -------------------------------------------------------------- 14 - 15
Inrijgen van de onderdraad ------------------------------------- 16 - 17
Inrijgen van de bovendraad ------------------------------------ 18 - 19
Gebruik van de automatische draadinrijger ---------------- 20 - 21
Naald-Garen-Stoftabel ------------------------------------------------- 22
Verwisselen van de naald --------------------------------------------- 23
Afstellen van de bovendraadspanning ----------------------- 24 - 25
Verwisselen van het voetje ------------------------------------- 24 - 25
Bedieningspaneelfuncties --------------------------------------- 26 - 27
Achterwaartsknop ------------------------------------------------- 28 - 29
2. BEGINEN MET NAIEN
Snelzoektabel voor steeklengte en breedte ---------------- 30 - 31
Rechte steek ------------------------------------------------------- 32 - 35
Het recht stikken van de naad,
Ritssluiting aanbrengen en koorden naaien
Quiltsteek in handgenaaide optiek --------------------------- 34 - 35
Zigzagsteek --------------------------------------------------------- 36 - 37
Afstellen van de steekbreedte en lengte,
Satijnsteek, Plaatsing van patronen
Blindzomen --------------------------------------------------------- 38 - 39
INHOUD
Zigzag met meerdere steken ---------------------------------- 40 - 45
Stretchsteken ------------------------------------------------------ 40 - 45
Rechte stretchsteek, Drievoudige rechte steek,
Smocksteek, Overlocksteek, Veersteek, Picosteek,
Festonneersteek, Trapsteek,
Elastische overlocksteek, Entredeux-steek,
Decoratieve patronen -------------------------------------------- 44 - 45
Enkele naaitips voor decoratieve steken
Doorlopende patronen ,Knopen aannaaien----------------- 44 - 45
Knoopsgaten maken ---------------------------------------------- 46 - 49
Gebruik van de knoopsgatvoet, werkwijze,
knoopsgat met koordinleg,
Knoopsgaten op moeilijk te naaien stoffen
3. ONDERHOUD VAN DE MACHINE
Schoonmaken van grijperruimte en transporteur --------- 50 - 51
Reinigen van de machine en het voetpedaal
4. OVERIGE INFORMATIES
Cordonvoet5 -------------------------------------------------------- 52 - 53
Dubbele naald(Optioneel) --------------------------------------- 52 - 53
Inrijgen van de dubbele naald
Naldpositie voor de rechte steek-------------------------------- 52 -53
5. PROBLEEMOPLOSSINGEN --------------------------- 54 - 55
Waarschuwingsbericht, Systeem fout ------------------------ 56 - 57
Afmetingen: 33 cm x 26 cm x 54.5 cm
Gewicht van apparatuur: 8.3 kg
Nominale spanning: 230 V ~
Nominale frequentie: 50 Hz
Nominaal stroomverbruik: 75 W
Uso de temperatura ambiente: temperatura normal
Akoestisch geluidsniveau: minder dan 70db (A)

6
12
14
13
16 17
15
1. Pre-tension guide
2. Bobbin winding tension disk
3. Thread tension control
4. Threading lever
5. Face cover
6. Thread cutter/holder
7. Extension table (Accessory box)
8. Bobbin winder shaft
9. Bobbin winder stop
10. Reverse stitch button
11. Horizontal spool pin
12. Handle
13. Hand wheel
14. Power/light switch
15. Cord socket
16. Identication plate
17. Presser foot lifter
18. Buttonhole lever
19. Twin thread guide
20. Thread guide
21. Presser foot screw
22. Needle
23. Bobbin cover plate
24. Needle bar
25. Alternate thread cutter
26. Foot release button
27. Needle clamp screw
28. Presser foot
29. Feed dogs
30. Needle plate
31. Bobbin cover release button
32. Power line cord
33. Foot control
34. Instruction manual
1. KNOWING YOUR SEWING MACHINE
MACHINE IDENTIFICATION
32 33 34
18
3
2
4
5
6
7
8
9
10
19
20
21
22
23
25
26
27
28
30
31
29
24
1
11

7
DESCRIPTION
1. DESCRIPTION DE LA
MACHINE À COUDRE
1. Draadopname
2. Draadgeleider
3. Draadspanningsregelaar
4. Inrijghendel
5. Frontkapje
6. Draadafsnijder/-houder
7. Aaanschuiftafel (toebehorenbox)
8. Spoelwinderasje
9. Spoelwinderstop
10. Achterwaartsknop
11. Horizontale garenpen
12. Handvat
13. Handwiel
14. Aan/uit-schakelaar
15. Netsnoeringang
16. Machinenummer
17. Persvoethevel
18. Knoopsgathevel
19. Dubbele draadgeleider
20. Draadgeleider
21. Bevestigingsschroef voor de voet
22. Naald
23. Schuifplaat (spoelruimtedeksel)
24. Naaldstang
25. Draadafsnijmesje
26. Ontgrendelknop voor de voet
27. Naaldklemschroef
28. Voetje
29. Transporteur
30. Naaldplaat
31. Uitwerpknop voor de schuifplaat
32. Netsnoer
33. Voetpedaal
34. Handleiding
BENAMING VAN DE ONDERDELEN
1. UW NAIMACHINE STELT ZICH
VOOR
1. Guide pré-tension
2. Disque de tension du bobineur
3. Réglage de la tension du l supérieur
4. Levier d’enlage
5. Plaque frontale
6. Coupeur et reteneur de l
7. Table de rallonge (Boîte d’accessoires)
8. Axe du bobineur
9. Butée d’arrêt du bobinage
10. Bouton du point de marche-arrière
11. Porte-bobine horizontal
12. Poignée
13. Volant
14. Interrupteur moteur/lumière
15. Prise du cordon d’alimentation
16. Plaque d’identication
17. Levier du pied presseur
18. Levier de la boutonnière
19. Guide de l double
20. Guide l de la barre d’aiguille
21. Presseur
22. Aiguille
23. Plaque couvre canette
24. Barre d’aiguille
25. Coupe-l supplémentaire
26. Levier de verrouillage du pied
27. Vis du serre-aiguille
28. Pied presseur
29. Griffes
30. Plaque d’aiguille
31. Bouton de relâchement du couvercle de la canette
32. Cordon d’alimentation
33. Rhéostat
34. Manuel d’instruction

8
ACCESSORIES
1. Needles
2. Bobbins
3. Auxiliary spool pin
4. Spool pin felt disks
5. Spool pin cap (small)
6. Spool pin cap (medium)
7. Spool pin cap (large)
8. Buttonhole opener/seam ripper and brush
9. Screwdriver for needle plate
10. Zipper foot
11. Satin stitch foot
12. Blindhem stitch foot
13. Buttonhole foot
The foot that comes on your
sewing machine is called the
general purpose foot and will
be used for the majority of your
sewing.
2 31 4
910 11
12
5678
The satin foot (11) is another very
useful foot and should be used for
most of your decorative sewing
- especially honeycomb , star
aetc.
When purchasing additional
bobbins, be sure they are Class
I5 J.
13

9
ACCESSOIRES
1. Aiguilles
2. Canettes
3. Porte-bobine auxiliaire vertical
4. Rondelle feutre
5. Chapeau pour bobine (petit)
6. Chapeau pour bobine (moyen)
7. Chapeau pour bobine (grand)
8. Séparateur de boutonnière/découseur et brosse
9. Tournevis pour plaque aiguille
10. Pied fermeture à glissière
11. Pied point bourdon
12. Pied ourlet invisible
13. Pied boutonnière
ACCESSOIRES
1. Set naalden
2. 4 spoelen (1 zit in de machine)
3. Tweede garenpen
4. 2 garenpenviltjes
5. Garenschotel (klein)
6. Garenschotel (groot)
7. Garenschotel (extra groot)
8. Tornmes/knoopsgatenopener/kwastje
9. Schroevendraaier voor naaldplaat
10. Ritssluitingvoet
11. Cordonvoet
12. Blindsteekvoet
13. Knoopsgatvoet
Le pied qui accompagne la machine à
coudre est appelé le pied universel et
est utilisé pour la plus grande partie des
travaux de couture.
De meegeleverde voet wordt standaardvoet
genoemd en wordt bij de meeste
naaiwerkzaamheden gebruikt.
Le pied point bourdon (11) est un autre
pied très utile et devrait être utilisé pour la
plus grande partie des travaux de couture
décorative - spécialement le nid d’abeille ,
l’étoile , etc.
Ook de cordonvoet (11) is zeer nuttig
en wordt voor de meeste decoratieve
steekpatronen gebruikt - met name
SMOCKSTEEK , STEERSTEEK enz.
Lors de l’achat de bobine additionnel
assurez-vous qu’elles soient des bobines de
type « Classe 15 J »
Bij aankoop van extra spoelen dient u erop
te letten, dat het gaat over spoelen van
klasse 15 J.

10
Power/light switch “OFF”
Interrupteur moteur/lumière
« Fermé » (OFF)
Aan/uit-schakelaar “OFF”
Power/light switch “ON”
Interrupteur moteur/lumière
« Ouvert » (ON)
Aan/uit-schakelaar “ON”
SETTING UP YOUR MACHINE
Be sure to wipe off any surplus oil from
needle plate area before using your machine
the rst time.
POWER LINE CORD/FOOT CONTROL
Connect the plug of the power line cord into
the cord socket (1) and your wall outlet (2)
as illustrated.
Connect the foot control plug (3) into the
machine socket.
POWER/LIGHT SWITCH
Your machine will not operate until the
power/light switch is turned on. The same
switch controls both the power and the light.
When servicing the machine, or changing
needles, etc., machine must be disconnected
from the power supply.
Always disconnect the machine from power
supply by removing the plug from the electrical
outlet.
NOTE: When foot control is
disconnected, the machine will not
operate.
Power line cord
Cordon d’alimentation
Netsnoer
1
3
Foot control
Rhéostat
Voetpedaal
Machine socket
2
Mettez l’interrupteur moteur/
lumière à la position « Fermé »
Aan/uit-schakelaar “OFF”
Prise du cordon de la machine
Netsnoereingang
Pin plug
Butée
Pin stekker
Set power/light switch at “OFF”

11
INTERRUPTEUR MOTEUR ET LUMIÈRE
La machine ne fonctionnera pas avant de mettre l’interrupteur
Moteur/Lumière en mode ouvert. Le même interrupteur
contrôle l’alimentation et la lumière.
Lorsque vous entretenez la machine, où changer une aiguille,
etc., assurez-vous de la débrancher de la prise murale.
INSTELLEN VAN UW MACHINE
Verwijder de eventuele olievlekken van de naaldplaat voordat
u met het gebruik van de machine begint.
NETSNOER/ Voetpedaal
Steek de stekker van het netsnoer in de netsnoereingang (1)
en in uw stopcontact (2), zoals afgebeeld is.
Sluit de stekker van het voetpedaal (3) aan op de
machineingang.
AAN/UIT-SCHAKELAAR
Uw machine werkt alleen als de aan/uit-schakelaar op aan staat.
Met deze schakelaar zet u zowel het licht als de machine aan.
Zet altijd de aan/uit-schakelaar op uit als u de machine
schoonmaakt of alleen moet laten staan.
Maak de machine steeds los van de
stroomvoorziening door de stekker uit het
stopcontact te verwijderen.
Débranchez toujours. La machine de
l’alimentation électrique en retirant la che de la
prise murale.
REMARQUE: Lorsque le rhéostat est débranchée, il
est impossible d’utiliser la machine. OPMERKING : Wanneer het voetpedaal wordt
losgemaakt, zal de machine niet functioneren.
PRÉPARATION DE LA MACHINE
Avant d’utiliser la machine pour la première fois, assurez-vous
de bien essuyer tout surplus d’huile sur et autour de la plaque
d’aiguille.
CORDON D’ALIMENTATION/RHÉOSTAT
Connectez la fiche du cordon d’alimentation au connecteur
de cordon (1) et à la prise murale (2) comme indiqué sur
l’illustration.
Connectez la fiche du rhéostat (3) au connecteur de la
machine.

12
CONVERTING TO FREE-ARM SEWING
Your machine can be used either as a at-bed or as a free-
arm model.
With the extension table in position, it provides a large working
surface as a standard at-bed model.
To remove the extension table, hold it rmly with both hands
and pull it off to the left as shown. To replace, slide the
extension table back into place until it clicks.
With the extension table removed the machine converts into
a slim free-arm model for sewing children’s clothes, cuffs,
trouser legs, and other hard-to-reach places.
SPOOL PINS
HORIZONTAL SPOOL PIN for normal
thread spool
Place thread spool on the pin and secure with a spool cap to
ensure smooth ow of thread. If the thread spool has a thread
retaining slit, it should be placed to the right.
Select the correct spool pin cap according to the type and
diameter of spool being used. The diameter of the spool pin
cap should always be larger than that of the spool itself.
PRESSER FOOT LIFTER
There are three positions for your presser foot.
1. Lower the presser foot to sew.
2. Raise the lifter to the middle position to insert or remove
fabric, and to change presser foot.
3. Lift it to its highest position to insert or to remove thick
fabric.
VERTICAL SPOOL PIN for large thread
spool
Attach the spool pin. Place the felt disc over it. Place a thread
spool on the spool pin.
Spool
Bobine
Garenklos
Spool pin
Porte-bobine
Garenpen
Felt disc
Rondelle feutre
Garenpenvilt
Vertical spool pin
Porte-bobine vertical
Verticale garenpen
Spool
Bobine
Garenklos
Thread retaining slit
Fente de retenue de l
Draadvoorspanning
Spool pin cap
Chapeau de bobine
Garenschotel
NOTE: If you start the machine with presser foot raised,
it will alert you with a beep sound to lower the presser
foot to sew.
FEED DOG CONTROL
The feed dogs control the movement of the fabric that is
being sewn. They should be raised for all general sewing
purposes and lowered for darning, freehand embroidery and
monogramming so that you, not the feed dogs, are moving the
fabric.
You will see the feed dog control when you remove the
extension table.
Down
Basse
Naar beneden
Feed dog control
Levier de contrôle des griffes
Controle stoftransport

13
PORTE-BOBINE
PORTE-BOBINE HORIZONTAL
(pour bobine de l standard)
Placez la bobine sur la tige et fixez-y un couvre-fil pour
assurer un débit de l bien régulier. Si la bobine est dotée d’une
fente de retenue de l, elle doit être placée à droite.
Utilisez le chapeau de retenue correspondant au diamètre et
au type de bobine utilisée. Le diamètre du chapeau de bobine
doit toujours est plus grand que la bobine utilisée.
PORTE-BOBINE VERTICAL
(pour bobine de l plus grosse)
Fixez le porte-bobine et la rondelle feutre sur le capot
supérieur. Placer la bobine sur le porte-bobine.
GARENPENEN
HORIZONTALE GARENPEN voor normale
garenklosen
Plaats de garenklos op de garenpen en zet deze vast met een
garenschotel om er voor te zorgen dat de draad soepel loopt.
Wanneer de garenklos met een draadvoorspanning uitgerust
is, dient deze naar rechts gericht te zijn.
Kies de juiste garenschotel afhankelijk van het garenklostype
en de dienovereenkomstige diameter uit. De diameter van de
garenschotel dient altijd groter te zijn dan de diameter van de
garenklos.
VERTICALE GARENPEN voor grote
garenklosen
De garenpen in de opening op het deksel van de machine
inzetten. Plaats een garenklos op de garenpen.
LEVIER DU PIED PRESSEUR
Il y a trois positions pour votre pied presseur.
1. Abaisser le levier pour coudre.
2. Soulever le levier en position moyenne pour insérer ou
enlever le tissu, et changer le pied.
3. Soulever le levier à sa position la plus haute, pour
accommoder les tissus épais.
PERSVOETHEVEL
Er zijn 3 posities voor deze hevel.
1. Laat de persvoethevel zakken om te naaien.
2. Zet de persvoethevel in de middelste stand om de stof te
plaatsen of te verwijderen, of om een andere persvoet te
plaatsen.
3. Zet de hevel in de hoogste stand om de voet te wisselen of
om dikke stoffen te plaatsen.
UTILISATION DU BRAS LIBRE
Cette machine peut s’utiliser aussi bien à plat ou comme bras
libre.
En conservant la table de rallonge en place, vous obtiendrez
une plus grande surface de travail.
Pour retirer la table de rallonge, tenez-la fermement avec les
deux mains et tirez-la à gauche vers l’extérieur, comme indiqué
sur l’illustration. Pour la remettre en place, faites glisser la table
de rallonge à sa place jusqu’à ce qu’elle s’enclenche.
En retirant la table de rallonge, la machine se transforme en
bras-libre pour confectionner des vêtements d’enfants, des
poignets, des pantalons ainsi que tout autre vêtement difcile
d’accès.
VRIJE-ARM NAIEN
Uw machine is eenvoudig om te zetten naar een vrije-arm
uitvoering.
Bij ingebouwde uitschuiftafel beschikt u over een grotere
werkoppervlakte dan bij een vlakbed-model.
Voor het verwijderen van de uitschuiftafel, deze stevig met
beide handen vasthouden en deze zoals afgebeeld naar links
lostrekken. Voor het weer aanbrengen van de uitschuiftafel,
deze op zijn plaats schuiven totdat u een klik hoort.
Wanneer de uitschuiftafel is verwijderd, kan de machine
veranderd worden in een handzaam vrije-arm model voor het
naaien van kinderkleren, manchetten, broekspijpen en andere
moeilijk te bereiken plaatsen.
CONTRÔLE DES GRIFFES
Les griffes contrôle le déplacement du tissu à coudre. Elles
doivent être en position relevée pour la couture normal et
abaissez pour le piquage et la broderie à mouvement libre,
pour que vous et non les griffes, contrôlez l’entraînement du
tissu.
Vous pourrez voir le levier de contrôle des griffes lorsque vous
retirerez la table de rallonge.
TRANSPORTEUR-AFDEKPLAAT
Gebruik de transporteur-afdekplaat, wanneer u het
automatische transport van de machine voor het aannaaien
van knopen, vrijehand-naaien en stoppen wilt uitschakelen.
Naald in de hoogste stand brengen en voetje optillen.
Transporteur-afdekplaat op de naaldplaat schuiven en de
groeven in de boringen laten inklikken.
REMARQUE: Si vous mettez la machine en marche
pendant que le pied presseur est relevé, la machine
emmétra un "beep" sonore, pour vous indiquez
d'abaisser le pied presseur pour coudre.
NOTA: Als U de machine start met de persvoet omhoog,
zal U door een pieptoon verwittigd worden om de
persvoet te laten zakken.

14
WINDING THE BOBBIN
1. Place a spool of thread on the spool pin, and secure it with
the spool pin cap. Pull the thread out from the spool and
place it through thread guides as shown in illustration.
2. Put end of thread through the hole in bobbin as shown.
3. Push bobbin winder shaft to far left position, if it is not
already there. Place bobbin onto shaft with end of thread
coming from top of bobbin. Push bobbin winder shaft to the
right until it clicks. Hold onto end of thread.
4. Start machine. After the bobbin has begun to ll, stop to cut
the thread tail. Step on the foot control again to continue
to ll the bobbin. The bobbin will automatically stop turning
when completely filled. Push shaft to the left to remove
bobbin and cut thread.
Be sure to use Class 15 J bobbins.
1
2
3
4
Note: Make sure the presser foot is down.

15
PRÉPARATION DE LA CANETTE
1. Placez une bobine de fil sur un porte-bobine et fixez-la
correctement à l’aide du chapeau de bobine. Tirez le fil
hors de la bobine et faites-le passer par le guide-l, comme
indiqué dans l’illustration.
2. Faites passer l’extrémité du fil par le trou de la canette,
comme indiqué. Placer la canette sur l’axe du bobineur.
3. Poussez le tout vers la droite jusqu’au déclic. Tenez le bout
de l à la verticale.
4. Mettez la machine en marche. Lorsque la canette
commencera à se remplir, arrêtez et coupez le bout de l
et redémarrer. Dès que la canette est pleine, elle s’arrêtera
de tourner. Poussez l’axe vers la gauche pour pouvoir
enlever la canette et couper le l.
SPOELEN
1. Plaats een garenklos op de garenpen en zet deze met
behulp van de garenschotel vast. Trek de draad via de
draadgeleider uit de garenklos, zoals afgebeeld is.
2. Steek het draaduiteinde door het gatje in de lege spoel van
binnen, zoals afgebeeld is.
3. Druk het spoelwinderasje zover mogelijk naar links.
Plaats de spoel op het spoelwinderasje en houd de draad
omhoog. Spoelwinderasje naar rechts schuiven u een klik
hoort. Houd het draaduiteinde.
4. Start de machine. Stop de machine zodra u een begin
hebt gemaakt en knip het uiteinde van de draad af. Duw
het voetpedaal opnieuw in en vul de spoel. De spoel stopt
automatisch zodra deze vol is. Schuif de spoelwinderas
naar links, verwijder de spoel en knip de draad af.
Assurez-vous d’utiliser des bobines de type
« Classe 15 J »
Zorg ervoor, dat u spoelen van klasse 15 J
gebruikt.
REMARQUE: Assurez-vous que le pied presseur est
abaissé. NOTA: Let op dat de persvoet omlaag staat.

16
6
5
4
3
2
1
A
THREADING THE BOBBIN THREAD
1. Raise the needle to its highest position by rotating the hand
wheel counter clockwise.
2. Remove the bobbin cover plate by pushing the release
button to the right. Bobbin cover will pop up sufciently to
allow you to remove the cover.
3. Insert the bobbin making sure the bobbin rotates counter-
clockwise when you pull the thread.
4. Pull thread through the slot (A) and then to the left.
5. With a finger held gently on top of the bobbin, pull the
thread until it stops in the slot (B). Then pull the thread
along the groove on the needle plate until it is snipped with
cutter on the top left.
6. Replace the clear bobbin cover plate onto the needle plate.
NOTE: Sewing can be started without picking up the
bobbin thread.
AB
Groove
Rainure
Groef
Cutter
Couteau
Draadafsnijder
NOTE: This is a very important step. The bobbin
must rotate counterclockwise when thread is pulled.

17
INRIJGEN VAN DE ONDERDRAD
1. Zet de naald in de hoogste stand door het handwiel naar u
toe te draaien.
2. Verwijder de schuifplaat door het uitwerpknopje naar rechts
te drukken. De schuifplaat wordt omhooggetild, zodat u
deze er kunt afnemen.
3. Plaats het spoelklosje in de capsule. Let op dat het klosje
tégen de klokrichting in draait als u aan het garen trekt.
4. Trek de draad door de gleuf (A) en naar links.
5. Met een vinger dient de spoel licht te worden vastgehouden
en hierbij dient de draad te worden getrokken, totdat hij in
de uitsparing (B) blijft liggen. Vervolgens de draad langs de
groef op de naaldplaat leiden, totdat deze links boven door
de draadafsnijder wordt afgesneden.
6. Plaats de schuifplaat weer terug op de naaldplaat.
REMARQUE: vous pouvez débuter la couture sans
avoir besoin de faire remontez le l de la canette.
OPMER KING : U kunt met het naaien beginnen.
Het is niet nodig om de spoeldraad op te halen.
REMARQUE: cette étape est très importante. La
canette doit tourner dans le sens contraires des
aiguilles d’une montre lorsque vous tirez sur le l de
la canette.
OPMERKING: dat is zeer belangrijk. Mocht de
spoel met de klok mee draaien, dan kan de
onderdraad eruit glijden en problemen bij het naaien
veroorzaken.
ENFILAGE DU FIL DE LA CANETTE
1. Faites tourner le volant vers vous jusqu’à ce que l’aiguille
soit dans sa position la plus haute.
2. Enlevez le couvercle de la canette en poussant sur le
bouton de relâchement du couvercle de la canette. Le
couvercle de la canette se désenclenchera sufsamment
pour pouvoir le retirez.
3. Insérez la canette, assurez-vous que la canette tourne
dans le sens anti-horaire lorsque vous tirez sur le l.
4. Insérez le l dans la rainure (A) et tirez le ver la gauche.
5. Appuyez délicatement sur le dessus de la canette avec un
doigt, tirez sur le l jusqu’à ce qu’il s’arrête dans la fente (B).
Tirez ensuite le l le long de la rainure de la plaque d’aiguille
jusqu’à ce que le fil se coupe sur le couteau en haut à
gauche.
6. Replacez le couvercle de la canette sur la plaque d’aiguille.

18
THREADING THE TOP THREAD
A. Raise the presser foot lifter. Always be sure to raise the
presser foot lifter before threading the top thread. (If the
presser foot lifter is not raised, correct thread tension
cannot be obtained.)
B. Turn the hand wheel counter clockwise until the needle is
in its highest position.
C. Thread the machine with your left hand while rmly gripping
the thread with your right hand in the following order as
illustrated.
* Guide the thread through thread guides (1 & 2), and then
pull it down along the groove (3).
* Guide the thread into the thread guide (4).
* Pass the thread through the eye of the needle (5) from
front to back. (See following page for instructions on
operation of the Automatic Needle Threader.)
IMPORTANT:
To verify that the machine is threaded properly in the
tension discs, do this simple check:
1.) With the presser foot raised, pull the thread towards
the back of the machine. You should detect only
a slight resistance and little or no deection of the
needle.
2.) Now lower the presser foot and again pull the thread
towards the the back of the machine. This time you
should detect a considerable amount of resistance
and much more deflection of the needle. If you do
not detect the resistance you have mis-threaded the
machine and need to re-thread it.
A
B
C
Other manuals for One
1
Table of contents
Other Singer Sewing Machine manuals

Singer
Singer 107-1 Installation and operation manual

Singer
Singer Simple 3223 User manual

Singer
Singer 185 Installation and operation manual

Singer
Singer 18U322 User manual

Singer
Singer 52W18 User manual

Singer
Singer 3210 User manual

Singer
Singer 3270 User manual

Singer
Singer CONFIDENCE 7467 User manual

Singer
Singer 675 User manual

Singer
Singer Quantum XL-6000 User manual

Singer
Singer 114-31 User manual

Singer
Singer 221 User manual

Singer
Singer Initiale User manual

Singer
Singer 9444 User manual

Singer
Singer 28-8 User manual

Singer
Singer 66-1 User manual

Singer
Singer M1000 User manual

Singer
Singer 4522 User manual

Singer
Singer M3330 User manual

Singer
Singer CONFIDENCE 7470 User manual