Sirena Proflex User manual
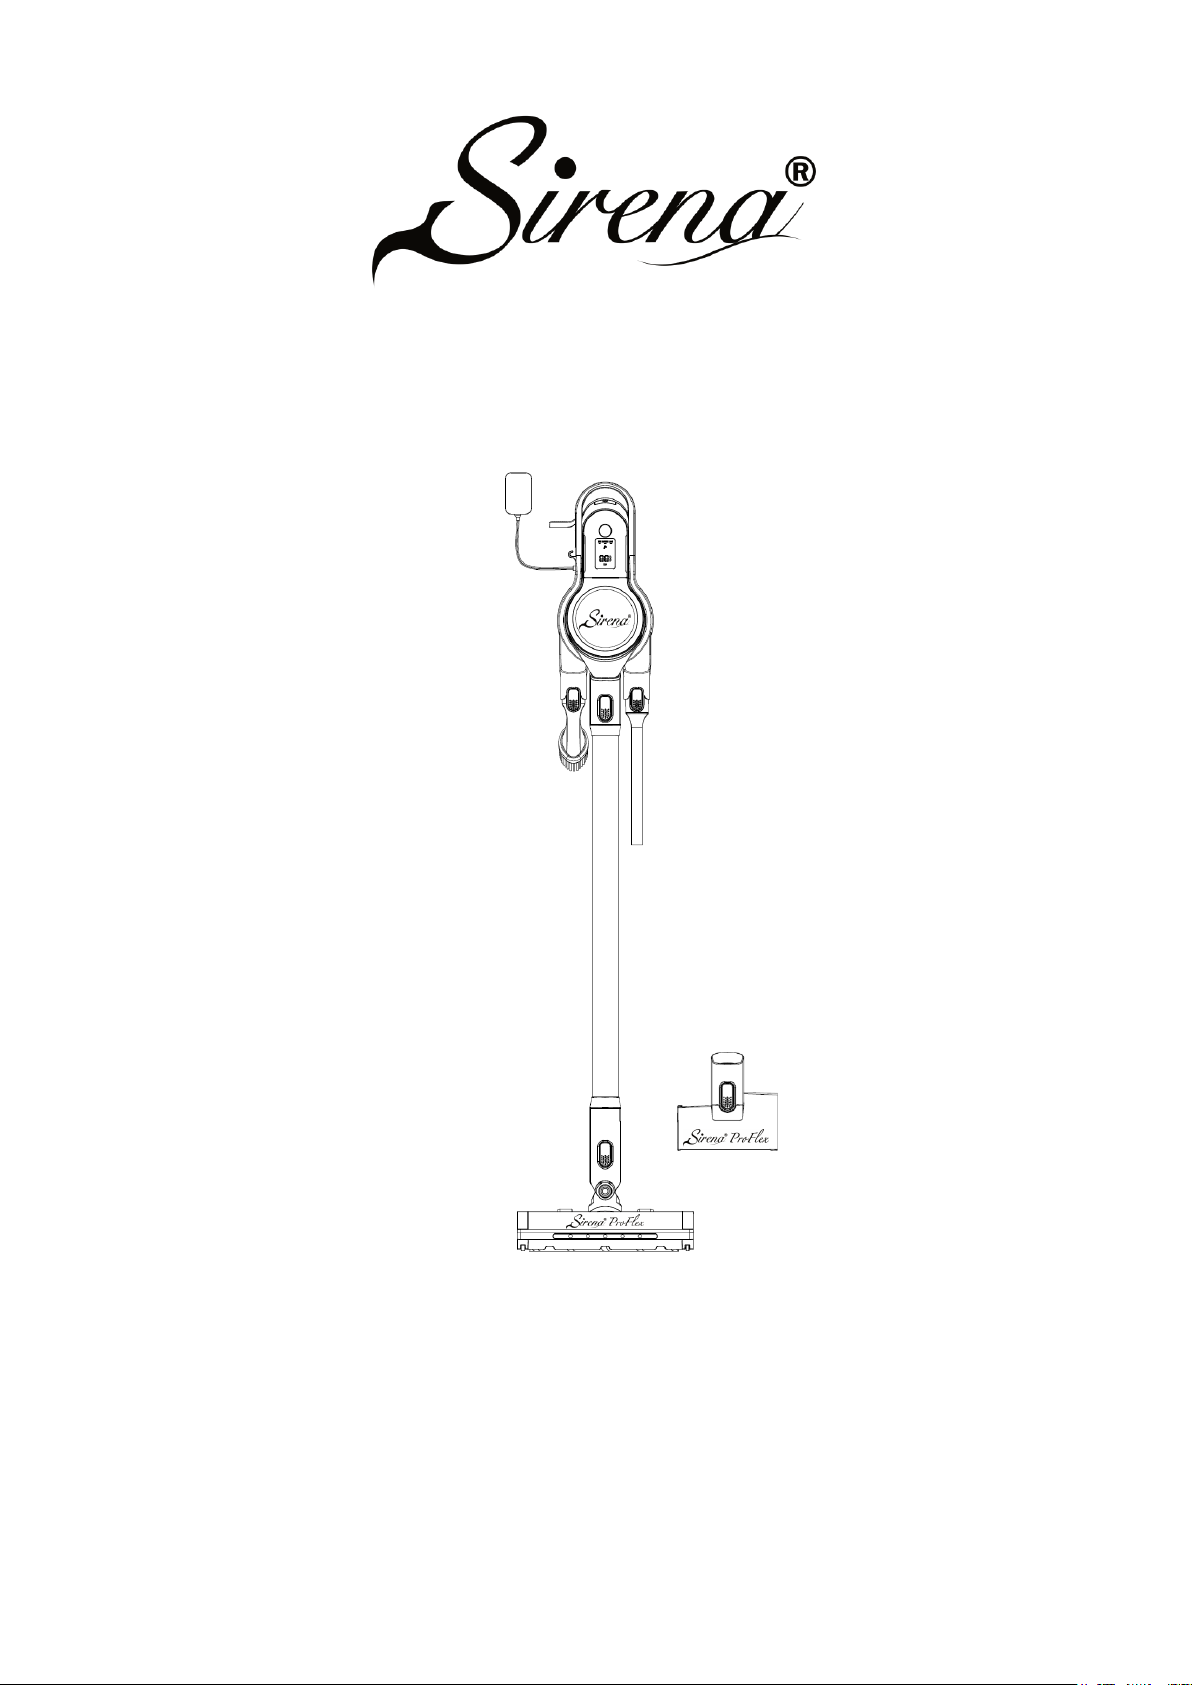
INSTRUCTION MANUAL
Model : Sirena Proflex
Read this manual thoroughly before using and save it for future reference.
Sirena Inc.
11334 Boggy Creek Suite 107 Orlando, Florida 32824
www.sirenasystem.com

1. Important Safeguards
When using an electrical appliance, basic precautions should always be
followed, including the following:
READ ALL THE INSTRUCTIONS BEFORE USING THIS APPLIANCE.
WARNING –To reduce the risk of fire, electric shock,
or injury:
1.1 This appliance has been designed for domestic dry vacuum cleaning
only. Do not pick up liquids or use on wet surfaces, this can cause damage
to the appliance.
1.2 Never immerse the charger or unit in water to avoid danger.
1.3 Keep the appliance and accessories away from hot surfaces like a stove
or microwave oven.
1.4 Do not block the appliance opening or hinder airflow so as not to affect
its heat dissipation effect.
1.5 Do not pick up anything flammable, burning, or smoking, like
cigarettes, matchsticks, or ashes.
1.6 The charger has been designed for a special voltage. Always check that
the main voltage is the same as what is stated on the rating plate.
1.7 Do not use the appliance if there are any signs of charger or power wire
damage or aging.
1.8 Only use batteries and chargers supplied by the manufacturer.
1.9 Ensure the appliance is powered off before cleaning, or this may cause

accidental electric shock.
1.10 Repairs should be conducted by a service agent in accordance with
relevant safety regulations.
1.11 Care should be taken to dispose of the battery pack safely in
accordance with local regulations; Never dispose of it in fire or water, as
this may increase the risk of explosion or contamination.
1.12 Use only as described in this manual. Use only manufacturer’s
recommended attachments.
1.13 Do not use the appliance for any purposes other than the
manufacturer's intended use.
1.14 Do not use the appliance outdoors.
1.15 WARNING: Only use the detachable supply unit
provided with this vacuum to recharge the battery.
1.16 Do not allow it to be used as a toy. Close attention is necessary when
used by or near children.
1.17 Cleaning and user maintenance should not be done by children
without supervision.
1.18 Switch off the appliance before cleaning or maintenance.
1.19 Vacuum cleaner is not intended for water suction cleaning.
1.20 Do not use with damaged cord or plug. If appliance is not working as
it should, has been dropped, damaged, left outdoors, or dropped into
water, return it to a service center.
1.21 Do not pull or carry by cord, use cord as a handle, close a door on cord,

or pull cord around sharp edges or corners. Do not run appliance over cord.
Keep cord away from heated surfaces.
1.22 Do not unplug by pulling on cord. To unplug, grasp the plug, not the
cord.
1.23 Do not handle plug or appliance with wet hands.
1.24 Do not put any object into the openings. Do not use with any opening
blocked; keep free of dust, lint, hair, and anything that may reduce air
flow.
1.25 Keep hair, loose clothing, fingers, and all parts of body away from
openings and moving parts.
1.26 Use extra care when cleaning stairs.
1.27 Do not use to pick up flammable or combustible liquids, such as
gasoline, or use in areas where they may be present.
1.28 Do not pick up anything that is burning or smoking, such as cigarettes,
matches, or hot ashes.
1.29 Do not use without dirt cup and/or filters in place.
1.30 For use only with VC3968-CB-P-H battery pack.
1.31 For use only with HCX1501-3200450U charger.
1.32 Do not immerse in water.
1.33 Prevent unintentional starting. Ensure the switch is in the off position
before connecting to battery pack, picking up or carrying the appliance.

Carrying the appliance with your finger on the switch or energizing
appliance that has the switch on invites accidents.
1.34 Disconnect the battery pack from the appliance before making any
adjustments, changing accessories, or storing appliance. Such
preventive safety measures reduce the risk of starting the appliance
accidentally.
1.35 Recharge only with the charger specified by the manufacturer. A
charger that is suitable for one type of battery pack may create a risk of
fire when used with another battery pack.
1.36 Use appliances only with specifically designated battery packs. Use
of any other battery packs may create a risk of injury and fire.
1.37 When a battery pack is not in use, keep it away from other metal
objects, like paper clips, coins, keys, nails, screws or other small metal
objects, that can make a connection from one terminal to another.
Shorting the battery terminals together may cause burns or a fire.
1.38 Under abusive conditions, liquid may be ejected from the battery;
avoid contact. If contact accidentally occurs, flush with water. If liquid
contacts eyes, additionally seek medical help. Liquid ejected from the
battery may cause irritation or burns.
1.39 Do not use a battery pack or appliance that is damaged or modified.
Damaged or modified batteries may exhibit unpredictable behavior
resulting in fire, explosion, or risk of injury.
1.40 Do not expose a battery pack or appliance to fire or excessive

temperature. Exposure to fire or temperature above 130 ° C may cause
an explosion. The temperature of 130°C can be replaced by the
temperature of 265°F.
1.41 Recommended ambient temperature range for battery pack.
·Operating temperature: -10℃~70℃
·Charging temperature: 10℃~43℃
·Storage temperature: -20℃~45℃
1.42 Follow all charging instructions and do not charge the battery pack or
appliance outside of the temperature range specified in the instructions.
Charging improperly or at temperatures outside of the specified range
may damage the battery and increase the risk of fire.
1.43 Have servicing performed by a qualified repair person using only
identical replacement parts. This will ensure that the safety of the
product is maintained.
1.44 Do not modify or attempt to repair the appliance or the battery pack
(as applicable) except as indicated in the instructions for use and care.
For Household Use Only
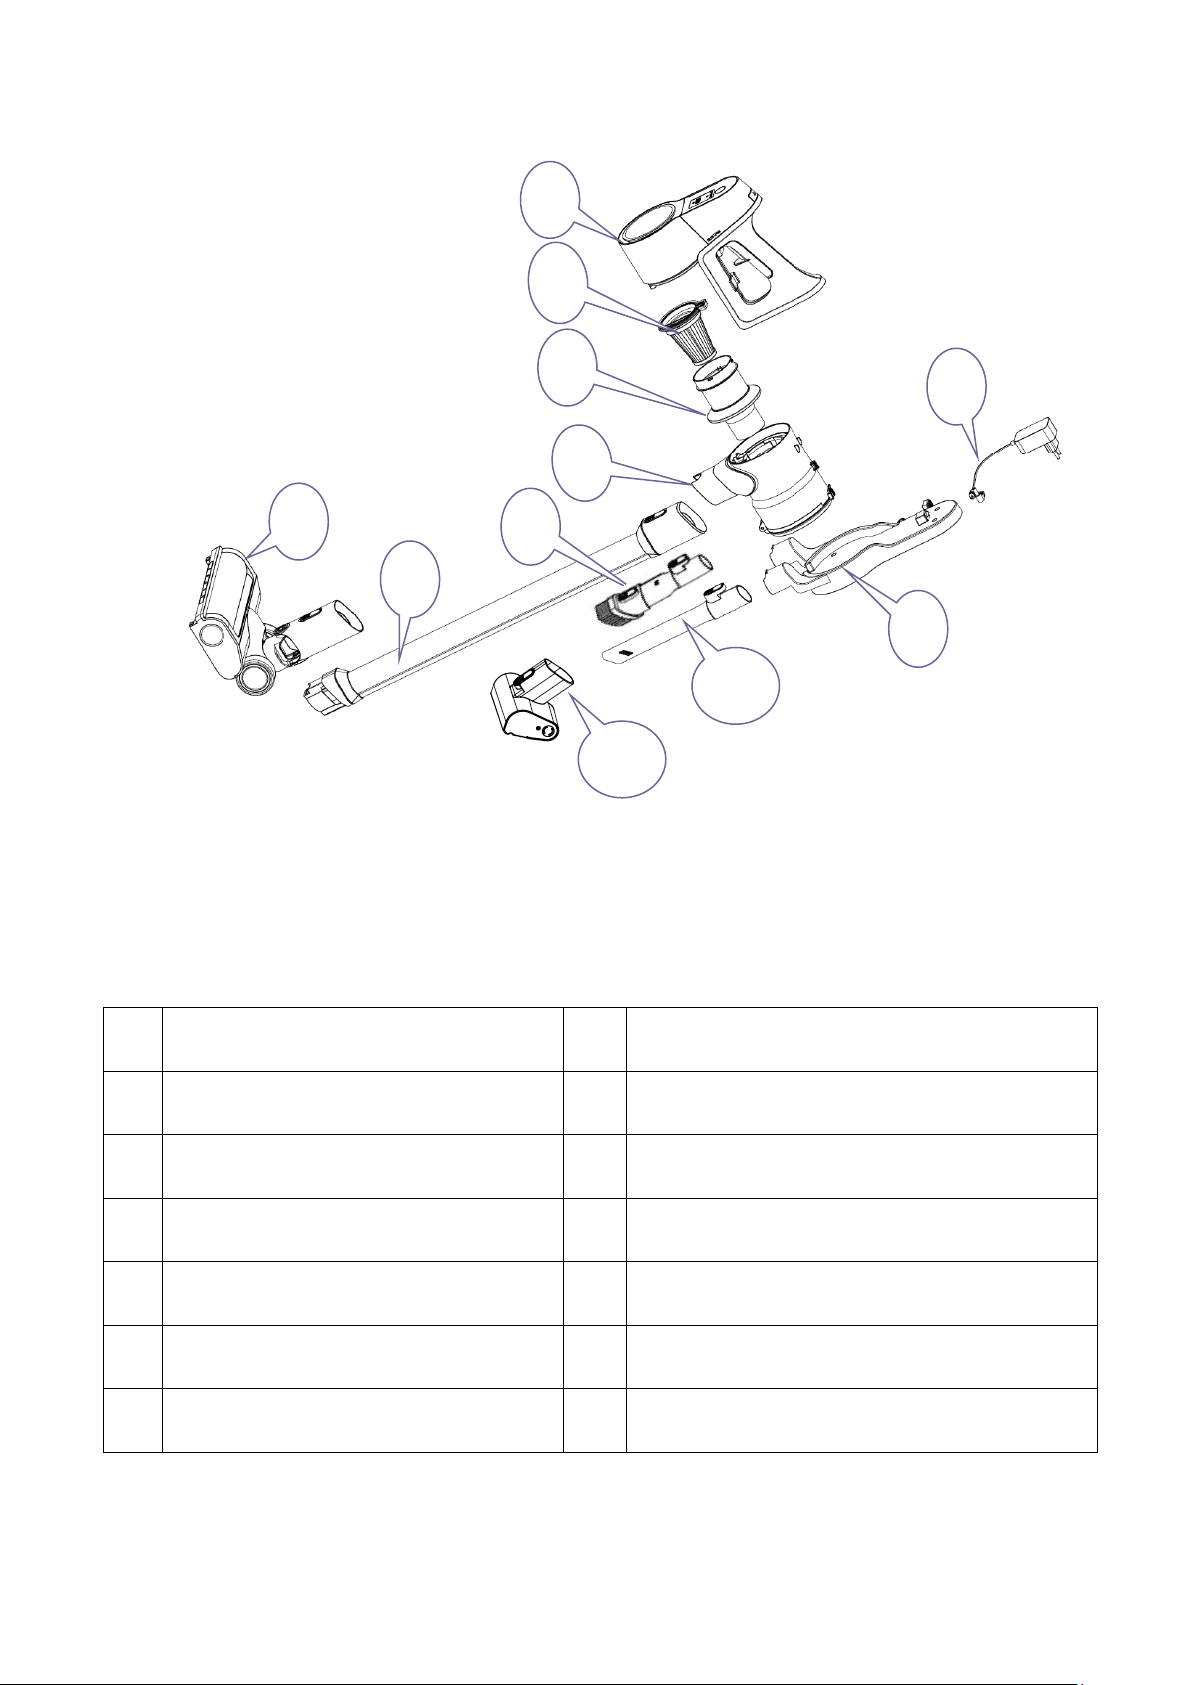
2. Product Display
1
Floor power nozzle
8
Charger
2
Aluminum wand
9
Charger stand
3
2 in 1 dusting brush
10
Crevice tool
4
Dirt cup
11
Pet brush
5
Filter screen
6
HEPA filter
7
Main Unit (Contains Battery Pack)
Fig. 2-1
8
9
2
4
5
6
7
10
3
1
11
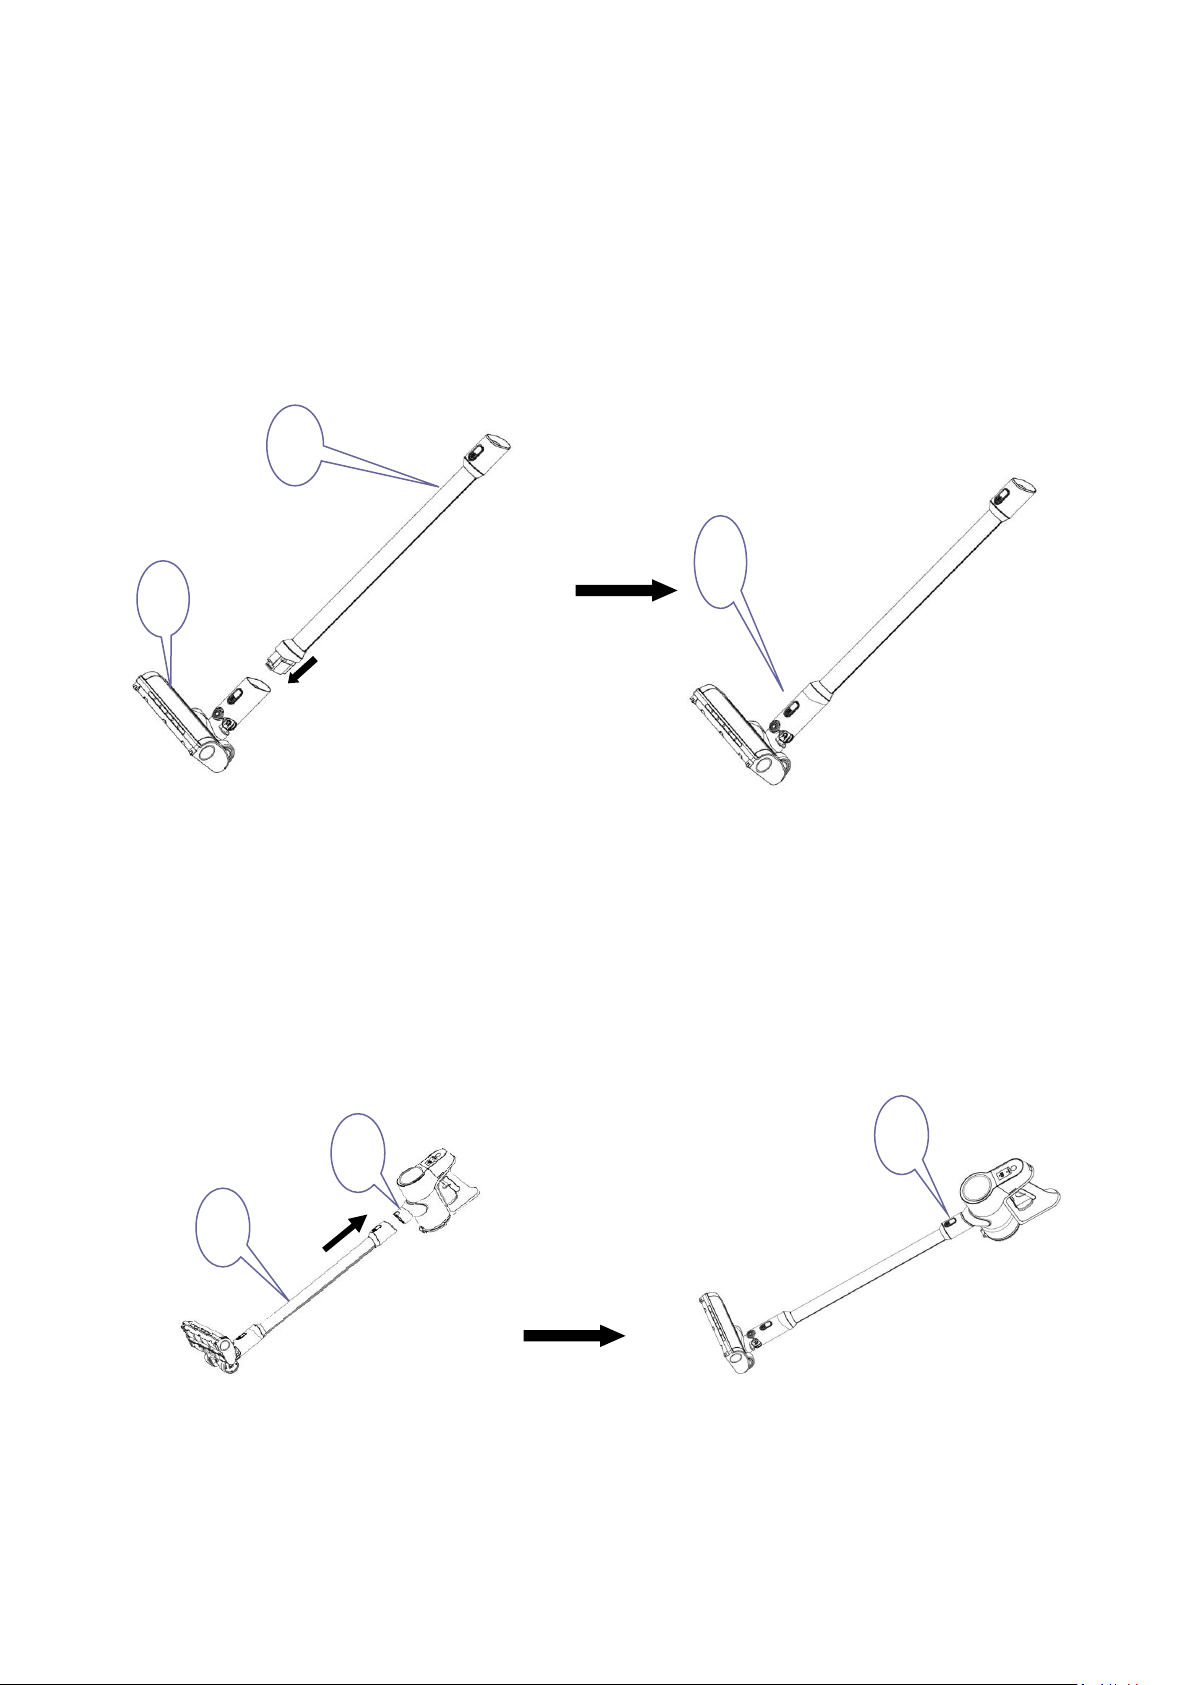
3. Product Assembly
Please be advised that users should follow the steps below for assembly before
the first use.
3.1 Attach the aluminum wand (No.1) to the floor power nozzle connector (No.2) as
shown. Unit release key (No.3) clicks in place properly; see Figures 3-1 and 3-2.
3.2 Aluminum Wand and Main Unit Assembly.
Slot aluminum wand (No.1) together with brush assembling into air inlet nozzle of
the main unit (No.2) as shown until release key (No.3) clicks in place properly. See
Figures 3-3 and 3-4.
3.3 Installing Charger Stand.
Figure 3-1
1
2
Fig. 3-2
Figure 3-2
Figure 3-3
Figure 3-4
3
1
2
3
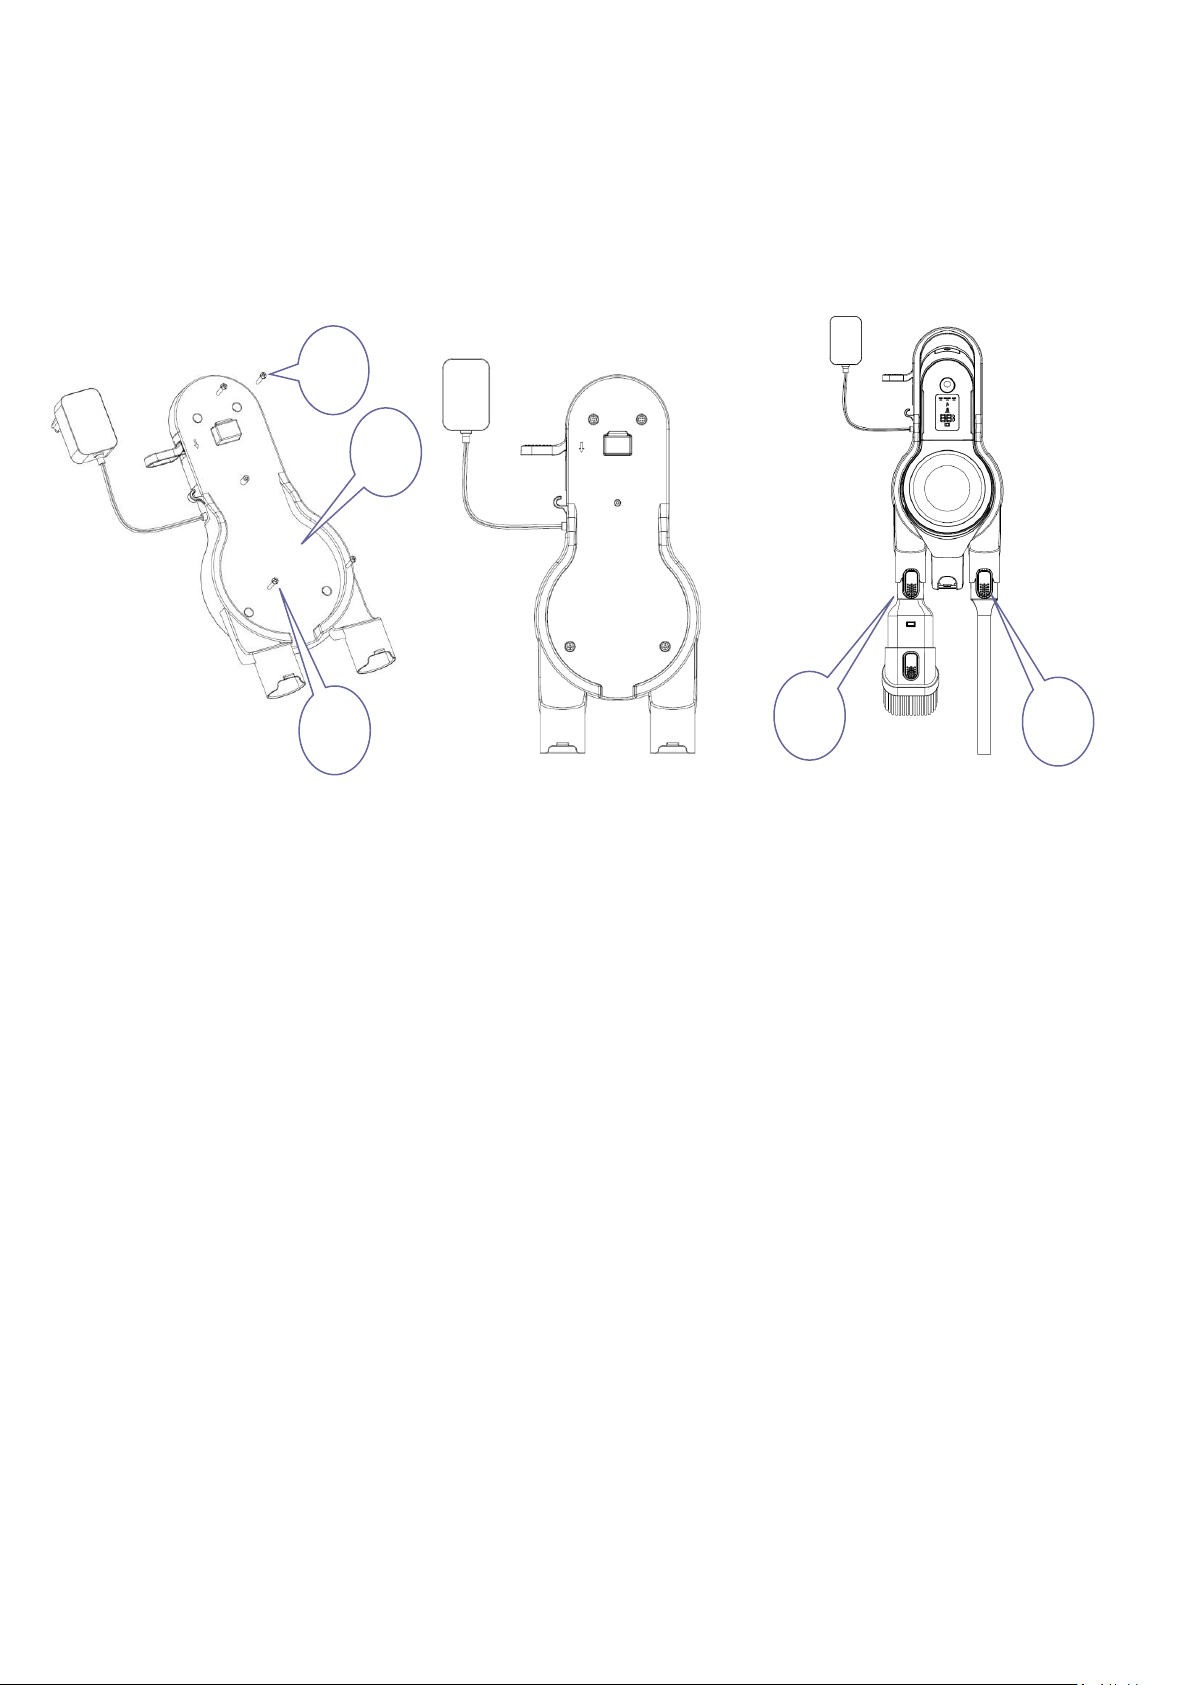
Place the charger stand (No.2) on the selected wall area. Then mount to the wall
with supplied M4*20 taper screws. The below figure 3-6 below shows the status of the
charger stand after being mounted to the wall. The dusting brush (No.3) and crevice tool
(No.4) can also hang on the wall mount when not in use, see Figure 3-7.
Figure 3-5
Figure 3-6
Figure 3-7
4
3
1
2
1
4. Operating Instructions
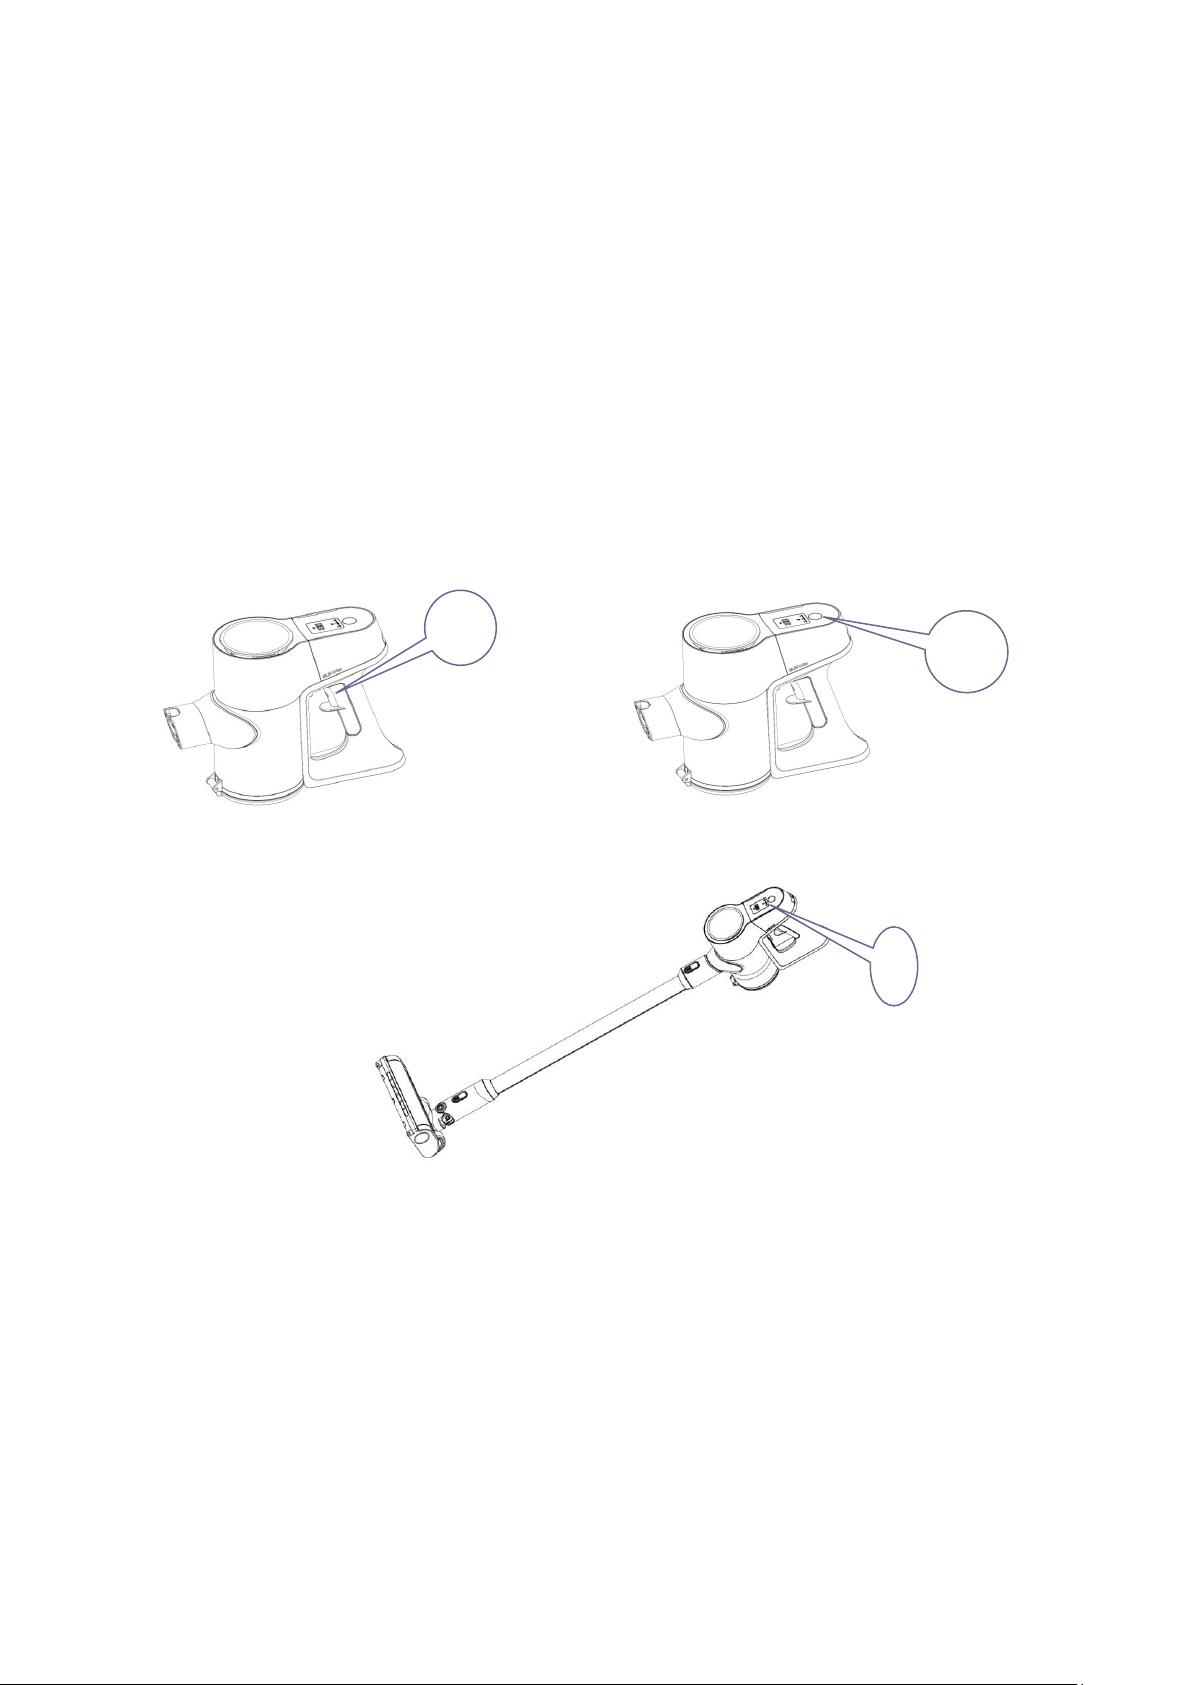
4.1 Vacuum Unit
Press the power switch (No.1) to start the vacuum, see Figure 4-1. The power
nozzle brush roll will run automatically when turned on. Press the speed-control button
(No.2) to switch between high and low speeds. The default speed setting is medium
when powering on. Press the power switch (No.1) again to turn the power off. You will
find the battery charge level on the battery power level LED (No.3). When the battery
charge is full, it shows 100%. When the battery charge is low, it shows relative
percentage. When the battery level shows 0% the vacuum will shut off automatically.
4.2 Main Unit Operation
Press the release key (No.1) to disassemble the aluminum wand and power the
nozzle, see Figure 4-4; Press the button (No.2) to power it on for cleaning furniture,
mattress, or wall. Press the speed-control button (No.3) to switch between high and low
speed as the initial default setting is medium, see Figure 4-6. Press the power switch
(No.2) again to turn the power off. You will find the battery charge level on the battery
power level LED (No.3). When the battery charge is full, it shows 100%. When the
battery charge is low, it shows relative percentage.
Figure 4-3
1
2
Figure 4-1
Figure 4-2
3
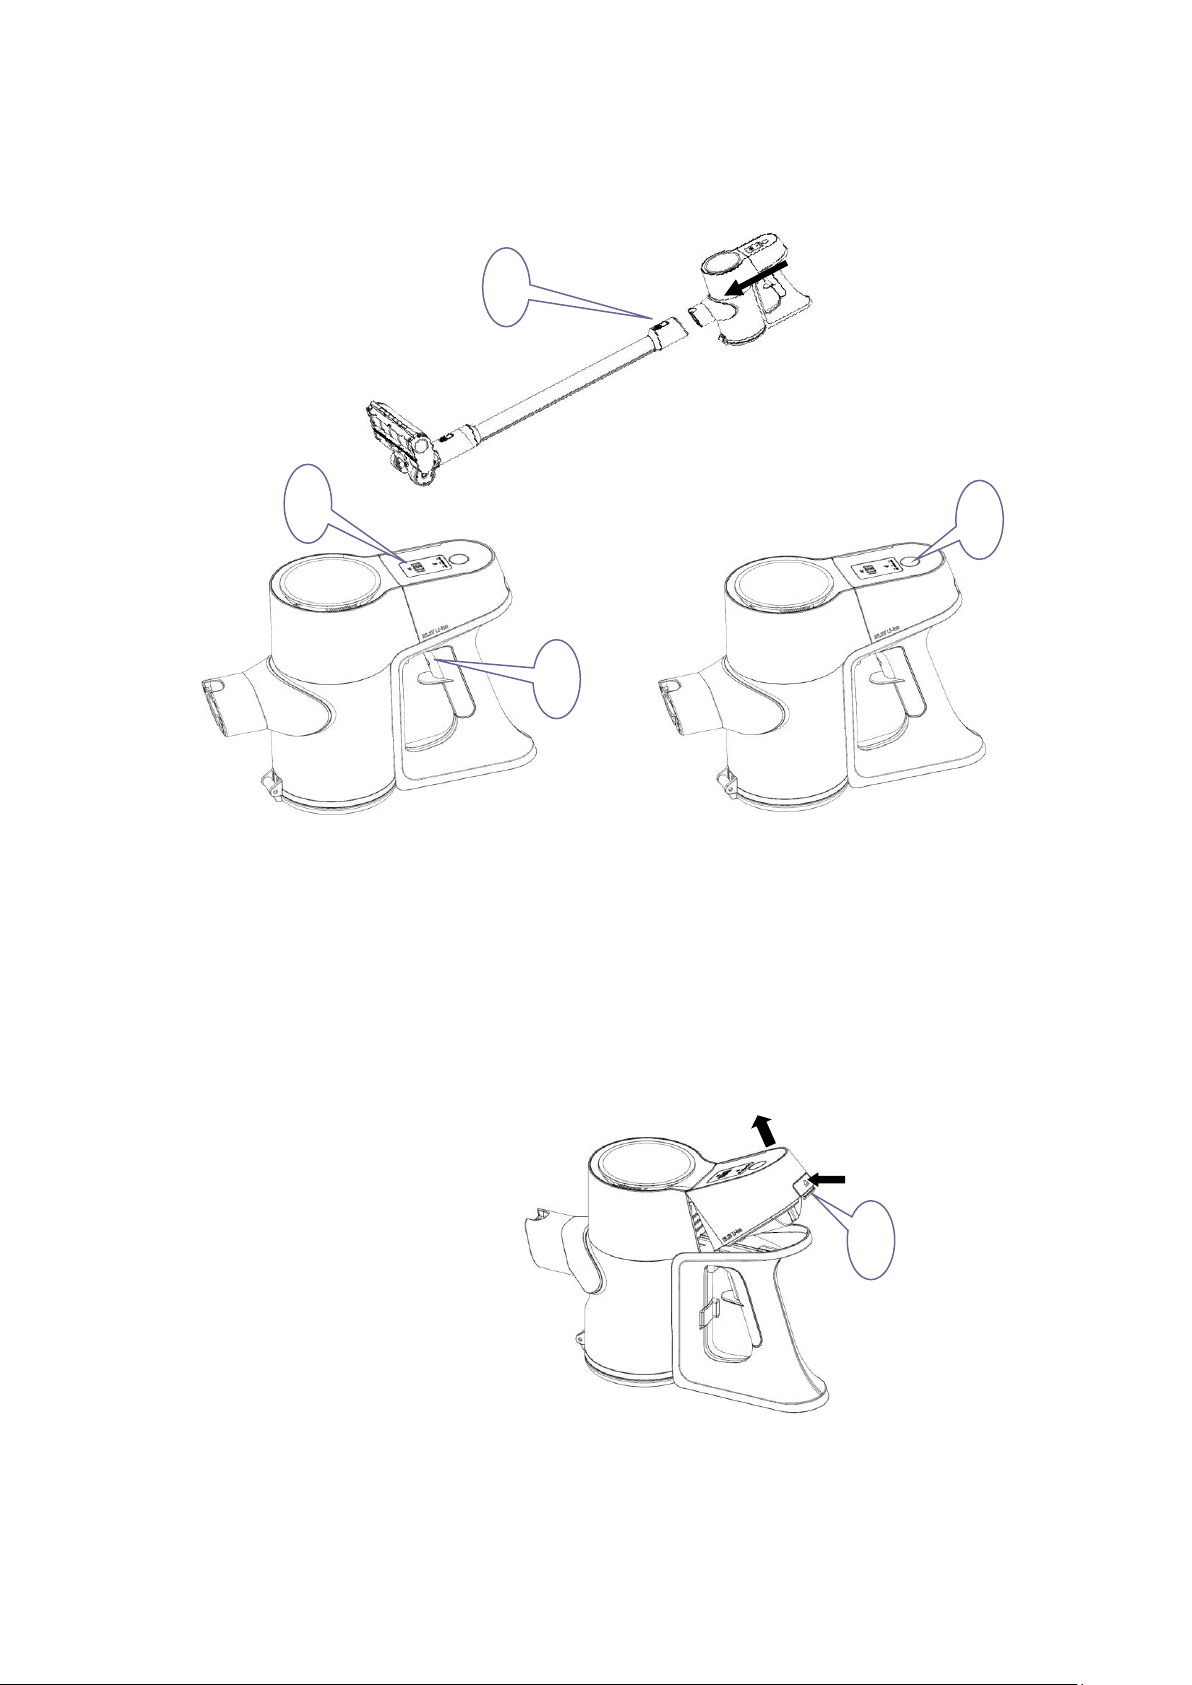
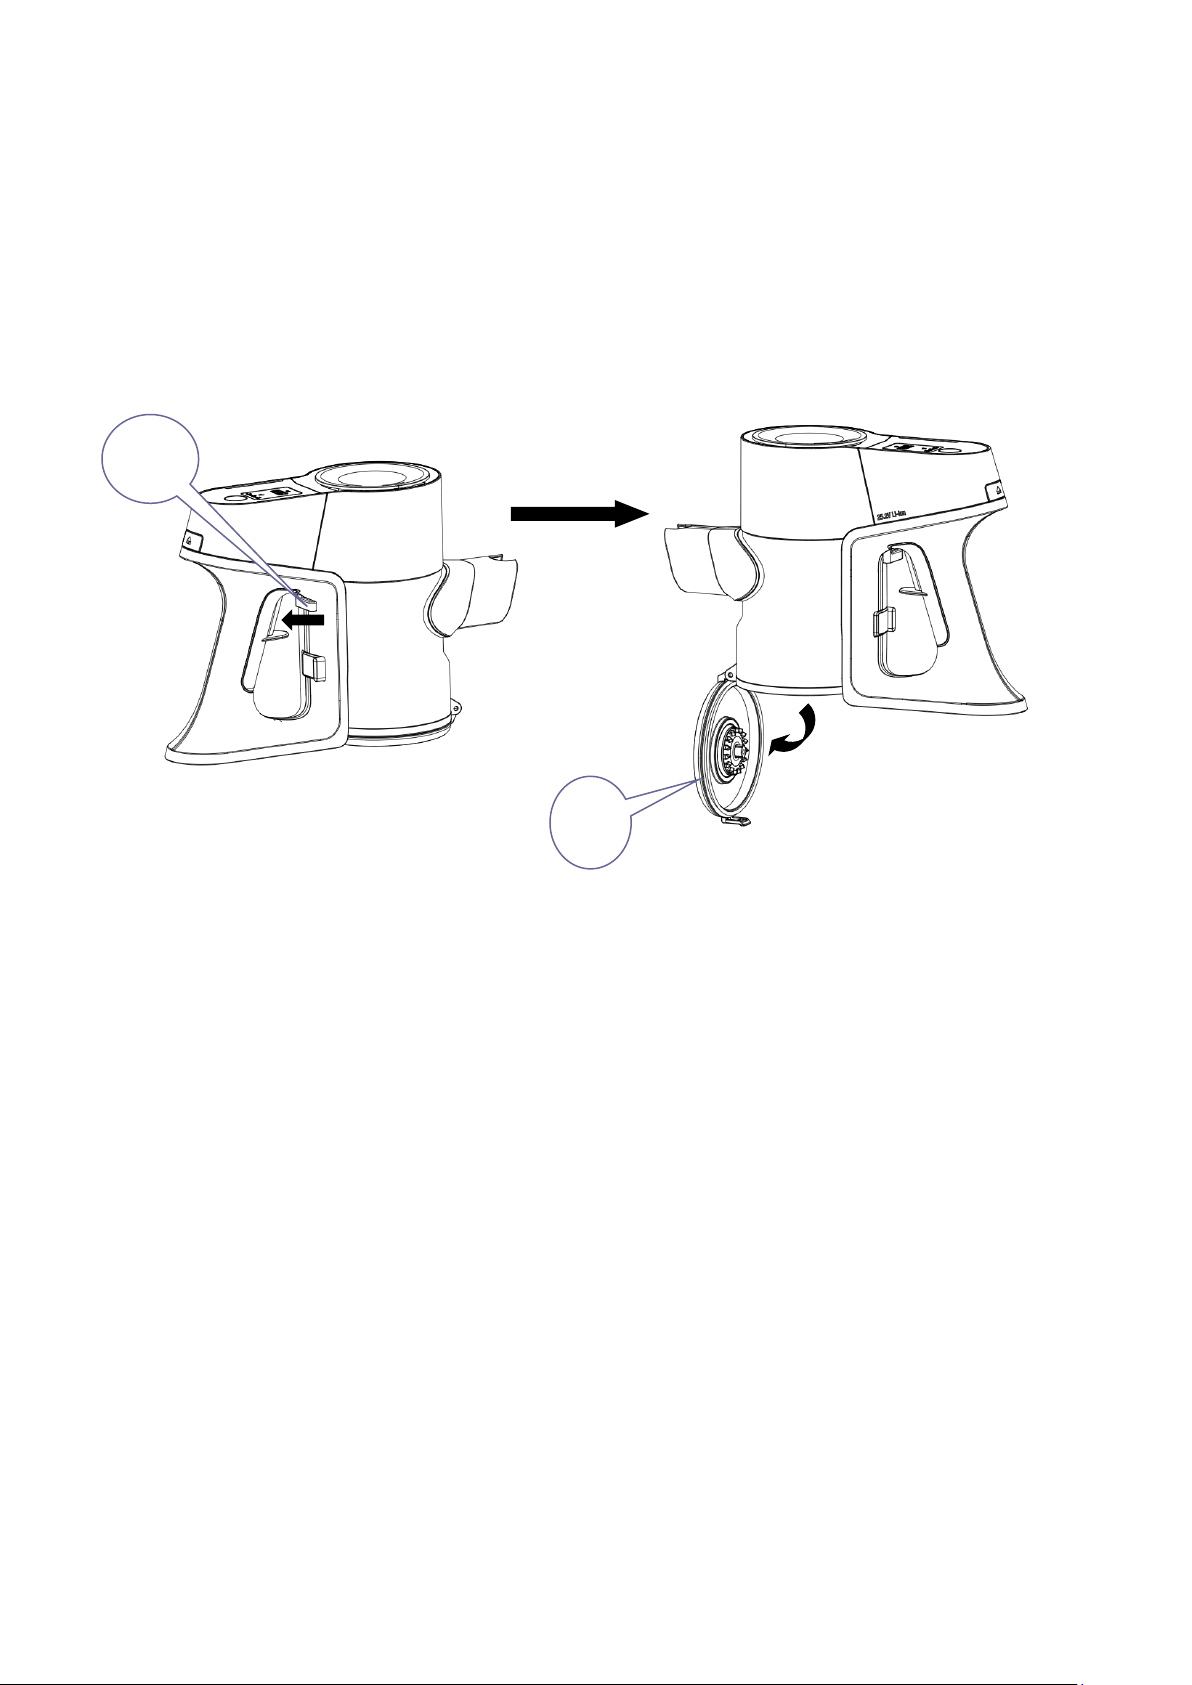
4.3 Battery disassembly operation.
Hold on to the main unit with one hand, press the release key (No.1) with your
other hand, and pull it up at the same time to release the battery. fig.4-7
Figure 4-5
Figure 4-6
1
2
4
3
Figure 4-4
Figure 4-7
1

4.4 Attachment Operation
The crevice tool (No.1) is for cleaning wall corners or confined gaps such as couch
cushions. The dusting brush (No.2) is for removing dust from surfaces. The pet brush
(No.3) is great for use on stairs and furniture. All three attachments will attach to the
main unit and at the end of the aluminum wand. see Figures 4-8, 4-9, 4-10, 4-11, 4-12,
and 4-13.
Figure 4-9
Figure 4-10
Figure 4-11
Figure 4-8
1
1
2
2
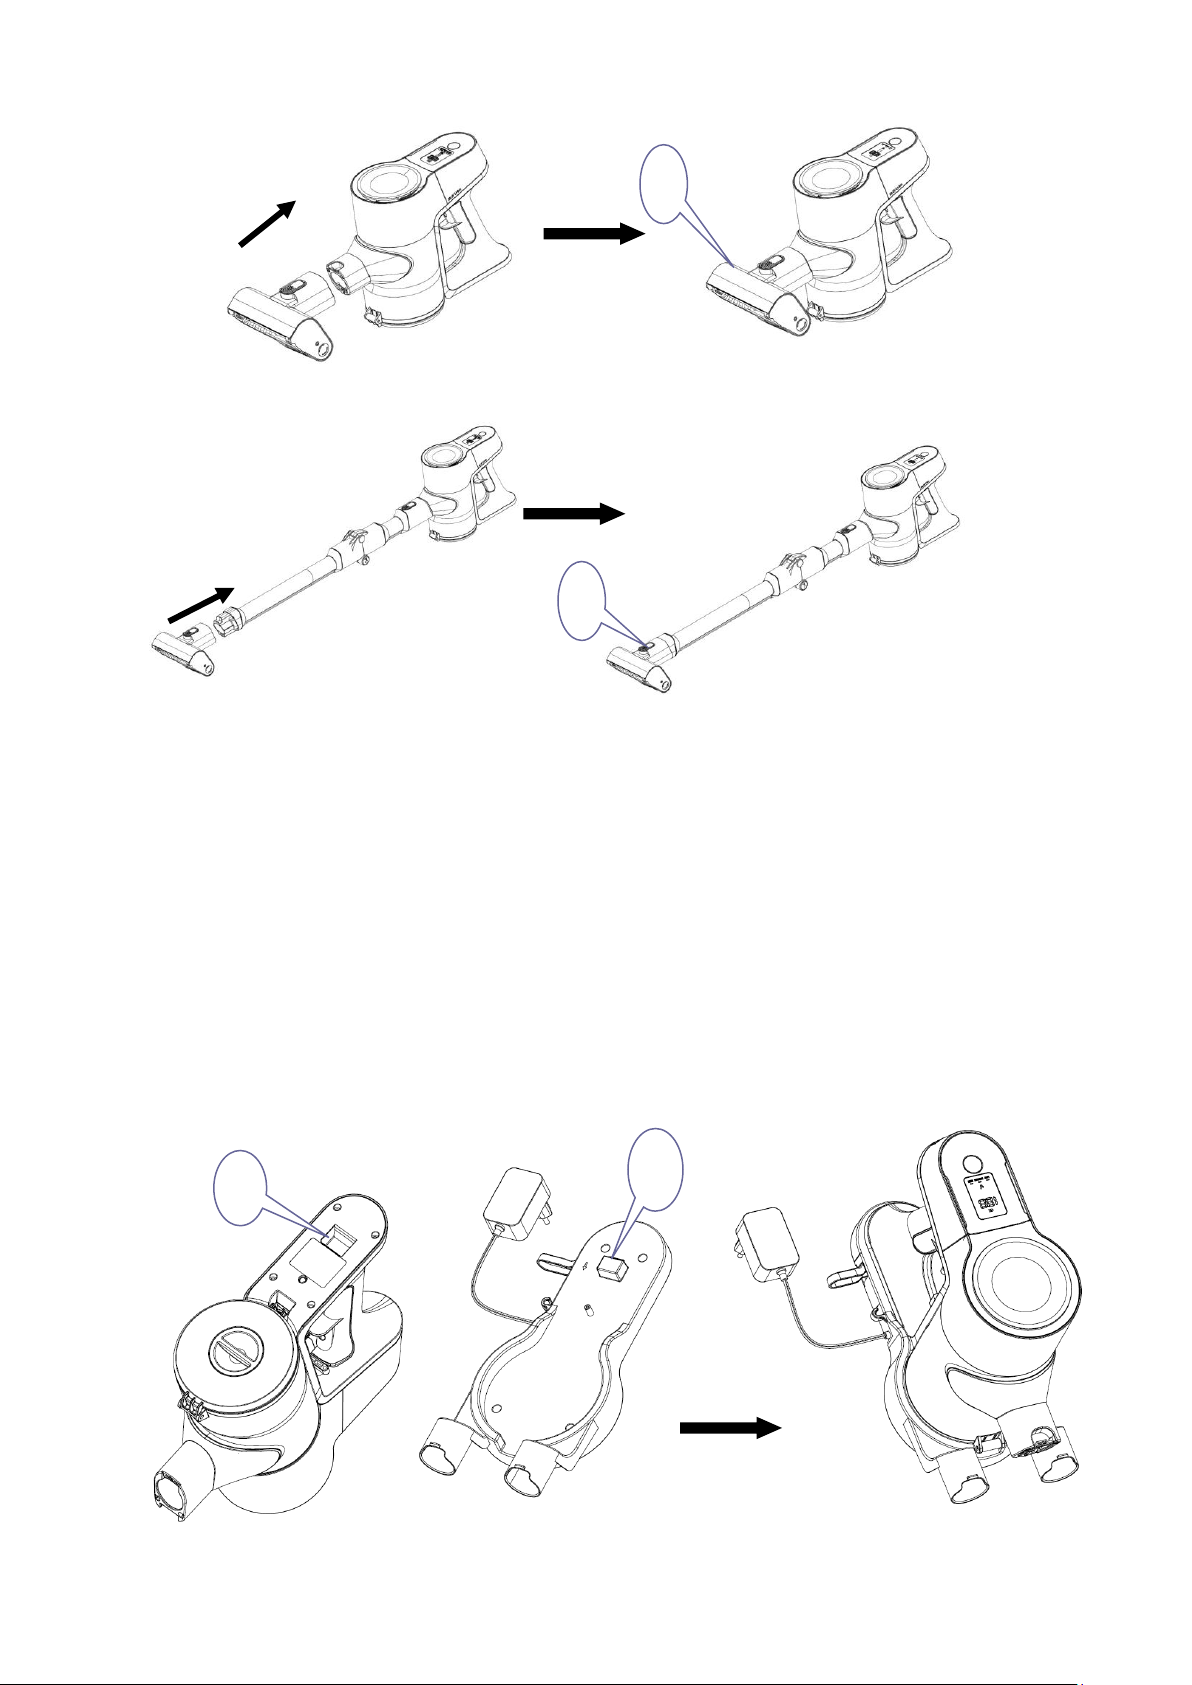
5. Battery Charging
5.1 Charging mode: as shown in Fig. 5-1, hang the hook (No.1) engaged into the
square hole (No.2) in the low body of the cleaner, and the charger is plugged into the
main unit at the same time. While charging the LED screen will show the level of
charge. When the LED shows 100%, the battery is fully charged. The charge time is
4-5 hours.
Figure 5-1
2
1
Figure 4-12
Figure 4-13
3
3

Attention: The vacuum is unable to start while charging.
6. Cleaning & Maintenance
6.1 Push the release button (No.1) back and pull to remove the dirt cup (No.2) from
the main unit.
6.2 Firmly hold the filter handle (No.3) and pull the filter (No.4) out of the filter
screen to empty; Wash the filter (No.4) if necessary, using tap water only, then let it
dry completely before using. To install the filter back in place, make sure to line up
the arrows on the filter with the arrow on the machine to ensure correct placement.
Figure 6-1
Figure 6-2
Figure 6-3
1
2
3
4
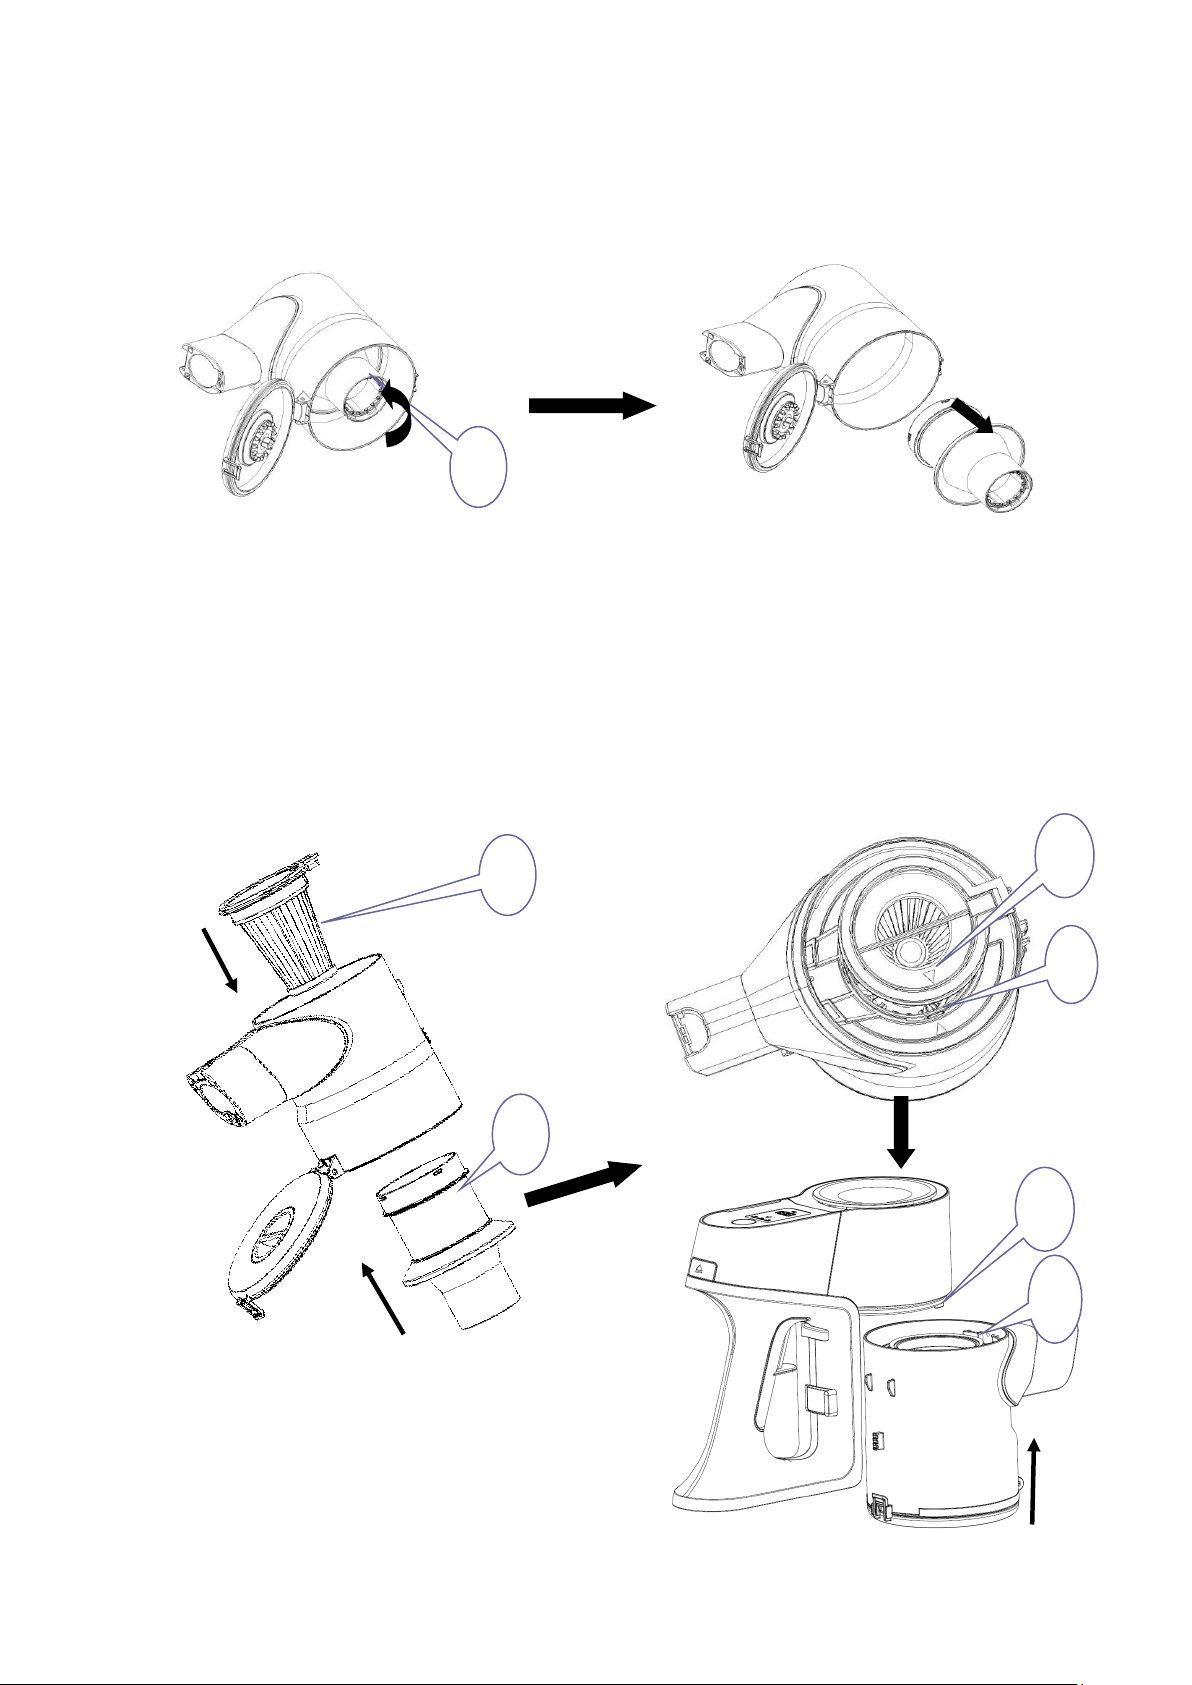
6.3 Hold the filter screen (No.5) and rotate it counterclockwise and pull it out of the
dirt cup. Tap the dirt from the filter screen (No.5) and empty any dirt from the dirt cup.
If you rinse with water, let the filter screen and dirt cup dry before reinserting back.
6.4 Slide the filter screen (No.5) back onto the dirt cup and rotate it clockwise to set it,
and then refit the HEPA filter (No.4) back into the filter screen (Pay attention to the
position arrow No.6 and No.7. These should line up for proper fit.). Insert the hook
(No.8) of the main unit into the hole (No.9) of the dirt cup, then slide them into the
main unit. See Figure 6-6.
Figure 6-4
Figure 6-5
Figure 6-6
5
5
4
8
9
6
7
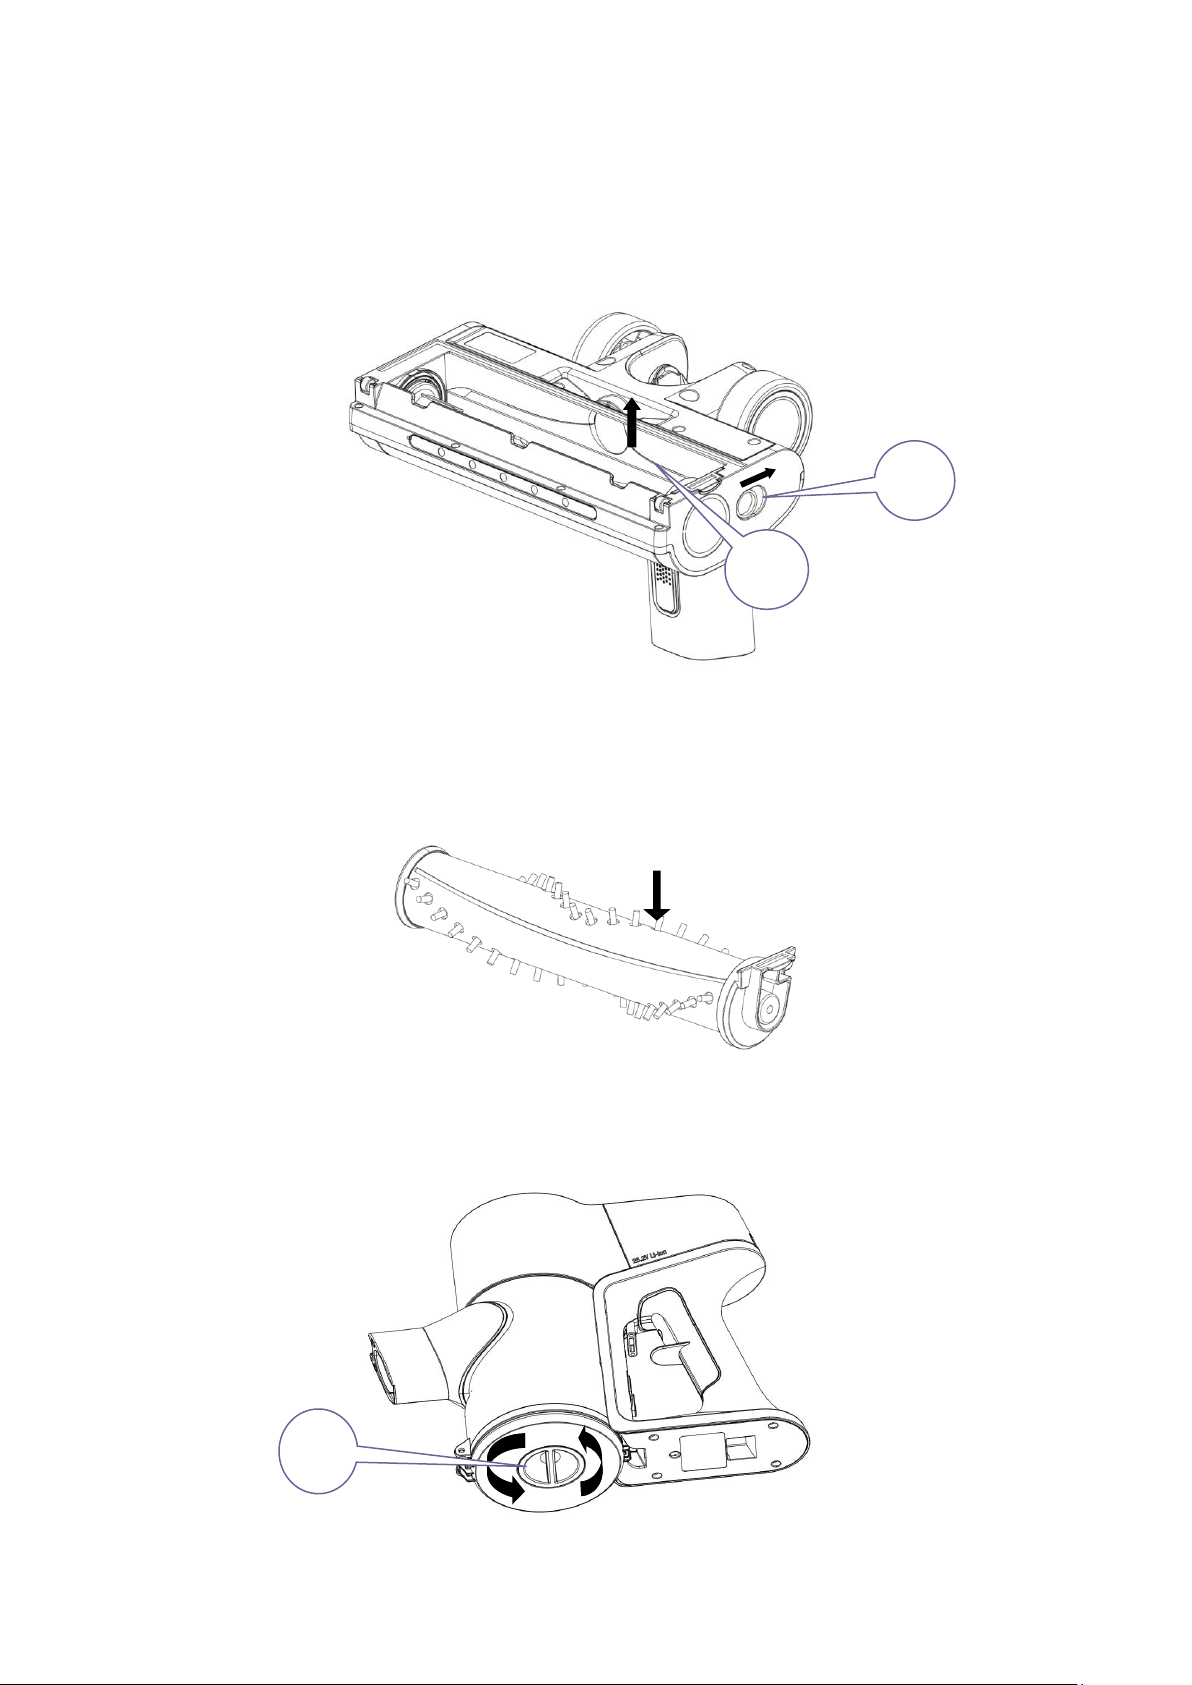
6.5 To remove the power nozzle roller, press the brush roll release button (No.10) and
then pull the brush roll (No.11) out from the top side. Reverse the steps to reinstall the
brush roll. See Figure 6-7.
6.6 To remove hair from the brush roll, run a razor blade down the groove to cut the
hair then pull it off, then re-insert it back in the power nozzle. See Figure 6-8.
6.7Clean the HEPA Filter with the dust scraping knob (No.12).After being used for
some time, dust will stick on the surface of the HEPA Filter, turn the knob to make the
dust drop into the dirt cup. See Figure 6-9.
Figure 6-7
11
Figure 6-8
10
Figure 6-9
12
6.8 The one-touch Easy-open makes emptying the dirt cup quick and easy. See Figure
6-10. Dirt disposal: Hold the vacuum above a garbage bin and pull the Dust Release
Key (No.13) with a finger, so that the Dirt Cup Cover pivots down and the dirt inside
the Dirt Cup will fall out into the garbage bin. Make sure not to lose the large
gasket ring (No.14) or the vacuum will not pick up properly.
Product Care: you may clean the dirt cup after each use. Wash or replace it if
there is too much dirt or blockage; remove hair from the brush roll if it jams and
keep it tangle-free so that the vacuum cleaner will work more efficiently.
Figure 6-10
13
14

7. Technical Specification
Product Model
Sirena ProFlex
Working Voltage
DC 25.2V
Max. Air Watt (High-Speed Level)
≥110W
Battery Charger Model
HCX1501-3200450E
Battery Charger Input
100-240V ~50/60Hz
Battery Charger Output
32V 450mA
Electrical Brush Rated Power
45W
Charging Period
4-5h
1. This device complies with Part 15 of the FCC
Rules. Operation is subject to the following two
conditions: (1) this device may not cause
harmful interference, and (2) this device must accept any
interference received, including interference that may cause
undesired operation.
Sirena Inc.
11334 Boggy Creek Rd #107
Orlando, FL 32824
1-855-474-7362
2.Please note that changes or modifications of this product is
not expressly approved by the party responsible for

compliance could void the user's authority to operate the
equipment.
3. NOTE: This equipment has been tested and found to
comply with the limits for a Class B digital device, pursuant to
Part 15 of the FCC Rules. These limits are designed to provide
reasonable protection against harmful interference in a
residential installation. This equipment generates, uses and
can radiate radio frequency energy and, if not installed and
used in accordance with the instructions, may cause harmful
interference to radio communications. However, there is no
guarantee that interference will not occur in a particular
installation. If this equipment does cause harmful
interference to radio or television reception, which can be
determined by turning the equipment off and on, the user is
encouraged to try to correct the interference by one or more
of the following measures: -- Reorient or relocate the
receiving antenna. -Increase the separation between the
equipment and receiver. -- Connect the equipment into an
outlet on a circuit different from that to which the receiver is
connected. -- Consult the dealer or an experienced radio/TV
technician for help.

Sirena Proflex Two-Year Warranty
The Sirena ProFlex Stick Vacuum comes with a two-year warranty, offering you peace
of mind with your purchase. This warranty specifically covers any defects in
manufacturing, ensuring that your vacuum will perform optimally as long as the issues
pertain to factory faults. However, it's important to note that wearable parts such as
brushes, attachments, and filters are not included in this warranty. Therefore, any
issues with these parts will need to be handled separately and are not covered by the
manufacturer's warranty. The warranty applies to products for indoor personal use
only.
ENVIRONMENT-FRIENDLY DISPOSAL
www.sirenasystem.com
You can help protect the environment!
Please remember to respect the local regulations:
Hand in the non-working electrical equipment to
a proper waste disposal centre.
Table of contents
Other Sirena Vacuum Cleaner manuals


