manuals.online logo
Brands
  1. Home
  2. •
  3. Brands
  4. •
  5. Sirius Satellite Radio
  6. •
  7. Keyboard
  8. •
  9. Sirius Satellite Radio Ursa Major Reference manual

Sirius Satellite Radio Ursa Major Reference manual

ζ URSA MAJOR
产品使用说明
SIRIUS Produced
Anti-ex Associated
Product Introduction
0开箱
Unboxing
本次键盘为军火箱发货
Customized suitcase is provided for delevery.
0.0
打开箱子,可见假组状态的键盘本体(左右俩部分)、配件
以及 透明底座(如果选购)
如选购了额外 彩色装饰铝合金选件 或 内胆,取出键盘本体,
抽离中层缓冲垫,额外购买物可见于仓体底部。
如选购配件 数量较多,将使用额外纸盒作为运输包装。
The keyboard is soft-assembled, while separately located on
two sides (left and right). In the middle space, Accessories
and the pedestal (if purchased) would be found.
Additional color decorative aluminum accessories and
PCB suits can be seen under thr keyboard, when taken out
the keyboard and middle cushion. (if purchased)
If you purchase a large number of additional accessories,
additional cartons would be provided for packaging and
delivery.
0.1
配件包含以下:(其中 a、b、c 为内胆组装必须品)
The accessories contain:
( notice a, b, and c are necessary to provide essential function)
0.2
a. 白色二脚灯珠 *4
White two-leg lamp bead * 4
b. 尼龙滚轮组件 *1
Nylon roller component*1
c. 信号增强天线 *2
Signal Booster Antenna*2
d. 脚贴 *8(圆形 *4+ 长条形状 *4)
Feet stickers*8 (round shape*4+long shape*4)
e. 额外螺丝若干
Extra screws
a b c d e
1拆解
Disassembling
键盘需要先拆离假组状态,建议过程如下:
In order to properly cancel the soft-assembling, following
steps is suggested:
1.1
Step 0: 取出测试触发功能
Test PCB trigger function
The keyboard development is completed by LNE Studio, and it is
recommended to use the ofcial software LINK for management.
By default, the left-hand part communicates with the PC host via Bluetooth, while the right-hand
part communicates with the left-hand part via Bluetooth.
If the Bluetooth signal of the host is good, you can turn on both parts' power supply switches
when the battery is connected, connect the host with Bluetooth, and conduct the trigger test.
If the Bluetooth signal of the host is poor, use the TypeC cable to connect the left hand, turn on
the power supply switch of the right hand, and use the cable to connect the host for the trigger
test.
键盘开发由 LNE 工作室完成,建议使用官方软件 LINK 进行管理
NOTE: 产品默认左手部分与 PC 主机蓝牙通信,右手部分只与左手部分蓝牙通信。
如主机蓝牙信号良好,可以在接入电池的情况下,打开双手供电开关,使用蓝牙连接主机,
进行触发测试。
如主机蓝牙信号不良,可使用 TypeC 线连接左手,打开右手供电开关,使用有线连接主机,
进行触发测试。
Step 2: 取下底部螺丝 x10(沉头内六角 M2*14 ~M2*16)
Step 1: 转至背面
Turn to the bottom side
Remove the bottom screw x10
(countersunk hex socket screw M2 * 14~M2 * 16)
Step 3: 打开键盘,解开排线(建议解开 PCB 位置的接口)
Open the keyboard and unlock the cable
(recommended to unlock the interface at the PCB side)
电池小板固定(沉头内六角 M2*4 ~M2*16) 配重固定(沉头内六角 M2*3 ~M2*4)
(countersunk hex socket screw M2 * 4~M2 * 6) (countersunk hex socket screw M2 * 4~M2 * 4)
Due to the transportation requirements, the overseas version does not
include batteries (Nokia BL5J * 2), which should be purchased locally
NOTE: 由于运输要求,海外版不含电池(诺基亚 BL5J*2),需自行购买。
Step 4: 取下左右手各自的螺丝 X6(沉头内六角 M2*5/M2*6)
Step 5: 得到内胆后,拆除卡扣件,准备进行组装。
Remove the screws X6 (countersunk hexagonal socket M2 * 5/M2 * 6)
on both left and right side.
After obtaining the core, remove the fasteners and prepare for further
assembly work.
Step 6: 展开后可见配件:定位板、夹心棉、PCB, 并开始进行组装。
Parts visible after expansion: positioning plate, sandwich cotton, PCBs
abcde
左手 PCB 使用灯珠(配件 a)进行焊接。
请确保 PCB 与定位板 使用 天线(配件 c)进行连接,否则将影响信号。
右手 PCB 使用滚轮(配件 b)进行焊接。
Accessory a would be used on left-hand PCB
Please ensure that PCB and positioning plate are connected by accessory c,
otherwise, the signal would be unstable.
Accessory b would be used on right-hand PCB
焊接要点提示
Key points for welding and assembly
1.2
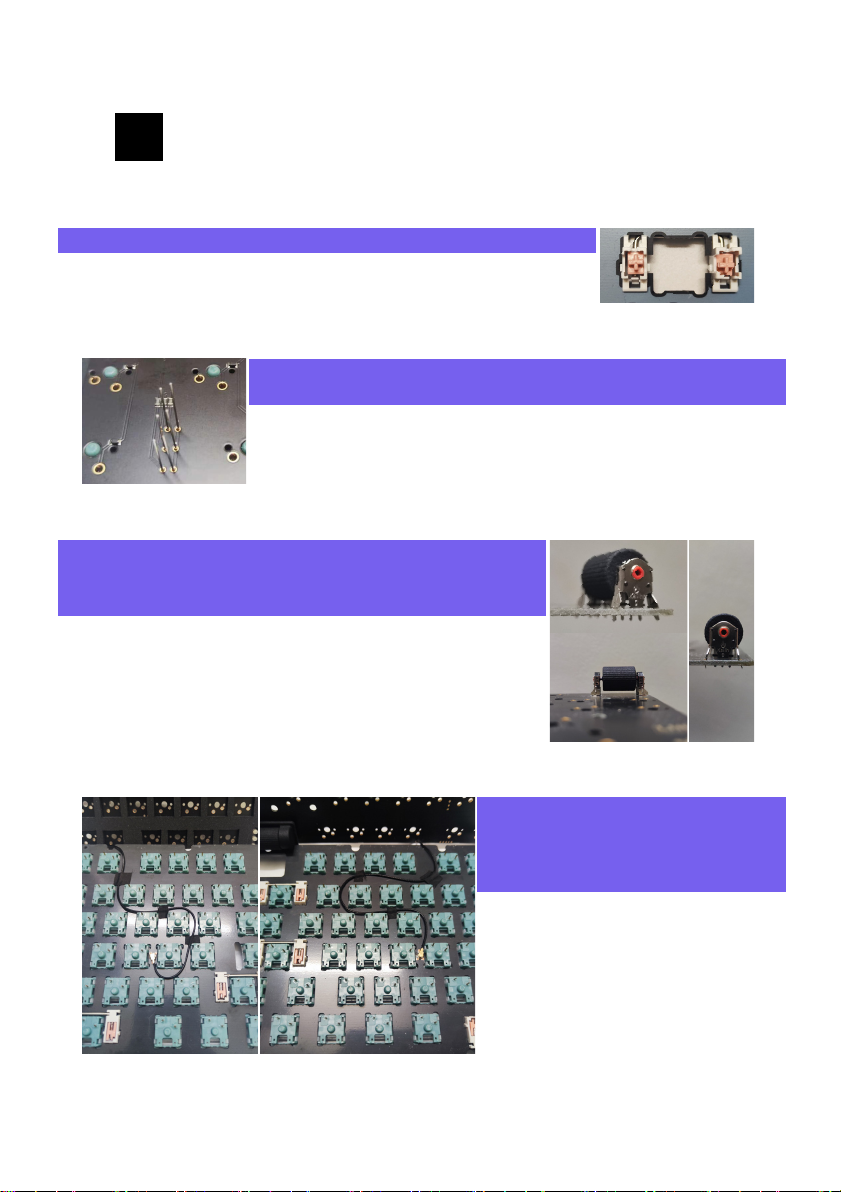
本品使用定位板卫星轴,可以从定位板开始,安装轴体和卫星轴并调试。
滚轮由于 打印尼龙件 *1 与 凯华编码器 *2 组。建议使用镊子调教
编码位置,以及编码器支撑脚的开合角度,使其匹配 PCB 孔位。
此外,编码器只需要焊接中间 3 脚以达成功能。
灯珠长脚为正极,可根据 PCB 上标记进行安装。
确认无误后进行焊接工作,焊接完成后可以剪除多于的针脚。
This product uses the positioning plate satellite.You can start from the
plate, install the switch and satellite and adjust them.
The roller component functions by printed-nylon roller * 1 and
Kaihua encoder * 2
It is recommended to use tweezers to adjust the encoder position
and the angle of the encoder support foot,
Make it match the PCB hole position. In addition, the encoder only
needs to weld the middle 3 pins to achieve the function.
The lamp bead long pin is a positive pole, which can be installed
referencing to the marks on the PCB.
Once conrmation, the welding work can be carried out, and cut off pin
extra part can after welding.
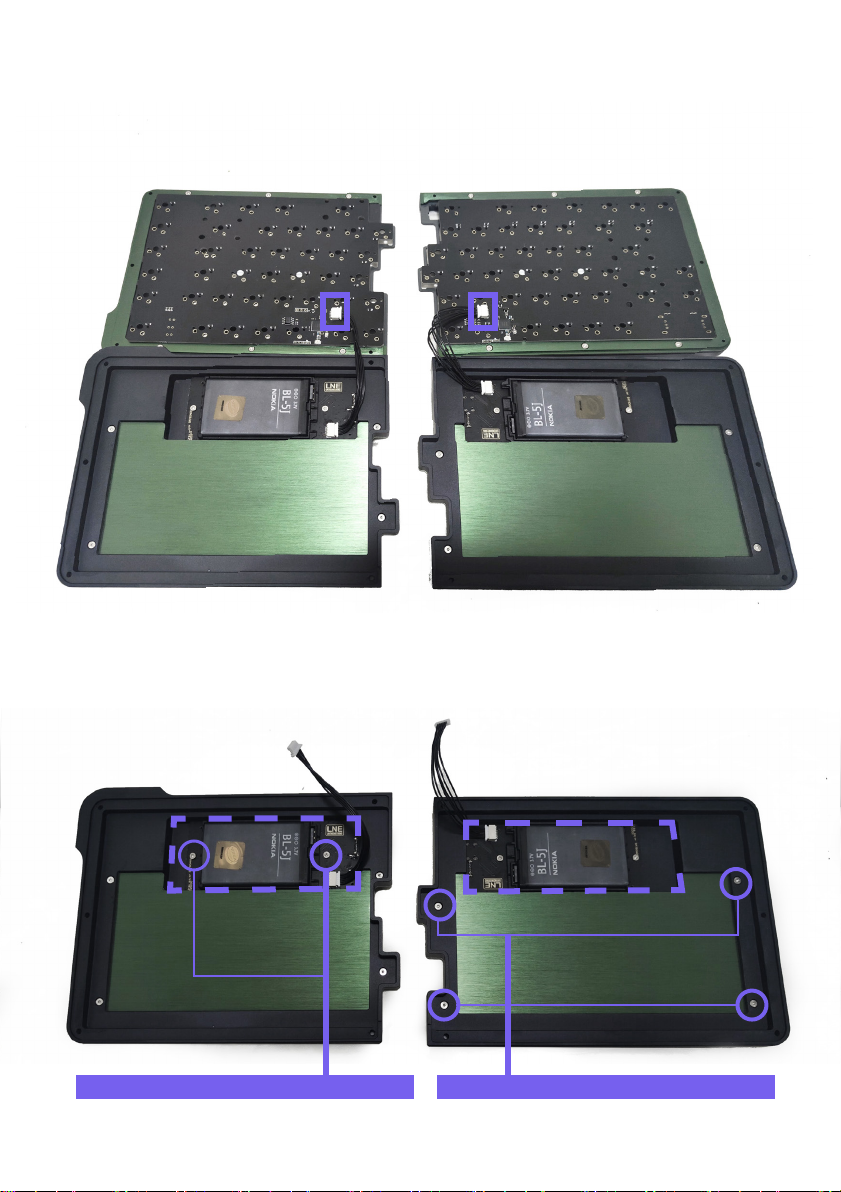
If you choose to install sound insulation
cotton between PCB and the plate, it is
recommended to use adhesive tape to
lock the signal antenna, apply certain
pressure, and preferentially weld the
switches near the antenna to ensure that
the core sets tightly.
如选择在 PCB 与定位板之间安装隔音棉,
建议使用胶带固定信号天线,并施加一定
压力,优先焊接天线附近的轴体,以保证
内胆紧实。
2重新组装
Reassembling
Step 1: 安装左右手各自的螺丝 X6(沉头内六角 M2*5/M2*6)
Step 0: 将焊接完整的内胆 与 彩色中框 放置于上盖。
Install the screws X6 (countersunk hexagonal socket M2 * 5/M2 * 6)
on both left and right side.
Place the completed core and colored middle frame on the top sheld.
Step 3: 连接底壳的排线
Connecting the cable from the bottom shell
Step 4: 合盖上下壳
Close the top and bottom shells
Step 5: 安装底部螺丝 x10(沉头内六角 M2*14 ~M2*16)
Install the bottom screw x10
(countersunk hex socket screw M2 * 14~M2 * 16)
Ensure the cable is connected properly and then lock the screws; Avoid the shells from
invading and pressuring the cable during the closing process.
NOTE: 确保排线连接正常再锁螺丝 ; 合盖过程中避免外壳侵压供电排线。
3使用
Using
使用场景分为 全无线模式 及 有线模式:
The usage scenarios had two mode:
full-wireless mode and wired mode
3.0
Turn “ON” the left-hand and right-hand power supply, and link it with PC's Bluetooth.
In this mode, the left-hand and right-hand rely on the battery board for power supply.
In this mode, the left-hand (the master) communicate with PC through Bluetooth, and the right-
hand(slave) communicate with the left-hand through Bluetooth.
将左手、右手电源拨至 ON 位置,与 PC 蓝牙配对即可达成。
此模式下,左右手均依靠电池小板供电。
此模式下,左手为主手,依靠蓝牙与 PC 通信;右手为副手,依靠蓝牙与左手通信。
全无线模式
full-wireless mode
When the left-hand connected to the PC through wired mode, and the right-hand (switch on) will
automatically link to it, and communicate with the left-hand through Bluetooth,
In this mode, the left-hand communicates with the PC through the cable and supplies power
through the cable as welll (battery charging)
If the right-hand is also connected to a wired connection, the right-hand (switch on) will still
communicate with the left hand through Bluetooth, but will supplies power through the cable
(battery charging).
左手通过有线模式连接 PC,右手(开关打开)将自动通过蓝牙与左手通信。
此模式下,左手通过线缆与 PC 通信,且通过线缆供电(电池充电中)。
如果右手也加入有线连接,右手(开关打开)依然将通过蓝牙与左手通信,但依靠线缆供电
(电池充电中)。
有线模式
wired mode
3使用
Using
与 PC 进行蓝牙匹配,操作如下:
Turn on the battery power of both hands and connect the PC with
Bluetooth matching. The operations are as follows:
3.1
3使用
Using
键盘组装完成后请接线使用 lne link 进行管理,
软件包含 windows 及 mac 支持,下载地址:https://www.lnelab.com/
After the keyboard is assembled, please use the Type-C cable
and the software LINK for management,
The software includes Windows and Mac support.
Download address: https://www.lnelab.com/
3.2
键值设置
Key value settings
蓝牙设置
Bluetooth settings
3.3
3.4
THANKS FOR UR
SUPPORT
感谢您的支持
SIRIUS Produced
Anti-ex Associated

Popular Keyboard manuals by other brands

Ceratech HKBRAIPWHED specification

Ceratech

Ceratech HKBRAIPWHED specification

Cleankeys CK3-15 Quick start guide & user manual

Cleankeys

Cleankeys CK3-15 Quick start guide & user manual

Amazon K690 manual

Amazon

Amazon K690 manual

Sharkoon Shark Zone K15 manual

Sharkoon

Sharkoon Shark Zone K15 manual

Brookstone 867146 user manual

Brookstone

Brookstone 867146 user manual

Nacon CL-510 Instruction booklet

Nacon

Nacon CL-510 Instruction booklet

Alienware AW568 user guide

Alienware

Alienware AW568 user guide

Mobility Electronics Stowaway Stowaway Bluetooth Keyboard owner's manual

Mobility Electronics

Mobility Electronics Stowaway Stowaway Bluetooth Keyboard owner's manual

Natec Genesis RX33 user manual

Natec

Natec Genesis RX33 user manual

Logitech K340 - Wireless Keyboard user guide

Logitech

Logitech K340 - Wireless Keyboard user guide

suvil KEiPad 2 BT user guide

suvil

suvil KEiPad 2 BT user guide

Behavioral Technology Group 6200 user guide

Behavioral Technology Group

Behavioral Technology Group 6200 user guide

Logitech G610 Orion Brown Setup guide

Logitech

Logitech G610 Orion Brown Setup guide

COP Security Symphony user manual

COP Security

COP Security Symphony user manual

Kexinhuacheng Communication Technology 6B011 user manual

Kexinhuacheng Communication Technology

Kexinhuacheng Communication Technology 6B011 user manual

Clifton SLM-37 manual

Clifton

Clifton SLM-37 manual

Krown Krown 200 Specifications

Krown

Krown Krown 200 Specifications

iHome Type Pro IH-IP2104 quick start guide

iHome

iHome Type Pro IH-IP2104 quick start guide

manuals.online logo
manuals.online logoBrands
  • About & Mission
  • Contact us
  • Privacy Policy
  • Terms and Conditions

Copyright 2025 Manuals.Online. All Rights Reserved.