Skanhex SX410z User manual


SYSTEM REQUIREMETS WINDOWS
• for USB –Windows 98/98 SE/2000 prof./Me
• 32 MB RAM
• 110MB free memory apa ity
• VGA olour monitor
• CD ROM drive
• USB
SYSTEM REQUIREMETS
IMac,iBook,G3 blue&white erie ,G4 erie
• Ma OS 8.6/9/9.0.2/if possible 9.0.4
• 32MB RAM or higher
• 110MB free memory apa ity
• VGA olour monitor
• CD ROM drive
• USB

3
Thank you for pur hasing the SKANHEX 410z.
Please take the time to read through this instruction manual so you can enjoy all
its features.
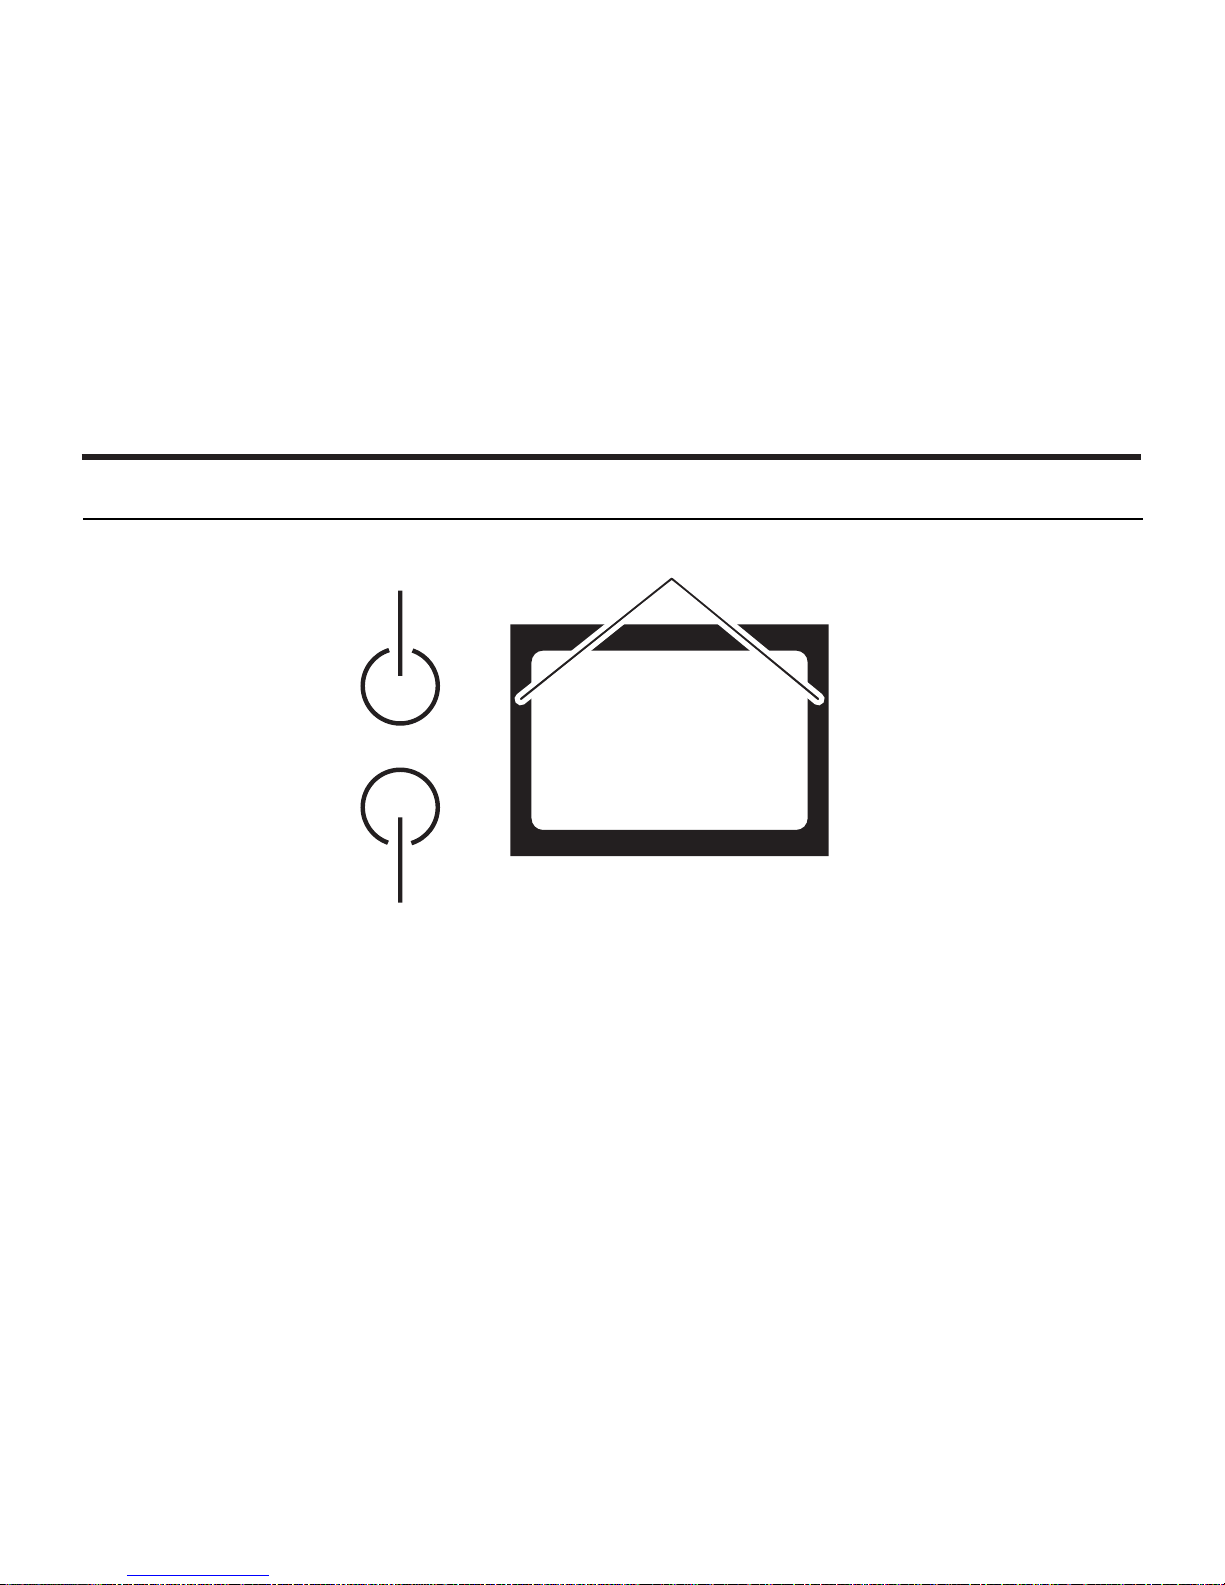
This mark on your amera ertifies that this amera meets the requirements of the
EU (European Union) on erning interferen e ausing equipment regulations.
CE stands for Conformité Européenne (European Conformity).
This devi e omplies with Part 15 of the FCC Rules. Operation is subje t to the fol-
lowing two onditions: (1) This devi e may not ause harmful interferen e, and (2)
this devi e must a ept any interferen e re ieved, in luding interferen e that may
ause undesired operation.
This Class B digital apparatus omplies with Canadian ICES-003.
Do not remove the ferrite ores form the ables.
FOR HOME OR OFFICE USE
SX410z

4
Read and understand all warnings and autions before using this produ t.
Batteries may be ome hot or explode due to improper use.
• Use only the batteries spe ified in this instru tion manual.
• Do not install the batteries with the polarity (+/-) reversed.
• Do not subje t batteries to fire or high temperatures.
• Do not attempt to re harge, short, or disassemble.
• Do not mix batteries of different types, brands, or ages.
• Follow lo al regulations for battery disposal.
Use aution, a idents may o ur when using this produ t near young hil-dren.Keep batteries or
things that ould be swallowed away from young hildren.Conta t a do tor immediately if an obje t
is swallowed.Immediately remove the batteries and dis ontinue use if...
• the amera is dropped or subje ted to an impa t in whi h the interior is exposed.
• the produ t emits a strange smell, heat, or smoke.
Do not walk while looking at the monitor.
Do not disassemble. Ele tri sho k may o ur if a high voltage ir uit inside
the amera is tou hed.
Take your amera to a SKANHEX Servi e Fa ility when repairs are required.
WARNING
CAUTION
The heat of the amera rises with extended periods of use. Use aution when handling the amera or
removing the batteries and ompa t flash ard.
FOR PROPER AND SAFE USE

5
EFORE YOU EGIN
Che k the pa king list before you begin. If some parts are missing, onta t your
amera dealer or a SKANHEXServi e Fa ility listed on the ba k over of this manual.
• SKANHEX SX410z ZOOM camera x 1)
• AA-size Alkaline Batteries x 4)
• Video Cable x 1)
• Hand Strap x 1)
• Camera Case x 1)
• USB Cable x 1)
• 16MB CompactFlash Card x 1)
• Software and Documentation on CD-ROM:
USB Driver Software for Windows ® 98/Windows ® 98 SE / Windows ® 2000
and Ma OS 8.6 / 9 / 9.0.2 / 9.0.4
Instru tion Manual (PDF) Windows ® /Ma intosh
Adobe PhotoDeluxe 4.0 Family Edition CD-ROM for Windows ®
Adobe PhotoDeluxe 2.0 CD-ROM for Ma intosh
• Documentation Printed)
Warranty Card (x 1)

6
TA LE OF CONTENTS
FOR PROPER AND SAFE USE........................4
BEFORE YOU BEGIN.......................................5
TABLE OF CONTENTS.....................................6
NAMES OF PARTS.........................................10
CAMERA BODY...........................................10
INSIDE THE TERMINAL COVER................12
BOTTOM OF BODY.....................................12
DATA PANEL...............................................13
VIEWFINDER..............................................14
QUICK REFERENCES....................................16
GETTING STARTED.......................................16
TAKING PICTURES........................................16
MONITORING THE CAPTURED IMAGES......18
DELETING IMAGES........................................19
PREPARATION
ATTACHING THE HAND STRAP.....................22
INSERTING THE BATTERIES........................23
CHECKING THE BATTERY POWER ........25
AUTO POWER OFF......................................26
USING THE DC
ADAPTER (Sold Separately).........................26
INSERTING/REMOVING THE COMPACT
FLASH (CF) CARD............................................27
INSERTING THE CF CARD.........................27
REMOVING THE CF CARD.........................28
TAKING PICTURES
BASIC RECORDING PROCEDURE.................31
THE RECORDING MODE DISPLAY ON THE
LCD MONITOR..................................................33
THE DISPLAY OF THE CAMERA SETTINGS
...........................................................................34
ADJUSTING THE FOCUS.................................35
FOCUS LAMP...............................................35
FOCUS DISTANCE IN THE AUTOFOCUS
MODE (Minimum Fo us Distan e)....................35
THE SUBJECT THAT IS DIFFICULT TO

7
TA LE OF CONTENTS
FOCUS
IN THE AUTOFOCUS MODE....................36
WHEN THE SUBJECT IS NOT IN THE
CENTER OF THE FRAME
(Fo us Lo k Fun tion)................................37
ADJUSTING THE FOCUS MANUALLY
(Manual Fo us Mode)................................38
FLASH.............................................................40
Flash Range...............................................40
SELECTING THE FLASH MODE..............41
Flash Lamp................................................42
ADVANCED OPERATIONS
BURST IMAGE CAPTURE.............................44
SELF-TIMER...................................................47
DIGITAL ZOOM...............................................50
CLOSE-UP......................................................52
EXPOSURE COMPENSATION......................55
ADJUSTING THE BRIGHTNESS OF THE LCD
MONITOR..........................................................57
SPECIFYING THE RECORDING MODE
SPECIFYING THE RECORDING MODE.......59
THE RECORDING
MODE MENU DISPLAY (LCD Monitor).....59
THE RECORDING MODE MENU ITEMS
....................................................................59
SPECIFYING THE IMAGE QUALITY MODE
........................................................................63
SPECIFYING THE IMAGE SIZE MODE .......65
SPECIFYING THE WHITE BALANCE MODE
........................................................................68
SPECIFYING THE SHARPNESS MODE.......70
RESETING TO THE RECORDING MODE DEFAULT
SETTINGS
.........................................................72
PLAYBACK MODE
SINGLE-FRAME PLAY....................................75
THE PLAYBACK MODE DISPLAY
ON THE LCD MONITOR................................76
THE IMAGE INFORMATION DISPLAY
IN THE PLAYBACK MODE........................77
INDEX PLAY...................................................78

8
TA LE OF CONTENTS - CONT'D
SPECIFYING THE PRINT SETTINGS WITH
THE DPOF.......................................................99
SPECIFYING THE IMAGE AND THE
NUMBER TO BE PRINTED......................100
SPECIFYING THE INDEX PRINT
SETTINGS................................................102
TO CANCEL THE PRINT SETTINGS WITH
THE DPOF................................................104
FOLDER NAME.............................................105
SELECTED AN FOLDER.........................106
GIVE FOLDER A NEW NAME.................107
On DCF (Design rule for Camera File system)
Format......................................................109
SETUP
THE SETUP MODE MENU DISPLAY............111
THE SETUP MODE MENU DISPLAY ON
THE LCD MONITOR.................................111
THE SETUP MODE MENU ITEMS AND
EACH SETTINGS.....................................111
SPECIFYING THE TIME FOR THE AUTO
ZOOM PLAY...................................................80
SLIDE SHOW
TO START THE SLIDE SHOW.................82
TO STOP THE SLIDE SHOW...................83
THE SETTING IN THE SLIDE SHOW
MODE MENU..........................................84
DELETING IMAGES
DELETING SELECTED IMAGE.....................87
DELETING ALL IMAGES...............................90
DELETING FOLDERS..................................92
ADJUSTING THE BRIGHTNESS OF THE LCD
MONITOR.......................................................94
SPECIFYING THE PLAYBACK MODE
THE PLAYBACK MODE MENU...................97
THE PLAYBACK MODE MENU
(LCD Monitor)..............................................97
THE PLAYBACK MODE MENU ITEMS AND
EACH SETTINGS..........................................97

9
TA LE OF CONTENTS - CONT'D
POWER OFF FUNCTION................................111
FORMATTING THE CFCARD........................115
SETTING THE DATE / TIME...........................117
SETTING THE BEEP SOUND........................120
SWITCHING THE VIDEO SIGNAL FROM
THE VIDEO OUTPUT TERMINAL...................122
SWITCHING THE LANGUAGE DISPLAYED
ON THE LCD MONITOR.................................124
RESETTING TO THE DEFAULT SETTINGS..126
CONNECTING TO THE PERSONAL COMPUER
CONNECTING TO THE PERSONAL
COMPUTER....................................................130
Edition.........................................................130
For Windows® 2000 Professinal...............130
For Windows® Me......................................130
For Ma intosh.............................................130
CAUTIONS WHEN CONNECTING TO
THE PERSONAL COMPUTER...............137
INSTALLING Adobe PhotoDeluxe...................139
APPENDIX
WATCHING THE CAPTURED IMAGES
ON TV............................................................142
TROUBLESHOOTING..................................143
NOTES ON THE HANDLING......................150
CARE AND STORAGE.................................151
TECHNICAL DETAILS..................................152
10
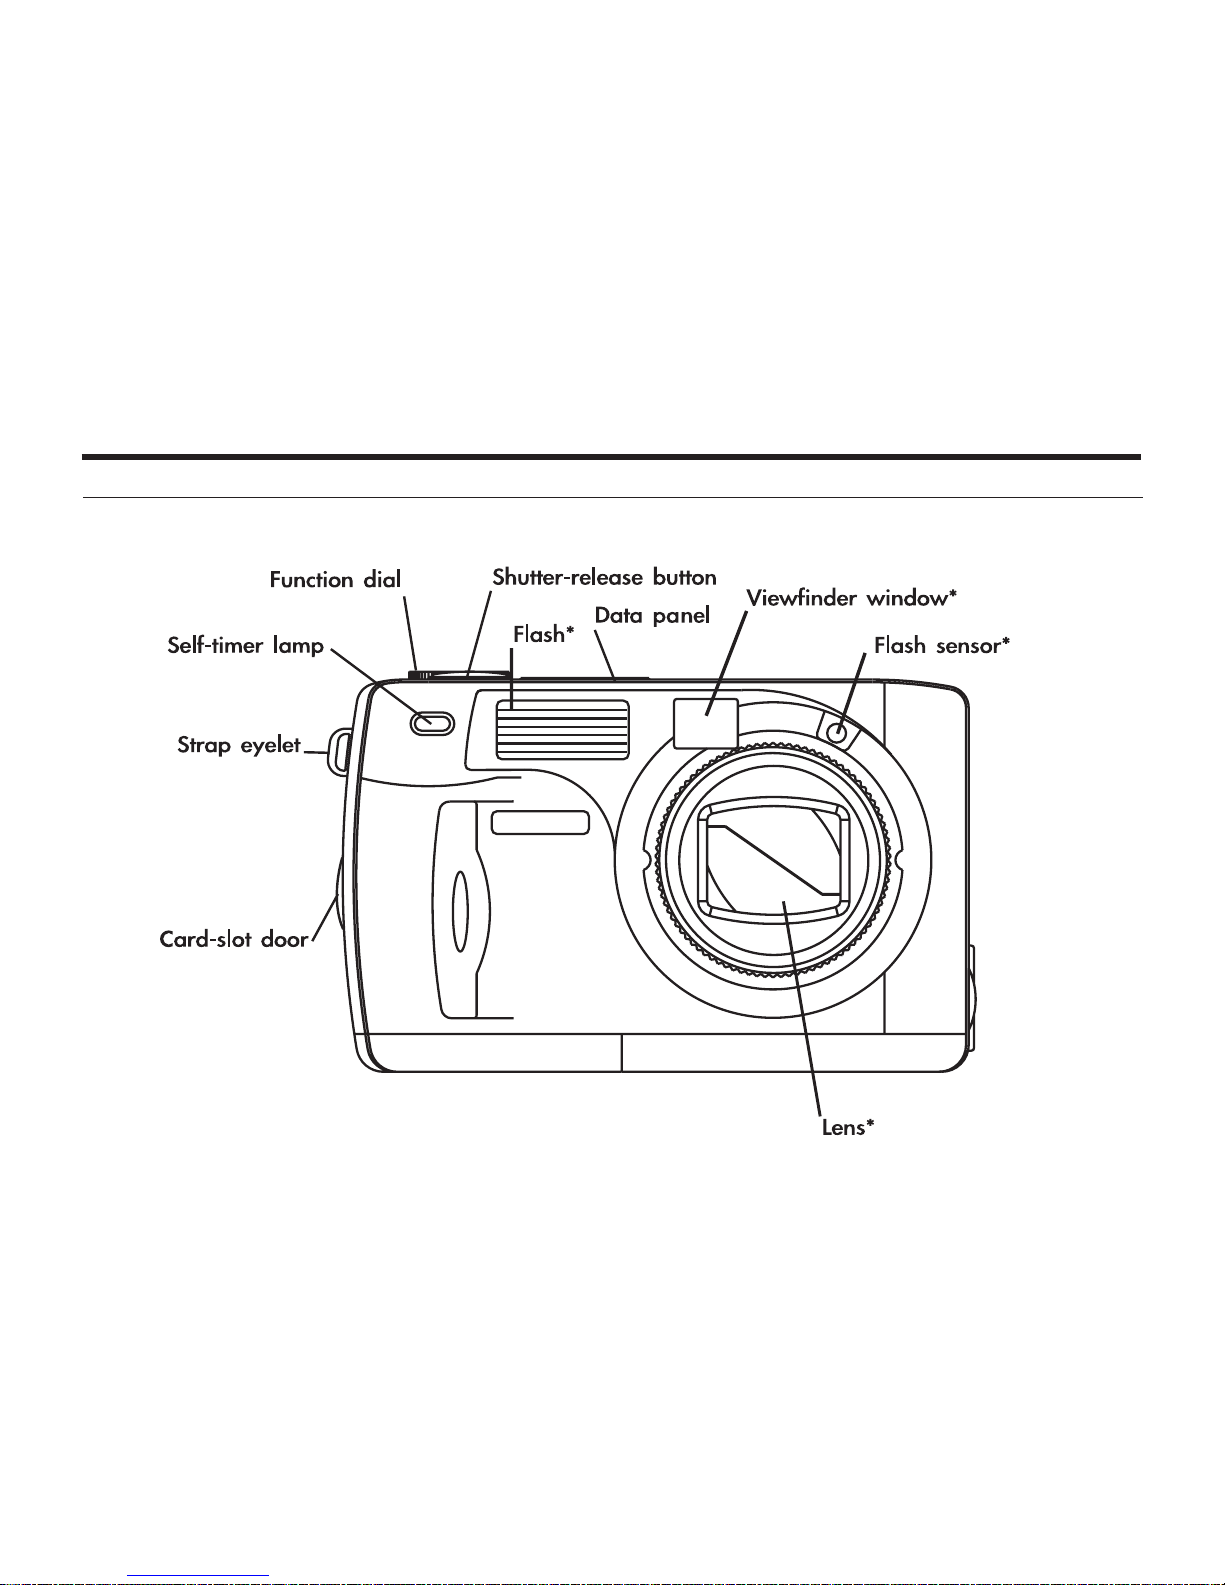
NAMES OF PARTS
CAMERA BODY
* Do not tou h.

11
NAMES OF PARTS
12
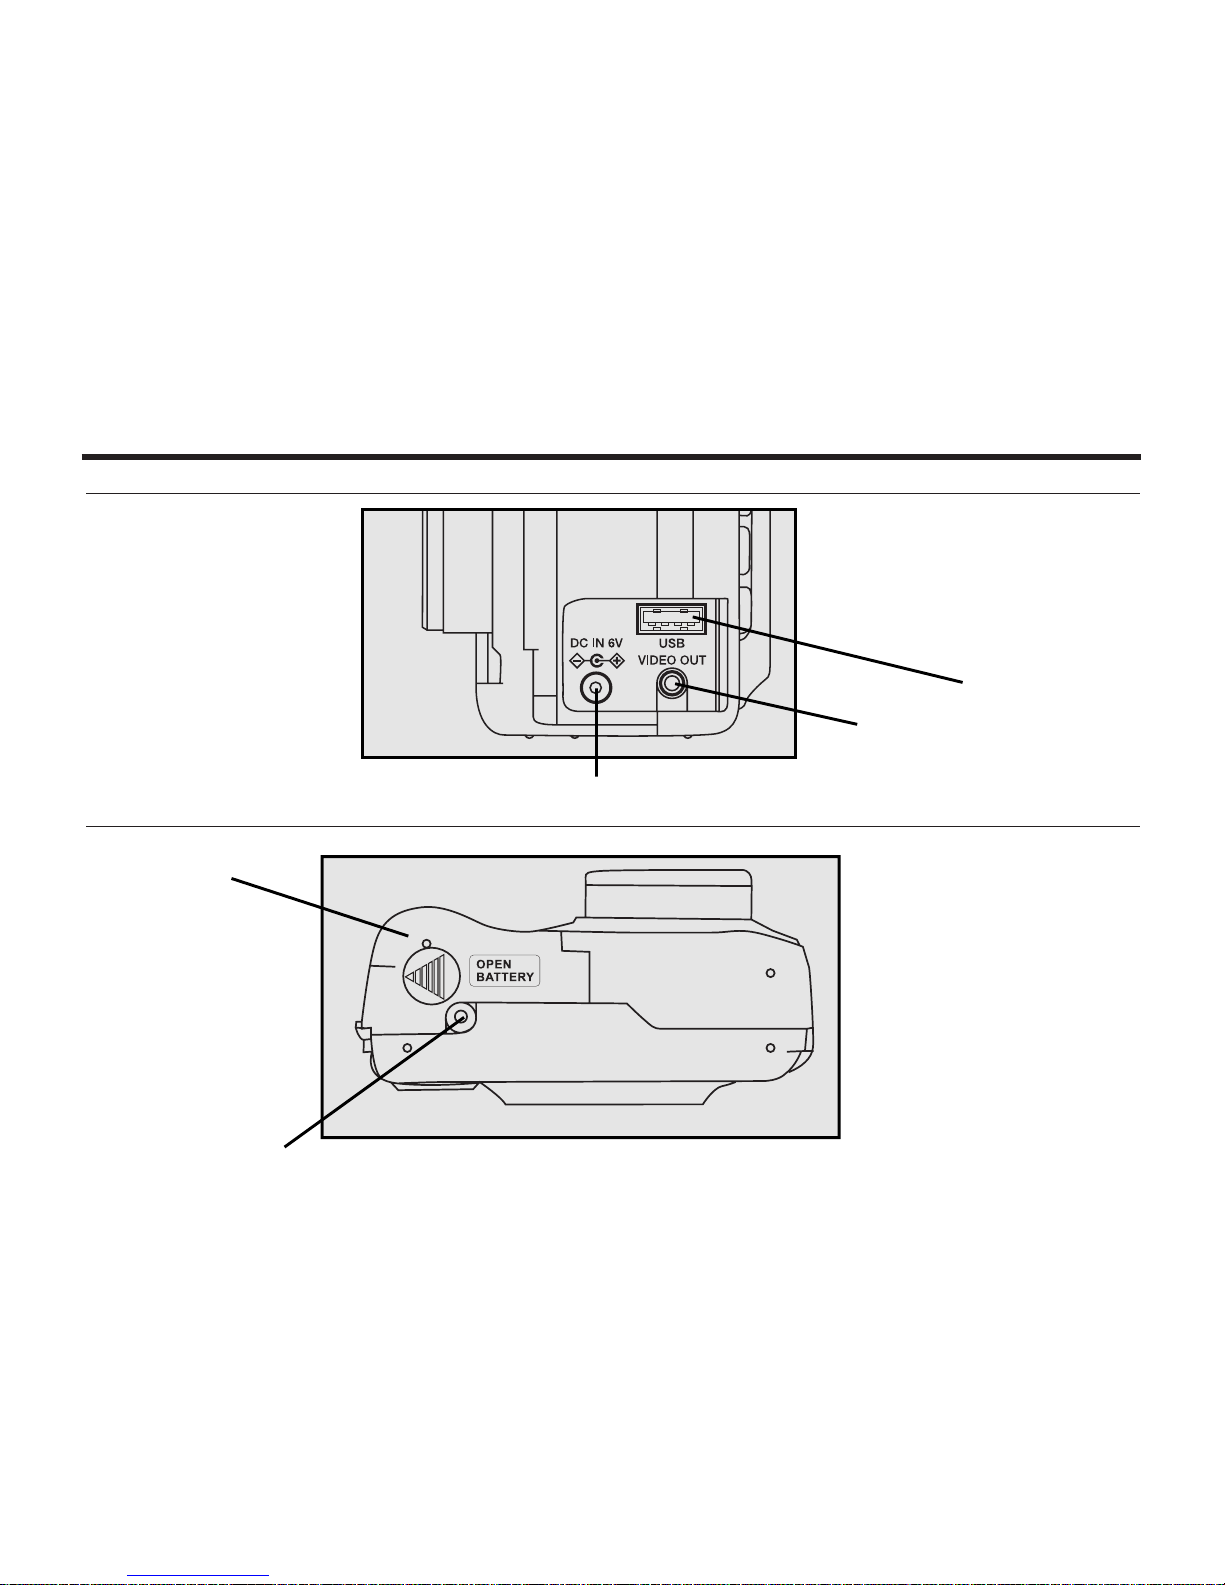
NAMES OF PARTS - CONT'D
INSIDE THE TERMINAL COVER
BOTTOM OF BODY
USB onne tor
Video-out terminal
DC terminal
Battery- hamber door
Tripod so ket

13
NAMES OF PARTS - CONT'D
* Refer to the number of re ordable remaining frame as a guide.
The number hanges depending on the s ene or subje t you re ord.
DATA PANEL
The following diagram shows all items displayed to aid the explanation.
Battery- ondition indi ator
Self-timer indi ator
Number display of re ordable remaining frame/
No- ard indi ator
Image-size indi ators Flash-mode indi ators
14
NAMES OF PARTS - CONT'D
Close-framing guide
When you shoot a subje t whi h is loser than 1m through the viewfinder, only the part under the
lose-framing guide is re orded. So, use the LCD monitor to he k the image omposition when you
shoot a subje t whi h is loser than 1m.
VIEWFINDER
Fo us Iamp
(green)
Flash Iamp
(orange)
Close-framing guide

15
NAMES OF PARTS - CONT'D
Focus Lamp Green)
Lights. The fo us is determined and lo ked.
Blinks qui kly (about 8
times in a se ond).
The fo us is not determined.
(The subje t ontrast is too low, the subje t is too dark or too lose.
Or the subje t is too far in the lose up mode.)
Blinks slowly (about 2
times in a se ond).
The image is being re orded in the CF (Compa t Flash) ard.
The amera reads out the image from the CF ard.
Focus Area as a Guide)
Flash Lamp Orange)
In the autofo us mode,
the fo us is adjusted at
the gray part as shown
in the figure.
Lights. The flash ready for fires.
Blinks qui kly when the shutter-release
button is pressed all-the-way down
(about 8 times in a se ond).
(When the flash fun tion is an elled)
Blinks slowly (about 2 times in a se ond).
The flash is being harged.
The shutter-release button is not released.
The shutter speed be omes slow.
Taking a pi ture in this mode may ause
an image blurred.

16
QUICK REFERENCES
GETTING STARTED
TAKING PICTURES – See page 31 for details.
11Insert the batteries see page 23).
22Insert the CF card see page 27).
11Rotate the function dial to .
22Slide the power switch to turn on the camera.
17
QUICK REFERENCES - CONT'D
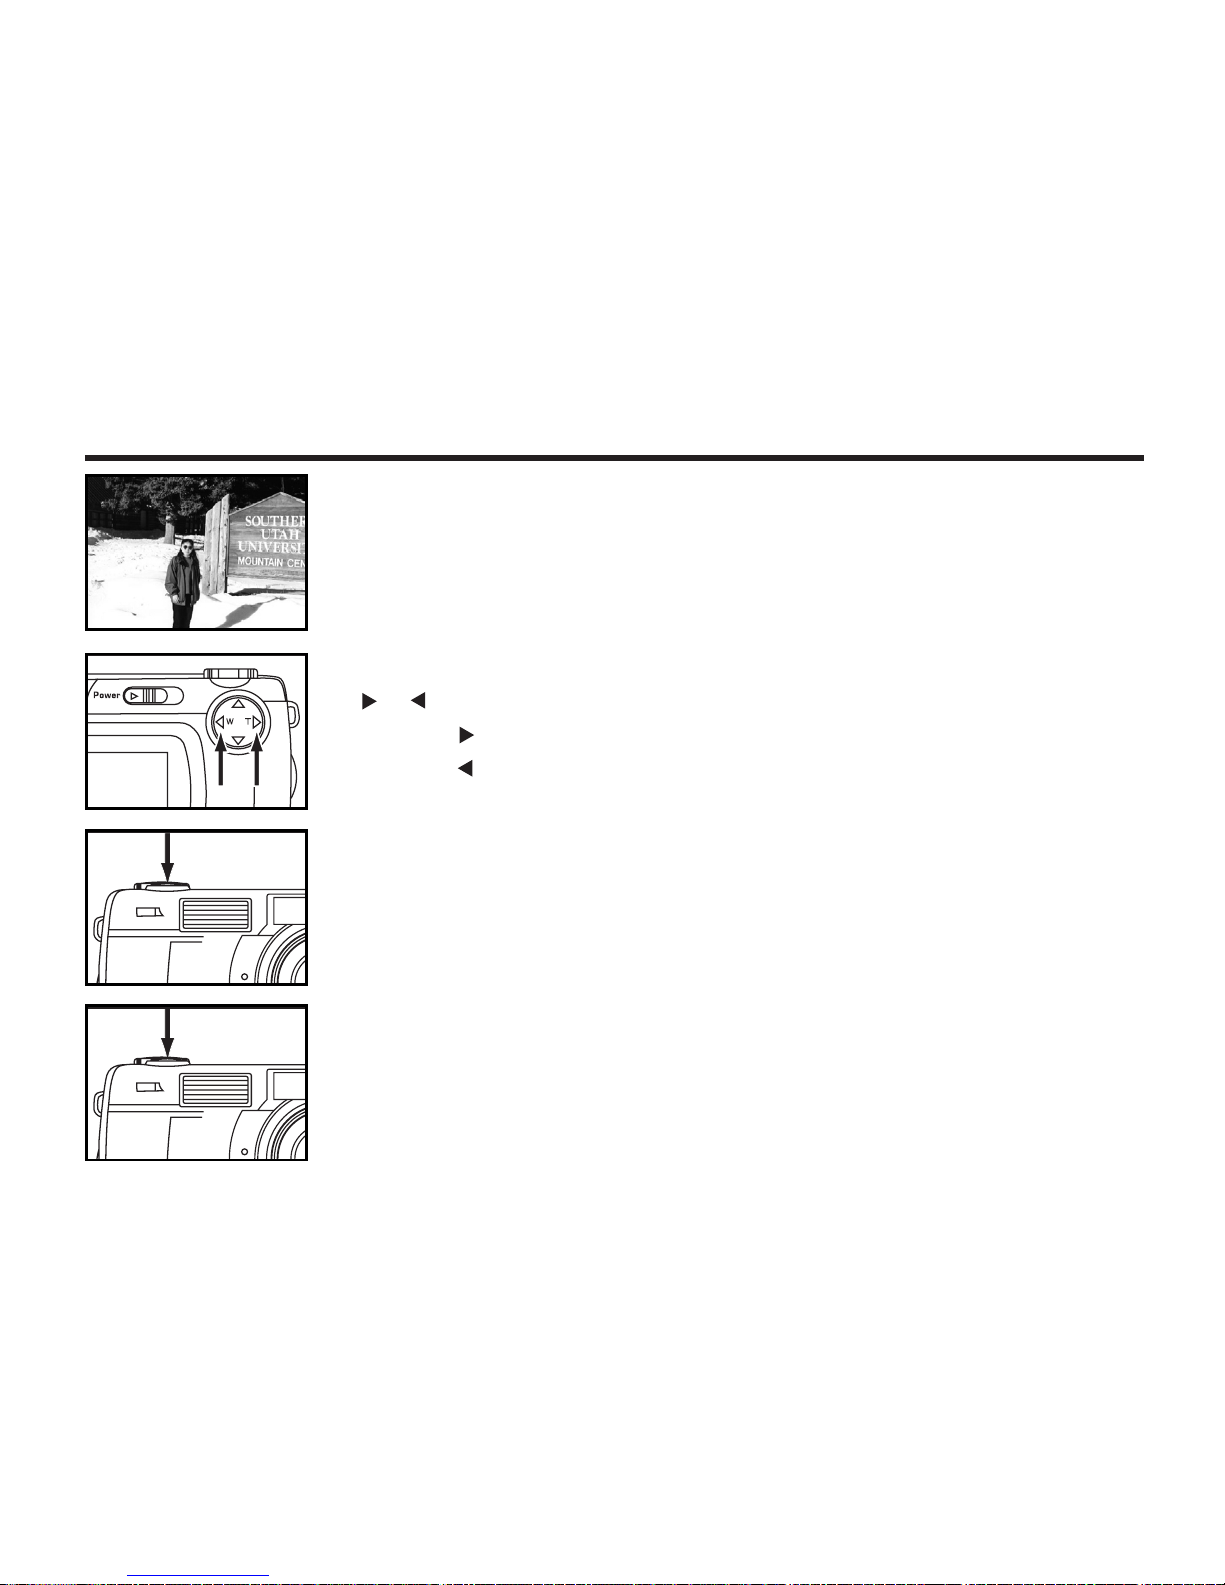
33Determine the image composition while looking into LCD
monitor or viewfinder.
55Press the shutter-release button part-way down.
• When the image is fo used, the fo us lamp (green) lights up.
44Adjust the image range and size with the four-way keys
/ ).
• When the key is pressed, the image size be omes large.
• When the key is pressed, the image range be omes wide.
66Press the shutter-release button all-the-way down to take
the picture.
• The aptured image is displayed on the LCD monitor.
• While the aptured image is re orded in the CF ard, the fo us lamp (green)
blinks slowly (about 2 times in a se ond).

18
QUICK REFERENCES - CONT'D
MONITORING THE CAPTURED IMAGES – See page 77 for details.
11Rotate the function dial to .
22Slide the power switch to turn on the camera.
• The latest image (whi h was re orded last) is displayed on the LCD monitor.
33When the or key is pressed, the image changes to the
next or previous one respectively.

19
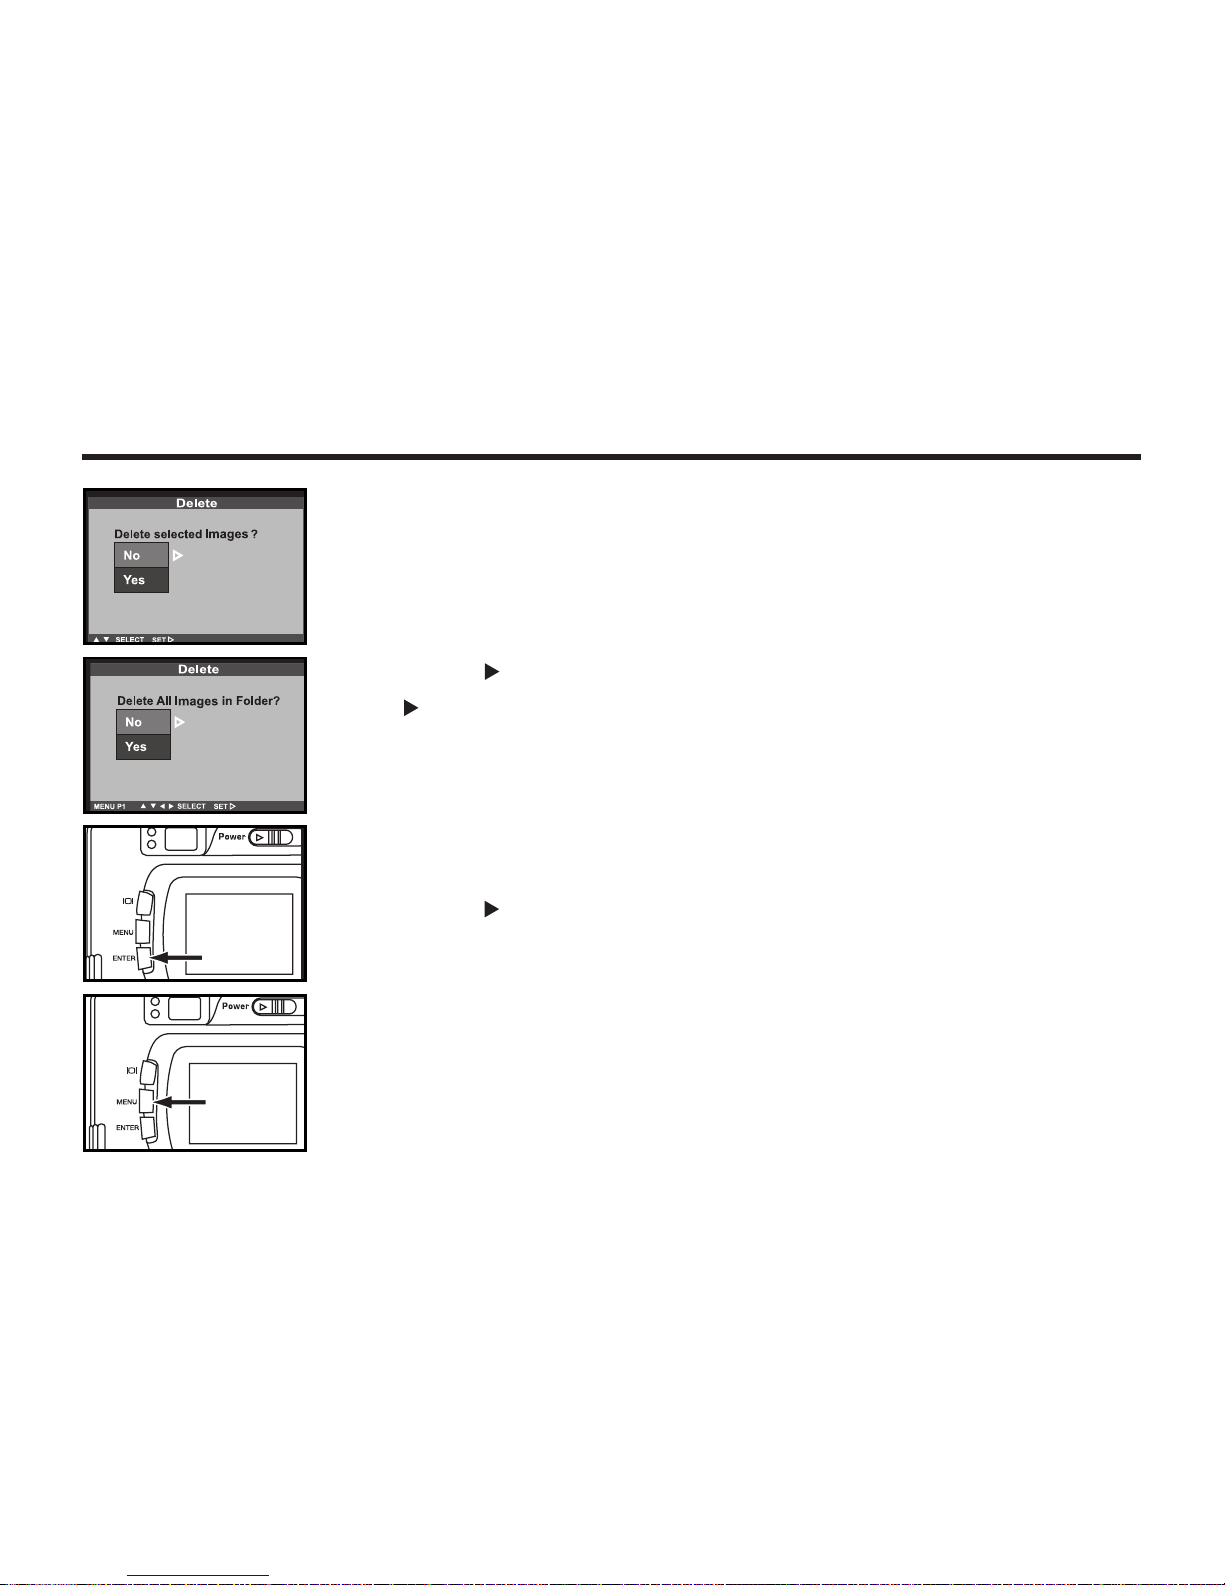
33After confirming that [SELECTED IMAGE] is highlighted,
press the key.
QUICK REFERENCES - CONT'D
DELETING IMAGES – See page 88 for details.
11Display the image to be deleted on the LCD monitor by per-
forming from steps 11to 33of "MONITORING THE CAP-
TURED IMAGES" described on the previous page.
22Press the MENU button.
• The playba k mode menu is displayed on the LCD monitor.
Continued on Next Page
44When the selected image is highlighted, press the ENTER
button.
20
55Press the key so that [YES] is highlighted and press
the key.
• The image displayed on the LCD monitor in step 1is deleted.
• The image to be deleted is displayed on the LCD monitor and the display to
onform whether you delete the image or not appears as shown in the figure.
QUICK REFERENCES - CONT'D
66To complete the operation of deleting an image, after con-
firming that [NO] is highlighted in the display to confirm,
press the key.
• The LCD monitor display returns to the playba k mode menu.
77Press the MENU button.
• The LCD monitor display returns to the playba k mode.
Table of contents
Popular Digital Camera manuals by other brands


PhaseOne
PhaseOne 645DF quick guide

Olympus
Olympus E420 - Evolt 10MP Digital SLR Camera Specifications

Canon
Canon PowerShot S100 DIGITAL ELPH Firmware update procedure

ipf electronic
ipf electronic OC539E21 Quick installation guide

Panasonic
Panasonic iPalm PV-DC3000 operating instructions

Konica Minolta
Konica Minolta DiMAGE X31 instruction manual


