Ricoh SHOTMASTER AF SUPER User manual

Ricoh Shotmaster
AF Super
This camera manual library is for reference and historical purposes, all rights reserved.
This page is copyright by , M. Butkus, NJ.
This page may not be sold or distributed without the expressed permission of the producer
I have no connection with Chinon Co., Japan
On-line camera manual library
This is the full text and images from the manual. This may take 3 full minutes for all images to appear.
If they do not all appear. Try clicking the browser "refresh" or "reload button" or right click on the image, choose "view image" then go back. It should now appear.
To print, try printing only 3 or 4 pages at a time.
If you find this manual useful, how about a donation of $3 to:
M. Butkus, 29 Lake Ave., High Bridge, NJ 08829-1701
and send your e-mail address so I can thank you. Most other places would charge you
$7.50 for a electronic copy
or $18.00 for a hard to read Xerox copy.
This will allow me to continue to buy new manuals and pay their shipping costs.
It'll make you feel better, won't it?
If you use Pay Pal, use the link below. Use the above address for a check, M.O. or cash.
Back to main camera manual page
CONTENTS
Locating the controls 3
Using the strap 5
Inserting the battery 6
www.PayPal.me/butkus
Venmo is @mike-butkus-camera

Opening the lens shield 8
Checking the battery 9
Loading the film 11
Setting the film speed 14
Holding your camera 15
Viewfinder 16
Auto-focus shooting 17
Pre-focus shooting 19
Rewinding the film (Auto reverse) 21
Flash photography 23
Using the self-timer 25
The feature mode 27
Using the panorama mode 29
Using the night photography mode 30
Using the TV mode 31
Using the continuous shooting mode 32
Using the interval mode 35
Using the ME mode 37
Remote control socket 38
Proper care of your camera 39
Specifications 40

INSERTING THE BATTERY
The camera will not operate unless the battery is installed. It is important to make
sure that the battery is installed correctly. 1. Push the Battery Compartment Cover
Latch by a pen etc. in the direction of the arrow and pull open the cover. (Fig. 3)
2. Insert the 6 volt lithium battery, checking that + and - on the battery are lined up
correctly according to the polarity diagram inside the battery compartment. (Fig. 4)
3. Close the Battery Compartment Cover by pushing it in the direction of the arrow.
(Fig. 5)4www.butkus.org
* When the battery is inserted correctly, the Battery Condition Mark WE appears
on the LCD Control Panel when the Lens Shield is opened. (Fig. 6)
* When replacing the battery, do so as quickly as possible, and avoid having film
inside the camera.
* Do not remove the battery from the camera unless it is to be replaced with a new
one.4www.butkus.or g
Battery for use
Lithium battery (6 V) Panasonic CR-P2DR

OPENING THE LENS SHIELD
1. Open the Lens Shield by sliding the Lens Shield Switch toward the mark of (A
(opening). (Fig. 7)
* You can only fire the camera when the Lens Shield is completely open.
* To avoid tripping the shutter inadvertently and wasting battery power, always
keep the Lens Shield closed when you are not taking pictures.
* When the Lens Shield is closed, the Battery Condition Mark will disappear to
conserve the battery power.
* Opening the lens shield while pressing the shutter release will release the shutter.
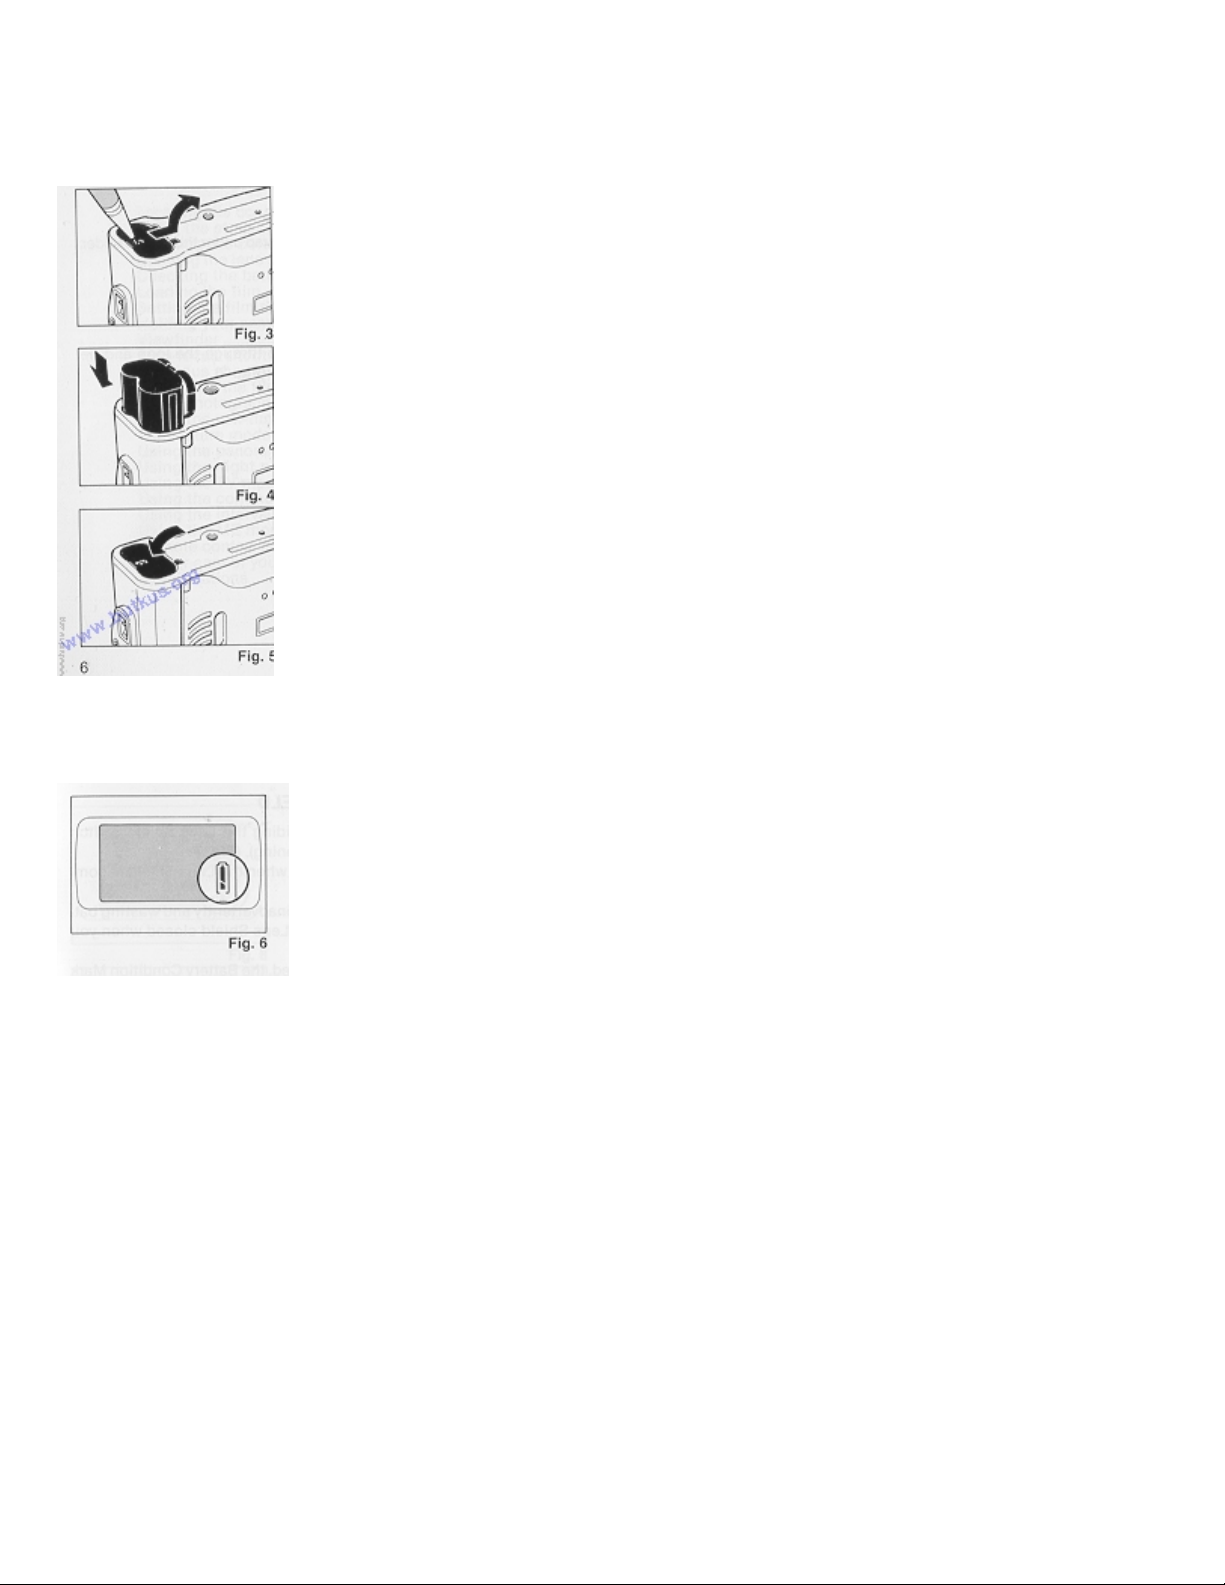
CHECKING THE BATTERY
1. The battery icon symbol is displayed on the LCD Panel when the battery power
is sufficient. (Fig. 8)
2. When the battery is nearly exhausted, the ~ symbol will appear. (Fig. 9)
If there is film in your camera, finish the roll as soon as possible and obtain a new
battery.
3. When the battery is completely exhausted, the c symbol will be displayed. (Fig.
10)
Replace with a new battery.4www.butkus.or g
* Cold temperatures will reduce battery efficiency. In freezing weather, the ~
symbol may turn off and only the can or c symbol may show in the LCD panel.
When the camera returns to normal temperature, the Battery "All Right" symbol
should reappear. If you are taking pictures in cold weather, keep the camera warm
and take it out only when you need it.
* When the empty battery symbol is shown in the LCD Panel, don't use the flash.
* If the battery voltage is insufficient, the shutter may not release or the film may not advance completely. In the
following cases, replace the battery:
1) When the battery mark displays only the outside of the frame (no black in battery icon).
2) When the shutter does not release.
3) When it takes 10 or more seconds for the Flash Ready Lamp to light.

4) When film advance and rewind cannot be done.
5) When the self-timer does not function.
6) When the battery has been in the camera for 5 years or longer.
LOADING THE FILM
Always avoid direct sunlight when loading the film.
1. Push the Back Cover Latch downwards to open. (Fig. 11)
2. Load the film cassette into the Film Chamber and pull out enough film leader to
extend over the mark of the film leader position ( - ). (Figs. 12.A, 12-B)
3. Please make sure that the film is within the Film Guides (Fig. 13), and that the film is not slack. (Fig. 14)

4. Press the Back Cover shut so that the Back Cover Latch returns to its original
position. The film is automatically advanced until number "1" appears in the LCD
Panel. As soon as you close the Back Cover, the LCD Panel will show the
following signs. (Fig. 15)4www.butkus.o rg
1. Film Cassette loaded Symbol
2. Film Advance Symbols (these symbols will flash in sequence toward the right
to tell you the film is winding.)
3. Exposure Counter
5. If the film has not advanced correctly and is not taken up onto the Film Take-up
Spool, the Film Cassette Loaded Symbol, the Film Advance Symbol and Exposure
Counter will blink for about 30 sec. (after 30 sec., they appear without blinking but
start to blink when the Shutter Release Button is pressed and the shutter can not be
released). Please reload the film by following steps 1--4 shown above. (Fig. 16)
* Whether there is film in your camera or not can be confirmed by either the Film
Loaded Window or the cartridge symbols in the LCD Panel. (Fig. 17)
* Do not use special-purpose films such as 35 mm Instant Reversal Film, etc.
because your camera may not be able to transport and expose them properly.
* You can load film in your camera although the Lens Shield is closed. However,
the LCD display is not shown.4www.butkus.o rg
SETTING THE FILM SPEED
DX coded films are provided with black-and-silver patterns corresponding to film
speeds which the camera reads and automatically sets. Your camera accepts DX
films with speeds ranging from ISO 100 to 1600.
Please check whether the film has a DX code system or not. (Fig. 18)
When using a film with DX code, setting the film speed is not necessary. Your
camera automatically makes the correct film speed setting.

When using a film without DX code, your camera will automatically set itself to ISO
100.
HOLDING YOUR CAMERA
1. Use both hands to steady your camera. (Figs. 19, 20)
2. Be careful not to place your fingers over the lens, flash, or focusing windows.
(Fig. 21)
* When holding vertically always position it with the flash at the top.4www.butkus.org
VIEWFINDER (Fig. 22)
1. Field of View Frame:
The subject (such as people or scenery) that you wish to take should be set within
this frame.
Parallax Correction Marks:
When taking a picture of subject that is between 0.8 m-- 1.2 m (2.6--4 ft.) away
from your camera, the subject should be positioned within these marks. Anything
outside the marks will not be included in the picture even if you can see it through
the viewfinder.
Auto Focus Frame:
The auto-focus system focuses automatically on any subject that appears within this
small circle.

AUTO-FOCUS SHOOTING
1. Set the subject you wish to take within the Auto-Focus Frame in the center of
the Viewfinder. (Fig. 23)
2. When you press the Shutter Release Button halfway, the AF monitor will light
up. If the AF monitor blinks (When the subject is closer than 0.8 m (2.6 ft.)), you
should move back a little as your camera is too close to the subject. (Fig. 24)
* The AF monitor may light steadily if the subject is 0.4 m (1.3 ft.) or closer to the
camera Releasing the shutter in this case will result in an out of focus picture.
Therefore, let go of the Shutter Release Button and adjust your distance to make
sure the subject is at least 0.8 m (2.6 ft.) away from the camera. Then point at the
subject once again and press the Shutter Release Button.4www.butkus.org
3. Gently press the Shutter Release down to take a picture. The film will advance automatically after the shutter
teas been released.
* Avoid pressing the Shutter Release Button too abruptly to avoid camera shake or possible misoperation.
* Please be careful not to accidentally cover the Distance Measuring Windows at the front of your camera, as this
will cause the incorrect focusing.
* Please keep the Distance Measuring Windows clean so that focusing is accurate. If they get dirty, they should be
wiped clean with a soft cloth.
* There may be rare cases where the subject cannot be well focused. (For instance, dark subject that do not reflect
light well, glossy subjects, or subject taken through glass.) In the cases, it is best to use the Pre-Focus technique to
"lock" the focus on a more "normal" subject at the same distance. While holding focus, turn your camera back to
the original subject and shoot. (See PRE-FOCUS SHOOTING for more details.)

PRE-FOCUS SHOOTING
When the main subject you wish to focus on is not within the Auto-Focus Frame,
or if the subject is difficult to focus on, then you should use pre-focus shooting.
When the subject is not within the Auto-Focus Frame:
1. If you want to photograph two people, there may be cases where neither of them
can be within the Auto-Focus Frame in the center of the Viewfinder. If you release
the shutter then, only the background will be in focus, and the people, who are the
main subject, will be out-of-focus. (Fig. 25)
2. Move the camera so that one of the people is within the AutoFocus Frame. Press
the Shutter Release Button halfway so that the AF Monitor lights up. Hold your
finger in that position on the Shutter Release Button. (Fig. 26)
3. Now return the camera to its original position so that both people are in the Field
of View Frame again, and press the Shutter Release Button fully to take the picture.
(Fig. 27)4www.butkus.org
When the subject is difficult to focus on:
1. When you are photographing subjects that are difficult to focus on (such as a black dog, glossy surface or behind
glass), find another subject at about the same distance from the camera. You can pre-focus on that subject in the
same way as described front page.
* If you are shooting through a window, aiming the camera at a slight angle to the glass usually avoids any direct
reflection of auto-focus beam.
* When you remove your finger from the Shutter Release Button, the pre-focused condition is cleared, so that you
can pre-focus again as many times as you wish.

REWINDING THE FILM (AUTO REVERSE)
1. After the end of the film has been reached, the film is automatically rewound.
2. The film rewind is indicated by three dashes flashing in sequence from right to
left and the counter gives a subtractive reading. (Fig. 28)
3. When the film is fully rewound, the motor stops automatically and "E" is
displayed in the LCD Panel, you can now open the Back Cover to unload the film.
(Fig. 29)
* If you wish to rewind the film before the end of the film is reached, push the
Manual Film Rewind Button with a pen, etc. (Fig. 30)4www.butkus .org
* The shutter release is locked when "E" is displayed.
* When removing film, the rewind mechanism may occasionally operate briefly as
the Back Cover is opened. This is not abnormal.
* The rewound film will still have part of the film tongue protruding out of the film
cartridge. (Fig. 31)

FLASH PHOTOGRAPHY
1. If flash is required, the Flash Unit automatically pops up when the shutter
Release Button is pressed halfway and its power source automatically turns on.
(Fig. 32)
2. Release the Shutter Release Button completely and wait for the Flash Ready
Lamp to become lit. Then take the picture. (Fig. 33)
(If the Shutter Release Button is then pressed before the flash is ready, the shutter
will be released immediately after the flash becomes fully charged.)
3. When you have completed flash photography, please be sure to push the Flash
Unit down. This turns off the flash power source and conserves your battery. (Fig.
34)
* After the Flash Unit pops up, it will take about 2 seconds to charge. For the next
5 minutes, flash recharging will continue to allow a constant flash capability.
However, to prevent battery drain, if no flash pictures are taken for 5 minutes, flash
recharging will stop and the Flash Ready Light will go off. Even after recharging
stops, when the Flash Unit is left popped up, it will start to recharge again when the
Shutter Release Button is pressed halfway.4www.butkus.or g
* Recommended flash shooting range 0.8 m~3.2 m (2.6~10.5 ft)
* Be careful not to put your fingers in front of the flash window. (Fig. 35)
Daytime Synchronization
When taking pictures of backlit subjects, the camera automatically compensates for
the lighting situation. If the subject is backlit and is at least 3 meters from the
camera, the Auto Back Light Control (ABLC) will be activated. If the subject is
within 3 meters of the camera, the strobe pops up automatically and compensation
is done via daylight synchronization. Thus, even with backlit subjects, trouble-free,
natural-looking pictures can be taken. (Fig. 36)

USING THE SELF TIMER
1. Press the Self-timer Button. The Self-timer LED on the front of your camera will
light for approximately 8 seconds. Then, the LED will blink for about 2 seconds to
indicate that the shutter will release soon. After a total 10 seconds have elapsed, the
shutter will release. (Figs. 37, 38)
* If you wish to clear the self-timer once it has started, close the Lens Shield or press
the Self-timer Button again.
Using the Self-timer for Flash Photography:
a. The Flash Unit will pop up automatically when the Self-timer Button is pressed if there is insufficient light.
b. Wait for the Flash Ready Lamp to light.
c. Press the Self-timer Button again (the camera will focus) to make the exposure as described above.4www.butkus.org
* For backlit subjects within 3 m from the camera, the Flash Unit will pop up automatically.
Using the Self-timer for Pre focus Photography:
a. Select the subject you wish to pre-focus on. Move the camera so that it is in
Auto-Focus Frame.
b. Press the Shutter Release Button halfway down to adjust and lock-in the focus.
c. While holding the Shutter Release Button halfway, press the Self-timer Button to
activate the self-timer.
d. The focus will remain fixed at the locked-in distance until the photograph is
taken.

THE FEATURE MODE
This camera has a variety of operating modes which permit you to widely express
your creativity. These modes include Panorama, Night Photography, TV,
Continuous Shooting, Interval, and Multiple Exposure (M.E.).
These modes may be used together with flash photography, self-timer, and/or
remote control picture taking, allowing you to fully and precisely obtain the photo
image you seek. Or you can experiment, and discover pleasantly surprising results.
These modes are to stimulate your imagination and creativity. By all means, use
this compact Ricoh SHOTMASTER AF SUPER camera to capture the unlimited
kinds of images the world has to offer.
* To change operating modes, simply press the Mode Button. Each time it is pressed, the camera will be set to the
next mode. (Fig. 39)
You can confirm that the desired feature mode is in effect by checking the LCD Panel which displays the current
feature mode. The following symbols are used for the respective modes as listed below. For detailed operation of
each mode, refer to their respective sections in this operating instructions.
Feature mode symbols (Fig. 40)
USING THE PANORAMA MODE
By using Panorama Mode to shoot landscapes or long-distance objects, you can
achieve even sharper images. (Refer to sample photo.)
1. Press the Mode Button until the ~ mark appears in the LCD Panel. Then, press
the Shutter Release Button to take a picture. (Fig. 41)
* The lens will focus at infinity (oo) when the shutter is released.
* The Flash Unit will not pop up even though the light may be insufficient.
(Since the flash will not reach the subject anyway, battery power is conserve).

* The Flash Unit will not fire even if the Flash Ready Lamp is lit.
(Since the flash will not reach the subject anyway, battery power is conserved.)
* To cancel the mode, press the Mode Button to set the camera to normal mode (when the LCD Panel displays no
mode symbols) or close the Lens Shield.
* To use the self-timer in this mode, press the Mode Button until the camera is set to the Panorama Mode, then
press the Self-timer Button.4www.butkus.org
USING THE NIGHT PHOTOGRAPHY MODE
This Night Photography mode lets you easily shoot breathtaking evening panoramas
that take advantage of natural illumination. (Refer to sample photo.)
1. Press the Mode Button until the ~q mark is shown in the LCD Panel. Then, take a
picture. (Fig. 42)
* The lens is set to 00 automatically and the exposure will be made on condition that,
ISO SHUTTER SPEED f~stop
100 1/4 sec. 3.5
* The Flash Unit does not pop up under the Night Photography Mode.
* To use the self-timer in this mode, press the Mode Button until the camera is set to the Night Photography Mode,
then press the Self-timer Button. Using a tripod, or other suitable firm support, is recommended to prevent camera
shake.
* To cancel this mode, press the Mode Button until the LCD Panel shows no mode symbol, or close the Lens
Shield.
* If flash is up, it will not work.

USING THE TV MODE
Use this mode to shoot the screen of a computer monitor or television. (Refer to
sample photo.)
1. Press the Mode Button until the ~ mark is displayed on the LCD Panel. Then, take
a picture. (Fig. 43)
* The Flash Unit does not pop up under the TV Mode.
* When taking pictures in the TV Mode, the shutter speed will be 1/30 sec. and the F-
stop will be 4.
* For TV Mode photography, a slow-moving TV picture will turn out clearer than a
fast-moving one. Using a tripod is also recommended to prevent camera shake.
* To use the self-timer in this mode, press the Mode Button until the camera is set to
TV Mode, then press the Self-timer Button.
* To cancel this mode, press the Mode Button until the LCD Panel shows no mode symbol, or close the Lens
Shield.
* If flash is up, it will not work.
USING THE CONTINUOUS SHOOTING MODE
This mode allows you to shoot continuously as long as the shutter is pressed.
You can accurately capture the continuous action of car races, competitive sport
events, and even the movements of an infant without missing any important
moments. (Samples 1, 2, 3: See next page.)4www.butkus.org
1. Press the Mode Button to set your camera in the Continuous Shooting Mode.
Confirm that the Hi mark appears in the LCD Panel. (Fig. 44)
2. Press and hold down the Shutter Release Button. Your camera will continuously take pictures at a rate of one
frame per second as long as the Shutter Release button is held down. (Fig. 45)
3. Press the Mode Button to cancel the Continuous Shooting Mode. Confirm that the Hi mark disappears on the
LCD Panel.
* If you want to cancel the Continuous Shooting Mode before taking any picture, press the Mode Button again
until the mode marks go off, or close the Lens Shield.

Combining the Continuous Shooting Mode and the Self-timer:
1. Set your camera to the Continuous Shooting Mode.
2. Press the Self-timer Button. Your camera will wait 10 se coeds, then shoot
two sequential frames.
3. Push the Mode Button to cancel the Continuous Shooting Mode. Confirm
that the Hi mark disappears on the LCD Panel.
Combining the Continuous Shooting Mode and the Flash:
1. Set your camera to the Continuous Shooting Mode.
2. Press the Shutter Release Button halfway down.
3. If the amount of light is insufficient, the Flash Unit will pop up automatically
4. After the Flash Ready Lamp lights, press the Shutter Release Button to make
the exposure.
5. Continue shooting by holding down the Shutter Release Button. Your camera
will automatically make another exposure each time the Flash Ready Lamp
relights.
6. Press the Mode Button to cancel the Continuous Shooting Mode, and push
the Flash Unit down to the original position.
Combining the Continuous Shooting Mode with the Self-timer and Flash:
1. Set the camera to the Continuous Shooting Mode.
2. Press the Self-timer Button. If the amount of light is insufficient, the flash will pop up automatically.
3. When the flash is fully charged, again press the Self-timer Button. The Self-timer LED will light.4www.butkus.org
4. The Self-timer LED will remain lit for 8 seconds and then start to f lash for 2 seconds. After a total of 10
seconds have elapsed, the shutter will release.
5. As soon as the Flash Ready Lamp comes on again, the shutter release a second time.
6. Cancel the Continuous Shooting Mode and push the Flash Unit down to the original position.

USING THE INTERVAL MODE
This mode closes the shutter in 60-second intervals.
You can enjoy the use of this mode in a variety of applications, such as the
wildlife observation of animals or birds where you need to keep a certain
distance or the growth records of plants.
(Samples 1, 2, 3: See next page.)
1. Set your camera to the Interval Mode. (Fig. 46)
2. Press the Shutter Release Button. After 60 seconds, the shutter will release.
Then, your camera will automatically make another exposure every 60 seconds
until the Interval Mode is cancelled.
3. Press the Mode Button to cancel it, or close the Lens Cover. Confirm that the
(60) mark disappears.
* When the Interval Mode is activated by pressing the Shutter Release Button, the symbol that was displayed on
the LCD Panel will blink (Fig. 47)
* At the end of the roll, your camera will automatically rewind the film and reset to the normal condition.
* You can also release the shutter during the Interval Mode.
(If the Interval Mode is not cancelled, the shutter will be released again 60 seconds after it was last released.)
* When in the Interval Mode, if the surrounding lighting is insufficient, the Flash
Unit will pop up automatically and the Interval Mode will be activated after the
flash is charged and ready. Pictures will then be taken with flash. All pictures
will be taken with flash unless the mode is cancelled or unless there is sufficient
lighting and the Flash Unit is pushed back down.
* To cancel the Interval Mode, press the Mode Button or close the Lens Shield.
If the mode is cancelled with the Mode Button, the camera will not switch to the
next M.E mode. It will be set to normal mode instead. To set it to the M.E mode
from the Interval Mode, use the Mode Button again to select the M.E mode.
* If the self-timer is used in the Interval Mode, the self-timer will operate first.
Then after that first picture, succeeding pictures will be taken according to the
Interval Mode.
(These photographs were taken with the camera in the Interval Mode.)

USING THE MULTIPLE EXPOSURE (M.E) MODE
The multiple exposure capability is used to take several different images on the
same film frame.
Multiple exposures can be easily produced with this mode, so exercise your
imagination to create your own original photographs. (Refer to sample photo.)
1. Set your camera to the M.E Mode. The M.E symbol will be displayed on the
LCD Panel. (Fig. 48)
2. Press the Shutter Release Button to make the first shot, and make second
exposure.
3. Press the Mode Button to cancel the M.E Mode. Then, the film will be wound
automatically Confirm that the "M.E" disappears. (Fig. 49)
* The Exposure Counter will not advance during multiple exposure photography.
* When you ask camera shops to print your pictures, please tell them that
multiple exposures were taken. If not, they may take them for "accidental"
double exposures and not print your shots.
* To use the self-timer in the M.E Mode, first use the Mode Button to select the
M.E Mode. Then press the Self-timer Button.
* The flash can also be used to obtain various special effects.
REMOTE CONTROL SOCKET
This camera is equipped with a Remote Control Socket. Various methods of
remote control can be used by plugging an (optional) infrared sensor, audio
sensor, remote controller, etc.. into this socket. A 50 cm electronic cable release
cord, and a 10-meter extension cord, are available from Ricoh as options for use in
remote control photography
Typical installation
1. Remove the cover of the Remote Control Socket to connect your remote
controller. An extension cord can be used for taking photographs at a distance
from subjects. (Fig. 50)
2. Set the camera, aim at the subject and gently press the remote control switch.
The natural expressions of subjects can now be captured from a distance. (Fig. 51)
* Before inserting or pulling out a cord into/from this socket, close the Lens
Shield. If the Lens Shield is left open, the shutter might accidentally be released.

Mini Tripod II (Sold separately)
Lightweight, compact, and easy to carry around. For self timer, interval, and slow shutter speed picture taking.
PROPER CARE OF YOUR CAMERA
* If there is dirt on the lens or Distance Measuring Windows, do not touch
with fingers. Use a blower to blow the dust away, or wipe the surface gently
with a soft cloth.
* Camera malfunction can be caused by shock, humidity, salt etc. After using
the camera at the beach or places where there are chemicals, wipe it carefully.
* Take care not to expose the camera to sudden changes in temperature, as
they may cause condensation on the lens, or other malfunctions.
* Do not expose the camera for a long period of time in extremely high
temperatures, such as in your car or on the beach, as this may ruin your film, or
cause other malfunctions.
* When using a tripod, do not try to force a long screw into the socket. The
screw length should be less than 5.7 mm (1/4 ")
* Do not place the camera near equipment that has strong magnetic fields such
as a television or radio.
MAJOR SPECIFICATIONS: RICOH SHOTMASTER AF SUPER
Type: 35 mm lens shutter type with automatic focusing
Lens: 35 mm f3.5 Ricoh lens 4 elements, 4 groups
Focusing: Automatic focusing with pre-focusing facility. Distance measuring (shooting) range: 0.8 m (2.6 ft) -
Distance less than 0.8 m (2.6 ft): AF monitor lamp blinks
Shutter: Programmed AE type electronic shutter, 1/4--1/400 sec.
Self~timer: Built-in electronic type with self-timer lamp. Operating delay of approx. 10 sec.
Interval Timer: Photography at 60 sec. intervals
Viewfinder: Al bade type with bright-frame viewfinder. Magnification 0.47X. Field of view 84%
Viewfinder Information: Field of view frame, parallax correction marks, auto-focus frame
Exposure Adjustment: Programmed automatic exposure adjustment with automatic back light control system.
Exposure coupling range EV5.6--17 (ISO 100)
Film Speed Range: ISO 100--1600. Compatible with DX-code system

Film Advance/Rewind: Automatic film advance and rewind. Automatic 1st. frame setting.
Automatic film reverse at the end of film.
Film Loading: Ricoh Auto-Load system
Exposure Counter: Additive, counts down during film reverse LCD Display: Film loaded, film advance, exposure
counter, film reverse and reverse completion, battery condition, landscape mode, night scene mode, continuous
mode, interval mode, multi-exposure mode, TV mode
Built-in Flash: Electronic flash automatically activates in dim light and backlight
Interval Between Flashes: About 2 sec.
Power Source: 1 lithium battery, CR-P2DP (6 volts) or equivalent 4www.butkus.org
Dimensions: 121 mm (W) x 67 mm (H) x 44 mm (D)
Weight: 220 9 (without battery)
Specifications and appearance of this camera are subject to change without notice.
Table of contents
Other Ricoh Digital Camera manuals

Ricoh
Ricoh XR-2s User manual

Ricoh
Ricoh THETA User manual

Ricoh
Ricoh DIACORD L User manual

Ricoh
Ricoh RDC-2 User manual

Ricoh
Ricoh RDC-I700 User manual

Ricoh
Ricoh G700SE User manual

Ricoh
Ricoh GR DIGITAL M User manual

Ricoh
Ricoh Caplio RR-1 User manual

Ricoh
Ricoh Caplio 400G wide F User manual

Ricoh
Ricoh Caplio RR-120 User manual

Ricoh
Ricoh Aficio G700 Use and care manual

Ricoh
Ricoh Caplio GX8 User manual

Ricoh
Ricoh Capio GX User manual

Ricoh
Ricoh Pentax K-3 III User manual

Ricoh
Ricoh R4 User manual

Ricoh
Ricoh RDC-5300 User manual

Ricoh
Ricoh Caplio R30 User manual

Ricoh
Ricoh Caplio R7 User manual

Ricoh
Ricoh Caplio GX User manual

Ricoh
Ricoh PDC-i700 User manual