SKANWEN YS-138 User manual
SKANWEN
INSTRUCTION MANUAL
MODEL:YS-138
BEFORE USE, PLEASE READ AND FOLLOW
ALL SAFETY RULES AND OPERATING INSTRUCTIONS.

2
SPECIFICATIONS
Model YS-138
Type de produit
Product Type
Cellier de service
Service Cellar
Capacité
Capacity
54 bouteilles
54bottles
T° zone du haut
Upper Zone T° 5-20℃
39-68°F
T° zone du bas
Lower Zone T°
Voltage / Fréquence
Voltage / Frequency AC 115V ~ 60Hz
Ampérage
Amperage 1A
Courant
Input Power 110W
Réfrigérant
Refrigerant
R600a
26g
Dimensions
(Largeur x profondeur x hauteur)
(Width x Depth x Height)
23.5” x 22.83” x 34.45”
595 x 580 x 875mm
Poids Net
Net Weight 128 lbs

3
TABLE OF CONTENTS
IMPORTANT SAFETY RULES........................................................................................ 1
CUSTOMER SERVICE...................................................................................................... 2
Contact Us....................................................................................................................... 2
PARTS & LABOR...............................................................................................................3
PREPARATION AND INSTALLATION.......................................................................... 3
Preparation...................................................................................................................... 3
Installation............................................................................................................3
Built-In Instructions...........................................................................................3-4
Electrical Connection..................................................................................................... 4
Extension Cord................................................................................................................4
Power Bar with Surge Protection................................................................................. 4
OPERATING THE UNIT.................................................................................................... 5
Initial Use......................................................................................................................... 5
Control Panel Lock...............................................................................................5
Control Panel for Dual Zone Models........................................................................... 5
Control Panel for Single Zone Models........................................................................ 6
Loading the Wine Bottles.............................................................................................. 6
Service and Preservation Temperature...................................................................... 7
Temperature Settings.................................................................................................... 7
Operating Noises............................................................................................................ 7
CARE INSTRUCTIONS..................................................................................................... 8
Moving the Unit............................................................................................................... 8
Defrosting and Hygrometry........................................................................................... 8
Operation Anomalies......................................................................................................8
Power Failures................................................................................................................ 8
Shelves.............................................................................................................................8
TROUBLESHOOTING GUIDE......................................................................................... 10
4
IMPORTANT SAFETY RULES
Before the appliance is used, it must be properly positioned and installed as described in this manual, so read the
manual carefully. To reduce the risk of fire, electrical shock or injury when using the appliance, follow basic precaution,
including the following:
Read all instructions before using the wine cellar.
Plug into a grounded 3-prong outlet, do not remove grounding prong, do not use an adapter, and do not use
an extension cord.
Replace all panels before operating.
It is recommended that a separate circuit, serving only your appliance be provided. Use an outlet that cannot
be turned off by a switch.
Never clean appliance parts with flammable fluids. These fumes can create a fire hazard or explosion. And do
not store or use gasoline or other flammable vapours and liquids in the vicinity of this or any other appliance.
The fumes can create a fire hazard or explosion.
Before proceeding with cleaning and maintenance operations, make sure the power line of the unit is
disconnected.
Do not connect or disconnect the electric plug when your hands are wet.
Unplug the appliance or disconnect power before cleaning or servicing. Failure to do so can result in electrical
shock or death.
Do not attempt to repair or replace any part of your appliance unless it is specifically recommended in this
material. All other servicing should be referred to a qualified technician.
To Prevent A Child From Being Entrapped, Keep Out Of Reach Of Children And Not In The Vicinity Of WINE
CELLAR.
Before you throw away your old wine cellar, take off the door but leave the shelves in place so that children
may not easily climb inside.
Never allow children to operate, play with, or crawl inside the appliance.
To ensure proper ventilation for your appliance, the front of the unit must be completely unobstructed. Choose
a well-ventilated area with temperatures above 60°F (16°C) and below 90°F (32°C). This unit must be
installed in an area protected from the element, such as wind, rain, water spray or drips.
The appliance should not be located next to ovens, grills or other sources of high heat.
The appliance must be installed with all electrical, water and drain connections in accordance with state and
local codes. A standard electrical supply (115 V AC only, 60 Hz), properly grounded in accordance with the
National Electrical Code and local codes and ordinances is required.
-- Do not kink or pinch the power supply cord of appliance.
It is important for the appliance to be levelled in order to work properly. You may need to make several
adjustments to level it.
Do not use solvent-based cleaning agents of abrasives on the interior. These cleaners may damage or
discolour the interior.
Do not use this appliance for other than its intended purpose.
5
FLAMMABLE REFRIGERANT GAS
For your safety observe the following recommendations.
This appliance contains a small quantity of R600a refrigerant which is environmentally friendly, but flammable.
It does not damage the ozone layer, nor does it increase the greenhouse effect.
During transportation and installation, ensure that the tubing of the refrigerant circuit is not damaged.
when handling, moving and use of the refrigerator or freezer to avoid either damaging the
refrigerant tubing or increasing the risk of a leak.
Avoid using or manipulating sharp objects near by the appliances.
Leaking refrigerant can ignite and may damage the eyes.
In the event any damage does occur, avoid exposure to open fires and any device which creates a spark.
Disconnect the appliance from the mains power.
Thoroughly ventilate the room in which the appliance is located for several minutes.
Notify Customer Service for necessary action and advice.
The room for installing the appliance must be at least 1 cubic metre per 8 grams of refrigerant. The refrigerant
quantity contained in this appliance is listed above in grams; it is also noted on the Rating Plate of the
appliance.
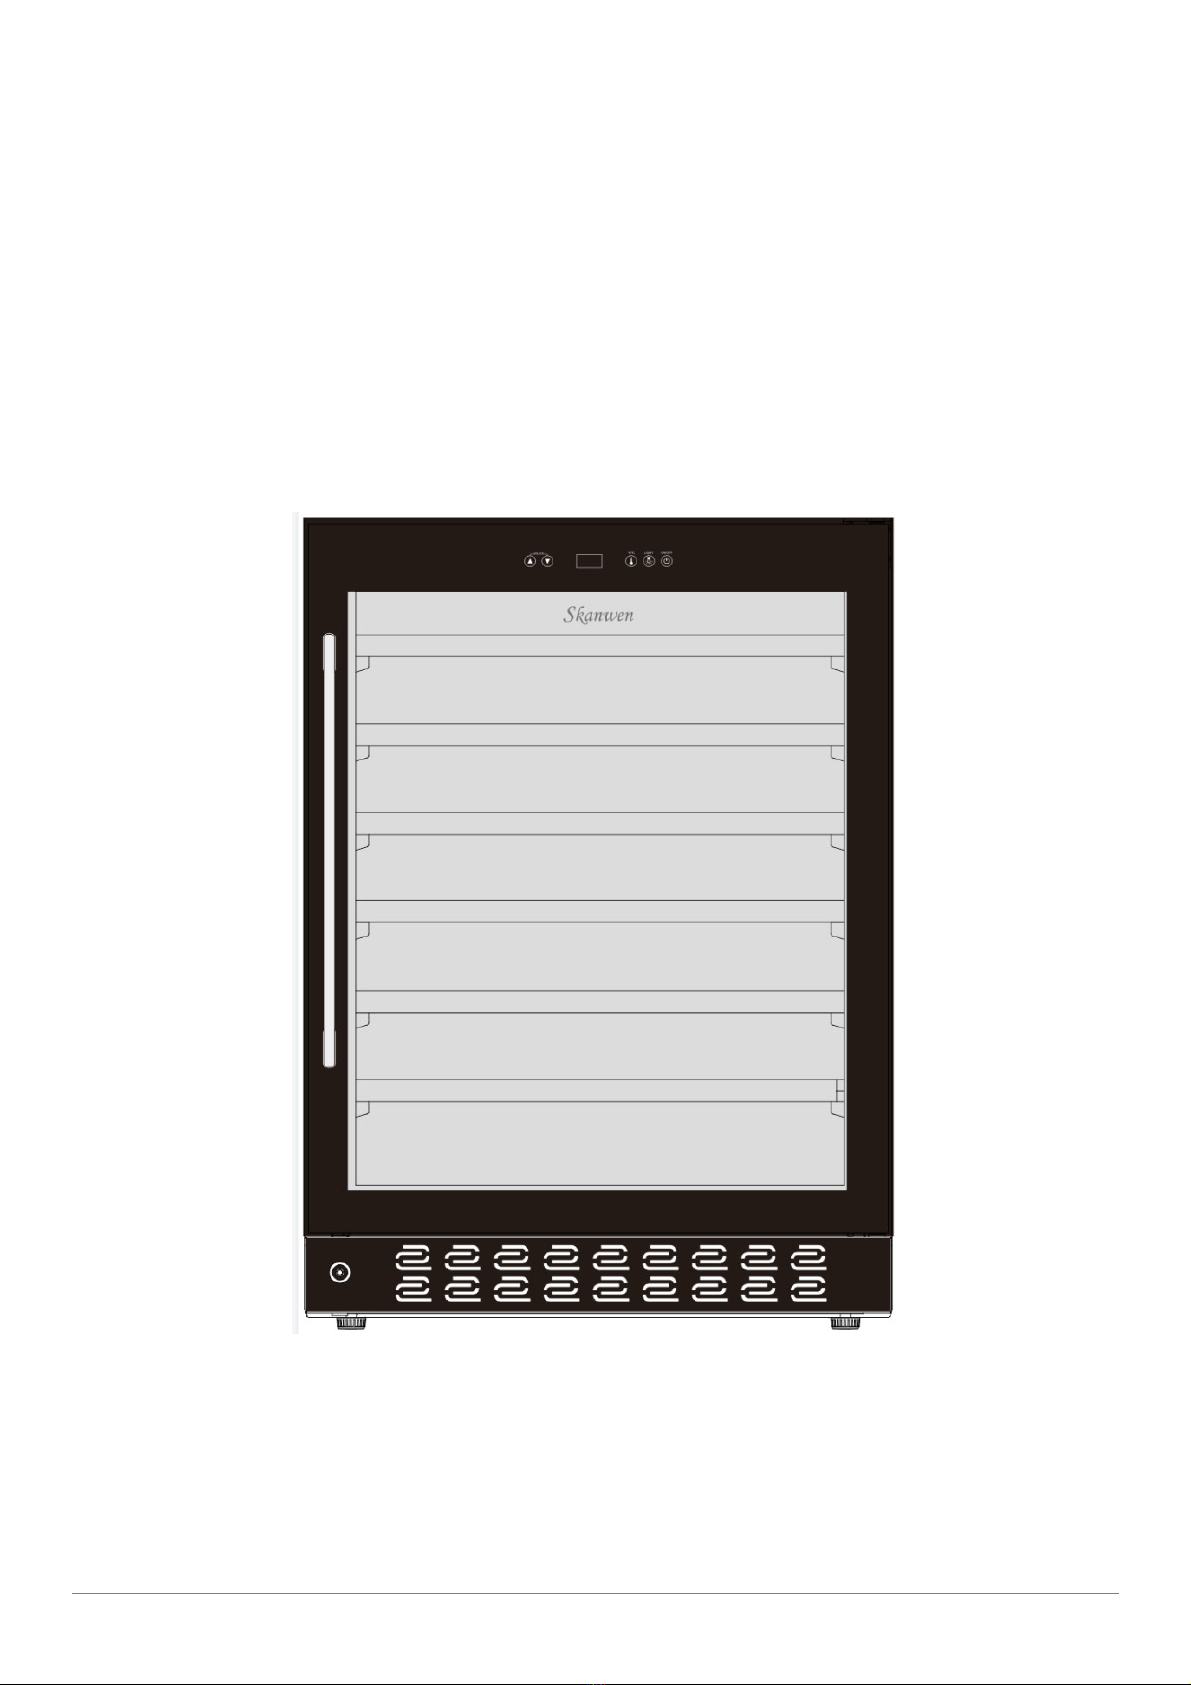
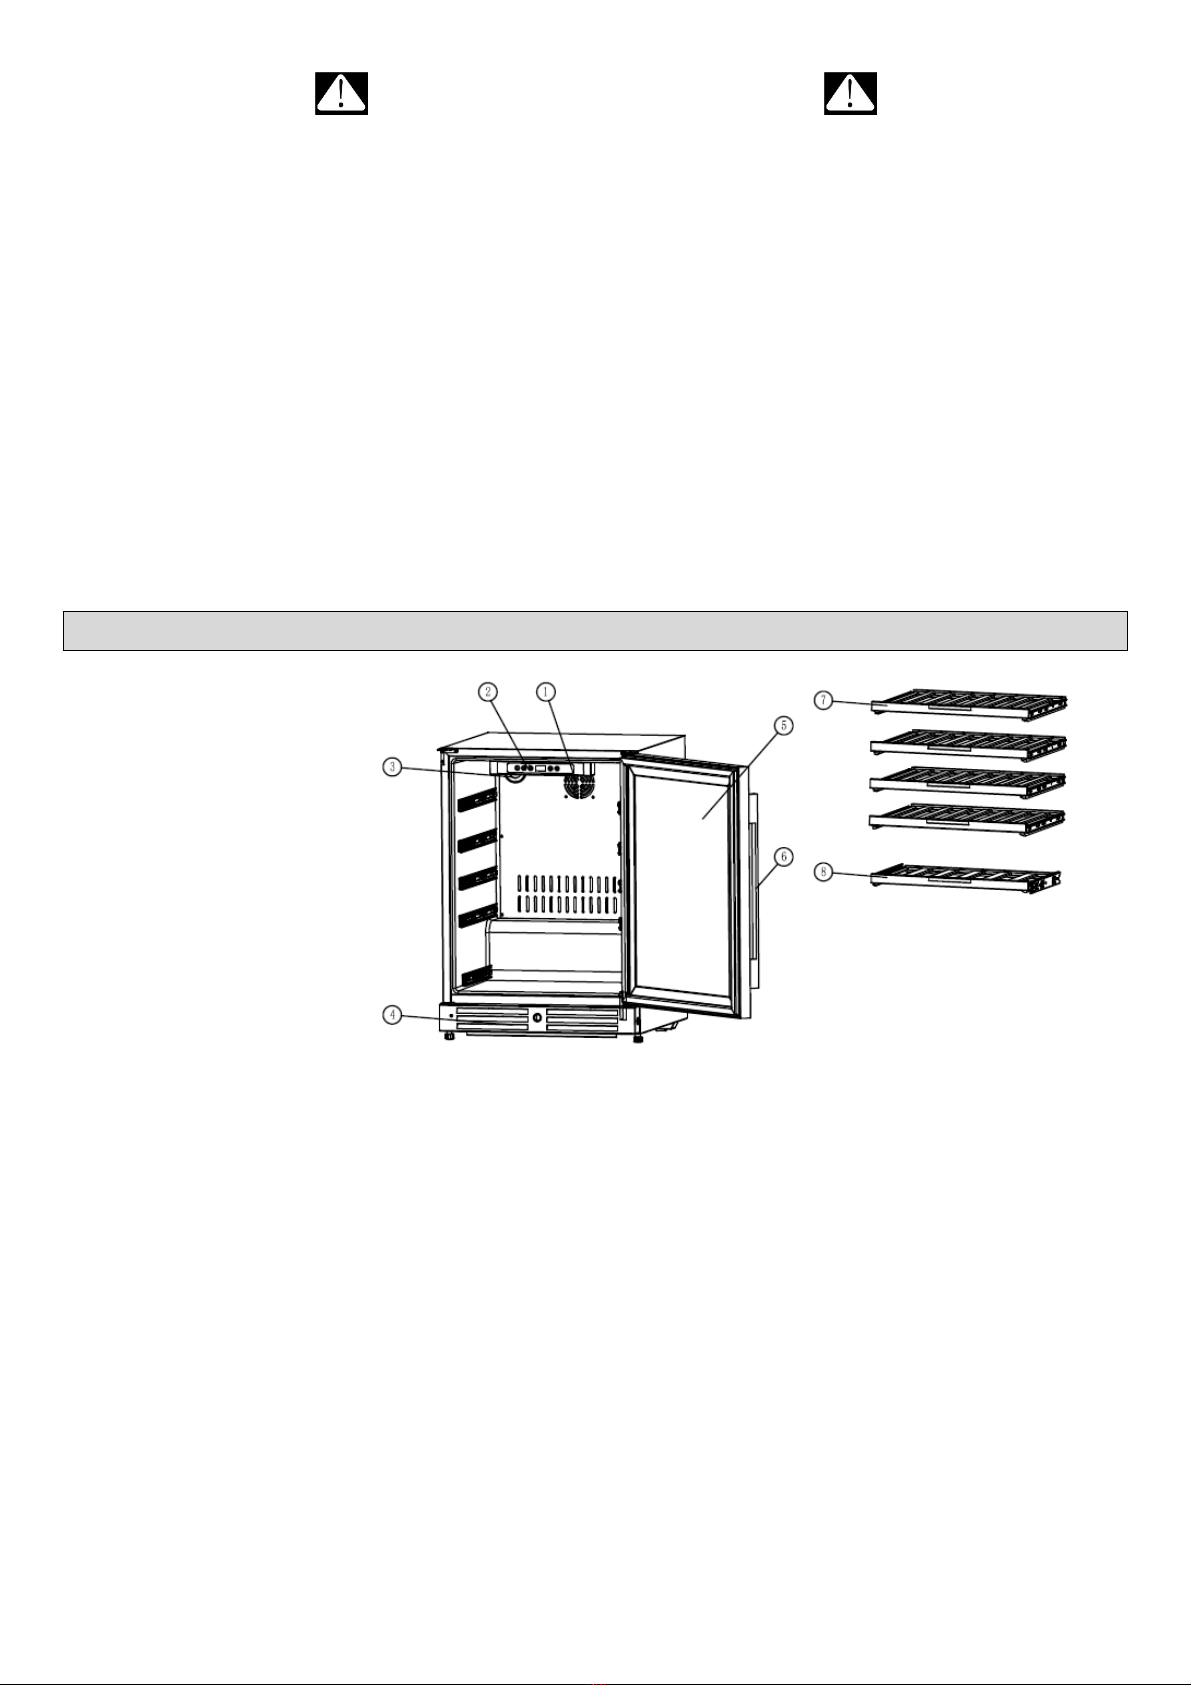
PARTS AND FEATURES
1. Fan
2. Temperature Display
3. Charcoal Filter
4. Kickplate
5. Door
6. Handle
7. Regular Shelf
8. Half Shelf
Table of contents


