SKEETA FOILING CRAFT SKEETA 8.5 Quick start guide

RIGGING
GUIDE
vol 1.5 April 2021
Designed, developed and manufactured by Skeeta Foiling Craft Pty Ltd, Melbourne, Australia


2
Index
Introduction
3
Inspecting your new Skeeta
3
Trolley
4
Hull
6
Hiking Straps
7
Wings
7
Mast
9
Adjustable Spreaders
11
Mast Rake
12
Sail
13
Sail numbers
15
Boom
16
Mainsheet
17
Outhaul
17
Vang system
-Vang rope tailing system
18
Rudder Box/tiller
-Rudder angle adjuster
20
Rudder
22
Daggerboard
-Attaching the pushrod
23
Wand - height sensor
25
Launching and leaving the shore
28
Returning to shore and unrigging
28
Towing and anchoring
28
Maintenance
29
Warranty
30
3
Introduction
This rigging guide explains in detail how to rig your Skeeta from the very beginning.
It is intended to provide you with details of how to rig the boat ready for sailing.
It does not instruct you on how to sail. Seek proper training and guidance prior to sailing Skeeta.
Information on how to launch and sail, capsize recovery and safety precautions are contained in the
Operating Guide.
Inspecting your new Skeeta
Check everything is in the package when delivered and first opened.
Immediately let your dealer know if any parts did not arrive.
Optional extras
1 x Skeeta Hull in hull bag
1 x 8.5 m² or 9.5 m² mast base
2 x Wings
1 x 8.5 m² sail or 9.5 m² sail
1 x Rudder box and tiller
1 x Tiller extension
1 x 2-piece Carbon mast
1 x Sail
1 x Boom assembly
1 x Daggerboard and rudder Vertical
1 x Main and rudder horizontal lifting foil
1 x Wand and wand tube

4
Trolley
The flat pack trolley is quickly and easily assembled with spring clips.
1. To join the trolley centre bar and the trolley rear bar together, push the spring clip in and insert the
centre bar into the square tube on the trolley rear bar. The spring clip will click into the hole.
2. To insert the axles, again push the spring clip in and insert the axle into the tube on the trolley rear
bar. The spring clip will click into the hole on the underneath side of the tube.
Repeat for opposite side.
3. To attach the wheels, place the wheels onto the axle, then place the washer over the axle. Insert
the linch pin into the hole on the outside of the axle.

5
4. To attach the centre T-bar, push the spring clip in and insert the T-bar into upstand on the trolley
centre bar. The spring clip will click into the hole.
5. Attach the handle by again pushing the spring clip in and inserting it into the tube at the very front
of the trolley. The spring clip will click into the hole.
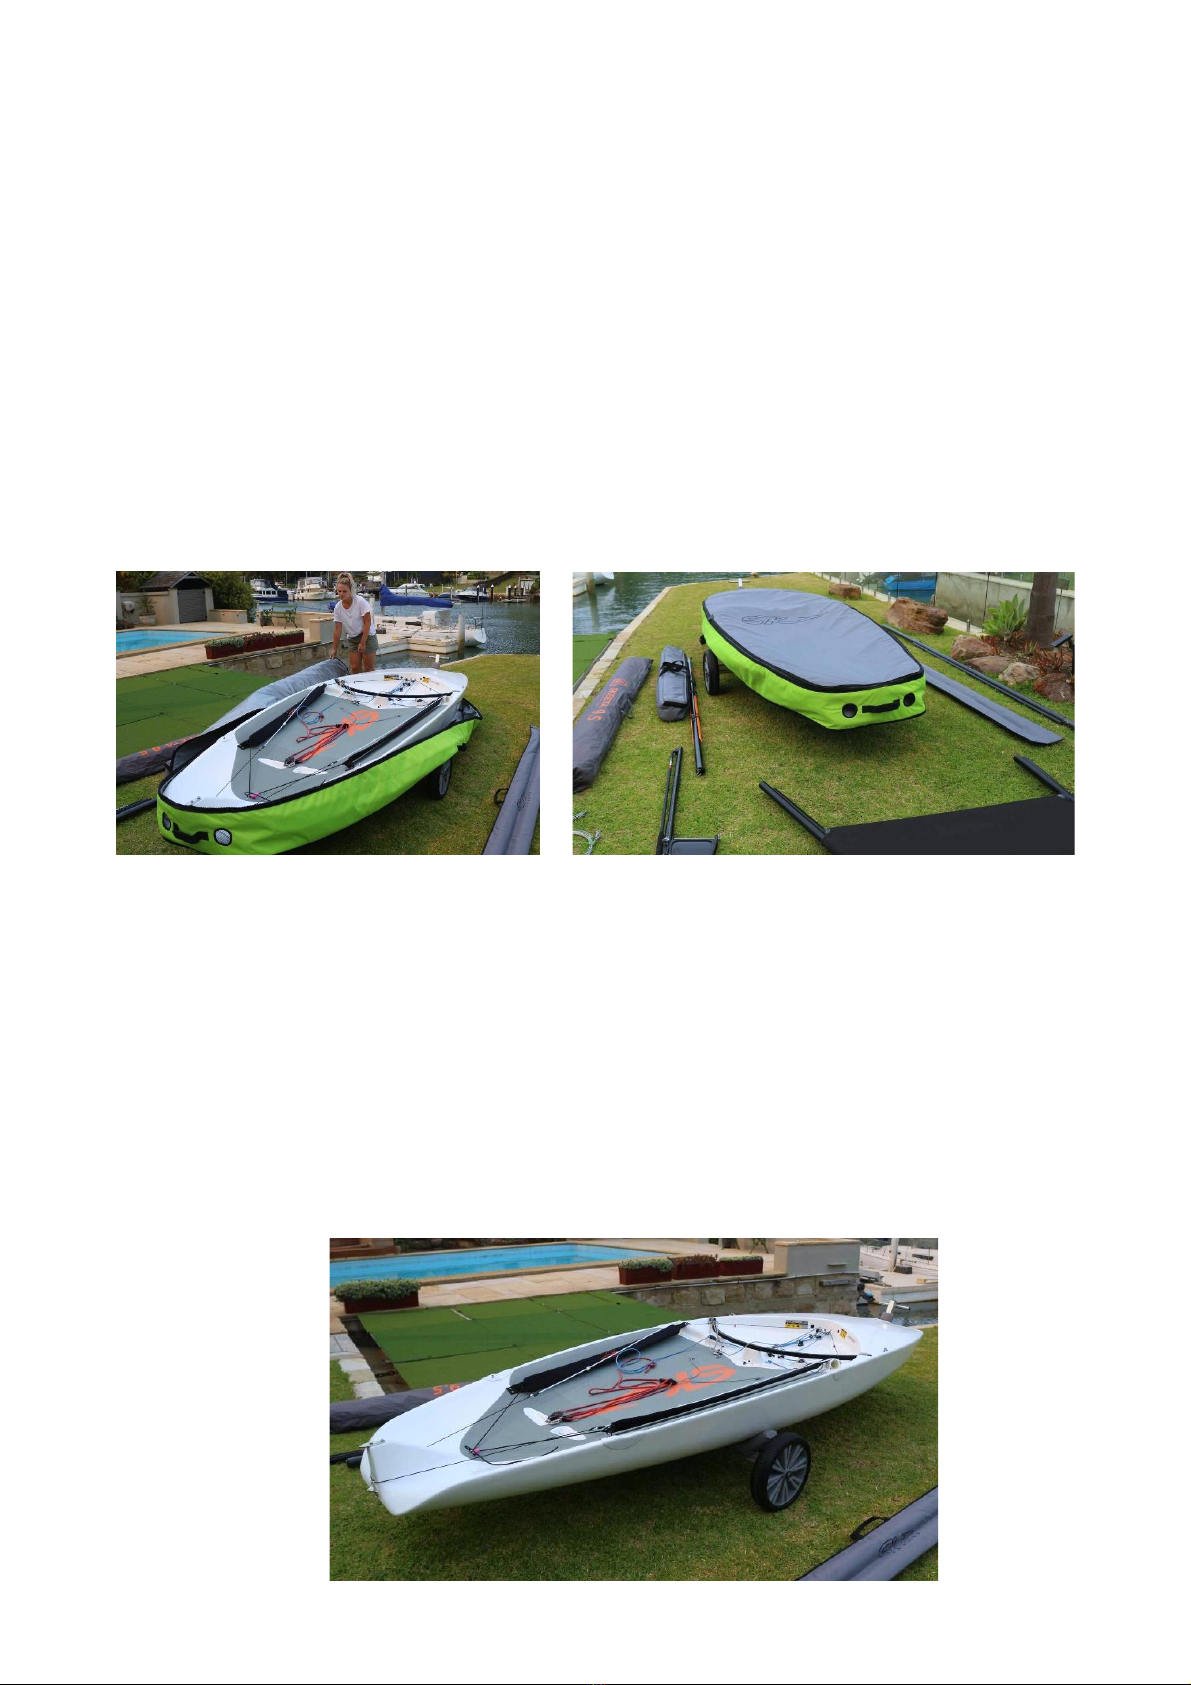
Skeeta can be neatly stored on the trolley in her protective padded bag with all components inside.

6
Hull
The hull is custom built from a solid foam core with a durable epoxy glass skin. The hull is very unlikely to
leak or sink, and there are no inspection hatches or drain plugs. All fittings have been attached from factory.
It comes in its very own boat bag. EVA foam is applied to the deck for comfort and grip.
Do not paint, vinyl wrap or heavily sticker the hull in dark colours, as overheating may cause damage to the
hull.
WARNING:
DO NOT cover up the air valve located on the bulkhead.
This hole needs to breathe, covering this will void warranty.
CARE:
Never leave your boat in damp conditions. For example, in a damp bag.
The hull is made to be reasonably lightweight for foiling.
On land, do not sit on the hull, or put weight on, as this may create dents.
7
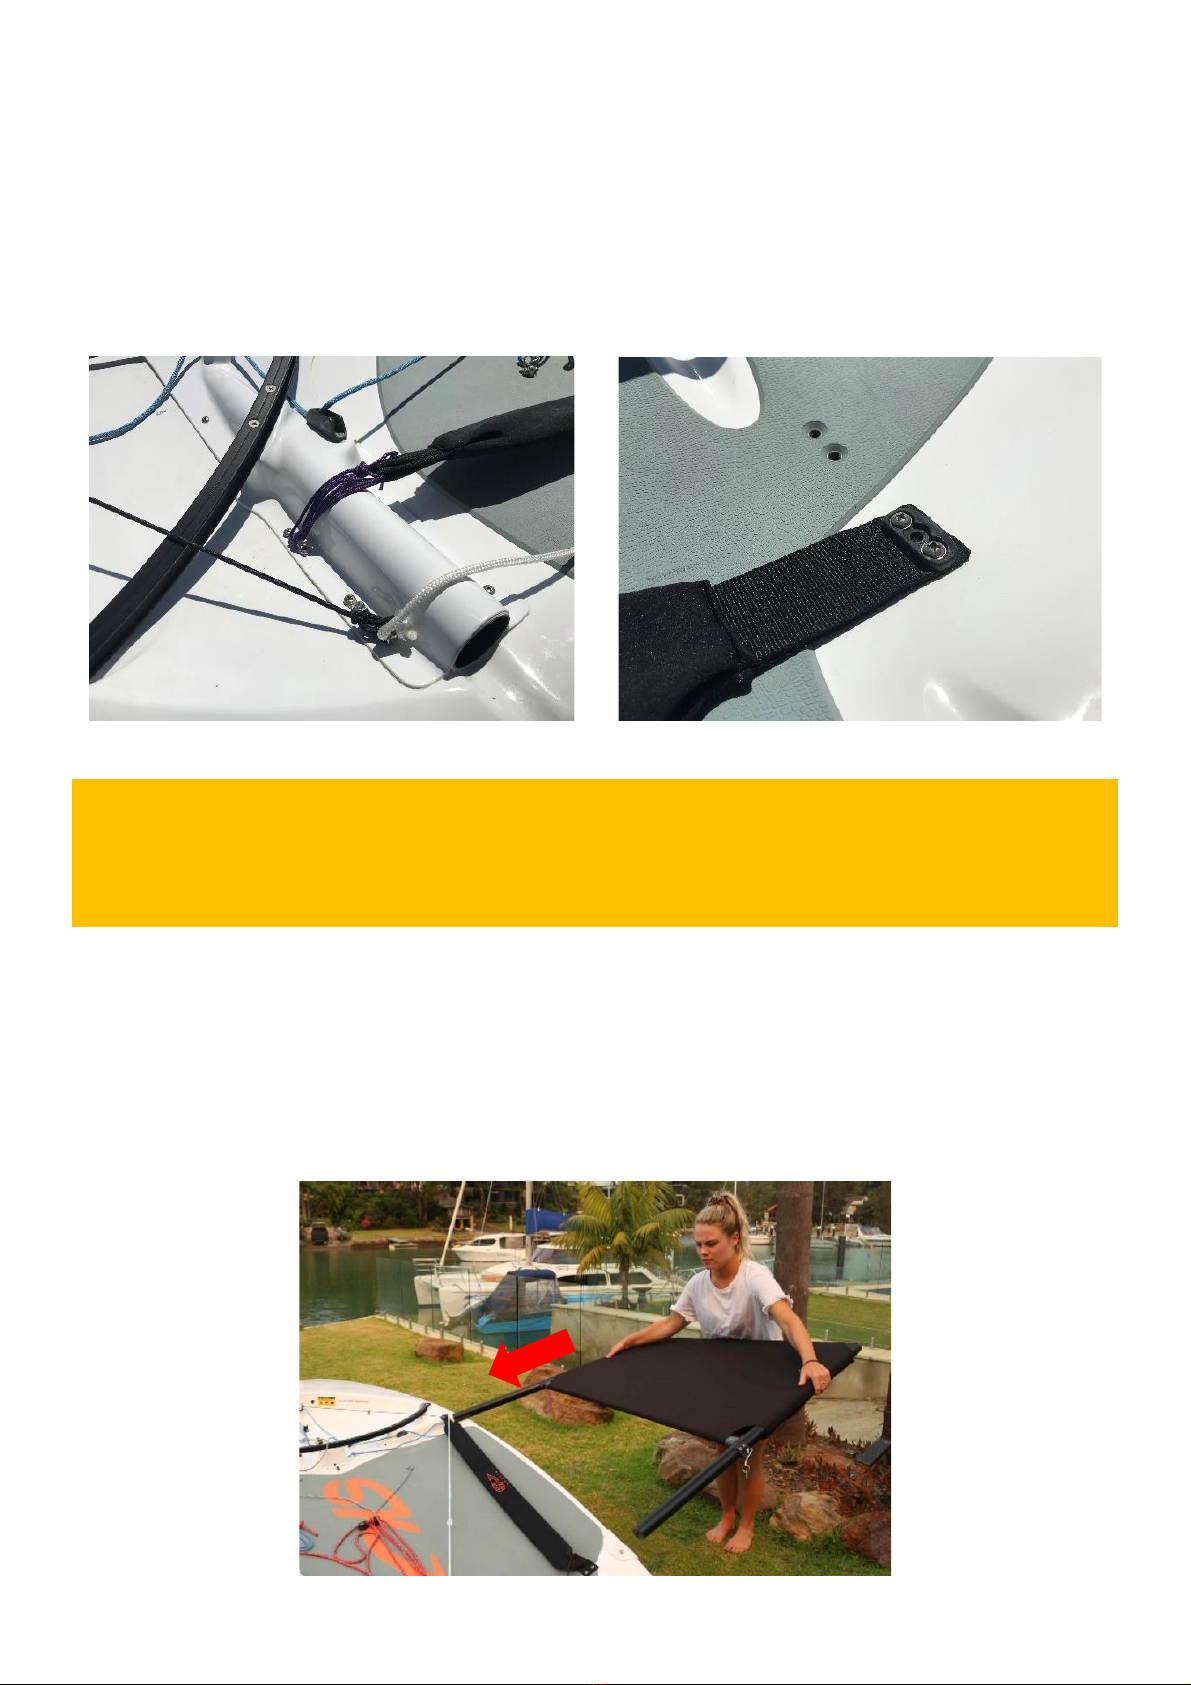
Hiking straps
Hiking straps are attached to the boat. They are placed over the front wing bar so you can easily get your
feet under. The straps sit under the rear wing bar so that the wings are easy to attach and remove.
There are 2 different hiking strap positions. Rope is provided so you can adjust the front of the straps to suit
your personal preference.
Wings
The port and starboard wings are provided with trampoline covers already laced up.
1. Simply slide the font wing bar into the hole.
WARNING:
When changing the rear strap position, be sure to ONLY use the screws provided.
DO NOT use power tools to screw these in –they must ONLY be screwed in by hand.
Ensure the correct Phillips head type to fit the screw.

8
2. Lower the rear bar into position and push the bar over the inner pin.
3. The outer pin will sit inside the hole on the moulding attached to the rear bar. Push the retaining pin
in place.
The wings are strong, the front wing bar can be used for lifting the boat.
The righting rope, used when capsized, is led under the wings.
To remove wings: Undo the retaining fast pin, pull the rear wing bar out and away from the hull. When clear
of the 2 attachment pins, lift the rear wing bar upwards. Then slide the front of the wing outwards and away
from the hull –the wing should come away easily.
The wing covers are supplied fully assembled, laced together with cable ties. Should the covers need
replacing, these ties are easy to cut off and replace. Only use UV stable Nylon with at least 50Kg breaking
load.
The underside of the wing covers have orange stripes to help make the boat more easily visible when
capsized.

9
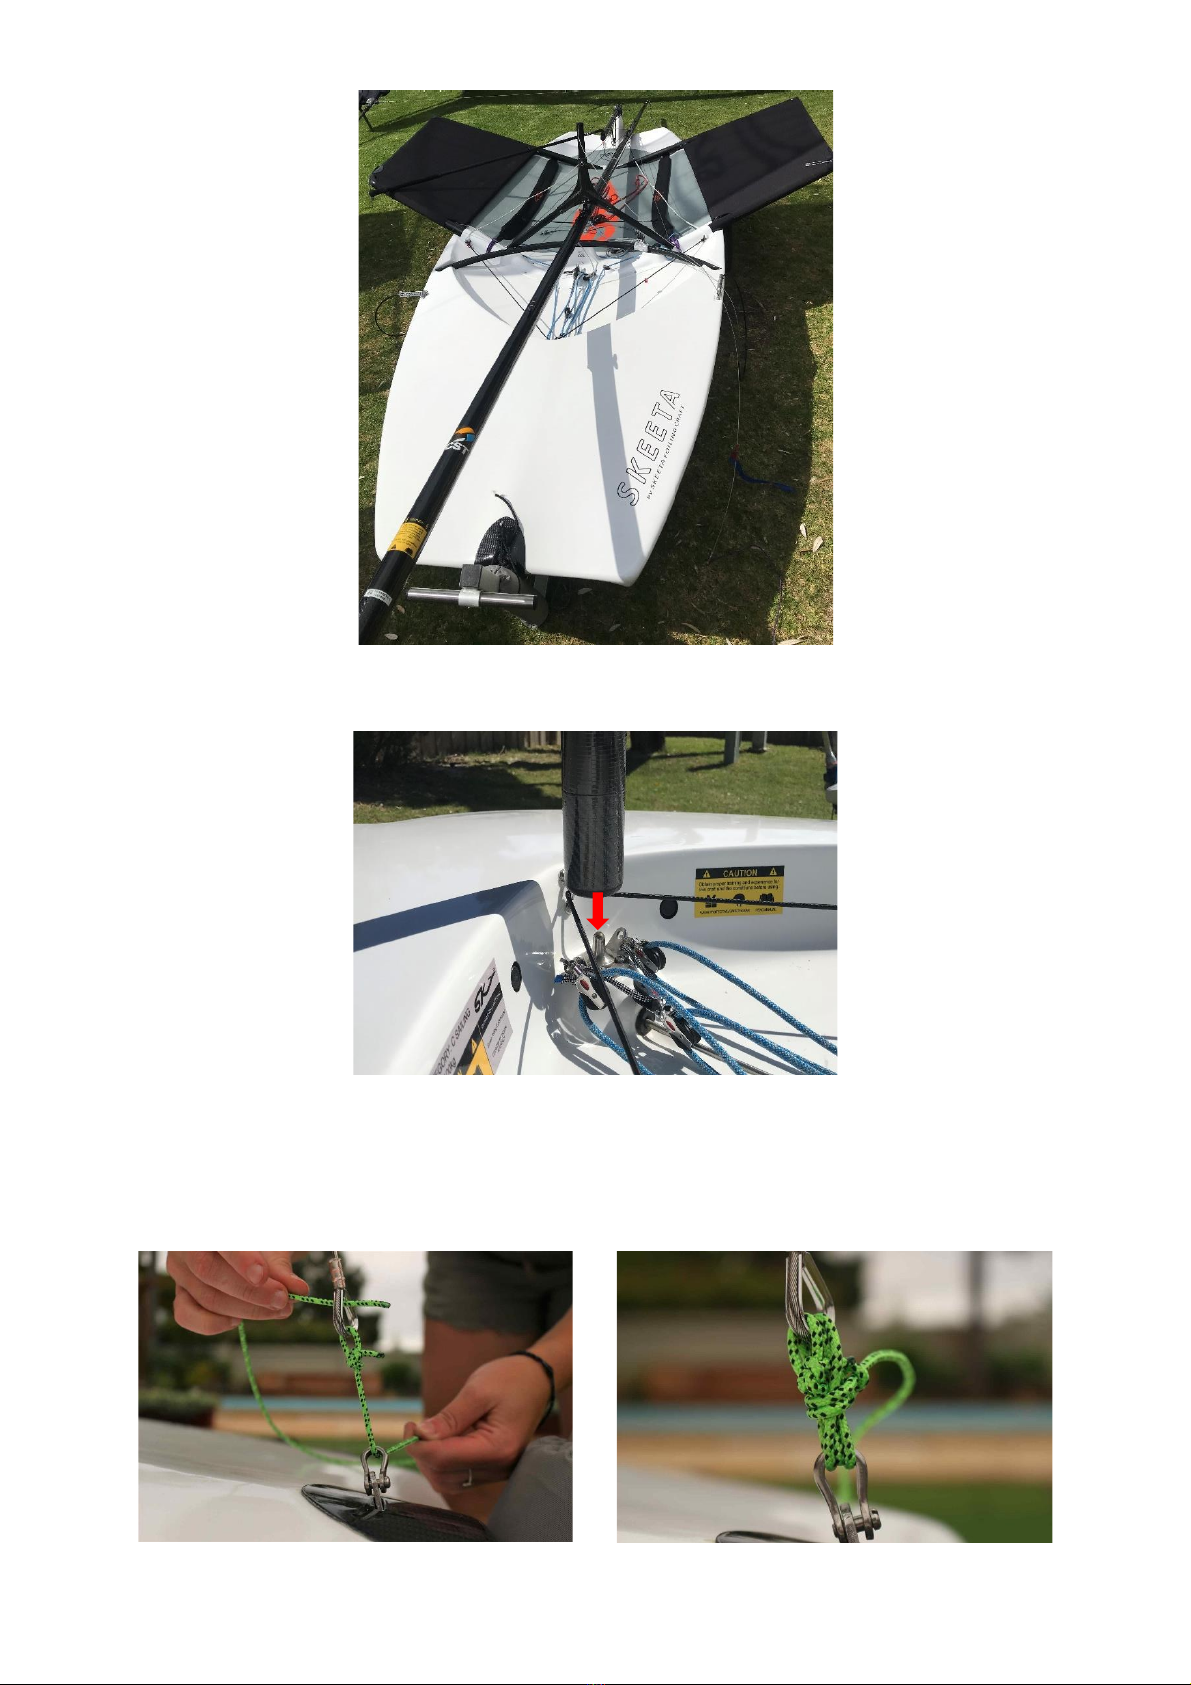
Mast
The two-piece carbon mast is supplied with a halyard, halyard lock, a vang saddle, a plastic sleeve and a mast
base plug.
1. Push the spring clip in and slide the mast base and mast tip together, making sure the sail track aligns
and locking pin is engaged.
2. Attach the 3 stays to the hound fitting attached to the mast tip with the shackle. Ensure the forestay
is positioned in the middle of the 3 stays.
3. Lay the mast on the boat and attach two of the stays.
10
4. Raise the mast and position the mast base onto the mast step pin attached to the boat.
5. Support the mast and attach the remaining stay.
6. Finally, tension the forestay and tie it off to the forestay fitting. The tension should be firm but not
too tight.
11
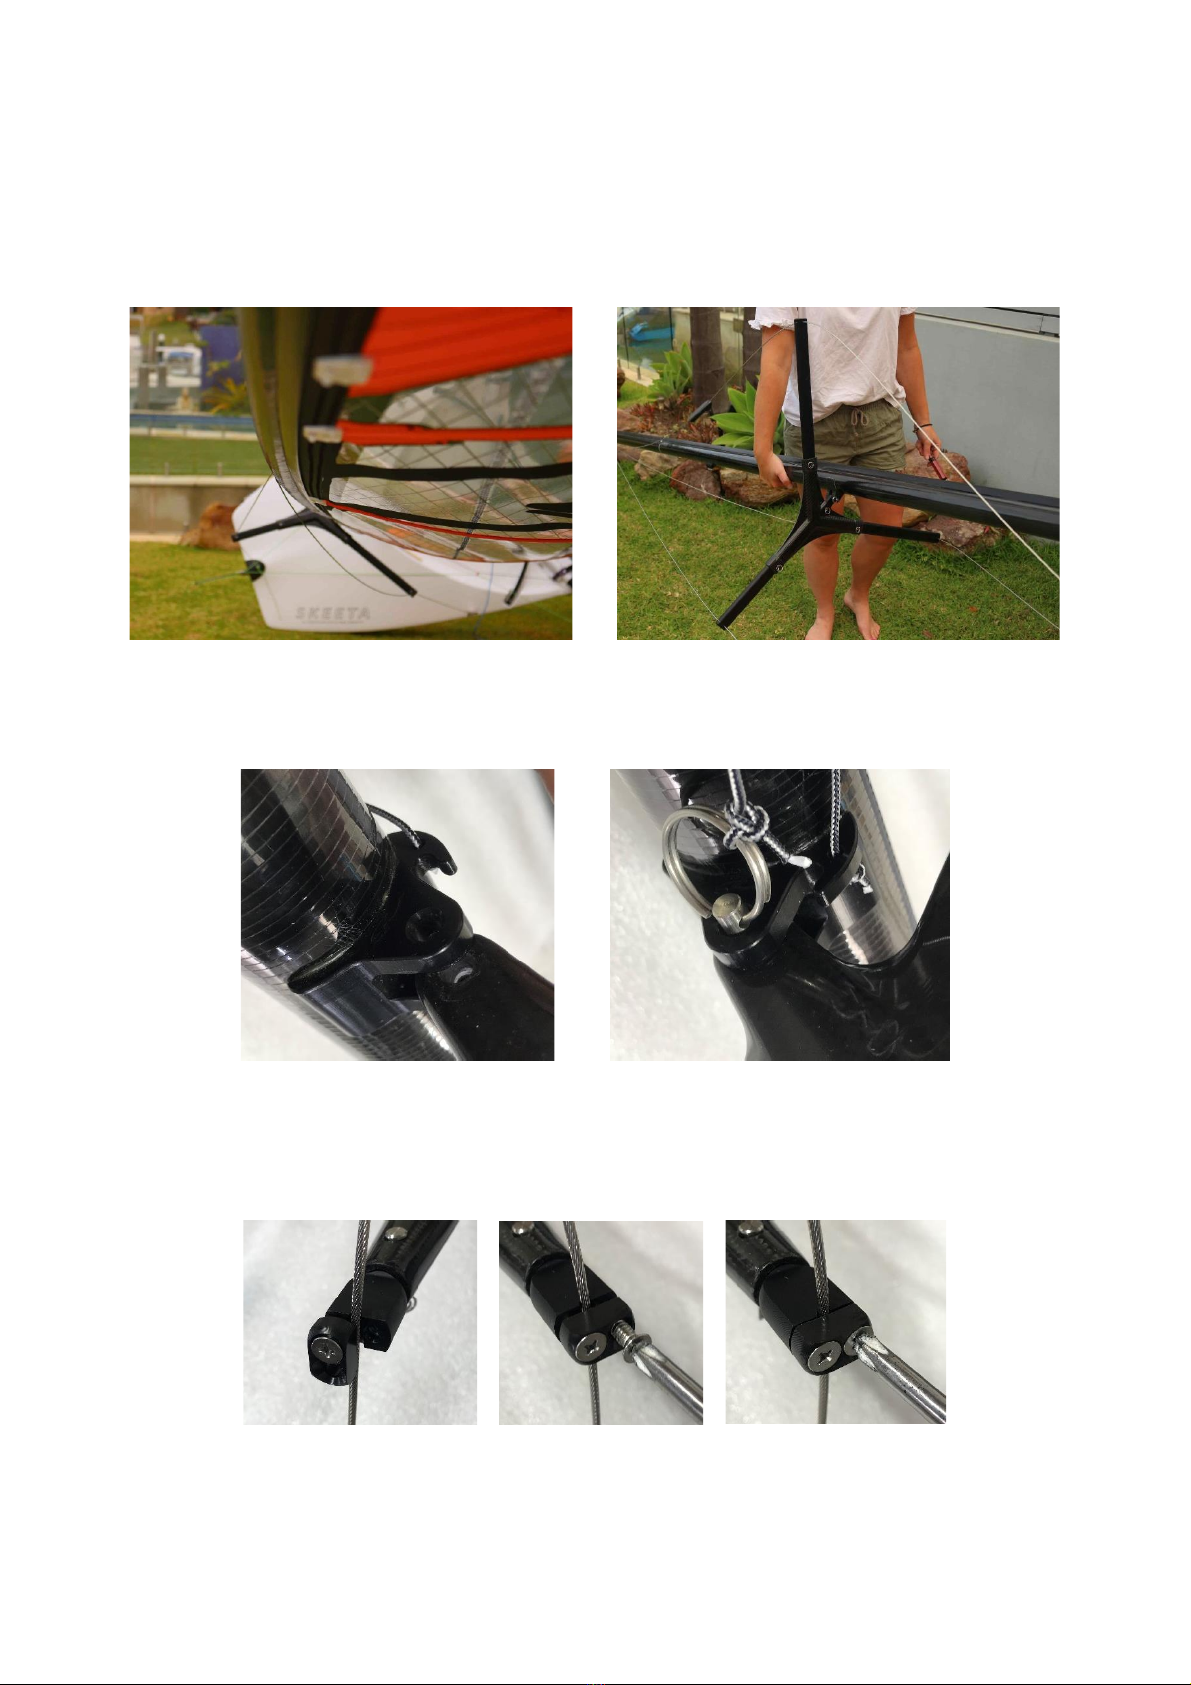
Adjustable Spreaders
The fully adjustable spreaders are a key part to be able to tune the rig to the sailor’s body weight. When
attaching the spreader for the first time, do not put the mast up on the boat –it is easier to do it with the
mast lying horizontally.
1. To attach the spreader onto the mast;
Insert the spreader base into the attachment on the mast base and insert the 1/4” pin.
2. To attach the stays onto the spreader;
Undo one of the screws on the spreader end cap and place the wire in between the two bolt holes.
When tightening up, make sure the wire sits in the groove on the end of the adjuster.
3. To adjust the spreader bar lengths;
Undo the ring and pull out the 3/16” clevis pin. The spreader bar can now slide in and out of the
spreader base and be inserted into any hole.

12
4. To position the spreader on the stays correctly, make sure;
-The front bar of the spreader is about 90 degrees to the mast.
-The side bars of the spreader are level from side to side.
Once you have done this once, mark both sides with a permanent marker. Remove the spreader
and check the position of the marks on the side stays to ensure they are at even lengths.
Mast Rake
To accurately measure mast rake, hoist the mast as normal and attach the stays as specified above.
1. With a tape measure, hook the end of the tape measure onto the top rudder gudgeon. It will be
easier to get someone to hold this end, or tape it into position.
2. Walk to the head of the mast and measure the distance to the top of the carbon mast (not the
plastic head fitting).

13
For the 8.5 rig, around 6100mm.
For the 9.5 rig, around 6600mm.
These are only benchmark settings, rake varies depending on the weather
conditions.
If this needs to be adjusted;
1. loosen the forestay to allow the mast to move around a little bit and tie it off.
2. At the side stay adjusters, pull the pin out holding the stay wire in place.
Move the pin up to decrease rake (increasing the measurement)
Move the pin down to increase rake (decreasing the tape measurement)
For each full hole adjustment on the side stays adjusters, this measurement will
change by about 100mm.
Sail
The sail comes in its own bag with battens inserted, but not tightened. Use the allen key provided to
tension up the battens before hoisting the sail. To achieve correct batten tension, wind the grub screw in
to tighten the batten tension until the crinkles in the batten pocket just disappear.
From there, it is a matter of fine tuning for different weather conditions.
Typically, in more wind, slightly loosen off the battens. In lighter winds, tighten the battens slightly.
1. Insert the head of the sail into the sail-feeder and feed the luff up the sail track on the back of the
mast and attach the Halyard shackle to the eye at the head of the sail.
14
2. When the sail is fully raised, insert the swage into the halyard lock on the front side of the mast.
3. Run the excess rope through the halyard keepers on the front of the mast.
4. Cleat the rope onto the horn cleat near the base of the sail track. The remaining halyard rope can be
stored in the sail pocket.

15
Sail Numbers
Sail numbers are supplied with each sail.
In the manuals pouch, there will be 6 x 300mm numbers.
The sail number is the same as the boats serial number located on the transom of the hull.
If you have digital #8 numbers, to achieve correct sail numbers relative to your boat, follow these steps.
1. Cut out the grey areas with a sharp pair of scissors.
2. Place them on the sail parallel to the battens.
•Numbers on the starboard side of the sail must be higher
than the port side.
•Place the numbers above the bottom batten as shown.
•Position the numbers a minimum of 60mm apart and to
the edge of the sail.

16
Boom
The boom is a parallel carbon fibre section to which a yoke, vang loop, mainsheet loop and outhaul have
been added.
Once the sail is up;
1. insert the outhaul end of the boom through the webbing loop on the clew of the sail and attach the
hook onto the small loop on the sail.
2. Insert the yoke end into the webbing loop on the tack of the sail and clip the yoke onto the mast.
Ensure the webbing is positioned in front of the boom hook.
TIP:
Once the boom is inserted into the loops,
you can roll the boom up with the sail when unrigging.
17
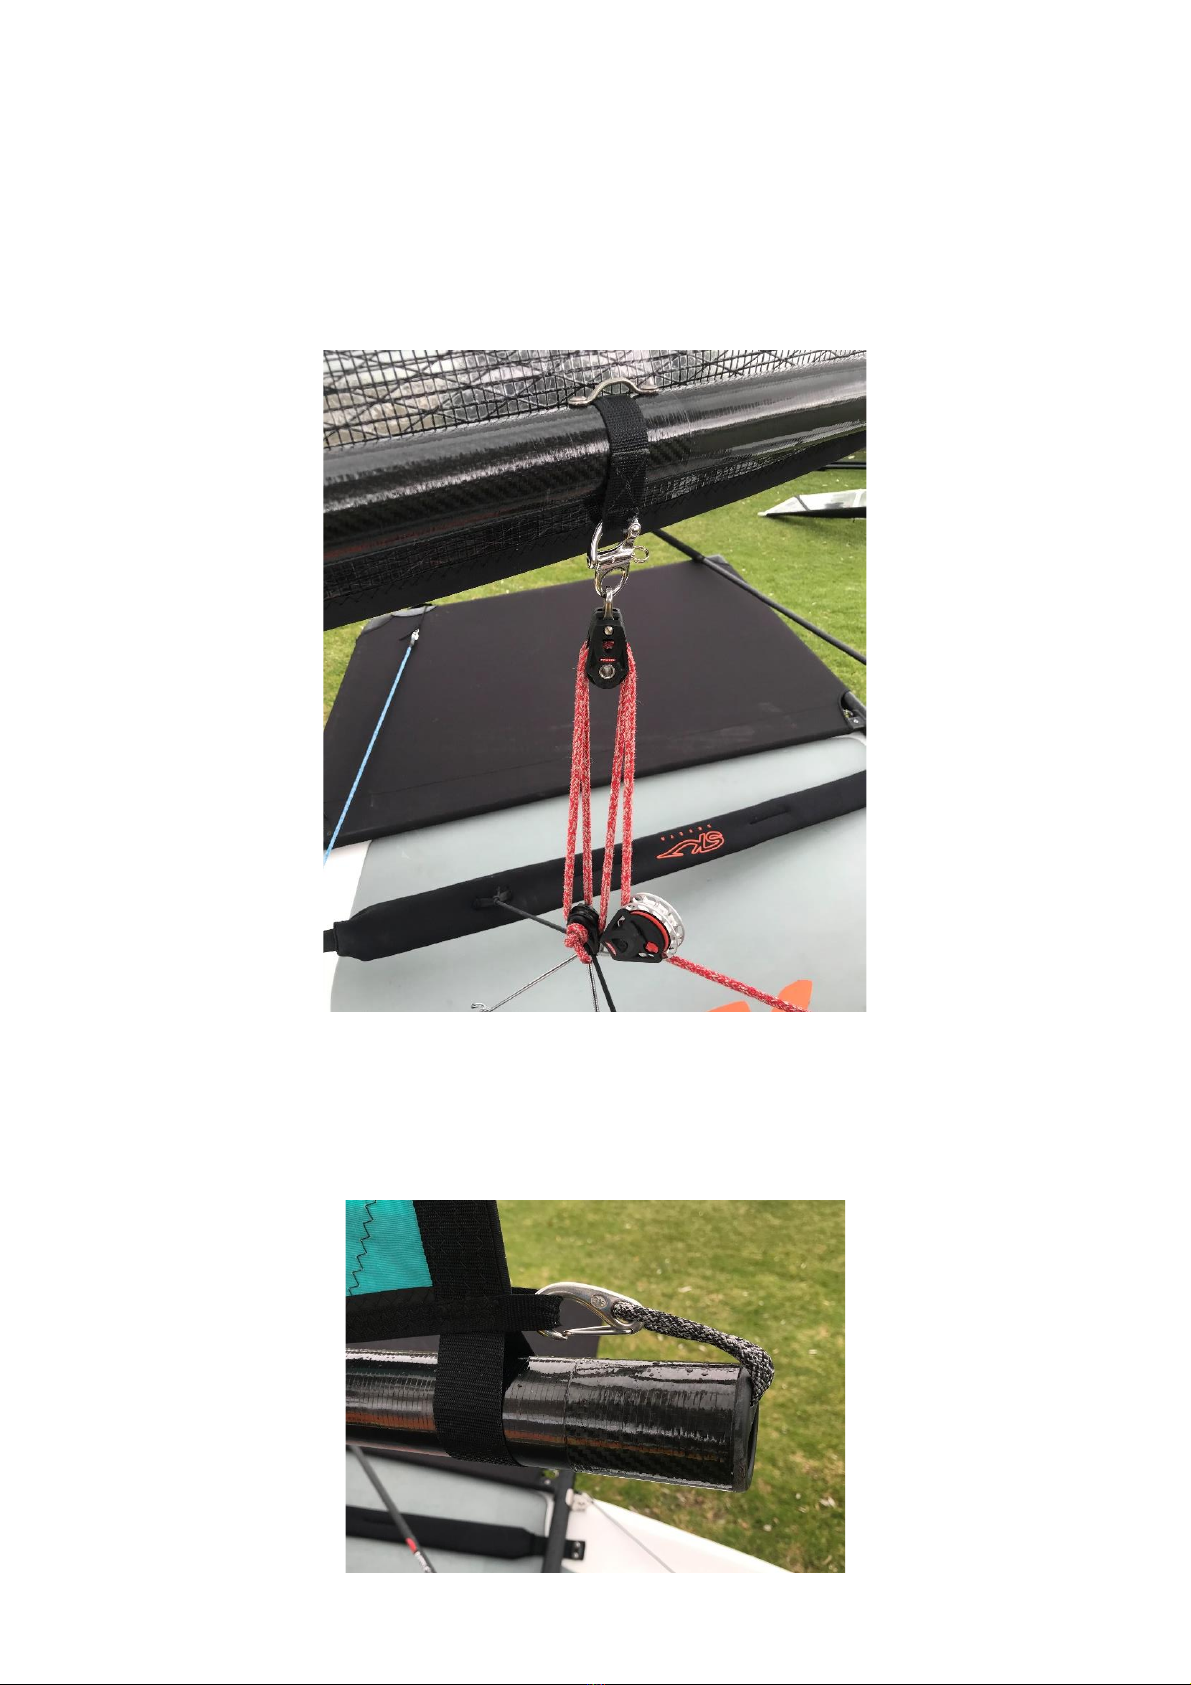
Mainsheet
The 4:1 mainsheet system is threaded through the pulleys provided as shown.
The mainsheet can always be left attached to the boat.
Attach the snap hook onto the mainsheet boom loop.
Ensure the mainsheet is in the correct orientation and not twisted.
Outhaul
1. To attach the outhaul control, clip the hook onto the webbing loop on the clew of the sail.

18
2. On the topside of the boom there is a v-cleat, the rope passes through this and can be adjusted as
necessary.
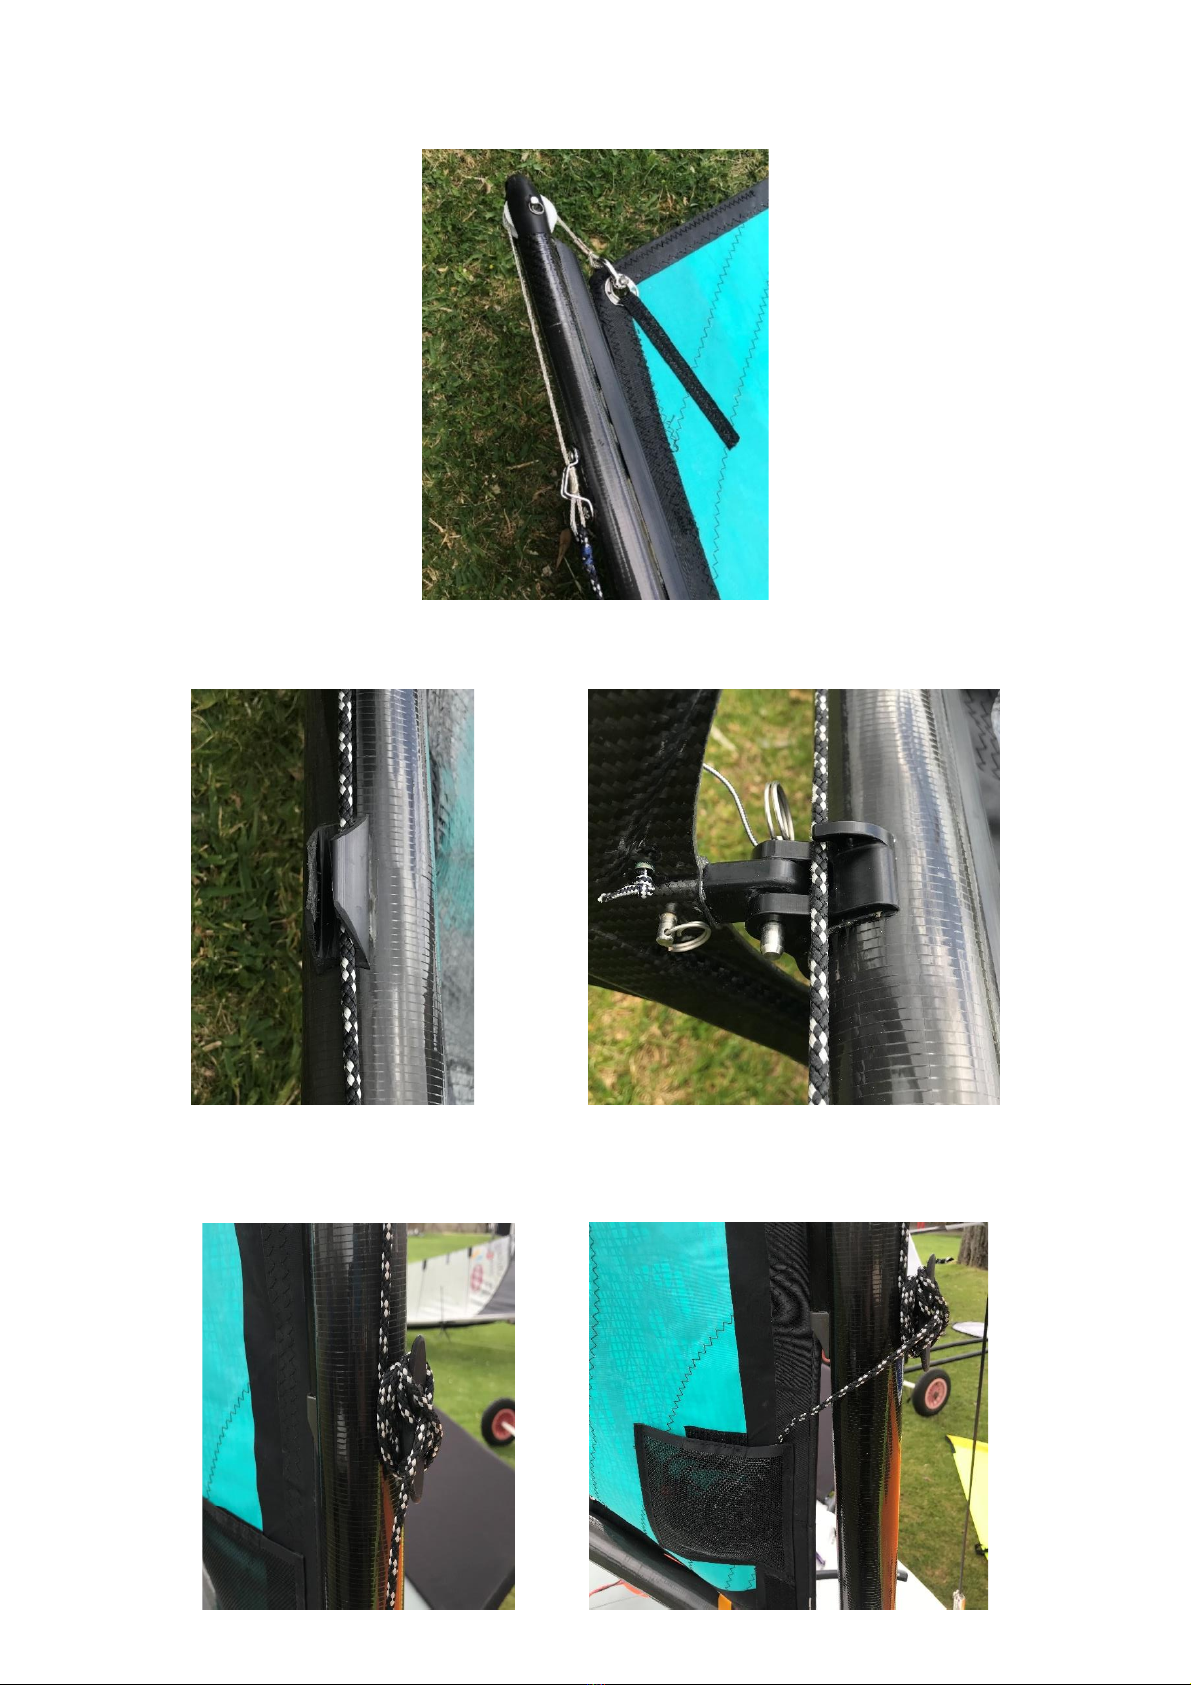
Vang system
The unique vang system on Skeeta revolves around a vang track. This reduces pressure on the mast, reducing
the chance of breakages and uncontrolled sail manipulation, whilst still maintaining the high leech tension
required for foiling.
The vang system can always remain on the boat.
To attach the vang, hook on the vang hook to the boom loop. Be sure that the ropes are not twisted to
achieve a smooth-running system.
When the vang is applied, the luff is free to move down the mast, which applies both luff and leech tension
at the same time. This greatly simplifies the controls and gives more time to concentrate on sailing the boat.

19
-Vang rope tailing system
Ensure wings are properly connected to the boat before connecting.
1. Pull the end of the vang rope through the loop on the forward end of the outer wing bar.
2. On the underneath side of the wing (where the orange stripes are) near the aft and inner wing bar,
there is a sister clip. Pull both sister clips together and connect them.
TIP:
If you find it difficult to attach the vang, it can be easier to
attach the mainsheet first and apply pressure to the sail.
This will lower the boom and will allow the vang to be easily attached.
This manual suits for next models
1
Table of contents
Other SKEETA FOILING CRAFT Boat manuals


