Skeeter Enterprises Stadia User manual

1

2
Contents
Overview......................................................................................................................................... 3
Parts................................................................................................................................................. 4
Mounting......................................................................................................................................... 5
Operation......................................................................................................................................... 7
Other ............................................................................................................................................. 13
3
Overview
Stadia is a modular high accuracy above ground level (AGL) altimeter that is designed to be
attached to the outside of an aircraft with a minimum of aircraft modifications or tools. Stadia
works by using a LIDAR to take hundreds of measurements every second and deliver this
information to the pilot via Bluetooth, giving them better spatial awareness when landing an
aircraft. The Stadia app delivers the altimeter information to the pilot both visually and audibly
so that the pilot can focus on their most important task – flying the airplane.
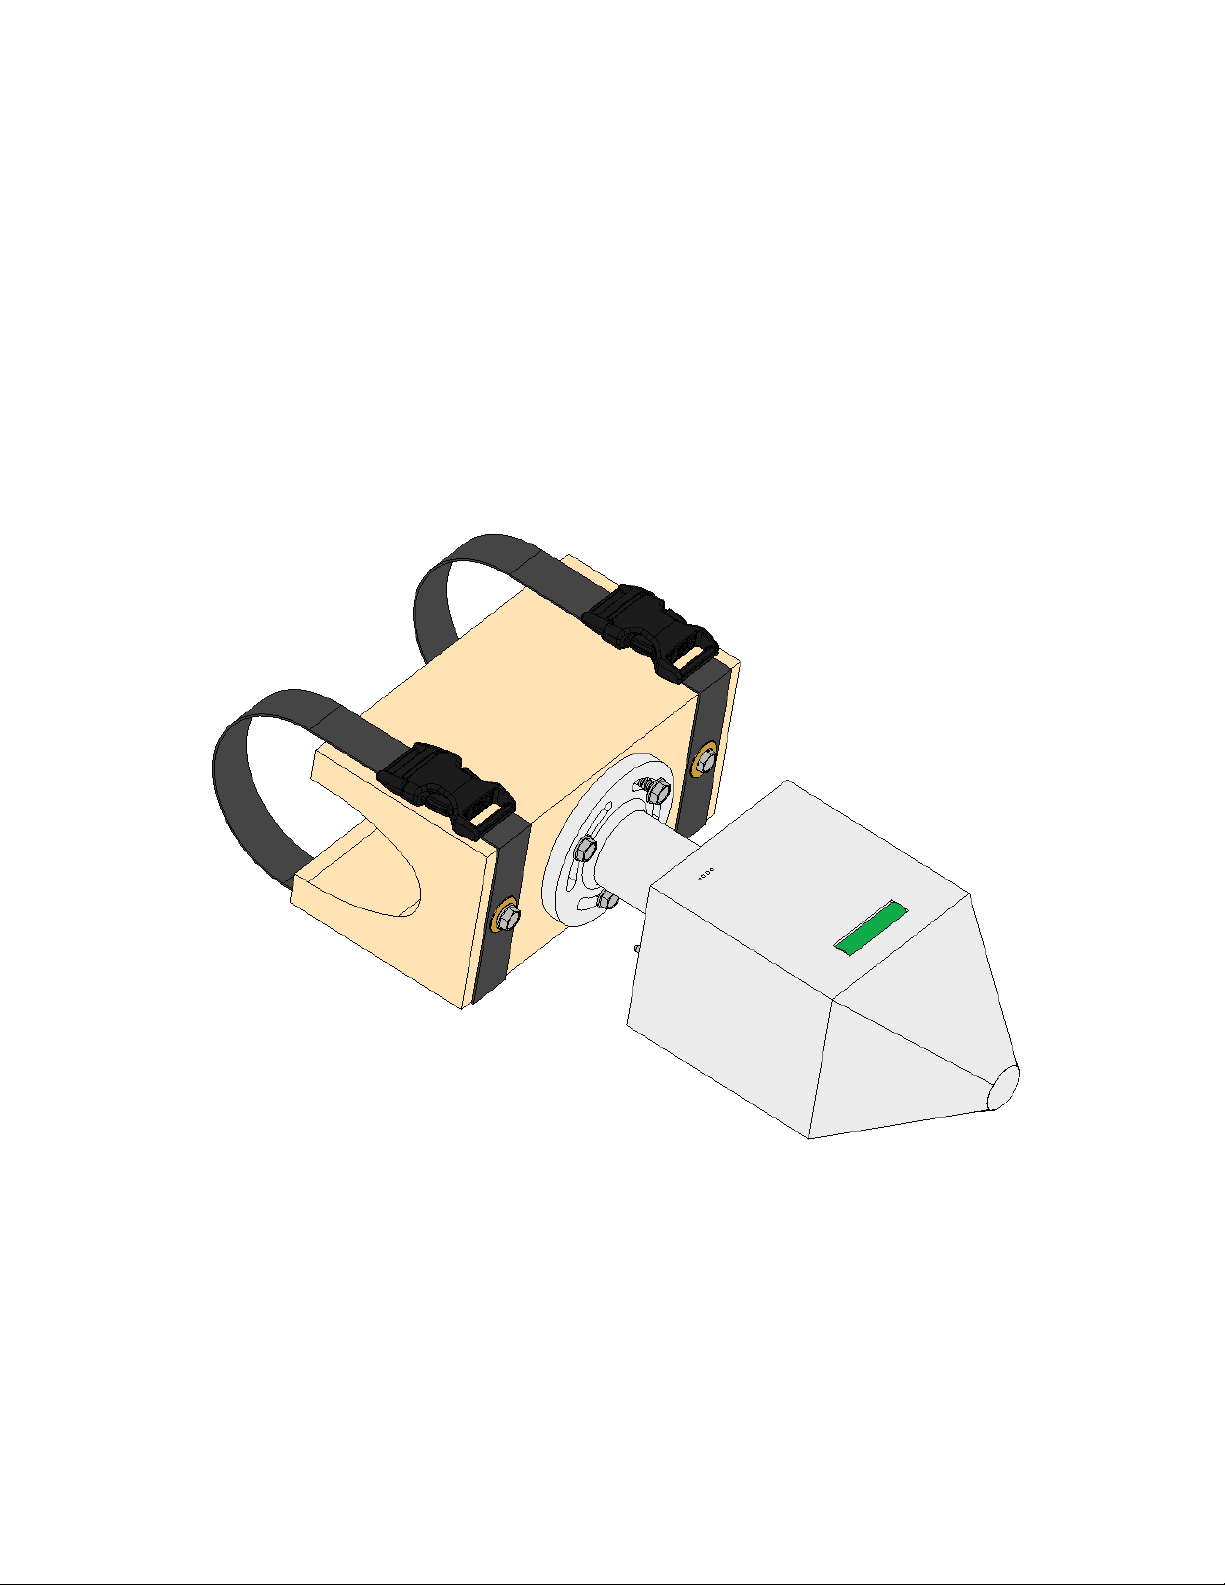
Figure 1 Stadia device

4
Parts
Stadia comes preassembled to be mounted onto an aircraft. Stadia uses two main pieces: the
mounting block and the LIDAR unit (Fig 1). In the unlikely event that these pieces need to be
taken apart, unscrew the retaining bolts. The LIDAR in the LIDAR unit seen in Fig N emits an
infrared laser that is invisible to the naked eye. DO NOT LOOK AT THE LIDAR WHILE IN
OPERATION! While short exposures to the infrared laser will not damage the eye, longer
exposures may, so it is best to avoid looking directly into the LIDAR while the device is
powered on.
LIDAR UNIT
s
Straps
On/
h
LIDAR
s
Figure 2 Stadia Top view and Bottom view

5
-
Figure 3 Stadia Rear view

6
Mounting
Stadia is designed to be mounted to a hard point of an aircraft, typically a wing strut (either side
works equally well). Do not mount Stadia directly behind the propeller or above the wheels, as
debris may damage the unit.
Release the buckles and fit the mounting block onto the leading edge of the wing strut. Attach
the buckles and tighten down the straps as much as possible to ensure that the mounting block
does not move on the strut. Make sure that no aircraft cables/wires are pinched between the
Stadia straps and the strut.
Rotate the LIDAR unit until the bubble level indicates that the LIDAR unit is level. If it is not
possible to rotate the LIDAR unit, loosen the three retaining bolts approximately one-half turn so
that the LIDAR unit can rotate freely and then re-tighten the retaining bolts the same amount
they were loosened until the LIDAR unit is firmly in place.
Figure 4 Stadia showing rotation of the LIDAR unit

7
Operation
Once Stadia is securely mounted to the aircraft, flip the toggle switch up to On. A set of lights
will illuminate on the Stadia device indicating the battery status. Once powered on, a connection
can be made to the Stadia App. If this is the first time using this unit of Stadia, you will have to
first pair with it through your phone/tablet’s Bluetooth settings. The Stadia Bluetooth name is
“Stadia.”
When the Stadia App is opened, a short Splash Screen will show before taking the user to the
Home Screen. Pressing the “Set Up Stadia” button that is located at the bottom will bring you to
the Set-Up screen.
Press the Bluetooth button at the top of the Set-Up screen. This will open a list of available
paired Bluetooth devices. Press “Stadia” to connect to the device.
Back at the Set-Up screen the text below the Bluetooth button should be green and read
“Connected”.
Figure 5 Home screen and Set-Up screens showing before and after a Bluetooth connection is made

8
The next step is to calibrate the device for the aircraft. Calibration consists of measuring the
distance from the Stadia unit to the ground while the aircraft is parked. This is done so that
Stadia can factor this distance into its calculations and give you a true value of your aircraft’s
wheel height above the ground. Calibration can be done one of two ways: automated calibration,
or manual input. If you choose the automated calibration it is very important that Stadia is
connected to the app, and that Stadia is in Active Mode, otherwise this process will not work.
For automated calibration, ensure that the aircraft is parked on level ground, and that the airplane
is flight level. This means that tailwheel aircraft may need to be propped up in the rear. If this is
not done, the automated calibration may be off as much as one foot. When the aircraft is flight
level, and ensuring that Stadia is connected to the app, press the “CALIBRATE” button on the
Set Up screen. A number should appear in the middle of your screen, giving you the offset
distance in inches. This is the distance between the Stadia unit and the ground while the airplane
is flight level.
For manual calibration, ensure that the aircraft is parked on level ground, and that the airplane is
flight level. Measure the distance between the Stadia unit and the ground. Input this number
into the text box labeled “INCHES” (or “Cm” in metric option) on the Set-Up screen, and then
press the “Enter” button. The number you input should appear in the middle of your screen,
giving you the offset distance.
9
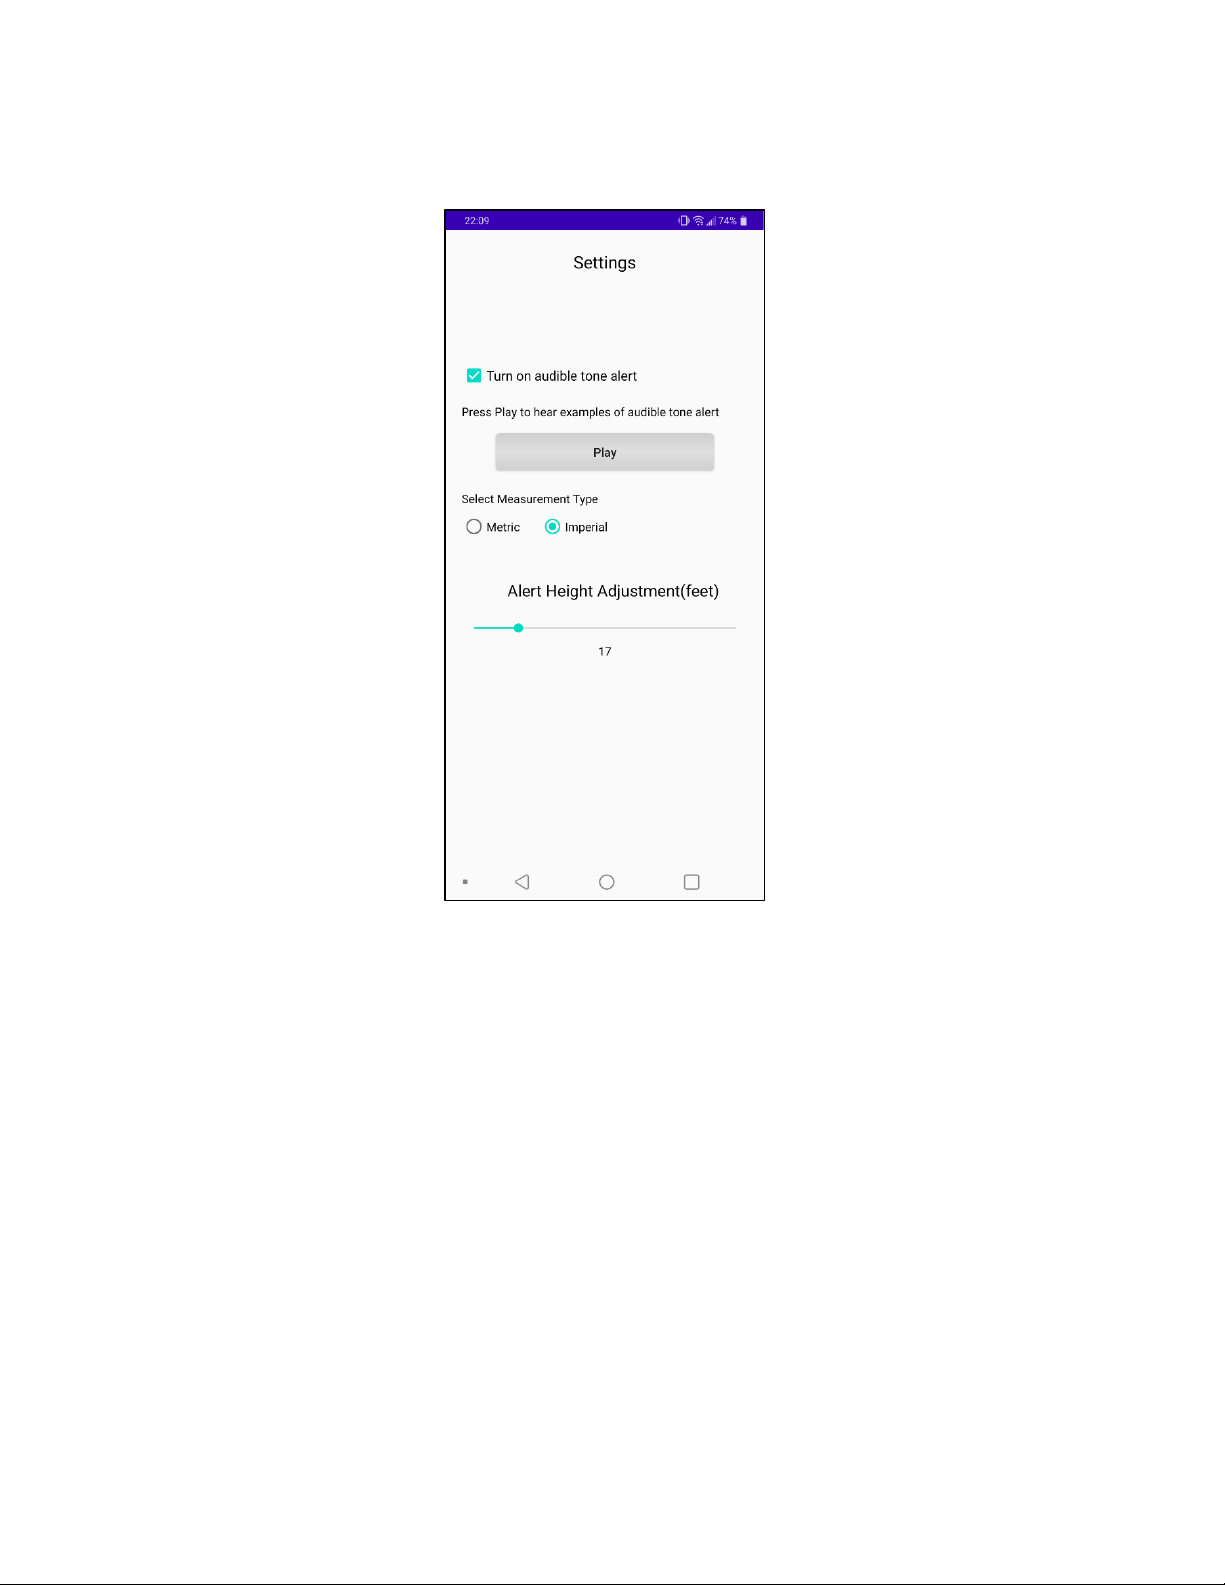
The next step is to set up Stadia to your preferences. Press the “Settings” button in the Set Up
screen.
The 3 settings to control are: Altitude Tones, Measurement type (Imperial or Metric), and Alert
Height adjustment.
“Altitude Tones” – A series of audible beeping tones will play through your audio system. The
frequency and pitch of the tones will increase as your above ground altitude decreases. This alert
will only activate once you have descended below the Alert Height Altitude.
“Measurement Type” – Allows the user to choose between Imperial or Metric units of
measurement.
“Alert Height Adjustment” slider – Changes the Alert Height Altitude at which the selected
audio will begin warning you. The larger the Alert Height, the farther above the ground the
warning systems will begin alerting you. No warnings/alerts will be given until you have
descended below the selected Alert Height Altitude.
Figure 6Stadia Settings

10
Once the settings are completed, press the back button to get to the Set-Up screen. At the Set-Up
screen, press the red “RUN STADIA” button to begin using Stadia.
Fig 7 shows the Stadia Operation screen. Displayed at the top is the above ground altitude
(AGL). This should be zero when you are on the ground if the calibration was done correctly.
The AGL may vary slightly on the ground as Stadia tries to correct for errors. If your screen
diplays “Height”, this means that the phone/tablet is not correctly connected to the Stadia unit.
Below the height reading is “Stadia Battery” next to a battery symbol. This indicates the battery
life available in the Stadia unit.
Figure 7 Stadia operation screen displaying "Height" indicating no Bluetooth
connection. Screen displaying 5.5 indicates Stadia is 5.5 ft off of the ground

11
Below the battery indication are two gray buttons, “Active Mode” and “Standby Mode”. These
buttons simply turn the LIDAR itself on or off, as running the LIDAR for an extended duration
may damage it. Also, Standby mode decreases the power consumption of the Stadia unit. When
in Active mode, the device will display the AGL. In Standby mode, the LIDAR is powered off
and the AGL will instead read “Standby” as in Fig 8. Switching between these modes will take a
few seconds. In both modes, the phone/tablet will remain connected to the Stadia unit via
Bluetooth.
Stadia has a maximum operational distance of 130ft in ideal conditions. If the LIDAR cannot
receive a clear return signal for measurement (i.e., the ground is too far away), Stadia will
display “UNKOWN” in the height display. See Disclosures/Disclaimers for more information.
If connection to the Stadia unit is lost, the app will automatically switch to the Settings screen
and the green “Connected” message will instead display the red “Tap button to connect to
STADIA via Bluetooth” to indicate that device connection has been lost. Some reasons for loss
of connection could be depleted batteries, excessive distance between the Stadia unit and
phone/tablet, metal objects interfering with the signal, or too many Bluetooth devices connected
to the phone/tablet.
Figure 8 Stadia operation screen displaying "STANDBY" indicates that Stadia is in Standby Mode.
"UNKNOWN" indicates that the LIDAR cannot receive clear return signal for measurement

12
The three buttons below the Active Mode and Standby Mode buttons marked “Test”, “Mute”,
and “UnMute” are straight forward. “Test” produces a short tone to indicate that audio is
working properly. “Mute” & “UnMute” mute the phone/tablet’s audio.

13
Other
Charging
The Stadia unit runs on a rechargeable 21700 Li-Ion battery, with a built-in charge/discharge
regulator. The system requires a 5V micro-USB cable to be recharged. The micro-USB cover
protects the electronics from water and dust exposure. To charge, remove the micro-USB cover
from the rear of the unit as seen in Fig 3 (this may need to be pried off with a flat tool or
fingernail). Look inside to gauge the orientation of the micro-USB slot, and then insert the cable
appropriately to charge. Looking at the top of the Stadia unit, you should see four LEDs. These
LEDs indicate the battery charge. When the battery is full, all four LEDs will remain solidly
illuminated. Remember to replace the micro-USB cover before use, and ensure that it is fully
inserted.
Disclosures/Disclaimers
-Stadia produces an infrared laser that is invisible to the naked eye. When Stadia is powered on,
this infrared laser may be emitted without the user being aware. It is incredibly important not to
stare into the bottom of the enclosure (Fig N) while the unit is turned on, as this could result in
permanent eye damage.
-Stadia is not a substitute for instrument flight rules (IFR) guidelines, or proper flying
procedures. Stadia is only meant to augment a pilot’s sense of awareness, not replace it.
-Stadia works well in all light conditions, but not all weather conditions. Adverse weather
conditions may include, but are not limited to, heavy fog, rain, snow, haze, or dust. These
weather conditions will deteriorate Stadia’s ability to give accurate AGL readings. It is
ultimately the pilot’s responsibility to ensure the aircraft’s safe flight.
-Stadia does not compensate for the yaw, pitch, or roll of the aircraft. As such, these maneuvers
will result in erroneous readings from Stadia. As an example, an aircraft flying at 100 ft AGL in
a 20° bank using Stadia would read 106 ft AGL. It is important that the pilot recognizes this
limitation of Stadia and appropriately compensates for it.
-The Stadia LIDAR has an effective range of no more than 130ft in ideal conditions. Ranges
greater than 130ft will not return a signal. Less than ideal conditions may also not return a signal
and may reduce the effective AGL range of Stadia. These conditions may include, but are not
limited to; soft ground surface, clear and/or still water, leafy undergrowth etc. Particular
attention must be paid to water landings, as the Stadia LIDAR is not meant to measure range
over water. Very clear/still water may cause the LIDAR to range the bottom of the body of
water instead of the top of the surface of the water.
-Stadia is an experimental avionics product and has not received FAA TSO approval. It is
ultimately up to the user to determine the legality of using Stadia on their individual aircraft.

14
-Stadia is rated for a maximum airspeed of 120 mph (193 kph).
-Stadia is only approved for operation in temperatures between 0° F to 120° F (-18° C to 49°C).
Charging Stadia should be done in temperatures between 32° F to 110° F (0° C to 43° C).
Table of contents
Popular Measuring Instrument manuals by other brands

Worldcast Systems
Worldcast Systems AUDEMAT FM MC5 Quick Start Notice

Endress+Hauser
Endress+Hauser Levelflex FMP50 Safety instructions

PCB Piezotronics
PCB Piezotronics 356B41/NC Installation and operating manual

Inficon
Inficon Micro GC Fusion installation guide

vinmetrica
vinmetrica SC-200 user manual

Craftomat
Craftomat 150705XCFT Instructions for use manual


