SKETCHNBUILD SNB-12A User manual
MACHINERY
SKETCHNBUILD

CONTENTS
Ⅰ.Usage andFeature of Structure…………….………………………1
Ⅱ.TechnicalParameter..…………………………………...……..……1
Ⅲ.SafetyPrecautions………………………………………....…..……1
Ⅳ.Machine Installation……………………...…………………..…..…2
4.1 Mounting Safety Cover on Riving Knife………………………………….....……2
4.2 Extension of Table…………………………...………………………………...…..3
4.3 Pressure Utensil …………………………………………………………...……....3
4.4 Workpiece Push Parts…………………………...…………………………...…….4
4.5 Assembly…………………………….……………………………………….……4
4.6. Adjustment after Installation………………………………………………….…..5
Ⅴ.Operation of Machine……………………………………..…….…6
5.1 Adjustment of Saw Blade……………………………...……………………....…..7
5.2 Replacement of Saw Blade……………………………...……………………....…7
5.3 Setting of Main Saw Blade Speed…...………………………..………………..….7
5.4 Lock of Moving Table……...……………………………………………...…....…8
5.5 Main Switch……………………...………………………………….…….......…..8
5.6 Reaction of Motor to Overload………………..…………………………....……..9
5.7 Scoring Saw………………………………………………………………..………9
5.8 Replacement of Scoring Saw Blade………………………………………...……10
Ⅵ.Maintenance ( Trouble Shooting)…………………………....……11
Ⅶ.Service…………………………………………………………...….13
Ⅷ.Easily DamagedParts……………………………………………..13
Ⅸ.Descriptionof Service Spare Parts for Customers……...….……13
Ⅹ.Circuit Diagram……………………………………………………25

1
Ⅰ.Usage and Featureof Structure
This saw is destined to cut solid wood panel, chipboard, ABS board, PVC board,
organic glass board and other board which have the similar structure and hardness. It
is the necessary working tool for furniture production and decoration industry.
It is made of the body, sliding table, support for sliding table, fixed table, main saw
blade, scoring blade, up & down system, the transverse and vertical guide plate, etc.
The sliding table carriage is linear structure, exact and durable and made of
high-strength extruded aluminum alloy, sliding table is high in strength and won’t be
bent. With oxidation treatment, sliding table surface is beautiful and enduring.
Ⅱ.TechnicalParameter
Power Source
380V+3Ph/50HZ
Sliding Table Length
3200mm
Max. Cutting Height
80mm
Saw Group Tilting Angle
45°-90°
Main Saw Diameter
300mm
Main Saw Arbor Diameter
30mm
Main Saw Speed
4000/6000r.p.m
Scoring Saw Diameter
120mm
Scoring Saw Arbor Diameter
20mm
Scoring Saw Speed
8000r.p.m
Motor Power(Main Saw + Scoring Saw)
4+0.75kw
Diameter of Dust Suction Below the Table
100mm
Net/Gross Weight
650/750kgs
Ⅲ.SafetyPrecautions
All equipment tools, especially the woodworking machinery fed manually, all will
cause a certain danger if not operated properly, therefore, it is required to comply with
the safety precautions and other industrial safety stipulations and requirements
summarized in this chapter forever.
Regulations on accident prevention:
*Before operation, ensure the safety and operating facilities are installed properly
without any damage.
*Before replacing saw blade, removing trouble and repairing, ensure the power
supply has been switched off and it is necessary to lock the main power supply
with lock for preventing accident.
*It is only allowed to use the saw blade and grooving saw blade supplied by the
manufacturer.
*Wear close-fitting work clothes, and do not wear ring, bracelet or wrist watch.
*The work place shall be clean, skidproof and has good illumination.
*Do not cut overlarge or too small workpiece that exceeds the equipment
characteristics.

2
*Stand out of the bounce area of saw blade side and workpiece when operating and
do not stand in middle of saw blade.
*Remove the loose matters around saw blade before starting the machine.
*Cutting shall not be started until the saw blade up to full speed.
*Use safety cover forever!
*Except cross-cutting long and thin wood into pieces, the riving knife shall be used
forever and the riving knife shall not be thicker than the cut width and thinner than
the main saw blade.
Whencross-cutting long and thin wood into pieces cutting, use the anti-bounce device,
such as fix it in the sliding table groove with striker plate against moving. After
cross-cutting long and thin wood into pieces, remount the riving knife and safety
cover immediately.
*When narrow wood is cut longitudinally, the feeding parts shall be used.
*For the purpose of avoiding the cut wood from being brought upward and
bounced out by the uprising tooth ring, an offsetting wedge may be used for
instance.
*Do not cut round log with saw using standard feed auxiliary device or check plate.
*Fix the workpiece on the sliding table with striker plate when trimming.
*When using feed device, it at lease needs to use the longitudinal knife as the
anti-bounce device.
*Worn and torn sliding table strip shall be replaced promptly.
*Do not use wobble saw or cutting device.
*Wear hearing protection when operating because the noise in work place is more
than 85dB (A).
*The saw dust produced in cutting may affect the sight line and be also harmful to
health, so the two dust collector openings of saw shall be connected with the
suction system. When the suction force is not enough, no operation shall be done,
and proper measures must be taken to ensure when the equipment is started, the
suction system also is started.
*Only qualified electrician can operate the electrical equipment of the machine.
*Clean the equipment periodically, especially the saw bench, sliding table and
check plate, which is an important safety factory, and before operation start, it
must be ensured that the equipment cannot be started without cause.
Ⅳ.Machine Installation
4.1 Mounting Safety Cover on Riving Knife
For the purpose of keeping the saw blade on the saw bench, we recommended
separated adjustable protective device.
4.1.1 Mounting Safety Cover

3
4.1.2 Setting of Riving Knife
With respect to safety, the accurate setting of riving knife plays a very important
role. The distance between riving knife and toothed ring in cut height area shall be
more than 8mm, and the distance in most common use is about 5mm and that of the
lower part is 3mm.
When setting riving knife, the power supply must be cut off, for setting riving knife,
move the upper bracket to terminal position of unlocking device, fold the orange
check plate downwards, subsequently, loosen the set screws on the holder of riving
knife with special spanner, then move it in the fixed groove to adjust its height,
remove the whole riving knife holder along the track to adjust the distance between
riving knife and saw blade, and observe the scale on the riving knife at the same time,
then tighten up the set screws and shut to the guard.
4.2 Extension of Table
The worktable attached to the table may prevent workpiece from inclining
backward in cutting and improve the safety. The attached worktable is a necessary
part of a standard machine.
4.3 Pressure Utensil
The pressure utensil is used for pressing workpiece on the sliding table.

4
4.4 Workpiece Push Parts
4.4.1 Push Knife
When the wood less than 120mm to be cut, the push knife shall be used to prevent
hand from approaching to the saw blade.
Push Knife Push Knife Seat
4.4.2 Push Knife Seat
When cutting narrow workpiece, lean the workpiece against the rip fence with push
knife seat that may be self-made by the operator.
5.5 Assembly
4.5.1 Installation of Panel Saw
The panel saw shall be on hardened and flat floor than is enough to bear the weight
of machine without necessity of special foundation. There shall be enough space on
the installation site, as shown in figure, so as to install the equipment and operate
large-size wood. There shall be a certain safety distance betweenother parts and other
machines indoor to prevent hurting other personnel.

5
4.5.2 Installation of Sliding Table
Put the sliding table on the position of machine body, align the three set screws
with the screw holes and tighten them up.
Mount the rear stop plate, check if it is up to the requirement and adjust it otherwise.
Before start-up, check each link.
4.5.3 Electrical Connection
Only qualified electrician can install the electrical equipment, including connection
with power supply. Before electrical installation, the power supply must be cut off.
Only when the main power supply is cut off, each contact may be closed or opened.
The distribution box of panel saw is mounted on the electrical box of machine body
and has output line. There is a terminal box on the side and it only needs to connect
according to the mark.
Electrical Box Terminal box Running Direction
After finishing connection of power cord, start the machine just a little to check the
running direction of main saw motor, if it is necessary to correct, just change the
direction of two cord ends, and write the running direction down on the saw blade
cover with arrow.
4.6. Adjustment after Installation
In final assembly, the basic settings have been done in the factory. But adjusting the
basic settings of machine is necessary because of disassembly, transportation and
assembly on site.
4.6.1 When adjustment, make the sliding table slide smoothly from one end to the
other and can be made slide with a little force from stationary state.
Check the moving table, put a rule on the moving table, move the moving table to
the middle position and move the moving table backward and forward, the aluminum
6
worktable shall be a little lower about 1/10mm.
Setting the moving table, unscrew the lock screws on the four stud bolts, adjust the
worktable, tighten up the set screws, then put the rule on the fixed table to be parallel
with the moving table, if the surface is sunken, adjust the pressure screw for
compensation.
4.6.2 Adjust the saw blade to max cutting position, use it to cut out a small piece (it
may as well be MDF board) along cross-cutting guiding rule, judge if the setting of
moving table is correct through the sound difference between saw teeth cutting and
not cutting, when the uprising saw teeth passing through, there is only a little swing,
but saw teeth have noise in cutting.
Setting: loosen the mounting pieces on both ends of moving table and in the middle,
unscrew the lock nuts of stop screws for adjusting properly and then lock them,
afterward, adjust the moving table and tighten up each set screw.
4.6.3 Parallel Check Plate Cutting
Adjust the saw blade to the max cutting position to cut a piece of 300×450mm
sample, if the setting of moving table is correct can be judged from the sound of
uprising saw teeth.
Ⅴ.Operation of Machine
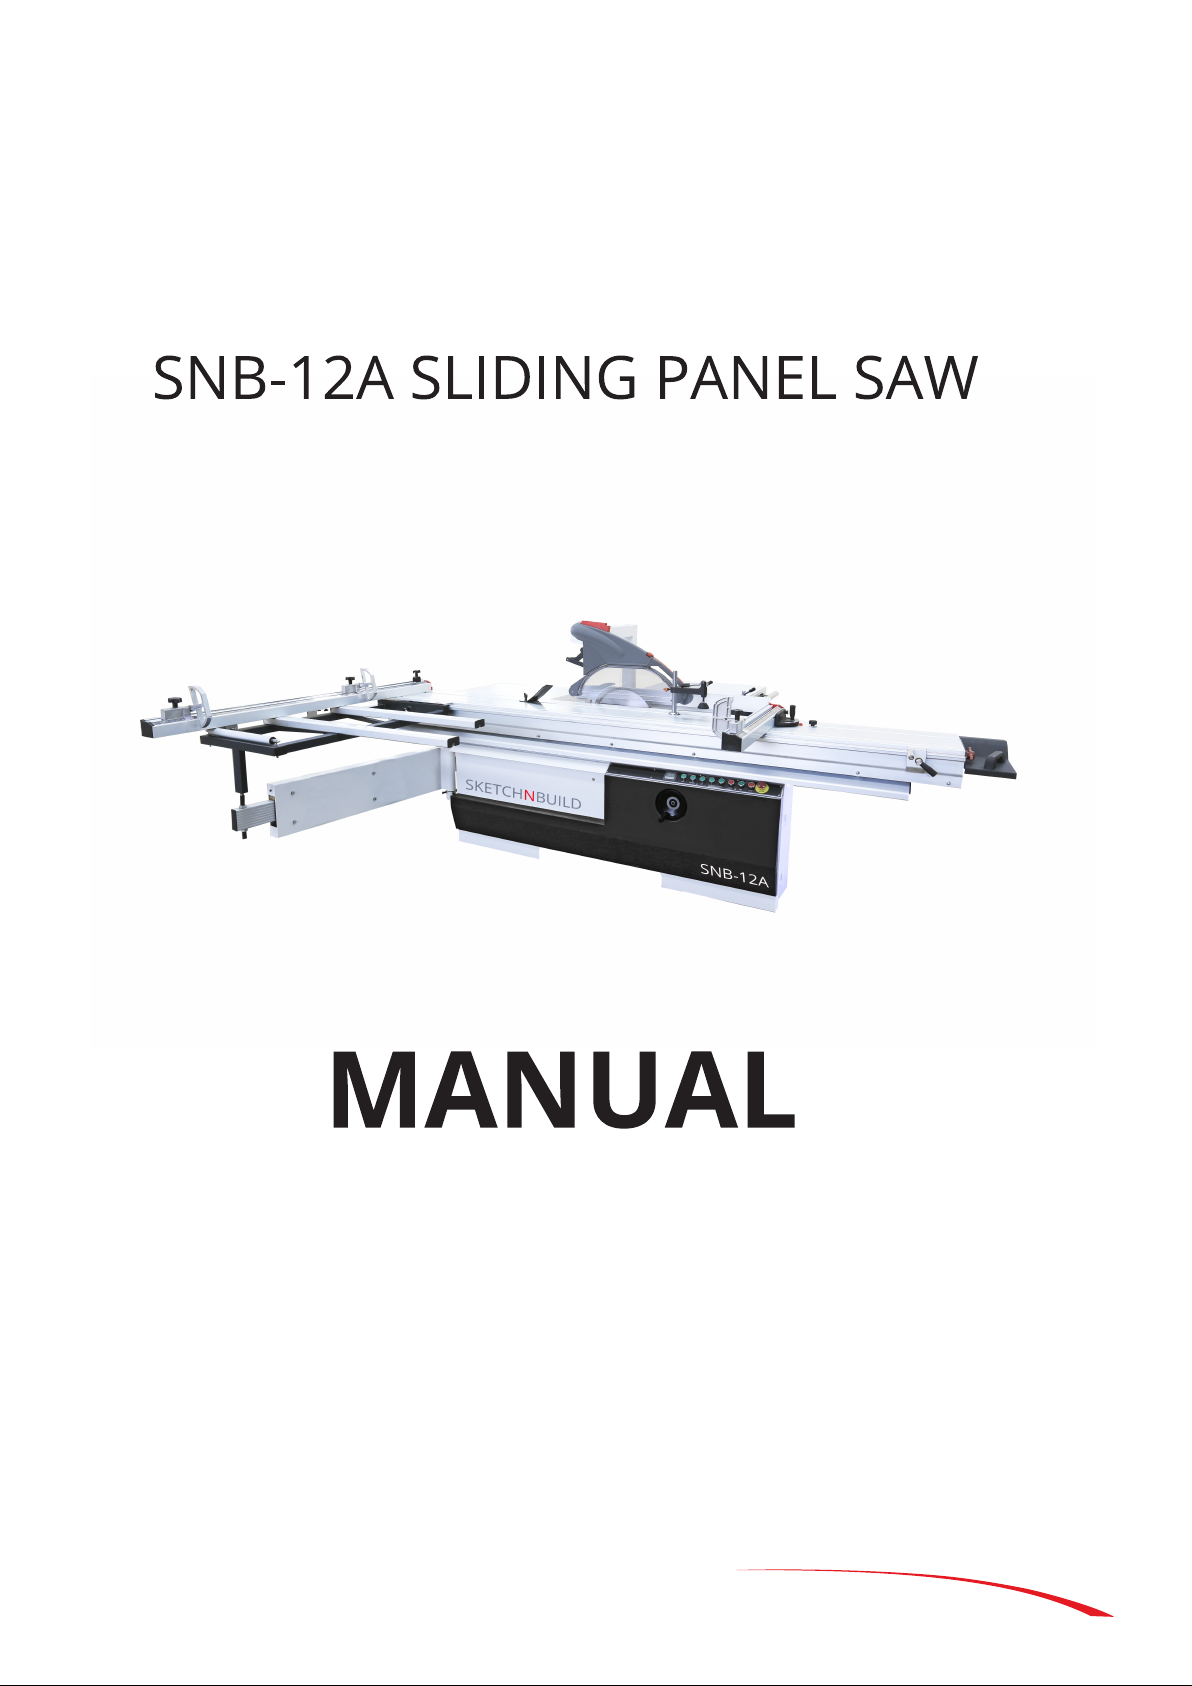
To raise or lower the saw blade: it just needs to adjust the Up/Down hand wheel on
the right side of the machine body.
To reduce or enlarge the angle: adjust the angle hand wheel in the front of machine.
Height Control Handle
Angle Control Handle
7
5.1 Adjustment of Saw Blade
It shall comply with the following requirements by all means:
*Don’t mount the cracked or damaged saw blade.
*Make a check, the rotary speed of saw blade shall not be too high, and the
maximum rotary speed is marked on the saw blade.
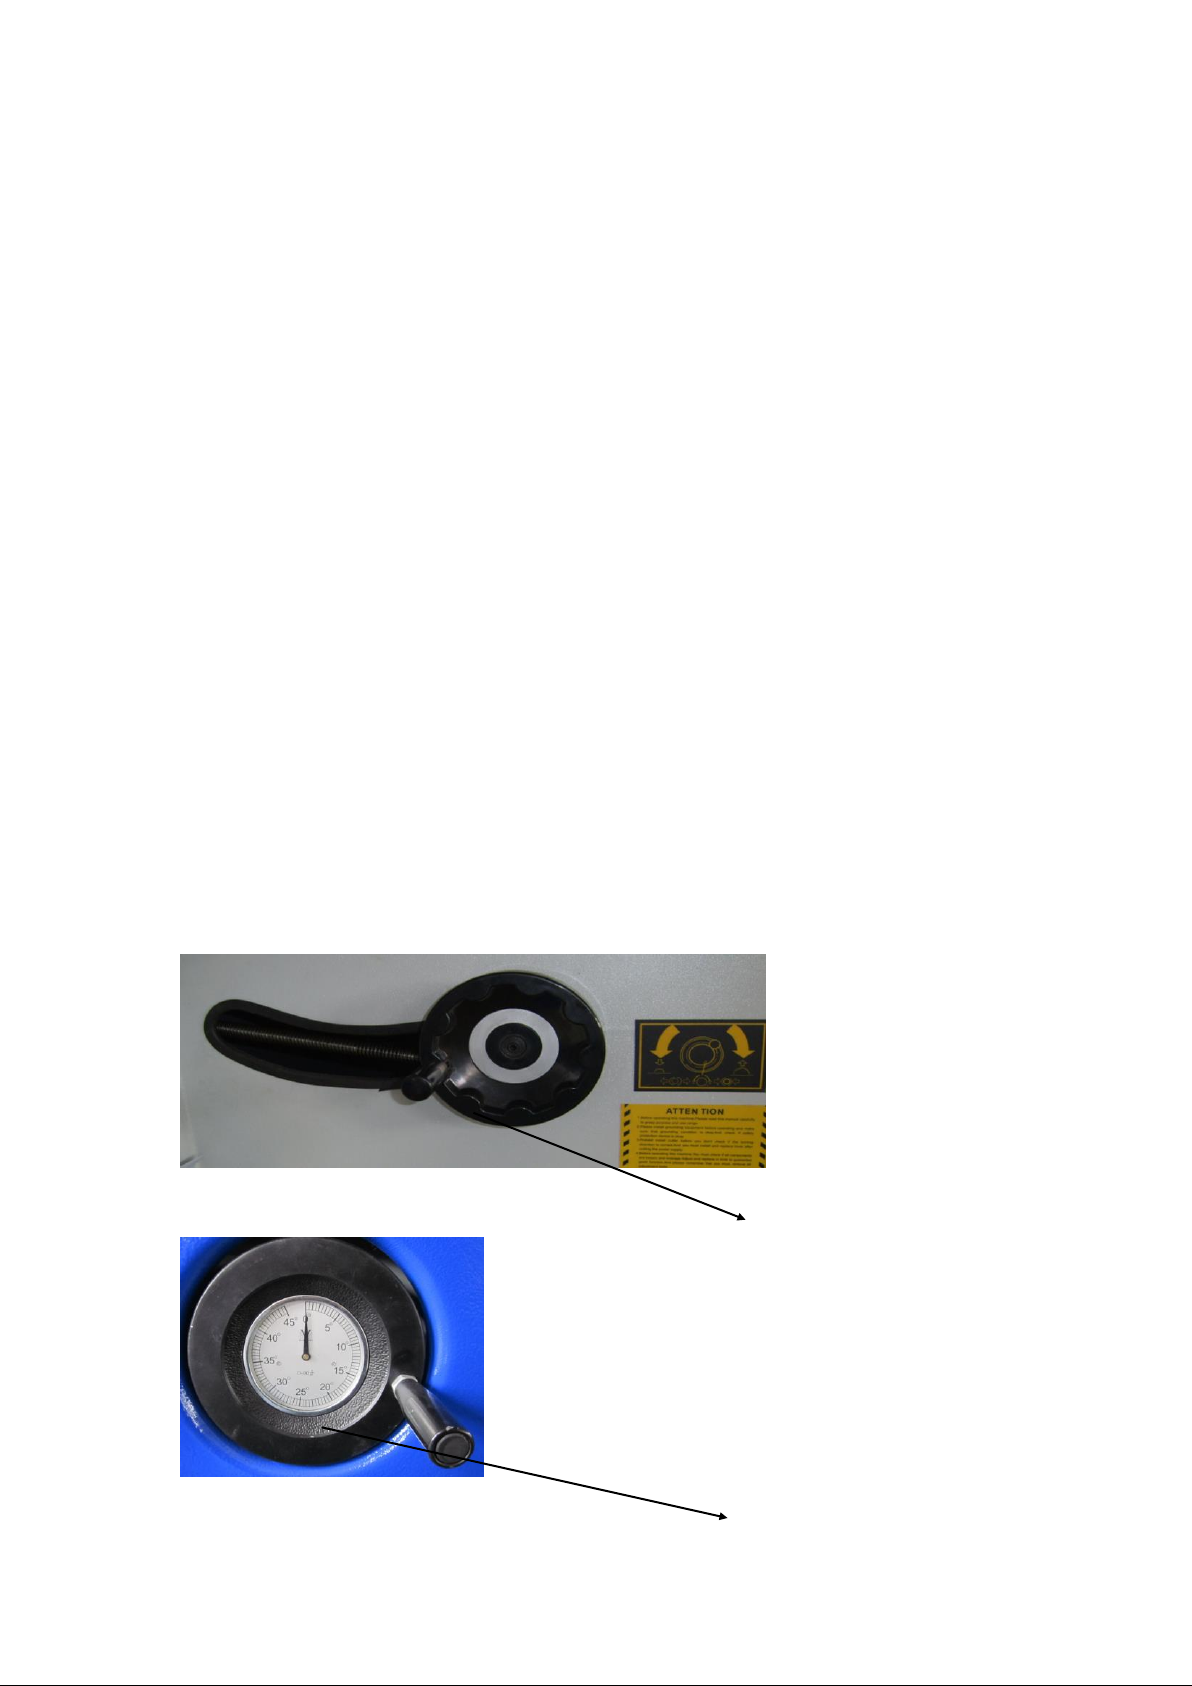
*Pay attention to choosing proper saw blade, open the clamp nut, and clockwise
mount the main saw blade on arbor, put the saw clamp on, then tighten up the
clamp nut, for scoring saw, mount anticlockwise the saw blade, tighten up the nut
at last.
Mount the Main Saw Blade Mount the Scoring Saw Blade
Cut off the power supply, adjust the saw blade to the top height with the
obliquity of 0°, press down the emergency button to move the upper moving table
towards the cutting direction until the forefront, and then lift the orange damper,
afterward clockwise screw off the saw arbor nuts with special spanner.
5.2 Replacement of Saw Blade
Prior to mount the new saw blade, remove the sawdust on flange firstly. Mount the
saw blade and front flange on saw arbor. Anticlockwise tighten up the saw arbor nuts
with specialspanner; afterward check if the thickness and space of the riving knife are
matching with the saw blade.
Close the safety cover, and take a simple trial run to see if the saw blade operates
correctly, lower the safety cover of upper saw blade to the designated position for
checking if the saw blade is protected completely.
Important suggestion: After saw blade is replaced, check if the riving knife is
mounted correctly by all means.
5.3 Setting of Main Saw Blade Speed
Our panel saw is of two speeds, i.e. the rotary speeds of main shaft are 4,000 and
8
6,000, which can be reached by moving the V-belt.
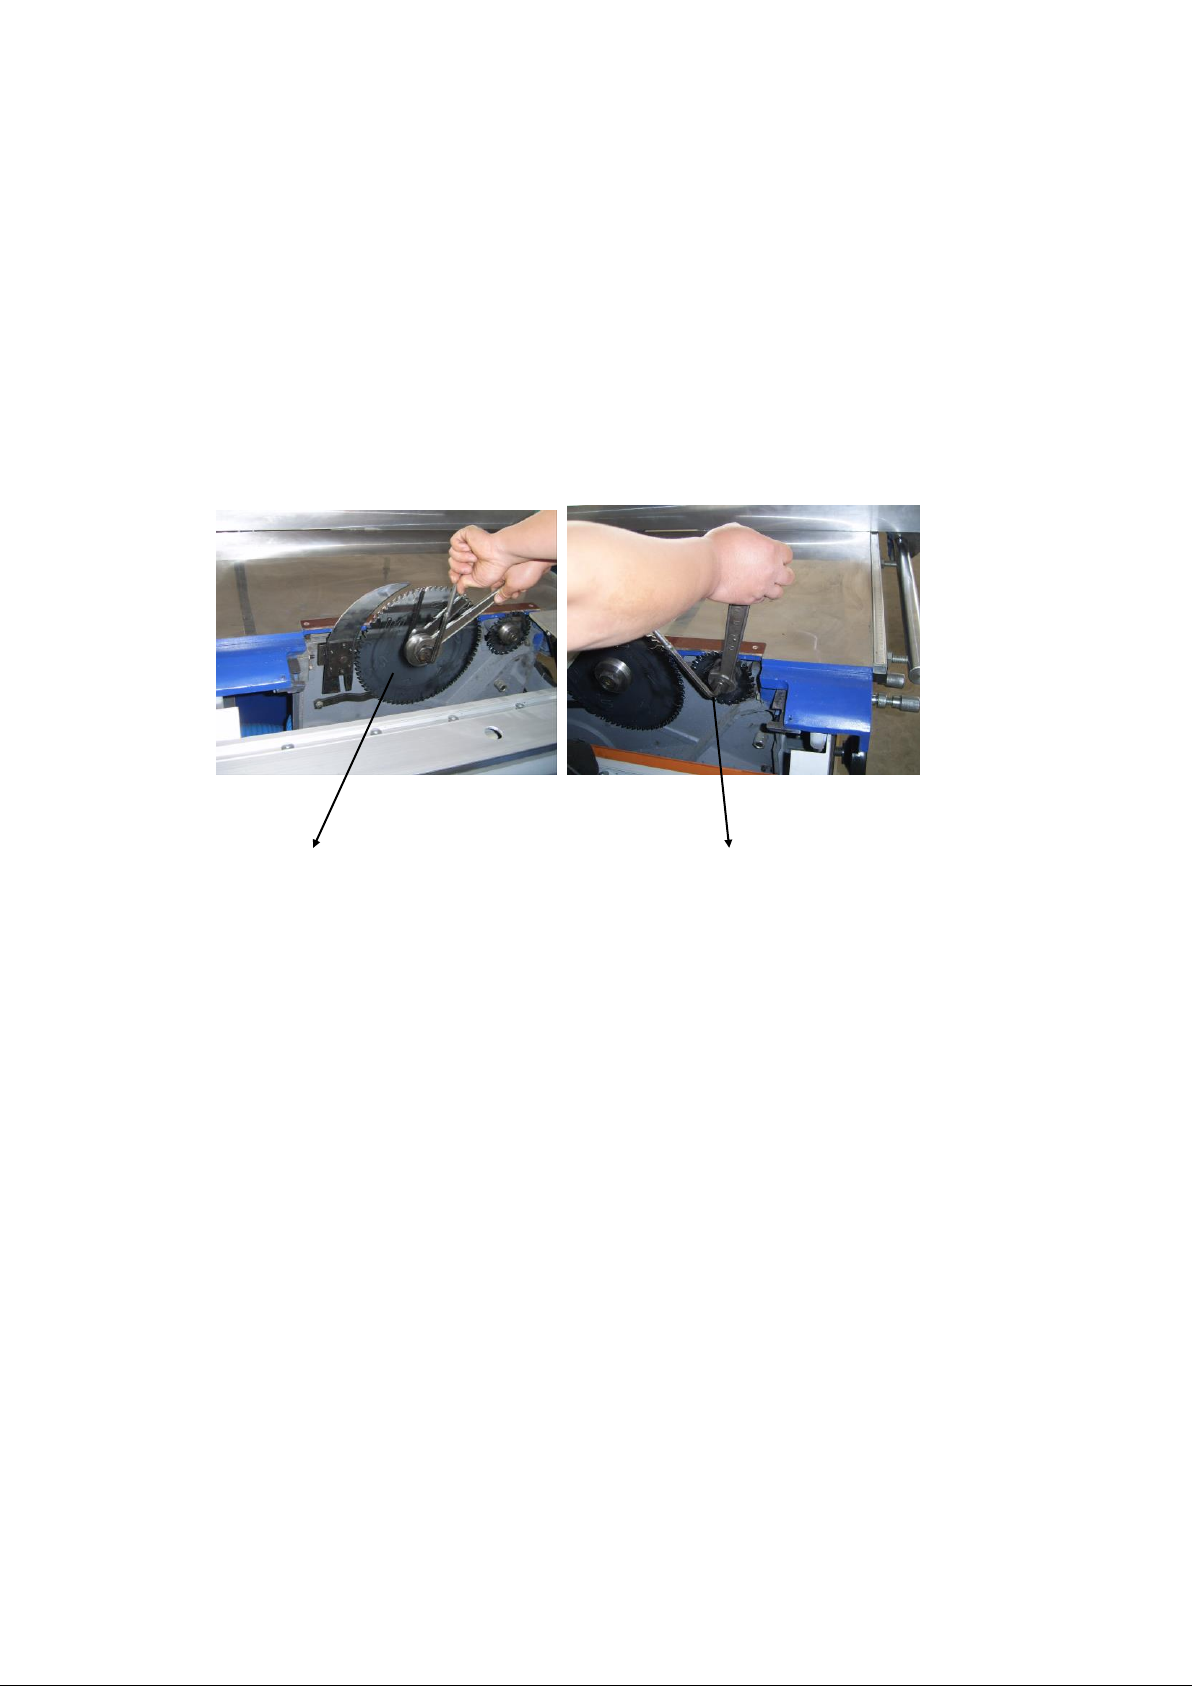
Shut down the driving, cut off all the power supplies, unscrew the V-belt tension
screws on the lift board, and raise it to the left, then the belt position can be adjusted,
please refer to the following pictures for operation.
Explanatory of Belt Replacement
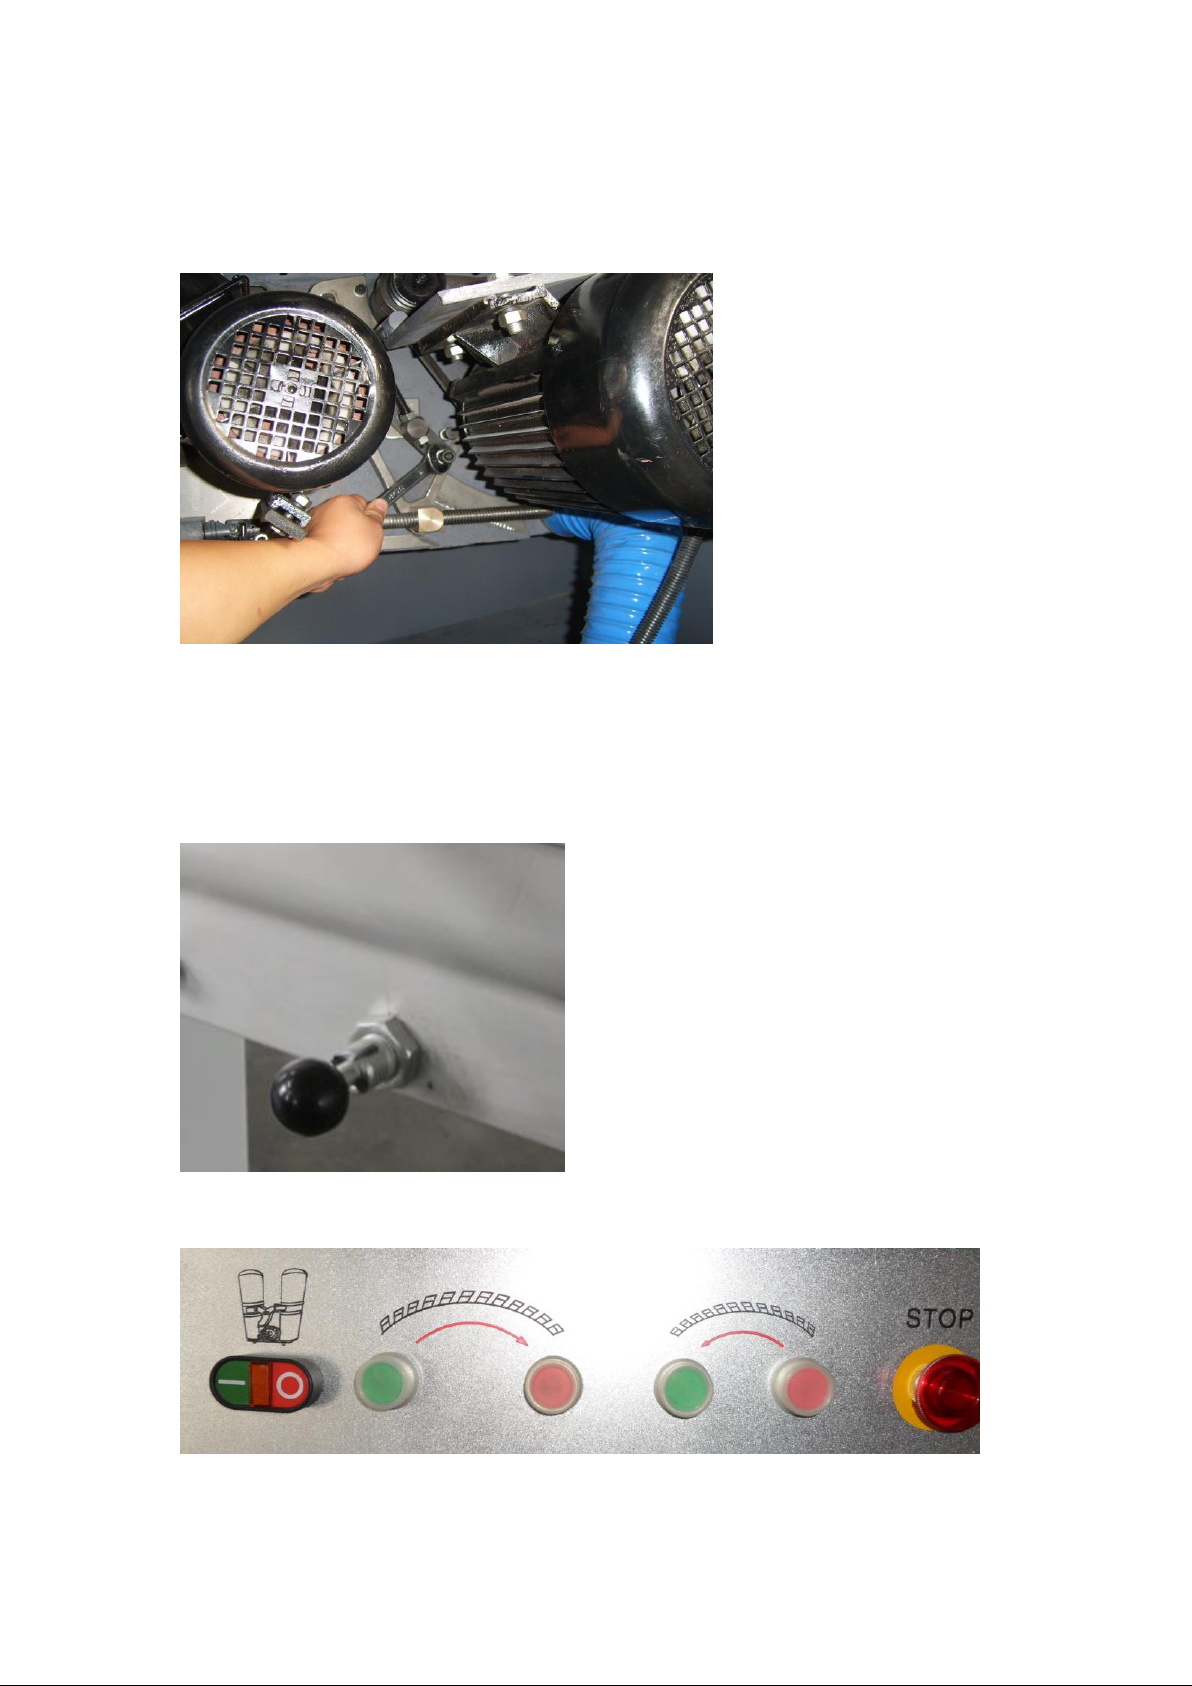
5.4 Lock of Moving Table
The moving table is locked manually at the backend against moving casually so as
to prop the wood to cut against the cross-cutting guiding rule, and it may be unlocked
with the handle at the backend of the moving table.
5.5 Main Switch
Button Panel

9
5.5.1 Start:
Before closing the main power supply switch, the emergency stop switch must be
in open condition. Then turn the emergency stop switch to left, and turn on the green
button of main saw, hereby the main saw is started. The scoring saw can be started
only 5s after main saw starting.
5.5.2 Stop:
The red button on the right of green button is the stop button of main saw. Press
down this button, the main saw will be stopped and the scoring saw will be stopped
accordingly.
5.5.3 Emergency Stop:
The machine can be stopped by the emergency stop switch, but this switch only can
be used in case of emergency.
5.6 Reaction of Motor to Overload
Reaction of motor to overload means the motor is over loaded, prior to restart,
causes shall be found out and trouble shall be removed by all means, there is a
thermal rounding protective device to protect the motor, if overheat, the motor will be
stopped automatically. Attention shall be paid in this situation that the motor of the
machine with a scoring saw attached will be stopped automatically even if the scoring
saw motor is not overheated. Only after the thermal relay cooling down, can the motor
be started again, and the thermal relay needs about 10min to cool down.
Electrical box shall be measured by the electrician every year.
5.7 Scoring Saw
The scoring saw is for the breakthrough in panel cutting that is to make the cutting
of both panel surfaces slippery and smooth. Scoring saw first cuts 1-2mm below the
panel, and then the main saw blade cuts it. Scoring saw blade and main saw blade
must be aligned with each other and with the same width.
This machine is furnished with stepped single-score saw blade, which can be
adjusted up and down or left and right by the regulating handle, cut of the scoringsaw
blade is 1/10mm wider than the main saw blade, that is to say 5/100mm of each side.
Cut height and left & right adjustments are all completed by the manual adjusting
handle and hand wheel.

10
Scoring SawAdjustment
Adjust Up & Down Adjust Left & Right
Use the handle of scoring saw on right side of panel saw to adjust, one is for
adjusting up and down and another is for left and right, turn the handle left and right
until aligning to a satisfactory height with the main saw blade.
5.8 Replacement of Scoring Saw Blade
*When stopping the machine, adjust the scoring saw blade to the highest position,
move the moving table to the cutting direction to expose all scoring saw blades,
lock up the moving table, open the safety cap, and clockwise screw off the fixing
nuts with special spanner. Take out the front flange and dismount the scoring saw
blade.
*Remove the stickers in the two flanges before mounting the new saw blade.
Mount the saw blade and the front flange on the saw arbor, and then clockwise
tighten up the nut.
*When using the scoring saw set with stepless cut width, it shall strictly comply
with the following items, and disobeying the requirements of operation manual
will endanger the production, the lose caused by which is not in the claim range:
◆Max. rotary speed of the saw blade is 8,000rpm, and allowable cut width is
2.8-3.2mm.
◆Open and pack the adjusting devices with special care against injury.
◆The adjusting devices can only be stored in the original packing!
◆All connecting parts shall be mounted properly by all means.
◆If the connecting component fittings being lost or damaged, the original
fittings shall be used for replacement.
5.8.1Setting of Scoring Saw Blade Width
*Use spacer to set the width of double saw blade to make it 0.1mm wider than the
main saw blade.
*At first, align the scoring saw with the main saw at one side of the machine, and
carry on a trial cutting.
*Align them in left and right by means of increasing or decreasing spacer.
5.8.2 Setting of the Single Grooving Saw Blade
Use the handle of scoring saw on right side of panel saw to adjust, one is for
adjusting up and down and another is for left and right, turn the handle left and right
until aligning to a satisfactory height with the main saw blade.

11
Ⅵ.Maintenance (Trouble Shooting)
In trouble shooting process, please operate complying with the following descriptions:
Trouble
Cause
Solution
Machine can’t
be started
Machine stops
automatically.
Main switch is not started up;
Interruption occurs in electric
circuit or some phase;
Protection for over load trips,
however, thermal relay is still not
cold that can’t reset;
Ends of the moving table exceed
the middle part of saw blade that
results in saw cut length is not
enough.
Emergency switch is pressed
down;
Saw blade front plate guard or
machine back door is not closed;
Fuse for controlling the current
circuit is blown out.
Power supply interruption occurs
in one or more phases, e.g.
because the fuse is blown out.
Saw blade is too blunt or saw
cutting speed is too fast that results
in over load protection trips;
Fuse for controlling current circuit
is blown out;
Close the main switch knife “I”
Wait for recovery of the electric
circuit, or find out and remove the
cause for power failure. (e.g.: fuse is
blown out)
Solve the over load problem of
machine, and wait for the thermal
relay cooling down;
Pull the moving table back to the front
end of the saw blade middle part
again.
Turn emergency switch to right to
original position;
Close the door, and cover the plate
guard;
Open the electrical cabinet (prior to
which close the main switch), and find
out which fuse is damaged among F1,
F2 & F3. Find out the cause and
remove the trouble. Then, replace the
burned fuse. Pay attention to that the
fuse with same load can only be used;
Remove the cause for power failure in
phase, and re-start the machine.
Replace the saw blade or reduce the
saw cutting speed; wait for the thermal
relay cooling down, then re-start the
machine;
Open the electrical cabinet (prior to
which close the main switch), and find
out which fuse is damaged among F1,
F2 & F3. Find out the cause and
remove the trouble. Then, replace the
blown fuse. Pay attention to that the
fuse with the same load can only be
used;
Motor is
running, but the
workpiece does
not run.
Saw blade becomes blunt;
Riving knife blade does not match
with the saw blade
Mount the new saw blade;
Replace with proper riving knife
blade, and the thickness of which shall
be a little narrower than that of the
main saw blade;

12
Trouble
Cause
Solution
Width of the workpiece cut
by saw is not corresponding
with the width regulated on
the parallel check plate
Scale of saw cut width shifts
Re-regulate the ruler. Cut a
workpiece on parallel check plate
with saw, and measure out the
saw cut width, and then adjust the
scale of aluminum ruler to this
measurement;
Width of the workpiece cut
by saw is not corresponding
with the width regulated on
the cross-cutting check plate
Scale of saw cut width ruler shifts
Adjust the ruler again. Cut a piece
of workpiece on cross-cutting
check plate with saw, and
measure out the saw cut width,
then adjust the scale of aluminum
ruler to this measurement;
Operation of oscillating arm
is unstable.
Telescopic arm or guide pulley is
dirty
Wash the telescopic arm and
guide pulley;
The moving table wonders.
Improper installation of lower
guide pulley
Adjust the lower guide pulley of
moving table
Ends of the moving table is
higher than the worktable
Improper installation of lower
guide pulley
Adjust the lower guide pulley of
moving table
Saw blade is scorched on the
moving table surface
Adjustment to the free saw cutting
of moving table is insufficient;
adjustment to the free saw cutting
of parallel check plate is too
large;
Adjust the free saw cutting;
Adjust the parallel check plate;
Saw blade is scorched on the
parallel check plate surface
Adjustment to the free saw cutting
of parallel check plate is
insufficient.
Adjust the free saw cutting;
Both sides of the saw blade
are scorched.
Adjustment to the free saw cutting
is insufficient;
Workpiece is locked;
Operation mistake;
Adjust the free saw cutting;
Replace with a little thicker riving
knife blade;
Push the workpiece forward along
left or right. Use the moving table
for saw cutting, and don’t prop
against the parallel check plate.
Workpiece is cut by saw later
and has the mark of being
scorched.
Saw blade is too blunt;
Charging speed is too slow;
Too many saw teeth on the saw
blade;
Mistake in free saw cutting;
Replace the saw blade;
Be quicker in feeding; Replace
the saw blade;
Adjust the free saw cutting
Broken stubble (with
grooving saw)
Grooving saw is not aligned with
the main saw;
Grooving saw blade is too narrow;
Readjust the centerline;
Adjust the width of saw blade;
Workpiece upwarping in saw
cutting process.
Grooving saw blade is too blunt;
Saw cut height is insufficient;
Replace the saw blade;
Adjust the saw cut height;

13
Ⅶ.Service
Prior to any maintenance for the machine, the power supply shall be cut off to guarantee
the safety. Periodic cleaning can prolong the service life, and also is the precondition of
perfect cutting effect. Thus the sliding table shall be cleaned at least twice a week according
to the service condition. It is advisable to clean it once a day.
Clean the main parts, including fixed table, sliding table, guide shaft of sliding table, casting
iron piece of the rip fence,machine inside, and machine surroundings.
Use the dust collector to remove the paring and saw dust attached to the machine, when
removing the resin residue, it is advisable to use the cleaning agent that can dissolve the resin,
after treatment of parts is finished, it is necessary to use the cloth with oil to wipe them for
preventing rust.
7.1 SawArbor Lubrication
Bearings of the main saw arbor and grooving saw are closed and have been lubricated for
whole lifetime, so there is no needto add lubricant.
7.2 Other parts shall be lubricated at least twice a week as the case maybe.
Ⅷ.Easily DamagedParts
Name
Model
Specification
Number
Installation parts
Bearing
6206
Import
2
Main Saw Arbor
Bearing
6203
Import
1
Scoring Saw Arbor
Bearing
6204
Import
1
Scoring Saw Arbor
V-Belt
0 model
580
2
Main Saw
V-Belt
0 model
560
1
Scoring Saw
Ⅸ.Descriptionof Service Spare Partsfor Customers
We have the stock of main spare parts and wearing parts, which is a very important
precondition for keeping board-cutting efficiency and production capacity.
When ordering the fittings, please refer to the detailed list. And for more details, please
refer tothe explanatory notes in drawings in the specification.
We are only responsible for guaranteeing the original parts provided by our factory.
We are not responsible for any lose or result from using the unoriginal fittings and
accessories.
Attention: there are available materials of the specification for specialized production and
delivery of the fittings supplied by us that are up to the updating technological requirement
and legal rules all.

14
Chapter
1. Fixed Table And Supporting & Adjustment Mechanism
2. Main Saw
3. Auxiliary Saw
4. Machine Body & Turning Arm
5. Bracket
6. Crosscut Guide Plate
7. Straight-cut Guide Plate
8. Double Roller Carriage-Top Carriage
9. Double Roller Carriage-Middle Carriage
10. Double Roller Carriage-Bottom Carriage

15
1. Fixed Table And Supporting & Adjustment Mechanism
1. Fixed Table
2. Protection Board
3. Lift Board
4. Connection Board
5. The Cover of Anti-Dust
6. Saw Nipping Plate
7. Pulling Board
8. Longitudinal Cutting Knife
9. Fixed Board
10. Nut
11. Connection Board
12. Following Action Board
13. Bolt
14. Cushion
15. Plywood
16. Bolt
17. Protection Hood
18. Circumgyrating Base
19. Guide Track
20. Bolt
21. Pipe Block
22. Dust Collection Pipe
23. Guide Track
24. Circumgyrating Base
25. Cushion
26. Bolt
27. Lift Nut
28. Lift Screw
29. Gimbal
30. Hand Wheel
31. Handle
32. Bolt
33. Angle Bolt
34. Angle Nut
35. Lift Adjusting Spindle
36. Adjusting Base
16
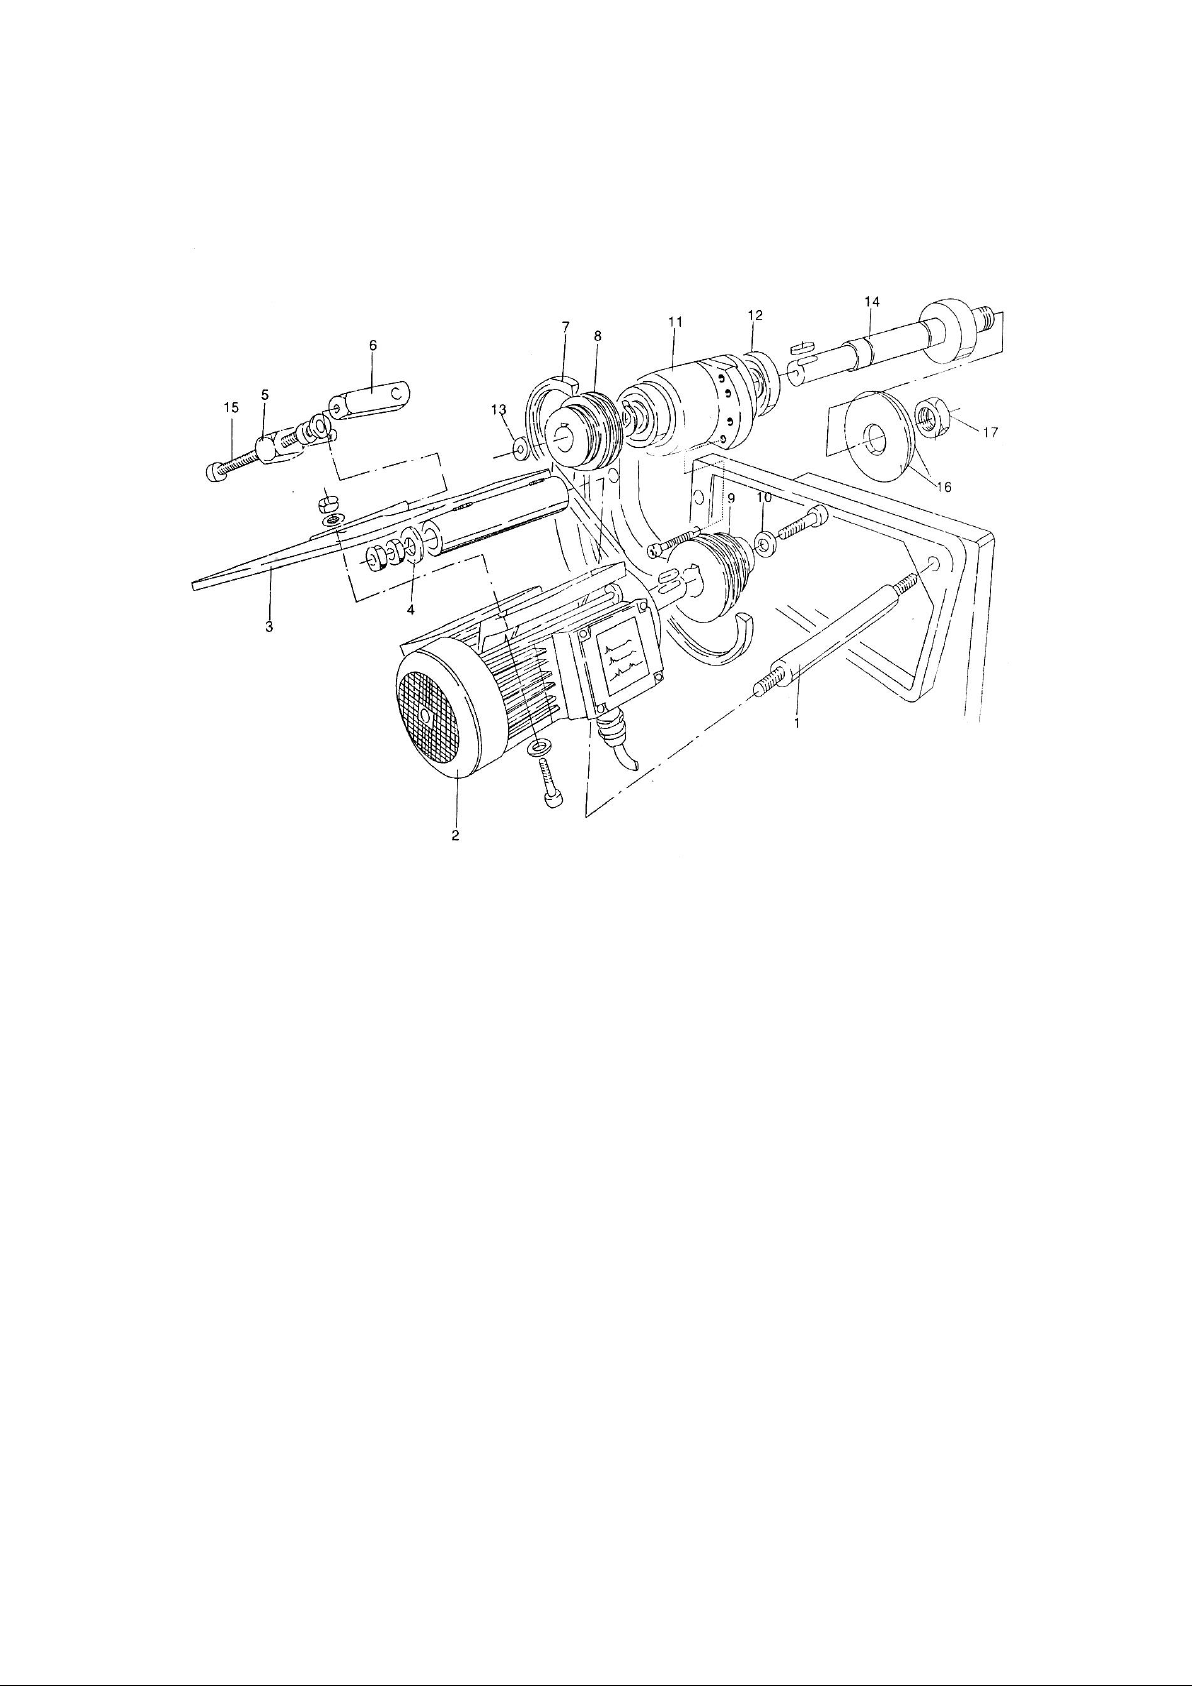
2. Main Saw
1. Motor Base Spindle
2. Motor
3. Motor Base
4. Cushion
5. Connection Board
6. Adjusting Sheath
7. Triangular Belt
8. Main Spindle Wheel
9. Motor Wheel
10. Pressure Cushion
11. Main Spindle Sheath
12. Bearing
13. Pressure Cushion
14. Main Spindle
15. Adjusting Screw
16. Saw Nip Plate
17. Nut

17
3. Auxiliary Saw
16. Inching handle
17. Lock nut
18. Fixed Sheath
20. Fixed Base
21. Feeding Block
22. Bolt
23. Scorning Saw Turning Base
24. Spring
25. Oriented Spindle
26. Motor Base
27. Nut
28. Pressure Cushion
29. Scoring Saw Spindle
30. Bearing
31. Scoring Saw Sheath
32. Bearing
33. Sheath
34. Driving Belt
35. Scoring SawWheel
36. Pressure Cushion
37. Motor Wheel
38. Pressure Cushion
39. Motor
40. TorsionSpring

18
4. Machine Body & Turning Arm
1. Machine Body
2. Door Cover
3. Bolt
4. Angle Adjusting Handle
5. Board Base
6. Operation Button
7. Nut
8. Sheath
9. Nut
10.Eccentric Spindle
11. Adjusting Spindle
12. Hair Brush
13. Stop Head
14. Roll Wheel
15. Bearing
16. Bearing
17. Spindle of Turning Arm
18. Hair Brush
19. The Pipe of Turning Arm
20. Lug
Table of contents
Popular Power Tools manuals by other brands

Axminster Trade
Axminster Trade AT150SP manual

Woodstock
Woodstock SHOP FOX W1667 owner's manual

Ingersoll-Rand
Ingersoll-Rand 1100PS4-EU instructions

Slime
Slime 40051 instructions

Swarts Tools
Swarts Tools SW2000 Instruction booklet and warranty information

Challenge
Challenge PADDY WAGON Instructions and parts manual

Meister
Meister MAS18W Translation of the original instructions

norbar
norbar EVOTORQUE 2 Quick reference guide

Grizzly
Grizzly H8118 instruction sheet

Worx
Worx Maker X WX743 Safety and operating manual original instructions

Milwaukee
Milwaukee M12 CHZ Original instructions

Scheer
Scheer HM 4 Maintenance manual


