manuals.online logo
Brands
  1. Home
  2. •
  3. Brands
  4. •
  5. SKF
  6. •
  7. Switch
  8. •
  9. SKF 234-11145-3 User manual

SKF 234-11145-3 User manual

www.skf.com/lubrication 1English
Installation
Notice
Operate the pressure switch within the specified
technical data only. The pressure switch must
not be exposed to high temperatures or rapid
pressure increases.
Do not touch the membrane of the flush-
mounted sensor: it can tear or become defor-
med.
– Always depressurize and disconnect pressure switches
from the power supply before mounting.
– Observe the following when mounting outdoors or in a
damp environment:
Select a mounting location that allows splash and
condensation water to drain away. Fluids must not be
allowed to accumulate on sealing surfaces.
Connect the device to the power supply immediately
after mounting to prevent moisture from entering the
connector. Otherwise fit a suitable protective cap to
prevent the ingress of moisture. The protection class
specified on the data sheet only applies if the device is
connected.
If there is a danger of damage from lightning strikes or
overvoltage, mount an overvoltage protection between
the power supply unit or switch cabinet and the
device.
– In hydraulic systems, position the device in such way
that the pressure connection faces upwards (venting).
– Mount the device in a location protected from direct
sunlight. Sunlight may affect the functionality of the
device or damage it.
– When installing devices with relative reference in the
housing (small bore next to the electrical connection),
make sure that the relative reference required for the
measurement is protected against dirt and moisture. If
the device is exposed to fluids, the relative reference
blocks the air pressure compensator. Accurate meas-
urements are not possible when this happens. And
there may also occur material damage to the device.
– No mechanical tension should be placed on the pres-
sure connection during installation as this may displace
the characteristic curve. This applies in particular to
extremely small pressure ranges and devices with a
plastic pressure connection.
Intended use
The pressure switches were designed to monitor the
pressure of lubricants compatible with stainless steel,
ceramics and fluoroelastomers (FKM). Depending on the
type of device and the mechanical connection the pressure
switches are suitable for the most different fields of appli-
cation.
The pressure switch is installed in a machine or integrated
into a system. Proper functioning in accordance with the
specifications in the technical data is ensured only when
original SKF accessories are used. Using other compo-
nents will void the warranty.
Modifications to the pressure switch or non-approved use
are not admissible and will result in a loss of warranty and
void any liability claims against the manufacturer.
Safety instructions
Carefully read the operating instructions prior to
integrating/commissioning the pressure swit-
ches.
These pressure switches must not be used in
applications in which the safety of persons is
dependent on the function of the device (not a
safety component according to EC Machinery
Directive).
Installation and start-up are to be performed only by
trained specialists.
The operator is responsible for ensuring that local safety
regulations are observed.
In particular, the operator must take measures to ensure
that a defect in the object detection systems will not result
in hazards to persons or equipment.
In case of defects or a failure that cannot be remedied,
take the pressure switch out of service and secure it
against unauthorized use.
Downloading the operating instructions
These operating instructions are also available on the
Internet at www.skf.com/lubrication
Validity
These instructions apply to the following pressure switches:
– 234-11145-3; 234-11145-4; 234-11145-5
– 234-11145-9
Standard High-End
High-End
Flush-Mounted
EU directives: 2014/30/EU (EMC); 2011/65/EU (RoHS II)
Standards: EN 61000-6-4:2011 (emission), EN 61000-6-2:2006 (interference resistance); EN 50581:2013
Emission tests: Radio noise emission EN 55011:2016 Group 1, classes A and B
Standard, High-End and High-End Flush-Mounted Pressure Switches
2English
Installation of connections according to EN 3852
Make sure that:
– the sealing surface on the relevant part is perfectly
clean and free of residues,
– the O-ring seated in the slot provided is undamaged.
1. Screw the device into the mounting thread by hand.
Secure devices to the steel pressure connection using
a flat spanner SW 27. Observe the following tightening
torques:
Installation
Fig. 2: Electrical connection and process connection
Adapter for process
connection
Tightening
torques
Connection
according
to EN 3852
Connec-
tion accor-
ding to EN
837
Connection
NPT
1/4" approx. 5
Nm
approx. 20
Nm
approx. 30
Nm
1/2" approx. 10
Nm
approx. 50
Nm
approx. 70
Nm
Fig. 3: Display and connection housing rotatable 320°
Fig. 4: Process connection for the flush-mounted pressure switch
(G1/2" acc. to EN 3852)
Factory-set
connection G1/2"
Fluid
Flush-mounted
pressure switch
Important notes for installation of flush-mounted
pressure switches
Notice
Handle the unprotected membrane with the
utmost care: it can be easily damaged.
– Do not remove the packaging and protective cap until
shortly before installation, so that the membrane
remains undamaged. Retain the protective cap.
– After disassembly, place the protective cap back over
the membrane immediately.
– Do not use force when installing the sensor, so as not
to cause damage to the device or the system.
Membrane
Fig. 1: Unprotected membrane of the flush-mounted sensor
Standard, High-End and High-End Flush-Mounted Pressure Switches
www.skf.com/lubrication 3English
Display and connection housing
rotatable 320°
Fig. 5: Dimensional drawing of standard and high-end pressure switches, not flush-mounted
(as of 100 bar)
Process connection
acc. to EN 3852
Dimensional drawings
Fig. 7: Dimensional drawing of flush-mounted pressure switches, 100 bar or higher
Adapter for process connection G1/4"
BSP pressure switches can be adapted to different pro-
cess connections using optional adapters (accessories).
The adapters must be ordered separately.
Adapters for other process connections are available on
request.
Adapter G1/4" acc. to EN
3852
Stainless steel
Connection:
- Pressure switch end: G1/4"
- Process end: G1/4"
Torque approx. 5 Nm
Standard, High-End and High-End Flush-Mounted Pressure Switches
4English
Establish the electrical connection to device according to
the specifications indicated on the type identification plate,
the pin assignment table below and the wiring diagram.
Notice
Always depressurize and disconnect pressure
switches from the power supply before esta-
blishing an electrical connection.
Fig. 9: Pressure switch diagram with analogous output
Fig. 8: Pressure switch diagram with 2 switching outputs
Electrical connections
Connector housing
Electrical
connections
Pressure swit-
ches with swit-
ching output
Pressure swit-
ches with analo-
gous output
Supply + 1
1
Supply – 3 3
Signal + 2
Switching output
1
4 4
Switching output
2
2
Shield Connector
housing
Connector
housing
Standard, High-End and High-End Flush-Mounted Pressure Switches
www.skf.com/lubrication 5English
LED status in the standard mode
Green
LED
on
Switch point 1 reached, active switching
output
off Switch point not reached
Yellow
LED
on
Switch point 2 reached, active switching
output
off Switch point not reached
Key functions
Press briefly
Scroll from menu 1 to menu 5, then
return to display
Press and
hold
Count up parameter values
quickly
Select a menu item within a menu
Accept selected parameter and
return to the current menu item
Press both
keys simul-
taneously
Return to the display
The pressure switch is configured according to VDMA
standards.
Display and operating elements
1. Four LEDs to display the units
2. Green LED Out 1: Status indicator for switching output
1
3. Yellow LED Out 2: Status indicator for switching output
2
4. Seven-segment display for measured values and
parameters
5. Key for navigating within a menu
6. Key for navigating from menu to menu
Adjustable hysteresis
The difference between the switch point (SP) and return
point (RP) is known as hysteresis. On electronic pressure
switches, any hysteresis can be selected within the mea-
suring range.
Hysteresis function The hysteresis keeps the switching
status of the outputs stable, even if the system pressure
fluctuates either side of the setpoint value. The output is
activated when the system pressure rises and the relevant
switch point (SP) is reached. The output is deactivated
when the pressure decreases again and the return point
(RP) is reached.
Adjustable window
The output function is activated when the measured value
falls between the preset switch and return point.
Window function: The range between a defined lower
pressure limit and a defined upper limit is known as a
window. A switching operation is initiated as soon as the
upper or lower limit of the programmed pressure range is
exceeded.
Adjustable delay time
Delay times can reliably filter out undesired pressure peaks
that occur momentarily. The status of the switching output
does not change immediately after the switching event
occurs, but only once a determined preselectable delay
time has elapsed (0...50 s). If the switching event no longer
exists by the time the delay has elapsed, the switching
output does not change either.
Fig. 10: Hysteresis function
Fig. 11: Window function
Fig. 12: Delay function
Standard, High-End and High-End Flush-Mounted Pressure Switches
6English
Legend
*Menus marked with an
asterisk do not appear if the
pressure switch has an analo-
gous output.
Operating instructions
1.Open menu 1 by pressing
the key.
2.Press the key to display
the values for switch point
1. The selected value
flashes.
3.Press the key to select a
value. Press the key to
confirm the selected value
and return to menu 1.
4.Press the key to open
the next menu and adjust
the value as described
under points 2 and 3.
5.Open menu 5 by pressing
the key.
6.Press the key to open
the first submenu 5:1 and
adjust the value as descri-
bed under points 2 and 3.
Note
If no keys are pressed for 60
seconds, the program returns
to the display without saving
the modified value.
Display mode
PW = 0000
Password prompt
PW ≠0000
Programming mode
Menu 1
SP1/FH1
Switch point 1
SP 1
FH 1 Value
e.g. 0...100 bar
Menu 2
RP1/FL1
Return point 1
Value
e.g. 0...99 bar
Menu 3
SP2/FH2
Switch point 2
Value
e.g. 0...100 bar
Menu 4
RP2/FL2
Return point 2
Value
e.g. 0...99 bar
Menu 5:1
Reset YES/NO
Value
e.g. 0...50 s
Value
e.g. 0...50 s
Value
e.g. 0...50 s
Value
e.g. 0...50 s
Value
e.g. 0000...9999
(0000 = no password)
XXXX
Parameters
Hno, Hnc, Fno, Fnc
Parameters
Hno, Hnc, Fno, Fnc
Parameters
bar, mbar, PSI, MPa
Execute
Display
Display
Execute
Menu 5:5
Return-switching delay 2
Menu 5:9
Rotate display 180°
Menu 5:3
Return-switching delay 1
Menu 5:7
Output 2
Menu 5:11
Max. value
Menu 5:2
Turn-on delay 1
Menu 5:6
Output 1
Menu 5:10
Min. value
Menu 5:4
Turn-on delay 2
Menu 5:8
Unit selection
Menu 5:12
Delete Min./ Max. value
Menu 5:13
Access protection
Menu 5
EF
Extended functions
SP 2
FH 2
EF rES
dr 2
FLiP
dr 1
ou 2
Hi
dS 1
ou 1
lo
dS 2
uni
----
codE
*
*
*
*
*
Menu
rP 1
FL 1
rP 2
FL 2
Standard, High-End and High-End Flush-Mounted Pressure Switches
www.skf.com/lubrication 7English
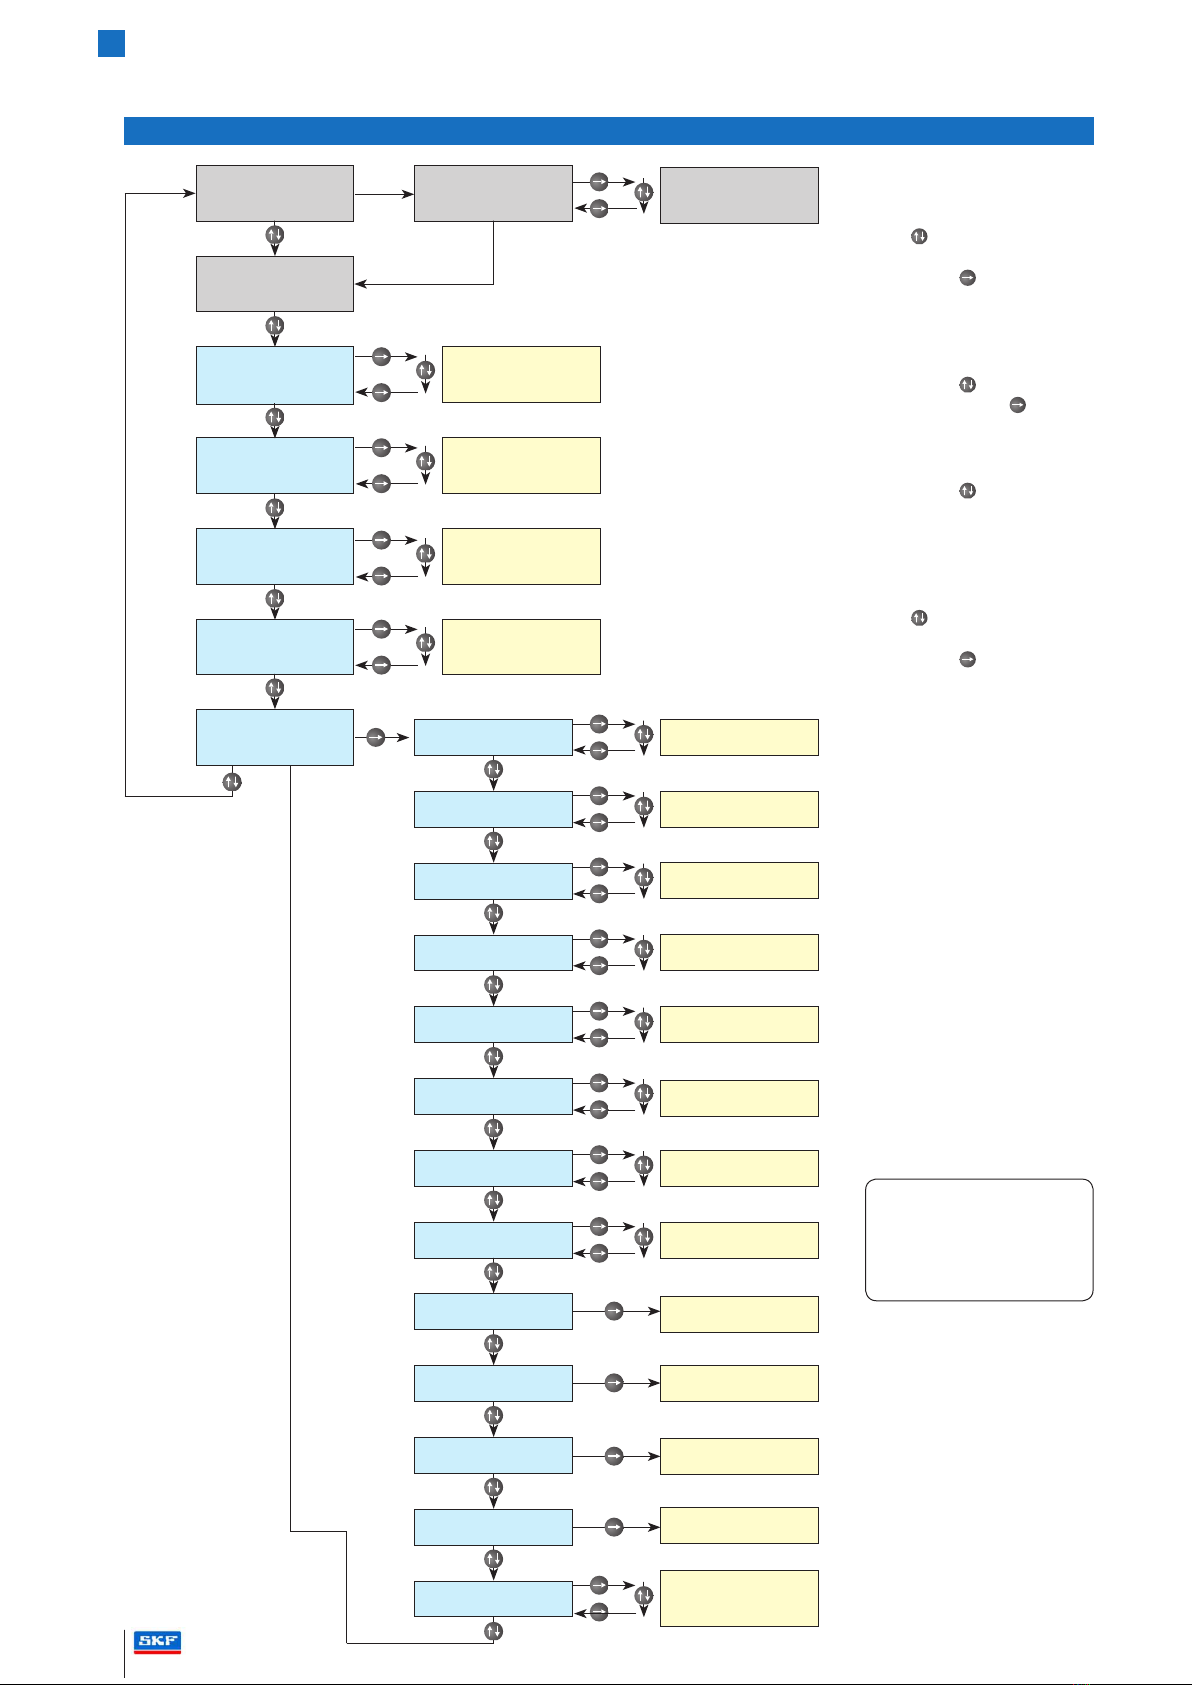
Menu functions for pressure switches with 2 switch points
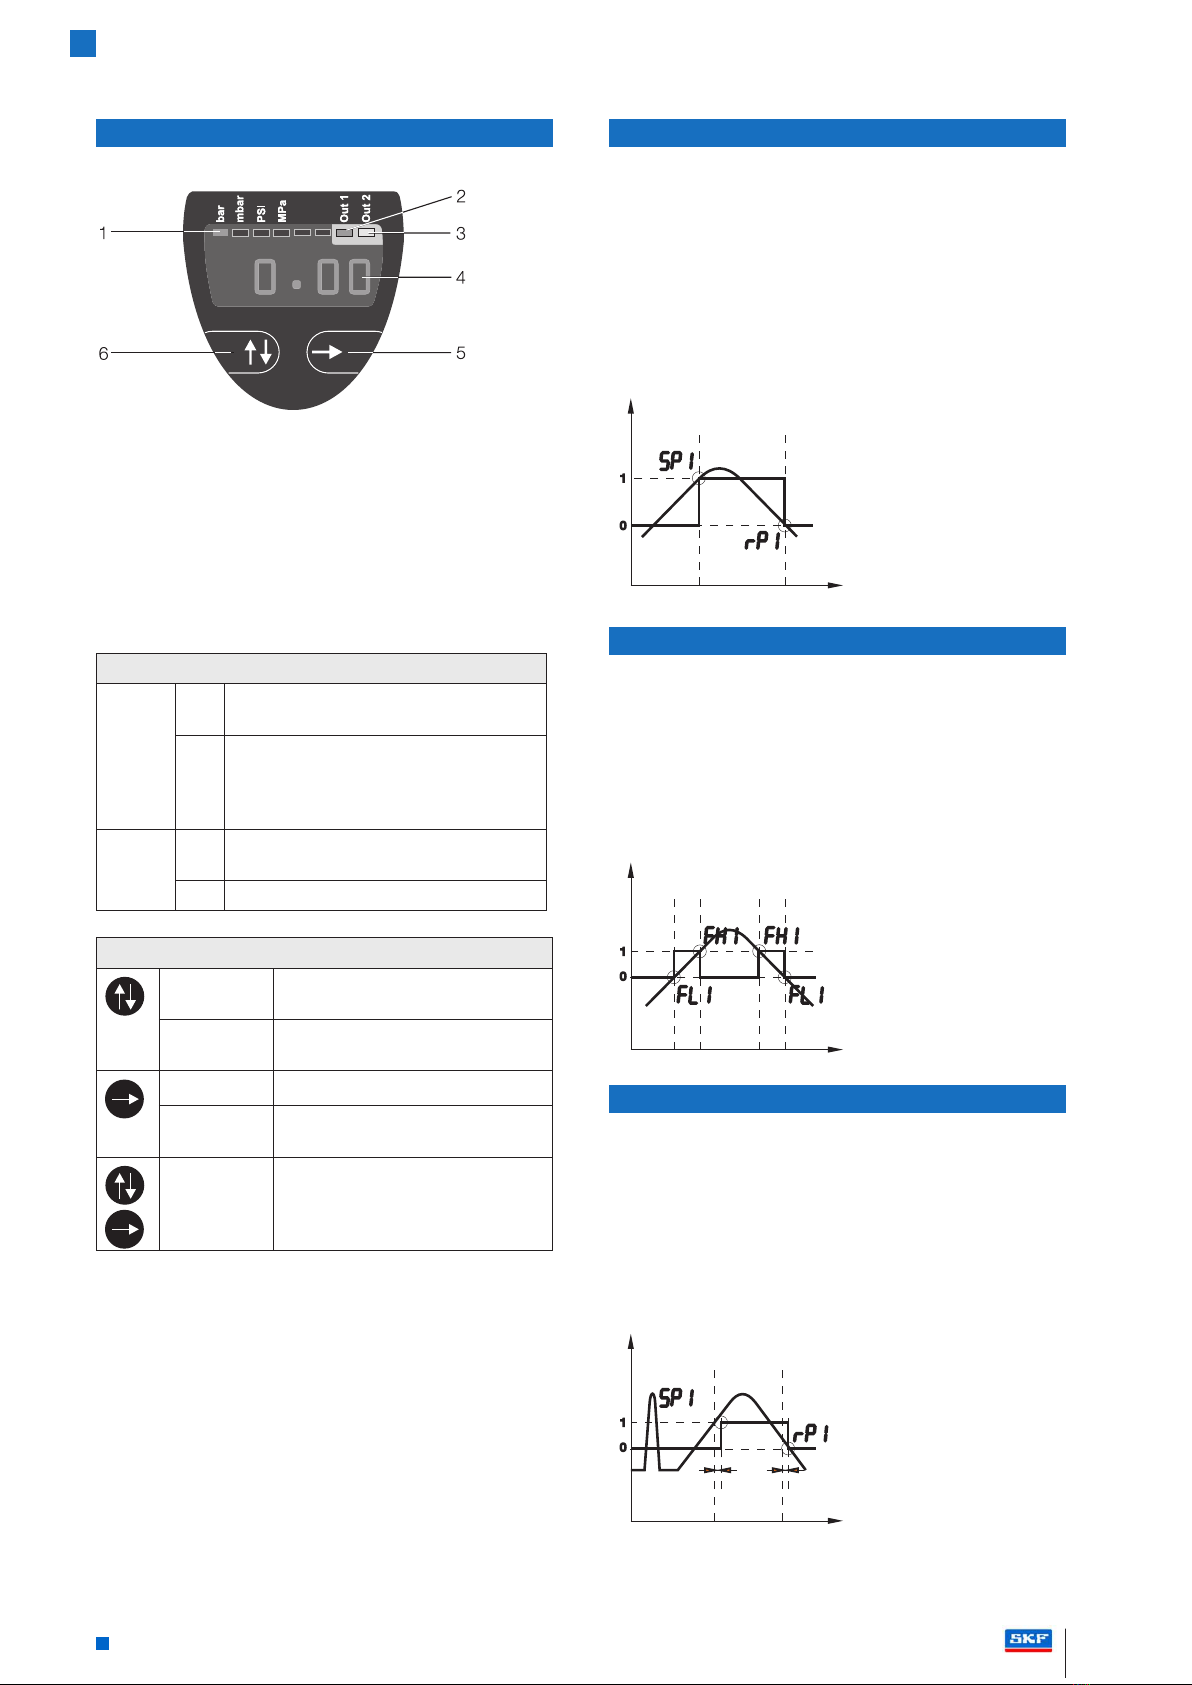
First menu level
SP 1
FH 1
Menu 1 – Setting for switch point 1, setting for
the relevant value from which switch point 1
shall be activated.
If the window function in menu 5:6 is activated,
the value for switch point 1 represents the
upper pressure limit in the window (FH).
rP 1
FL 1
Menu 2 – Setting for return switch point 1,
setting for the relevant value from which return
point 1 shall be activated.
If the window function in menu 5:6 is activated,
the return value for switch point 1
represents the
lower pressure limit in the window (FL).
SP 2
FH 2
Menu 3* – Setting for switch point 2, setting for
the relevant value from which switch point 2
shall be activated.
If the window function in menu 5:7 is activated,
the value for switch point 2 represents the
upper pressure limit in the window.
rP 2
FL 2
Menu 4 – Setting for return switch point 2,
setting for the relevant value from which return
switch point 2 shall be activated.
If the window function in menu 5:7 is activated,
the value for switch point 2 represents the
upper pressure limit in the window.
EF Menu 5 – Extended functions
Second menu level
rES Menu 5:1 – Reset
Restores all adjustable parameters to their
default settings and deletes the Min. and Max.
values,
dS 1 Menu 5:2 – Switching delay time 1
Setting for the value of switching delay time 1,
which starts after switch point 1 is reached
(time range 0...50 seconds)
dr 1 Menu 5:3 – Return switching delay time 1
Setting for the value of return switching delay
time 1, which starts after return switch point 1
is reached (time range 0...50 seconds)
dS 2 Menu 5:4*– Switching delay time 2
Setting for the value of switching delay time 2,
which starts after switch point 2 is reached
(time range 0...50 seconds)
dr 2 Menu 5:5*– Return switching delay time 2
Setting for the value of return switching delay
time 2, which starts after return switch point 2
is reached (time range 0...50 seconds)
ou 1 Menu 5:6 – Output 1
Switching function of the switching output:
Hno = Hysteresis function, NO contact
Hnc = Hysteresis function, NC contact
Fno = Window function, NO contact
Fnc = Window function, NC contact
Menu functions (continued)
Second menu level (continued)
ou 2 Menu 5:7*– Output 2
Switching function of the switching output:
Hno = Hysteresis function, NO contact
Hnc = Hysteresis function, NC contact
Fno = Window function, NO contact
Fnc = Window function, NC contact
uni Menu 5:8 Change units
Selection of physical unit of measurement for
displayed and preset pressure values:
bAr = bar,
nnBa = mbar,
PSi = PSI,
mPA = MPa
FLiP Menu 5:9 – Rotate display
Rotate the display 180°
lo Menu 5:10 - Min value
Display of minimum pressure attained during
the measurement (the value is lost when the
power supply is interrupted)
Hi Menu 05:11 - Max value
Display of maximum pressure attained during
the measurement (the value is lost when the
power supply is interrupted)
--- Menu 5:12 – Deletion of Min and Max values
The display confirms that the process for
deleting the values has started
codE Menu 5:13 – Access protection
Setting the password for protecting access to
the menu
0000 = no password
0000...9999 adjustable
Legend
*Menus marked with an
asterisk do not appear if the
pressure switch has an analo-
gous output.
Standard, High-End and High-End Flush-Mounted Pressure Switches
8English
Overview of adjustable parameters
Menu item Description Factory setting Own setting
Menu 1
SP1 / FH1
Switch point 1/
FH 1
80 %
of the nominal pressure
Menu 2
rP1 / FL1
Return switch point 1/
FL 1
75 %
of the nominal pressure
Menu 3
SP2 / FH2
Switch point 2/
FH 2
80 %
of the nominal pressure
Menu 4
rP2 / FL2
Return switch point 2/
FL 2
75 %
of the nominal pressure
Menu 5:2
dS1
Switching
Delay time 1
0 seconds
Menu 5:3
dr1
Return switching
delay time 1
0 seconds
Menu 5:4
dS2
Switching
delay time 1
0 seconds
Menu 5:5
dr2
Return switching
delay time 1
0 seconds
Menu 5:6
ou1
Switching function
Output 1
Hno
Menu 5:7
ou2
Switching function
Output 2
Hno
Menu 5:8
uni
Units bar
Menu 5:13
code
Password 0000
Maintenance
Incorrect cleaning can cause irreparable
damage of the measuring cell.
Therefore never use pointed objects or com-
pressed air to clean the membrane.
In principle, the device is maintenance free. If required, the
housing can be cleaned with a damp cloth and mild
cleaning solution provided the device is switched off.
The membrane may become covered with deposits and
contamination, depending on the measuring material. If a
contamination of the material is known, the operator must
define appropriate cleaning intervals. When the device is
decommissioned correctly, the membrane can be cleaned
carefully with a mild cleaning solution and a soft brush or
sponge.
Decommissioning
The measuring material may pose a risk to the
operator. Therefore always take appropriate
protective measures.
Always depressurize and disconnect the device from the
power supply before removing. Before removing check
whether material must be drained first.
Disposal
Residual material on the device may pose a risk
to the operator and a danger to the environ-
ment. Therefore always take appropriate protec-
tive measures and dispose of the device cor-
rectly.
The device must be disposed of according to European
Directive WEEE 2012/19/EU (Waste Electrical and Electro-
nic Equipment). Waste equipment must be disposed of
separately from domestic waste!
Standard, High-End and High-End Flush-Mounted Pressure Switches
www.skf.com/lubrication 9English
Electrical data
Operating voltage UB18...36 V DC
Output current max 500 mA
No-load supply current I0max ≤50 mA
Reverse polarity protected Ja
Short-circuit proof Ja
Switching frequency f 200 Hz
Accuracy according to IEC
60770
≤±0,5 % FSO BFSL
Temperature error
Standard, High-End and
Flush-mounted 100 bar or
higher
frontbündig bis 50 bar
≤±0,3 % FSO/10 K.
≤±0,15 % FSO/10 K.
Mechanical data
Housing material
Standard pressure switches
High-end pressure switches
PA 6.6, stainless steel
Stainless steel
Measuring cell material Ceramic
Sealing ring material Fluoroelastomer
Connection of connector M12, 4-pin
Process connection
BSP Standard, High-end
BSP High-End Flush-mounted
G1/4", 1/4" NPT
G1/2" flush-mounted
Displays
Function indicators LEDs
Display 7-segment display
Ambient conditions
Ambient temperature range
Standard pressure switches
High-end pressure switches
–25...+85 °C
–40...+85 °C
Material temperature
Standard pressure switches
High-end pressure switches
–25...+125 °C
–40...+125 °C
Type of protection as per IEC
60529
IP 67 when connected
Technical data
Pressure data
Pressure switch 0 - 600 bar
Not flush-
mounted
Flush-
mounted
Rel. nominal pressure 600 bar 600 bar
Overload pressure 750 bar 750 bar
Burst pressure 800 bar 1200 bar
Permitted negative
pressure vacuum-proof
Pressure switch 0 - 400 bar (part no.: 234-11145-5)
Not flush-
mounted
Flush-
mounted
Rel. nominal pressure 400 bar 400 bar
Overload pressure 650 bar 650 bar
Burst pressure 700 bar 1000 bar
Permitted negative
pressure vacuum-proof
Your type of pressure switch
The type identification plate contains the exact designa-
tion and most important technical data so that the device
can be identified clearly.
SKF
www.skf.com/lubrication 234-11145-X
xxxxxxxxxxx
Part number
Electrical connec-
tions
Nominal
pressure
Standard, High-End and High-End Flush-Mounted Pressure Switches
10 English
SKF Lubrication Systems Germany GmbH
Motzener Straße 35/37
12277 Berlin
Deutschland
Tel: +49 (0) 30 72002-0
Fax: +49 (0) 30 72002-111
[email protected]
nwww.skf.com
SKF Lubrication Systems Germany GmbH
2. Industriestraße 4
68766 Hockenheim
Deutschland
Tel: +49 (0) 6205 27-0
Fax: +49 (0) 6205 27-101
[email protected]
nwww.skf.com
SKF Lubrication Systems Germany GmbH
Heinrich-Hertz-Str. 2-8
69190 Walldorf
Deutschland
Tel: +49 (0) 6227 33-0
Fax: +49 (0) 6227 33-259
[email protected]
nwww.skf.com
951-181-018-EN | Version 01 | Status of information: 2017-02-14
Ordering information
Part number / order number Version
234-11145-3 Standard, incl. adapter G1/4" internal thread to
G1/4" external thread with M12 socket 90°
234-11145-4 Standard G1/4" internal thread without socket
234-11145-5 High-end flush-mounted G1/2" external thread
without socket
234-11145-9 Standard incl. adapter G1/4" internal thread to
G3/8” and M12 socket 90°
Standard, High-End and High-End Flush-Mounted Pressure Switches

This manual suits for next models

3

Other SKF Switch manuals

SKF ST Series User manual

SKF

SKF ST Series User manual

SKF ST User manual

SKF

SKF ST User manual

Popular Switch manuals by other brands

Broadcast Devices AES-200 Technical reference manual

Broadcast Devices

Broadcast Devices AES-200 Technical reference manual

NETGEAR FS308 - Switch installation guide

NETGEAR

NETGEAR FS308 - Switch installation guide

D-Link DGS-1024D G2 user manual

D-Link

D-Link DGS-1024D G2 user manual

Myson Touch 2 WiFi Leaflet

Myson

Myson Touch 2 WiFi Leaflet

NETGEAR GS605AV datasheet

NETGEAR

NETGEAR GS605AV datasheet

Hama Premium Silver USB 2.0 Hub 1:4 Operating	 instruction

Hama

Hama Premium Silver USB 2.0 Hub 1:4 Operating instruction

prophecy Gofanco PRO-KVMaud2P user guide

prophecy

prophecy Gofanco PRO-KVMaud2P user guide

BT Mini Hub user guide

BT

BT Mini Hub user guide

Edimax EU-HB4S Specification sheet

Edimax

Edimax EU-HB4S Specification sheet

Cisco Nexus 93108TC-FX3P Hardware installation guide

Cisco

Cisco Nexus 93108TC-FX3P Hardware installation guide

Elko RFSA-62B manual

Elko

Elko RFSA-62B manual

Potter PAD100-DRTS installation manual

Potter

Potter PAD100-DRTS installation manual

NETGEAR GS748Tv4 installation guide

NETGEAR

NETGEAR GS748Tv4 installation guide

Aeon Labs Aeotec Micro Smart Energy Switch G2 manual

Aeon Labs

Aeon Labs Aeotec Micro Smart Energy Switch G2 manual

StarTech.com DS81000 Instruction guide

StarTech.com

StarTech.com DS81000 Instruction guide

Broadcast Pix Slate 3000 Series Installation planning guide

Broadcast Pix

Broadcast Pix Slate 3000 Series Installation planning guide

Tyco Electronics 8 Port 10/100Mbit/s Ethernet Smart Switch with Fibre... Product user guide

Tyco Electronics

Tyco Electronics 8 Port 10/100Mbit/s Ethernet Smart Switch with Fibre... Product user guide

ATEN KN1132VB Series user manual

ATEN

ATEN KN1132VB Series user manual

manuals.online logo
manuals.online logoBrands
  • About & Mission
  • Contact us
  • Privacy Policy
  • Terms and Conditions

Copyright 2025 Manuals.Online. All Rights Reserved.