Skid Steer SKID-SICKLE User manual

14/25/2006 Revision 1 Page 1 of 12
Installation Instructions &
Operators Manual

14/25/2006 Revision 1 Page 2 of 12
1: INTRODUCTION
Congratulations on choosing a Skid Steer Solutions Skid Sickle, Sickle Bar Mower. This mower has been
designed to be a cost effective way to side mow vegetation less than 2 inches in diameter.
Read this Operator’s Manual over carefully before operating or maintenance is performed on the double
bar mower.
Become knowledgeable in Safety, Operation, Maintenance and Trouble Shooting information. This
information is provided to ensure safe, trouble free operation and maintenance of the Skid Sickle.
2: SAFETY
This Safety Alert symbol means BE ALERT! ATTENTION! YOUR SAFETY IS INVOLVED!
This Safety Alert symbol is used throughout this Manual and on decals on your mower. When you see
this symbol become alert to safety information and adhere to it to prevent injury or death.
SIGNAL WORDS
There are signal words that are used in conjunction with the safety alert symbol; these signal words have
been selected using the following guidelines:
DANGER – An immediate and specific hazard WILL result in severe personal injury or death if
the proper precautions are not taken.
WARNING – A specific hazard or unsafe practice which COULD result in severe personal injury
or death if proper precautions are not taken.
CAUTION – Unsafe practices which could result in personal injury if proper practices are not
taken, or as a reminder of good safety practices.
You as the owner of a Skid Steer Solutions, Skid Sickle are responsible for its safe operation and
maintenance. You need to make sure anyone working with, maintaining or working around the mower is
familiar with the operation and maintenance of the unit. Be alert, know all safety information in this
manual and adhere to safety practices at all times.
Remember a safe operator is the key to avoiding most accidents. Most accidents can be avoided by –
THINKING SAFETY AND WORKING SAFELY.

14/25/2006 Revision 1 Page 3 of 12
2.1 GENERAL SAFETY
1. Read, study and understand your Operator’s Manual. Understand all safety symbols before
operating or maintaining the mower.
2. Never operate this machine in an area with people present.
3. After maintaining or adjusting, make sure all tools and foreign objects are removed.
4. Review all safety rules with all operators just prior to when the season starts.
5. Use only Skid Steers equipped with a roll over protection system (ROPS) and fasten your seat belt
before operation.
6. Stop Skid Steer, set park brake and remove the key from ignition. Make sure all moving parts have
been stopped before dismounting your Skid Steer for any reason.
7. Make sure all guards and shields are properly installed and secure.
2.2 OPERATION SAFETY
1. Read and understand the Operator’s Manual and all safety signs before operating, servicing,
adjusting or unplugging.
2. Do not allow riders on the mower or Skid Steer during field operation or transport.
3. Install and secure all guards and shields before starting and operating.
4. Do not operate a PTO driven system unless the required guards and shields are in place and
secured.
5. Never wear ill-fitting, baggy or frayed clothing when working around or on any of the drive system
components.
6. Keep hands, feet, hair and clothing away from all moving and/or rotating parts.
7. Never operate the machine inside a closed building.
8. Stop Skid Steer engine, place hydraulic controls in neutral, set park brake, remove ignition key and
wait for all moving parts to stop before servicing, adjusting, repairing or unplugging.
9. Ensure that all Skid Steer controls are in neutral before starting.
10. Clear the area of all bystanders, especially children, before starting.
11. Be careful when working around or maintaining a high-pressure hydraulic system. Wear proper eye
and hand protection when searching for a high-pressure leak. Use a piece of wood or cardboard as a
backstop when searching for a pin hole leak in a hose or line.
12. Before applying pressure to the hydraulic system, make sure all components are tight and that steel
lines, hoses and couplings are not damaged.
13. Take care when working on steep ground, particularly when turning, and especially with mounted
mowers.
14. Stay away from overhead obstructions and power lines during set-up and operation. Electrocution
can occur without direct contact.
15. Review all safety instructions annually.
2.3 MAINTENANCE SAFETY
1. Review the Operator’s Manual and all related Maintenance, Operating and SAFETY information
annually with all personnel who will be working with, maintaining or operating the Mower.
2. Stop Skid Steer engine, disengage PTO clutch, place hydraulic controls in neutral, set park brake,
remove ignition key and wait for all moving parts to stop before servicing, adjusting, repairing or
unplugging.
3. Be careful when working around or maintaining high-pressure hydraulic systems. Wear proper eye
and hand protection when searching for a high-pressure hydraulic leak. Use a piece of wood or
cardboard as a backstop when searching for a pin hole leak in a hose or steel line.
4. Before applying pressure to a hydraulic system, make sure all components are tight and that steel
lines, hoses and couplings are not damaged.
5. Seek immediate medical attention if a high-pressure concentrated stream of hydraulic fluid pierces
the skin, as a toxic reaction and infection could develop.
6. Keep hands, feet, clothing and hair away from all moving and/or rotating parts.
7. Never wear ill-fitting, baggy or frayed clothing when working around or on any of the drive system
components.
8. Wear protective gloves when changing or performing maintenance on the knife (sickle).
9. Make sure that all guards and shields are properly installed and secured before operating the Mower.
10. Clear the area of all bystanders, especially children, when carrying out any maintenance or making
adjustments on the systems components.

14/25/2006 Revision 1 Page 4 of 12
11. Place stands or blocks under the frame before working beneath the mower. Heavy parts may also
need supporting, for example, support axles when changing wheel bearings.
12. Lower bars to ground before servicing, adjusting or repairing the machine.
Think SAFETY! Work SAFELY!
2.4 HYDRAULIC SAFETY
1. Always place all Skid Steer hydraulic controls in neutral before dismounting.
2. Make sure that all components in the hydraulic system are kept in good condition and are clean.
3. Replace any worn, cut, abraded, flattened or crimped hoses and metal lines.
4. Do not attempt any makeshift repairs to the hydraulic lines, fittings or hoses by using tape, clamps or
cements. The hydraulic system operates under extremely high-pressure. Such repairs will fail
suddenly and create a hazardous and unsafe condition.
5. Wear proper hand and eye protection when searching for a high-pressure hydraulic leak. Use a
piece of wood or cardboard as a backstop instead of hands to isolate and identify a leak.
6. If injured by a concentrated high-pressure stream of hydraulic fluid, seek medical attention
immediately. Serious infection or toxic reaction can develop from hydraulic fluid piercing the skin
surface.
7. Before applying pressure to the system, make sure all components are tight and that lines, hoses and
couplings are not damaged.
Think SAFETY! Work SAFELY!
2.5 TRANSPORT SAFETY
1. Read and understand ALL the information in the Operator’s Manual regarding procedures and
SAFETY when operating the Mower in the field or on the road.
2. Make sure the SMV (Slow Moving Vehicle) emblem and all the lights and reflectors that are required
by the local highway and transport authorities are in place, are clean and can be seen clearly by all
overtaking and oncoming traffic.
3. Do not allow riders on any parts of the machine during either field operation or road and highway
travel.
4. Attach the mower to the Skid Steer using the skid mounting plate. Always use warning flashers
(hazard) on the Skid Steer when transporting unless prohibited by law.
5. Always position mower in transport mode to narrow mower up as much as possible. Be aware, the
mower is 7 + feet wide when in transport mode.
2.6 STORAGE SAFETY
1. Store unit in an area away from human activity.
2. Do not permit children to play around the stored unit.
3. Make sure bar is either lowered to the ground or secured with the bar stay rod in the up position.
4. Lower the hydraulic cylinder to its down position.

14/25/2006 Revision 1 Page 5 of 12
2.7 TIRE SAFETY
1. Failure to follow proper procedures when mounting a tire on a wheel or rim can produce an explosion,
which may result in serious injury or death.
2. Do not attempt to mount a tire unless you have the proper equipment and experience to do the job.
3. Have a qualified tire dealer or repair service perform required tire maintenance.
4. Avoid changing a tire where traffic is moving. An unobservant motorist could hit you.
2.8 SAFETY DECALS
1. Be sure to keep safety decals clean and legible.
2. Safety decals that are missing or illegible should be replaced immediately.
3. Safety decals are available at your Skid Steer Solutions dealer parts department.
2.9 SIGN-OFF FORM
Skid Steer Solutions feels that all people who own or operate the Mower need to read and clearly
understand all safety operating and maintenance information present in this manual.
Before season start up, it is very important that everyone review this information to re-familiarize them
selves with the information.
It is a good idea to review owners and operators manuals on all your equipment with your employees
annually. This keeps safety in the minds of your employees at all times.
Below is a sign-off sheet for owners and employees who will be operating and maintaining the equipment.
This provides you a record that the owner’s manual has been read and understood.
DATE EMPLOYEE SIGNATURE EMPLOYEE SIGNATURE

14/25/2006 Revision 1 Page 6 of 12
3: OPERATION
3.1 INTRODUCTION
The Skid-Sickle was designed to side mow brush material the most efficient and economical way
possible. Many features present in the Skid-Sickle were suggestions by our customers. We encourage
further suggestions to better serve you, the customer. The Owner’s Manual is designed to help you be a
safe and knowledgeable operator of this mower. With proper maintenance your Skid-Sickle will provide
many years of trouble free service. For sake of discussion in this manual, machine orientation will be as
follows-right hand, left hand, and forward designations are those related to the operator when in operating
position.
3.2 MACHINE OPERATION
The Skid-Sickle is a hydraulically driven sickle bar mower consisting of a mower bar mounted on a
forward skid steer mounted frame. The mower is powered by connecting directly into the Skid Steer
hydraulic system. The Skid Steer hydraulics provides the oil flow necessary to operate the hydraulic
motor on the SCH Pitmanless planetary gearbox. The minimum hydraulic system requirements should be
10GPM at 900PSI. Be sure to maintain proper system filtration. The gearbox has a single over-stroke
design and strokes 3-3/8” long. The sickle bar is raised and lowered by a single acting hydraulic cylinder.
Each function is actuated by a frame mounted solenoid control valve. This solenoid valve is controlled
with a machine mount switch. In the normal position, all of the flow is diverted to the sickle head when
the auxiliary flow control is turned on from the skid steer. When the switch control is depressed, the
solenoid is energized and allows flow to be diverted to the tilt cylinder. By changing the direction of flow
on the main control in the skid steer, the tilt cylinder will raise or lower the sickle to the desired angle of
cut.
Operating safety
1. Read and understand the Operator’s Manual and all safety signs before operating, servicing,
adjusting, or unplugging.
2. Do not allow riders on the Skid Steer or Mower.
3. Install and secure all guards and shields before starting or operating.
4. Keep hands, feet, hair and clothing away from all moving and/or rotating parts.
5. Stop Skid Steer engine, disengage PTO clutch, place in hydraulic controls in neutral, set park brake,
remove ignition key and wait for all moving parts to stop before servicing, adjusting, repairing or
unplugging.
6. Ensure that all Skid Steer controls are in neutral before starting.
7. Clear the area of all bystanders, especially children, before starting.
8. Be careful when working around or maintaining a high-pressure hydraulic system. Wear proper eye
and hand protection when searching for a leak. Use a piece of wood or cardboard as a backstop.
9. Stay away from overhead obstructions and power lines during set-up and operation.
14/25/2006 Revision 1 Page 7 of 12
3.3 PRE-OPERATION CHECKLIST
The Skid Steer Solutions Skid-Sickle is simply designed to ensure years of trouble free use. A poorly
maintained machine is an invitation to expenses and trouble.
We recommend that before operation that this checklist be followed to ensure trouble free operation.
1. Carefully study and understand your owner’s manual.
2. Give the machine a “once-over” for any loose bolts, worn parts, cracked welds, hydraulic leaks,
frayed hoses etc. and make necessary repairs.
3. Be sure that there are no tools lying on or in the machine.
4. Lubricate the machine as per the maintenance section.
5. Make sure all hoses are clear of cuts, abrasions, worn spots and pinch points before operating.
6. Check the tire pressure and make sure they are inflated to their recommended pressures. ( see side
of tire)
7. Check all shields make sure they are in place and properly secured.
8. Check all PTO shields; make sure they are free to turn around the drive shaft. Never operate any
equipment without shields in the place.
9. Connect to skid steer.
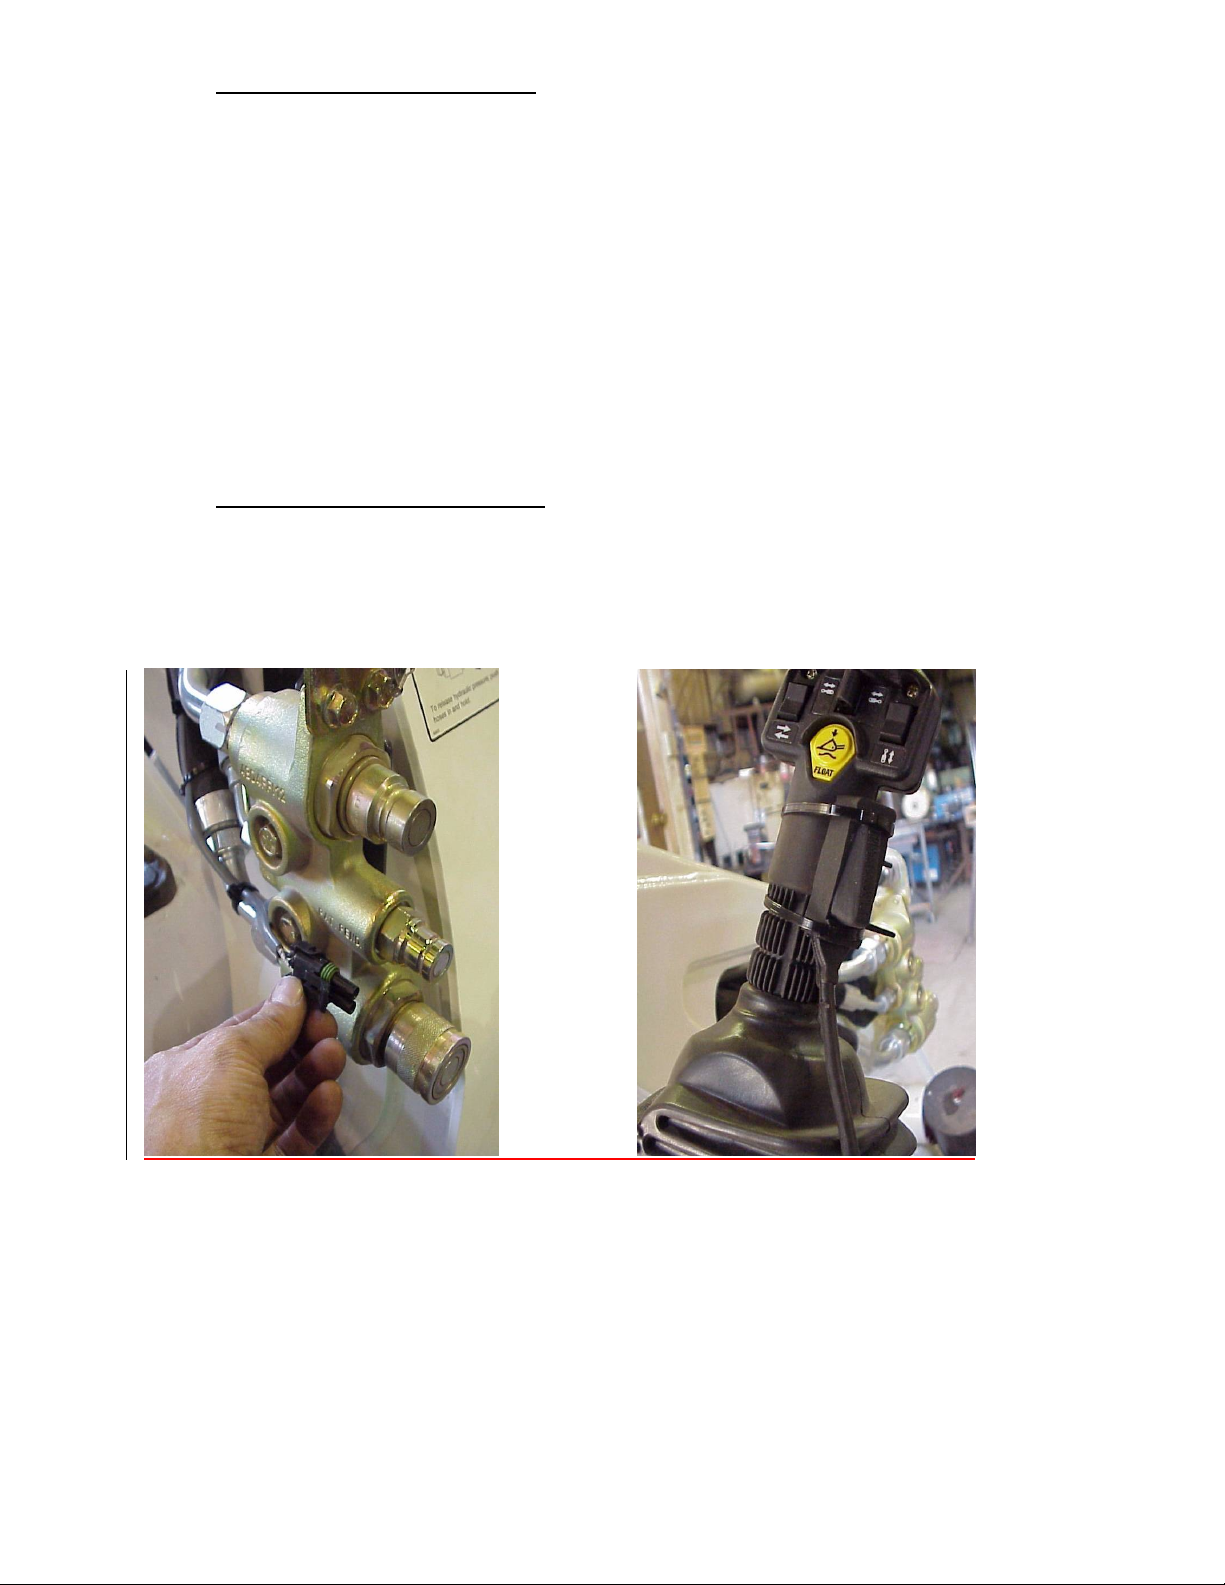
3.3.5 ELECTRICAL CONNECTIONS
Begin with the wire that has the plug matching the wire plug that comes from the Skid-Sickle. Start at the
couplers and follow the hydraulic lines into the engine compartment, to an area close to the source of
power (battery). You might have more wire than you need, so coil up extra and tie out of the way. Tie
switch to lever and feed wire into engine compartment connecting to a 12-volt power source. Red Positive
+, Black Negative -. (Note, if you feed wire through rubber grommets around control levers make sure
wire is not pinched when using your levers.) Plug Switch wire into wire that was left near your power
source. Test rotation action. If you have any problems check all connections.

14/25/2006 Revision 1 Page 8 of 12
3.4 MACHINE RUN-IN
1. The Skid Steer Solutions Skid-Sickle has been pre-lubricated from the factory and therefore
lubrication is not necessary when 1st purchased.
2. Give the machine a “once over” before the initial machine start up. Look for any loose bolts,
hydraulic leaks, or damaged parts that may have happened in transportation or set-up.
3. Attach the sickle bar to the inner shoe. Locate the three 5/8”shouldered lug bolts protruding up from
the bottom of the inner shoe. Remove the 3 nuts, place the bar onto and over the bolts and allow
the bar to settle into the shoe. Replace and tighten the nuts. As the nuts draw the bar into the shoe
some resistance will be felt until the bar seats properly. Torque the 5/8” nuts to 170 ft-lbs. each.
4. Assemble the knife (sickle) to the gearbox drive. Remove the spud from the output side of the
gearbox. Use the 3/8” allen wrench supplied. Loosen the cross bolt on the knife head and push
the spud through the knife head. Rotate the gearbox until the wedge attachment is in-line with the
bar. From the side of the gearbox opposite the bar, slide the knife under the gearbox into the bar.
The knife will slide into and through the guards and hold-downs. Slide the knife (with the spud in
place) past the wedge connection on the gearbox, raise the knife head slightly and push back into
the wedge connection on the gearbox. Connect the spud to the wedge connection with the allen
head bolts provided. REMEMBER to TORQUE these bolts to 59 FT-LBS. See decal on inner shoe.
This is critical for the proper performance of the mower drive. DO NOT ALLOW THIS
CONNECTION TO BECOME LOOSE. DAMAGE TO THE GEARBOX WILL RESULT.
RESULTING DAMAGE IS NOT COVERED UNDER WARRANTY. Check torque on these bolts
after 1 hour of operation. Position the knife to ride smoothly on the lower edge of the first guard next
to the inner shoe by moving the knife head up or down on the spud. Retighten the cross bolt.
5. Attach hydraulic hoses from the hydraulic solenoid on the gearbox to the Skid Steer hydraulic
remotes.
6. Start the Skid Steer and operate the Skid-Sickle cylinder lift. Raise and lower the bar, check for
smooth operation. Operate the Skid Steer hydraulics to the hydraulic motor on the gearbox. Slowly
bring Skid Steer to operating RPM. Check for smooth operation. Make sure all people, children and
animals are away from the machine as the cutting areas are exposed and serious injury could occur.
***Never operate this machine when people are present.
7. After the initial machine run-in, give the machine a “once over” again to ensure proper setup.
3.5 EQUIPMENT MATCHING
1. TheSkid Steer Solutions Skid-Sickle is designed for use with a Skid Steer of 25 hp or more.
2. Auxiliary Hydraulic Connections are required to operate the bar lift.
3. Auxiliary Hydraulic Connections are required to operate the hydraulic motor on the Hydro units.
Minimum hydraulic requirements include 10GPM at 900PSI.
4. Make sure your Skid Steer complies with the State and Local laws governing highway safety and
movement of farm equipment on public roads. The Skid Steer needs to be equipped with a roll over
protection system and seat belts.

14/25/2006 Revision 1 Page 9 of 12
3.5.5 USES
1. The Skid-Sickle was designed for side cutting any vegetation 2” or less in diameter. This can include
trimming hedges, ditch clearing on road-sides, vertical cuts along driveways where vegetation may have
grown out over the path. Care must be exercised when operating to insure you do not run the sickle into
fixed objects. If you hit a fixed object, the safety will release and must be reset before cutting
commences. Put the sickle head on the ground and reverse the skid steer. The release bar will reset.
You can now start cutting again. Take care when working on steep ground, particularly when tuning.
Stay away from overhead obstructions and power lines during operation.
3.6 TRANSPORTING
1. Always obey State and Local laws for farm equipment safety on roads.
2. Always use a slow moving vehicle emblem.
3. Never allow riders on the Skid Steer or implement.
4. Always narrow up equipment to its transport mode for moving down the road.
5. Always use Skid Steer flashers when transporting.
6. Always couple the brakes together when transporting equipment at road speed.

14/25/2006 Revision 1 Page 10 of 12
3.7 STORAGE
1. Park implement on a flat location to avoid rolling of equipment. Lower leg stands and set 3-point
mounted unit on level ground surface.
2. Store with the bar either tied up with the stay rod or lowered to the ground. Lower the hydraulic
cylinder so that it is not holding up the bars and shield assembly.
3. Tie up hydraulic hoses to prevent contamination to the hydraulic system.
4. After the season apply 10 to 15 shots of grease to the gearbox housing and 2 shots to the knifehead
bearing and run for a few minutes. (See Lubrication Methods)
5. Park equipment in an area away from livestock or human activity.
4: MAINTENANCE AND LUBRICATION
1. Before performing any maintenance review the operators manual for all safety information.
2. Never operate this machine inside a closed building.
3. Keep hands, feet and loose clothing away from all moving parts.
4. Ensure that all Skid Steer controls are in neutral before starting.
5. Seek medical attention if you contact high-pressure hydraulic fluid, which pierces the skin as
infection can occur.
6. Seek medical attention if hydraulic oil enters your eyes.
7. Never place your self between pinch points when working on the Skid-Sickle.
8. Be Safe! Work Safe! Think Safe!
4.1 GREASING
Use SAE multi-purpose lithium based grease for all grease fittings.
Do Not use anything but the above in the Pro-drive Gearbox. Synthetic or high heat greases will not flow
properly in the gearbox and will damage the gearbox.
5: LUBRICATION METHODS
5.1 GREASING
1. Use only hand pump grease guns.
2. Clean all grease fittings before greasing to prevent dirt from entering the bearings.
3. Replace broken or missing fittings immediately.
4. If a fitting will not take grease, remove fitting and clean. Replace fitting and grease. If fitting still will
not take grease, replace with a new fitting.
5. Wheel bearings have been greased at the factory. We recommend that they be repacked every 250
hours of operation.
6. Grease main gearboxes every 50 hours with 5 pumps of grease from a hand grease gun. See decal
on inner shoe. The torque of the knifehead bolts should be checked every time grease is applied.
7. Grease bottom drive spud every 50 hours with 1 pump of grease from a hand grease gun. When
cutting green juicy material grease 1 pump daily. See decal on inner shoe.
8. Grease drive shaft crosses and yokes every 8 hours of operation.
9. Grease drive shaft slides every 20 hours of operation.
10. Grease all ¾” ball pivot joints 1 pump every 8 hours of operation.
11. Grease the ball hitch at the start of each cutting season. Repeat with extended use.
12. At the end of the season place 1 pump of grease at each location. Operate the mower to ensure
grease is evenly placed.

14/25/2006 Revision 1 Page 11 of 12
6. ADJUSTMENTS
6.1 BAR TILT
Bar tilt adjustments are made by tipping the skid plate forward or backward with the skid steer hydraulics.
6.2 BAR LEAD
Bar lead is adjusted by loosening the 1 ¼” jam nut on the breakaway, taking the ¾ “ X 3” bolt out of the
ball socket on the shoe end of the breakaway. Rotate the whole breakaway assembly counter clockwise
for more bar lead or clockwise for less bar lead. Replace the bolt and tighten, then tighten the jam nut.
The outer end of the bar should be ahead of the inner end of the bar by about 1 ½” to 2” (non-cutting
position).
6.4 FRAME HEIGHT ADJUSTMENT
Carry the Skid-Sickle frame as low to the ground or as conditions permit. Height of the mower frame is
adjusted by raising or lowering the skid steer main lift arms With the height of the frame set, you may find
it necessary to adjust the lift spring assembly on the bar lift. To check lay the sickle bar flat on the ground
with the lift cylinder fully contracted. If there is tension in the chain adjust the clevis to allow the chain to
be loose. Lift the sickle bar into transport position. The bar should be between 85 and 90 degrees from
horizontal in this position.
6.5 SPRINGBACK ASSEMBLY
When an obstruction is encountered, the cutter bar will pivot back against the spring cushion to absorb
the shock. The operator must be alert and stop the forward motion of the mower. Reversing the direction
of the mower will reset the springback. The tension on the springback is factory set. No adjustment
should be necessary.
6.6 WEAR ADJUSTMENTS
All cutting areas are factory set. Adjustments to these components are necessary as wear progresses.
Do not hammer or bend down the lips of the guards. This practice may damage the knife. Replace
guards as they wear. Replace the knife (sickle) as required by cutting conditions. A clearance of 0.010”
should be maintained between the knife clips and the top of the knife.
6.7 BAR FLOAT
The bar float is factory set. This device helps in raising the bar and also reduces the weight of the inner
shoe pressing down on the ground as the mower moves through the field. Placing more tension on the
spring will reduce the weight of the shoe on the ground. Reducing the tension will add weight to the shoe
pressing on the ground. Proper bar float is required to reduce any build up of cut hay ahead of the inner
shoe in working position.

14/25/2006 Revision 1 Page 12 of 12
General Support: Warranty Information
Skid Steer Solutions, Inc.'s Limited Product Warranty
If you find physical defects in the materials or the workmanship used in making the product
described in this document, Skid Steer Solutions, Inc. will repair, or at its option, replace, the
product at no charge to you, provided you return it (freight prepaid, with proof of your purchase
from the original reseller) during the 6-month period after the date of your original purchase of
the product.
Skid Steer Solutions, Inc.'s RMA Replacement Product Warranty
If you find physical defects in the materials or the workmanship used in the refurbishment of an
RMA product replacement, we will repair, or at our option replace, the product at no charge to you
for a period of 90-days from the date the RMA was created, or until the end of your original
warranty period (whichever is greater).
Skid Steer Solutions, Inc.'s Refurbished Product Warranty
If you find physical defects in the materials or the workmanship used in a product sold as a
refurbished unit, we will repair, or at our option replace, the product at no charge to you for a
period of 90-days from the date of purchase.
SKID STEER SOLUTIONS WARRANTS THAT THE EQUIPMENT DELIVERED BY SELLER WILL BE OF THE
KIND AND QUALITY DESCRIBED IN THE ORDER OR CONTRACT AND WILL BE FREE FROM DEFECTS IN
WORKMANSHIP OR MATERIAL. SHOULD ANY FAILURE TO CONFORM WITH THIS WARRANTY OCCUR,
AND THE BUYER HAVING GIVEN WRITTEN NOTICE TO SELLER WITHIN 180 DAYS FROM THE DATE OF
SHIPPING, SELLER SHALL CORRECT SUCH NONCONFORMITY AT ITS OPTION BY EITHER REPAIRING THE
DEFECTIVE PART OR PARTS OR MAKING AVAILABLE F.O.B. AT SELLERS LOCATION A REPAIR OR
REPLACEMENT PART.
THIS WARRANTY IS IN LIEU OF ALL WARRANTIES OF MERCHANTABILITY, FITNESS FOR PARTICULAR
PURPOSE OR ANY OTHER WARRANTIES, EXPRESS OR IMPLIED. CORRECTION AND NONCONFORMITIES IN
THE MANNER AND FOR THE PERIOD OF TIME PROVIDED ABOVE, SHALL CONSTITUTE FULFILLMENT OF
ALL LIABILITIES OF SELLER TO BUYER, WHETHER BASED ON CONTRACT, NEGLIGENCE OR OTHERWISE
RESPECT TO OR ARISING OUT OF SUCH GOODS.
NEITHER PARTY SHALL BE LIABLE FOR SPECIAL, INDIRECT, OR CONSEQUENTIAL DAMAGES. THE
REMEDY SET FORTH IN THIS INSTRUMENT ARE EXCLUSIVE, AND THE LIABILITY OF SELLER WITH
RESPECT TO ANY CONTRACT OR SALE OF ANYTHING DONE IN CONNECTION WITH THE SAME, WHETHER
IN CONTRACT, IN TORT, UNDER WARRANTY, OR OTHERWISE, SHALL NOT EXCEED THE PRICE OF THE
GOODS OR PART UPON WHICH SUCH LIABILITY IS ALLEGEDLY BASED.
All exclusions and limitations of this warranty are made only to the extent permitted by applicable law and
shall be of no effect to the extent in conflict with the express requirements of applicable law.
Table of contents


