SKP Pro Audio DMP-3006iP User manual


This symbol is to alert the user to important operating and maintenance (service )
instructionsin this manual and literature accompanying the product.
This symbol isto alert theuser to thepresence of uninsulated dangerous voltages
inside the product's enclosure that may constitute a risk of electric shock.
Note:
1. Important safety instructions shall be provide with each appliance. These safety instructions may be in
the form of a separate booklet, separate sheet, or part of the instruction manual.
2. If included in the instruction manual, the safety instructions shall be located before any operating
instructions.
3. These instructions shall be entitled "IMPORTANT SAFETY INSTRUCTIONS" .
4. The safety instructions shall include, as applicable to the particular apparatus, the in formation and
warnings listed before. The wording is capable of being supplements, although not replaced, by drawing
or cartoons.
5. The symbol shall be shown adjacent to the text of Important Safety Instructions.
WARNING: CHANGES OR MODIFICATIONS TO THIS UNIT NOT EXPRESSLY APPROVED BY THE
PARTY RESPONSIBLE FOR COMPLIANCE WILL VOID THE USER'S AUTHORITY TO
OPERATE THE EQUIPMENT. ANY CHANGE TO THE EQUIPMENT WILL VOID FCC GRANT.
CAUTION: TO REDUCE THE RISK OF FIRE OR ELECTRIC SHOCK, DO NOT EXPOSE THIS APPARATUS
TO RAIN OR CORDS. IF THIS HAPPENS, BE SURE POWER TO THE ELECTRICAL OUTLET IS
TURNED OFF BEFORE YOU TOUCH OR UNPLUG THE APPLIANCE.
against harmful interferencein a residentialinstallation. This equipment generates, uses and can
radiate radio frequencyenergy and, ifnot installed andused in accordancewith the instructions,
may cause harmfulinterference to radio communications. However, there is no guarantee that
interference will not occur in a particular installation. If this equipment does cause harmful
interference to radioor television reception, which can bedetermined by turning the equipment
off and on, the user is encouraged to try to correct the interference by one or moreof the following
measures:
--Reorient or relocatethe receiving antenna.
--Increase the separationbetween the equipment and receiver.
--Connect the equipmentinto an outlet on a circuit different from that to which the receiver is
connected.
--Consult the dealeror an experienced radio/TV technician for help.
This device complies with Part 15 of the FCC Rules. Operation is subject to the following two
conditions: (1) this device may not cause harmful interference,and (2) this device must accept
any interference received,including interference that may cause undesired operation.
This equipment has been tested and found to comply with thelimits for a Class C digital device,
pursuant to part 15 of the FCC Rules. These limits aredesigned to providereasonable protection
CAUTION:TO REDUCE THE RISK OF ELECTRIC SHOCK, DO NOT
REMOVE COVER (OR BACK). NO USER- SERVICEABLE PARTS
INSIDE REFER SERVICING TO QUALIFIED SERVICE PERSONNEL.
Caution Marking Explanation
Outdoor Use and Wet Location Warning
IMPORTANTSAFETY PRECAUTIONSIMPORTANTSAFETY PRECAUTIONS Player

Getting your system ready for use
Choose an area away from heat. Allow about three(3) inches between the cabinet back and the wall for
proper ventilation. Place your system near an AC outlet supplying common household current (105-120V
AC60Hz).
Grounding or polarization
Do not defeat the safety purpose of the polarized or grounding type plug. A polarized plug has two blades
with onewider than the other. A grounding type plug has two blades and a third grounding prong. The wide
blade or the third prong are provided for your safety. When the provided plug does not fit into your outlet,
consult an electrician for replacement of the obsolete outlet.
Power cord protection
Protect the power cord from being walked on or pinched particularly at plugs, convenience receptacles,
and the point where they exit from the apparatus.
Only use attachments/accessories specified by the manufacturer.
Carts and stands
Use only with a cart, stand, tripod, bracket, or table specified by the manufacturer, or sold with the apparatus.
When acart is used, use caution when moving the cart/apparatus combination to avoid injury from tip-over.
Therefore:
1. Never block the ventilation openings of a unit by placing it on a bed, soft rug, etc.
2. Never place a set in a built-in enclosure unless proper ventilation is provided.
3. Never cover the opening with cloth or other material.
4. Do not install near any heat sources such as radiators, heat registers, stoves, or other apparatus (inclu-
ding amplifiers) that produce heat.
To avoid personal injury:
1. The manufacturer recommends that this unit not be mounted on a wall or ceiling.
2. Carefully follow the operating instructions when making connections.
3. Do not insert tools, hands, or fingers in openings (such as a tape slot), especially if the unit is connected
to a power source.
WARNING
Do not turn on your stereo system with the volume at maximum.
This will damage your speakers and void you warranty.
Installation
* Operate the unit only from a power source as indicated on the unit or in the operating instructions.
* Overloaded AC outlets and extension cords are dangerous and so are frayed cords and broken plugs.
Call your service technician for replacement of such cords and plugs
* Audio products are provided with ventilation openings to allow heat generated during operation to be
relesed. If these openings are blocked, heat build-up within the set can cause failure which may result in
a fire hazard.
Safety Instructions
IMPORTANTSAFETY PRECAUTIONS Player

IMPORTANTSAFEGUARDS
1. READ INSTRUCTIONS- All the safety and operating Instructions should be read before the product is
operated.
2. RETAIN INSTRUCTIONS- The safety and operating Instructions should be retained for future reference.
3. HEED WARNING- All warnings on the appliance and in the operating instructions should be adhered to.
4. FOLLOW INSTRUCTIONS - All operating and use instructions should be followed.
Cleaning
The appliance should be cleaned only as recommended by the manufacturer.
Non-use periods
Unplug this apparatus during lightning storms or when unused for long periods of time.
Object and liquid entry
Care should be taken so that objects do not fall and liquids are not spilled into the enclosure through
Damage requiring service
The appliance should be serviced by qualified service personnel when:
A. The power supply cord or the plug has been damaged.
B. Objects have fallen, or liquid has been spilled into the appliance.
C. The appliance has been exposed to rain.
D. The appliance does not appear to operate normally or exhibits a marked change in performance.
E. The appliance has been dropped; or the encolsure damaged.
Servicing
Do not attempt to service the appliance beyond that which is described in the operating instructions. All
other servicing should be referred to qualified service personnel.
openings.
IMPORTANTSAFETY PRECAUTIONS
Water and Moisture
The appliance should not be used near water, for example, near a bathtub, washbowl, kitchen sink,laundry
tub, in a wet basement or neat a swimming pool and the like.
Player

1
2
5
4
3
6
7
8
9
10
11
12
13
14
15
16
17
18
20 2122 23 24
25
27
26
19
28
29
30
REFERENCE DRAWING FORFRONT PANEL
FRONT PANEL FUNCTION
Player
1.CD/IPOD
Select to CD or IPOD.
2.
6.
MENU BUTTON
Press to enter or exit the menu.
3.SCROLL BUTTON
Use this button to select the last item of
menu.
4.SCROLL BUTTON
Use this button to select the next item of
menu.
5.ENTER BUTTON
Press this button to enter what you select.
PLAY LIST BUTTON
Press this button to select last play list.
7.PLAY LIST BUTTON
Press this button to select next play list.
8.LED(PITCH RANGE)
9.PITCH SYSTEM
10.SEARCH BUTTON
When you push this button, you en-
able change the jog and the search
function.
11.TIME BUTTON
Use this knob to choose the time mode :
Elapsed time, remaining time or total
remaining time.
12.SINGLE/CONT.
Press these to switch between the SI-
NGLE and CONTINUOUS play mode.
The selected mode is indicated on the
LCD. In SINGLE mode, after each track,
the unit stops the reading. In CONTINOUS
mode, the unit reads all track and stops
13.PITCH BEND +
The pitch will automatically rise when the
+ button is pressed and return to the original
pitch when it is released.
14.PITCH BEND -
REFERENCE DRAWING FORFRONT PANEL Player
The pitch willdrop while the -button is pressed and return tothe original pitch when
it is released.
15.IN BUTTON ( LOOP SYSTEM )
This button sets the beginning of the loop. The Loop indicator on the display flashes
16.OUT BUTTON ( LOOP BUTTON ).
When you pressthis button, you set the end point of theseamless loop and you start the loop.
To finish theloop, press again this button.
17.PROG BUTTON
In STOP mode, you canprogram several tracks( 20 tracks max ) :
-Press theSTOP button to enter inthe stop mode
-Press thePROG button to enter in the program mode
-Use theskip track buttons to choose the track you wantto listen then press the PROG button
to enter yourchoice.
-Use onemore time the skip track buttons to choose thetrack you want to listen then press the
PROG button toenter your choice.
-Repeat theoperation to select all the track you want tolisten
Press the PLAY/PAUSE button to startthe playback
18.RELOOP BUTTON ( LOOP SYSTEM )
This button is used to start the last saved loop. To finish the loop, press the reloopbutton.
19.DISPLAY
20.
+10 BUTTON
Use this buttonto jump of 10 tracks in one press.
23.
Use this buttonto repeat one track or all the track ofthe CD.
25.STOP BUTTON
Press this buttonto stop the playback.
26.JOG & SHUTTLEWHEELS
Shuttle : Use thedial to select the scanning direction and speed. The disc is scanned in the
forward direction whenthe shuttle dial is turned clockwise from the neutralposition, in the
reverse direction whenthe shuttle dial is turned counterclockwise. The scanning speeds up
when the shuttledial is turned faster.
Jog : Inpause mode, if you turn the jog, the pointat which the sound is being produced moves
by a numberof frames corresponding to the number of clicks. Clockwisemoves the point forward,
counterclockwise moves thepoint backward. In play mode, the jog increases ordecreases the
speed of thesong. ( clockwise : increase , counterclockwise : decrease).
27.PITCH CONTROL
Use this faderto increase or decrease the speed of the CD track or tone in iPOD.
28.CUE BUTTON
Pressing the CUEbutton during play provides a return to the positionat which play was started
29.PLAY / PAUSE BUTTON
Each time youpress the PLAY/PAUSE button, the operation changes from play to pause or
from pause toplay.
30.OPEN/CLOSE
Press to loador eject disk. Each press will open or closethe disk tray.
NOTE: disc holderwill not open unless stop or pause button hasbeen pushed fir.
SKIP BUTTON
Use this buttonto select the last track.
21. SKIP BUTTON
Use this buttonto select the next track.
22.
IPOD JACK
Use to connect with the IPOD.
24.REPEAT BUTTON

REFERENCE DRAWING FORREAR PANEL
REAR PANEL FUNCTION
1. POWER BUTTON
Press the power switch to turn the unit on. To switch the power off press the power
switch again.
2. ACCORD
Use this cableto connect the AC mains power to the unit.
3. POWER SUPPLY SWITCH
Use this selectorto choose the good Power supply (several countries haveanother power
supply).
4. USB
Connect to theUSB.
5. VIDEO
6. AUDIO OUT
The audio for each CD player is an output for thesejacks. Connect to the line input of the mixer.
1
2
3
4
5
6
Player
WARRANTYCONDITIONS
DMP-3006iP equipment is covered
by a 6 monthswarranty on parts and labour except for
Crossfaders (90 days).
The following rulesapply from theday the equipment leaves the factory:
The date onthe invoice is considered to be the date thewarranty begins.
Only companies approvedby DMP-3006iP are allowed towork on theequipment. Warranty
becomes void whenother service technicians open the equipment.
During warranty period,defective equipment must be sent by pre-paid mail inthe original box.
DMP-3006iP will return thegoods by pre-paid mail during the first year ofwarranty; thereafter
the mailing costis to be paid by the recipient
Potentiometers have alimited lifetime and are not covered by the manufacturerfor more than
normal use.
For all serviceenquiries, refer to your local distributor, as heis best ableto help you.
SPECIFICATIONS :
Anti-Shock Buffer Memory : 40seconds
Range of adjustments: +/- 12%
Power supply : 115 / 230V 50/60Hz
Power Consumption : 25 Watts
Dimensions : 260x217x112mm
REFERENCE DRAWING FORWARRANTY Player


PARA UNA OPERACIÓN SEGURA Y EFICIENTE
-Seleccione el lugar para la instalación de su unidad, cuidadosamente
-Evite instalarla donde reciba luz solar directa
-También evite lugares sujetos a vibración, excesos de polvo, calor, frío o humedad
-Mantenga el equipo, lejos de fuentes de zumbido, tales como transformadores o
motores.
-No abra el gabinete ya que puede causar daños al equipo ó choque eléctrico
-Al desconectar el cable de alimentación, del tomacorriente, siempre agárrelo de la
ficha. Nunca tire del cable.
-No use la fuerza al operar perillas, teclas y botones.
-Antes de mover el equipo, asegúrese de desconectar el cable de alimentación y todos
los cables de conexión.
-No use solventes químicos para limpiar la unidad, porque puede dañar su acabado.
Para su limpieza, utilice un trapo limpio y seco.
-No exponga el aparato a goteos ni a salpicaduras, y no coloque sobre el, objetos que
contengan líquidos.
-El tomacorriente donde se conecta el equipo, deberá estar ubicado cerca de este,
para fácil acceso.
-Si el cable de tensión está dañado, debe ser reemplazado por el fabricante, por un
agente de servicio técnico o por una persona calificada para evitar cualquier tipo
de peligro.
-Guarde este manual en lugar seguro para futuras referencias.
PRECAUCIONES DE SEGURIDAD IMPORTANTES
El signo de exclamación dentro del triángulo equilátero intenta alertar al
usuario de la presencia de instrucciones operativas y de mantenimiento
importantes en texto que acompaña este producto.
El relámpago con cabeza de flecha dentro de un triángulo equilátero
intenta alertar al usuario de la presencia de “voltaje peligroso” sin
aislamiento dentro del envase del producto que puede ser de suficiente
magnitud para constituir un riesgo de descarga eléctrica para las personas.
Explicación del signo de precaución
PRECAUCION: PARA REDUCIR EL RIESGO DE CHOQUE ELECTRICO, NO
REMUEVA LA CUBIERTA (O PARTE TRASERA). NO HAY PARTES
REPARABLES DENTRO DEL EQUIPO. DEJE LA REPARACIÓN EN MANOS DE
PERSONAL TÉCNICO CALIFICADO.

ADVERTENCIA: LOS CAMBIOS O MODIFICACIONES HECHOS A LA UNIDAD
NO APROBADOS EN FORMA EXPRESA POR LA PARTE RESPONSABLE DEL
CUMPLIMIENTO ANULARÁN LA FACULTAD DEL USUARIO DE HACER
FUNCIONAR EL EQUIPO. CUALQUIER CAMBIO HECHO AL EQUIPO
ANULARÁ LA GARANTIA FCC.
Este equipo ha sido testeado para cumplir con los límites para un dispositivo digital de
Clase C, de acuerdo a la sección 15 de las Normas FCC. Estos límites fueron diseñados
para proveer una protección razonable contra la interferencia peligrosa en una
instalación doméstica. Este equipo genera, utiliza y puede irradiar energía de frecuencia
y, si no es utilizado de acuerdo a las instrucciones, puede causar una interferencia
peligrosa en las radio comunicaciones. Sin embargo, no hay garantía de que no se
produzca una interferencia peligrosa en una instalación determinada. Si este equipo
causa interferencia peligrosa en la recepción de radio o televisión, lo que puede
determinarse encendiendo o apagando el equipo, el usuario debe intentar corregir la
interferencia tomando una o más de las siguientes medidas:
Reorientar o reubicar la antena de recepción
Aumentar la separación entre el equipo y el receptor.
Conecte el equipo a un tomacorriente en un circuito diferente al que ha sido conectado
el receptor.
Consulte a su distribuidor o a un técnico especializado en radio/ TV para más ayuda.
Este dispositivo cumple con la sección 15 de las Normas FCC. El funcionamiento se
encuentra sujeto a las siguientes condiciones: (1) Este dispositivo no debe causar
interferencia peligrosa, y (2) este dispositivo debe aceptar cualquier interferencia
recibida, incluyendo interferencias que puedan causar un funcionamiento no deseado.
ADVERTENCIA SOBRE EL USO A LA INTEMPERIE Y UBICACIÓN EN
LUGARES HÚMEDOS
NOTA:
1) Las instrucciones de seguridad importantes deben ser provistas con cada equipo.
Estas instrucciones pueden encontrarse en un folleto por separado, en una hoja,
o como parte del manual de instrucciones.
2) Si se incluyen en el manual de instrucciones, las instrucciones de seguridad
deben estar al comienzo, antes de cualquier instrucción de funcionamiento.
3) Estas instrucciones deben titularse “INSTRUCCIONES DE SEGURIDAD
IMPORTANTES”.
4) Las instrucciones de seguridad deben incluir, si es aplicable al aparato, la
información y advertencias mencionadas anteriormente. El texto puede ser
complementado, pero no reemplazado, por dibujos.
5) El símbolo debe mostrarse en forma adyacente al texto de INSTRUCCIONES
DE SEGURIDAD IMPORTANTES.

Instalación
Haga funcionar la unidad a través de una fuente de tensión como la indicada en la
unidad o en las instrucciones de funcionamiento únicamente.
Los tomacorrientes AC y cables de extensión sobrecargados son peligrosos como los
cables y enchufes rotos. Llame a un técnico para reemplazar dichos cables y enchufes.
Los productos de audio son provistos con aberturas de ventilación para permitir que
fluya el calor durante el funcionamiento. Si se bloquean estas aberturas, el calor dentro
del equipo puede causar una falla que puede provocar peligro de fuego.
Por ese motivo:
1-Nunca bloquee las aberturas de ventilación de la unidad al colocarlo sobre una cama,
alfombra, etc.
2- Nunca coloque el equipo en un mueble empotrado a menos que se provea una
ventilación adecuada.
3-Nunca cubra las aberturas con telas o algún otro material.
4-No instale cerca de fuentes de calor tales como radiadores, calefactores, estufas u
otros aparatos (incluyendo amplificadores) que produzcan calor.
Para evitar lastimaduras:
1-El fabricante recomienda que el equipo no sea montado sobre una pared o cielorraso.
2-Siga cuidadosamente las instrucciones de funcionamiento al realizar las conexiones.
3- No inserte herramientas, manos, o dedos en las aberturas, especialmente si la unidad
está conectada a una fuente de tensión.
ADVERTENCIA
No encienda el equipo con el volumen del sistema al máximo.
Esto dañará los parlantes y hará nula la garantía.
Preparando el sistema para usar
Elija cualquier área lejos del calor. Deje 8 cm (3 inch) entre la parte trasera del gabinete
y la pared para una ventilación adecuada. Coloque el sistema cerca de un tomacorriente
AC con corriente adecuada (105-120V AC 60Hz).
Conexión a tierra o polarización
No intente cambiar el enchufe polarizado o a tierra. Un enchufe polarizado posee dos
espigas, una más ancha que la otra. Un enchufe a tierra posee dos espigas y una tercera
de conexión a tierra. La más ancha o la tercera espiga se provee para su seguridad.
Cuando el enchufe provisto no calza en el tomacorriente, consulte a un electricista para
reemplazar el tomacorriente obsoleto.
Protección del cable de tensión
Proteja el cable de tensión evitando que sea pisado o dañado en especial en el enchufe,
receptáculos y justo donde el cable sale del aparato.
Utilice únicamente los accesorios provistos y especificados por el fabricante.

Soportes y carritos
Utilice con un soporte, trípode, o mesa especificada por el fabricante o vendida con el
aparato. Cuando se utilice un carrito, tenga cuidado al mover el mismo y el aparato para
evitar cualquier daño.
Agua y humedad
El equipo no debe ser utilizado cerca de agua por ejemplo bañaderas, piletas de cocina,
lavatorios, lavaderos, en una superficie mojada o cerca de una pileta de natación o
similar.
Limpieza
Debe limpiarse el equipo sólo como ha sido recomendado por el fabricante.
Períodos si uso
Desenchufe el aparato durante tormentas eléctricas o cuando no se utilice por largos
períodos.
Entrada de objetos y líquidos
Se debe tener cuidado de que no caigan objetos ni se derramen líquidos dentro del
gabinete a través de las aberturas.
Servicio de Reparación
El equipo debe ser reparado por personal calificado cuando:
A- La fuente de tensión haya sido dañada.
B- Hayan caído objetos o se hayan derramado líquidos dentro del equipo.
C- La unidad haya sido expuesta a lluvia.
D- La unidad no funcione normalmente o muestra un cambio notable en su
funcionamiento.
E- La unidad haya sido arrojada al suelo o se haya dañado el gabinete.
Reparación
No intente reparar el equipo más allá de lo descrito en las instrucciones de
funcionamiento. Todas las demás reparaciones deben ser realizadas por personal técnico
calificado.
INSTRUCCIONES DE SEGURIDAD IMPORTANTES
1- LEA LAS INSTRUCCIONES: Se deben leer todas las instrucciones de
seguridad y funcionamiento antes de hacer funcionar la unidad.
2- CONSERVE LAS INSTRUCCIONES: Las instrucciones de seguridad y
funcionamiento deben ser conservadas para futuras referencias.
3- HAGA CASO A LAS ADVERTENCIAS: Debe seguir todas las advertencias en
el equipo y en las instrucciones de funcionamiento.
4- SIGA LAS INSTRUCCIONES: Se deben seguir todas las instrucciones de
funcionamiento y uso.
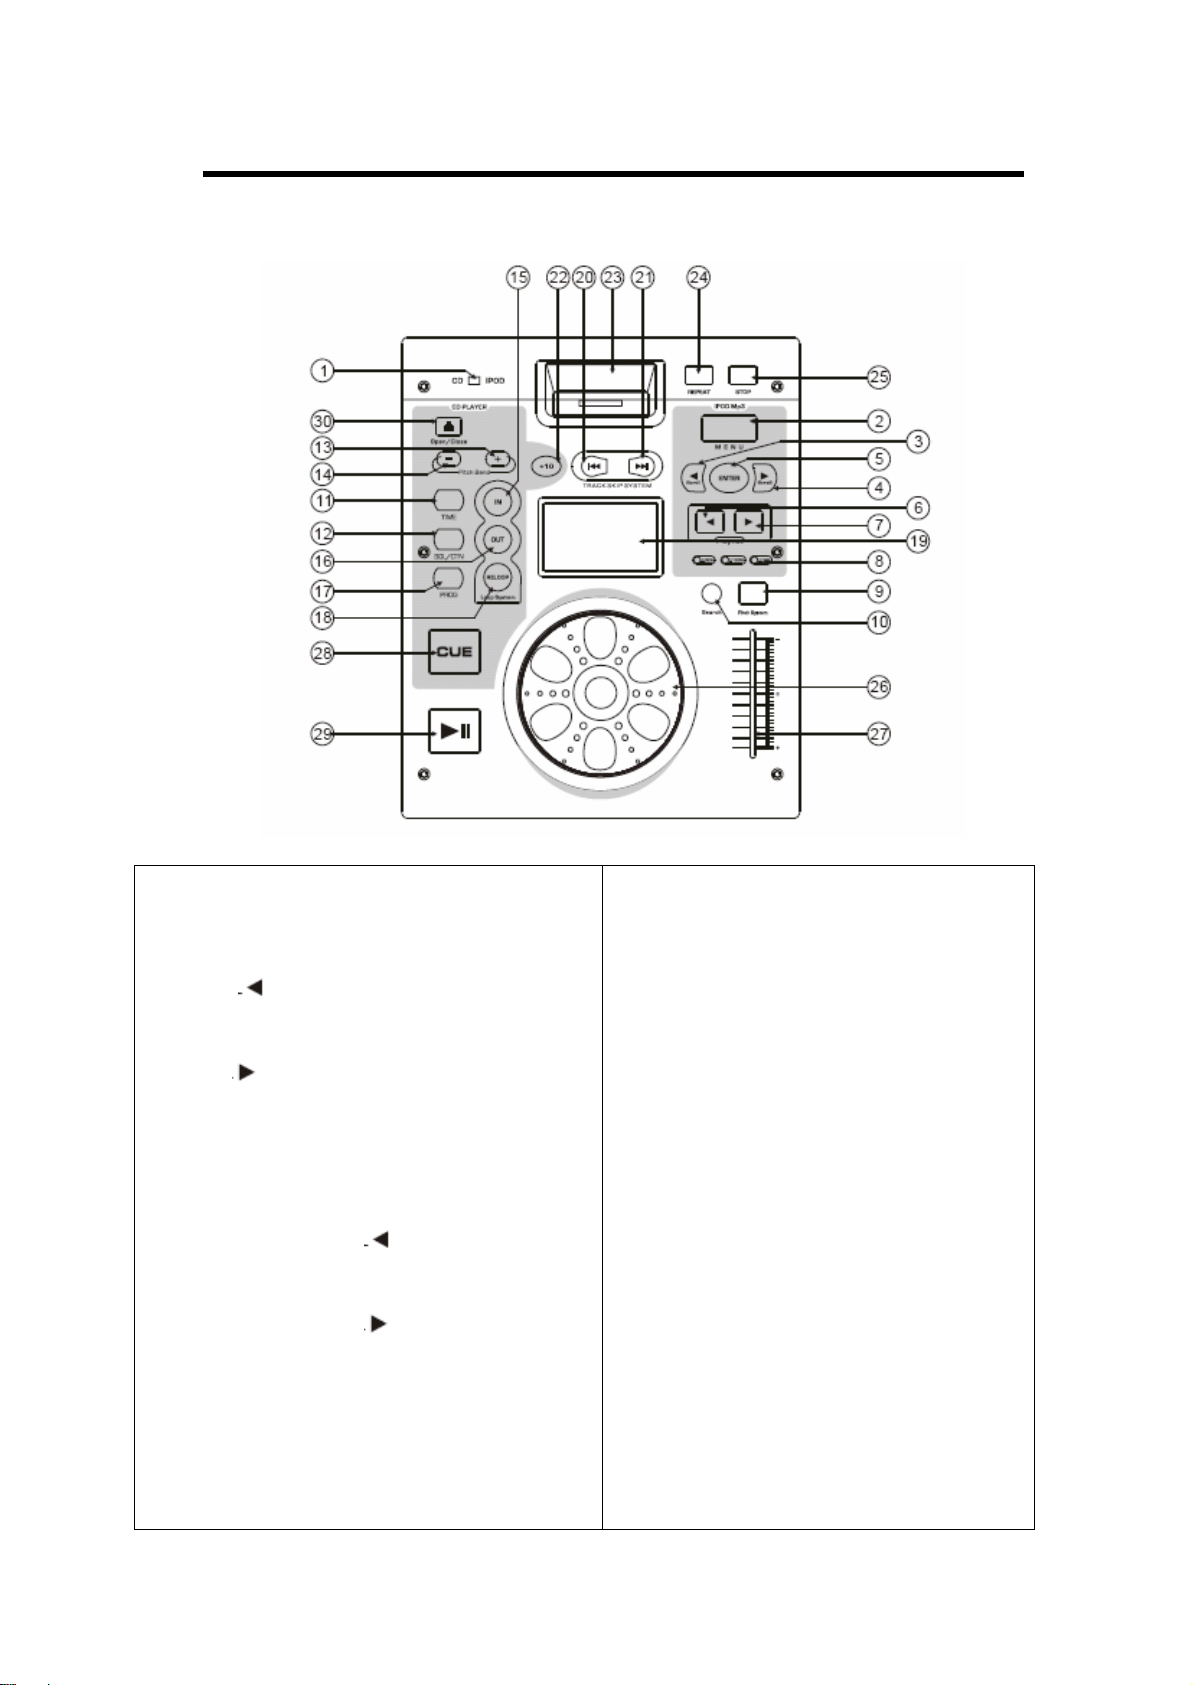
DIAGRAMA DE REFERENCIA DEL PANEL FRONTAL
FUNCIONES DEL PANEL FRONTAL
1-CD/ IPOD
Para seleccione CD o IPOD.
2-Botón MENU
Presione para ingresar o salir del MENU.
3-Botón
Utilice este botón para seleccionar el anterior
ítem del menú.
4-Botón
Utilice este botón para seleccionar el próximo
ítem del menú.
5-Botón ENTER
Presione este botón para confirmar lo
seleccionado.
6-Botón PLAY LIST [Reproducir Lista]
Presione este botón para seleccionar la última
lista de reproducción.
7- Botón PLAY LIST [Reproducir Lista]
Presione este botón para seleccionar la
próxima lista de reproducción.
8-LED (RANGO DE PITCH)
9- SISTEMA DE PITCH
10-BOTÓN SEARCH (BÚSQUEDA)
Cuando presiona este botón, activa la
sunción de búsqueda.
11- Botón TIME
Utilice esta perilla para elegir el modo de
tiempo: tiempo transcurrido, tiempo
remanente o tiempo total remanente.
12-SINGLE/ CONT
Presione estos botones para cambiar entre
el modo de reproducción SINGLE y
CONTINUO. El modo seleccionado se
indica en el LCD. En el modo SINGLE,
después de cada pista, la unidad detiene la
lectura. En modo CONTINUO, la unidad
lee todas las pistas y se detiene.
13-PITCH BEND+
La velocidad aumentará automáticamente
cuando se presione el botón + y volverá a
la velocidad original cuando se suelte.
14- PÌTCH BEND –
La velocidad disminuirá automáticamente
cuando se presione el botón - y volverá a
la velocidad original cuando se suelte.

15-Botón IN (LOOP SYSTEM)
Este botón configura el comienzo del segmento.
16-Botón OUT (LOOP BUTTON)
Cuando presione este botón, configura el punto de finalización del segmento y
comienza la misma. Para finalizar, presione nuevamente este botón.
17-Botón PROG
En el modo STOP, puede programar varias pistas (20 pistas máximo)
Presione el botón STOP para ingresar al modo STOP.
Presione el botón PROG para ingresar al modo de programación.
Utilice los botones de saltear pistas para elegir la pista que desea escuchar y luego
presione el botón PROG para confirmar la elección.
Utilice una vez más los botones de saltear pistas para elegir las pistas que desea
escuchar y luego presione el botón PROG para confirmar la elección.
Repita la operación para seleccionar todas las pistas que desee escuchar.
Presione el botón PLAY/ PAUSE para comenzar la reproducción.
18-Botón RELOOP (LOOP SYSTEM)
Este botón se utiliza para reproducir el último segmento guardado. Para finalizar,
presione el botón RELOOP.
19- DISPLAY
20- Botón SKIP
Utilice este botón para seleccionar la pista anterior.
21- Botón SKIP
Utilice este botón para seleccionar la próxima pista.
22-Botón +10
Utilice este botón para avanzar de a 10 pistas de una sola vez.
23-Entrada IPOD
Utilice para conectar el IPOD.
24- Botón REPEAT
Utilice este botón para repetir una pista o todas las pistas del CD.
25- Botón STOP
Presione este botón para detener la reproducción.
26- Perillas JOG & SHUTTLE
SHUTTLE: Utilice la rueda para seleccionar la dirección de escaneado y la
velocidad. El disco es explorado en dirección hacia delante cuando la rueda
SHUTTLE se gire en sentido horario a partir de la posición neutral; en dirección
reversa cuando la rueda SHUTTLE se gire en sentido anti horario. La velocidad de
escaneado aumenta cuando la rueda SHUTTLE se gire más rápidamente.
JOG: En modo pausa, si gira la rueda JOG, el punto en el cual el sonido se produce
se mueve por un número de cuadros correspondiente al número de clicks. Si la gira
en sentido horario, mueve el punto hacia delante; si la gira en el sentido contrario,
lo mueve hacia atrás. En el modo PLAY, la función JOG aumenta o disminuye la
velocidad de la pista. (sentido horario: aumenta, anti horario: disminuye).
27- PITCH CONTROL
Utilice este fader para aumentar o disminuir la velocidad de la pista del CD o
aumentar o disminuir el tono de la pista del iPOD.
28- Botón CUE
Presione el botón CUE durante la reproducción para volver a la posición de donde
comenzó la misma.
29-Botón PLAY/ PAUSA
Cada vez que presione el botón PLAY/ PAUSE, el funcionamiento cambia de
reproducción a pausa o de pausa a reproducción.

30- OPEN/ CLOSE
Presione para cargar o expulsar el disco. Cada vez que presione se abrirá o cerrará la
bandeja de disco.
NOTA: El soporte de disco no se abrirá amenos que se haya pulsado el botón
detener o pausa anteriormente.
DIAGRAMA DE REFERENCIA DEL PANEL TRASERO
FUNCIONES DEL PANEL TRASERO
1-Botón POWER
Presione la llave para encender o apagar el equipo. Para apagar, presione nuevamente.
2- CABLE AC
Utilice este cable para conectar el cable de tensión AC a la unidad.
3-LLAVE DE LA FUENTE DE TENSIÓN
Utilice este selector para elegir la fuente de tensión adecuada (algunos países tienen
otras fuentes de tensión)
4-USB
Conecte al USB
5-SALIDA DEVIDEO
6-SALIDA DE AUDIO
Salida de audio de CD/IPOD. Conecte esta salida a la entrada del mezclador.

GARANTÍA
CONDICIONES DE GARANTÍA
El equipo DMP-3006ip está cubierto por una garantía de 6 meses sobre las partes y
reparación excepto los Crossfaders (90 días).
Las siguientes normas se aplican a partir del día en que el equipo deja la fábrica:
La fecha en la factura se considera la fecha a partir de la cual la garantía es efectiva.
Solo las empresas aprobadas por DMP-3006iP pueden trabajar sobre el equipo. La
garantía se vuelve nula cuando otros técnicos abren el equipo.
Durante el período de garantía, los equipos defectuosos deben ser enviados a través de
correo pre-pago en la caja original. DMP-3006iP devolverá los equipos a través de
correo pre-pago durante el primer año de la garantía. Luego, el costo de envío será
pagado por el usuario.
Los potenciómetros tienen un período de vida útil limitado y no están cubiertos por el
fabricantes por más del uso normal.
Para todas las dudas y preguntas acerca de la reparación, consulte al distribuidor local
que estará capacitado para ayudarlo al respecto.
ESPECIFICACIONES:
Memoria BUFFER anti-choque: 40 segundos.
Rango de Pitch: +/- 12%
Fuente de tensión: 115/ 230V 50/60Hz
Consumo: 25 Watts
Medidas: 260x 217 x 112 mm


MANUAL DE INSTRUÇÕESMANUAL DE INSTRUÇÕES
MANUAL DE INSTRUÇÕES
Table of contents
Languages:


