Skyfood PA-7 PRO User manual

69975.3 - ENGLISH/ESPAÑOL
Data de Revisão: 12/11/2021
DUE TO THE CONSTANT IMPROVEMENTS INTRODUCED TO OUR EQUIPMENTS, THE INFORMATION CONTAINED IN THE PRESENT INSTRUCTION MANUAL MAY BE
MODIFIED WITHOUT PREVIOUS NOTICE.
Skyfood Equipament LLC
OFFICE
11900 Biscayne Blvd. Suite 616 - North Miami, FL
33181 - USA
1-800-503-7534 | 305-868-1603
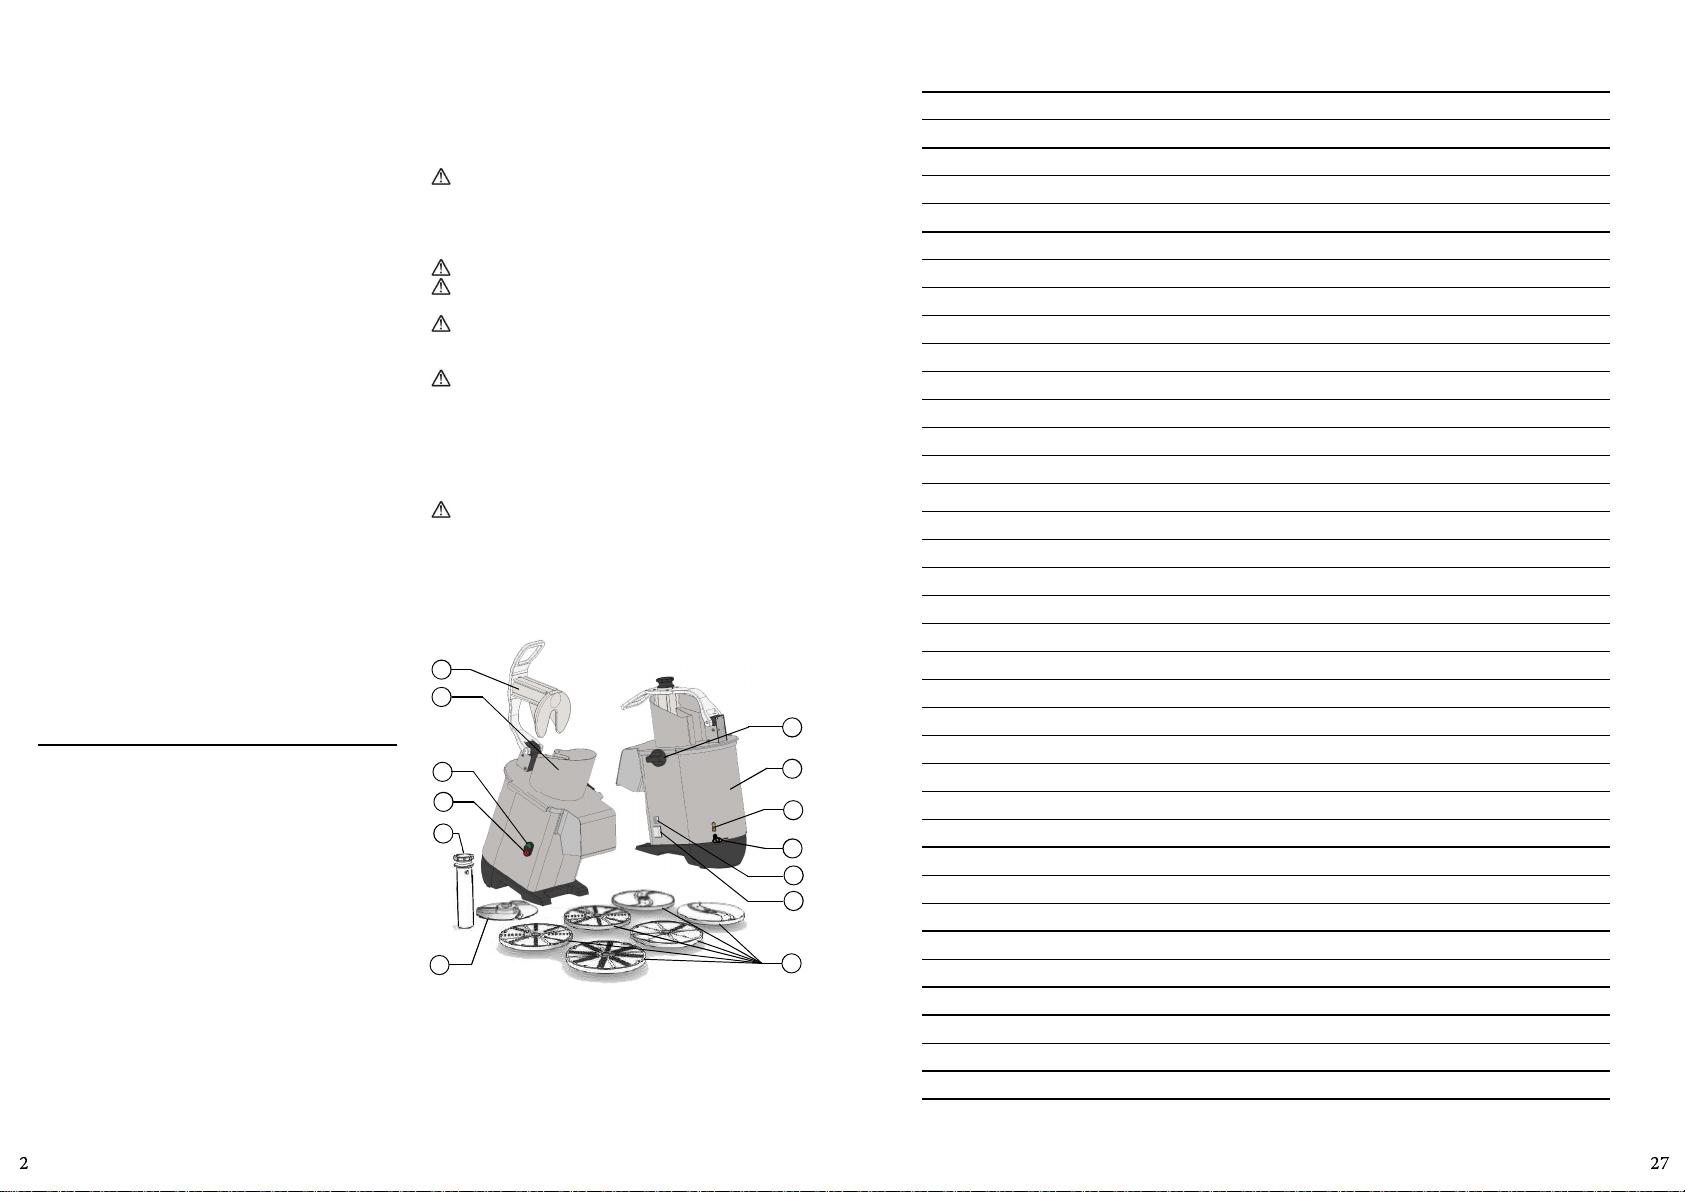
01 – Large Food Pusher
02 – Chamber Lid
03 – ON Switch
04 – OFF Switch
05 – Small Food Pusher
06 – Lock Lid
07 – Housing
08 – Terminal equipotencial
09 – Cable
10 – Oponal Discs
11 - Expeller Plate
12 - General Switch
11
05
06
07
12
1. INTRODUCTION
This product was developed to be used in commercial
kitchens. It is used, for example, in restaurantes, cafeterias,
hospitals, bakeries, butlers and others.
For the use of this equipment, it is not recommended that:
- The producon process be done connuously, in industrial
scale;
- The workplace be with corrosive or explosive atmosphere,
or contaminated with water, steam, dust or gas.
1.1 Safety
To avoid accidents, seizures and damages to the equipment,
follow the instrucons below:
1.1.1 Never use it with wet clothes or shoes and/or standing
on wet floors. Do not plunge it into water nor any other
liquid, do not spray water directly to the equipment.
1.1.2 When the equipment is in operaon the operator shall
supervise it, principally when children might be near.
1.1.3 Do not use spare parts that are not Recommended by
the manufacturer.
1.1.4 Keep the hands or any other object away from moving
parts while the equipment is in operaon.
1.1.5 Never wear clothes with loose sleeves, when operang
the appliance.
1.1.6 Check if the equipment tension is the same as the
power grid and that it is accordingly connected to the
grounding network.
This equipment shall not be used by children or any
person with reduced physical or mental capacity, lack of
experience or knowledge, unless they are under supervision
or have received from the person responsible for safety,
proper instrucons on how to use the equipment.
Keep this equipment out of the reach of children..
Never introduce fingers or any objects that are not the
Pushed in the Feeding Nozzle.
Unplug the equipment when: It is not in use, before to
clean it, before to remove or to place some accessory during
maintenance or any other service that is in operaon.
Make sure the cord is in perfect working condions,
if not, change it for one in accordance to the local safety
standards. Such change shall be made by qualified
professional following the local safety standards. Do not
operate the equipment if the cord or plug are damaged.
Do not lean the cord on table edges, nor let them lie on
hot surfaces.
In case of emergency, unplug the appliance from wall
electrical outlet immediately.
2. COMPONENTS AND TECHNICAL CHARACTERISTICS
01
02
03
04
10
08
09
SUMMARY
1. INTRODUCTION ............................. 2
1.1 Safety ...................................................... 2
2. COMPONENTS AND TECHNICAL
CHARACTERISTICS ...........................2
2.1 Avaliable Discs ......................................... 3
2.2 DISCS SELECTION ..................................... 3
3. INSTALLATION AND PRE-OPERATION ....5
3.1 Posioning ............................................... 5
3.2 Electrical Installaon ................................ 5
3.3 Equipotenal Terminal ............................. 5
3.4 Safety System .......................................... 5
3.5 Discs Disassembly .................................... 5
3.6 Discs assembling ...................................... 5
4. OPERATION.................................... 5
4.1 Starng .................................................... 5
4.2 Operaonal Procedures ........................... 5
4.2.3 Feeding the Processor ........................... 7
5. CLEANING ...................................... 7
6. MAINTENANCE .............................. 7
7. GENERAL SAFETY PRACTICES .......... 7
7. PROBLEM SOLVING ........................ 9
8. ELECTRICAL DIAGRAM ................. 10
SKYFOOD EQUIPMENT LLC - SERVICE ...
........................................................ 20
SKYFOOD’S LIMITED WARRANTY ..... 20
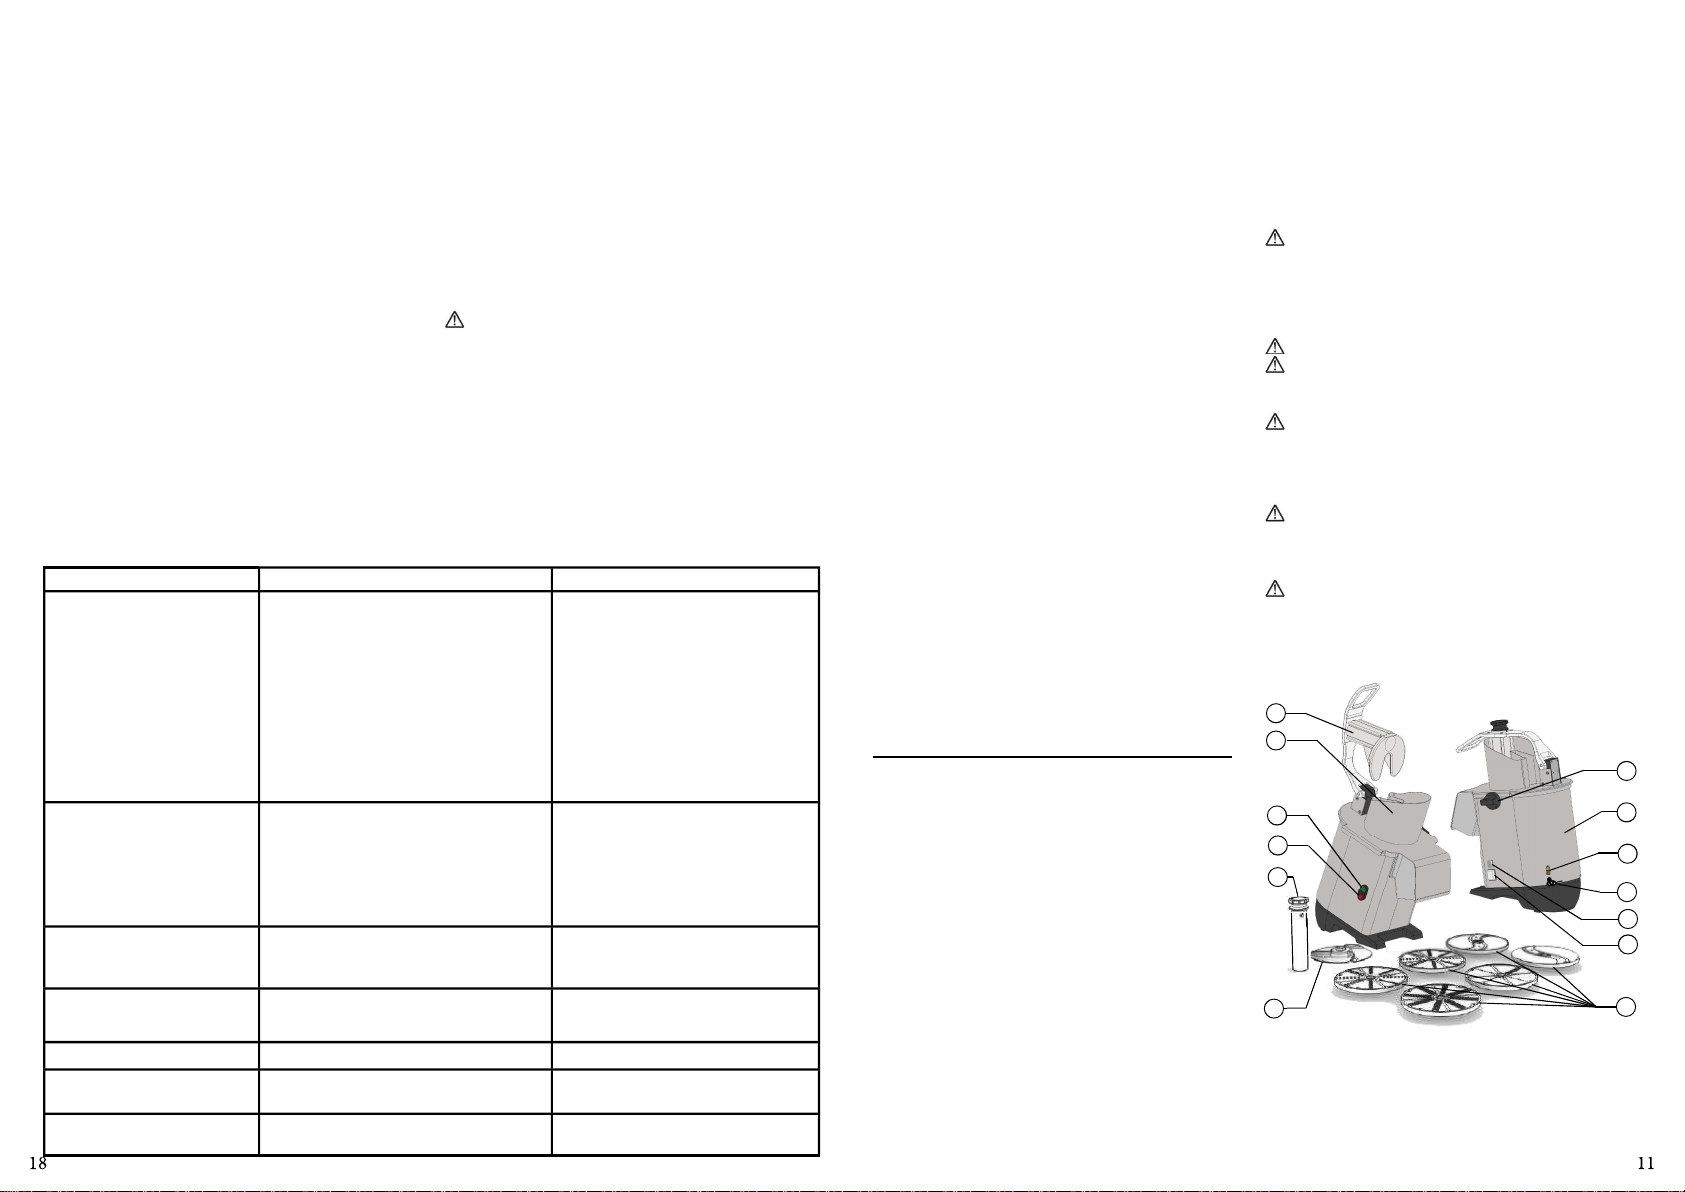
PICTURE 01
13

2.2 DISCS SELECTION
EXPELLING PLATE
The expelling plate is responsible for expelling de product
processed in the in the housing. It will Always have to be
used no maer what disc is chosen.
SHREDING DISCS - E.
Used to shered products (*) (except leaves and a lot fibered
products)
(*) Tomato, cabagge, carrot, beet, radish, potato, chayote,
turnip and similars
SHREDING COMBED DISCS - EH.
Used specially to shred products with skin or leaves (*). (*)
Tomato, cabbage, cucumber, kale and similar (*).
SHREDING DISCS - Z.
Used to shred products(*) that aer being processed, will
have secons like half-moon.
(*) Carrot, beet, turnip, potato, chayote and similar.
SQUARE SHREDING DISCS - H.
Used to shrede products(*) that aer being processed , will
have square cuts.
(*) Carrot, beet, turnip, potato, chayote and similar.
GRATER DISC - V
Used to grate products (*) (except leaves) (*) Bread, cheese,
coconut, cashew nut and similar.
CHARACTERISTICS UNIT PA7 PRO
Voltage V 110
Frequency Hz 60
Nominal Power W 600
Motor Power HP 0.5
Height mm 580
Width mm 280
Depth mm 520
Net Weight Kg 24
Gross Weight Kg 26.4
The chart below shows the dimensions of equipment to
the instalaon.
Height (open lid) 850 mm
height (closed lid) 580 mm
Width (open lid) 540 mm
Width (closed lid) 280 mm
Length 538 mm
Height up to exit 185 mm
2.1 Avaliable Discs
OPTIONAL DISCS
(Sold Separetly)
DENOMINATION MODEL
SLICER DISC - 1 mm E1
SLICER DISC - 2 mm E2
SLICER DISC - 3 mm E3
SLICER DISC - 5 mm E5
SLICER DISC - 8 mm E8
SLICER DISC - 14 mm E14
SLICER DISC - 3 mm Z3
SHREDING DISC - 5 mm Z5
SHREDING DISC - 8 mm Z8
GRATING DISC V
SQUARE SHREDING DISC (JULIENE) - 7 mm H7
OPTIONAL DISCS (CONTINUATION)
(Sold Separetly)
DENOMINATION MODEL
SQUARE SHREDING DISC (JULIENE) - 3 mm H3
SLICER DISC - 10 mm E10
DICING BLADE -10mm GC10
WAVY SHREDING DISC - 3 mm W3
SQUARE SHREDING DISC - 1,5 mm H1,5
DICING BLADE -8mm 8mm
DICING BLADE -14mm 14mm
DICING BLADE -20mm 20mm
FRENCH FRIES BLADE -10mm 10mm
CHART 01
CHART 02
CHART 03

CHART OF SELLECTED CUTS
Food / Cut Slices
E, EH Wavy Slices
WSquared Sh.
HShreded
ZGrated
VCubes
Zuchini E1/E2/E3/E5/E8 W3 H1,5/H3/H7 Z3/Z5/Z8
Banana* E3/E5
Potato E1/E2/E3/E5/E8 W3 H1,5/H3/H7 Z3/Z5/Z8 E8+GC8 / E10+GC10 /E14+GC14
Beet E1/E2/E3/E5/E8 H1,5/H3/H7 Z3/Z5/Z8 E8+GC8 / E10+GC10 /E14+GC14
Nuts V
Onion E1/E3/E5 H1,5/H3 Z3/Z5 E5+GC8 /E8+GC8
Carrot* E1/E2/E3/E5/E8 W3 H1,5/H3/H7 Z3/Z5/Z8 E8+GC8 / E10+GC10 /E14+GC14
Chocolate V
Coconut Z3/Z5/Z8 V
Cabbage E1/E2/E3
Mushroom E1/E2/E3/E5
Lemon E1/E2/E3/E5 W3
Apple E1/E2/E3 H3
Toast V
Cucumber* E1/E2/E3/E5/E8 W3 H1,5/H3 Z3/Z5
Bell Pepper E1/E2/E3/E5/E8 W3 E5+GC8 /E8+GC8
Cheese Z3/Z5/Z8 V
Parmesan Cheese V
Radish E1/E2/E3/E5/E8 W3 H1,5/H3 Z3/Z5/Z8
Leuce E1/E2/E3/E5/E8 H3/H7 Z3/Z5/Z8
Orange E3/E5
Tomato E1/E2/E3/E5 E5+GC8 /E8+GC8
Papaya E14+GC20
Melon E14+GC20
Watermelon E14+GC20
The CHART 04 (The Chart of sellected cuts) suggests some types of cuts to the products that are commonly processed
in kitchens and restaurants. The cung results depend on the type and quality of the procut to be processed.
*For these products it is only recommended to use the small nozzle. The use of large nozzle will result in less quality in
the product process.
CHART 04
GARANTIA LIMITADA DE SKYFOOD
SKYFOOD EQUIPMENT LLC - SERVICIO
02 01
03
04
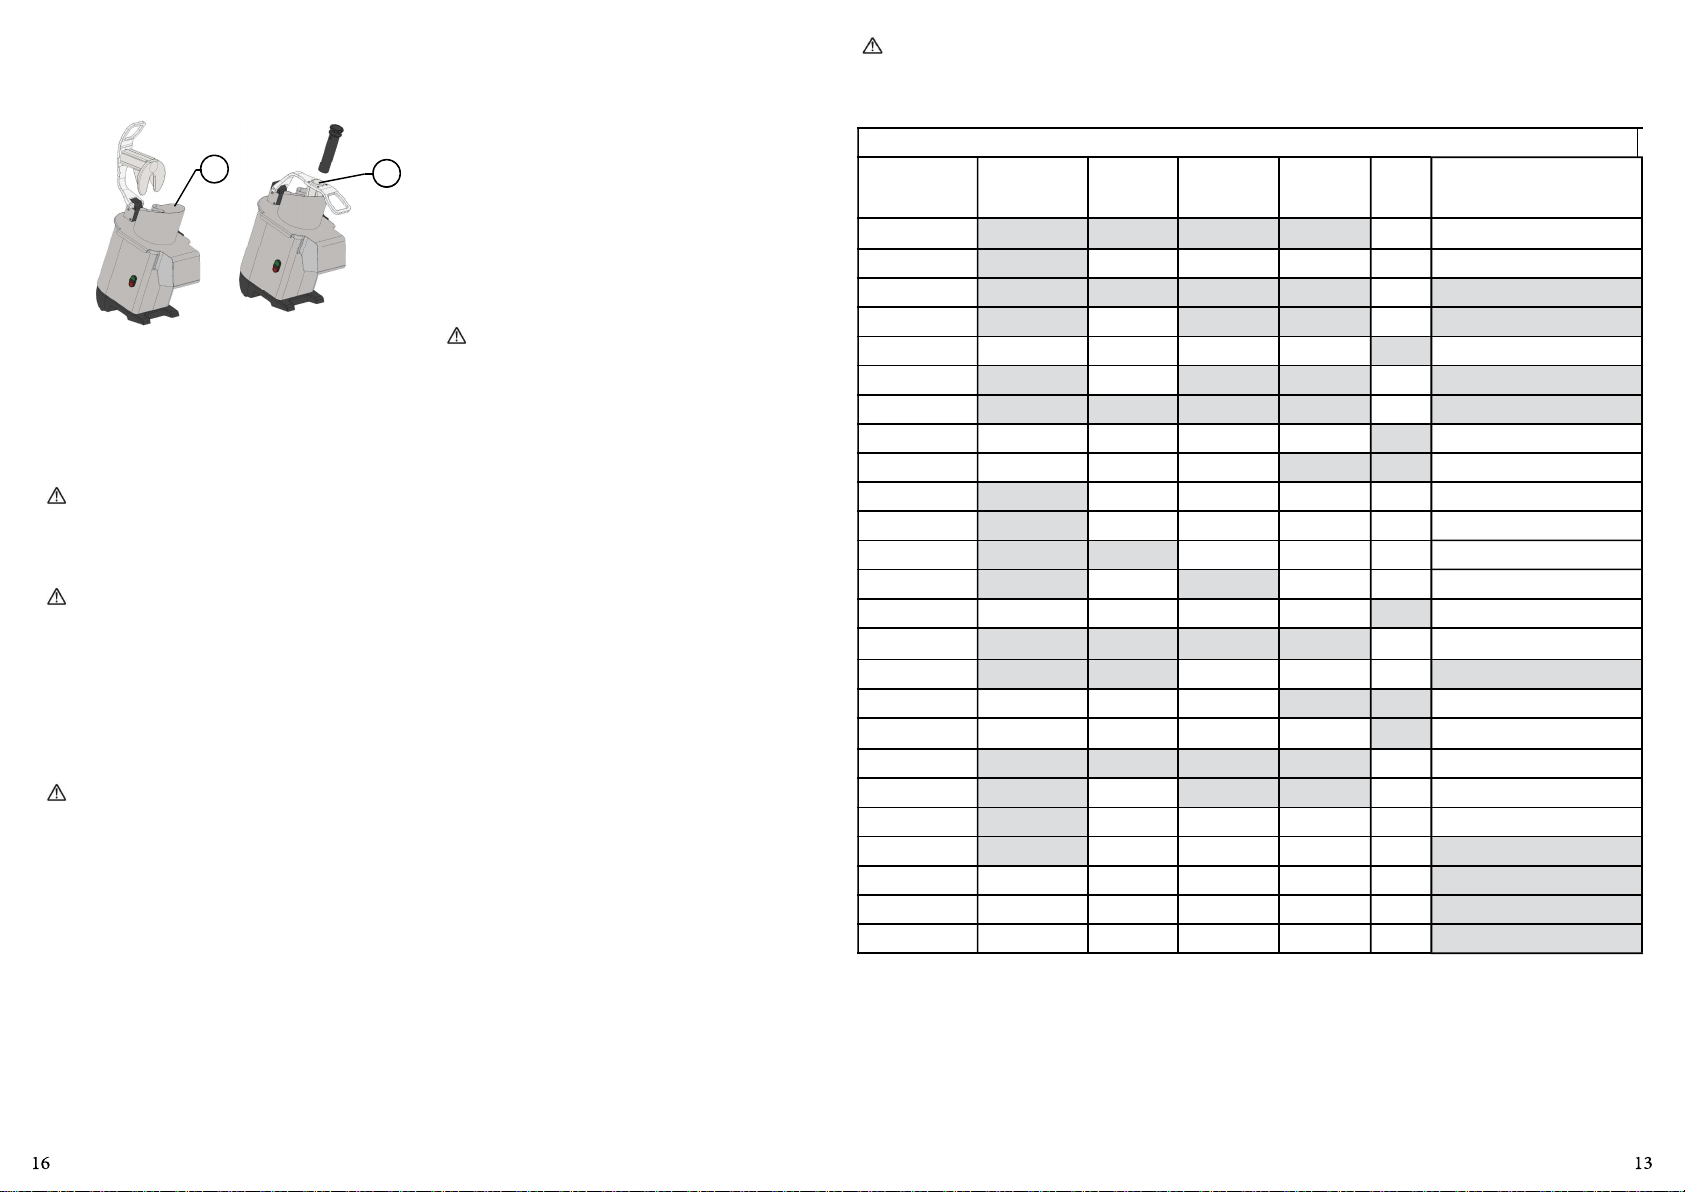
Terminal
3. INSTALLATION AND PRE-OPERATION
3.1 Posioning
This appliance must be posioned on a dry, steady and
leveled posion with a preferable height of 850mm.
3.2 Electrical Installaon
The electrical cable has 3 pins, the central one being the
grounding. It’s mandatory that all three pins are properly
connected before starng the equipment.
This equipment was developed to work in 110 V. Before
connecng the to the outlet, check the tension in the
Feeding Cable tag.
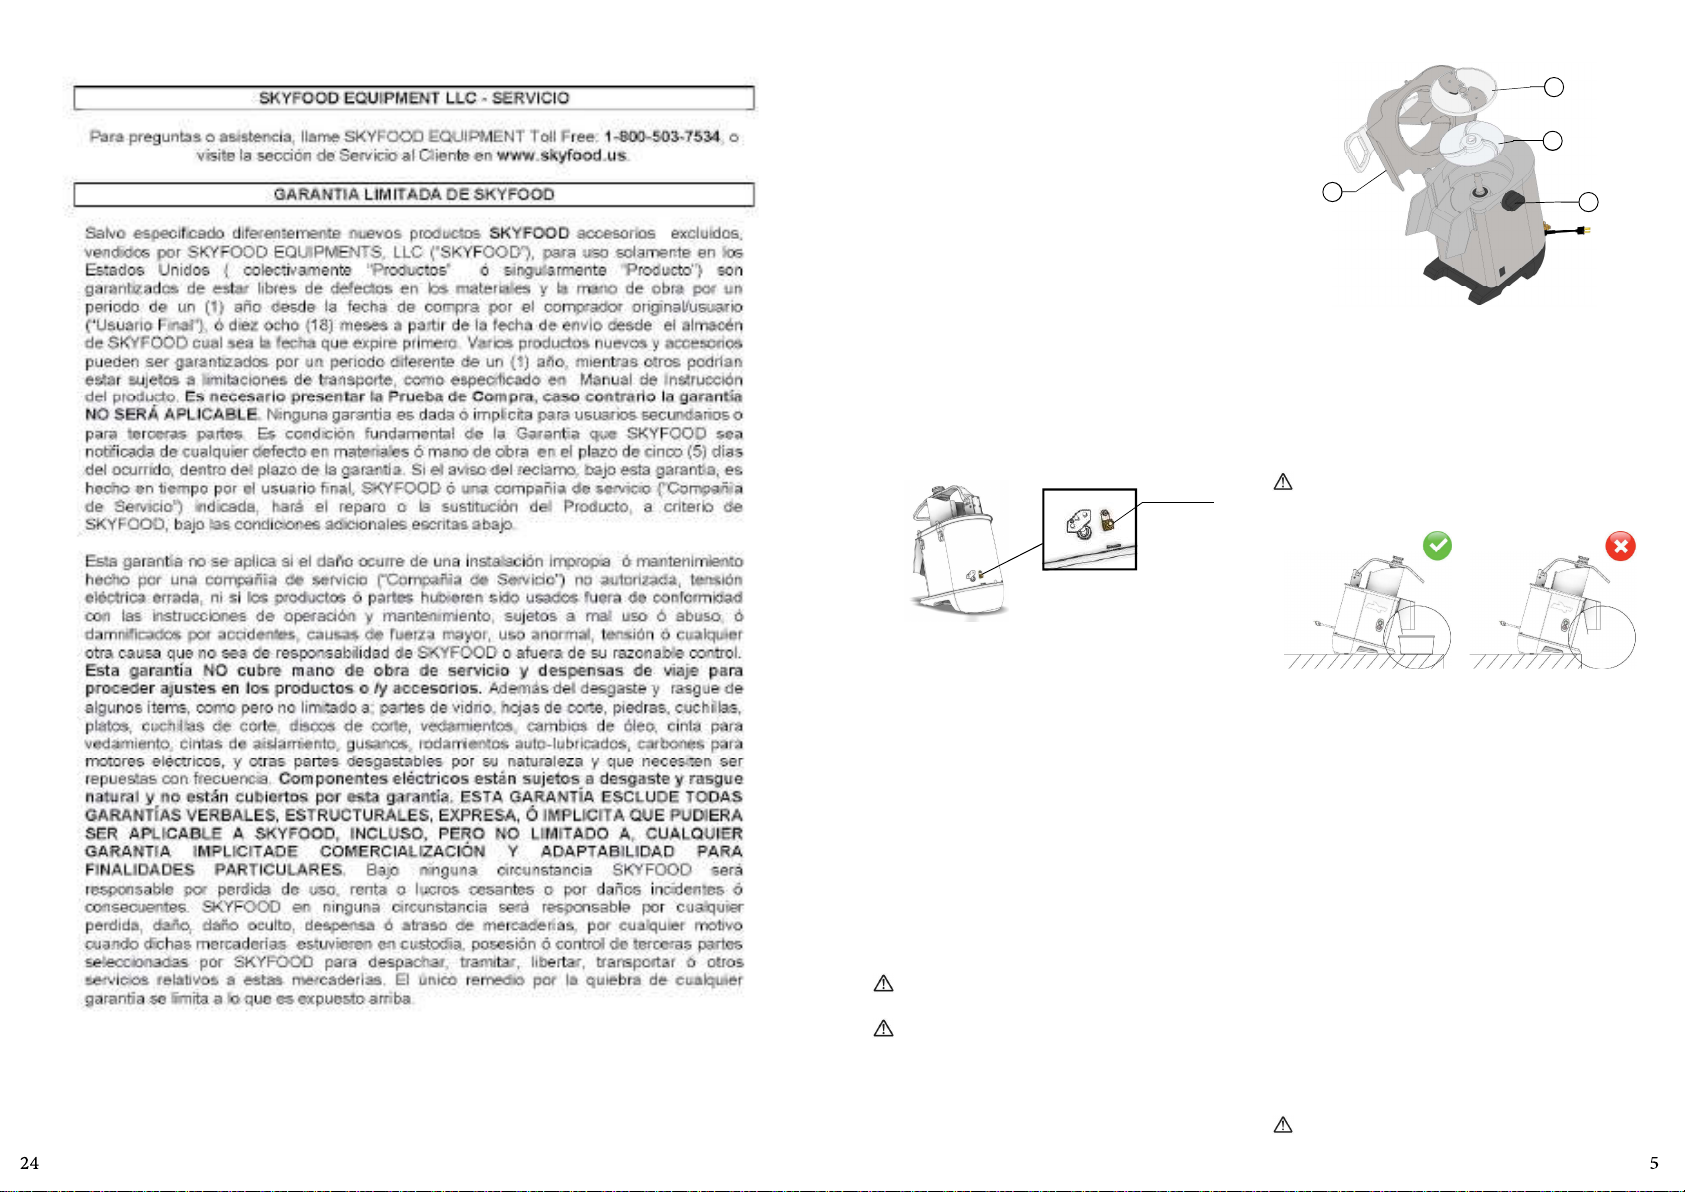
3.3 Equipotenal Terminal
The picture below indicates the terminal of external
equipotenal connecon.
This must be used to guarantee that there is no difference in
the potenal between different equipment turned on to the
power grid, diminishing the risks of electrical shock.
The equipment must be connected by their on equipotenal
connecon terminals.
3.4 Safety System
For the safety of the operator, this equipment has three
devices to turn off the machine and doing so prevent
accidents.
a - The first one automacally turns off when removing
the Lid. When returning to its posion, the machine
automacally works again.
b - The second device stops the machine when the large
pusher is raised, opening the large nozzle. When returning
the pusher to its posion, the machine will work again
automacally.
c - The third device turns off the machine motor in case of
overheang. Aer some minutes the machine will cool and
you can press Switch ON Buon again.
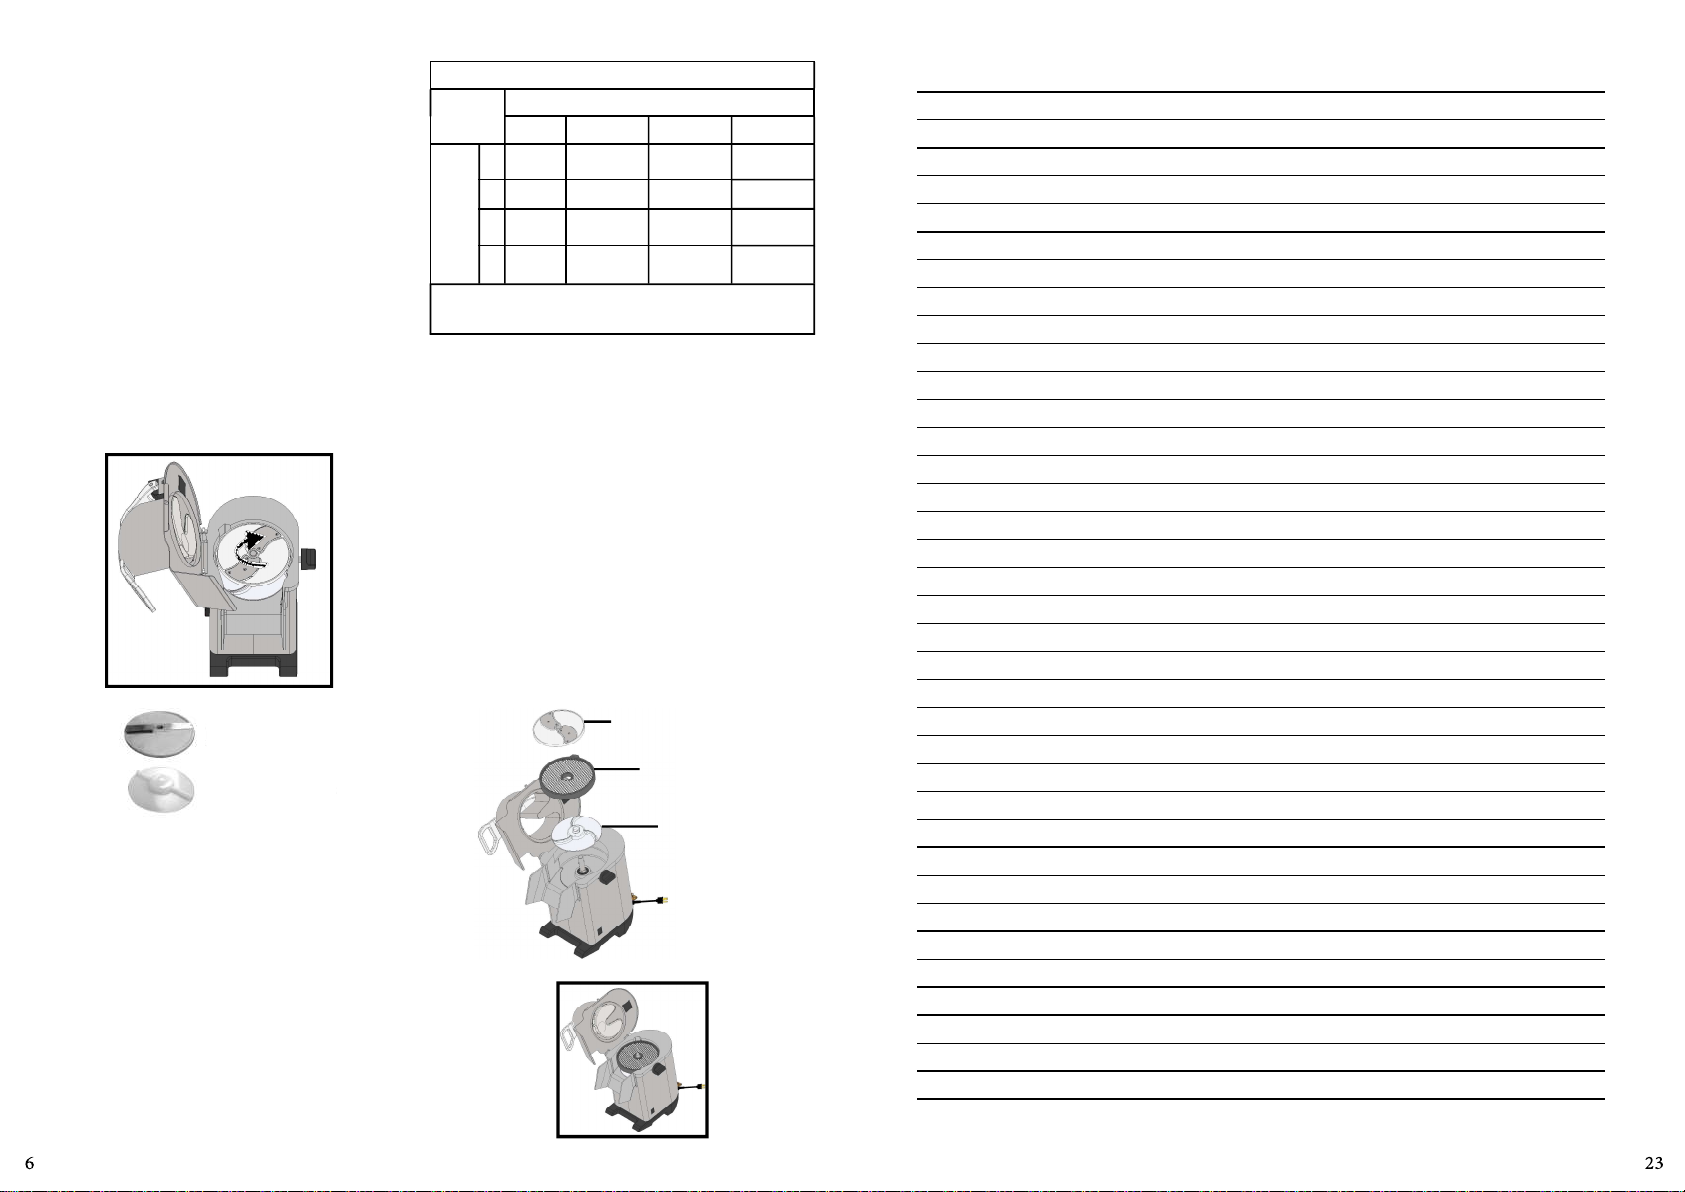
3.5 Discs Disassembly
Step 1: Open the Lid locks No. 1 and lt the lid of the storage;
Before placing the Lid of the Storage check if the disc is
well fied, avoiding damages to the equipment.
It is advised the use of the steel gloves to handle the
shredding discs. The discs are sharp and can hurt the user.
Step 2: Carefully remove the Disc No. 3 (Picture 03), turning
it in counter clockwise and pulling it up;
Step 3: Remove the Expelling plate No. 04 (Picture 03),
pulling it up.
3.6 Discs assembling
Step 1: Fit the expelling disc N° 04;
Step 2: Carefully fit the disc N° 03, that was chosen to the
processing;
Step 3: Close the Chamber Lid N° 02;
Step 4: Lock the zips No. 01 of the lid to fix the Lid in its
posion.
4. OPERATION
Never operate the equipment when close to the work
surface.
• Check if the equipment is firmly posioned in the work
area.
• Before using this equipment, you should wash all parts
that are in contact with the product to be processed,
with water and mild detergent.
4.1 Starng
Before starng the Food Processor:
- Check if the Lid is closed and locked;
- Check if the Small Pucher is correctly posioned inside the
Nozzle;
- Check if the General Switch is in the posion “I” on.
To start the equipment, follow the steps below:
Step 1: Press Switch Off to restart the equipment;
Step 2: Press Switch On to start the equipment;
Aer this procedure the appliance should turn on. In
case this does not happen, check the possible causes and
soluons in item 5 of the manual. (Analysis and Problem
Soluon).
4.2 Operaonal Procedures
4.2.1 Using only one disc
The expelling plate must always be used, no maer the
disc or grid that is being used. Before opening the lid, make
FIGURA 03
PICTURE 02
PICTURE 04
sure the disc is fully stopped.
All the discs must easily fit in the tracon system, with only
a lile turning movement of the disc.
Any contact between the disc and the lid indicates a bad
posioning of the disc.
The procedure for pung and removing the discs is
described below:
1 - With the lid open, place the expelling plate to perfectly
fit the facets that are present in the axle.
2 - Fit the disc in axle being careful with the selected disc
blade, turning it soly in the counter clockwise posion for
perfect lock.
3 - Close the lid, making sure it´s perfectly locked.
4 - To remove the disc, make the opposite process described
before.
The disc removal and placing must be done according to the
Picture 05.
4.2.2 Using a disc with a grid
The grid must fit between the expelling disc and the disc,
that must be completly clean to fir perfectly.
The grids must only be used with the shreding discs,
accoding to the Chart 05:
You may find the procedure top lace or to remove the discs
and grids below:
1 - When the machine is turned off and the disc is stopped,
open the lid.
2 - Place the expelling disc being careful that it fits perfectly
the exisng axle facets.
3 - Place the grid in such a way that it fits into the cavity
exisng in the machine frame.
4 - Be careful with the selected disc blade, fit the disc in its
axis turning it soly in the counter clockwise posion for
perfect lock.
5 - Close the lid and make sure that it is perfectly locked.
To remove the disc, make the opposite process described.
The disc removal and placing must be done according to the
Picture 06 and 07.
Cube Grid
Disc
Cube Grid
Expeller Plate
Expeller Disc
Slicer Disc E5
PICTURE 05
PICTURE 06
PICTURE 07
Dicing Cung Opon
CUBE GRID
GC8 GC10 GC14 GC20
DISCS
E5 5x8x8mm 5x10x10mm 5x14x14mm 5x20x20mm
E8 8x8x8mm 8x10x10mm 8x14x14mm 8x20x20mm
E10 x10x10x10mm 10x14x14mm 10x20x20mm
E14 x x 14x14x14mm 14x20x20mm
It´s not indicated the cut in cubes when the shrediding disc is
bigger than the cube grid.
CHART 05

02
01
4.3 Feeding the Processor
The Food Processor has two feeding nozzles, each one with
its parcularies.
- The Large Nozzle No. 01 (Picture 08) should be used to
process bigger food quanes (ex.: onions and potatoes),
for products with bigger dimension (cabbage, beet) and also
to cut in a specific direcon (ex.: limes and tomatoes).
- The Small Nozzle No. 02 (Picture 09) should be used to cut
long products (carrots and coconuts).
Always use the Pushers in their respecve nozzles and
never use other objects or hands to push food. In case of
damage, loss of the pushers, ask for replacement with the
Authorized Technical Assistance.
The products get out of the machine aer being
processed by gravity. It is important to clean the housing
and Outlet Nozzle to avoid obstrucon.
5. CLEANING
Step 1: Turn off the plug from the outlet.
Step 2: Disassemble the equipment (Item 3.5).
Step 3: Wash all the disassembling parts with warm water
and mild soap.
Never use water jets directly on the equipment, only
wash the disassembling parts when they´re disassembled.
Step 4: When washing the discs, handle with care. Do not
throw the discs one against the others or in other objects, to
preserve the blades.
Step 5: Clean the Housing and the Discs Housing with wet
fabric with warm water and mild soap.
5.1 Cauons with Stainless Steel
The Stainless Steel may present rust signs, which ARE
ALWAYS CAUSED BY EXTERNAL AGENTS, especially when the
cleaning or sanizaon is not constant and appropriate.
The Stainless Steel resistance towards corrosion is mainly
due to the presence of chrome, which in contact with
oxygen allows the formaon of a very thin protecve coat.
This protecve coat is formed through the whole surface of
the steel, blocking the acon of external corrosive agents.
When the protecve coat is broken, the corrosion process
begins, being possible to avoid it by means of constant and
adequate cleaning.
Cleaning must always be done immediately aer using
the equipment. For such end, use water, neutral soap or
detergent, and clean the equipment with a so cloth or a
nylon sponge. Then rinse it with plain running water, and dry
immediately with a so cloth, this way avoiding humidity on
surfaces and especially on gaps.
The rinsing and drying processes are extremely important to
prevent stains and corrosion from arising.
6. MAINTENANCE
The maintenance must be a group of procedures that have
the objecve of keeping the appliance in its best condion
of operaon and increasing its life expectancy and safety.
* Cleaning – Check the item 5 Cleaning of this Manual.
* Electrical wiring – Check all the cables to avoid deterioraon
and all the electrical contacts about their ghtening and
corrosion.
* Turn on and off buon, emergency buon, reset buon,
electric circuits, etc. Check the appliance so that all the
components are working correctly and that the operaon
is working normally.
* Installaon – Check the installaon of your appliance
according to the item 2.1 Installaon of this manual.
1 - Items to be verified and implemented monthly:
- Check the electrical installaon;
- Check the outlet tension;
- Measure the operang current and compare it to the
nominal one;
- Check all the electrical terminal ghtening of the appliance,
to avoid bad contact;
- Check the possible clearance of the shi of the electric
motor;
- Check the wiring and the electric cable to avoid its
overheang, deficient isolaon and mechanical breakdown.
2 - Items to be verified and implemented every 3 months:
- Check the electric components as ON/OFF Switch,
Emergency Buon, Reset Switch, and eletric circuit related to
overheang, deficient isolaon and mechanical breakdown.
- Check possible loosens in the bearings
- Check retainers, o´rings, v´rings and other sealing systems.
7. GENERAL SAFETY PRACTICES
The following safety instrucons have been elaborated to
guide and instruct the users of this equipment.
The machine has to be delivered only in perfect condions
of use by the Distributor to the user. The user shall operate
the machine only aer being well acquainted with the safety
procedures described in the present manual. READ THIS
MANUAL WITH ATTENTION.
7.1 Basic Operaon Pracces
a) Dangers
Some areas of this electric device have parts that are
connected to high voltage. These parts when touched may
cause a severe electrical shock or even be lethal.
Never touch manual commands such as switches, buons,
turning keys and knobs with your hands wearing wet clothes
PICTURE 08 PICTURE 09

and/or wet shoes. By not following these instrucons, the
operator could be exposed to the risk of severe electrical
shock or even to a lethal situaon.
b) Warnings
* The operator has to be well familiar with the locaon of
the ON/OFF Switch. This will assure that this Switch is easy
to be reached when necessary.
* Before any kind of maintenance or service on the
equipment, remove the plug from the socket.
* Provide enough space for a comfortable and safe
operaon, thus avoiding accidents.
* Water or oil on the floor will make it slippery and
dangerous. Make sure the floor is well clean and dry.
* Before using any commands (switches, buons, levers),
be sure it is the correct one. In case of doubt, consult this
manual.
* Never touch any manual commands (switch, buons,
lever) unadvisedly.
* If any work is to be made by two or more persons,
coordinaon signs will have to be given for each operaon
step. Every step of the operaon shall be taken only if a sign
has been made and responded.
c) Advices
* In case of power shortage, immediately switch the
machine off.
* Use recommended or equivalent lubricants, oils or greases.
* Avoid mechanical shocks/impacts, once they may cause
damages or malfunconing.
* Avoid contact of water, dirt or dust to the mechanical and
electrical components
Carefully read all the INSTRUCTIONS of this manual
before turning the machine ON. Be sure to well understand
all the informaon contained in this manual. If you have
any quesons contact your supervisor or your nearest
Dealer.
* DO NOT change the standard characteriscs of the
machine.
* DO NOT remove, tear off or maculate any safety or
idenficaon labels. If any labels have been removed or
are no longer readable, contact your nearest dealer for
replacement.
7.2 Basic Operaon Pracces
Carefully read all the INSTRUCTIONS of this manual before
turning the machine ON. Be sure to well understand all
the informaon contained in this manual. If you have any
quesons contact your supervisor or your nearest Dealer.
a) Danger
An electric cord or electric wire with damaged jacket or
bad insulaon might cause an electrical shock as well as
electrical leaks. Before use, check the condion of wires and
cord.
b) Advices
Be sure to well understand all the informaon contained in
this manual. Every operaon funcon or procedure has to
be thoroughly clear.
Before using any commands (switches, buons, levers),
be sure it is the correct one. In case of doubt, consult this
manual.
c) Precauons
The electric cord has to be compable with the power
required by the machine.
Cords touching the floor or close to the machine need to be
protected against short circuits.
7. 3 Roune Inspecon
a) Advice
When checking the tension of belts, DO NOT insert your
fingers between the belts and the pulleys.
b) Precauons
Check the motor and sliding or turning parts of the machine
in case of abnormal noise.
Check the tension of belts and replace the set when belts
show signs of wearing.
When checking the tension of belts DO NOT insert your
fingers between belts and pulleys.
Always remove the plug from the socket in any
emergency situaon.
Check protecons and safety devices to make sure they
always work properly.
7. 4 Operaon
a) Warnings
Do not operate the machine with long hair, which could
touch any moving part of the machine. This might lead to a
serious accident. Tie your hair up well and/or cover it with
a scarf.
Only trained and skilled personnel shall operate this
machine.
NEVER operate the machine without any original safety
devices, which must always be in perfect condions.
7.5 Aer Finishing the Work
a) Precauons
Always TURN THE MACHINE OFF before cleaning, and
remove the plug from the socket.
Never clean the machine unless it has come to a complete
stop.
Put all the components back to their funconal posions
before turning the machine ON again.
Do NOT insert your fingers in between belts and pulleys or
chains and gears.
7. 6 Maintenance
a) Dangers
Any maintenance with the machine in working situaon is
dangerous. TURN IT OFF AND UNPLUG IT FROM THE SOCKET
DURING ANY KIND OF MAINTENANCE SERVICE.
Always remove the plug from the socket in any
emergency situaon.
7.7 Warning
Electrical or mechanical maintenance has to be undertaken
by qualified personnel. The person in charge of maintenance
has to be sure that the machine is under TOTAL SAFETY
condions in order to service it.
SKYFOOD’S LIMITED WARRANTY
SKYFOOD EQUIPMENT LLC - SERVICE PROBLEMS CAUSES SOLUCTIONS
- The equipment doesn´t turn
on.
- Incorrect starng procedure;
- Thermal protector working;
- The Disc Housing Lid is open;
- Problem with Internal or External Electrical
circuit;
- Lack of electrical energy.
- Read the item 3.1 -
Starng the machine;
- Wait for some minutes and start again;
- Close the Lid;
- Call the Authorized Assistance;
- Check if there´s electric power.
- The machine starts, but when
the product is placed on the
equipment, it stops or turns
slowly.
- The belt is sliding.
- The safety device of the Lid is not working;
- Problems with the Electrical Motor.
- Adjust the belts tension;
- Call the Authorized Assistance;
- Call the Authorized Assistance.
- The cut product is stuck inside
the equipment.
- Lack of expelling plate.
- Outlet Nozzle is blocked.
- Place the Expelling Plate.
- Unblock the Nozzle.
- Burning or smoke smell. - Problem with Internal or External Electrical
circuit. - Call the Authorized Assistance.
- Irregular cut. - The Blades are not cung anymore. - Sharpen the Blades.
- Damaged Cable. - Problems in the shipping. - Call the Authorized Assistance.
- Abnormal noises. - Problems with the bearings. - Call the Authorized Assistance.
7. PROBLEM SOLVING
CHART 06
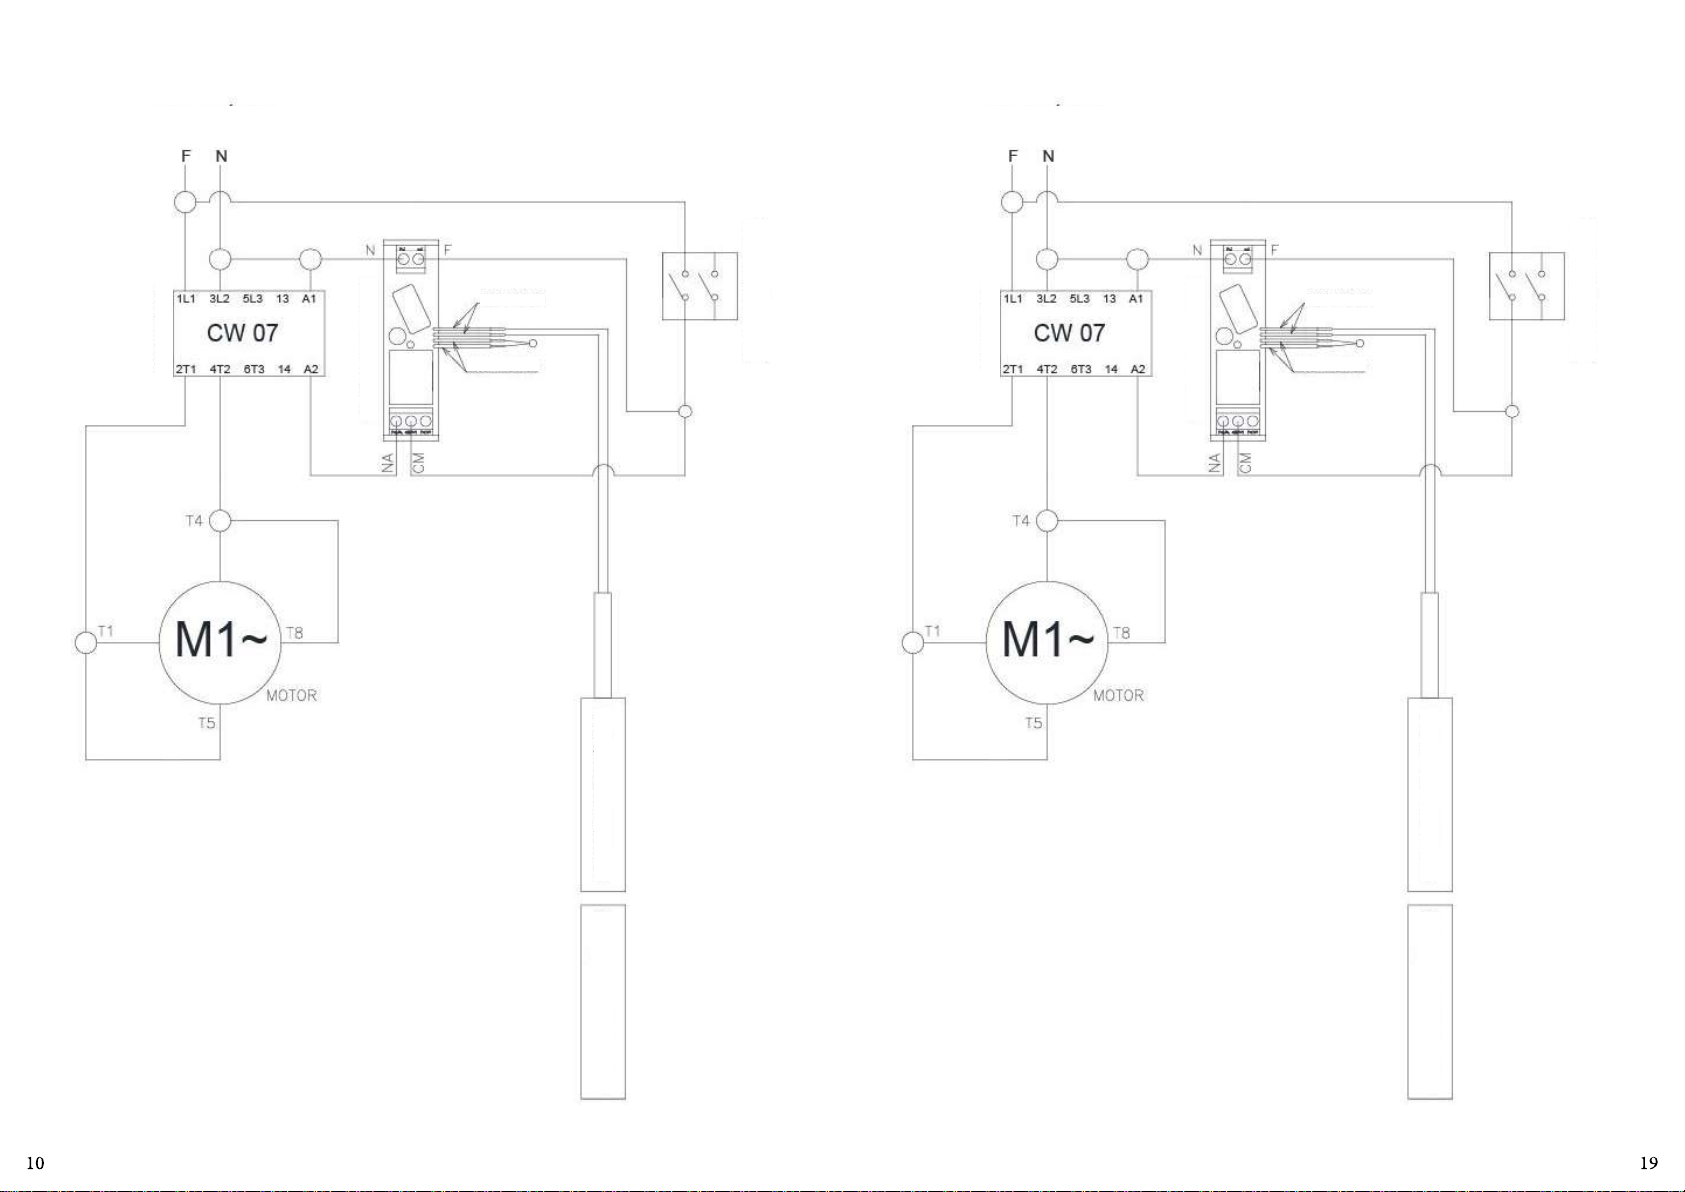
8. ELECTRICAL DIAGRAM
POWER GRID
ON/OFF
MAGNETIC SENSTOR
MAGNETIC ACTUATOR
ACTUATOR RELAY
CONTACTOR
BLUE WIRE
BLACK WIRE
9. DIAGRAMA ELECTRICO
RED ELÉCTRICA
ENCENDE/APAGA
SENSOR MAGNETICO
ACTUADOR MAGNETICO
RELÉ DEL ACTUADOR
CONTACTORA
HILOS AZULES
HILOS NEGROS
b) Cuidados
Verifique los motores, correas, y las partes deslizantes o
girantes de la maquina, con relación a ruidos anormales .
Al verificar la tensión de las correas, sustuya el conjunto,
caso alguna correa tenga desgaste .
Verifique las protecciones y los disposivos de seguridad
para que siempre funcionen adecuadamente .
4. Operación
a) Avisos
No trabaje con pelo largo, que pueda tocar cualquier
parte de la maquina , pues el mismo podría causar serios
accidentes. Manténgalo recogido, ó cúbralo con una gorra
o pañuelo. Solamente operadores entrenados y calificados
pueden operar la maquina .
Nunca toque con las manos o de cualquier otra manera,
partes girantes de la maquina.
JAMÁS opere la maquina, sin algún de sus accesorios de
seguridad
7.5 Después de Terminar el Trabajo
a) Cuidados
Al terminar el día de trabajo proceda con la limpieza de la
maquina. Para tanto, despréndala
sicamente de la toma.
Nunca limpie la maquina antes de su PARADA COMPLETA.
Recoloque todos los componentes de la maquina en sus
lugares, antes de prenderla otra vez.
Con frecuencia controle la tensión de las correas o de las
cadenas, NO coloque los dedos entre las correas y las poleas
ni entre las cadenas y sus engranajes.
7. 6 Mantenimiento
a) Peligros
Con la maquina prendida cualquier operación de
mantenimiento es peligrosa. DESPRENDALA FÍSICAMENTE
DE LA RED ELÉCTRICA, DURANTE TODA LA OPERACIÓN DE
MANTENIMIENTO.
Siempre rere la flecha de su enchufe en casos de
emergencia.
7.7 Aviso
El mantenimiento eléctrico o mecánico debe ser hecho por
una persona calificada para hacer el trabajo.
La persona encargada por el mantenimiento debe
cerficarse que la maquina trabaje bajo condiciones
TOTALES DE SEGURIDAD.
PROBLEMAS CAUSAS SOLUCIONES
- El equipo no enciende.
- Procedimiento de accionamiento
incorrecto.
- Protector térmico del motor está actuando.
- La Tapa del Recipiente de los discos está
abierta.
- Problema en el circuito eléctrico interno o
externo de la máquina.
- Falta de energía eléctrica.
- Lea el ítem 3.1 -
Accionamiento
- Aguarde algunos minutos e intente
nuevamente.
- Cierre la Tapa del Recipiente.
- Llame al Servicio Técnico Autorizado.
- Verifique si hay energía
eléctrica.
- El equipamiento enciende,
pero al colocar el producto
dentro de él, para de funcionar
o gira en baja rotación.
- La correa está panando.
- El disposivo de seguridad de la Tapa del
Recipiente está con mal contacto.
- Problemas con el Motor
Eléctrico.
- Ajuste la tensión de las correas;
- Llame al Servicio Técnico Autorizado;
- Llame al Servicio Técnico Autorizado.
- El producto cortado queda
preso en el interior de la
máquina.
- Falta del disco expulsor.
- Boca de Salida obstruida.
- Coloque el disco expulsor.
- Desobstruya la Boca de Salida.
- Olor a quemado e/o humo. - Problema en el circuito eléctrico interno o
externo de la máquina. - Llame al Servicio Técnico Autorizado.
- Corte Irregular. - Cuchillas desafiladas. - Afilar las cuchillas.
- Cable eléctrico dañado. - Falla en el trasporte del producto. - Llame al Servicio Técnico Autorizado.
- Ruídos anormales. - Problemas con rulemanes. - Llame al Servicio Técnico Autorizado.
8. RESOLUCIÓN DE PROBLEMAS
CUADRO 06
01 – Empujador ancho
02 – Tapa del recipiente
03 – Interruptor encendido
04 – Interruptor apagado
05 – Empujador estrecho
06 – Traba de la Tapa
07 – Gabinete
08 – Terminal equipotencial
09 – Cable de energía
10 – Discos
11 - Disco Expulsor
12 - Llave geral
11
05
06
07
12
1. INTRODUCCIÓN
Este producto fue desarrollado para el uso en cocinas
comerciales. Se uliza en, por ejemplo, restaurantes,
cannas, hospitales, panaderías, carnicerías y similares.
La ulización de esta máquina no es recomendada cuando:
- El proceso de producción sea de forma connua en escala
industrial;
- El local de trabajo sea un ambiente con atmósfera corrosiva,
explosiva, contaminada con vapor, polvo o gas.
1.1 Seguridad
Para evitar accidentes, lesiones graves o daños a la máquina,
se deberán tener en cuenta las siguientes instrucciones:
1.1.1 Nunca ulice la máquina con ropas o pies mojados,
así como tampoco sobre superficies húmedas o mojadas.
Jamás la sumerja en agua ni direccione chorro de agua u
otro líquido hacia la misma.
1.1.2 Si la máquina ha sufrido una caída, está abollada,
dañada o no enciende, es necesario llevarla a un Servicio
Técnico Autorizado para revisión, reparación o ajuste.
1.1.3 No use accesorios que no sean recomendados por el
fabricante.
1.1.4 Mantenga las manos o cualquier utensilio alejados de
las partes en movimiento.
1.1.5 Nunca use ropas con mangas anchas, principalmente
en los puños, durante la operación.
1.1.6 Verifique que el voltaje de la máquina sea igual al de la
red eléctrica y que la misma esté debidamente conectada a
la descarga a erra.
Esta máquina no es apta para ser ulizada por niños
ni personas con discapacidad sica, sensorial o psíquica,
o que carezcan de la experiencia y los conocimientos
necesarios; excepto cuando lo hagan bajo la supervisión de
una persona responsable de su seguridad o que hayan sido
instruidos en el manejo.
Mantenga la máquina fuera del alcance de los niños.
Nunca introduza os dedos nos locais de alimentação
e descarga de alimentos. Ulize apenas os soquetes na
alimentação.
Desconecte la máquina de la red eléctrica en las
siguientes situaciones: cuando no esté en uso; antes de
limpiarla; para la colocación o rerada de accesorios;
durante la manutención o cualquier otro servicio que no
sea la operación.
No ulice ninguna máquina que esté con el cable o
enchufe dañado. No deje que el cable cuelgue del borde
de la mesa o del mostrador ni que entre en contacto con
superficies calientes.
En caso de emergencia, rere el enchufe del
tomacorriente.
2. COMPONENTS Y CARACTERÍSTICAS TÉCNICAS
01
02
03
04
10
08
09
FIGURA 01
13
INDICE
1. INTRODUCCIÓN ........................... 11
1.1 Seguridad .............................................. 11
2. COMPONENTS Y CARACTERÍSTICAS
TÉCNICAS ........................................ 11
2.1 Discos Disponibles ................................. 12
2.2 Selección de Discos ................................ 12
3. INSTALACIÓN Y PRÉ-OPERACIÓN .. 14
3.1 Posicionamiento .................................... 14
3.2 Instalación Electrica ............................... 14
3.4 Sistema de seguridad ............................. 14
3.5 Desmontaje de los Discos ...................... 14
3.6 Montage de los Discos ........................... 14
4. OPERACIÓN ................................. 14
4.1 Accionamento........................................ 14
4.2 Procedimiento para Operación .............. 14
4.3 Alimentando los Vertedores ................... 16
5. LIMPIEZA ..................................... 16
6. MANUTENCIÓN ........................... 16
7. NOCIONES GENERALES DE
SEGURIDAD ....................................1 8
8. RESOLUCIÓN DE PROBLEMAS ...... 18
9. DIAGRAMA ELECTRICO ................ 19
SKYFOOD EQUIPMENT LLC - SERVICIO .
........................................................ 24
GARANTIA LIMITADA DE SKYFOOD ......
........................................................ 24

2.2 Selección de Discos
DISCO EXPULSOR
El disco expulsor es responsable por la expulsión del
producto procesado en el Recipiente. Deberá ser usado
independientemente del disco elegido.
DISCOS CORTADORES - E.
Ulizados para rebanar productos (*) (excepto hojas y
productos muy fibrosos).
(*) Tomate, repollo, pepino, col, zanahoria, remolacha,
rabanito, patata, cayote, nabo y similares.
DISCOS CORTADORES ONDULADOS - W.
Ulizados para rebanar productos (*) (excepto hojas), cuyas
rebanadas, una vez procesadas, tendrán forma ondulada.
(*) Patata, pepino, zanahoria, remolacha, rabanito, nabo y
similares.
DISCOS DESHILADORES - Z.
Ulizados para deshilar productos (*) que luego de
procesados presentarán secciones media luna.
(*) Zanahoria, remolacha, rabanito, patata, cayote, nabo y
similares.
DISCOS DESHILADORES CUADRADOS (JULIENE) - H.
Ulizados para deshilar productos (*) que luego de
procesados presentarán secciones cuadradas.
(*) Zanahoria, remolacha, rabanito, patata, cayote, nabo y
similares.
DISCO RALLADOR - V.
Ulizado para rallar productos (*) (excepto hojas). (*) Pan,
queso, coco, castaña y similares.
CARACTERÍSTICAS UNIDAD PA-7 PRO
Tensión V 110
Frecuencia Hz 60
Potencia Nominal W 600
Potencia del Motor CV 0,5
Altura mm 580
Ancho mm 280
Profundidad mm 520
Peso Neto Kg 24
Peso Bruto Kg 26,4
El cuadro a seguir, conene las dimensiones de la
máquina para su respecva instalación.
Altura (tapa abierta) 850 mm
Altura (tapa cerrada) 580 mm
Largura (tampa abierta) 540 mm
Largura (tampa cerrada) 280 mm
Largo 538 mm
Altura hasta la boquilla de
salida
185 mm
2.1 Discos Disponibles
DISCOS OPCIONALES
(Vendidos Separadamente)
DENOMINACIÓN MODELO
DISCO CORTADOR - 1 mm E1
DISCO CORTADOR - 2 mm E2
DISCO CORTADOR - 3 mm E3
DISCO CORTADOR - 5 mm E5
DISCO CORTADOR - 8 mm E8
DISCO CORTADOR - 14 mm E14
DISCO DESHILADOR - 3 mm Z3
DISCO DESHILADOR - 5 mm Z5
DISCO DESHILADOR - 8 mm Z8
DISCO RALLADOR V
DISCO DESH. QUADRADO (JULIENE) - 7 mm H7
DISCOS OPCIONALES (CONTINUACIÓN)
(Vendidos Separadamente)
DENOMINACIÓN MODELO
DISCO DESH. QUADRADO (JULIENE) - 3 mm H3
DISCO CORTADOR - 10 mm E10
REJILLA DE CORTE EN CUBOS -10mm GC10
DISCO CORTE ONDULADO - 3 mm W3
DISCO DESH. CUADRADO (JULIENE) - 1,5 mm H1,5
REJILLA DE CORTE EN CUBOS -8mm 8mm
REJILLA DE CORTE EN CUBOS -14mm 14mm
REJILLA DE CORTE EN CUBOS - 20mm 20mm
REJILLA DE CORTE EN BASTONES -10mm 10mm
CUADRO 01
CUADRO 02
CUADRO 03
funcionen correctamente y que la operación del aparato sea
normal.
* Instalación – Verifique la instalación de su aparato según el
ítem 2.1 “Instalación” de este manual.
1 - Ítems a verificar y ejecutar mensualmente:
- Verificar la instalación eléctrica;
- Medir la tensión del tomacorriente;
- Medir la corriente de funcionamiento y comparar con la
nominal;
- Verificar aprietes de todos los terminales eléctricos del
aparato a fin de evitar posibles malos contactos;
- Verificar posibles holguras del eje del motor eléctrico;
- Chequear el cableado y el cable eléctrico cuando haya
señales de supercalentamiento, aislación deficiente o avería
mecánica.
2 - Ítems a verificar o ejecutar a cada 3 meses:
- Verificar componentes eléctricos como el Interruptor
Encendido/Apagado, botón de emergencia, botón reset/
reinicio y circuito electrónicos cuando haya señales de
supercalentamiento, aislación deficiente o avería mecánica.
- Verificar posibles holguras en los cojinetes y rodamientos.
- Verificar retenes, anillos o’rings, anillos v’rings y demás
sistemas de sellamiento.
7. NOCIONES GENERALES DE SEGURIDAD
Las Nociones Generales de Seguridad fueran preparadas
para orientar y instruir adecuadamente a los operadores de
las maquinas, así como aquellos que serán responsables por
su mantenimiento.
La maquina solamente debe ser entregue al operador en
buenas condiciones de uso, al que el operador debe ser
orientado cuanto al uso y a la seguridad de la maquina por
el Vendedor. El operador solamente debe usar la maquina
con el conocimiento completo de los cuidados que deben
ser tomados, luego de LEER ATENTAMENTE TODO ESTE
MANUAL.
7.1 Praccas Básicas de Operación
a) Peligros
Algunas partes del accionamiento eléctrico presentan
pontos o terminales con altos voltajes. Cuando tocados
pueden ocasionar graves choques eléctricos, o hasta la
muerte de una persona.
Nunca toque un comando manual (botón, llave eléctrica,
palancas etc.) con las manos, zapatos o ropas mojadas, no
obedecer esta recomendación, también podrá provocar
choques eléctricos, o hasta la muerte de una persona.
b) Advertencias
El local de la llave prende/apaga debe ser bien conocido,
para que sea posible accionarla a cualquier momento sin la
necesidad de procurarla.
Antes de cualquier manutención desconecte la maquina de
la red eléctrica.
Proporcione espacio suficiente para evitar caídas peligrosas.
Agua o aceite podrán hacer resbaloso y peligroso el piso.
Para evitar accidentes, el piso debe estar seco y limpio.
Antes de accionar cualquier comando manual (botones,
llaves eléctricas, etc.) verifique siempre si el comando es el
correcto, o en caso de dudas, consulte este Manual. Nunca
toque ni accione un comando manual (botones, llaves
eléctricas, palancas, etc.) por acaso.
Si un trabajo debe ser hecho por dos o más personas, señales
de coordinación deben ser dados antes de cada operación.
La operación siguiente no debe ser comenzada sin que la
respecva señal sea dada y respondida.
c) Avisos
En el caso de falta de energía eléctrica, desligue
inmediatamente la llave prende/apaga.
Use solamente óleos lubrificantes o grasas recomendadas o
equivalentes.
Evite choques mecánicos, ellos pueden causar fallas o malo
funcionamiento.
Evite que agua, suciedad o polvo entren en los componentes
mecánicos y eléctricos de la maquina.
NO ALTERE las caracteríscas originales de la maquina.
NO SUCIE, RASGUE O RETIRE CUALQUIER ETIQUETA DE
SEGURIDAD O DE IDENTIFICACIÓN. Caso alguna esté ilegible
o fuera perdida, solicite otra al Asistente Técnico mas
cercano. LEA ATENTAMENTE Y CON CUIDADO LAS ETIQUETAS
DE SEGURIDAD Y DE IDENTIFICACIÓN CONTENIDAS EN LA
MAQUINA, ASÍ COMO LAS INSTRUCCIONES Y LAS TABLAS
TÉCNICAS CONTENIDAS EN ESTE MANUAL .
7.2 Cuidados y Observaciones Antes de Prender la Maquina
Lea con atención y cuidado las INSTRUCCIONES
contenidas en este Manual, antes de prender la
maquina. Cerquese que entendió correctamente todas
las informaciones. En caso de duda, consulte su superior
o el Vendedor.
a) Peligro
Cables o hilos eléctricos con aislamiento dañado, pueden
provocar choques eléctricos.
Antes de usarlos verifique sus condiciones.
b) Avisos
Esté seguro que las INSTRUCCIONES contenidas en este
Manual, estén completamente entendidas. Cada función o
procedimiento de operación y de mantenimiento debe estar
perfectamente claro.
El accionamiento de un comando manual (botón, llave
eléctrica, palanca, etc.) debe ser hecho siempre después
que se tenga la certud de que es el comando correcto .
c) Cuidados
El cable de alimentación de energía eléctrica de la maquina,
debe tener una sección suficiente para soportar la potencia
eléctrica consumida.
Cables eléctricos que estuvieran en el suelo cerca de la
maquina, deben ser protegidos para evitar corto circuitos.
Los tanques de aceite deben estar siempre llenos. Reponga
aceite cuando necesario.
Para su seguridad lea todos los adhesivos en la
maquina.
3. Inspección de Runa
a) Aviso
Al averiguar la tensión de las correas, NO coloque los dedos
entre las correas y las poleas.
02
01
4.2.3 Alimentando los Vertedores
La Procesadora de Alimentos posee dos vertedores de
alimentación, cada uno con sus parcularidades.
- El Vertedor de Boca Ancha N° 01 (Fig. 08) desnado al
procesamiento de grandes candades de alimentos (ej.:
cebollas y patatas), para productos más grandes (ej.: repollos
y remolachas) y también para cortes en determinada
dirección (ej.: limones y tomates).
- El Vertedor de Boca Estrecha N° 02 (Fig. 09) desnado para
el corte de productos alargados (ej.: zanahorias y cocos).
Siempre use los Empujadores en sus respecvos
vertedores y nunca use otros instrumentos para empujar
los alimentos, mucho menos las manos. En caso de pérdida
o extravío de Empujadores, solicite su repuesto al Servicio
Técnico Autorizado.
La salida de productos ocurre por gravedad. Se
debe efectuar regularmente la limpieza en el interior
del Recipiente y en la boca de Salida a fin de evitar su
obstrucción.
5. LIMPIEZA
Paso 1: Desconecte el enchufe del tomacorriente.
Paso 2: Efectúe el desarme del aparato (Ítem 3.5).
Paso 3: Lave las partes desmontables con agua caliente y
jabón neutro.
Nunca use chorros de agua directamente sobre
el aparato, sólo en las partes desmontables y una vez
desarmadas.
Paso 4: Al lavar los discos, manipúlelos con cuidado. Para
preservar las cuchillas, no arroje los discos unos contra otros
o en otros objetos.
Paso 5: Pase un paño humedecido con agua bia y jabón
neutro en el Gabinete y en el Recipiente de los Discos.
5.1 Cuidados con los aceros inoxidables
Los aceros inoxidables pueden presentar puntos de
“corrosión”, que SIEMPRE SON PROVOCADOS POR AGENTES
EXTERNOS, principalmente cuando el cuidado con la
limpieza o higienización no sea constante y adecuado.
La resistencia a la corrosión del acero inoxidable se debe
principalmente a la presencia del cromo que, en contacto
con el oxígeno, permite la formación de una finísima camada
protectora. Esta camada protectora se forma sobre toda la
superficie del acero, bloqueando la acción de los agentes
externos que provocan la corrosión.
Cuando la camada protectora sufre un rompimiento, el
proceso de corrosión es iniciado, pudiendo ser evitado a
través de la limpieza constante y adecuada.
Inmediatamente después de la ulización del equipamiento,
es necesario proceder con la limpieza, ulizando agua,
jabón o detergentes neutros, aplicados con un paño suave o
esponja de nylon. A seguir, enjuagar con agua corriente, se
debe enjugar e, inmediatamente secar, con un paño suave,
evitando la permanencia de humedades en las superficies y
principalmente en las grietas.
El enjuague y el secado son extremamente importantes para
evitar el aparecimiento de huellas o corrosiones.
Soluciones ácidas, soluciones salinas, desinfectantes
y determinadas soluciones para esterilizar (hipocloritos,
sales de amoníaco tetravalente, compuestos de iodo,
acido nítrico y otros), deben ser EVITADAS por no poder
permanecer mucho empo en contacto con el acero
inoxidable.
Visto que generalmente poseen CLORO en su composición,
tales sustancias atacan el acero inoxidable, causando puntos
de corrosión.
Mismo los detergentes ulizados en la limpieza domésca,
no deben permanecer en contacto con el acero inoxidable
más de lo necesario, debiendo ser también removidos con
agua y la superficie deberá ser completamente seca.
Uso de abrasivos:
Esponjas o estropajos de acero y cepillos de acero en
general, además de rallar la superficie y comprometer
la protección del acero inoxidable, dejan parculas que
oxidan y reaccionan, contaminando el acero inoxidable.
Por eso, tales productos no deben ser usados en la limpieza
e higienización. Raspados hechos con instrumentos
punagudos o similares también deberán ser evitados.
Principales sustancias que causan la corrosión de los aceros
inoxidables:
Polvos, grasas, engrases, aceites, soluciones ácidas como el
vinagre, jugos de frutas u otros ácidos, soluciones salinas
(salmuera), sangre, detergentes (excepto los neutros),
parculas de aceros, residuos de esponjas o estropajos de
acero común, además de otros pos de abrasivos.
6. MANUTENCIÓN
La manutención comprende un conjunto de procedimientos
con el objevo de mantener el aparato en las mejores
condiciones de funcionamiento, permiendo el aumento de
su vida úl y de la seguridad.
* Limpieza – Verificar el ítem 3.3 “Limpieza” de este manual.
* Cableado: Revise todos los cables para corroborar posible
deteriorización y todos los contactos (terminales) eléctricos
para verificar posibles aplastados y corrosión.
* Contactos – Interruptor Encendido / Apagado, botón de
emergencia, botón reset/restablecer, circuitos electrónicos,
etc. Verifique el equipo para que todos los componentes
FIGURA 08 FIGURA 09
CUADRO DE SELECCIÓN DE CORTE
Alimento/ Corte Rebanada
E, EH Rebanada
ondulada
W
Deshilado
cuadrado
H
Deshilado
ZRallado
VCubos
Zapallito E1/E2/E3/E5/E8 W3 H1,5/H3/H7 Z3/Z5/Z8
Banana* E3/E5
Patata E1/E2/E3/E5/E8 W3 H1,5/H3/H7 Z3/Z5/Z8 E8+GC8 / E10+GC10 /E14+GC14
Remolacha E1/E2/E3/E5/E8 H1,5/H3/H7 Z3/Z5/Z8 E8+GC8 / E10+GC10 /E14+GC14
Frutos secos V
Cebolla E1/E3/E5 H1,5/H3 Z3/Z5 E5+GC8 /E8+GC8
Zanahoria* E1/E2/E3/E5/E8 W3 H1,5/H3/H7 Z3/Z5/Z8 E8+GC8 / E10+GC10 /E14+GC14
Chocolate V
Coco Z3/Z5/Z8 V
Col E1/E2/E3
Seta E1/E2/E3/E5
Limón E1/E2/E3/E5 W3
Manzana E1/E2/E3 H3
Pan Tostado V
Pepino* E1/E2/E3/E5/E8 W3 H1,5/H3 Z3/Z5
Pimiento E1/E2/E3/E5/E8 W3 E5+GC8 /E8+GC8
Queso Z3/Z5/Z8 V
Queso Parmesano V
Rabanito E1/E2/E3/E5/E8 W3 H1,5/H3 Z3/Z5/Z8
Repollo E1/E2/E3/E5/E8 H3/H7 Z3/Z5/Z8
Naranja E3/E5
Tomate E1/E2/E3/E5 E5+GC8 /E8+GC8
Papaya E14+GC20
Melón E14+GC20
Sandía E14+GC20
El CUADRO 04 (Cuadro de selección de cortes) sugiere algunos pos de cortes para los productos comúnmente
procesados en cocinas y restaurantes. El resultado de los cortes va a depender del estado, del po y de la calidad del
producto a procesar.
*Para estos productos se recomienda solamente la ulización del vertedor de alimentos de boca estrecha. El uso del
vertedor de boca ancha provocará una disminución en la calidad del procesamiento del producto.
CUADRO 04
02 01
03
04
3. INSTALACIÓN Y PRÉ-OPERACIÓN
3.1 Posicionamiento
Su aparato debe ser posicionado sobre una superficie seca,
firme y nivelada, con 850 mm de altura, preferencialmente.
3.2 Instalación Electrica
Antes de conectar el enchufe al tomacorriente, compruebe
el voltaje indicado en la equeta existente en el cable de
alimentación.
Es obligatorio que los tres puntos de el enchufe estén
debidamente conectados antes de poner en marcha el
aparato.
3.3 Terminal Equipotencial
La figura mostrada abajo indica el terminal de conexión
equipotencial externo. Este debe ser ulizado para garanzar
que no haya diferencia de potencial entre diferentes
aparatos conectados a la red eléctrica, disminuyendo al
máximo los riesgos de choque eléctrico.
Los disntos aparatos deben estar conectados uno al otro
por sus respecvos terminales de conexión equipotencial.
3.4 Sistema de seguridad
Para seguridad del operador, este aparato posee tres
disposivos capaces de apagar la máquina evitando así,
posibles accidentes.
a - El primero apaga la máquina automácamente al rerar
la Tapa del Recipiente. Al regresarla a su posición, la máquina
vuelve a funcionar de manera automáca.
b - El segundo disposivo interrumpe el funcionamiento de
la máquina cuando el empujador ancho se levanta, abriendo
el vertedor del mismo tamaño. Al retornar a su posición, la
máquina vuelve a funcionar automácamente.
c - El tercer disposivo apaga el motor de la máquina en caso
de sobrecalentamiento. Espere algunos minutos hasta que
la máquina se enfríe y vuelva a encenderla presionando el
interruptor Encendido.
3.5 Desmontaje de los Discos
Paso 1: Gire la traba de la tapa Nº 01 y bascule la tapa del
recipiente Nº 02;
Antes de colocar la Tapa del Recipiente, verifique si el
disco está bien encajado, evitando así daños al aparato.
Se recomienda el uso de guantes de malla de acero
para manipular los discos de corte. Sus bordes cortantes
pueden herir al usuario.
Paso 2: Rere cuidadosamente el Disco Nº 03, girándolo en
sendo anhorario y jalándolo hacia arriba;
Paso 3: Rere el disco expulsor N° 04, jalándolo hacia arriba.
3.6 Montage de los Discos
Paso 1: Encaje el disco expulsor N° 04;
Paso 2: Encaje cuidadosamente el Disco N° 03 escogido para
procesar;
Paso 3: Cierre la Tapa del Recipiente N° 02;
Paso 4: Trabe los enganches de la tapa N° 01 a fin de fijarla
en su posición.
4. OPERACIÓN
Nunca opere el equipo cuando el mismo se encuentre
en el borde de la mesa de trabajo.
• Verifique que el equipo esté firme en su local de
trabajo.
• Antes de usar la máquina, se deben lavar con agua y
jabón neutro, todas las partes que entran en contacto
con el producto a procesar.
4.1 Accionamento
Antes de encender el aparato, tenga en cuenta los siguientes
ítems:
- Verifique si la Tapa del Recipiente está cerrada y
debidamente trabada;
- Verifique si el Empujador estrecho está correctamente
colocado dentro del Vertedor;
- Verifique si el Interruptor General está en la posición “I”,
encendido.
Para poner en marcha el equipo, presione el Interruptor
Encendido.
4.2 Procedimiento para Operación
4.2.1 Usando solamente un disco
El disco expulsor deberá ulizarse siempre,
independiente del disco o rejilla que se esté usando. Antes
de abrir la tapa del recipiente, asegúrese que el disco se
haya detenido por completo.
FIGURA 03
FIGURA 04
Terminal
FIGURA 02
Todos los discos deben encajar fácilmente en el eje de
tracción. Para ello, basta realizar un pequeño movimiento
giratorio del disco.
Cualquier po de contacto entre el disco y la tapa del
recipiente, indica una incorrecta colocación del disco.
A connuación, se describe el procedimiento para la
colocación y extracción de los discos:
1 - Con la tapa abierta, coloque el disco expulsor, teniendo
en cuenta que debe ser encajado perfectamente en las
ranuras existentes en el eje.
2 - Encaje el disco seleccionado en el eje, tomando mucho
cuidado con las cuchillas del mismo. Luego gírelo levemente
en sendo anhorario para obtener un enganche perfecto.
3 - Cierre la tapa del recipiente, asegurándose que quedó
perfectamente trabada.
4 - Para extraer el disco, realice el procedimiento inverso al
descripto anteriormente.
La colocación y extracción del disco se debe hacer según la
Figura 05.
4.2.2 Usando un disco con rejilla
La rejilla debe encajarse entre el disco expulsor y el disco, los
cuales deberán estar absolutamente limpios para un encaje
perfecto.
Las rejillas deben ulizarse sólo con discos de corte, según
el Cuadro 05:
A connuación, se describe el procedimiento de colocación
y extracción de discos y rejillas:
1 - Con la máquina apagada y el disco parado, abra la tapa.
2 - Coloque el disco expulsor, teniendo en cuenta su encaje
perfecto en las ranuras existentes en el eje.
3 - Coloque la rejilla de tal manera que la misma quede
encajada en la cavidad existente en el recipiente de la
máquina.
4 - Tomando cuidado con las cuchillas del disco seleccionado,
encaje el mismo girándolo levemente en sendo anhorario
a fin de obtener una traba perfecta.
5 - Cierre la tapa asegurándose que la misma quede
perfectamente trabada.
Para extraer el disco, realice el procedimiento inverso al
descripto anteriormente.
La colocación y extracción del disco se debe hacer según
Figuras 06 y 07.
Rejilla Cubo
Disco
Rejilla Cubo
Disco Expulsor
Disco Expulsor
Disco Cortador E5
FIGURA 05
FIGURA 06
FIGURA 07
Opciones de cortes en cubo
REJILLA DE CORTE EN CUBO
GC8 GC10 GC14 GC20
DISCOS
E5 5x8x8mm 5x10x10mm 5x14x14mm 5x20x20mm
E8 8x8x8mm 8x10x10mm 8x14x14mm 8x20x20mm
E10 x10x10x10mm 10x14x14mm 10x20x20mm
E14 x x 14x14x14mm 14x20x20mm
No se recomienda el corte en cubos cuando el disco de corte
sea mayor que la rejilla.
CUADRO 05
Table of contents
Languages:
Popular Food Processor manuals by other brands

REDEKOP
REDEKOP MAV - 220 installation guide

Tower Hobbies
Tower Hobbies T18004 Safety and instruction manual

Ninja
Ninja STORM QB751Q Series owner's guide

Abode
Abode G2SMFP3001 user guide

Scarlett
Scarlett SC-HB42F61 instruction manual

Brentwood Appliances
Brentwood Appliances FP-546 Operating and safety instructions


