SKYPINE ELECTRONICS SN6104AC User manual

Release Date:2008/06/05
(Draft Only)

MAIN MENU Operation
BUTTON FUNCTION DESCRIPTION
1. When the XM2000 Module is connected to the head unit, pressing will go into
XM mode ,When the Sirius SC-C1 Module is connected to the Head Unit ,then
pressing will go into SIRIUS mode.
2. Pressing will go into NAVI mode.
3. Pressing will go into DVD mode
4. Pressing will go into HD Radio mode
5. Pressing will display the left additional part of the MENU
6. Pressing will display the right additional part of the MENU
7. Pressing will go into USB Media play mode
8. Pressing will go into SD media play mode

9. Pressing will go into iPod mode
10. Pressing will open Bluetooth menu
11. Pressing will view the Camera imag
12. Pressing will go into AUX IN 1 mode
13. Pressing will go into AUX IN 2 mode
14. Pressing will go into System Setup menu

HDRadio (FM/AM) Operation
BUTTON FUNCTION DESCRIPTION
1. Current Source information.
2. Touch to return to MAIN menu.
3. Radio Frequency Indicator
4. HD Radio Logo: Show this Logo when find HD Radio Signal.
5. Touch to change among AM/FM.
6. Auto Store/Preset Scan.
7. Scan all channel.
8. HD seek down.
9. HD seek up.
10. Touch to hide function button.
1
4
5 6 7 8 910

11. Information of the channel the playing back currently .You can touch to change
their items among ROGRAM ,TITLE ,ARTIST ,GENRE and COMMENT.
12. Touch to show function button.
13. Touch to seek backward
14. Touch to seek forward.
15. Touch to tune backward one step.
16. Touch to tune forward one step.
17. Label of current channel/number of available ,channels, touch to change the
channel.
18. Touch to show previous page of Preset Radio Stations.
19. Touch to show next page of Preset Radio Stations.
20. Volume control.
21. Preset Radio Stations: Touch to recall preset stations or touch and hold to store
a station.
Select FM/AM Band
Touch the BAND mode on the screen, or press the BAND button()on the remote
Control to change among the following bands: FM、AM.
Auto Tuning
Press the button ( ) on remote control or touch the button on the screen to
seek the next available channel by increasing the tuning frequency. Press the button
again to stop searching.
Press the button ( ) on the remote control or touch the button on the screen
to seek the next available channel by decreasing the tuning frequency. Press the
button again to stop searching.
Manual Tuning
Touch the or to increase or decrease the tuning frequency one step.
20
19
21
18
1416171513
12
11

Using Preset Stations
15 numbered preset buttons store and recall stations for each band. First 5 stored
stations (P1-P5) for the current band appear on the screen, touch the channel directly
to select.
You can touch the arrow buttons on the screen to see the other 10 preset
stations.
Storing a Station
1. Select a band (if needed), then select a station.
2. Touch and hold an onscreen preset button (5) for three seconds. The preset
number appears at the top of the screen.
Recalling a Station
1. Select a band (if needed).
2. Touch an on-screen preset button (5) to select the corresponding stored station.
Auto Store (AS)
Press and hold the button on the screen to automatic scan and store strong
radio stations in the 15 preset channels in the current band.
Program Scan (PS)
1.Press the button on the screen. Scan the stations in the 15 preset channels
in the current band.
2. Touch the button on the screen to automatic scan all channels in current
band.
3. Press any button to stop scanning and listen to the selected station.

DVD Player Operation
DVD Mode
The Unit will auto switch to DVD mode when a disc is inserted. Or press the DVD
button on the front panel or DVD ICON on the MAIN MENU
BUTTON FUNCTION DESCRIPTION
1. Touch to access Main Menu.
2. TouchtoswitchamongLEFT,RIGHT,STEREO.
3. Touch to display Sub-title.
4. Touch to repeat playback.
5. Touch to repeat from A to B. Select the repeat point A wherever you want to
start and the point B wherever you want to end, then, DVD displays from A to B
continually.
6. Touch to Show play information.
7. Touch to return to DVD main menu.
8. Touch to stop.
9. Touch to play Next.
10. Touch to fast forward.
11. Touch to Play/Pause.
12. Touch to fast reverse.
13. Touch to play previous.
14. Touch to GOTO Search.
15. Make use of these buttons to access a chapter/Track directly.
1
2
3
4
5
6
7
8
9
1
0
11
12
1
3
14

Controlling Playback
Stopping Playback
Touch the stop button on the screen or press the ()buttonontheremote
control to stop DVD play and touch the play/pause button on the screen or the (OK)
button on the remote control to resume disc play.
Pausing Playback
Touch the play/pause button on the screen to suspend or resume disc play.
Repeat Playback
Press the Repeat button on the screen or on the remote control to alter repeat
mode according to the following:
• DVD: Repeat Title, Repeat Chapter, Repeat Off
• CD (PBC Off): Repeat Single, Repeat Off
• MP3: Repeat Single, Repeat Folder, Repeat Off
Sectional Repeat Function (A-B)
Use the A-B function to define a specific area of a disc to repeat.
•PresstheRepeat A-B button ( ) on the screen or on the remote control to set the
start point (A) of the repeated section.
•PresstheRepeat A-B button ( ) again once you reach the desired end point (B)
of the repeated section. The selected portion of the DVD will now repeat continuously.
•PresstheRepeat A-B button ( ) again to cancel the A-B section setting and stop
repeat play.
Accessing the DVD Menu
Press any place of the DVD screen.
Moving Through Chapters
Press the ( ) button on the remote control to advance to the next chapter on the
DVD.
Press the ( ) button on the remote control to move to the previous chapter on the
DVD.
Fast Forward/Fast Reverse
Press the ( ) button on the remote control or touch the on the screen to fast
forward. Keep pressing or touching and releasing the button to increase the rate from
“2X” to “4X”, “8X”, and “20X”.
Press the ( ) button on the remote control or touch the on the screen to fast
reverse. Keep pressing or touching and releasing the button to increase the rate from
“2X” to “4X”, “8X”, and “20X”.
GOTO Search
During DVD or CD playback, perform the following steps to use the GOTO feature to
access a specific location on a disc:
1. Press the “-/--”button on remote control or touch the F Area on the screen to enter
“GOTO” mode.
2. Press the ( / ) buttons on the remote control to select a category.

• For DVD mode, you can choose Time or Title/ Chapter search.
• For CD mode, press the“-/--”button to choose between Track Search ,Disc Search
and Exit.
DVD Search
Time --- Go to specific time in current title
Title/Chapter ----Go to specific chapter in a title.
3. Touch the ( )/ (--- / ---) area on the screen to display a numeric
keypad on the touch screen.
4. Enter a time/Track number into the field using the numeric keypad on the remote
control or on the screen.
5. Press the OK button on the remote control or on the touch screen to go to the
specified location on the disc.
6. Press the “-/--”button on the remote control or the “ESC” to exit.
Direct Chapter / Track Selection
During DVD, VCD and CD playback, you can use the numeric keypad on the remote
control to access a track directly.
Viewing an Alternate PictureAngle (DVD Only)
Some DVDs contain scenes that have been shot simultaneously from different angles.
For discs recorded with multiple angles, press the (ANGLE) button on the remote
control to toggle available angles of the on-screen image.
Multi-Language Discs (DVD Only)
Changing Audio Language
:
:
15

If you are watching a disc recorded in multiple languages, press the (AUDIO) button
on the remote control to choose a language. You also can touch the area E, and then
touch the button.
NOTE: During CD playback, press the (AUDIO) button on the remote control to
choose between Left Channel, Right Channel, and Stereo.
Changing Subtitle Language
If you are watching a disc recorded in multiple languages with subtitles, press the
(SUBT) button on the remote control to choose the language in which you would like
the subtitles to appear. You also can touch the area E, and then touch the
button.
Playback Information
During DVD and CD playback, press the (INFO) button on the remote to display
playback information on the screen, including the media playing and current playback
time.
DVD Playback Information
The following information is displayed at the top of the screen during DVD playback:
1. indicates Current playing source.
2. Indicates the fourth of 16 titles on the DVD is currently playing.
3. Indicates the first of 20 chapters on the DVD is currently playing.
4. Indicates the playback time of the current title.
5. Indicates EQ setting (or decoding mode when listening to a DVD with 5.1
surround sound.)
6. Indicates the Loud Setting.
7. Indicates the current system time.
DVD T:1/1 00:01:35 User AM08:06
C:1/31 Level 3 Rear:Off
3
○
4
○
6
○
2
○5
○7
○
1
○

General Disc Information
Disc Symbols
Symbol 12cm Disc Properties Max Play Time
Single side single layer (DVD-5)
Single side double layer (DVD-9)
Double side single layer (DVD-10)
Double side double layer (DVD-18)
(MPEG 2 Method)
133 minutes
242 minutes
266 minutes
484 minutes
Single side single layer (VCD) (MPEG 1 Method)
74 minutes
Single side single layer 74 minutes
Symbol Meaning
Number of voice languages recorded.
The number inside the icon indicates the number languages
on the disc (maximum of 8).
Number of subtitle languages available on the disc
(maximum of 32).
Number of angles provided (maximum of 9).
Aspect ratios available. “LB” stands for Letter Box and “PS”
stands for Pan/Scan. In the example on the left, the 16:9
video can be converted to Letter Box video.
Indicates the region code where the disc can be played.
• Region 1: USA, Canada, East Pacific Ocean Islands
• Region 2: Japan, Western Europe, Northern Europe, Egypt,
South Africa, Middle East
• Region 3: Taiwan, Hong Kong, South Korea, Thailand,
Indonesia, South-East Asia
• Region 4: Australia, New Zealand, Middle and South
America, South Pacific Ocean Islands/ Oceania
• Region 5: Russia, Mongolia, India, Middle Asia, Eastern
Europe, North Korea, North Africa, North-West Asia
• Region 6: Mainland China
• ALL: All regions

CD/MP3/WMA Operation
BUTTON FUNCTION DESCRIPTION
16. Touch to display the numeric keypad on the screen, and then you can use the
numeric keypad to access a track directly.
17. Touch to repeat playback.
18. Touch to activate/deactivate Random Mode.
19. previous Page
20. Volume control
21. Next Page
22. Current track and total number of tracks on disc.
23. EQ
24. Track title , touch to play the track.
25. Touch to Play/Pause.
Playing CD Files
After inserting a CD disc, files will play in the sequence of the all directory. In playing
back, you can press the numeric button on the remote control or touch a track on the
onscreen directly to play.
Fast backward/fast forward
Touch the or on the screen to fast backward or fast forward play.

P3/WMA Discs
Press Button on the right
Playing MP3/WMA Files
After inserting a MP3/WMA disc, files will play in the sequence of the all directory. In
playing back, you can press the numeric button on the remote control or touch a track
directly to play.
XM Operation
This function is available when a XM Satellite Radio Receiver is connected through the
dedicated connection.
BUTTON FUNCTION DESCRIPTION
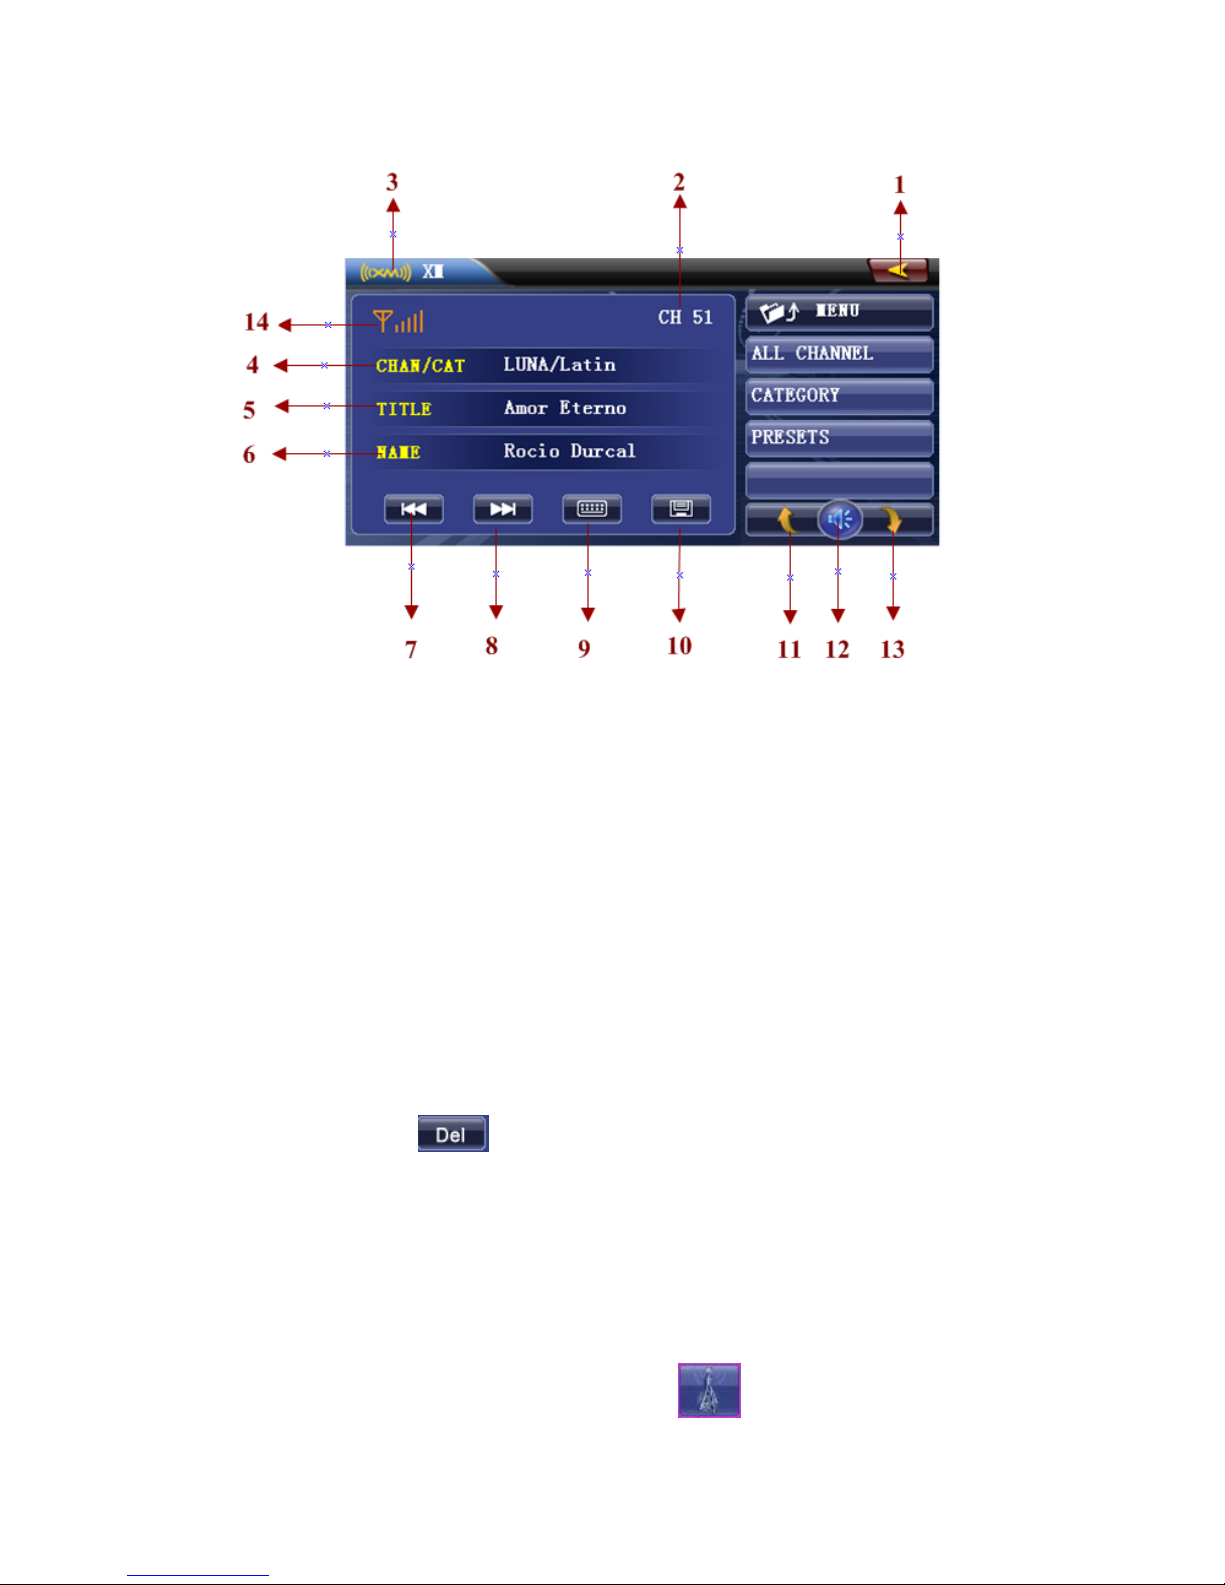
1. Touch to access Main Menu.
2. Current channel label.
3. Current source name.
4. Information of the channel the playing back currently .You can touch to change their
items among CH NAME, CATEGORY , CHAN/CAT.
5. Title of the channel the playing back currently.
6. Name of the channel the playing back currently.
7. Previous channel
8. Next channel
9. Touch to display the numeric keypad on the screen to access a channel directly.
10. Touch to store current channel.(If current channel is already in the PRESET list, this
button will become , and press it will delete the current channel from the
PRESET LIST)
11. Touch to show previous page of current list.
12. Volume control.
13. Touch to show next page of current list.
14. Signal Indicator.
Accessing the XM Mode
Access the MAIN menu first and then touch the button on the screen to
access XM mode.

Back Button
Press will go back to Main menu, and XM is still running until you select a
new source.
View all channels available
In XM screen press “ALL CHANNEL” will list out all available channels.
View all categories available
In XM screen press “CATEGORY” will list out all available categories.
Select a channel directly
Press and input the channel number you want and press “OK”.
Save channel to Preset
There are two ways:
15. If the current channel is not in Preset List, you can press button to store the
current channel to the first empty preset memory.
16. If the current channel is not in Preset List, you can press PRESET to display Preset
List and then find an empty preset list space and hold it for 3 seconds, then the
current channel will be stored to this space.
Delete Preset Channel
There are two ways:
1. In Preset list and select the channel you want to delete,then press , this
channel will be deleted from the Preset List.
2. If you want to replace a current new channel to one of the used Preset List space,
you can hold the List and then the old one will be replaced by the new one, and
old one will be deleted.
Go into Diagnoses mode
Press and input 999 and press OK, after that you will see the DIAGNOSE
screen below.

SIRUS Operation
This function is available when a Sirius Satellite Radio Receiver is connected through the
dedicated connection. This unit requires the following receiver:
●SIRIUS Satellite Radio Receiver: SC-C1
Note:
SIRIUS satellite radio is a subscription service.
Please contact Sirius Radio to begin or alter your subscription:
Internet: www.sirius.com
Telephone: 888-539-SIRIUS (747487)
BUTTON FUNCTION DESCRIPTION

1. Touch to access Main Menu.
2. Signal Indicator.
3. SID or Information of the channel the playing back currently .You can
touch to change their items among CHAN./CATE , CATEGORY ,
CHAN.NAME ,ARTIST , TITLE.
4. Previous available channel.
5. Next available channel.
6. Touch to display the numeric keypad on the screen to tune to a channel
directly, same as XM mode.
7. Touch to store current channel, same as XM mode.
8. Touch to show previous page of current list.
9. Press to display EQ Setting screen.
10. Touch to show next page of current list.
OPTIONS Function
Press “OPTIONS” to go into SIRIUS Setting mode. See below.

11. Press “TIME”, and you can select different TIME ZONE and the time will
be synchronized from the satellite.
PARENT LOCK MODE(NEED INPUT PASSWORD):
12. Previous page.
13. Next page.
14. Lock list. Touch to lock the channel.
15. Touch to go into PARENT LOCK mode, you need to input a correct
password.

16. Press to set the PASSWORD or remove the PASSWORD
17. Set Password
18. Remove password

19. Press to display Sirius ID.
View all channels available
In SIRIUS screen press “ALL CHANNEL” will list out all available channels.
View all categories available
In SIRIUS screen press “CATEGORY” will list out all available categories.
Select a channel directly
Press and input the channel number you want and press “OK”.
Save channel to Preset
There are two ways:
1. If the current channel is not in Preset List, you can press button to
store the current channel to the first empty preset memory.
2. If the current channel is not in Preset List, you can press PRESET to display
Preset List and then find an empty preset list space and hold it for 3
seconds, then the current channel will be stored to this space.
Delete Preset Channel
There are two ways:
Table of contents
Other SKYPINE ELECTRONICS Car Receiver manuals


