TAKEDOWN/CARE
Skywalk GmbH & Co. KG - Windeckstraße 4 - 83250 MARQUARTSTEIN | GERMANY
For more information, watch our how-to videos at:
www.x-gloo.com/en/experience/videos/
PLEASE NOTE: Before taking down your X-GLOO Inflatable Event
Tent, we strongly recommend first laying down our Protection
Foil to help prevent it from becoming soiled or damaged.
TAKEDOWN
1. Remove all Side Walls, Banners, and Canopies.
2. Disconnect all Tent Pegs, Anchoring Lines, and Ballasts.
3. Unscrew the housing on the
Valve on each Tube (not just
the cover) (1). The air will
completely escape within
minutes.
4. Take the tube intersection
loop (found inside of the tent
where all four tubes intersect)
and turn the Event Tent Matrix
upside-down so that the tube
intersection loop is facing
upwards (2).
5. Lay the Tubes on top of one
another with the Valves facing
upwards. The Roof should be
drawn outwards in large folds
(3).
6. After the last of the air has
escaped, roll up the Event
Tent Matrix starting from the
top of the Roof and ending at
the Tube ends (4).
7. Pack the Event Tent in the
Multifunction Transport Bag
or Trolley. Side Walls can
be stored separately in the
protective Side Wall Bag
included in delivery.
PLEASE NOTE: Be sure to observe the Packing/Storage/
Handling instructions in order to preserve the quality of your
Event Tent and ensure a long product life.
CLEANING
First attempt to brush away the dirt or stain using a soft, dry brush
or microfiber cloth. If the stain cannot be brushed away, then use a
small amount of conventional soap mixed with lots of water.
PLEASE NOTE: Use caution when cleaning digitally-printed Elements.
CAUTION: Never use solvents, detergent, steam cleaning or
gasoline! This destroys the cloth.
PACKING/STORAGE/HANDLING
• Do not pack or store the X-GLOO Inflatable Event Tent for a
prolonged period of time when damp or wet, as this can cause the
formation of mold spots and discoloration. If the conditions at
your location prevent you from packing the Event Tent while it is
dry, be sure to unpack it and set it up again in a dry location as
soon as possible. Allow the Event Tent to dry before repacking to
reduce the risk of damage or molding.
If digitally-printed Elements are stored while damp, the ink from
the printed material can bleed and the printing can become
permanently damaged! We are unable to accept liability.
• Avoid pressure spots (e.g. do not lean on the Event Tent with your
knees while folding it).
• Store the Event Tent in a cool, dry location.
• At temperatures lower than 0° celsius, folding can lead to damage
of the components. Take special care with the Window Walls in low
temperatures and pack them carefully.
• Never store the Event Tent in an automobile in direct sunlight.
The intense heat can cause PVC parts (e.g. Window Walls) to stick
together irreversibly, or may cause permanent damage to the cloth.
SERVICE AND REPAIRS
• Inspect your X-GLOO Inflatable Event Tent periodically for chafe
marks, damage, or signs of wear-and-tear.
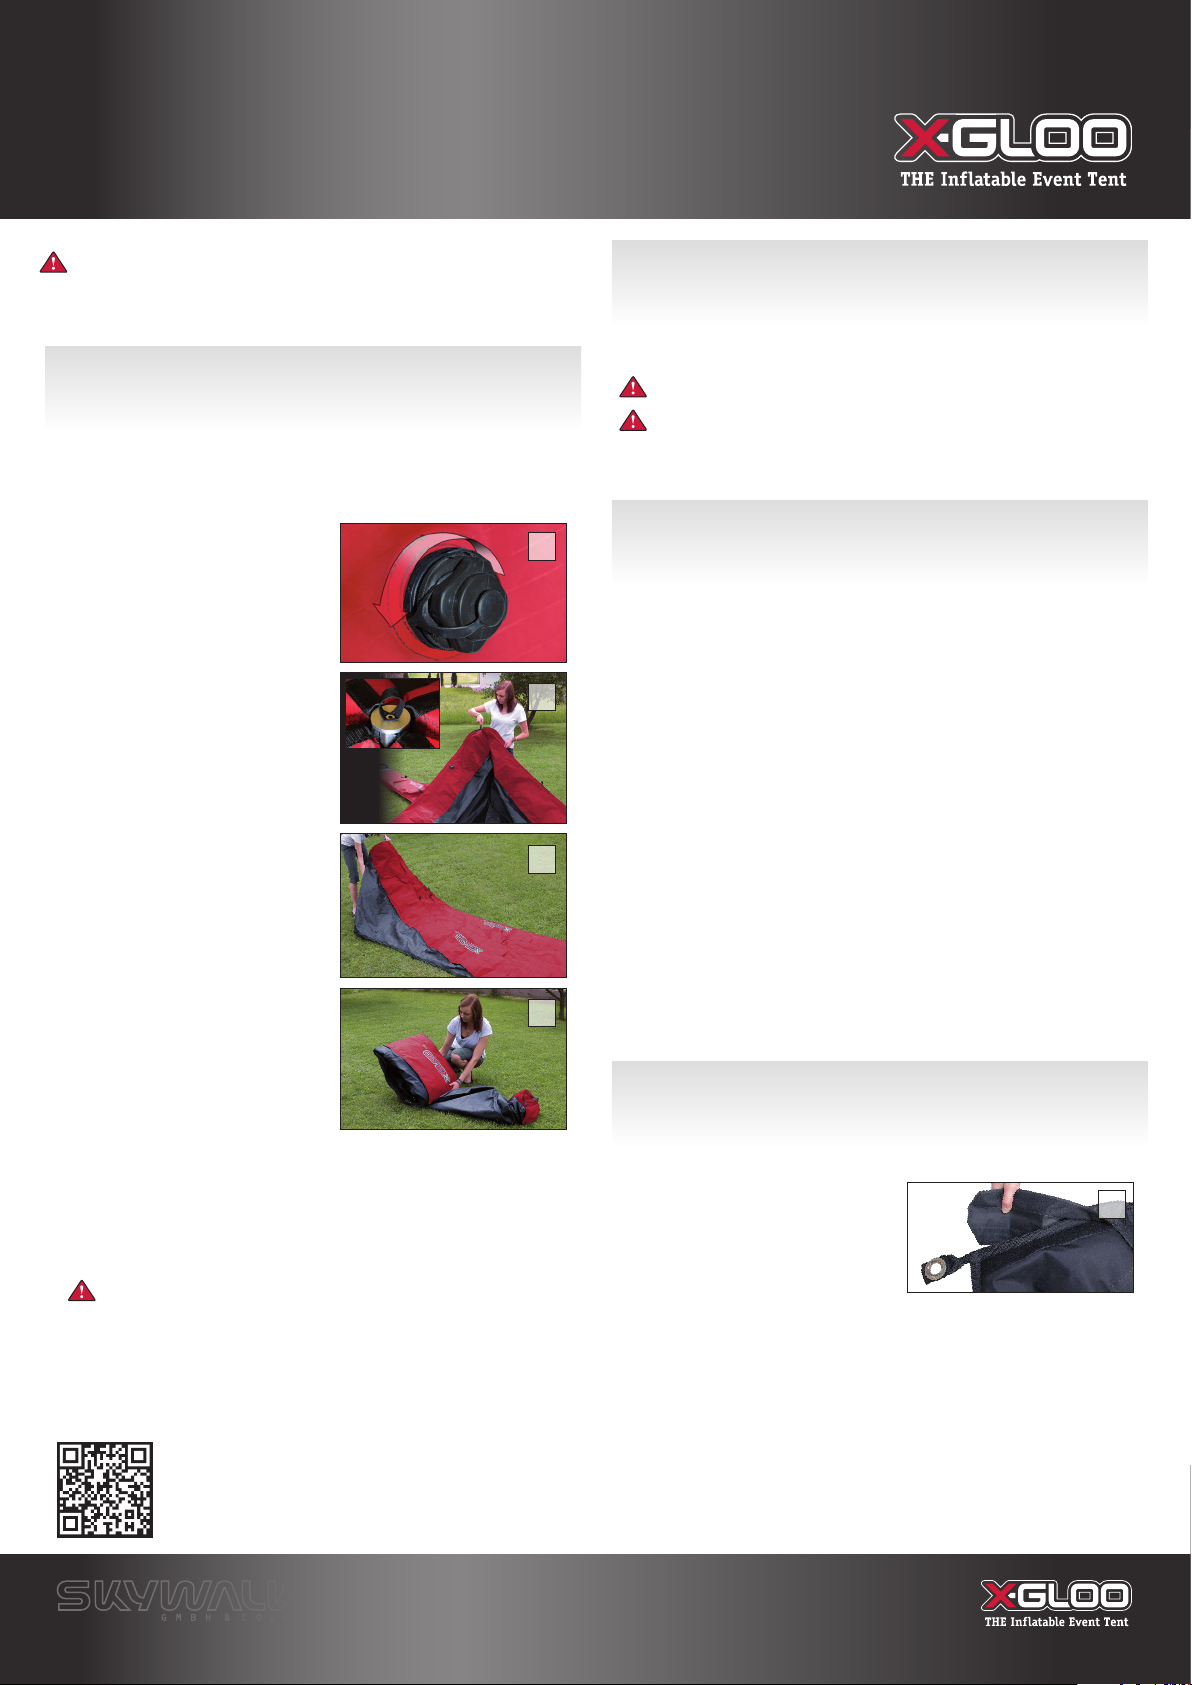
If the Protection Strips at the
bottom of the Tubes become
worn, they can easily be replaced
by simply removing the worn strip
and attaching the new one (5).
• Repairs should be carried out only
by X-GLOO or by an authorized Service Center.
• Re-waterproofing of the Event Tent is not possible.
1
3
4
2
5
ABBAU/PFLEGE
Skywalk GmbH & Co. KG - Windeckstraße 4 - 83250 MARQUARTSTEIN | GERMANY
Beachten Sie auch unsere Tutorialvideos unter:
www.x-gloo.com/erleben/videos/
BITTE BEACHTEN: Zum Schutz vor Beschädigung oder Verschmut-
zung empfehlen wir dringend, vor dem Aufbau des X-GLOO
Inflatable Event Tents zuerst unsere Schutzfolie auszulegen.
ABBAU
1. Trennen Sie alle Elemente (z.B. Seitenwände, Vordach,
Trennwand), die am Eventzelt befestigt sind heraus.
2. Stellen Sie sicher, dass alle Heringe gezogen und alle
Abspannungen gelöst sind.
3. Öffnen Sie anschließend
die Ventile an jeder Säule
(1), indem Sie das gesamte
Ventilgehäuse aus der
Fassung schrauben. Die Luft
entweicht in wenigen Minuten
vollständig.
4. Drehen Sie anschließend das
Zelt auf links, so dass die Naht
der zentralen Dachschlaufe
außen liegt (2).
5. Legen Sie die Säulen mit
nach oben zeigenden Ventilen
übereinander. Das Dach sollte
in großen Falten nach außen
gezogen werden (3).
6. Legen Sie nach kurzem Warten
die Säulen übereinander
und rollen Sie das Zelt vom
Dachkreuz her auf (4).
7. Nun lässt sich das Eventzelt
leicht im Rucksack oder im Trolley verstauen.
Die Wände können zusätzlich in der mitgelieferten
Seitenwandtasche geschützt verpackt werden.
BITTE BEACHTEN: Um die Qualität Ihres X-GLOO Inflatable
Event Tents möglichst lange zu erhalten und eine lange
Lebensdauer des Produktes zu sichern, empfehlen wir die
Beachtung unserer Anweisungen für Einpacken, Lagerung und
Bedienung.
REINIGUNG
Reinigen Sie das Eventzelt bei Verschmutzung zunächst trocken.
Wir empfehlen weiche Bürsten oder ein Microfasertuch. Bei Flecken
verwenden Sie bitte herkömmliche Seife, der Sie ausreichend
Wasser beifügen.
BITTE BEACHTEN: Gehen Sie behutsam bei der Reinigung von
digital-bedruckten Elementen vor.
ACHTUNG: Verwenden Sie niemals Lösungsmittel, Waschmittel,
Dampfstrahler oder Benzin! Dies zerstört das Gewebe.
EINPACKEN/LAGERUNG/
BEDIENUNG
• Digital bedruckte Elemente müssen trocken verpackt werden!
Sollten die Elemente im nassen Zustand verpackt werden, kann die
Digitaldrucktinte vom Trägermaterial abfärben und der Druck dauer-
haften Schaden nehmen! Wir übernehmen dafür keinerlei Haftung.
• Punktueller Druck (z.B. Belastung mit dem Knie beim
Zusammenfalten) ist zu vermeiden.
• Das Eventzelt muss trocken und bei nicht mehr als 40° Celsius
gelagert werden.
• Bei Temperaturen unter 0° Celsius kann starkes Knicken unter Druck
zu Beschädigungen an Bauteilen führen. Speziell die Fenster sollten
bei niedrigen Temperaturen sehr sorgfältig zusammengelegt werden.
• Das Eventzelt darf niemals im Kfz bei direkter Sonneneinstrahlung
aufbewahrt werden, da es unter großer Hitze zu irreversiblem
Verkleben der Fensterelemente oder zu Schäden am Tuch kommen
kann.
WARTUNG/REPARATUR
• Das Eventzelt sollte je nach Einsatzhäufigkeit von Zeit zu Zeit auf
Scheuerstellen und Beschädigungen kontrolliert und rechtzeitig
repariert werden.
Eine abgenutzte Schutzsohle am
Säulenende kann einfach ersetzt
werden, in dem sie abgezogen
und durch eine neue Sohle ersetzt
wird (5).
• Wartung und Reparaturen sind nur vom
Hersteller oder autorisierten Betrieben durchzuführen.
• Eine Nachimprägnierung ist nicht möglich.
1
3
4
2
5


