SM Pro 500 Series User manual

Tubebox
500 series tube mic preamp
!
Operating Manual
V1.1
!

SM Pro Audio Page 2 of 12 Tubebox manual
!
!
Contents
!
1 Safety instructions ......................................................................................................... 3
2 Foreword ......................................................................................................................... 4
2.1 Important Notes:....................................................................................................... 4
3 Introduction..................................................................................................................... 5
3.1 unboxing ................................................................................................................... 5
3.2 connecting ................................................................................................................ 5
4 Audio Connections......................................................................................................... 6
5 Preamp control ............................................................................................................... 6
Rotary INPUT GAIN (labelled 0 to 10), ............................................................................ 6
PAD(-20dB)........................................................................................................................ 6
48V Phantom power switch. ............................................................................................ 6
6 Optical Compressor ....................................................................................................... 6
7 Output level..................................................................................................................... 7
7.1 Phase reversal switch.............................................................................................. 7
7.2 80Hz low-cut ............................................................................................................. 7
8 Making sound.................................................................................................................. 7
9 Let’s play ......................................................................................................................... 8
9.1 Line Input Level........................................................................................................ 8
9.2 Tube Bypass ............................................................................................................. 8
10 Specs ............................................................................................................................. 9
11 Warranty ...................................................................................................................... 10
11.1 Warranty Registration.......................................................................................... 10
11.2 Warranty................................................................................................................ 10
11.3 Return Authorization Number ............................................................................. 10
11.4 Warranty Regulations .......................................................................................... 10
11.5 Claim for Damages............................................................................................... 11
11.6 Other Warranty Rights ......................................................................................... 11
12 FCC and CE Regulation ............................................................................................. 12
13 Correspondence ......................................................................................................... 12

SM Pro Audio Page 3 of 12 Tubebox Manual
!
!
1Safety instructions
!
CAUTION: Please ensure power to your 500 series power chassis is OFF before installing or
removing your 500 series modules. Hot Swapping, (exchanging of 500 series modules with the
power on) is NOT recommended. If the power is on whilst exchanging modules, the pins on the
modules multipin connector may short and burn the regulator. For this reason, hot swapping of
modules is not covered under the SM Pro Audio warranty.
DETAILED SAFETY INSTRUCTIONS:
All safety and operation instructions of this manual should be read and adhered to before operation.
Retain Instructions:
Please retain all safety and operating instructions for future reference.
Follow instructions:
All operation and user instructions should be followed.
Water, liquid and Moisture:
The appliance should not be used near water, rain or other liquids. Make sure that no liquid can leak,
spill or otherwise seep into the appliance.
Ventilation:
Please place the appliance so no obstacles interfere or impede the flow of air through the ventilation
openings.
Heat:
The appliance should be situated away from other heat sources such as heaters, radiators, ovens,
or other appliances that produce heat.
Power Source:
Make sure your appliance is set to the correct voltage for the country in which it will
be use before switching the device ON.
Grounding and Polarization:
Precautions should be taken so that the grounding or polarization means of an appliance is not
defeated.
Power-Cord Protection:
Power supply cords should be routed so that they are not likely to be walked on, pinched, damaged,
worn, or rubbed by any other device or obstacle.
Cleaning:
The appliance should be cleaned only with a light soft cloth. Do not use any damaging
or corrosive products on the unit.
Periods of inactivity:
The power cord of the appliance should be unplugged from the outlet when left unused
for a long period of time or in case a lightning storm occurs.
Damage Requiring Service:
The appliance should be serviced by qualified service personnel when:
• The power supply cord or the plug has been damaged; or
• Objects have fallen, or liquid has been spilled into the appliance; or
• The appliance has been exposed to rain; or
• The appliance does not appear to operate normally or exhibits a marked change in
performance; or
• The appliance has been dropped, or the enclosure damaged.
Servicing:
The user should not attempt to service the appliance beyond that is described in the Operating
Instructions.
All other servicing should be referred to qualified service personnel.! !

SM Pro Audio Page 4 of 12 Tubebox manual
!
!
!
2Foreword
!
Dear Customer,
Thank you for purchasing this SM Pro Audio product. Our Tubebox has been designed as a usable
tool for home & professional studios, P.A. rental companies, Schools, Houses of Worship and in
many other situations where audio products would be used.
With vast experience in the audio industry over a long period of time, and along with valuable
suggestions from our customers, our engineers have developed a product that we know you will be
satisfied with. We guarantee you uncompromising quality as well as excellent technical and audio
properties at an extremely affordable price.
We hope you enjoy making music with SM Pro Audio!
!
2.1 Important Notes:
!
Every effort has been made to ensure all information provided in this manual is accurate at the time
of writing.
SM Pro Audio is not liable for any incorrect information contained in this manual and extends no
liabilities in regard to this manual other than those required by local law.
SM Pro Audio may update the contents of this manual at any time without prior notice. The latest
version of this manual is available from the SM Pro Audio website at all times.
"##$%&&'''()*$+,-./0,(1,*!
!
!
! !
23!
Fall$

SM Pro Audio Page 5 of 12 Tubebox Manual
!
!
!
3Introduction
!
Tubebox is a single-slot 500-series tube microphone preamp with pristine audio output. It features a
Class A tube preamplifier circuit, switchable phantom power, phase invert, selectable -20dB pad,
and a super fast in-line optical compressor. The front panel includes a TRS microphone input.
The interchangeable 12AX7 preamp tube allows you to experiment with a variety of modern and
vintage tubes to customize the Tubebox’s sound and performance to your taste. The switchable
(in/out) compressor provides adjustable attack and release, and when using the compressor, the
on-board VU meter automatically changes from displaying master level, to amount of gain
reduction, so you can view the exact results of the compression being applied. Last but not least:
The Tubebox audio circuit uses LME49720 ultra-low distortion/low noise Op Amps, for superb audio
output.
!
3.1 unboxing
!
Your SM Pro Audio Tube Box was carefully packed in the factory and the packaging was designed
to protect the unit from rough handling. Nevertheless, we recommend that you carefully examine the
packaging and its contents for any signs of physical damage, which may have occurred in transit.
If the unit is damaged, please do not return it to us, but notify your dealer and the shipping company
immediately, otherwise claims for damage or replacement may not be granted. Shipping claims must
be made by the consignee.
!
3.2 connecting
The SM Pro Audio TubeBox is a 500 series compatible module, which connects to a 500 series
power chassis via the rear card slot. Please ensure the power is off before slotting your module
into your 500 series power supply. Below is the feature layout of the Tubebox multipin connector.
Terminal 1 CHASSIS
2 OUTPUT + (+4 Level)
3 Output + (-2 Level)
4 OUTPUT -
5 GND
6 STEREO LINK
7 INPUT - (-2 Level)
8 INPUT - (+4 Level)
9 INPUT + (-2 Level)
10 INPUT + (+4 Level)
11 GAIN TRIM RESISTOR
12 +16V DC
13 GND
14 -16V DC
15 +48V DC

SM Pro Audio Page 6 of 12 Tubebox manual
!
!
4Audio Connections
!
The Tube Box features a 1/4” (6.5mm) TRS connector on the front panel for connection of a
Balanced Microphone or unbalanced instrument. All other connections are done thru the back panel
multipin connector. Note: The Tube Box accepts mic or line level input signals. Do not connect your
power amplifier outputs to the Tube Box inputs!
5Preamp control
!
Input controls for the preamp are:
Rotary INPUT GAIN (labelled 0 to 10),
PAD(-20dB)
48V Phantom power switch.
!!!
A Peak LED is also provided to indicate when the input level exceeds the preamps operational level
and sends the unit into square wave (distortion), which sometimes may be a desirable effect.
6Optical Compressor
Why Optical Compression?
Optical compressors have a smooth gradual release curve making them very musical. This style of
release is not usually found on a solid state or tube compressor. It acts as an attenuator on your
volume path, splitting the signal between a resistor and an LED light.
COMP - Compression on/off switch
Simply turns the compressor stage on or off. When you switch on the
compressor, the VU meter will change to show Gain Reduction rather
than output volume.
Rotary compression control
The rotary compression control (labelled 0 to 10), sets the amount of
compression. It expresses the difference between the input level
change and the output level change. The higher the amount of
compression, the smaller the dynamic range.
Att - Rotary attack encoder
The rotary attack control allows for adjustment in milliseconds. Attack is the time it takes the
compressor module to respond to the corresponding input signal before gain reduction occurs. Short
attack times quickly bring down the level of the loud, fast transients in the audio signal; long attack
times let more sound through before the compressor engages, resulting in a punchier sound.
Rel - Rotary release encoder
The release control sets the time in seconds it takes for the compressor module gain to return to the
point of no gain reduction in the absence of audio program material. Short release times create a
more exaggerated effect (“breathing”), whereas long release times have a more gradual decay.
SM Pro Audio Page 7 of 12 Tubebox Manual
!
!
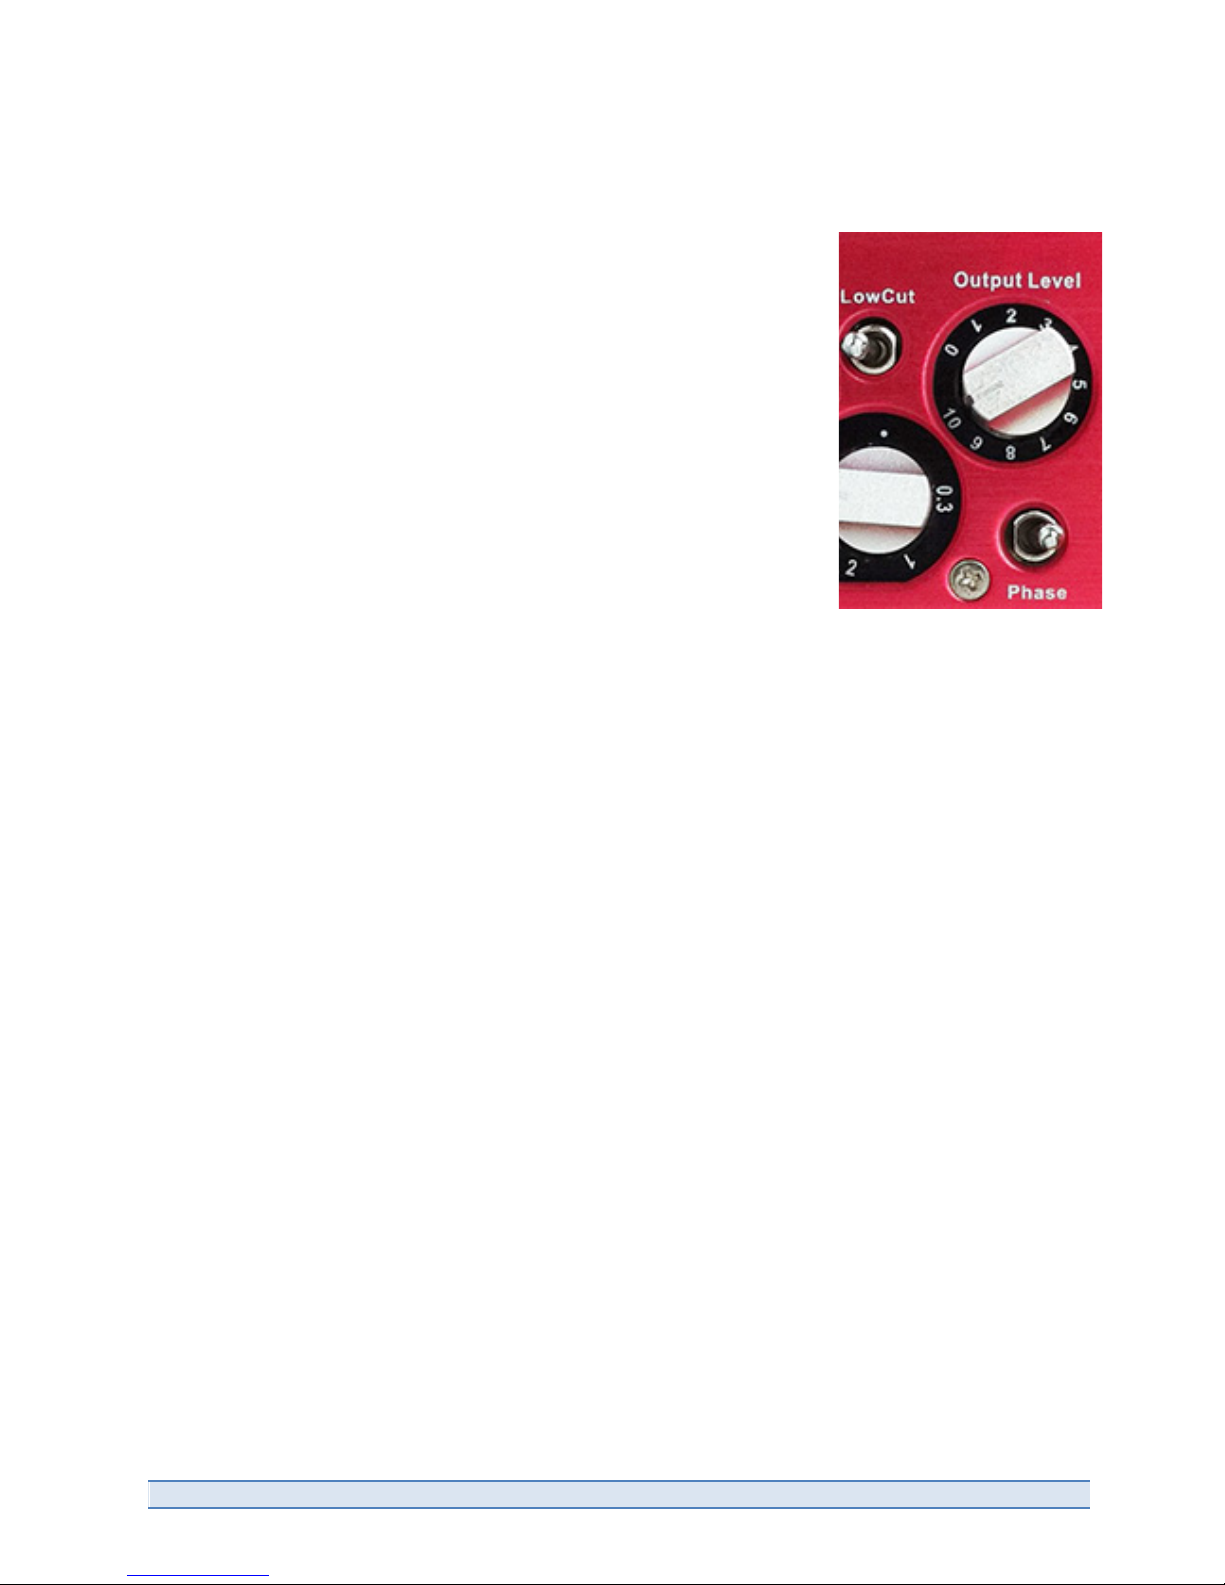
7Output level
!
The output level (labelled 0 to 10) is a rotary control that simply controls
the output level of the TUBE BOX.
7.1 Phase reversal switch
A phase reverse switch is available for reversing the phase of the signal
by 180 degrees. This can be desired in situations such as recording a
snare drum from above and below the drum simultaneously. By reversing
the phase on one of your microphone signals you will achieve a better
result, recording full range of signal without a phase cancellation
occurring. It is also used for matching the rest of your gear or recordings
or removing feedback when recording stereo pairs.
7.2 80Hz low-cut
(high-pass) filter switch
The low-cut (high-pass) filter switch enables and disables the 80Hz high-
pass filter. Engaging this filter effectively removes low frequency “rumble”
and other unwanted noise by attenuating the signal dB below 80Hz.
8Making sound
!
Make your physical connections ...
Simply make your signal connections by either connecting an instrument (guitar, bass,mic etc) to the
instrument input on the front panel, or connecting an input to the rear of a 500 series power supply
box.
Do you need phantom power? ... or to change the phase of your input signal?
If you are using a condenser microphone that requires phantom power, select the phantom power
switch to the on position. You can also choose to switch the polarity of your signal at this stage if
required.
Set your input gain control ...
Set your input level. Adjust the input rotary control to an acceptable level. This is a good time to
check the clip indicator to ensure you are not overdriving the tube pre-amp with too much signal. If
your signal is too strong, reduce the amount with the rotary control. If you cannot reduce the signal
enough to stop the clip indicator constantly illuminating, you can enable the -20dB PAD to assist in
reducing the incoming signal gain.
Do you desire compression? ...
You can now choose to add some optical compression to your signal if desired. To initiate, press the
compressor on/off switch to the on position. Set your attack and release pots to the desired settings,
and adjust the compression ratio rotary control until you are satisfied with the result.
Set your output level ...
Adjust your master output level rotary control to the required amount.
! !
SM Pro Audio Page 8 of 12 Tubebox manual
!
!
!
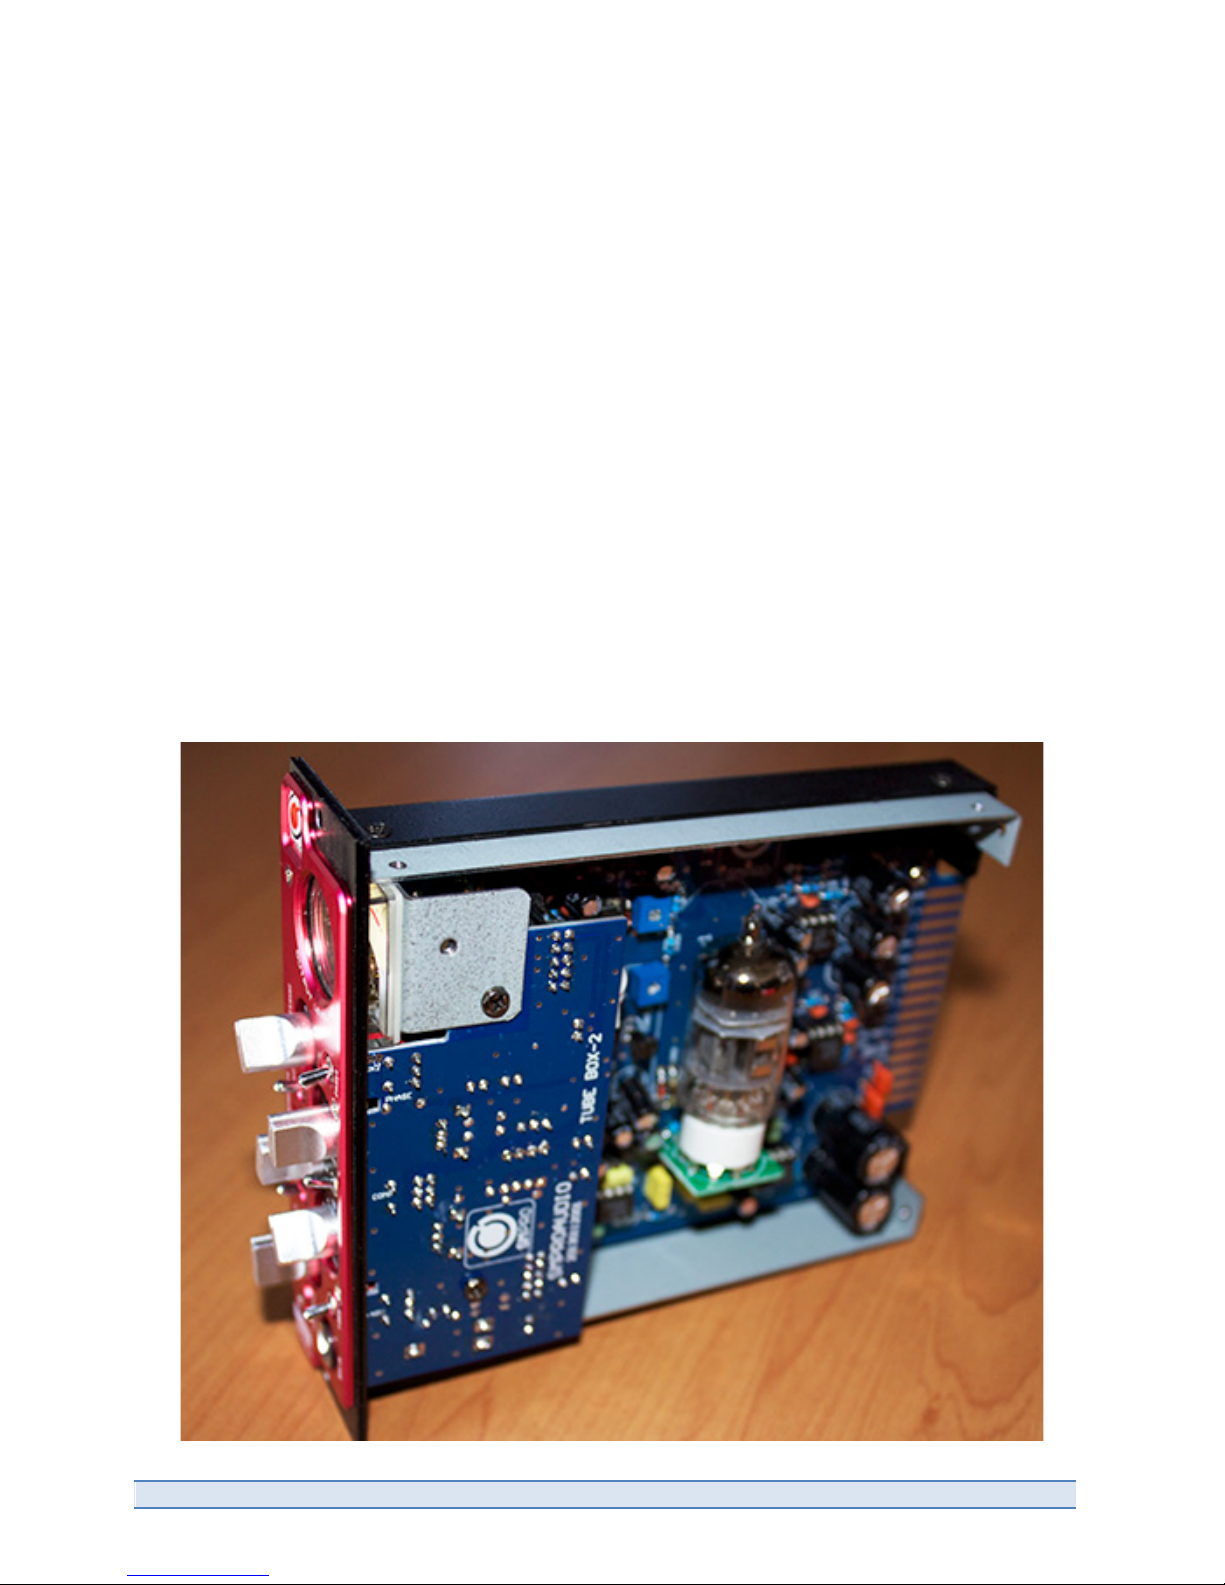
9Let’s play
The Tube Box’s opamps are in DIP8 sockets, this simply means that users can interchange between
different types of opamps to achieve different results, and we would be happy if you report the
results to us as well. Please note that any damage caused in this process cannot be covered under
warranty.
9.1 Line Input Level
!
On the main board, right next to the Tube, you will find a Blue square colored trimpot. This trimpot is
for the adjustment of the input level from the 500 series connector. To make the unit as compatible
as possible we left this as a variable resistor so that users can match the level to their own system.
!
9.2 Tube Bypass
!
The Tube in the TUBE BOX can be exchanged with various compatible types. The 12AX7 tube
simply pulls out of the white socket base. On the main board near the Tube, is small selector Pad,
you can bypass the tube section entirely and use the TUBE BOX purely as an optical compressor.
! !

SM Pro Audio Page 9 of 12 Tubebox Manual
!
!
!
10 Specs
!
Audio Inputs
Mic input connector TRS balance
Impedance 3k Ohms
Mic input gain 10dB to 60dB
Phase reversal switchable
Phantom power + 48V, switchable
Instrument input con. 1/4“ jack unbalanced (or XLR from back panel)
Instrument input gain 0dB to 45dB
Audio Outputs
Connectors XLR & 1/4“ jack (back panel)
Type Balanced & Unbalanced
Amplitube Frequency Response
Line in 10Hz to 40kHz within 1dB
Mic in 10Hz to 40kHz within 2.5dB
Compressor
Photoresistive servo operated
Ratio 1:1 - 10:1
Attack 1 ms – 100 ms
Release 0.1 s – 3 s
Filter
Shelving filter at 80 Hz
Slope: 16 dB
Meter
VU meter -20 dBu – + 3 dBu
Switched to Gain reduction when the compressor is switched ON
Performance
THD (Unweighted) 0.05%
Signal to noise > 101dB
Power Supply
500 series power supply required
SM ProAudio is constantly striving to maintain the highest professional standards. As a result of
these efforts, modifications may be made from time to time to existing products without prior notice.
Specifications and appearance may differ from those listed or shown.

SM Pro Audio Page 10 of 12 Tubebox manual
!
11 Warranty
!
11.1 Warranty Registration
!
To be protected by this warranty, please register your purchase using our online registration form at
http://www.smproaudio.com/index.php/en/service/register
11.2 Warranty
SM ProAudio warrants the mechanical and electronic components of this product to be free of
defects in material and workmanship for a period of three (3) years from the original date of
purchase, in accordance with the warranty regulations described below. If any defects occur within
the specified warranty period that are not caused by normal wear or inappropriate use, SM Pro
Audio shall, at its sole discretion, either repair or replace the product through its local distributor.
Warranty claims other than those indicated above are expressly excluded.
11.3 Return Authorization Number
!
To obtain warranty service, the buyer must: a. return the product to its place of purchase, or b.
contact your local distributor, or c. email service@smproaudio.com BEFORE returning the product.
All warranty requests must be accompanied by a description of the problem and an original
purchase receipt. If you have previously registered your purchase (via the SM Pro Audio web site),
you will then be issued with a return authorization number. If you have not previously registered your
purchase, then you must forward a proof of purchase document (retail dealers invoice) before a
return authorisation can be provided.
The product must then be returned in its original shipping carton, together with the return
authorization number.
11.4 Warranty Regulations
!
Any product deemed eligible for repair or replacement by SM Pro Audio under the terms of this
warranty will be repaired or replaced in the best possible manner.
If the product needs to be modified or adapted in order to comply with applicable technical or safety
standards on a national or local level, in any country which is not the country for which the product
was originally developed and manufactured, this modification/adaptation shall not be considered a
defect in materials or workmanship.
The warranty does not cover any such modification/adaptation, irrespective of whether it was carried
out properly or not. Under the terms of this warranty, SM Pro Audio shall not be held responsible for
any cost resulting from such a modification/adaptation.
Free inspections, maintenance/repair work and replacement of parts are expressly excluded from
this warranty, in particular if caused by inappropriate use. Likewise, the warranty does not cover
defects of expendable parts caused by normal wear of the product. Expendable parts are typically
pots, potentiometers, switches and similar components.
Damages/defects caused by the following conditions are not covered by this warranty:
Misuse, neglect or failure to operate the unit in compliance with the instructions given in the user or
service manuals.

SM Pro Audio Page 11 of 12 Tubebox Manual
!
Connection or operation of the unit in any way that does not comply with the technical or safety
regulations applicable in the country where the product is used.
Damages/defects that are caused by any other condition beyond the control of SM Pro Audio.
Any repair carried out by unauthorized personnel will void the warranty.
Products which do not meet the terms of this warranty will be repaired exclusively at the buyer‘s
expense. SM Pro Audio will inform the buyer of any such circumstance. If the buyer fails to submit a
written repair order within 4 weeks after notification, SM Pro Audio will return the unit C.O.D. with a
separate invoice for freight and packing. Such cost will also be invoiced separately when the buyer
has sent in a written repair order.
11.5 Claim for Damages
Failure of SM Pro Audio to provide proper warranty service shall not entitle the buyer to claim
(consequential) damages. In no event shall the liability of SM Pro Audio exceed the invoiced value of
the product.
11.6 Other Warranty Rights
This warranty does not exclude or limit the buyer‘s statutory rights provided by national law, in
particular, any such rights against the seller that arise from a legally effective purchase contract.

SM Pro Audio Page 12 of 12 Tubebox manual
!
12 FCC and CE Regulation
This device complies with Part 15 of the FCC Rules. Operation is subject to the following two
conditions: (1) this device may not cause harmful interference, and (2) this device must accept any
interference received, including interference that may cause undesired operation.
Caution: Any changes or modifications in construction of this device with are not expressly approved
by the party responsible for compliance, could void the user's authority to operate equipment.
Note: This equipment has been tested and found to comply with the limits for a Class A digital
device, pursuant to Part 15 of the FCC Rules. These limits are designed to provide reasonable
protection against harmful interference when the equipment is operated in a commercial
environment. This equipment generates, uses, and can radiate radio frequency energy and, if not
installed and used in accordance with the instruction manual, may cause harmful interference to
radio communications. Operation of this equipment in a residential area is likely to cause harmful
interference in which case the user will be required to correct the interference at his/her own
expense. If necessary, consult an experienced radio/television technician for additional suggestions.
13 Correspondence
For technical support, warranty claims, and all other enquiries, please contact your local SM Pro
Audio distributor.
Contact details of all SM Pro Audio distributors list can be found online at
"##$%&&'''()*$+,-./0,(1,*&04/56($"$&54&/5-75+)8/0)#+09.#,+)!
The information contained in this manual is subject to change without notice. No part of this manual
may be reproduced or transmitted in any form or by any means, electronic or mechanical, including
photocopying and recording of any kind, for any purpose, without the express written permission of
SM Pro Audio.
ALL RIGHTS RESERVED © 2013 SM Pro Audio
This manual suits for next models
1
Table of contents
Other SM Pro Amplifier manuals


