Smeg HTY511DSUK User manual

1
TRANSLATION OF THE ORIGINAL INSTRUCTIONS
SUMMARY
1PRODUCT IDENTIFICATION.................................................................................................................................. 3
1.1 APPLICATION,GENERAL FUNCTIONS ANDINTENDED USE............................................................................. 3
1.2 NAME AND ADDRESS OF MANUFACTURER OR DISTRIBUTOR........................................................................ 3
SMEG S.P.A. ............................................................................................................................................................ 3
1.3 DECLARATION OFCONFORMITY TO PRODUCT STANDARDS.......................................................................... 3
2SYMBOLS USED IN THE MANUAL........................................................................................................................ 4
3SAFETY PRECAUTIONS AND INSTRUCTIONS........................................................................................................ 5
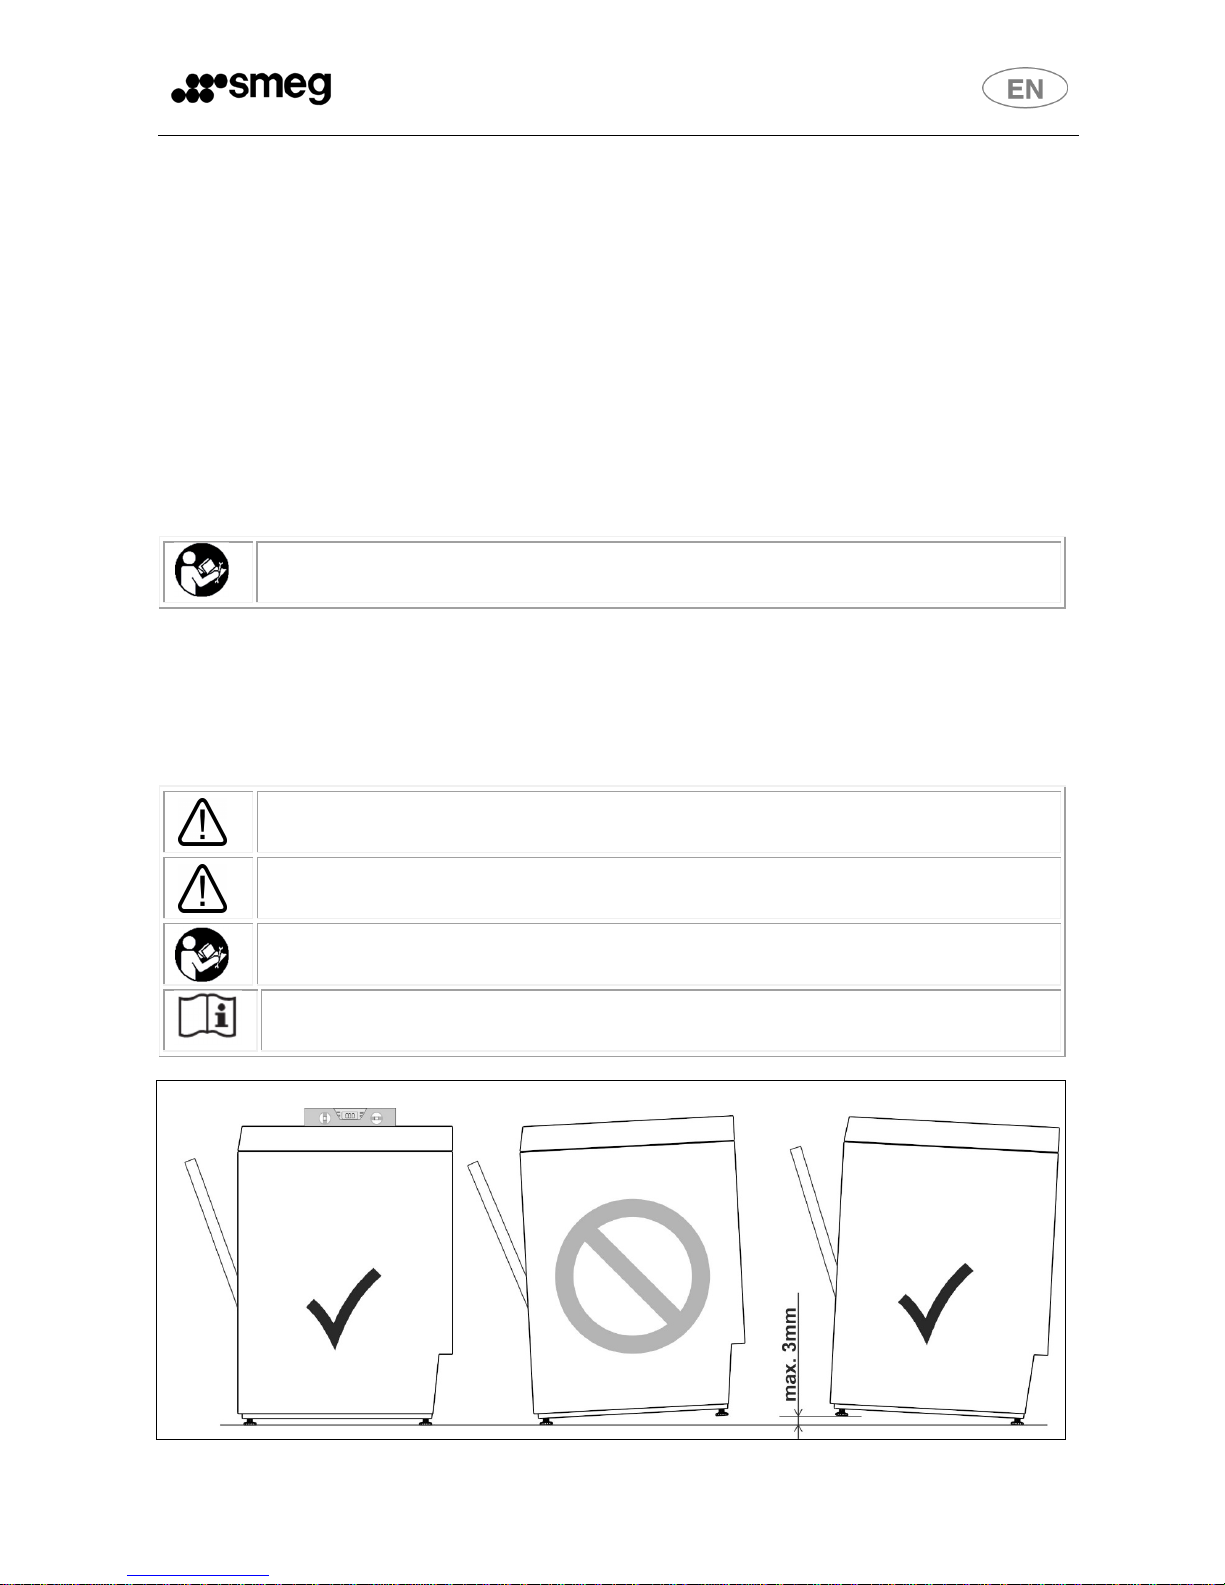
3.1 CORRECT INSTALLATION.............................................................................................................................. 5
3.2 SAFE USE...................................................................................................................................................... 5
3.3 CORRECT MAINTENANCE............................................................................................................................. 6
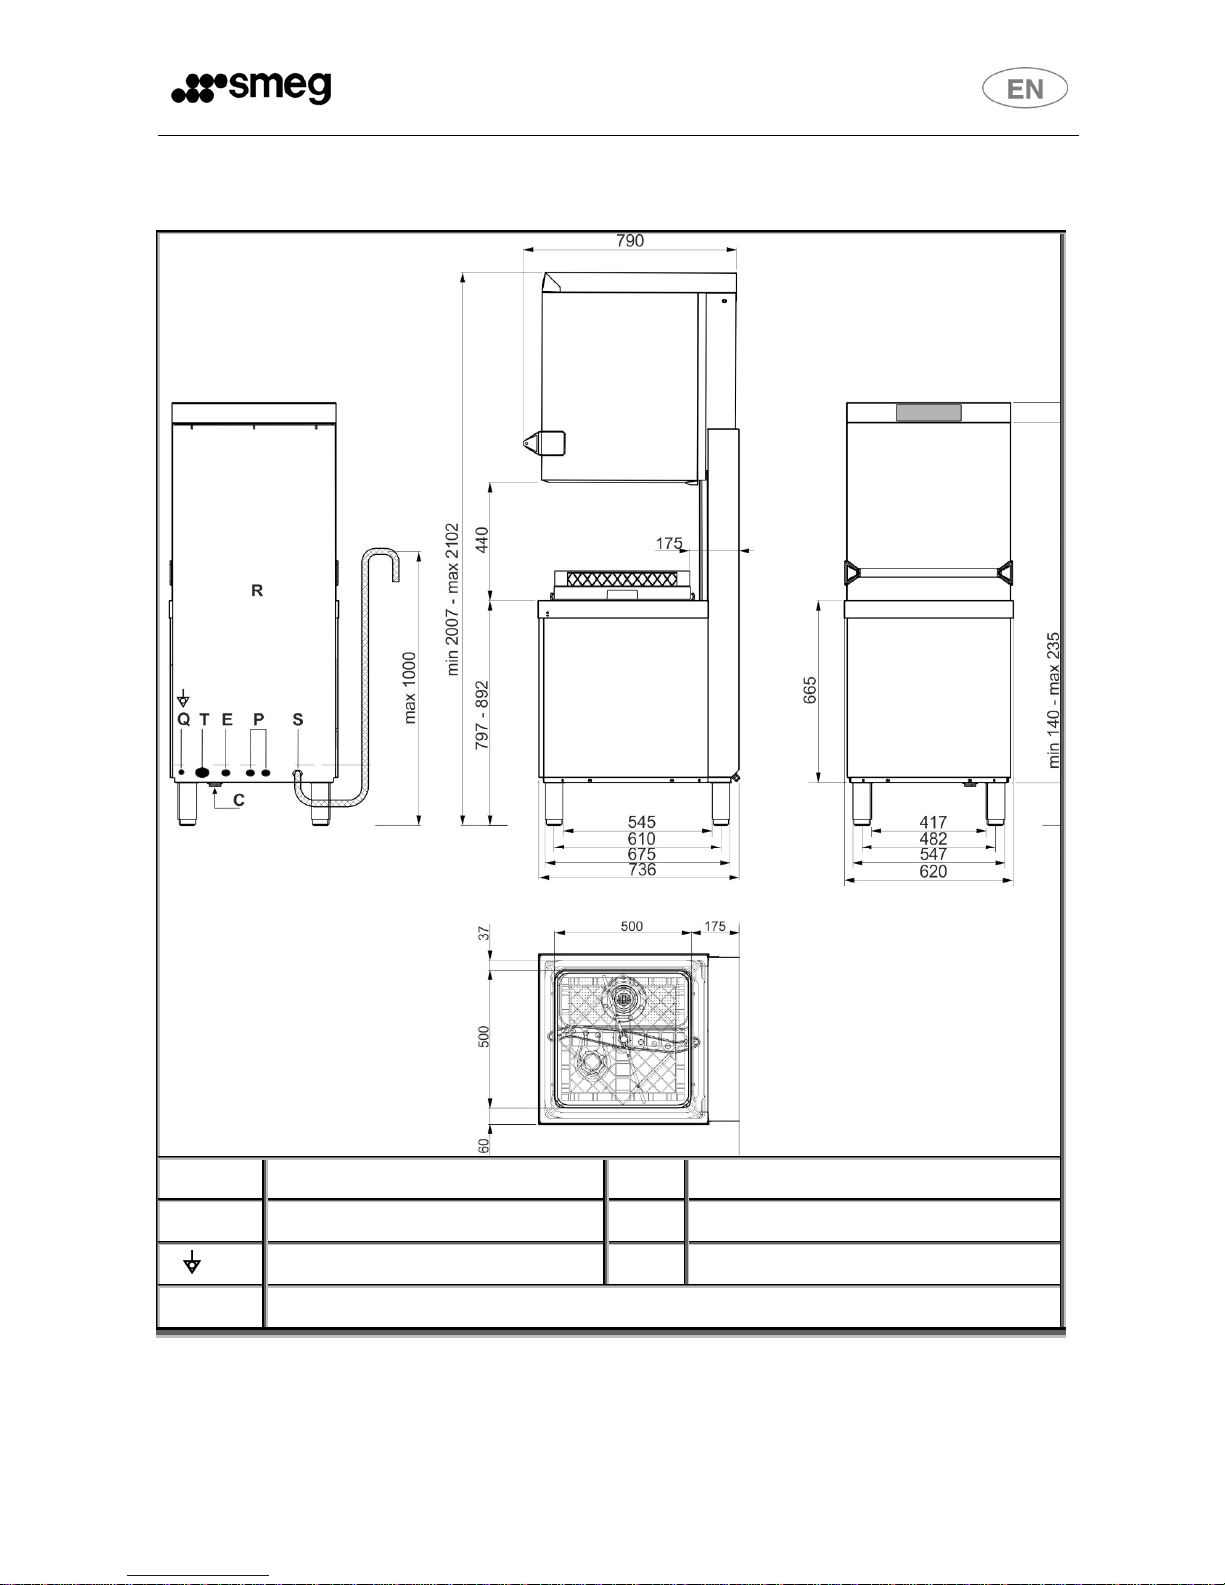
4PRODUCT CHARACTERISTICS............................................................................................................................... 8
4.1 OVERALL DIMENSIONS FOR BUILT-UNDER INSTALLATION............................................................................. 8
4.2 TECHNICAL CHARACTERISTICS...................................................................................................................... 9
5PREPARING THE APPLIANCE FORUSE.................................................................................................................10
5.1 POSITIONING AND INSTALLATION...............................................................................................................10
5.2 CONNECTION TO THE WATER SUPPLY.........................................................................................................11
5.3 DRAINCONNECTION...................................................................................................................................11
5.4 CONNECTION TO THE ELECTRICITY SUPPLY..................................................................................................11
6FIRST START-UP..................................................................................................................................................12
6.1 FIRST START-UP ..........................................................................................................................................12
6.2 PREPARING FOR USE ( IMPORTANT )..........................................................................................................13
6.3 USING THE WATER SOFTENER (ON MODELS WITH THIS FEATURE ONLY)......................................................13
7CONTROL PANEL................................................................................................................................................14
LIGHT L2 ................................................................................................................................................................14
GREEN LIGHT: DISHWASHER READY........................................................................................................................14
BLUE LIGHT: DISHWASHER IN OPERATION (WASHING IN PROGRESS, FILL IN PROGRESS ....) ....................................14
RED LIGHT: INDICATES A MALFUNCTION.................................................................................................................14
7.1 SET-UP (AUTHORISED STAFF ONLY)............................................................................................................15
7.2 MODIFIABLE PARAMETERS..........................................................................................................................16
7.3 STARTING THE PERISTALTIC PUMPS – RAPID FILLING OF DETERGENT AND RINSE AID DELIVERY CIRCUIT......19
8MALFUNCTIONS SHOWN ON THE DISPLAY (FOR THE TECHNICIAN)....................................................................20
9INSTRUCTIONS FOR THE USER............................................................................................................................22
LIGHT L2 ................................................................................................................................................................22
GREEN LIGHT: DISHWASHER READY........................................................................................................................22
BLUE LIGHT: DISHWASHER IN OPERATION (WASHING IN PROGRESS, FILL IN PROGRESS ....) ....................................22
RED LIGHT: INDICATES A MALFUNCTION.................................................................................................................22
9.1 BEFORE WASHING.......................................................................................................................................23
9.2 FIRST USE EACH DAY (TANK AND BOILER EMPTY) ........................................................................................24
9.3 OPERATING ANOMALIES.............................................................................................................................25
9.4 PROGRAM CHANGE....................................................................................................................................26
10 CHOSING THE PROGRAM ...............................................................................................................................27
11 BASKETS PROVIDED .......................................................................................................................................28

2
12 MAINTENANCE AN CLEANING........................................................................................................................29
12.1 CLEANING THE FILTER DURING THE DAY......................................................................................................30
12.2 TOTAL PUMP-OUTAT THE END OF THE DAY................................................................................................30
12.3 TOPPING UP WITH REGENERATING SALT(FOR MODELS WITH SOFTENER)...................................................31
12.4 ROUTINE INSPECTIONOF THE SPRAY ARM (ONCE A WEEK ) ........................................................................31
12.5 LENGTHY PERIODS OUTOF USE...................................................................................................................31
13 TROUBLESHOOTING.......................................................................................................................................32
14 MALFUNCTIONS SHOWN ON THE DISPLAY (FOR THE USER)...........................................................................34
SMEG thanks you for choosing one of its products.
Thismanual is an integral part of the appliance. Take good care of it and keep itto hand throughout
the appliance’s life cycle, since it contains important information about assembly, safety, use and
maintenance.
In the event that the appliance is sold on, consign this manual to the new owner.
Before putting the appliance into operation,read all theinstructions in thismanual carefully to become familiar with
the right conditions for the proper use of your professional dishwasher.

3
1PRODUCT IDENTIFICATION
1.1 Application, general functions and intended use
This dishwasher is intended for professional use in the restaurant and institutional catering sector
and complies with the relevant safety regulations. However, misuse may cause injury and/or
damage, and therefore the dishwasher must only be used by suitably trained staff.
This dishwasher is designed for use innon-mobile premises and is intended only for washing cutlery
and dishes (plates, ovenware, cups, glasses, bowls, etc.) stable at the temperature and humidity
generated by the appliance. Any other type of use is not permitted and may be dangerous.
Persons whose physical, sensory or mental capabilities, inexperience or lack of knowledge render
them unable to use the dishwasher safely must not use it without the supervision and guidance of
a responsible person.
The manufacturer is not liable for any injury or damage caused by failure to comply with the
instructions given in this manual, misuse, tampering with even a single part of the appliance, or the
use of non-genuine spare parts.
1.2 Name and address of manufacturer or distributor
Smeg S.p.A.
Via Leonardo da Vinci, 4 - 42016 Guastalla (RE) Tel. +39 0522 8211 - Fax + 39 0522 821453
Internet: www.smegfoodservice.com, email: food[email protected]
Our Sales Department staff will be able to provide you with information about prices and special
offers.
Our After-Sales Department will be able to provide you with guidance about keeping your device
functioning correctly and put you in touch with your nearest authorised Service Centre. Our entire
product offering can be viewed at our website.
1.3 Declaration of conformity to product standards
This appliance complies with the relevant safety regulations and conforms to the requirements of
directives 2006/42/EC and 2004/108/EC.
The dishwasher is also marked in compliance with European Directive 2002/96/EC on Waste
Electrical and Electronic Equipment (WEEE).
For information on the treatment, recovery and recycling of this product, contact the
local authority, domestic waste collection service, or your Smeg reseller.
Make sure that this product is scrapped correctly to safeguard the environment and
health.

4
2SYMBOLS USED IN THE MANUAL
This symbol instructs the user to read the instructions in the manualwith care.
This symbol appears next to information important for the safety of people and the
appliance.
This symbol is applied tosome parts which contain live electrical components and
indicates the risk of electric shock.
This symbol is applied close to the terminal used to earth the appliance's electrical
system.
This symbolappears next to important information. Read the instructions provided
with care and comply with the procedures and rules described.
This symbol appears next to information and technical instructions intended for the
qualified staff who are to install, commission and test the appliance and carry out
any repairs.
This symbol indicates that at the end of its working life, the appliance must be
consigned to a disposal plant for recovery and recycling in accordance with the
relevant legislation in the country of installation. Contact a specialist centre for
disposal.

5
3SAFETY PRECAUTIONS AND INSTRUCTIONS
The precautions and instructions below contain important information and must be read with care.
The manufacturer does not accept responsibility for damage caused by failure to comply with the
safety precautions and instructions.
3.1 Correct installation
The dishwasher must be installed by an authorised technician.
Whenhandlingand installing the dishwasher, always wear the most suitable personal
protection equipment (PPE) for the task in hand.
Do not install a dishwasher which has been damaged during transport. If in doubt,
consult your dealer.
If the power supply cable is damaged, do not run the dishwasher.
Do not install the dishwasher in areas subject to freezing temperatures or in
atmospheres with explosion risk (ATEX).
Any accessories may only be installed on the appliance if authorised by the
manufacturer.
Do not install the dishwasher next to appliances which irradiate strong heat (e.g. gas
burners, stoves, etc.) since they could cause damage.
If the dishwasher is installed above the ground, make sure that the stand and
dishwasher are secured properly and do not constitute a hazard.
Electrical safety is only ensured if the dishwasher is connected to an earth conductor
compliant with the relevant electrical regulations. If in doubt, have the system
inspected by a qualified electrician.
A circuit breaker and overcurrent protection device (magnetothermal switch or fuses)
must be installed in an easily accessible position on the dishwasher's power supply
line. This device must only serve the dishwasher and must be suitable for its rated
electrical characteristics.
Do not connect the dishwasher to the electrical mains by means of adapters or
extensions, since they do not guarantee the safety required.
If the dishwasher is connected to the electrical mains by means of a plug, it must be
of the same type as the power socket, suitable for the appliance's rated electrical
characteristics and compliant with the relevant national regulations on electrical
systems. The power plug must be easily accessible after the appliance has been
installed.
Only use new hoses for connection to the water supply. Old hoses or hoses salvaged
from previous installations must not be used.
The drain connection must be made in accordance with the relevant national
regulations. Substandard connections may cause flowback and in some cases
pollution.
3.2 Safe use
The staff assigned to use the dishwasher must be suitably trained and instructed.

6
The appliance is not suitable for use by juveniles or persons with reduced physical,
sensorial or mental capacities, or those without the necessary knowledge and
experience. Such persons may only use the appliance under the supervision of a
person responsible for their safety.
Do not leave the dishwasher door open. Risk of tripping or injury against the edges
of the door.
Do not sit or lean on the open door. This may tip over or damage the appliance.
The water inside the dishwasher is not drinkable.
Do not use the dishwasher for washing or soaking foods.
Do not use the water inside the dishwasher for defrosting foods, even if they are in
airtight containers.
When using the dishwasher, remember that the plates are very hot at the end of a
wash cycle.
Knives and pointed kitchen equipment must be placed in the basket with their tips
downwards, or horizontally, taking care not to allow them to protrude from the basket
The dishwasher is only intended for use with water and detergents suitable for
washing in professional dishwashers. The use of other products may damage both
the dishes and the appliance.
Do not operate the dishwasher with organic solvents or flammable liquids. Never load
dishes dirty with ash, wax or paint.
When handling detergents comply strictly with the instructions provided by the
detergent producer.
Always keep the detergent safety datasheets within reach so that the operator can
consult them easily if necessary.
Swallowing or inhaling detergents may cause serious injury to the nose, mouth and
throat. If detergent has been inhaled or swallowed, seek medical advice
immediately.
3.3 Correct maintenance
Do not clean the machine with a water jet machine, high-pressure or steam cleaners.

7
Before performing any maintenance procedure on the appliance disconnect it from
the mains electricity supply. Touching live electrical components, even accidentally,
may be very dangerous.
Never open the dishwasher's case. Electric shock hazard. Only the authorised
technician may access the internal parts of the dishwasher.
The dishwasher may only be repaired by the authorised service organisation.
Substandard repairs may cause damage or danger for the user.
No alterations or changes of any kind to the appliance's electrical circuits or
mechanical structure are permitted. The manufacturer declines all responsibility for
damage arising from unauthorised alterations.
Replace any faulty parts only with genuine spare parts. The manufacturer declines
all liability for damage resulting from the use of non-genuine spare parts.
The power supply cable, if fitted, must be replaced by the manufacturer or an
authorised service centre in accordance with the technical data specified on the
wiring diagram supplied with the appliance, to prevent all risks.
IN CASE OF INTERVENTIONS WHICH REQUIRE THE HOOD TO BE COMPLETELY
OPEN, IT IS NECESSARY TO BLOCK IT WITH A SCREWDRIVER INSERTED IN THE
SPECIFIC HOLE, AS SHOWN IN THE PICTURES BELOW.

8
4PRODUCT CHARACTERISTICS
4.1 Overall dimensions for built-under installation
R BACK PANEL E ELECTRICITY SUPPLY CABLE
C FILLER HOSE P PERISTALTIC PUMP HOSES
Q EARTH TERMINAL S DRAIN HOSE
T EXTERNAL DISPENSER POWER SUPPLY CABLE ENTRY POINT

9
4.2 Technical characteristics
Electricity supply - See technical data
plate and
electrical wiring
diagram supplied
with the
appliance
Intake water pressure -
Intake water temperature -
Use - Indoor
Max. working altitude m 2000
Working ambient temperature °C 10 - 35
Relative humidity
80% for
temperatures up
to 25°C with
linear decrease to
50% at the
temperature of
35°C
Intake water hardness
(models with softener) °f ≤ 60
Intake water hardness
(models without softener) °f ≤ 15
Water intake flow rate
(models with rinsing pump) L/min min 6
Water intake flow rate
(models without rinsing pump) L/min min 12
Intake hose connection - threaded 3/4 “
Drain minimum diameter mm 25
Drain height (above appliance installation surface) mm max 600
Rinse cycle water consumption L 3.2
Boiler capacity L 8
Tank capacity L 17
Noise level LpA < 60 dB(A)
Degree of protection IPX 4
Net weight kg ˜ 100
Power supply cable type ◄HAR►H07RN-F

10
5PREPARING THE APPLIANCE FOR USE
Convey the dishwasher to the installation site, remove the packaging and check the appliance and
components for damage; any damage found must be reported to the transporter in writing. The
packagingcomponents(plasticbags,expandedpolystyrene,nails,etc.)mustnotbeleftwithinreach
of children and pets since they are potentially dangerous. All packaging materials used are
environment-friendly. They can be kept without constituting any hazard, or may be disposed of at
a specialist waste disposal centre. The plastic components suitable for recycling are marked as
follows:
PE -polyethylene: externalpackaging film, bag containing the instructions, protective bags.
PP - polypropylene: straps used to close the packaging.
PS -expanded polystyrene:corner guards, top of packaging.
Wooden and cardboard components can be disposed of in accordance with the local regulations.
5.1 Positioning and installation
Place the dishwasher in the chosen point and remove the protective film. Level the dishwasher
(with the aid of a spirit level) on its four feet, adjusting them to ensure that it is stable. If the
dishwasher is installed above the ground, make sure that the stand and dishwasher are secured
properly and do not constitute a hazard.
All operations described in this section must be carried out and/or checked by the
qualified staff who install and commission the dishwasher.
The systems and premises in which the dishwasher is installed must comply with the
relevant regulations.
If the dishwasher is installed next to another appliance, also check the
recommendations provided by the manufacturer of the adjacent appliance.
Installations other than those described must first be approved by the manufacturer.
Use only professional furnishings and units in the vicinity of the dishwasher. Any
other types of furnishing may be damaged.

11
5.2 Connection to the water supply
Check that the intake water pressure, flow rate and temperature are as stated in the dishwasher's
technical characteristics. If the dynamic pressure exceeds the limit stated in the
technical characteristics, a pressure reducer must be installed. If the pressure is lower,
it might be necessary to fit a special pump to ensure optimal performance. Connect
the water intake hose to a connector with ¾” gas threaded fitting, inserting the filter
"A" provided. The tap must be easily accessible after installation ofthe appliance.
5.3 Drain connection
The dishwasher is fitted with a drain pump and can operate with drain connections on the floor or
wall. Before connecting the hose, check that the diameter and height of the wall drain connection
are as stated in the dishwasher's technical characteristics. When connecting the dishwasher's
drain hose, take care to avoid kinks, sharp bends or crushing. Since the drain water temperature
can be very high, the end of the drain hose must be fixed to the drain connection using the hose
clamps provided.
5.4 Connection to the electricity supply
The dishwasher must be connected to the electrical system by authorised, skilled staff, in
accordance with the relevant regulations. Also comply with the technical instructions for the
connection provided with the appliance. The dishwasher's rated electrical characteristics are
Only use new hoses for connection to the water supply. Old hoses or hoses salvaged
from previous installations must not be used.
If the water supply system has been unused for a long time or if work has been done
on it, before connecting the appliance's intake hose runthe water to flush the air
and dirt from the pipes.
FOR MODELS WITH A WATER SOFTENER
An “approved” double check valve or some other no less effective device providing
backflow prevention protection to at least fluid category two shall be fitted at the
point of connection between the water supply and the fitting or appliance.
FOR MODELS WITHOUT A WATER SOFTENER
An “approved” single check valve or some other no less effective device providing
backflow prevention protection to at least fluid category two shall be fitted at the
point of connection between the water supply and the fitting or appliance.
The drain connection must be made in accordance with the relevant national
regulations. Substandard connections may cause flowback and in some cases
pollution.
No extensions must be added to the drain hose supplied with the appliance. Any
extensions might cause drainage problems.

12
provided on its technical data plate. A circuit breaker with contact gap rated for category II
overvoltage and an overcurrent protection device (magnetothermal switch or fuses) must be
installed in an easily accessible position on the dishwasher's power supply line. These devices must
only serve the dishwasher and must be suitable for its rated electrical characteristics. The
electrical protection devices must undergo a functional test before the dishwasher is put into
operation. If the dishwasher is connected to the electrical mains by means of a plug, it must be of
the same type as the power socket, suitable for the appliance's rated electrical characteristics and
compliant with the relevant national regulations. The power plug must be easily accessible after
the appliance has been installed.
6FIRST START-UP
6.1 First start-up
The electrical protection system must undergo a functional test before the appliance is put into
operation.
The appliance must be installed and/or inspected by qualified staff, who will start it up for the first
time and provide the relevant operating instructions.
Electrical safety is only ensured if the dishwasher is connected to an earth conductor
compliant with the relevant electrical regulations. If in doubt, have the system
inspected by a qualified electrician.
Donot connect the dishwasher tothe electrical mains by means of adapters or
extensions, since they may cause dangerous overheating.
Connect the appliance to the earth system. The earth connection terminal is low
down on the back of the appliance and is marked with the symbol.
The dishwasher is always powered up unless the master switchis turned off or, on
appliances with powerplug,the plug is disconnected.

13
6.2 Preparing for use ( Important )
The rinse aid dispenser is fitted on all models,the detergent dispenser only on some.
If both dispensers are present put the external detergent and rinse aid containers in place and
insert the respective intake hoses on the rear of the appliance into them. Red hose: detergent,
blue hose: rinse aid.
Before inserting the hoses into the containers, fit the weights (needed to
ensure that they always draw in liquid from the bottoms of the containers)
and the filters onto their ends as shown. If the detergent dispenser is not
factory-fitted, it can be retrofitted after ordering the relative kit.
6.3 Using the water softener (on models with this feature only)
The quantity of lime in the water (which indicates its hardness) causes
whitish marks on dry dishes and dishes alsotend to lose their shine over
time. The dishwasher is equipped with an automatic water softener which
removes the substances that cause hardness from the water with the aid of
regenerating salt.
The first time the dishwasher is used, a litre of watermust be poured into the
tank with the salt. Whenever the tank is filled, always take care to ensure that
the cap is firmly closed. The mixture of water and detergent must not get into
the salt tank, as this would impair operation of the regeneration system. In
this case warranty cover will be forfeited.
IMPORTANT:
Wheneverthetypeofdetergent orrinse aidis changed,itis ABSOLUTELY ESSENTIALtoflush out
the peristaltic pumps by placing the external intake pipes in water for a few cycles. Always use
only products specifically recommended for use in a professionaldishwasher. Failureto comply
with this recommendation leads to forfeiture of the warranty entitlement on the appliance’s
watersystem.Replacementoftheinternaltubeofthedetergentandrinseaidperistalticpumps
is recommended every 12 months or 15.000 wash cycles, by the After-Sales Service.

14
7CONTROL PANEL
On-off button
Program selection button
Start CONFIRM/PAUSE button
Total emptying button (tank and boiler)
Additional function selection button
L1 Mains power on light
L2 Light indicating dishwasher in operation, cycle running, FILL running…. (blue), ready
(green), malfunction (red)
L3 Pump-out in progress light
No rinse-aid symbol (if a system for monitoring outside the dishwasher is provided)
Tank heating element on symbol
No saltsymbol (if softener is fitted)
Boiler element on symbol
No detergent symbol (if a system for monitoring outside the dishwasher is provided)
Light L2
Green light: dishwasher ready
Blue light: dishwasher in operation (washing in progress, FILL in progress ....)
Red light: indicates a malfunction
The instructions apply to "undercounter" and hood-type dishwashers, so some sections of the
manual may describe procedures referring to one or the other type,depending on the model
purchased (e.g. open the door/lift the hood....).

15
When the display control panel is switched on, the
display shows the type of dishwasher (PRF 400,
PRF 500, CAPOTE…….), followed by the firmware
version and update installed.
If the dishwasher is already powered up, press the
on/off button for direct display of the firmware
version and update installed.
7.1 SET-UP (Authorised staff only)
Dishwasher parameter modification procedure
With the tank empty
1- Switch the appliance on; the display will show
“FILL” and filling will start.
2- Open the door/lift the hood (depending on the
model); "CLOSE"will appear on the display
3- Press the button and hold it down for 5/7
seconds. When -------- appears on the display, release
the button and press it again to access the main PCB
setup menu.
With the tank full/the hood open
1 - Press the button and hold it down for 5/7
seconds. When -------- appears on the display, release
the button and press it again to access the main
PCB setup menu.
All the modifiable parameters can now be displayed, scrolling through them with the button.
Press the button to select the value required for each parameter.
To confirm the value required simply quit the menu or move on to the next parameter by pressing
.
Quitting the setup menu automatically: wait about 3 minutes without using the controls.
Quitting thesetup menu in manual mode: hold the ON/OFF button until the beep sounds; the
dishwasher switches off.
Set-up
During first start-up, the functions/parameters listed below must be set oradjusted:

16
7.2 Modifiable parameters
The illustrations are purely guideline. The minimum and maximum temperatures
available depend on the model (glass washer, dishwasher, undercounter or hood-
type model, ..).
Rinsing temperature
(boiler temperature)
Washing temperature
(tank temperature)
Warning: The tank and boiler temperatures shown on the display may be different from the
actual temperatures by a few degrees, especially in transient phases (just after the FILL is
completed, just after the end of the cycle, etc.) due to the inertia of the measurement probe.
Adjusting rinse aid dispensing (optional if installed)
Every time is
pressed, the value
increases of 0,1 g/l up
to a max. of 2 g/l.
Default: 1,2 g/l.
Adjusting detergent dispensing (optional if installed)
From 0,0 g/l to 3,0 g/l every time is pressed, the value increases of 0,2 g/l.
Beyond 3,0 g/l every time is pressed, the value increases 1,0 g/l up to 10,0 g/l (maximum
value).
Factory-set default value = 2 gr/lt.

17
Autostart function
Set at “on” to start the cycle when the hood/door is closed.
Set at “off” to start the cycle after confirmation with the
start button .
Regeneration frequency setup (models with softener)
* (Default value: H03; modify the parameter to suit the mains water hardness.
At first use, the salt tank has to be filled. It is subsequently sufficient simply to fill up with
regenerating salt when necessary.
Mains water hardness setting table
Ppm-
mg/l Durezza
°d gradi
tedeschi
Durezza
°f gradi
francesi
Livello
regolazione
Rigenerazione disattivata
H00
150
8,5
15
H01
200
11
20
H02
300
17
30
* H03
With values over 60°f an external water
treatment device must be used and the
regeneration frequency must be set on H00.
400
22,5
40
H04
500
28
50
H05
600 33,5 60 H06
Importante:
During normal operation, the dishwasher will perform a number of washing cycles while
regeneration is in progress. During this time (5-6 cycles) the intake water will not be treated, but
this will not affect the washing quality.
Extra rinse
Rinsing is 10” longer than the standard in each washing
cycle.
On: enabled – OFF: disabled.

18
"Clean water" cycle
Whenthis option is activated, theappliance pumps out all
the water from the tank and then refills it with clean water
at every wash cycle. Howlong this operation takes depends
on the washing water temperature.
On: enabled – OFF: disabled.
N.B.: prolonged use of this option leads to higher detergent
and rinse aid consumption.
Thermostop
Set as “on” = minimum rinsing temperature as set, (see
boiler temperature above) regardless of intake water
temperature; the cycle duration may be a few seconds
longer than the nominal length.
Set as “off” = the minimum rinsing temperature might be a
few degrees lowerthan the setting if hot intake water is not
used.
If the thermostop device is set “off” the rinsing °tare no longer monitored and the user is
responsible for ensuring that the minimum correct °tare maintained for the tank and boiler. It is
particularly important to check the intake water temperature.
Also refer to the insufficient washing/drying /foam in tank point of the “troubleshooting” section :
restore °tStop ON and/or connect the appliance to a hot water supply.
High speed (FST) or economy (ECO) filling (FILL)
Fast start (FST): starts the dishwasher in less than the
standard time; leads to higher water consumption for the
first cycle start.
Eco start (ECO): starts the dishwasher in standard time, with
no added water consumption.
On: enabled – OFF: disabled.
Cycles performed counter
Shows the count of the total cycles performed by the
dishwasher since installation.
This parameter cannot be modified or resetunless the
software is reprogrammed.

19
USER program duration customisation (optional, only if installed)
USER. is the only program which can be customised.
Scroll through the setup parameters to display
USER.P1, P2….. followed by two dashes (e.g. P2--).
KeeppressingthePbuttonuntilUSERappearsfollowed
by the duration (e.g. USER. 03.10).
Steam extraction time setting (optional if installed)
Steam extraction system operating time display and
setting.
Service setting (for After-Sales Service only)
See information on Smegtech
7.3 Starting the peristaltic pumps – rapid filling of detergent and rinse aid
delivery circuit.
Perform after the parameter modification procedure explained in the previous point
With the dishwasher powered up and the tank full,
press the on/off button for a few seconds; when --
---- appears on the display, release the button and
press it again quickly within 0.5 seconds.
The peristaltic pumps continue to operate until the
same button is pressed again. The rinse aid and
detergent symbol lights flash alternately as long as
the pumps are on; bear in mind that the rinse aid
peristaltic pump fills the circuit in about 7 minutes,
while for the detergent it only takes 2 minutes. So
draw only rinse aid from the jerry cans (1 for the rinse
aid and the other for the detergent) for the first 5
minutes and then also take in detergent for the last 2.
On some models, the message “door” (PCB self-diagnostics on dishwasher closure)
may appear during the setup procedure. To reset the message, open the
dishwasher door and close it again. If the message persists, contact the after-sales
service.

20
8MALFUNCTIONS SHOWN ON THE DISPLAY (FOR THE
TECHNICIAN)
The dishwasher is able to identify a number of malfunctions and show them on the display. If the
problem persists after the dishwasher has been switched off and back on, proceed as described
below:
Er
04 Tank temperature probe
malfunction Tank temperature probe disconnected or not working.
Er
05
Tank water filling
malfunction - The tank wasn’t filled in the expected time: check the
water supply tap, the dynamic supply pressure,cleanliness
oftheinletwaterfilter,cleanlinessoftherinsenozzles,any
damage of the water charging hose. If the problem still
occurs during the“FILL”:
- Work level tank pressure switch damaged (it always
detects “empty”: check if the tank safety pressure switch
starts operating).
- Leakage from the tube connected to the air trap; if the
problem is not solved, it occurs during the work program.
- vent valve of the drain pipe obstructed with dirt: with
siphonage, the tank gets completely empty at the end of a
washing program.
Er
06
Water pump-out
malfunction
Check:
- filter cleanliness; obstructions, bending and narrowing of
the drain pipe.
- possible obstructions of the drain pump (blocked with a
foreign body).
In case the problem is not solved, please contact the After-
Sales Service.
Er
23
Boiler does not heat up as
expected. The problem might occur because water is continually
entering the tank (the causes are as for “Er 05” – see
above)Iftheboilerheatingelementisdamaged,thismight
be due to operation with no water in the boiler - the
pressure switch is indicating full even with the boiler
empty: - damaged boiler heating element – contactor
failure - open on boiler safety thermostat side. - boiler
temperature probe faulty or incorrectly positioned -
motherboard relay failure, Important: If the boiler heating
element is damaged, this might be due to operation with
no water in the boiler, pressure switch continues to give
full reading even with boiler empty: check boiler air trap
and/or relative pressure switch and replace if necessary.
Er
24
Boiler temperature probe
malfunction Boiler temperature probe disconnected or not working
Table of contents
Other Smeg Dishwasher manuals