Smeg PL4325XIN User manual

G
GU
UI
ID
DE
E
F
FO
OR
R
U
US
SI
IN
NG
G
T
TH
HE
E
D
DI
IS
SH
HW
WA
AS
SH
HE
ER
R
A
AN
ND
D
T
TH
HE
E
W
WA
AS
SH
HI
IN
NG
G
P
PR
RO
OG
GR
RA
AM
MS
S
INSTRUCTION MANUAL


Contents
1
1. Description of the controls _______________________________ 2
2. Operating instructions__________________________________ 14
3. Cleaning and maintenance______________________________ 30
4. Troubleshooting ______________________________________ 34
Thank you for choosing one of our products.
You are advised to read this manual carefully; it contains all the
information you need to use your dishwasher safely, correctly and in the
most satisfactory manner.
Following the cleaning instructions provided here will keep your
dishwasher's performance at peak levels in the long term.
USER INSTRUCTIONS: these consist of recommendations for using the
appliance, a description of its controls and of the correct cleaning and
maintenance procedures.

User instructions
2
1. Description of the controls
1.1 Front panel
All the dishwasher controls are grouped on the front panel. Programming
and option selection are only possible with the door closed.
1 ON/OFF BUTTON AND WARNING LIGHT
2 OPTION SELECTION BUTTONS AND WARNING LIGHTS
3 “CHILD LOCK” ACTIVATION BUTTONS
4 START/PAUSE BUTTON
5 PROGRAM SELECTION BUTTONS
6 INFORMATION DISPLAY
7 HANDLE TO OPEN THE DOOR
N.B.: symbols and styling are guideline and may vary depending on
the model or version of the dishwasher purchased.

User instructions
3
1.2 Information display
The dishwasher is equipped with a practical DISPLAY which provides
information on the programmed dishwasher functions.
Rinse aid lack warning indicator
Salt lack warning indicator
End of cycle signal
“Child lock” option warning light
000
Delayed start indicator, wash cycle duration and alarms
Program phases warning lights
With program in progress, it indicates the
status of the program
Prewash
Wash
Rinse
Drying

User instructions
4
PROGRAMS TABLE
PROGRAMME
NUMBER
& SYMBOL
LOAD CROCKERY AND
CUTLERY PROGRAM
PROGRESS
DURATION
CONSUMPTION
MINUTES
(1)
WATER
LITRES POWER
KWh (1)
1SOAK
Pans and dishes awaiting
completion of the load Cold prewash 15 3,5 0,02
2 GLASS
Glass, china and mixed
dishes with light dirt.
Wash at 45°C
Cold rinse
Rinse at 70°C
Dry
65
9,5 1,10
3 ECO (*)
EN 50242
Dishes with normal dirt,
even with dried-on
residues
Wash at 45°C
Cold rinse
Rinse at 55°C
Dry
**
** **
4 NORMAL
IEC/DIN***
Dishes with normal dirt,
even with dried-on
residues
Cold prewash
Wash at 65°C
Cold rinse
Rinse at 70°C
Dry
105
13,5 1,35
5 ULTRA
CLEAN
****
Very dirty pans and
dishes, even with dried-on
residues.
Hot prewash
Wash at 70°C
Cold rinse (2)
Rinse at 70°C
Dry
155
15,5 1,70
IMPORTANT: see “NOTES AND REFERENCES” table on the following pages.
The
ULTRA CLEAN
program terminate with an extra anti-bacteria rinse that ensures
a further reduction in the bacteria level. If the temperature falls during this stage of the
program (e.g. because the door is opened or due to a power blackout), the program
lights flash to warn that the anti-bacteria effect is not guaranteed.
If the dishwasher door is open or not properly closed, the washing cycle
will not start.

User instructions
5
QUICK TIME PROGRAMS
(see relevant section for explanation of functioning modes)
PROGRAMME
NUMBER E
SYMBOL
LOAD CROCKERY AND
CUTLERY
PROGRAM
PROGRESS
DURATION
CONSUMPTION
MINUTI
(1)
WATER
LITRES
POWER
KWh (1)
6 RAPID 27’
+
Dishes with light dirt,
washed immediately after
use
Wash at 38°C
Rinse at 50°C
27
6,5 0,70
7
DELICATE
QUICK
+
Delicate dishes with normal
dirt.
Cold prewash
Wash at 50°C
Cold rinse
Rinse at 70°C
80
10,5 1,15
8
ECO
QUICK
+
Dishes with normal dirt,
washed immediately after
use.
Cold prewash
Wash at 60°C
Cold rinse
Rinse at 70°C
80
12,5 1,25
9
NORMAL
QUICK
+
Dishes with normal dirt,
washed immediately after
use.
Cold prewash
Wash at 70°C
Cold rinse
Rinse at 70°C
85
13 1,40
10
STRONG
and FAST
+
Mixed dishes with normal
dirt without dried-on
residues.
Wash at 65°C
Cold rinse
Rinse at 70°C
50
10 1,20
IMPORTANT: see “NOTES AND REFERENCES” table on the following pages.
If the dishwasher door is open or not properly closed, the washing cycle
will not start.

User instructions
6
NOTES AND REFERENCES
Only
run the soak program with half loads.
Options cannot be used with the soak program.
The ENERSAVE option cannot be used with soak, ultra clean, or any programs
which do not include the final drying stage.
* Standard programme under
EN 50242
. The
ENERSAVE
option must
be
enabled.
** See information sheet provided
***
IEC/DIN
reference programme. The
ENERSAVE
option must
be enabled
.
**** Reference program for laboratories: Detergent:
20g
in the
dispenser
+
10g
in
the door or tablet. Configuration: see photo in “Using the baskets”.
(1) The cycle duration and power consumption may vary according to the water
and room temperatures, and the type and amount of dishes.
(2) 1 or 2 cold rinses depending on the model.
REFERENCES for the ENERGY LABEL supplied with the dishwasher:
- Annual energy consumption is based on 280 standard wash cycles withcold
water and consumption of low-energy operating modes. Actual consumption
depends on the way in which the appliance is used.
- Water consumption is based on 280 standard wash cycles. Actual
consumption depends on the way in which the appliance is used.
- Information refers to the EN 50242 STANDARD programme (identified in the
programmes table), which is the most effective in terms of combined energy
and water consumption. The programme is recommended for dishes with a
normal level of dirt.
- Drying efficiency class on a scale from “G” (minimum efficiency) to “A”
(maximum efficiency).

User instructions
7
1.3 Washing programs
The dishwasher is equipped with a control panel and an
INFORMATION
DISPLAY from which it is possible to carry out all the power switch-on,
switch-off and programming operations.
Before starting a washing program make sure that:
The water supply tap is open.
The correct amount of detergent has been added to the
dispenser.
The baskets have been correctly loaded.
The spray arms are able to rotate freely and without
obstruction.
The dishwasher door is securely closed.
Warning:
during the initial phase of the washing program, the operation of sprayers
is not perceived because they start rotating about 5 minutes after the start.
This is the normal operation of the washing cycle.
LIGHTING
Pressing the ON/OFF button will start the dishwasher and will lit up the
dishwasher pilot light. After approximately 3 second from this operation
the DISPLAY will be turned on with a visualization that will depend upon
the state of the dishwasher.
PROGRAMMING
All the programming operations are possible only with closed door. With
open door, on the DISPLAY will appear - - : - -.
SELECTION PROGRAM
The program selection is possible
through the relative buttons.

User instructions
8
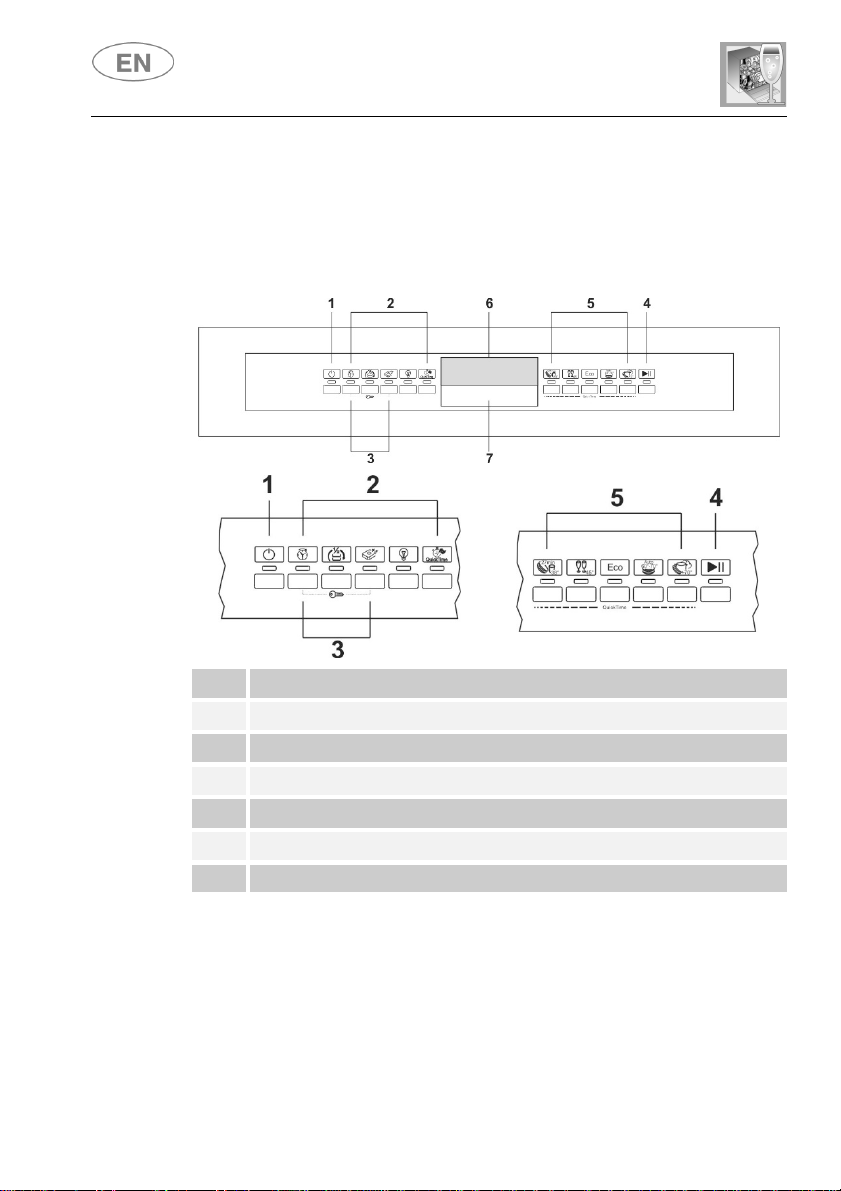
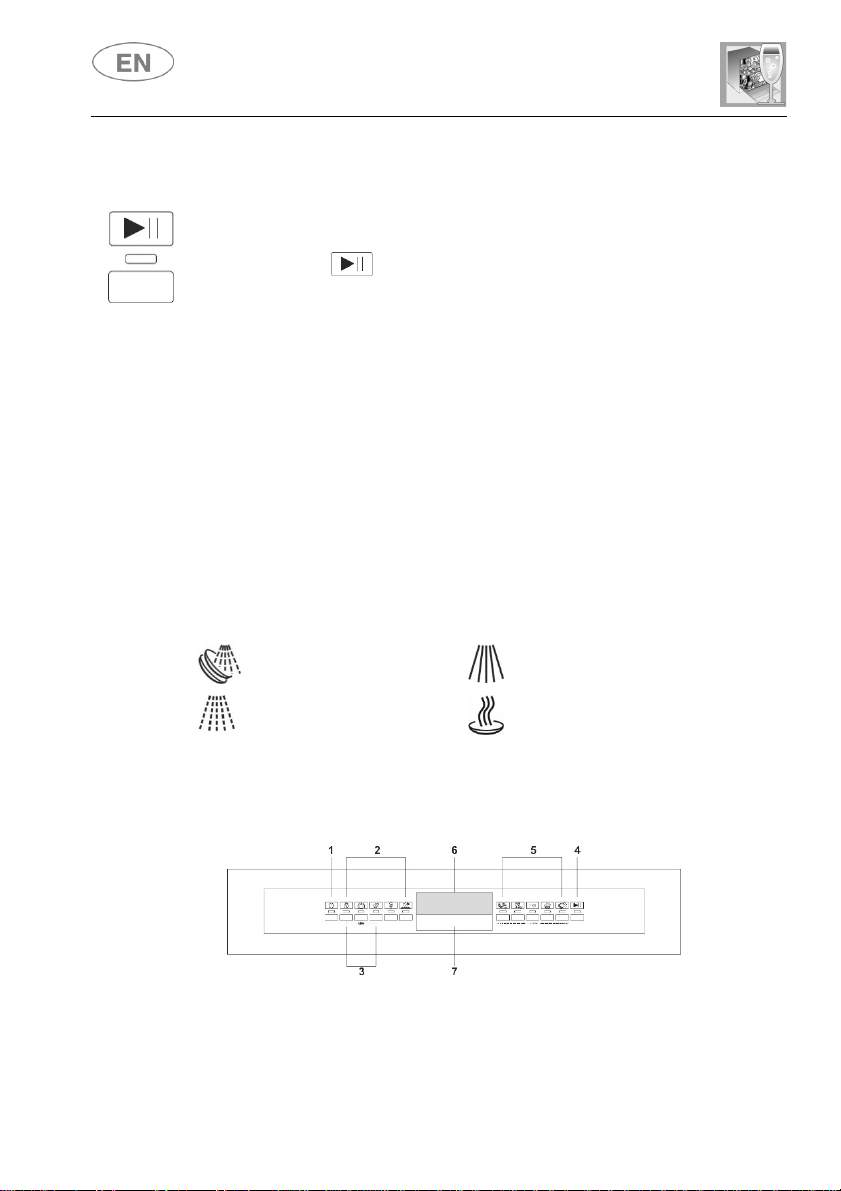
By pressing the relative button of the desired program (see table) it will
light up the relative pilot light to confirm that the operation occurred and
on the DISPLAY a program duration forecast will appear (“h.mm”).
START PROGRAM
At this point, in order to start the machine, it is only enough to press the
START/PAUSE for some seconds until the symbol START/PAUSE
start toflash andconfirmation“beep” isheard. From thismoment the cycle
duration on the DISPLAY starts to decrease.
This phase, that updates itself during the cycle, is “indicative” since it is
influenced by the washing conditions such as dishwasher type and
quantity, entry temperature etc. For this reason it is normal to see the
updating during a program (increment and decrease of minutes) specially
in the passage from one phase to the other (for example, from washing to
rinse).
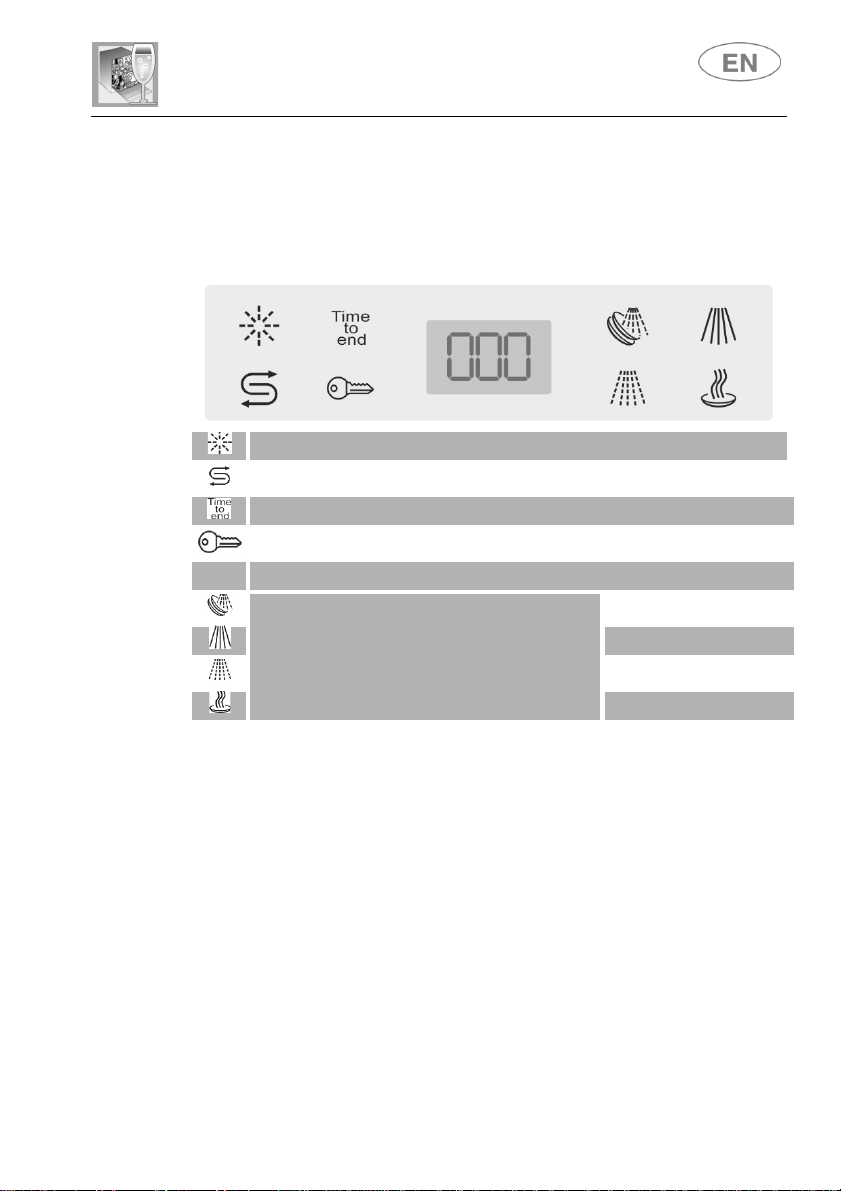
Program progress isindicated by theprogram phases that show the status
of the current cycle.
The current phase flashes, while the next washing phases lights stay on.
At the end of each phase, the signal will turn off.
N.B.: when a program which does not need the prewash phase is
selected, the prewash signal stays off.
Prewash
Wash
Rinse
Drying
END PROGRAM
At the end of the program the DISPLAY shows “Time to end”. By
pressing one of the program buttons, “Time to end” turns off and the
washing machine is ready to start a new cycle.

User instructions
9
INTERRUPTING
A
PROGRAM
In order to interrupt a running program it is necessary:
to press the START/PAUSE for some seconds until when the
symbol START/PAUSE remains lit on the display (confirmation
beep). At this point, it is possible to start the cycle again, otherwise:
TO CHANGE A PROGRAM
To change the running program it is necessary:
to interrupt the running program (see “INTERRUPTING A PROGRAM”);
select the new program;
to press againthe START/PAUSE button to make start the new
program.
STOPPING A PROGRAM
To cancel a program which is running:
Interrupt the program (see "INTERRUPTING A PROGRAM")
Press the START/PAUSE button and hold it down; the
display will show "P0" and the dishwasher will immediately
switch to the end of the cycle and drain the tank (during this
process, the "START/PAUSE symbol will flash). When the drain
procedure ends, the end of cycle "End" message appears on
the display.
In case that the door is opened during the operation, to the next door
closing it is going to be necessary to start the program as shown in
paragraph “STARTING THE PROGRAM”. The program will resume from the
point in which it was interrupted.
In case that the tub temperature is higher than 50°C the program will
start about 60 seconds later.

User instructions
10
OPTIONS
The selection of options is controlled by the
relative buttons and indicated by the warning
light below the symbol. Please read the
paragraphs relating to each option for their
usage details.
QUICK TIME PROGRAMS
Select this option together with any washing program (except the soak
program) to SHORTEN the cycle by from a minimum of 10% to a
maximum of 55%, depending on the cycle selected. To activate this
option, press the QUICK OPTION button (light comes on) after
selecting the program required. The option is automatically deactivated at
the end of the program.
ENERSAVE
This option allows the further reduction of energy consumption, thanks
to the assisted drying when the door opens at the end of the cycle. At the
end of the wash, a device automatically releases the door, which slowly
opens a few centimeters. This allowsthe best drying possible, even at low
rinse temperature, permitting an important energy saving.
When the door is completely open, a brief sound signal indicates that the
wash cycle has ended.
Enersave is automatically activated in all programs that include a final
drying phase(seeprogram table). It is possible to disableit beforestarting
the program.
If this function is active, never prevent the door from opening by any
means, clear the space necessary to allow the opening of the door. Do
not force the closure of the doorbefore the end of cycle signal, because
this would damage the mechanism.

User instructions
11
PROGRAM DELAY
ThePROGRAM DELAY button can bepressed to delay thestart ofthe
washing program by from 1 to 12/24 hours depending on the model. This
option allows the dishwasher to be operated at the time of day of the user's
choice. The first time the PROGRAM DELAY button is pressed the
optionlight comesonand 1:happears on theDISPLAY. Thebutton canthen
bepressed again, toset thedelayrequired (2:h, 3:h, … etc.).Ifno buttonis
pressed for afew seconds, theDISPLAY showsthetimeleft(timeremaining)
to theend of theselected program (e.g. 5:40, duration of the washing cycle
+ program delay).When theuser confirmstheprogram start (read therelative
section) a prewashwillbecarried out, after whichthePROGRAM DELAY set
will begin, and the time remaining on the DISPLAY will gradually be counted
down. At the end of the delay set, the option light goes out and the washing
cyclestarts.
N.B.: It is not possible to select the PROGRAM DELAY option once the
cycle has begun.
Chosen the delay, proceed with the program start, press the button
START/PAUSE for same seconds until the START/PAUSE symbol
start to flash.
The machine will perform a dish pre-washing, and when finish, the “delay
program” will enter in function as it was first set.
In case you want to put to zero the “delay program” within the running
program it is necessary:
to press the START/PAUSE button for some seconds until the
START/PAUSE (D) symbol remain lid up on the display;
to press the DELAY PROGRAM more times until the reset of
the delay program (START/PAUSE symbol shut off);
to press the START/PAUSE button to make start the program.
N.B.: It is not possible to select the “delay program” when the program
have already began.

User instructions
12
Flexi Tabs
Ideal for multi-function detergents, this option allows washing to be
optimised, with full benefits from the combined-action tablets. When this
option is activated, any salt and rinse aid in the relative containers will not
be used.
If the option is not provided, we recommend the use of conventional
products (separate detergent, salt and rinse aid), because with
conventional washing cycles, combined products might create problems
such as a white deposit, poor drying results and residues left on dishes.
N.B.:
When the salt and rinse aid containers are empty, the relative lights will
remain on even if the “Flexi Tabs” option is selected.
IMPORTANT:
when no longer required, the option must be deactivated by pressing the
relative button (the light goes out).
If the water hardness has been set on a value
above
H3
, and the “Flexi
Tbas” option is activated, the relative light flashes, warning of a setting
error. Multi-function products are not suitable for use with very "hard"
water; this does not prevent the useof the option, butthe washing results
might not be of the best.
SPREAD HALF LOAD
Suitable when there are not many dishes to be washed, it saves energy
andreduces theprogram duration. Place dishes inbothbaskets then load
the detergent dispenser than less than the normal amount for a full load.
“
CHILD LOCK” OPTION
By pressing the indicated buttons (3) at the same time, the controls are
locked, whichis confirmedwhen the warninglight on display turns on. This
option stays active until the buttons (3) are pressed again.

User instructions
13
TO SAVE ON ENERGY! … AND PROTECT THE ENVIRONMENT
Always try to run the dishwasher fully loaded.
Do not wash the dishes in running water.
Use the washing program that is most appropriate for each type of
load.
Do not carry out any preliminary rinsing.
If available, connect the dishwasher to a hot water supply up to 60°C.
TO CUT DOWN ON DETERGENT CONSUMPTION! … AND PROTECT
THE ENVIRONMENT
The phosphates contained in dishwasher detergents are harmful to the
environment. To avoid using excessive amounts of detergent and to save
on electricity, observe the following:
separate the more delicate items from dishes that are more resistant
to aggressive detergents and high temperatures;
do not pour the detergent directly on the dishes.
ENERGY MANAGEMENT
At the end of the program the warning lights of programs no. 4and 5
flash for 5 minutes; afterwards, the washing machine switches off
automatically in order to reduce standby power consumption.
In order to switch it on again, it is necessary to press the ON/OFF button.
REMOVING THE DISHES
At the end of the washing program, wait at least 20 minutes before
removing the dishes, to allow them to cool down. To prevent any water
droplets onthe upper basket fromfalling onthedishesinthelower basket,
it is advisable to unload the lower basket first, and then the upper basket.

User instructions
14
2. Operating instructions
Once the dishwasher has been correctly installed, prepare for use as
follows:
Adjust the water softening system;
Add the regenerating salt;
Add the rinse aid and detergent.
2.1 Using the water softening system
The amount of scale contained in the water
(water hardness index) can cause whitish
staining on the dry dishes, which tend to
become dull over time. The dishwasher is
equipped with an automatic softening
system which uses a special regenerating
salt to reduce the hardness of the water.
The dishwasher is factory set for water
hardness level 3 (average hardness ).
When using water of medium hardness, the regenerating salt container
should be refilled after approximately 20 washing cycles. The salt
container can hold approximately 1.7 Kg of salt in grains. Thecontainer is
situated at the bottom of the dishwasher. After removing the lower basket,
unscrew the salt container cap by turning it anticlockwise and pour in the
salt using the funnel supplied with the dishwasher. Before replacing the
cap, remove any salt residues from around the opening.
When using the dishwasher for the first time, in addition to the salt it
is also necessary to add one litre of water to the container.
Each time the salt container is refilled, make sure that the cap is
securely closed. The mixture of water and detergent must never
penetrate the salt container, as this would compromise the operation
of theregeneration system. In theevent ofthis occurring, thewarranty
will be invalidated.
Only use regenerating salt specially formulated for domestic
dishwashers. If using salt tablets, do not fill the container
completely.
SALT

User instructions
15
Donot use table salt as it contains insoluble substances which, over
time, may damage the water softening system.
When necessary, refill the regenerating salt container before
starting the washing program. In this way, the excess saline
solution will be immediately removed by the water; the prolonged
presence of salt water inside the tank may lead to corrosion.
Be careful not to confuse the salt and detergent packages; adding
detergent to the salt container will damage the water softening system.
ADDITIONAL
FUNCTIONS
(Customizing the consumer parameters)
(available in all programs except the soak program)
The electronic control system allows personalizing the machine use
directly through a programming procedure not directly accessible that
allows: regulate water hardness level.
To access the programming environment, the
appliance
must
be turned
on with the door open. Then proceed as follows:
press thePROGRAM DELAY button until the Hsymbol appears
on the display, followed by the number currently set (e.g.H3)
press the PROGRAM DELAY button the number of times
needed to select the right setting level for the hardness of the water
(H0, H1, H2, H3, H4, H5, H6);
N.B.: after few seconds the appliance exits the parameter setting menu
automatically.

User instructions
16
WATER HARDNESS TABLE
WATER HARDNESS
SETTING
German degrees (°dH)
French Degrees (°dF)
0 - 6 0 - 11
H 1
NO SALT
7 - 10 12 - 18 H 1
11 - 15 19 - 27 H 2
16 - 21 28 - 37 H 3
22 - 28 38 - 50 H 4
29 - 35 51 - 62 H 5
36 - 50 63 - 90 H6
Contact your local water board for information on the hardness of your
water supply.
After adjustment or display of the current setting, simply do not touch the
button for a few seconds; the dishwasher will automatically return to
standard mode, quitting the adjustment mode.
2.2 Using the rinse aid and detergent dispensers
The detergent and rinse aid
dispensers are situated on the inner
part of the door: the detergent
dispenser is ontheleft, andtherinse
aid dispenser is on the right.
With the exception of the SOAK program, before every washing cycle it is
necessary to add the required amount of detergent to the detergent
dispenser. The rinse aid, on the other hand, should only be added as
required.

User instructions
17
ADDING THE RINSE AID
The rinse aid helps the dishes dry faster and
prevents the formation of scale deposits and
staining; it is automatically added to the water
during the final rinse cycle, from the container
situated on the inner side of the door.
To add rinse aid:
Open the door.
Rotate the container cap anticlockwise by ¼ of a turn and remove it.
Add therinseaid until the container is full (approximately 140 cc). The
optical level indicator on the side of the cap should be completely
obscured. Refill the rinseaid when the optical level indicator becomes
clear again, or when the rinse aid warning light illuminates.
Replace the cover and turn it in a clockwise direction.
Use a cloth to remove any spillage of rinse aid which might lead to
the formation of excess foam.
ADJUSTING THE RINSE AID DISPENSER SETTING
The dishwasher is factory set for medium water hardness. However it
possible to change the setting by turning the dispenser’s selector to the
desired position: the amount of rinse aid dispensed is proportional to the
selector position.
To adjust the rinse aid setting, rotate the dispenser cap through a
quarter turn in an anticlockwise direction and remove it.
Then use a screwdriver to rotate the rinse aid selector to the desired
position.
Replace the cap, turning it clockwise.
The amount of rinse aid must be increased if the washed dishes
appear dull or feature circular stains.
If, on the other hand, the dishes are sticky or have white streaks, it is
necessary to reduce the rinse aid setting.

User instructions
18
ADDING THE DETERGENT
To open the detergent dispenser cap, lightly press the
button P. Add the detergent and close the cap
carefully.
During the washing cycle, the dispenser will be
opened automatically.
When a program with hot prewash is selected (see program table),
extra detergent must be placed in the cavity G/H (depending on
models).
Use only detergents specially formulated for dishwashers. For optimal
washing results it is important to use a good quality detergent.
The detergent packs must be sealed and stored in a dry place to
prevent the formation of lumps which may negatively affect washing
results. Once opened the detergent packs should not be kept for too
long, otherwise the detergent loses its effectiveness.
Do not usedetergents formulatedfor washingdishes byhand, because
they produce a great deal of foam and may negatively affect the
operation of the dishwasher.
Add the correct amount of detergent. An insufficient amount of
detergent will result ina partialremovalof dirt fromthe dishes, whereas
an excessive amount is wasteful and does not improve the washing
results.
The market offers liquid and powder detergents with differingchemical
compositions, which may contain phosphates, or be phosphate-free
but contain natural enzymes.
- Detergents containing phosphates are more effective against grease
and starch at temperatures above 60°C.
- Enzyme detergents, on the other hand, are also effective at lower
temperatures (from 40 to 55°C) and are more easily biodegradable.
With enzyme detergents it is possible to obtain at low temperatures
comparable results to those which can only be achieved at 65°C
using traditional detergents.
For the safeguarding of the environment we recommend the use of
phosphate- and chlorine free detergents.
Table of contents
Other Smeg Dishwasher manuals

Smeg
Smeg PL8210X User manual

Smeg
Smeg DWAI152XT User manual

Smeg
Smeg STL362DQ User manual

Smeg
Smeg LVS1251B User manual

Smeg
Smeg ST331L User manual

Smeg
Smeg Universale DWAI6314X2 User manual

Smeg
Smeg Dishwasher PL660EB User manual

Smeg
Smeg ST4512IN User manual

Smeg
Smeg DWD1SSE-1 User manual

Smeg
Smeg LF-455IT User manual