Smeg SHR+ User manual


1
TRANSLATION OF THE ORIGINAL INSTRUCTIONS
SUM M ARY
1PRODUCT IDENTIFICATION ................................................................................................................................................. 3
1.1 APPLICATION, GENERAL FUNCTIONS AND INTENDED USE ............................................................................................ 3
1.2 NAM E AND ADDRESS OF M ANUFACTURER OR DISTRIBUTOR........................................................................................ 3
1.3 DECLARATION OF CONFORM ITY TO PRODUCT STANDARDS.......................................................................................... 3
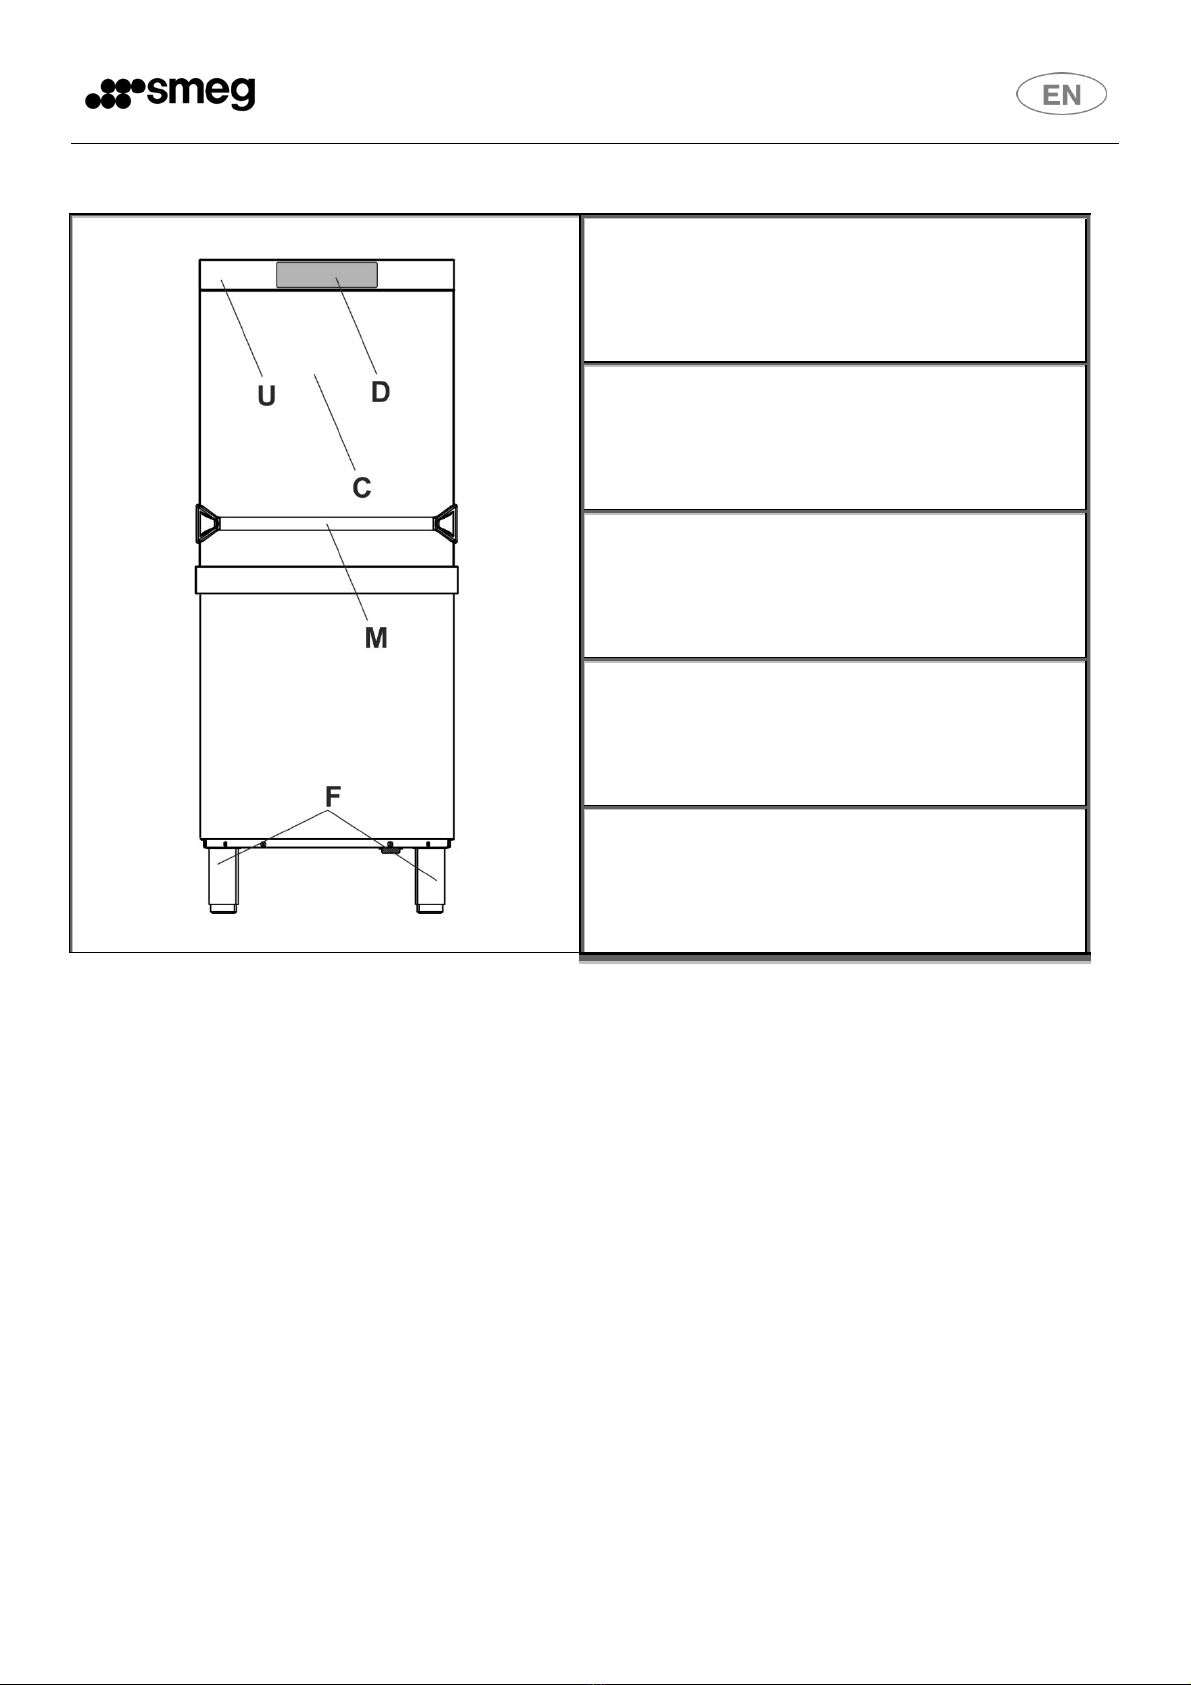
1.4 DESCRIPTION OF THE APPLIANCE................................................................................................................................. 4
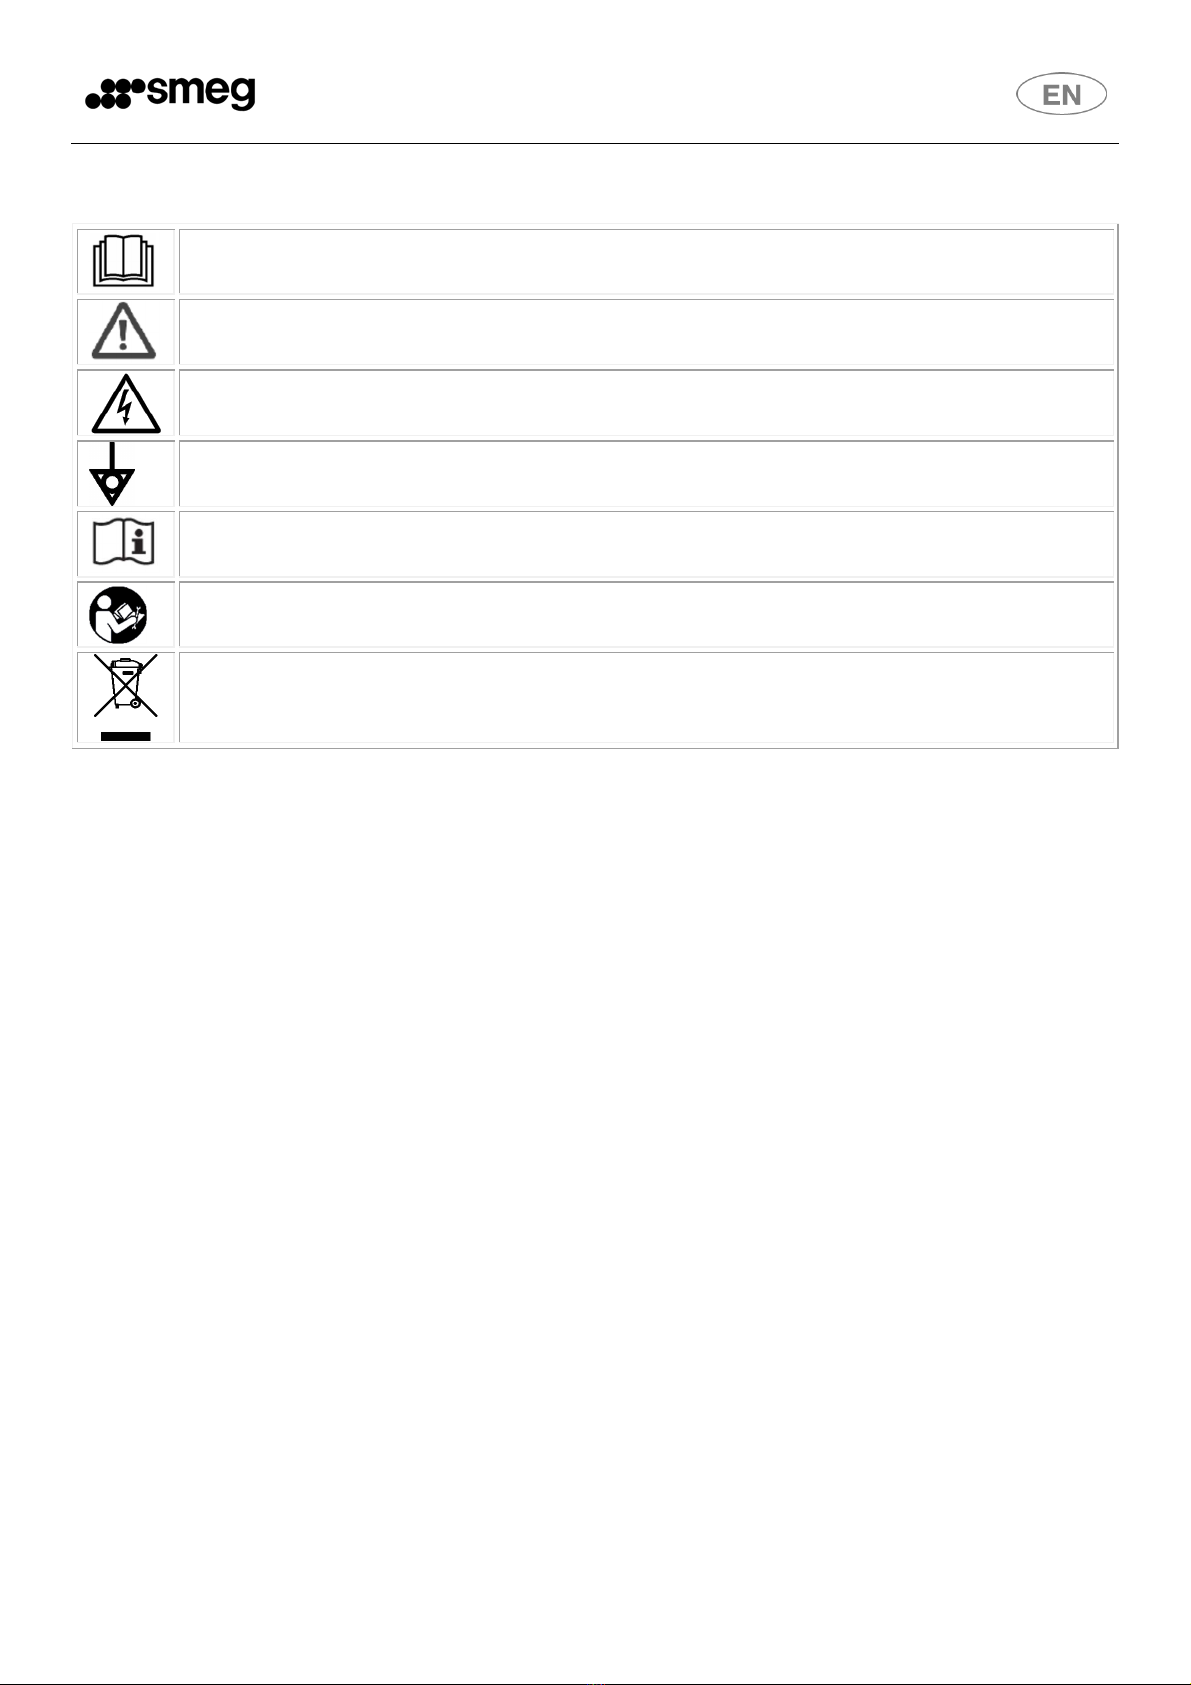
2SYM BOLS USED IN THEM ANUAL........................................................................................................................................ 5
3SAFETY PRECAUTIONS AND INSTRUCTIONS........................................................................................................................ 6
3.1 CORRECT INSTALLATION .............................................................................................................................................. 6
3.2 SAFE USE..................................................................................................................................................................... 7
3.3 CORRECT M AINTENANCE............................................................................................................................................. 8
4PRODUCT CHARACTERISTICS............................................................................................................................................... 9
4.1 OVERALL DIM ENSIONS................................................................................................................................................. 9
4.2 OVERALL DIM ENSIONS (SHR+ M ODELS) ..................................................................................................................... 10
4.3 TECHNICAL CHARACTERISTICS.................................................................................................................................... 11
5PREPARING THE APPLIANCE FOR USE............................................................................................................................... 12
5.1 POSITIONING AND INSTALLATION .............................................................................................................................. 12
5.2 CONNECTION TO THE WATER SUPPLY........................................................................................................................ 14
5.3 DRAIN CONNECTION.................................................................................................................................................. 14
5.4 CONNECTION TO THE ELECTRICITY SUPPLY................................................................................................................. 15
6FIRST START-UP ................................................................................................................................................................ 16
6.1 FIRST START-UP......................................................................................................................................................... 16
6.2 PREPARING FOR USE ( IM PORTANT ) ......................................................................................................................... 16
6.3 USING THE WATER SOFTENER (ON M ODELS WITH THIS FEATURE ONLY) .................................................................... 16
7CONTROLPANEL............................................................................................................................................................... 17
7.1 SET-UP (AUTHORISED STAFF ONLY) ........................................................................................................................... 19
7.2 M ODIFIABLE PARAMETERS........................................................................................................................................ 19
7.3 STARTING THE PERISTALTIC PUM PS – RAPID FILLING OF DETERGENT AND RINSE AID DELIVERY CIRCUIT..................... 23
8M ALFUNCTIONS SHOWN ON THE DISPLAY (FOR THE TECHNICIAN) .................................................................................. 24
9INSTRUCTIONS FOR THE USER .......................................................................................................................................... 26
9.1 BEFORE WASHING ..................................................................................................................................................... 26
9.2 FIRST USE EACH DAY (TANK AND BOILER EM PTY) ....................................................................................................... 27
9.3 OPERATING ANOM ALIES............................................................................................................................................ 28
9.4 PROGRAM CHANGE................................................................................................................................................... 29
10 CHOSING THE PROGRAM .............................................................................................................................................. 30
11 BASKETS PROVIDED ...................................................................................................................................................... 31
12 M AINTENANCE AN CLEANING....................................................................................................................................... 32
12.1 TOTAL PUM P-OUT AT THE END OF THE DAY............................................................................................................... 33
12.2 CLEANING THE FILTER DURING THE DAY .................................................................................................................... 33
12.3 TOPPING UP WITH REGENERATING SALT (FOR M ODELS WITH SOFTENER).................................................................. 34
12.4 ROUTINE INSPECTION OF THE SPRAY ARM (ONCE A WEEK ) ....................................................................................... 34
12.5 LENGTHY PERIODSOUT OF USE.................................................................................................................................. 34

2
13 TROUBLESHOOTING...................................................................................................................................................... 35
14 M ALFUNCTIONS SHOWN ON THE DISPLAY (FOR THE USER).......................................................................................... 36
SM EG t hanks you for choosing one of it s product s.
This manual is an integral part of t he appliance. Take good care of it and keep it t o hand t hroughout the
appliance’s life cycle, since it cont ains important informat ion about assembly, safet y, use and maint enance.
In t he event that t he appliance is sold on, consign t his manual t o the new ow ner.
Before putting the appliance int o operation, read all the instructions in t his manual carefully t o become familiar with the right
conditions for the proper use of your professional dishwasher.

3
1PRODUCT IDENTIFICATION
1.1 Application, general functions and intended use
This dishwasher is int ended for professional use in t he restaurant and instit utional catering sector and
complies w it h t he relevant safet y regulat ions. However, misuse may cause injury and/ or damage, and
therefore t he dishw asher must only be used by suit ably t rained staff.
This dishw asher is designed for use in non-mobile premises and is int ended only for washing cutlery and
dishes (plat es, ovenware, cups, glasses, bow ls, et c.) stable at t he t emperat ure and humidit y generated by
the appliance. Any ot her t ype of use is not perm itt ed and may be dangerous.
Persons whose physical, sensory or ment al capabilit ies, inexperience or lack of know ledge render t hem
unable t o use the dishw asher safely must not use it wit hout t he supervision and guidance of a responsible
person.
The manufact urer is not liable for any injury or damage caused by failure t o com ply w it h the inst ructions
given in t his manual, misuse, t ampering with even a single part of t he appliance, or the use of non-genuine
spare part s.
1.2 Name and address of manufacturer or distributor
Smeg S.p.A.
Via Leonardo da Vinci, 4 - 42016 Guastalla (RE) Tel. +39 0522 8211 - Fax + 39 0522 821453
Int ernet: w ww .smegfoodservice.com, email: foodservice@smeg.it
Our Sales Depart ment staff w ill be able to provide you w it h informat ion about prices and special offers.
Our Aft er-Sales Department w ill be able t o provide you w it h guidance about keeping your device
functioning correctly and put you in touch with your nearest aut horised Service Cent re. Our entire product
offering can be view ed at our websit e.
1.3 Declaration of conformity to product standards
This appliance complies w it h the relevant safet y regulations and conforms t o t he requirement s of direct ives
2006/ 42/ EC and 2004/ 108/ EC.
The dishwasher is also marked in compliance wit h European Directive 2002/ 96/ EC on Waste Electrical and
Elect ronic Equipment (WEEE).
For information on the treat ment , recovery and recycling of t his product, cont act t he local
aut horit y, domestic waste collection service, or your Smeg reseller.
M ake sure that t his product is scrapped correctly t o safeguard t he environment and healt h.

4
1.4 Description of the appliance
U COVER (TOP)
D DISPLAY AND CONTROL PANEL
C HOOD
M HOOD OPENING / CLOSING HANDLE
F ADJUSTABLE FEET

5
2SYM BOLS USED IN THE M ANUAL
This symbol inst ructs t he user to read t he inst ructions in the manual w it h care.
This symbol appears next to informat ion important for t he safet y of people and t he
appliance.
This symbol is applied t o some parts w hich cont ain live electrical component s and indicat es
the risk of elect ric shock.
This symbol is applied close to the terminal used t o eart h t he appliance's elect rical system.
This symbol appears next to import ant informat ion. Read the instructions provided w it h care
and comply w it h the procedures and rules described.
This symbol appears next to informat ion and technical instruct ions intended for t he qualified
staff who are to install, commission and test the appliance and carry out any repairs.
This symbol indicates t hat at t he end of it s w orking life, the appliance must be consigned t o a
disposal plant for recovery and recycling in accordance wit h t he relevant legislat ion in t he
count ry of inst allat ion. Cont act a specialist cent re for disposal.

6
3SAFETY PRECAUTIONS AND INSTRUCTIONS
The precaut ions and inst ructions below cont ain import ant informat ion and must be read w it h care.
The manufacturer does not accept responsibilit y for damage caused by failure t o comply wit h t he safety
precaut ions and instructions.
3.1 Correct installation
The dishwasher must be installed by an authorised technician.
When handling and installing the dishwasher, always wear the most suitable personal
protection equipment (PPE) for the task in hand.
Do not install a dishwasher which has been damaged during transport. If in doubt, consult
your dealer.
If the power supply cable is damaged, do not run the dishwasher.
Do not install the dishwasher in areas subject to freezing temperatures or in atmospheres
with explosion risk (ATEX).
Any accessories may only be installed on the appliance if authorised by the manufacturer.
Do not install the dishwasher next to appliances which irradiate strong heat (e.g. gas burners,
stoves, etc.) since they could cause damage.
If the dishwasher is installed above the ground, make sure that the stand and dishwasher are
secured properly and do not constitute a hazard.
Electrical safety is only ensured if the dishwasher is connected to an earth conductor
compliant with the relevant electrical regulations. If in doubt, have the system inspected by a
qualified electrician.
A circuit breaker and overcurrent protection device (magnetothermal switch or fuses) must
be installed in an easily accessible position on the dishwasher's power supply line. This
device must only serve the dishwasher and must be suitable for its rated electrical
characteristics.
Do not connect the dishwasher to the electrical mains by means of adapters or extensions,
since they do not guarantee the safety required.
If the dishwasher is connected to the electrical mains by means of a plug, it must be of the
same type as the power socket, suitable for the appliance's rated electrical characteristics
and compliant with the relevant national regulations on electrical systems. The power plug
must be easily accessible after the appliance has been installed.
Only use new hoses for connection to the water supply. Old hoses or hoses salvaged from
previous installations must not be used.
The drain connection must be made in accordance with the relevant national regulations.
Substandard connections may cause flowback and in some cases pollution.

7
3.2 Safe use
The staff assigned to use the dishwasher must be suitably trained and instructed.
The appliance is not suitable for use by juveniles or persons with reduced physical, sensorial
or mental capacities, or those without the necessary knowledge and experience. Such
persons may only use the appliance under the supervision of a person responsible for their
safety.
Do not leave the dishwasher door open. Risk of tripping or injury against the edges of the
door.
Do not sit or lean on the open door. This may tip over or damage the appliance.
The water inside the dishwasher is not drinkable.
Do not use the dishwasher for washing or soaking foods.
Do not use the water inside the dishwasher for defrosting foods, even if they are in airtight
containers.
When using the dishwasher, remember that the plates are very hot at the end of a wash
cycle.
Knives and pointed kitchen equipment must be placed in the basket with their tips
downwards, or horizontally, taking care not to allow them to protrude from the basket
The dishwasher is only intended for use with water and detergents suitable for washing in
professional dishwashers. The use of other products may damage both the dishes and the
appliance.
Do not operate the dishwasher with organic solvents or flammable liquids. Never load dishes
dirty with ash, wax or paint.
When handling detergents comply strictly with the instructions provided by the detergent
producer.
Always keep the detergent safety datasheets within reach so that the operator can consult
them easily if necessary.
Swallowing or inhaling detergents may cause serious injury to the nose, mouth and throat.
If detergent has been inhaled or swallowed, seek medical advice immediately.

8
3.3 Correct maintenance
Do not clean the machine with a water jet machine, high-pressure or steam cleaners.
Before performing any maintenance procedure on the appliance disconnect it from the mains
electricity supply. Touching live electrical components, even accidentally, may be very
dangerous.
Never open the dishwasher's case. Electric shock hazard. Only the authorised technician
may access the internal parts of the dishwasher.
The dishwasher may only be repaired by the authorised service organisation. Substandard
repairs may cause damage or danger for the user.
No alterations or changes of any kind to the appliance's electrical circuits or mechanical
structure are permitted. The manufacturer declines all responsibility for damage arising from
unauthorised alterations.
Replace any faulty parts only with genuine spare parts. The manufacturer declines all liability
for damage resulting from the use of non-genuine spare parts.
The power supply cable, if fitted, must be replaced by the manufacturer or an authorised
service centre in accordance with the technical data specified on the wiring diagram
supplied with the appliance, to prevent all risks.
IN CASE OF INTERVENTIONS W HICH REQUIRE THE HOOD TO BE COM PLETELY OPEN, IT IS
NECESSARY TO BLOCK IT W ITH A SCREW DRIVER INSERTED IN THE SPECIFIC HOLE, AS
SHOW N IN THE PICTURES BELOW .

9
4PRODUCT CHARACTERISTICS
4.1 Overall dimensions
R LOWER BACK PANEL E ELECTRICITY SUPPLY CABLE
C FILLER HOSE P PERISTALTIC HOSES
Q EARTH TERM INAL S DRAIN HOSE
T EXTERNAL DISPENSER POWER CABLE ENTRY POINT

10
4.2 Overall dimensions (SHR+ models)
R LOWER BACK PANEL E ELECTRICITY SUPPLY CABLE
C FILLER HOSE P PERISTALTIC HOSES
Q EARTH TERM INAL S DRAIN HOSE
T EXTERNAL DISPENSER POWER CABLE ENTRY POINT

11
4.3 Technical characteristics
Elect ricit y supply - See t echnical dat a
plate and
electrical w iring
diagram supplied
with t he
appliance
Int ake w ater pressure -
Int ake w ater t emperature
-
Use - Indoor
M ax. working altitude m 2000
Working ambient temperat ure °C 10 - 35
Relat ive humidit y
80% for
temperat ures up
to 25°C w it h
linear decrease to
50% at the
temperat ure of
35°C
Int ake w ater hardness
(models with soft ener) °f ≤ 60
Int ake w ater hardness
(models without soft ener) °f ≤ 15
Wat er intake flow rat e
(models with rinsing pump) L/ min min 6
Wat er intake flow rat e
(models without rinsing pump) L/ min min 12
Int ake hose connection - threaded 3/ 4 “
Drain m inim um diamet er mm 25
Drain height (above appliance installat ion surface) mm max 600
Rinse cycle w at er consumpt ion L 3.2
Boiler capacit y L 8
Tank capacit y L 17
Noise level LpA < 60 dB(A)
Degree of prot ection IPX 4
Net weight kg ˜ 100/ 135 (SHR+)
Power supply cable type ◄HAR►H07RN-F

12
5PREPARING THE APPLIANCE FOR USE
Convey the dishwasher to t he installat ion sit e, remove t he packaging and check the appliance and
components for damage; any damage found must be report ed t o t he t ransport er in writ ing. The packaging
components (plastic bags, expanded polystyrene, nails, etc.) must not be left within reach of children and
pet s since t hey are pot ent ially dangerous. All packaging materials used are environment-friendly. They can
be kept w it hout constit uting any hazard, or may be disposed of at a specialist waste disposal centre. The
plastic com ponents suit able for recycling are marked as follows:
PE - polyet hylene: ext ernal packaging film , bag cont aining the instruct ions, prot ective bags.
PP - polypropylene: straps used t o close the packaging.
PS - expanded polystyrene: corner guards, t op of packaging.
Wooden and cardboard component s can be disposed of in accordance wit h the local regulat ions.
5.1 Positioning and installation
Place the dishwasher in t he chosen point and rem ove t he prot ect ive film. Level t he dishwasher (wit h the
aid of a spirit level) on it s four feet , adjusting t hem to ensure t hat it is stable. If t he dishw asher is installed
above t he ground, make sure t hat the stand and dishw asher are secured properly and do not constit ute a
hazard.
All operat ions described in this section must be carried out and/ or checked by the qualified
staff who install and comm ission t he dishwasher.
The systems and premises in w hich t he dishw asher is installed m ust comply with the relevant
regulations.
If the dishwasher is installed next t o anot her appliance, also check t he recommendat ions
provided by t he manufacturer of t he adjacent appliance.
Installat ions other than those described must first be approved by t he manufacturer.
Use only professional furnishings and unit s in the vicinity of the dishw asher. Any other types
of furnishing may be damaged.

13

14
5.2 Connection to the water supply
Check that t he intake water pressure, flow rat e and temperat ure are as stat ed in the dishwasher's
technical characteristics. If the dynamic pressure exceeds the limit stat ed in the
technical characteristics, a pressure reducer must be inst alled. If t he pressure is
lower, it might be necessary to fit a special pum p t o ensure opt imal
performance. Connect the w ater intake hose to a connector wit h ¾” gas
threaded fit ting, inserting the filt er "A" provided. The t ap must be easily
accessible after installat ion of t he appliance.
5.3 Drain connection
The dishw asher is fit ted w it h a drain pum p and can operat e with drain connections on t he floor or w all.
Before connect ing t he hose, check t hat t he diamet er and height of t he w all drain connect ion are as st ated
in the dishw asher's t echnical characteristics. When connecting the dishw asher's drain hose, take care t o
avoid kinks, sharp bends or crushing. Since the drain wat er temperat ure can be very high, the end of the
drain hose must be fixed to t he drain connect ion using the hose clamps provided.
Only use new hoses for connection t o the water supply. Old hoses or hoses salvaged from
previous inst allat ions must not be used.
If the water supply system has been unused for a long time or if w ork has been done on it,
before connect ing the appliance's int ake hose run t he wat er t o flush t he air and dirt from t he
pipes.
To run the beer cycle, only present on some models (see programs t able), a cold wat er
supply is required. This increases t he washing t im es for all programs.
FOR M ODELS W ITH A W ATER SOFTENER
An “ approved” double check valve or some ot her no less effective device providing backflow
prevent ion protection t o at least fluid category t wo shall be fit t ed at t he point of connect ion
bet w een the w ater supply and the fit ting or appliance.
FOR M ODELS W ITHOUT A W ATER SOFTENER
An “ approved” single check valve or some ot her no less effect ive device providing backflow
prevent ion protection t o at least fluid category t wo shall be fit t ed at t he point of connect ion
bet w een the w ater supply and the fitt ing or appliance.
The drain connection must be made in accordance wit h t he relevant nat ional regulat ions.
Subst andard connections may cause flowback and in some cases pollution.
No ext ensions must be added t o the drain hose supplied with t he appliance. Any ext ensions
might cause drainage problems.

15
5.4 Connection to the electricity supply
The dishw asher must be connected t o t he electrical syst em by aut horised, skilled st aff, in accordance w it h
the relevant regulat ions. Also comply w it h t he t echnical instructions for the connect ion provided with the
appliance. The dishwasher's rated electrical characteristics are provided on it s t echnical dat a plate. A
circuit breaker w it h contact gap rated for category II overvolt age and an overcurrent prot ection device
(magnetot hermal swit ch or fuses) must be inst alled in an easily accessible posit ion on t he dishwasher's
pow er supply line. These devices must only serve t he dishwasher and must be suit able for it s rat ed
electrical charact eristics. The electrical prot ection devices must undergo a funct ional t est before t he
dishw asher is put into operat ion. If t he dishw asher is connected to t he electrical mains by means of a plug,
it must be of the same t ype as the power socket , suit able for the appliance's rated elect rical charact eristics
and compliant w it h the relevant nat ional regulat ions. The power plug must be easily accessible aft er t he
appliance has been inst alled.
Elect rical safet y is only ensured if t he dishwasher is connected t o an eart h conductor
compliant w it h t he relevant elect rical regulat ions. If in doubt , have t he syst em inspect ed by a
qualified electrician.
Do not connect the dishw asher t o the electrical mains by means of adapt ers or ext ensions,
since they may cause dangerous overheat ing.
Connect t he appliance to t he earth system. The eart h connect ion terminal is low down on
the back of the appliance and is marked wit h t he symbol.
The dishw asher is always pow ered up unless the master swit ch is t urned off or, on
appliances wit h pow er plug, the plug is disconnect ed.

16
6FIRST START-UP
6.1 First start-up
The electrical prot ection system must undergo a functional test before the appliance is put int o operat ion.
The appliance must be installed and/ or inspected by qualified staff, who w ill st art it up for the first time
and provide t he relevant operat ing instructions.
6.2 Preparing for use ( Important )
The rinse aid dispenser is fit ted on all models, the det ergent dispenser only on some.
If both dispensers are present put t he ext ernal det ergent and rinse aid cont ainers in place and insert the
respect ive int ake hoses on the rear of the appliance int o them. Red hose: det ergent, blue hose: rinse aid.
Before insert ing t he hoses int o t he cont ainers, fit the weight s (needed t o ensure
that they alw ays draw in liquid from the bot t oms of t he containers) and the filt ers
ont o their ends as show n. If the det ergent dispenser is not factory-fitt ed, it can be
retrofit ted aft er ordering t he relative kit .
6.3 Using the water softener (on models with this feature only)
The quant ity of lime in t he w at er (which indicat es it s hardness) causes whit ish marks
on dry dishes and dishes also tend to lose their shine over time. The dishwasher is
equipped with an aut omatic wat er soft ener w hich removes t he substances t hat
cause hardness from the w at er w it h t he aid of regenerat ing salt.
The first time t he dishwasher is used, a lit re of w at er must be poured into the t ank
with the salt . Whenever t he tank is filled, always take care to ensure t hat t he cap is
firm ly closed. The mixt ure of w at er and detergent must not get int o the salt t ank, as
this would impair operat ion of t he regenerat ion syst em. In t his case warranty cover
will be forfeit ed.
IM PORTANT:
Whenever t he t ype of det ergent or rinse aid is changed, it is ABSOLUTELY ESSENTIAL to flush out the
peristalt ic pumps by placing the external int ake pipes in wat er for a few cycles. Alw ays use only product s
specifically recommended for use in a professional dishwasher. Failure to comply w it h this
recommendat ion leads t o forfeiture of the warranty entitlement on t he appliance’s w ater system.
Replacement of the internal tube of t he det ergent and rinse aid perist alt ic pum ps is recommended every
12 months or 15.000 wash cycles, by the Aft er-Sales Service.

17
7CONTROL PANEL
On-off butt on
Program selection butt on
Start CONFIRM / PAUSE but ton
Tot al empt ying but t on (t ank and boiler)
Additional funct ion selection but ton
L1 M ains pow er on light
L2 Light indicating dishwasher in operat ion, cycle running, FILL running…. (blue), ready
(green), malfunct ion (red)
L3 Pump-out in progress light
No rinse-aid symbol (if a syst em for monit oring outside t he dishwasher is provided)
Tank heat ing element on symbol
No salt symbol (if softener is fitted)
Boiler element on symbol
No det ergent symbol (if a system for monit oring out side the dishwasher is provided)
Light L2
Green light: dishwasher ready
Blue light: dishwasher in operation (washing in progress, FILL in progress ....)
Red light: indicates a malfunction
The instructions apply to "undercounter" and hood-type dishwashers, so some sections of the manual
may describe procedures referring to one or the other type, depending on the model purchased (e.g.
open the door/ lift the hood....).

18
W hen the display control panel is sw itched on, the display
shows the type of dishwasher (PRF 400, PRF 500,
CAPOTE…….), followed by the firmware version and
update installed.
If the dishwasher is already powered up, press the on/ off
button for direct display of the firmware version and
update installed.

19
7.1 SET-UP (Authorised staff only)
Dishwasher parameter modification procedure
W ith the tank em pty
1- Swit ch t he appliance on; the display will show “ FILL” and
filling will start.
2- Open t he door/ lift the hood (depending on t he model);
"CLOSE" w ill appear on t he display
3- Press the but t on and hold it down for 5/ 7 seconds.
When -------- appears on t he display, release the but t on and
press it again to access t he main PCB set up menu.
W ith the tank full/ the hood open
1 - Press the but t on and hold it down for 5/ 7 seconds.
When -------- appears on the display, release t he but t on
and press it again t o access t he main PCB setup menu.
All the modifiable parameters can now be displayed, scrolling through them with the button.
Press the button to select the value required for each parameter.
To confirm the value required simply quit the menu or move on to the next parameter by pressing
.
Quitting the setup menu automatically: wait about 3 minutes without using the controls.
Quitting the setup menu in manual mode: hold the ON/OFF button until the beep sounds; the
dishwasher switches off.
7.2 M odifiable parameters
The illustrations are purely guideline. The minimum and maximum temperatures available depend on the
model (glass washer, dishwasher, undercounter or hood-type model, ..).
Rinsing temperature
(boiler temperature)
W ashing temperature
(tank temperature)
W arning: The t ank and boiler temperatures show n on the display may be different from t he act ual
temperat ures by a few degrees, especially in transient phases (just aft er t he FILL is complet ed, just after
the end of t he cycle, etc.) due to the inert ia of t he measurement probe.
Set-up
During first start -up, the functions/ parameters listed below m ust be set or adjust ed:
Table of contents
Other Smeg Dishwasher manuals

Smeg
Smeg ST8647 User manual

Smeg
Smeg LSA13X User manual

Smeg
Smeg SNZ653S User manual

Smeg
Smeg 19590 0653 User manual

Smeg
Smeg Classica Aesthetic STX325BLLC User manual

Smeg
Smeg IG40521W2 User manual

Smeg
Smeg PL673WH User manual

Smeg
Smeg STC75 User manual

Smeg
Smeg ST147 User manual

Smeg
Smeg LSE5304XA User manual