Smeg UD505DAUS User manual

1
TRANSLATION OF THE ORIGINAL INSTRUCTIONS
SUMMARY
1PRODUCT IDENTIFICATION....................................................................................................................3
1.1 APPLICATION, GENERAL FUNCTIONS AND INTENDED USE ...............................................................3
1.2 NAME AND ADDRESS OF MANUFACTURER OR DISTRIBUTOR...........................................................3
SMEG S.P.A................................................................................................................................................3
1.3 DECLARATION OF CONFORMITY TO PRODUCT STANDARDS.............................................................3
1.4 DESCRIPTION OF THE APPLIANCE.....................................................................................................4
2SYMBOLS USED IN THE MANUAL...........................................................................................................4
3SAFETY PRECAUTIONS AND INSTRUCTIONS..........................................................................................5
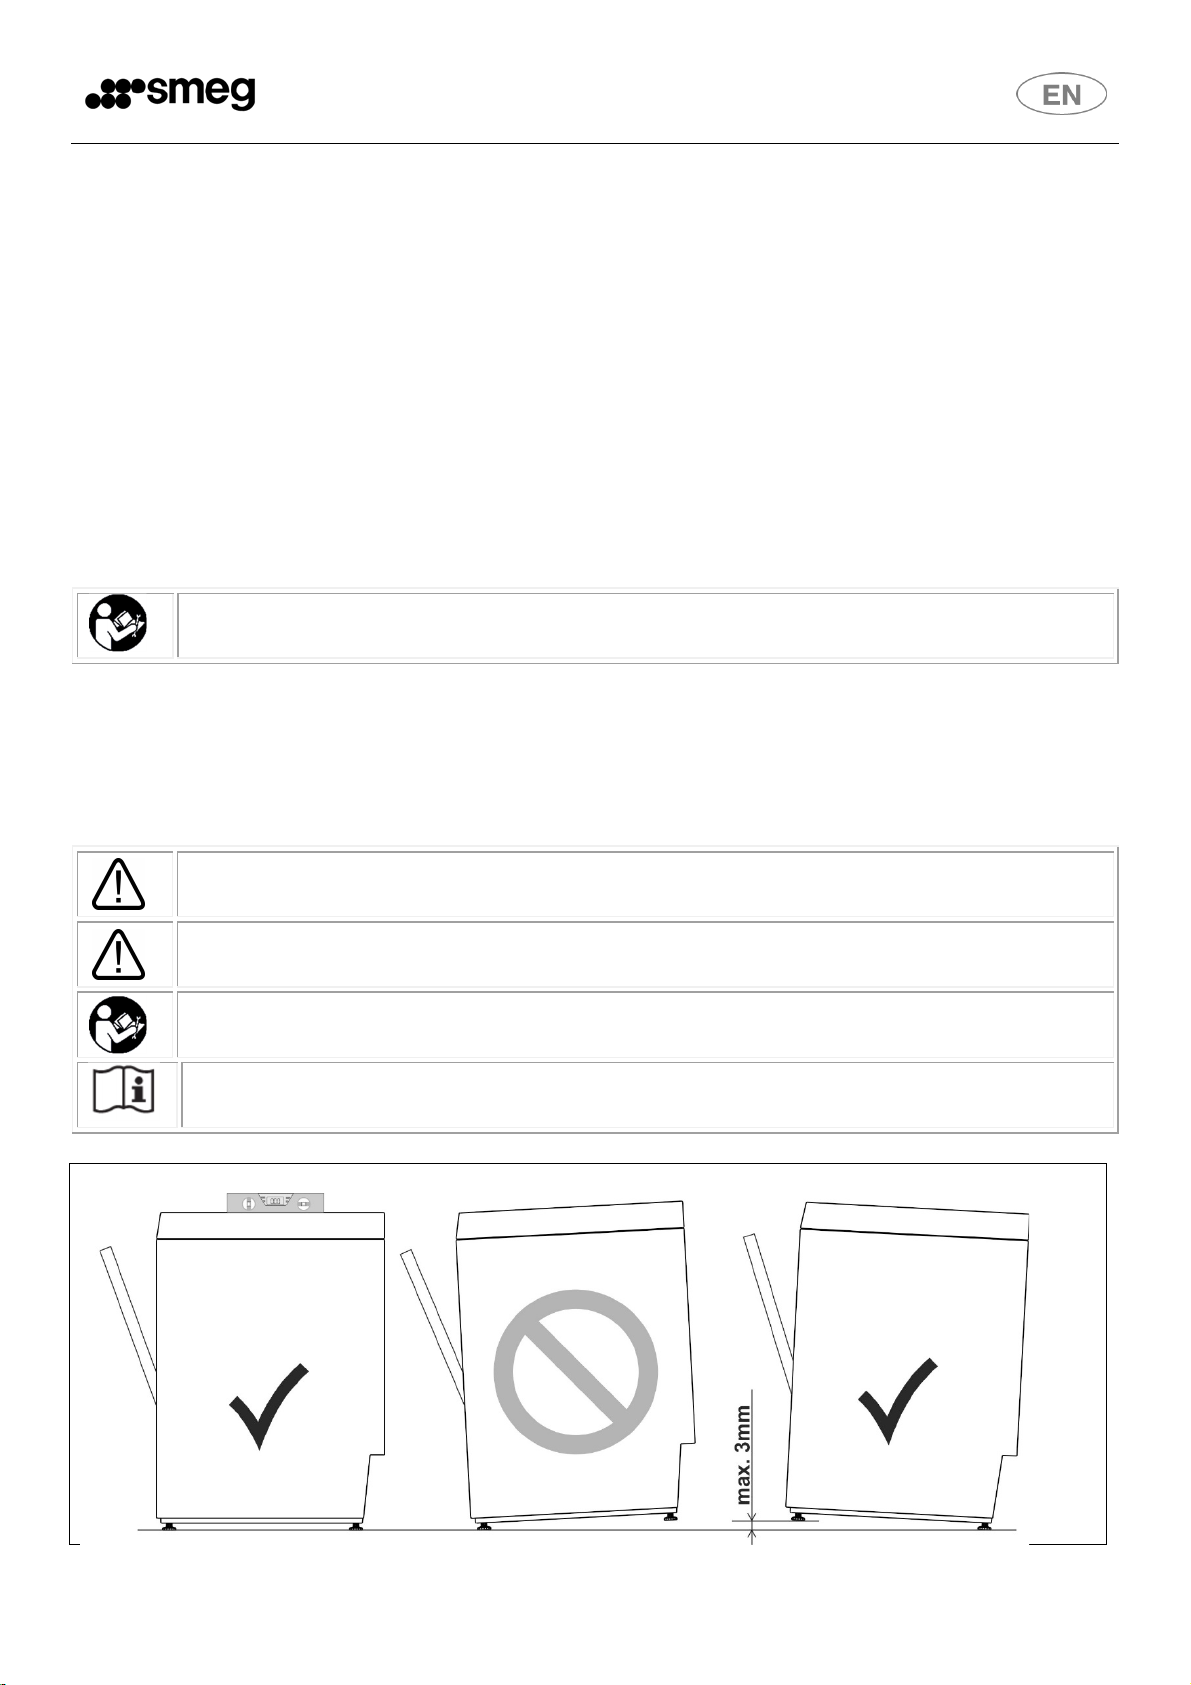
3.1 CORRECTINSTALLATION..................................................................................................................5
3.2 SAFEUSE..........................................................................................................................................6
3.3 CORRECTMAINTENANCE.................................................................................................................7
4PRODUCT CHARACTERISTICS.................................................................................................................8
4.1 OVERALL DIMENSIONS.....................................................................................................................8
4.2 TECHNICAL CHARACTERISTICS .........................................................................................................9
5PREPARING THE APPLIANCE FOR USE..................................................................................................10
5.1 POSITIONING AND INSTALLATION..................................................................................................10
5.2 CONNECTIONTO THEWATER SUPPLY............................................................................................11
5.3 DRAINCONNECTION......................................................................................................................11
5.4 CONNECTIONTO THEELECTRICITY SUPPLY....................................................................................12
6FIRST START-UP...................................................................................................................................13
6.1 FIRSTSTART-UP .............................................................................................................................13
6.2 PREPARING FOR USE (IMPORTANT ).............................................................................................13
6.3 USING THEWATER SOFTENER (ONMODELS WITH THIS FEATURE ONLY).......................................13
7CONTROL PANEL..................................................................................................................................14
7.1 SET-UP (AUTHORISED STAFF ONLY)...............................................................................................15
7.2 CONTENTS OF DISPLAY ..................................................................................................................15
7.3 PARAMETERPROGRAMMING PROCEDURE(SETUP).......................................................................16
7.4 MODIFIABLEPARAMETERS............................................................................................................16
7.5 ADJUSTING DETERGENT AND RINSE AID DISPENSING (ONLY AVAILABLE ON CERTAIN MODELS)....17
7.6 STARTING THE PERISTALTIC PUMP IN MANUAL MODE-RAPID FILLING OF DETERGENT AND RINSE
AID CIRCUIT.............................................................................................................................................17
7.7 MAINS WATER HARDNESS SETTING TABLE (MODELS WITH SOFTENER ONLY)................................18
7.8 EXTRA RINSE OPTION (LONG RINSE). - DISPLAYREADS “E.R”..........................................................18
7.9 "CLEAN WATER CYCLE" OPTION - DISPLAY READS “CL”..................................................................19
7.10 “THERMOSTOP” OPTION- DISPLAYREADS “TS”.............................................................................19
7.11 FAST/ECO STARTING OPTION- DISPLAYREADS “FI”.......................................................................19
8MALFUNCTIONS SHOWN ON THE DISPLAY (FOR THE TECHNICIAN)....................................................20
9INSTRUCTIONS FOR THE USER.............................................................................................................22

2
9.1 BEFORE WASHING.........................................................................................................................23
9.2 FIRST USE EACH DAY (TANK AND BOILER EMPTY)..........................................................................24
9.3 PROGRAM CHANGE.......................................................................................................................25
10 CHOSING THE PROGRAM .................................................................................................................25
11 BASKETS PROVIDED..........................................................................................................................26
12 MAINTENANCE AN CLEANING..........................................................................................................26
12.1 DAILY CLEANING OF FILTERS..........................................................................................................27
12.2 TOTAL PUMP-OUT AT THE END OF THE DAY..................................................................................29
12.3 TOPPING UP WITH REGENERATING SALT (FOR MODELS WITH SOFTENER).....................................29
12.4 ROUTINEINSPECTION OF THE SPRAY ARM (ONCE A WEEK ) ..........................................................30
12.5 LENGTHYPERIODS OUT OF USE.....................................................................................................30
13 TROUBLESHOOTING.........................................................................................................................31
14 MALFUNCTIONS SHOWN ON THE DISPLAY (FOR THE USER)............................................................33
SMEG thanks you for choosing one of its products.
This manual is an integral part of the appliance. Take good care of it and keep it to hand throughout the
appliance’s life cycle, since it contains important information about assembly, safety, useand maintenance.
In the event that the appliance is sold on, consign this manual to the new owner.
Before putting the appliance into operation, read all the instructions in this manual carefully to become
familiar with the right conditions for the proper use of your professional dishwasher.

3
1PRODUCT IDENTIFICATION
1.1 Application, general functions and intended use
This dishwasher is intended for professional use in the restaurant and institutional catering sector and
complies with the relevant safety regulations. However, misuse may cause injury and/or damage, and
therefore the dishwasher must only be used by suitably trained staff.
This dishwasher is designed for use in non-mobile premises and is intended only for washing tableware
(dishes, pans, trays, cups, glasses and bowls) and any other item for commercial catering, stable to
temperature and humidity produced by the appliance”. Any other type of use is not permitted and may be
dangerous.
Persons whose physical, sensory or mental capabilities, inexperience or lack of knowledge render them
unable to use the dishwasher safely must not use it without the supervision and guidance of a responsible
person.
The manufacturer is not liable for any injury or damage caused by failure to comply with the instructions
given in this manual, misuse, tampering with even a single part of the appliance, or the use of non-genuine
spare parts.
1.2 Name and address of manufacturer or distributor
Smeg S.p.A.
Via Leonardo da Vinci, 4 - 42016 Guastalla (RE) Tel. +39 0522 8211 - Fax + 39 0522 821453
Our Sales Department staff will be able to provide you with information about prices and special offers.
Our After-Sales Department will be able to provide you with guidance about keeping your device
functioning correctly and put you in touch with your nearest authorised Service Centre. Our entire product
offering can be viewed at our website.
1.3 Declaration of conformity to product standards
This appliance complies with the relevant safety regulations and conforms to the requirements of directives
2006/42/EC and 2004/108/EC.
The dishwasher is also marked in compliance with European Directive 2002/96/EC on Waste Electrical and
Electronic Equipment (WEEE).
For information on the treatment, recovery and recycling of this product, contact the local
authority, domestic waste collection service, or your Smeg reseller.
Make sure that this product is scrapped correctly to safeguard the environment and health.

4
1.4 Description of the appliance
U COVER (TOP)
D DISPLAY AND CONTROL PANEL
A FRONTLOADING/UNLOADING DOOR
V SERVICE COMPARTMENT
F ADJUSTABLE FEET
2SYMBOLS USED IN THE MANUAL
This symbol instructs the user to read the instructions in the manual with care.
This symbol appears next to information important for the safety ofpeople and the
appliance.
This symbol is applied to some parts which contain live electrical components and indicates
the risk of electric shock.
This symbol is applied close to the terminal for the connection of an external equipotential
conductor.
This symbol appears next to important information. Read the instructions provided with care
and comply with the procedures and rules described.
This symbol appears next to information and technical instructions intended for the qualified
staff who are to install, commission and test the appliance and carry out any repairs.
This symbol indicates that at the end of its working life, the appliance must be consigned to a
disposal plant for recovery and recycling in accordance with the relevant legislation in the
country of installation. Contact a specialist centre for disposal.

5
3SAFETY PRECAUTIONS AND INSTRUCTIONS
The precautions and instructions below contain important information and must be read with care.
The manufacturer does not accept responsibility for damage caused by failure to comply with the
safety precautions and instructions.
3.1 Correct installation
The dishwasher must be installed by an authorised technician.
When handling and installing the dishwasher, always wear the most suitable personal
protection equipment (PPE) for the task in hand.
Do not install a dishwasher which has been damaged during transport. If in doubt, consult
your dealer.
If the power supply cable is damaged, do not run the dishwasher.
Do not install the dishwasher in areas subject to freezing temperatures or in atmospheres
with explosion risk (ATEX).
Any accessories may only be installed on the appliance if authorised by the manufacturer.
Donot installthedishwashernexttoapplianceswhichirradiatestrongheat (e.g. gasburners,
stoves, etc.) since they could cause damage.
If the dishwasher is installed above the ground, make sure thatthe stand and dishwasher are
secured properly and do not constitute a hazard.
Electrical safety is only ensured if the dishwasher is connected to an earth conductor
compliant with the relevant electrical regulations. If in doubt, have the system inspected by
a qualified electrician.
A circuit breaker and overcurrent protection device (magnetothermal switch or fuses) must
beinstalledinan easilyaccessiblepositiononthedishwasher's powersupplyline. Thisdevice
must only serve the dishwasher and must be suitable for its rated electrical characteristics.
Do not connect the dishwasher to the electrical mains by means of adapters or extensions,
since they do not guarantee the safety required.
If the dishwasher is connected to the electrical mains by means of a plug, it must be of the
same type as the power socket, suitable for the appliance's rated electrical characteristics
and compliant with the relevant national regulations on electrical systems. The power plug
must be easily accessible after the appliance has been installed.
Only use new hoses for connection to the water supply. Old hoses or hoses salvaged from
previous installations must not be used.
The drain connection must be made in accordance with the relevant national regulations.
Substandard connections may cause flowback and in some cases pollution.
If the machine is not installed in a recess, ask the manufacturer for the special
mounting kit in order to make it stable.

6
3.2 Safe use
The staff assigned to use the dishwasher must be suitably trained andinstructed.
The appliance is not suitable for use by juveniles or persons with reduced physical, sensorial
or mental capacities, or those without the necessary knowledge and experience. Such
persons may only use the appliance under the supervision of a person responsible for their
safety.
Do not leave the dishwasher door open. Risk of tripping or injury against the edges of the
door.
Do not sit or lean on the open door. This may tip over or damage the appliance.
The water inside the dishwasher is not drinkable.
Do not use the dishwasher for washing or soaking foods.
Do not use the water inside the dishwasher for defrosting foods, even if they are in airtight
containers.
When using the dishwasher, remember that the plates are very hot at the end of a wash
cycle.
Take care when opening the door as you might be splashed with water.
When the door is opened, splashed of hot water may come out.
Knives and pointed kitchen equipment must be placed in the basket with their tips
downwards, or horizontally, taking care not to allow them to protrude from the basket
The dishwasher is only intended for use with water and detergents suitable for washing in
professional dishwashers. The use of other products may damage both the dishes and the
appliance.
Donotoperatethedishwasherwithorganic solventsorflammableliquids.Neverloaddishes
dirty with ash, wax orpaint.
When handling detergents comply strictly with the instructions provided by the detergent
producer.
Always keep the detergent safety datasheets within reach so that the operator can consult
them easily if necessary.
Swallowing orinhaling detergents may cause serious injury to the nose, mouth and throat.
If detergent has been inhaled or swallowed, seek medical advice immediately.
When the door is opened, splashed of hot water may come out.
It is recommended to use baskets that are intact and not damaged by wear or tampering.
The plastic runnersof the baskets, if present, must not be removed, damaged, modified or
tampered with.

7
3.3 Correct maintenance
Do not clean the machine with a water jet machine, high-pressure or steam cleaners.
Beforeperforminganymaintenanceprocedureontheappliancedisconnectitfromthemains
electricity supply. Touching live electrical components, even accidentally, may be very
dangerous.
Never open the dishwasher's case. Electric shock hazard. Only the authorised technician may
access the internal parts of the dishwasher.
The dishwasher may only be repaired by the authorised service organisation. Substandard
repairs may cause damage or danger for the user.
No alterations or changes of any kind to the appliance's electrical circuits or mechanical
structurearepermitted.The manufacturerdeclinesallresponsibilityfor damagearisingfrom
unauthorised alterations.
Replace any faulty parts only with genuine spare parts. The manufacturer declines all liability
for damage resulting from the use of non-genuine spare parts.
The power supply cable, if fitted, must be replaced by the manufacturer or an authorised
service centre in accordance with the technical data specified on the wiring diagram
supplied with the appliance, to prevent all risks.

8
4PRODUCT CHARACTERISTICS
4.1 Overall dimensions
R LOWER BACK PANEL E ELECTRICITY SUPPLY CABLE
C FILLER HOSE P PERISTALTIC HOSES
Q TERMINAL FOR EXTERNAL
EQUIPOTENTIAL CONDUCTOR. S DRAIN HOSE
T EXTERNAL DISPENSER POWER CABLE ENTRY POINT

9
4.2 Technical characteristics
Electricity supply - See technical data
plate and
electrical wiring
diagram supplied
with the
appliance
Intake water pressure -
Intake water temperature -
Use - Indoor
Max. working altitude m 2000
Working ambient temperature °C 10 - 35
Relative humidity
80% for
temperatures up
to 25°C with
linear decrease to
50% at the
temperature of
35°C
Intake water hardness
(models with softener) °f/°d/ppm
≤ 60/≤ 34/≤ 600
Intake water hardness
(models without softener) °f/°d/ppm
≤ 3/≤ 5/≤ 30
Water intake flow rate
(models with rinsing pump) L/min min 6
Water intake flow rate
(models without rinsing pump) L/min min 12
Intake hose connection - threaded 3/4 “
Drain minimum diameter mm 25
Drain height (above appliance installation surface) mm max 600
Rinse cycle water consumption L 3,2
Boiler capacity L 6
Tank capacity L 13
Noise level LpA < 60 dB(A)
Degree of protection IPX 4
Net weight kg ˜ 52
Power supply cable type ◄HAR►H07RN-F

10
5PREPARING THE APPLIANCE FOR USE
Convey the dishwasher to the installation site, remove the packaging and check the appliance and
components for damage; any damage found must be reported to the transporter in writing. The packaging
components (plastic bags, expanded polystyrene, nails, etc.) must not be left within reach of children and
pets since they are potentially dangerous. All packaging materials used are environment-friendly. They can
be kept without constituting any hazard, or may be disposed of at a specialist waste disposal centre. The
plastic components suitable for recycling are marked as follows:
PE -polyethylene: external packaging film, bag containing the instructions, protective bags.
PP - polypropylene: straps used to close the packaging.
PS -expanded polystyrene: cornerguards, top of packaging.
Wooden and cardboard components can be disposed of in accordance with the local regulations.
5.1 Positioning and installation
Place the dishwasher in the chosen point and remove the protective film. Level the dishwasher (withthe
aid of a spirit level) on its four feet, adjusting them to ensure that it is stable. If the dishwasher is installed
above the ground, make sure that the stand and dishwasher are secured properly and do not constitutea
hazard.
All operations described in this section must be carried out and/or checked by the qualified
staff who install and commission the dishwasher.
The systems and premises in which the dishwasher is installed must comply with the relevant
regulations.
If the dishwasher is installed next to another appliance, also check the recommendations
provided by the manufacturer of the adjacent appliance.
Installations other than those described must first be approved by the manufacturer.
Use only professional furnishings and units in the vicinity of the dishwasher. Any other types
of furnishing may be damaged.

11
5.2 Connection to the water supply
Check that the intake water pressure, flow rate and temperature are as stated in the
dishwasher's technical characteristics. If the dynamic pressure exceeds the limit stated
in the technical characteristics, a pressure reducer must be installed. If the pressure is
lower, it might be necessary to fit a special pump to ensureoptimal performance.
Connect the water intake hose to a connector with ¾” gas threaded fitting, inserting
the filter "A" provided. The tap must be easily accessible after installation of the
appliance.
5.3 Drain connection
The dishwasher is fitted with a drain pump and can operate with drain connections on the floor or wall.
Before connecting the hose, check that the diameter and height of the wall drain connection are as stated
in the dishwasher's technical characteristics. When connecting the dishwasher's drain hose, take care to
avoid kinks, sharp bends or crushing. Since the drain water temperature can be very high, the end ofthe
drain hose must be fixed to the drain connection using the hose clamps provided.
Only use new hoses for connection to the water supply. Old hoses or hoses salvaged from
previous installations must not be used.
If the water supply system has been unused for a long time or if work has been done on it,
before connecting the appliance's intake hose run the water to flush the air and dirt from the
pipes.
FOR MODELS WITH A WATER SOFTENER
An “approved” double check valve or some other noless effective device providing backflow
prevention protection to at least fluid category two shall be fitted at the point of connection
between the water supply and the fitting or appliance.
FOR MODELS WITHOUT A WATER SOFTENER
An “approved” single check valve or some other no less effective device providing backflow
prevention protection to at least fluid category two shall be fitted at the point of connection
between the water supply and the fitting or appliance.
The drain connection must be made in accordance with the relevant national regulations.
Substandard connections may cause flowback and in some cases pollution.
No extensions must be added to the drain hose supplied with the appliance. Any extensions
might cause drainage problems.

12
5.4 Connection to the electricity supply
The dishwasher must be connected to the electrical system by authorised, skilled staff, in accordance with
the relevant regulations. Also comply with the technical instructions for the connection provided with the
appliance. The dishwasher's ratedelectrical characteristics are provided on its technical data plate. A
circuit breaker with contact gap rated for category II overvoltage and an overcurrent protection device
(magnetothermal switch or fuses) must be installed in an easily accessible position on the dishwasher's
power supply line. These devices must only serve the dishwasher and must be suitable for its rated
electrical characteristics. The electrical protection devices must undergoa functional test beforethe
dishwasher is put into operation. If the dishwasher is connected to the electrical mains by means ofa plug,
it must be of the same type as the power socket, suitable for the appliance's rated electrical characteristics
and compliant with the relevant national regulations. The power plug must be easily accessible afterthe
appliance has been installed.
Electrical safety is only ensured if the dishwasher is connected to an earth conductor
compliant with the relevant electrical regulations. If in doubt, have the system inspected by a
qualified electrician.
Donot connect the dishwasher to theelectrical mains by means ofadapters or extensions,
since they may cause dangerous overheating.
Connect the appliance to the equipotential bonding system. The equipotential terminal is
low down on the back of the appliance and is marked with the symbol.
Additional recommendation: class B all-current sensitive residual-current circuit breaker with
a tripping current of 30 mA
The dishwasher is always poweredup unless the master switch is turnedoff or, on
appliances with power plug, the plug is disconnected.

13
6FIRST START-UP
6.1 First start-up
The electrical protection system must undergoa functional test before theappliance is put into operation.
The appliance must be installed and/orinspected by qualified staff, who will start it up for the first time
and provide the relevant operating instructions.
6.2 Preparing for use ( Important )
The rinse aid dispenser is fitted on all models, the detergent dispenser only on some.
If both dispensers are present put the external detergent and rinse aid containers in place and insert the
respective intake hoses on the rear of the appliance into them. Red hose: detergent, blue hose: rinse aid.
Before inserting the hoses into the containers, fit the weights (needed to ensure that
they always draw in liquid from the bottoms of the containers) and the filters onto their
ends as shown. If the detergent dispenser is not factory-fitted, it can be retrofitted after
ordering the relative kit.
6.3 Using the water softener (on models with this feature only)
The quantity of lime in the water (which indicates its hardness) causes whitish marks
on dry dishes and dishes also tend to lose their shine over time. The dishwasher is
equipped with an automatic water softener which removes the substances that
cause hardness from the water with the aid of regenerating salt.
The first time the dishwasher is used, a litre of water must be poured into the tank
with the salt. Whenever the tank is filled, always take care toensure that the cap is
firmly closed. The mixture of water and detergent must not get into the salt tank, as
this would impair operation of the regeneration system. In this case warranty cover
will be forfeited.
IMPORTANT:
Whenever the type of detergent or rinse aid is changed, it is ABSOLUTELY ESSENTIAL to flush out the
peristaltic pumps by placing the external intake pipes in water for a few cycles. Always use only products
specifically recommended for use in a professional dishwasher. Failure to comply with this
recommendation leads to forfeiture of the warranty entitlement on the appliance’s water system.
Replacementoftheinternaltubeofthedetergentandrinseaidperistalticpumpsisrecommendedevery
12 months or 15.000 wash cycles, by the After-Sales Service.

14
7CONTROL PANEL
Key to Symbols
On/off button
Total pump-out (tank -boiler) button
Regenerating salt symbol (only if softener is fitted)
Short programme button
Medium programme button
Long programme button
L1 Short programme Led
L2 Medium programme Led
L3 Long programme Led
L4 Drainage Led
L5 Appliance on Led
L6 No salt Led (only if softener is fitted)
Key to messages on display
CLOSE Close the door
FILL Machine preparing for cycle
End End of operation requested
PrF
400/500/CAP
Machine model
(viewed when the machine is started with master switch)
F x xx r xxx Version/revision of the installed firmware.
(viewed when the machine is started with master switch, after the model code)
UnLoad Pump-out
OFF Energized machine OFF

15
Using the buttons
Button Short press Pressed for 2” Pressed for 5”
Long press, release, press
again
Display temperatures
Boiler and tank On/OF
Door open and machine
OFF.
Long press >>> display
reads “- -“ >>> release
and press again: Access
Setup Menu (1)
Scroll through Setup
options (2) Start Pump-
out Total pump-out
(tank+boiler)
Set Short Programme
Start Short Programme
Set Medium
Programme Start Medium
Programme
Set Long Programme Start Long Programme
Set P0 (Empty tank) Start P0
Door closed
Peristaltic pumps in
Manual mode to prime
pipes
Reset to DEFAULT
parameters (1)
Technician user only
1) Restores the default parameters.
A series ofoperations can be carried out when the dishwasher is first installed tocustomise it tothe user's
requirements.
7.1 SET-UP (Authorised staff only)
7.2 Contents of display
The display provides the following information:
• Machine off but energized: OFF
• Machine on and ready for use: End/P1-P2-OP3
• Wash phase: ||||||||||
• Programming phase: See parameter programming section
• Error message: See error messages section
Note on display of temperatures
Temperatures shown on the display might notindicate theactual temperature inthe tank and/or boiler
during heating - wait about1’ after the heating elements switch offto see the real temperature.
Set-up
During first start-up, the functions/parameters listed below must be set or adjusted:

16
7.3 Parameter programming procedure (setup)
To modify the parameters, proceed as follows starting with the appliance in “OF” status with the door
open.
1) Switch the appliance using the On/OF button
2) Press and hold the button until the display shows “- -“ , release and press again.
3) Press the pump-out button to scroll through the parameters for modification
4) Modify the parameter by pressing button P1
5) During setup operations, the description and value of the parameter alternate on the display.
6) Select the other parameters for modification in the same way and proceed as described above
7) To exit the setup menupress and hold until thedisplay shows “OFF”, press P2 or P3 orwait
at least 3 minutes without pressing any key; in this way the machine automatically exits the setup menu.
7.4 Modifiable parameters
This table lists the model choice or programme and temperature option parameters.
Display Settings available Description
°b From 85° to 71° Boiler temperature
°t From 62° to 52° Tank temperature
ri 0 – 2 gr/lt (in steps of 0,1) Rinse aid batching
dE 0-10 gr/lt (0-10 insteps of 0,2) Detergent batching
St On - OF Auto-start:
washing programme starts when door is closed
On enabled OF disabled
HA H0 – H6 Water hardness setting
Er On-OF Prolonged rinse at the end of the washing cycle (+8”).
On enabled OF disabled
CL On-OF Clean water cycle. On enabled OF disabled
TS On - OF Thermostop On enabled OF disabled
Fi
FS-EC Starting the machine in FAST or ECO mode
(models without rinsing pumponly)

17
7.5 Adjusting detergent and rinse aid dispensing (only available on certain models)
Rinse aid – Grams/liter dosage (depends on model)-The display reads “ri”
Every time is pressed,
the value increases of 0,1 g/l
up to a max. of 2 g/l.
Default: 0,4 g/l.
NOTE: Do not exceed the amount indicated by the manufacturer, as shown on the package.
An excessive amount may cause foaming.
Detergent - Grams/liter dosage (depends on model) - The display reads “dE”
Every time is pressed,
the value increases of 0,2 g/l
up to a max. of 10 g/l.
Default: 1,4 g/l.
NOTE: Do not exceed the amount indicated by the manufacturer, as shown on the package.
An excessive amount may cause foaming.
7.6 Starting the peristaltic pump in manual mode-rapid filling of detergent and rinse aid
circuit
Energized dishwasher and full tank: press for 5 seconds buttons P2 +P3 simultaneously.
The peristaltic pumps work until P1 or P2 are pressed again; during the procedure the indicator lights stay
on and the display shows “rd”. The rinse aid circuit is filled in 7 minutes, the detergent circuit is filled in 2
minutes.
Since the pumps work at the same time, only the rinse aid (blue tube in the rinse aid jerrycan) must be
withdrawn for 5 minutes, then the detergent (red tube in the detergent jerrycan) is withdrawn too for the
last two minutes.

18
7.7 Mains water hardness setting table (models with softener only)
If “rE9E” appears on the display, it indicates that the
machine is carrying out a resin regeneration cycle, which
lasts approximately 90 seconds. It is normal for the machine
to fill or drain water automatically during this procedure,
even if it is not carrying outa washing cycle.
Ppm-mg/l
Hardness
(°dH German
degrees)
Hardness
(°dF French
degrees)
Setting
level
Regeneration off HA: 00
150 8.5 15 H
A
200 11 20 H
A
300 17 30
HA_ 03 default
400 22.5 40 H
A
500 28 50 H
A
600 33.5 60 H
A
Adjusting the regeneration frequency (models with softener only)
See appliance setup menu.
With values over 60°dF /33°dH an external water treatment device must be used and the
regeneration frequency must be set at H0
7.8 Extra rinse option (long rinse). - Display reads “E.r”
Rinse is 8” longer than the standard in every washing cycle.
Press to enable (On)/disable (OF)

19
7.9 "Clean water cycle" option - Display reads “CL”
When this option is activated, the appliance pumps out all
the water from the tank and then refills it with clean water
at every wash cycle. How long this operationtakes depends
on the washing water temperature.
Press to enable (On)/disable (OF)
7.10 “Thermostop” option - Display reads “tS”
“on” = the minimum temperature of rinse as set,
independently from theintake water temperature, the
nominal duration of cycle may be extended by a few
seconds.
“off” = the minimum temperature of rinse may be a few
degrees lower than the set one, if hot intake water is not
used. Press to enable (On)/disable (OF)
7.11 Fast/eco starting option - Display reads “Fi”
Fast (FS): it allows to start the machine in less time than
the standard; it involves a greater water consumption at
the first start.
Eco starting (EC): the machine starts in standard time,
without any additional water consumption.
Press to enable (On)/disable (OF)

20
8MALFUNCTIONS SHOWN ON THE DISPLAY (FOR THE TECHNICIAN)
The dishwasher is able to identify a number of malfunctions and show them on the display. If the problem
persists after the dishwasher has been switched off and back on, proceed as described below:
Er 04 Tank temperature probe
malfunction Tank temperature probe disconnected or faulty.
Er 05 Tank water filling malfunction
- The tank wasn’t filled in the expected time: check the water
supply tap, the dynamic supply pressure, cleanliness of the inlet
water filter, cleanliness of the rinse nozzles, any damage of the
water charging hose. If the problem persists during filling:
- Work level tank pressure switch damaged (it always detects
“empty”: check if the tank safety pressure switch starts
operating).
- Leakage from the tube connected to the air trap; if the problem
is not solved, it occurs during the work program.
- vent valve of the drain pipe obstructed with dirt: with
siphonage, the tank gets completely empty at the end of a
washing program.
Er 06 Water pump-out malfunction
Check:
- filter cleanliness; obstructions, bending and narrowing of the
drain pipe.
-possible obstructions ofthe drain pump (blocked with aforeign
body).
Er 23 Boiler does not heat up as
expected.
The problem might occur because water is continually entering
the tank (the causes are as for “Er 05” – see above) If the boiler
heating elementis damaged,this might bedueto operationwith
no water in the boiler - the pressure switch is indicating full even
with the boiler empty: - damaged boiler heating element –
contactor failure - open on boiler safety thermostat side. - boiler
temperature probe faulty or incorrectly positioned -
motherboard relay failure, Important: If the boiler heating
element is damaged, this might be due to operation with no
water in the boiler, pressure switch continues to give full reading
even with boiler empty: check boiler air trap and/or relative
pressure switch and replace if necessary.
Er 24 Boiler temperature probe
malfunction Boiler temperature probe disconnected or faulty.
Er 25 Boiler water filling
malfunction
The boiler wasn’t filled in the expected time: check the water
supply tap, the dynamic supply pressure, cleanliness of the inlet
waterfilter,anydamageofthewatercharginghose,orcheckthe
following in this order:
- faulty boiler pressure switch (it always detects “empty”),
- leakage or unbinding of the tube (water runs inside the tube)
- menu service wrong setting “rP”
Table of contents
Other Smeg Dishwasher manuals

Smeg
Smeg Dishwasher 3LBS931 User manual

Smeg
Smeg STP364 User manual

Smeg
Smeg LSPU8643WH User manual

Smeg
Smeg DWI66 Operation instructions

Smeg
Smeg LSE451 User manual

Smeg
Smeg GM287-120 User manual

Smeg
Smeg DWAFI6314-2 Installation instructions

Smeg
Smeg ST975 User manual

Smeg
Smeg KNO745 User manual

Smeg
Smeg LSP6445XD User manual

Smeg
Smeg CL6S-4 User manual

Smeg
Smeg Dishwasher CSU2001B1 User manual

Smeg
Smeg Universale PL65233XIN User manual

Smeg
Smeg GM287-110 User manual

Smeg
Smeg ST66T User manual

Smeg
Smeg CWC 611 User manual

Smeg
Smeg DS643 User manual

Smeg
Smeg ST8650 User manual

Smeg
Smeg ST975 User manual

Smeg
Smeg PL338NE User manual