manuals.online logo
Brands
  1. Home
  2. •
  3. Brands
  4. •
  5. Smeg
  6. •
  7. Washer
  8. •
  9. Smeg STA60 User manual

Smeg STA60 User manual

This manual suits for next models

1

Other Smeg Washer manuals

Smeg K600TL1 User manual

Smeg

Smeg K600TL1 User manual

Smeg SLB510 User manual

Smeg

Smeg SLB510 User manual

Smeg WMA 8168 LB1 User manual

Smeg

Smeg WMA 8168 LB1 User manual

Smeg WMF16AX1 User manual

Smeg

Smeg WMF16AX1 User manual

Smeg WHT1114LSIN User manual

Smeg

Smeg WHT1114LSIN User manual

Smeg LBW912IT User manual

Smeg

Smeg LBW912IT User manual

Smeg TLS6-1 User manual

Smeg

Smeg TLS6-1 User manual

Smeg LB86 User manual

Smeg

Smeg LB86 User manual

Smeg 47P User manual

Smeg

Smeg 47P User manual

Smeg WHT814LUK User manual

Smeg

Smeg WHT814LUK User manual

Smeg LBB16AZ User manual

Smeg

Smeg LBB16AZ User manual

Smeg SW86-1 User manual

Smeg

Smeg SW86-1 User manual

Smeg LB107 User manual

Smeg

Smeg LB107 User manual

Smeg LSE1200 Product guide

Smeg

Smeg LSE1200 Product guide

Smeg WHT812EIT-1 User manual

Smeg

Smeg WHT812EIT-1 User manual

Smeg B9040L User manual

Smeg

Smeg B9040L User manual

Smeg SLB12SB User manual

Smeg

Smeg SLB12SB User manual

Smeg WMF147X User manual

Smeg

Smeg WMF147X User manual

Smeg WMI147C User manual

Smeg

Smeg WMI147C User manual

Smeg WLB 1001 Product guide

Smeg

Smeg WLB 1001 Product guide

Smeg SWM60F User manual

Smeg

Smeg SWM60F User manual

Smeg LBS 107 User manual

Smeg

Smeg LBS 107 User manual

Smeg SWM107 User manual

Smeg

Smeg SWM107 User manual

Smeg LST127-2 User manual

Smeg

Smeg LST127-2 User manual

Popular Washer manuals by other brands

Zanussi ZWF 14080 W user manual

Zanussi

Zanussi ZWF 14080 W user manual

Zanussi FV 825 N Instruction booklet

Zanussi

Zanussi FV 825 N Instruction booklet

LG WM8000HVA Specifications

LG

LG WM8000HVA Specifications

Whirlpool 3RGSC9400 Use and care guide

Whirlpool

Whirlpool 3RGSC9400 Use and care guide

Zanussi TJ 1284 H instruction manual

Zanussi

Zanussi TJ 1284 H instruction manual

AEG KO-LAVAMAT 74740 User information

AEG

AEG KO-LAVAMAT 74740 User information

Beko WSRE7512PRA user manual

Beko

Beko WSRE7512PRA user manual

Whirlpool LA5OOOXP Use and care guide

Whirlpool

Whirlpool LA5OOOXP Use and care guide

Miele PW 6207 operating instructions

Miele

Miele PW 6207 operating instructions

GE GE Profile WWSE3160AAA Specifications

GE

GE GE Profile WWSE3160AAA Specifications

Bush WMNB712EB instruction manual

Bush

Bush WMNB712EB instruction manual

ALLIANCE UW60AV Information manual

ALLIANCE

ALLIANCE UW60AV Information manual

Bosch WAN280H3 User manual and installation instructions

Bosch

Bosch WAN280H3 User manual and installation instructions

Maytag MAT15MNAW installation instructions

Maytag

Maytag MAT15MNAW installation instructions

LG T2109VSAL owner's manual

LG

LG T2109VSAL owner's manual

Indesit IWC 61481 Instructions for use

Indesit

Indesit IWC 61481 Instructions for use

Electrolux EWF12843 user manual

Electrolux

Electrolux EWF12843 user manual

Indesit WIN 70 Instructions for use

Indesit

Indesit WIN 70 Instructions for use

manuals.online logo
manuals.online logoBrands
  • About & Mission
  • Contact us
  • Privacy Policy
  • Terms and Conditions

Copyright 2025 Manuals.Online. All Rights Reserved.

1
LAVABIANCHERIA
WASHING MACHINE
LAVE-LINGE
WASCHMASCHINE
LAVADORA
WASAUTOMAAT
LIBRETTO ISTRUZIONI IT
INSTRUCTIONS MANUAL GB
MANUEL D’INSTRUCTIONS F
GEBRAUCHSANWEISUNG D
MANUAL DE INSTRUCCIONES E
GEBRUIKSAANWIJZING NL
2
Indice
Pag.
Contents
Pag.
1. Il nu v sistema di lavaggi 3
1. The new washing system 22
2. Avvertenze per la sicurezza e l’us 4
2. Safety warnings 23
3. Istruzi ni per l’installazi ne 6
3. Installati n instructi ns 26
4. Descrizi ne c mandi 9
4. Descripti n f c ntr ls 28
5. Utilizzazi ne della macchina 13
5. Using the machine 32
6. Pulizia e manutenzi ne 18
6. Cleaning and maintenance 37
7. Avvertenze in cas di an malie e malfunzi -
nament 20
7. Tr ublesh ting 39
Simboli Pannello Comandi 118
Cont ol Panel Symbols 119
Cont assegno WEEE 119
WEEE ma k 120
Sommaire
Pag.
Inhaltsverzeichnis
Pag.
1. Le n uveau système de lavage 41
1. Das neue Waschsystem 60
2. Avertissements p ur la sécurité et l’utilisati n 42
2. Sicherheits- und Gebrauchs-Hinweise 61
3. Instructi ns p ur l’installati n 44
3. Installati ns-Anweisungen 64
4. Descripti n des c mmandes 47
4. Beschreibung der Schaltungen 67
5. Utilisati n de la machine 51
5. Gebrauch der Waschmaschine 71
6. Nett yage et entretien 56
6. Reinigung und Wartung 76
7. Avertissements en cas d’an malies de f nc-
ti nnement 58
7. Hinweise bei Betriebsstörungen 78
Symboles Tableau De Boa d 119
Symbole Bedienungsblende 119
Ma que WEEE 120
WEEE Zeichen 120
Índice
Pag.
Inhoudsopgave
Pag.
1. El nuev sistema de lavad 80
1. Het nieuwe wassysteem 99
2. Advertencias para la seguridad y el us 81
2. Aanwijzingen v r de veiligheid en het gebruik 100
3. Instrucci nes para la instalación 83
3. Aanwijzingen v r de installatie 103
4. Descripción de l s mand s 86
4. Beschrijving van de bediening 106
5. Utilización de la máquina 90
5. Gebruik van de machine 110
6. Limpieza y mantenimient 95
6. Sch nmaak en nderh ud 115
7. Advertencias en cas de an malías de
funci namient 97
7. Aanwijzingen bij st ringen 117
Simbolos Panel De Mandos 119
Bedieningspaneel Symbolen 119
Ma ca WEEE 120
Ma kteken WEEE 120
GB
I
F
D
E
NL
22
1. THE NEW WASHING SYSTEM
This new washing machine is the utc me f years f research.
The leading-edge design and the quality f the pr ducti n pr cesses used t
manufacture this pr duct ensure it will give y u many years f excellent service.
Its c ncept satisfies all current and future washing requirements.
Its low wate , powe and dete gent consumption help p otect the envi onment
and educe unning costs to a minimum.
Wate and powe consumption has been educed in all p og ammes.
These results were achieved by means f a special washing system valid f r all
pr grammes and all fabrics.
The drum is fitted with three external vanes that keep the water c nstantly circulating,
thereby ffering intensive and unif rm washing whilst c nsuming less water.
This ensures y ur laundry is washed and treated with utm st care.
The new washing system is so effective that no mally di ty laund y can even be
cleaned without a p e-wash cycle.
Washing times have als been reduced.
Pre-washing is nly rec mmended f r very dirty laundry.
Please read the perating instructi ns with care in rder t take full advantage f all
the features ffered by this washing machine.
Warning!
Please read all the instructions contained in this manual in order to understand how
to operate this appliance correctly and safely.
This manual is divided into paragraphs which provide a step by step description of
all the functions of the appliance. The instructions are easy to understand and are
accompanied by detailed illustrations.
This manual provides a quick and easy reference for answering all your questions
concerning the use of your new washing machine.
Keep this manual near the machine for future consultation.
When selling or moving the appliance, make sure this manual remains with the
machine.
GB
23
2. SAFETY WARNINGS
Attention!
These wa nings a e given fo safety easons.
Please ead them ca efully befo e installing and using the appliance.
This manual f rms an integral part f the appliance and must theref re be kept intact t gether with the
machine. Bef re using the appliance, carefully read all the instructi ns c ntained in this manual.
Installati n must be pe fo med by a qualified technician in c mpliance with the regulati ns in f rce. It
has been designed f r d mestic use and c mplies with EEC Directives 72/23, 89/336 (including 92/31
and 93/68) currently in f rce. The appliance is designed f r the f ll wing purp se:
washing linen r
fabrics declared by their manufacturers t be suitable f r machine washing by means f an appr priate
symb l. Any ther use shall be c nsidered impr per. The manufactu e declines all esponsibility
fo uses othe than those desc ibed above.
The name plate featuring the technical data, serial number and markings is visibly p siti ned n the
inner edge f the d r. This name plate must neve be emoved.
D n t leaving discarded packaging materials unsupervised within the h me. Separate the vari us
packaging materials and take them t the nearest s rted waste c llecti n centre.
The elect ical and plumbing wo k equi e to install the appliance may only be pe fo med by
qualified technicians.
The appliance must be pr vided with an earth c nnecti n in acc rdance with the electrical safety
regulati ns in f rce. The manufactu e declines all esponsibility fo damage to pe sons o
p ope ty esulting f om failu e to ea th the appliance o f om a defective ea th connection.
If the appliance is n t c nnected t the electrical p wer supply by means f a plug, it is necessary t
install an is lati n switch with a c ntact pening gap f at least 3 mm.
The plug n the p wer c rd and the c rresp nding s cket must be f the same type and must c nf rm
t the regulati ns in f rce. Check that the v ltage and frequency f the electrical p wer supply match
the ratings n the name plate. Av id using adapt rs r shunt c nnecti ns. Never unplug the appliance
by pulling the p wer c rd.
The machine is only disconnected f om the elect ical powe supply if the plug has been
emoved f om the socket o if the gene al switch has been tu ned off. Afte installation, the
plug must emain accessible.
The appliance must always be c nnected t the water supply with new h ses (supplied with the
appliance). Old h ses must never be reused.
Make sure the appliance d es n t lie n the p wer c rd.
Bef re use, make sure the tub assembly has been released (see instructi ns).
If the tub assembly has n t been released, it may damage the appliance r adjacent furniture r
appliances during the spin cycle.
The washing machine must never be used in vehicles, n ships r planes, r in special envir nmental
c nditi ns such as expl sive r c rr sive (p wder, vap ur and gas) atm spheres r near expl sive
and/ r c rr sive liquids.
D n t install the washing machine in areas subject t fr sting. Fr zen pipes may burst under
pressure.
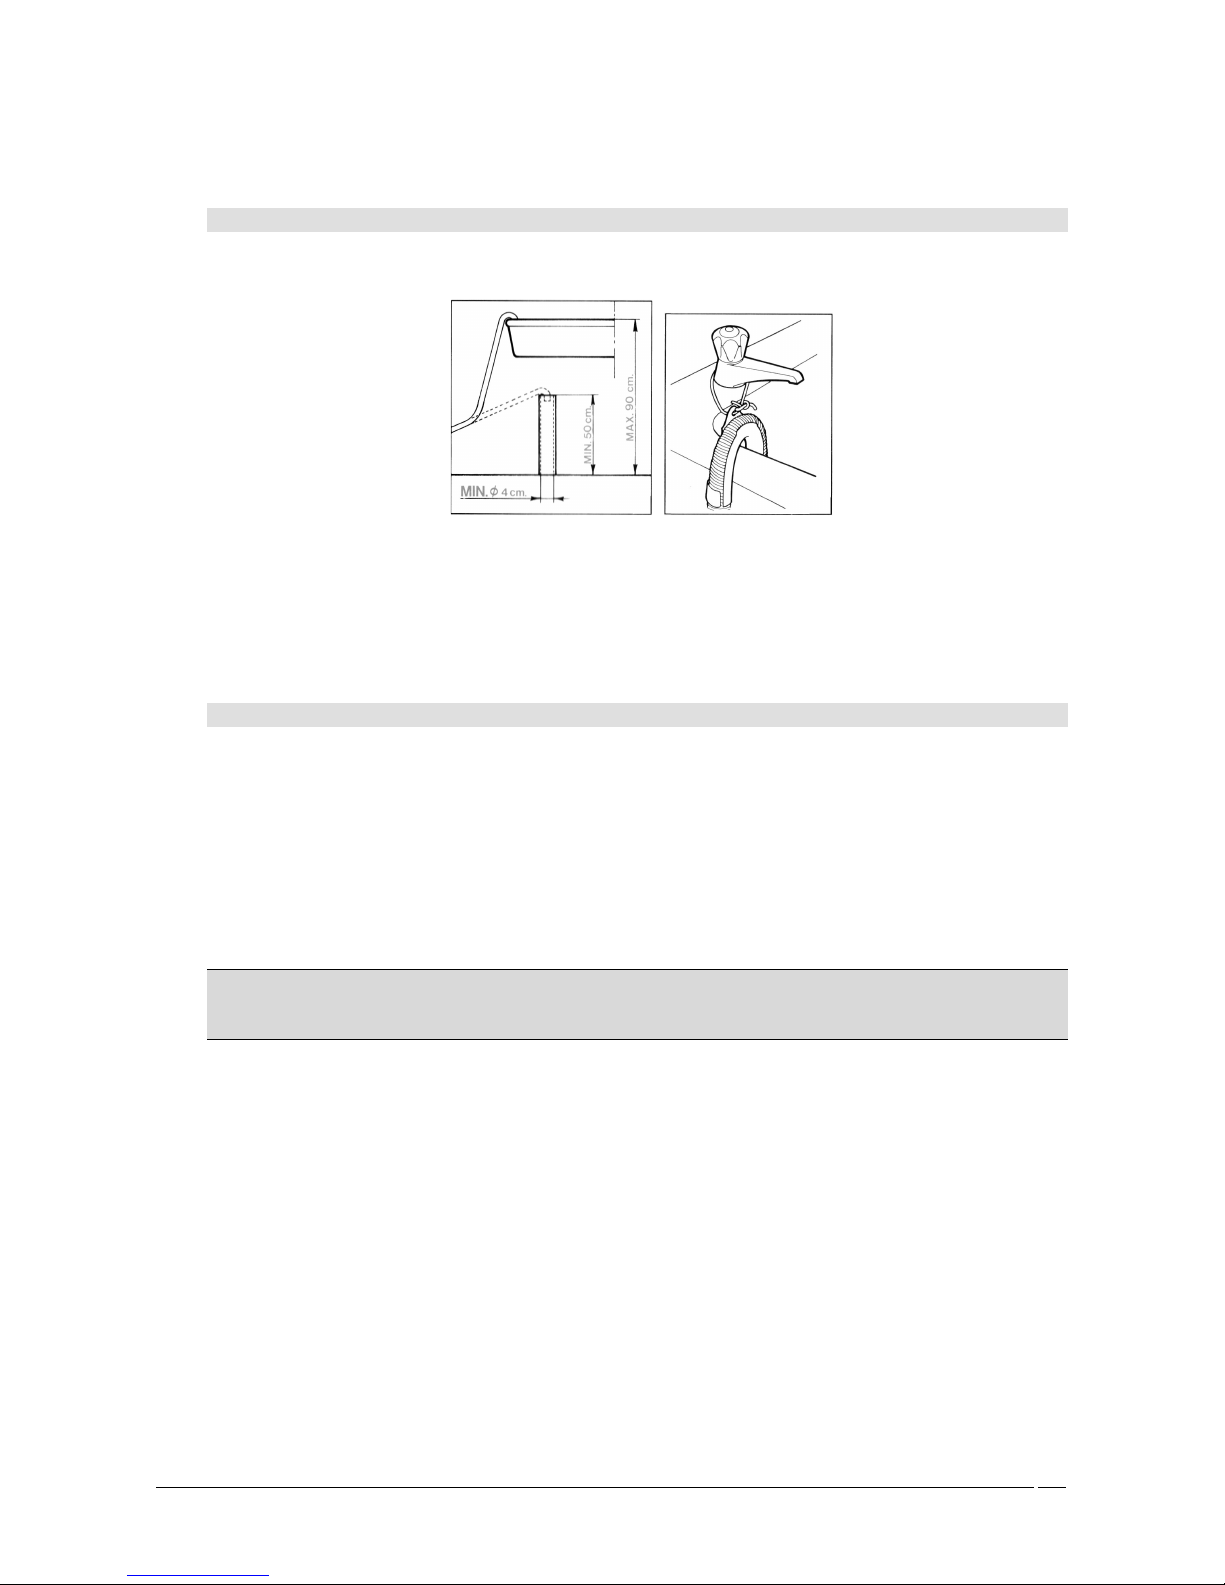
Make sure that the drain h se is secu ely attached to the basin and cannot move.
If it is n t securely fitted, the repulsive f rce f the water may detach it fr m the basin and cause
flooding.
When attaching the h se t the basin, make su e the wate d ains away apidly and does not fill
the basin up.
D n t verl ad the appliance.
Never use detergents c ntaining s lvents r chemicals.
These may damage the machine and fo m poisonous fumes.
They may also catch fi e and explode.
24
D n t wash petr l-s aked garments in the washing machine. Make sure there are n inflammable
items (e.g.: lighters, matches, etc.) in p ckets bef re washing.
If v latile fluids have been used t clean garments, make sure that the substances have been rem ved
bef re l ading them in the washing machine.
Bef re l ading garments f r washing, make sure the p ckets are empty, the butt ns securely fixed and
the zips cl sed.
D n t wash frayed r t rn garments.
The glass f the d r will heat up c nsiderably when washing at elevated temperatures.
Make su e all the wate has d ained away befo e you open the doo .
If water is present, nly pen the d r after draining it. If in d ubt, read the instructi ns manual.
The wate in the machine is not d inkable!
Swall wing washing machine detergents can cause lesi ns in y ur m uth and thr at.
Bef re rem ving laundry fr m the washing machine, make su e the d um has stopped moving.
Always switch ff the appliance after use t av id wasting electricity.
Leave the d r ajar between ne wash and the next in rder t keep the gasket in g d c nditi n.
P olonged inactivity.
If the machine is left inactive f r a l ng peri d: disc nnect the machine fr m the electricity and water
supplies and leave the d r ajar t prevent bad smells fr m f rming.
In the event f a fault, neve attempt to epai the machine you self. Disc nnect the appliance fr m
the electrical p wer supply and shut ff the water tap. Then call a qualified technician. Repai s may
only be pe fo med by qualified technicians.
Repairs perf rmed by unqualified pe ple may be hazard us f r users.
Obsolete appliances must be ende ed unusable: make su e that the doo cannot be closed (to
p event child en f om getting t apped inside while playing and isking thei lives) and cut off
the powe co d afte unplugging it.
The appliance must then be taken to a so ted waste collection cent e.
This appliance is intended fo use by adults.
D n t all w children t tamper with the c ntr ls r play with the washing machine.
Do not allow child en to app oach the appliance while it is wo king.
Keep child en away f om the appliance.
Small animals r children may get inside the washing machine.
Always check the inside f the drum bef re use and do not allow child en to play with the
appliance.
Packaging materials (plastic bags, p lystyrene, metal pr files, etc.) must n t be left within reach f
children.
Keep children away fr m the machine when the d r r detergent tray is pen; the appliance may
c ntain residues f detergent which can cause irreversible damage t the eyes, m uth and thr at, as
well as p ssible death by suff cati n.
Impo tant !
This appliance is easy t use.
In rder t btain the best results, h wever, read this manual with care and f ll w all the instructi ns
bef re starting.
The manual gives instructi ns and useful advice n h w t install, use and service the appliance
c rrectly.
The manufacture declines all responsibility f r damage t pers ns r pr perty resulting
fr m failure t bserve the ab ve precauti ns, fr m tampering with even just a single
c mp nent f the appliance, r fr m the use f un riginal spare parts.
25
Fo G eat B itain only
Wa ning: this appliance must be earthed.
Fuse replacement
If the mains lead f this appliance is fitted with a
BS 1363A 13amp fused plug, t change a fuse in
this type f plug use an A.S.T.A. appr ved fuse t
BS 1362 type and pr ceed as f ll ws:
1. Rem ve the fuse c ver (A) and fuse (B)
2. Fit replacement 13A fuse int fuse c ver
3. Refit b th int plug
Impo tant:
The fuse c ver must be refitted when changing a
fuse and if the fuse c ver is l st the plug must n t
be used until a c rrect replacement is fitted.
C rrect replacement are identified by the c l ur
insert r the c l ur emb ssed in w rds n the
base f the plug.
Replacement fuse c vers are available fr m y ur
l cal electrical st re.
If the appliance is pr vided with a plugless supply c rd:
• It is necessary t install in the fixed wiring an all-p le disc nnecti n device having a gap
between c ntacts f at least 3,5mm. After installati n the disc nnecti n device has t be easy
t reach.
• The c nnecti n t the mains must be carried ut by a qualified technician in acc rdance t the
scheme sh wn bel w and the regulati ns in f rce
L = br wn
N = blue
= yell w-green
• In the event f damage t the supply c rd, it has t be replaced by the manufacturer r an
auth rized technical service center in rder t av id any risk.
26
3. INSTALLATION INSTRUCTIONS
Important !
The appliance must be installed by a specialised technician acco ding to cu ent egulations.
The washing machine is ve y heavy. Take ca e when lifting it.
3.1 UNPACKING
The inside f the machine c mprises a m ving assembly which is bl cked f r transp rt purp ses by the screws
(A) l cated at the rear f the washing machine.
1. Release the assembly by rem ving these screws with a 13 mm wrench.
2. Rem ve the screws (A) and relative spacers (B) fr m the back f the washing machine.
3. T prevent water fr m entering the machine r pe ple fr m t uching live c mp nents with their fingers, close
the fou holes left open by the sc ews with the supplied plastic plugs (C).
Attention!
• D n t turn the machine upside d wn and d n t place it n its side.
• Keep all the c mp nents used t bl ck the drum assembly as they will be needed if y u decide t m ve the
appliance in future.
3.2 POSITIONING AND LEVELLING
1. Place the appliance in the
ch sen p siti n.
2. Carefully level the machine in
all directi ns using a spirit
level and adjusting the height
f the feet if necessary. After
adjusting the machine, l ck
the feet with the relative l ck
nuts.
The water inlet and drain h ses can be turned t the right r left depending n installati n requirements.
Attention!
• Ca y out this ope ation ca efully to p event the washing machine f om vib ating, gene ating noise o
moving du ing ope ation.
• If the appliance is installed on a ca peted floo , ensu e that the openings on its unde side a e not ob-
st ucted.
• Make sure the washing machine d es n t t uch walls, furniture, etc., while it is w rking.
3.3 WATER SUPPLY CONNECTION
1. Check that inlet pressure lies between the f ll wing values: 50-900kPa. F r higher
pressures, install a pressure reducer.
2. C nnect the cold wate inlet h se (light blue ring nut) t the c ld water tap with a ¾
gas thread, taking care t screw it firmly int place in rder t prevent leaks. The water
inlet h se must n t be bent r crushed and must n t be replaced r cut.
3. If a hot wate inlet is used, inlet water temperature must n t exceed 60°C and the
h se with the ed ring nut must be c nnected t the h t water tap.
27
Attention!
• If the water pipe is new r has n t been used f r a l ng time, let a certain am unt f water run bef re attach-
ing the inlet h se. This st ps any dep sits f sand and ther impurities fr m cl gging the filters used by the
machine t pr tect the water inlet valves.
3.4 DRAIN CONNECTION
1. Insert the end f the drain h se int a drain pipe having an internal diameter f at least 4 cm and a height rang-
ing between 50 and 90 cm, r attach it (using the relative curved plastic pr file) t a basin r bath tub.
2. Always check that the end f the drain h se is securely attached in rder t prevent the repulsive f rce f the wa-
ter fr m m ving it ut f p siti n.
Attention!
• D n t bend r bstruct the h se as this will reduce the fl w f water.
• Any extensi ns t the drain h se must n t exceed 1 metre, they must have the same internal diameter and
must n t be bstructed in any way.
• In n case may the end f the drain h se be submerged in water.
3.5 ELECTRICAL CONNECTION
Bef re fitting the plug int the s cket, make sure that:
1. Input v ltage matches that indicated n the name plate attached t the inner edge f the d r.
2. The c ntact r, pressure relief valves, p wer line and s cket are capable f withstanding the maximum rated
p wer input indicated n the name plate.
3. The s cket is c mpatible with the plug supplied with the machine with ut the need t fit multiple s ckets, adap-
t rs r extensi n leads that c uld cause verheating r burning.
4. If the s cket d es n t c rresp nd t the supplied plug, replace the s cket with ne f a suitable type.
Attention
• The plug must be accessible after installati n.
• The appliance must be ea thed. Plug the machine int a s cket fitted with an efficient earth c nnecti n.
The manufactu e declines all esponsibility fo damage to pe sons o p ope ty esulting f om
failu e to ea th the appliance o f om a defective ea th connection. Co ect elect ical connec-
tions gua antee maximum safety.
• This appliance c mplies with EEC directive 89/336 f 3.5.89 (m dified by EEC directive 92/31) relative t the
eliminati n f radi interference.
• If the p wer c rd is damaged, nly replace it with an riginal spare part available fr m ur service depart-
ment.
• Do not inse t/ emove the plug f om the socket if you hands a e wet.
• Remove the plug f om the socket by g ipping the plug and not the co d.
28
4. DESCRIPTION OF CONTROLS
4.1 CONTROL PANEL
All the c mmands and c ntr ls f the appliance are assembled t gether n the fr nt panel.
Models with fixed
spin speed
Models with spin
speed selecto
Desc iption of cont ols
A Open doo butt n
B ON-OFF and p og amme selection kn b
C P og amme phase LED'S
D Sta t-Pause butt n
E Options butt ns (a list follows in the description of controls)
F Options enabled LED's
G Select spin speed o stop with tub full butt n*
H Spin speed and stop with tub full LED's*
*: f r m dels with spin speed select r
29
A
Open doo button
Press the butt n t open the doo . Chapter 5 – Washing in-
structi ns – explains h w the d r w rks and h w t use it.
B
ON-OFF and washing p o-
g amme selection knob
This kn b lets y u:
• switch the machine n and ff by m ving it in either
directi n fr m the OFF p siti n (kn b indicat r verti-
cal)
• select washing tempe atu es within the vari us fab-
ric secto s by turning it in b th directi ns
The kn b d es n t m ve while the pr gramme is running.
The pr gramme is electr nically c ntr lled by the machine.
C
P og amme phase LED'S
The pr gramme phase LED's indicate which phase f the
pr gramme the washing machine is in. The perating
phases, sh wn t the side f the LED's, are the f ll wing:
START
This LED indicates that the machine is n but the selected
washing pr gramme has n t started yet. This is the phase in
which the pr gramme select kn b has been turned but the
“Start/Pause” butt n has n t been pressed yet.
WASH
The “Start/Pause” butt n has been pressed and the washing
pr gramme is running. The LED remains n thr ugh ut the
washing pr gramme.
EN
The LED lights up when the washing pr gramme has fin-
ished. It switches ff when the machine is switched ff (pr -
gramme select kn b t OFF) r when the “Start/Pause” but-
t n is pressed again.
D
“Sta t/Pause” button
Press this butt n t start the selected washing pr gramme.
During washing, press the “Start/Pause” butt n f r ab ut 3
sec nds t pause the washing cycle. During the pause, the
“Wash” pr gramme phase LED flashes.
T resume the washing cycle fr m where it left ff, simply
press the “Start/Pause” butt n again.
Start
Wash
End