Smokin Brothers Wood Pellet BBQ Gril User manual

Wood Pellet
BBQ Grills
Owner’s Manual

1
TABLE OF CONTENTS
WELCOME TO THE SMOKIN BROTHERS FAMILY……………………......PAGE 2
SECTION 1:
INTRODUCTION………………………………………………………….PAGE 3
CONTACT INFORMATION……………………………………………...PAGE 3
COMPONENTS…………………….……………………………………..PAGE 4
INTERNAL PARTS ASSEMBLY ……………………………………….PAGE 4
SECTION 2:
FIRING INSTRUCTIONS………………………………………..……….PAGE 4
INITIAL FIRING INSTRUCTIONS………………………………PAGE 4
LIGHTING OF YOUR SMOKIN BROTHERS GRILL………...PAGE 5
SHUTTING DOWN OF YOUR GRILL………………………….PAGE 5
MANUAL LIGHTING..……………………………………………….. ….PAGE 5
WARNING………………………………………………………………….PAGE 6
SECTION 3:
COOKING TIPS………………………………………………….………..PAGE 6
MAINTAINING AND CLEANING………………………………………..PAGE 7
NOTE WARRANTY DISCLAIMER……………………………………...PAGE 8
SECTION 4:
USER’S GUIDE DIGITAL CONTROL………………………..….. PAGES 9-26
(Complete section for operation and troubleshooting)
SECTION 5:
WARRANTY………………………………………………………………PAGE 27

2
WELCOME TO THE SMOKIN BROTHERS FAMILY
Thank you for purchasing a Smokin Brothers Wood Pellet BBQ Grill. Your family
BBQ will never be the same.
YourSmokin Brothers grill is a very versatile cooking machine. As you would expect,
you can GRILL burgers and steaks. Not only grill, but SMOKE pulled pork, ribs,
turkeys, and seafood. Plus BAKE pizzas and deserts to perfection. Also ROAST beef,
pork, and poultry on this amazing grill.
Prepareevery meal on your Smokin Brothers Grill. Even cook breakfast biscuits,
eggs and bacon. Don’t forget to cook vegetables and fruit.Making jerky is simple.
With regular maintenanceand care, the Smokin Brothers Grill will last
for years of trouble free grilling. It will become a permanent choice for your daily use
replacing other appliances. This residential grill is for outdoor use only.
AuthorizedSmokin Brothers Dealers are available to provide additional Smokin
Brothers products. We recommend to use Smokin Brothers 100% unblended pure
wood pellets designed to be used in Smokin Brothers Grills. DO NOT USE a heating
fuel pellet to cook your food. Smokin Brothers Rubs, Sauces and Accessories are
available to enhance your grilling experience.Check the website for a local dealer near
you.
At the top of the priority list, is our commitment to manufacture the Smokin
Brothers Wood Pellet Grill in the U.S.A.
This manualhas been prepared to provide the necessary information to give you
confidence to use your new grill to become a grand champion master griller.
Congratulations,you are the newest Smokin Brothers Grill Owner.

3
SECTION 1:
INTRODUCTION
Residential Wood Pellet Grill
Smokin Brothers Grills are proudly Made in America. The major body of this grill has
been designed, engineered and manufactured in the United States.
Heavy duty American steel has been used for the body of this grill. All components,
used to complete the finished product, are being assembled by American workers.
Smokin Brothers believes in our Country and are proud to support it by keeping jobs
here in the U.S. and doing our part to sustain American traditions.
We are dedicated to providing quality barbeque products that help bring families
together whether it is around the dinner table, the picnic table or just standing over the
grill.
CONTACT INFORMATION
Smokin Brothers is based out of Sikeston, Missouri.
Contact us:
On the Web:www.smokinbrothers.com
By email:barbeque@smokinbrothers.com
Telephone:573-471-5513
Fax:573-471-5524
Ship to Address: 1012 East US Hwy 62
Mail to Address: P.O. Box 1767, Sikeston, MO 63801
Distributor for Smokin Brothers Products: Double D Supply Company

4
COMPONENTS
Grill Parts
Grill Body Digital Control Cooking Grid Sections
Auger RTD Temperature Detector Long Top Cooking Grid
Power Cord Igniter Hot Rod Drip Pan
Wheels Combustion Draft Fan Deflector
Bucket Auger Motor Fire Pot
INTERNAL PARTS ASSEMBLY
Order of Part Assembly
•Place the deflector over the fire pot located in the bottom of the grill
•Secure the drip pan at an angle on the braces located at each end of the grill
•Insert the long upper cooking grid
•Insert the lower cooking grid sections
•Hang the grease bucket on the outside hook
SECTION 2:
FIRING INSTRUCTIONS
Initial Firing Instructions
Test the internal parts of the grill to be working properly.
•Set the Cook Control Switch to the OFF position.
•Remove the grids, drip pan and deflector to expose the fire pot, auger and igniter
hot rod.
•Plug the grill into AC power.
•Turn the Cook Control Switch to the 180F position.
•Look into the pellet hopper to verify the auger is turning.
•Place your hand above the fire pot and verify air movement from the draft fan.
•Verify the igniter hot rod, located in the base of the fire pot, is getting hot by
visual observance. DO NOT TOUCH THE IGNITER.
•Fill the hopper with Smokin Brothers pellets.
•Once pellets have filled the auger tube and begin to drop into the fire pot, set the
Cook Control Switch to the OFF position.
•When the grill passes the test, the parts are working properly, reassemble the
internal parts. If not refer to the “Trouble Shooting” section.

5
You have successfully filled the auger tube with pellets and are now ready to begin the
initial firing. Recommended not to put food on the grill the first time the grill is
fired. Allow the grill to burn for approximately 60 minutes. After completing the initial
firing process you are ready to turn the grill on and begin normal cooking.
Keep an ample supply of pellets in your hopper. If pellets run out, repeat the process to
fill the auger tube with pellets and turn the Cook Control Switch to the OFF position.
You are once again ready to turn the grill on and begin normal cooking.
Lighting of your Smokin Brothers Grill
•Check the hopper for adequate amount of pellets.
•Set the Cook Control Switch to the OFF position.
•Plug the grill into AC power.
•Turn the Cook Control Switch to the 180F position starting the ignition sequence.
The grill temperature is displayed along with 3 flashing dots signifying the igniter
hot rod is on. The auger motor will run constant for two minutes and shut off,
while the igniter hot rod will remain on for 4 minutes.
•When the grill lights, set the Cook Control Switch to the desired temperature.
Allow 10 to15 minutes to reach temperature.
•Ready to begin normal cooking.
Shutting down of your Smokin Brothers Grill
•Remove all food from the Smokin Brothers Grill.
•Raise the lid and turn the Cook Control Switch to Smoke.
•Allow your Smokin Brothers Grill to cool down like this for 5-10 minutes.
•Smokin Brothers digital control is equipped with a built in cool down sequence
that runs the combustion fan for 10 minutes after the Cook Control Switch has
been turned OFF.
•After the shut down sequence has concluded and your grill is completely cooled,
close the lid, unplug your Smokin Brothers Grill to protect from lightning and
power surges.
•Cover the grill when not in use or move the grill inside to keep the pellets dry until
you are ready to use again. DO NOT ALLOW PELLETS TO BECOME WET.
MANUAL LIGHTING INSTRUCTIONS
When the hot rod igniter has failed to operate by lighting the pellets, use a fire gel to
manually light them to continue cooking until a replacement igniter can be installed.

6
WARNING!
•Always disconnect the grill from AC power before accessing the control for
service or working under the grill.
•Removing the control from the grill, installing the control into the grill, or
working under the grill while the grill is connected to AC power could result
in shock or could damage the control.
•AC power is present on the control at all times and is a shock hazard
unless the grill is unplugged from the wall socket or AC line.
•Protect yourself from injury and protect the control.
SECTION 3:
COOKING TIPS
Your Smokin Brothers Grill is an extremely versatile cooking machine. If it can be
smoked, baked, grilled or roasted, you can do it on your Smokin Brothers Grill! Use
only one grill to do everything.
Here are some Basic principles to remember when cooking on your Smokin Brothers
Grill.
•Similar Function – Smokin Brothers Grills function similar to a convection oven;
smoke and heat are circulated inside the grill with the use of a fan. When the lid
is open the smoke and heat escape and do not allow the food to cook. Raise the
lid minimally to check on the progress of your food. Thanks to the grease pan
placed under your cooking grids, you do not have to worry about nasty flare ups
causing unwanted fires. The grease and food drippings are drained into a
bucket.
•Smoking – Smoking is done at the lower temperature settings of the digital
control. Cooking low allows the pellets to smolder and produce significant
amounts of smoke. Smoke will penetrate the meat, providing a gorgeous smoke
ring and flavor. Also by cooking slow, the meat’s temperature is gradually
increased, which will help keep its tenderness. To reduce the amount of smoke
flavor turn your grill to a higher temperature setting.
•Baking – Baking on your Smokin Brothers Grill is similar to baking in your
conventional oven. Set the temperature to the appropriate setting at the higher
end of the controller (300-350). When the appropriate temperature is achieved
place your item on the grill. We have found that metal pans work better than
glass and that you may have to add a few extra minutes to the cooking time.
•Grilling - When cooking steaks on your Smokin Brothers Grill allow the cooking
grids to heat up thoroughly. You can do this by letting your Smokin Brothers Grill
warm up for 20 minutes prior to placing the steaks on the grill.

7
Grilling Tip –
•On smoke expect to use ½ lb of pellets per hour
•On medium temperature (300-350) expect to use 1 lb of pellets per hour
•On high temperature expect to use 2 lbs of pellets per hour
•Each hopper is designed to hold a minimum of 15 lbs of pellets giving a
maximum of 30 hours of cooking depending on the temperature setting and
weather conditions
Questions and Answers – Smokin Brothers is available to answer questions for your
cooking needs with several options –
•Contact your dealer retail outlet
•Refer to our Smokin Brothers Owner’s Manual
•Refer to our Smokin Brothers Cookbook
•Contact Smokin Brothers through our contact information on the web
We take great pleasure in supporting our Smokin Brothers Family on their desire to be
adventurous in their cooking and grilling experience with our wood pellet grill. Share
with Smokin Brothers your grilling accomplishments and be rewarded if your recipes are
used and shared on the Smokin Brothers website.
MANTAINING AND CLEANING
You will have years of trouble free grilling with our Smokin Brothers Grill, however some
minor maintenance will lengthen the life or your grill.
Following are some basic maintenance items that should be performed regularly:
•The drip pan should be cleaned regularly along with the lower brace the drip pan
rests on. This will reduce the risk of continued buildup of grease that can cause
a fire at high temperatures. Cover the drip pan with aluminum foil for easy clean
up. The foil should not overlap the sides of the drip pan blocking air flow for
proper operation inside the grill.
•The grease bucket should be emptied on a regular basis to ensure no overflow
and cause a significant mess on your deck or patio. For easy clean up, line the
bucket with foil for grease removal.
•The grill should be vacuumed to remove ash residue. Disassemble the grill by
removing the grids, drip pan, and heat deflector. Use a shop vacuum to remove
the ash from the fire pot and inside of grill after cooking approximately 20 hours
or consuming one 20 pound bag of pellets. This will ensure many years of care
free service.
•The temperature detector inside the grill should be cleaned after each cooking
along with cleaning the grids. This will ensure the proper temperature reading
and will increase the life of the temperature detector.

8
•Wipe the over all surface of the grill with a non abrasive cleaner and cloth to
remove any baked on food and grease residue.
NOTE WARRANTY DISCLAIMER
WARRANTY SHALL BE VOID IF THE FOLLOWING…
•Unit has not been operated according to manual instructions.
•Resold or traded to another owner.
•User has abused or failed to maintain the unit under normal residential use.
•Failure to disconnect electric before storing or repairing the unit.
Smokin Brothers shall not be held liable under this or any implied warranty for incidental
or consequential damages.

9
User’s Guide
SMOKIN BROTHERS PELLET GRILL
Digital Control

10
Table of Contents
Forward....................................................................................11
Introduction ..............................................................................11
Major Features ......................................................................11
How It Works........................................................................12
Operation..................................................................................12
Overview ..............................................................................12
Understanding the Display......................................................13
Connecting the Grill to AC Power.............................................14
Igniting the Grill ....................................................................14
Cooking................................................................................15
Smoking ...............................................................................16
Automatically Restarting the Grill.............................................17
Cooling Down the Grill............................................................17
Understanding Idle Fuel Feed Rate and Smoke Settings.............18
Error Modes and Messages .....................................................19
Product Service and Support.......................................................21
Wiring Diagram .....................................................................21
Troubleshooting ....................................................................22
Contacting Smokin Brothers....................................................26

11
Foreword
Copyright Notice All rights reserved. No part of this publication may be
reproduced, transmitted, transcribed, stored in a retrieval
system, or translated into any language, in any form or by
any means, electronic, mechanical, magnetic, optical,
chemical, manual or otherwise.
Disclaimer Smokin Brothers, Inc. makes no representations or
warranties with respect to the contents hereof and
specifically disclaims any implied warranties of
merchantability or fitness for any particular purpose.
Further, information in this document is subject to change
without notice and does not represent any commitment on
the part of Smokin Brothers, Inc.
Product Reference Smokin Brothers, Inc. Digital Controller
Product Number: 103
Applicable Software Versions: 1.20
Document Number: 103-72-02-03
Copyright: Smokin Brothers, Inc.
Introduction
Major Features
Three Digit Temperature Display
Front Panel Cook Control
Eight Cook Temperature Settings (180 through 375 degrees)
“High” Cook Temperature Setting
Front Panel Smoke Control
Sixteen Smoke Settings (P0 - P15)
Ignition Indicator
Smoke Setting Indicator
Cook Idle Fuel Rate Indicator
Low Temperature Indicator
Loss of Fire Restart Protection
Overtemperature Protection
Cool Down Feature
12
How It Works
Cook Mode In Cook Mode, the temperature of the grill is constantly
monitored and a microprocessor operates the draft fan and
fuel feed auger to maintain a constant grill temperature.
Smoke Mode In Smoke Mode, the fuel feed rate is set manually by the
operator. The grill operates at low temperature to provide
maximum smoke.
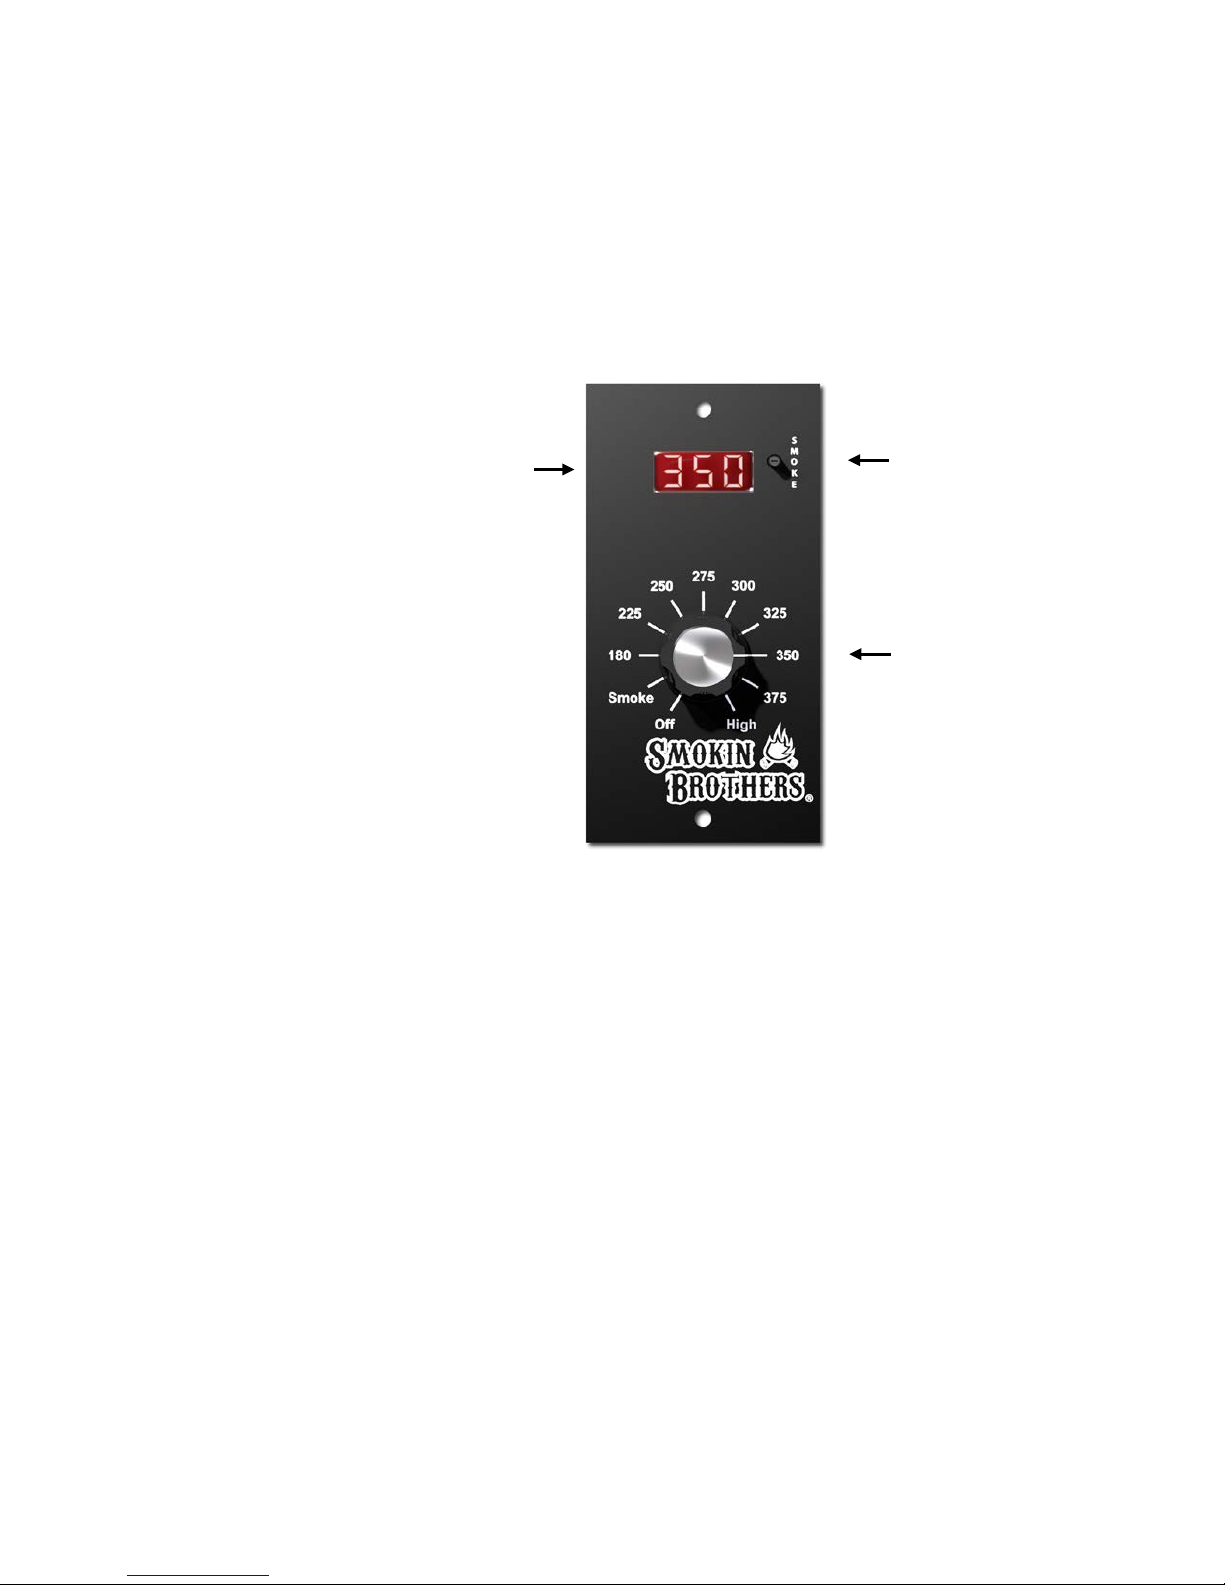
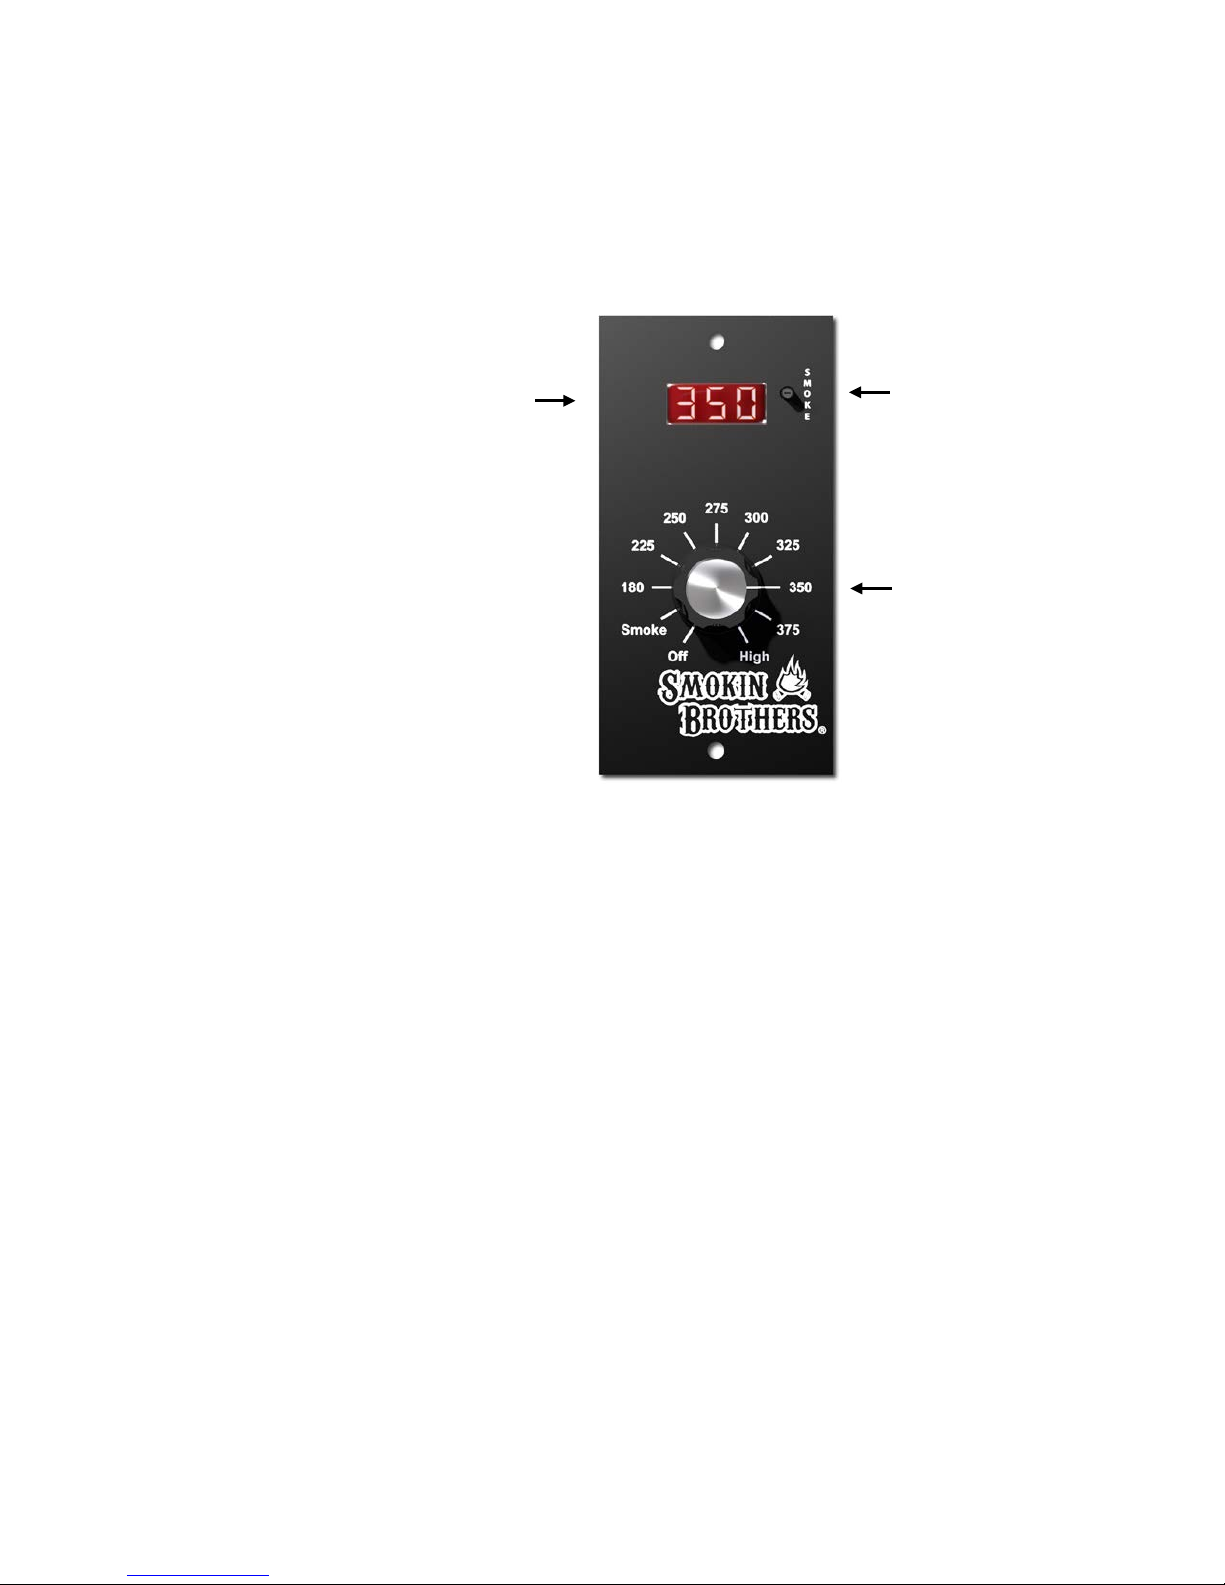
Operation
Overview
LED Readout Displays grill temperature, smoke settings, idle fuel feed
settings, igniter status, cool down timer, low temperature
indicator, and error messages.
Cook Control Switch Selects Off, Smoke Mode, or one of nine Cook Mode grill
temperatures.
Smoke Control Switch Selects one of sixteen smoke/idle fuel feed rates.
Cook Mode Maintains the selected cook temperature.
Smoke Mode Produces maximum smoke at a low grill temperature.
Smoke Control
Cook Control
Display
13
Microprocessor In Cook Mode, the temperature of the grill is constantly
Control monitored and a microprocessor operates the draft fan and
fuel feed auger to maintain a constant grill temperature.
Manual Control In Smoke Mode, the fuel feed rate is set manually by the
operator. The grill operates at low temperature to provide
maximum smoke.
Understanding the Display
Numbers When the grill is connected to AC power, the model number
and software version of the control are displayed
momentarily.
Temperature In Cook Mode and Smoke Mode, the grill temperature is
displayed in 5 degree (Fahrenheit) increments.
Flashing In Cook Mode and Smoke Mode, the displayed temperature
Temperature flashes if the grill temperature is below 150 degrees.
Flashing Dots The igniter is on.
“P0” - “P15” When the Cook Control switch is set to the Smoke position,
the smoke setting is displayed for 3 seconds.
If you adjust the Smoke Control switch while in Smoke
Mode, the smoke setting is displayed for 3 seconds.
Smoke Control
Cook Control
Display

14
If you adjust the Smoke Control switch while in the Cook
Mode, the idle fuel feed rate setting is displayed for 3
seconds.
Flashing “C10”The grill is cooling down. The cool down timer is displayed
and decremented ("C10", "C 9", "C 8"...).
Flashing “ErH” The grill temperature exceeded 615 degrees.
Flashing “ErL” The grill temperature has dropped below 120 degrees, an
automatic grill restart sequence has been attempted and
failed.
Connecting the Grill to AC Power
Turn the Grill Off Set the Cook Control switch to the Off position.
Plug the Grill In Connect the grill to AC power. The control displays its
model number and software version.
Igniting the Grill
Cook Control To ignite the grill, set the Cook Control switch to the 180 or
the 225 position .
Ignition Sequence The draft fan turns on and remains on for the duration.
The igniter turns on for four minutes and then turns off.
The fuel feed auger turns on and delivers fuel continuously
for two minutes.
The grill temperature is displayed along with three flashing
dots signifying that the igniter is on. The three flashing dots
are turned off after four minutes when the igniter is turned
off.
The controller will exit the Ignition Sequence when one of
the two following conditions is met:
- The igniter has been turned off and the grill temperature
is greater than 120 degrees.
- Ten minutes have elapsed.
When the grill exits the Ignition Sequence, if the Cook
Control switch is set to the Smoke position, the grill operates
in Smoke Mode. If the Cook Control switch is set to a

15
temperature setting, the grill operates in Cook Mode.
High Temperature If the current grill temperature is greater than 615 degrees,
Limit Error (ErH) a flashing “ErH” is displayed indicating a high limit error and
the grill shuts down. Refer to the “Error Modes and
Messages” section for details.
Cooking
Cook Control Set the Cook Control switch to the desired temperature. The
control displays the grill’s current temperature.
Cook Sequence Once the ignition sequence is complete, the auger feeds fuel
into the fire pot to maintain the set temperature.
Temperature 180 180 degrees
Settings 225 225 degrees
250 250 degrees
275 275 degrees
300 300 degrees
325 325 degrees
350 350 degrees
375 375 degrees
High 450 degrees or Maximum Temperature
On Fuel Feed Rate The on fuel feed rate is the rate the auger delivers fuel while
the grill is under the set temperature. In Cook Mode, the on
fuel feed rate is designed to drive the grill's temperature
upward to the set temperature and limit temperature
overshoot. The on fuel feed rates are preprogrammed into
the control and are not adjustable.
Idle Fuel Feed Rate The idle fuel feed rate is the rate the auger delivers fuel
while the grill is idling at or above the set temperature. In
Cook Mode, you can manually adjust the idle fuel feed rate
using the Smoke Control switch. See “Understanding Idle
Fuel Feed Rate and Smoke Settings” for more information.
Low Temperature If the grill temperature is less than 150 degrees, the
displayed temperature flashes indicating a low temperature.
This is not an error condition and does not effect the
operation of the grill. The flashing display is designed to
alert the operator that there is some risk of the fire going
out.
Low Temperature If the grill temperature drops below 120 degrees, the grill
Auto Restart enters Auto Restart Mode. Refer to the “Automatically
Restarting the Grill” section for details.

16
High Temperature If the Cook Control switch is set to High, the grill operates at
Setting higher than 375 degrees. If the grill is unable to attain 450
degrees due to ambient temperature and humidity, fuel type
and quality, and/or thermal characteristics of the grill, the
auger feeds fuel continuously allowing the grill to operate at
its Maximum Temperature.
High Temperature If the grill temperature is greater than 615 degrees, a
Limit Error (ErH) flashing “ErH” is displayed indicating a high limit error and
the grill shuts down. Refer to the “Error Modes and
Messages” section for details.
Smoking
Smoke Control Set the Cook Control switch to Smoke. Use the Smoke
Control switch to manually select the auger fuel feed rate.
The control displays the grill’s current temperature.
Smoke Sequence Once the ignition sequence is complete, the auger delivers
fuel at a constant rate determined by the smoke setting (P0
- P15).
Smoke Setting The smoke fuel feed rate is the rate the auger delivers fuel
while the grill is operating in the Smoke Mode. In Smoke
Mode, manually adjust the fuel feed rate using the Smoke
Control switch to establish the desired temperature and/or
smoke output.See “Understanding Idle Fuel Feed Rate and
Smoke Settings” for more information.
Low Temperature If the grill temperature is less than 150 degrees, the
displayed temperature flashes indicating a low temperature.
This is not an error condition and does not effect the
operation of the grill. The flashing display is designed to
alert the operator that there is some risk of the fire going
out.
Low Temperature If the grill temperature drops below 120 degrees, the grill
Auto Restart enters Auto Restart Mode. Refer to the “Automatically
Restarting the Grill” section for details.
High Temperature If the grill temperature is greater than 615 degrees, a
Limit Error (ErH) flashing “ErH” is displayed indicating a high limit error and
the grill shuts down. Refer to the “Error Modes and
Messages” section for details.

17
Automatically Restarting the Grill
Low Temperature If the current grill temperature drops below 120 degrees
Auto Restart while operating in Smoke Mode or Cook Mode, the grill
enters Auto Restart Mode.
Auto Restart Error The grill will perform a single automatic restart. If the grill
Check (ErL) fails the initial restart or successfully restarts then later falls
below 120 degrees, a flashing “ErL” is displayed indicating a
restart error and the grill shuts down. Refer to the “Error
Modes and Messages” section for details.
Auto Restart The igniter turns on for four minutes and then turns off.
Sequence
The grill temperature and three dots flash in unison on the
display to alert the operator that there is some risk of the
fire going out and that the igniter is on. The three flashing
dots are turned off after four minutes when the igniter is
turned off.
The controller will exit the Auto Restart Sequence when one
of the two following conditions is met:
- The igniter has been turned off and the grill temperature
is greater than 120 degrees.
- Ten minutes have elapsed.
If the grill temperature is greater than 120 degrees when
grill exits the Auto Restart Sequence, the grill operates in
Smoke Mode if the Cook Control switch is set to the Smoke
position or the grill operates in Cook Mode if the Cook
Control switch is set to a temperature setting.
If the grill temperature is less than 120 degrees when the
grill exits the Auto Restart Sequence, a flashing “ErL” is
displayed indicating a restart error and the grill shuts down.
Refer to the “Error Modes and Messages” section for details.
Cooling Down the Grill
Cook Control To cool down the grill, change the Cook Control switch from
Smoke or any of the temperature settings to the Off
position.
Cool Down Sequence The igniter turns off.
The fuel feed auger turns off.

18
The draft fan remains on for 10 minutes.
A count down timer is displayed. The counter starts at
"C10" and is decremented every minute.
Once the 10 minute count down timer expires:
- The display is blank.
- The draft fan turns off.
- The fuel feed auger pulses on for 10 seconds to clear
burned pellets from the auger tube.
Understanding Idle Fuel Feed Rate and Smoke Settings
Smoke Control The Smoke Control switch sets the fuel feed rate (the
Switch amount of fuel delivered in a given period of time) when the
grill is operating in Smoke Mode and when the grill is idling
in Cook Mode.
During cook idle or smoke mode, the auger turns on,
delivers fuel for 15 seconds, then turns off. The off time is
set by the Smoke Control switch.
“P” Settings The fuel feed rate setting is displayed momentarily
whenever the Cook Control switch is set to the Smoke
position. It is also displayed whenever the Smoke Control
switch is adjusted. The setting is designated with the letter
“P” and a number. The greater the “P” setting number the
greater the auger off time.
Your standard “P” setting should be P5 or P6 for best
performance.
Dual Function The selected “P” setting controls both the Smoke Mode fuel
feed rate and the Cook Mode idle fuel feed rate. They are
one and the same.
For example, if “P3” is selected using the Smoke Control
switch, the auger delivers fuel for 15 seconds, turns off for
50 seconds, and repeats in Smoke Mode. It also delivers
fuel for 15 seconds, turns off for 50 seconds and repeats
while idling at or above the selected set temperature in Cook
Mode.
Cook Mode The idle fuel feed rate is the rate of fuel delivery that
Idle Fuel Feed Rate maintains the fire in the fire pot without raising the grill’s
temperature.

19
In Cook Mode, whenever the grill temperature is at or above
the set temperature, the auger runs at the idle fuel feed
rate. If the grill temperature is below the set temperature
the auger runs at the on fuel feed rate.
We recommend the “P6” setting as the default idle fuel feed
rate while in Cook Mode.
For the experienced operator, the auger idle fuel feed rate
can be adjusted to improve the grill's performance. For
example, to optimize temperature stability at a high
temperature setting, select “P0” or “P1” to increase the
auger idle fuel feed rate. Or, if due to ambient conditions,
the grill is unable to cool down enough to reach a low
temperature setting such as 180 degrees, select “P10”,
“P11”, or higher to decrease the idle fuel feed rate.
High Temperature In Cook Mode, the idle fuel feed rate for the High
Idle Fuel Feed Rate temperature setting is preprogrammed into the control. The
idle fuel feed auger timing at High is 15 seconds on / 15
seconds off and is independent of the Smoke Control switch
"P" setting. The preprogrammed fuel feed rate helps
maintain the elevated cooking temperature at the High
setting.
Smoke Mode In Smoke Mode, increasing the “P” setting decreases the
Fuel Feed Rate fuel feed rate, lowering the grill temperature. Start at
setting “P6”, adjust the “P” setting manually for the desired
temperature and/or smoke output.
Error Modes and Messages
High Temperature If the grill temperature exceeds 615 degrees, the control
Limit Error (ErH) displays a flashing “ErH” indicating a High Temperature Limit
Error.
The fuel feed auger is turned off, the igniter is turned off,
and the draft fan is turned off.
To clear the error, set the Cook Control switch to the Off
position. If the error will not clear, the temperature detector
is not functioning normally. See “Display is Flashing “ErH” in
the “Troubleshooting” section.
Table of contents
Other Smokin Brothers Grill manuals


Popular Grill manuals by other brands


Landmann
Landmann Avalon PTS Plus 5.1 Plus 12122 Assembly and operating manual

Kenyon
Kenyon B70200 owner's manual

Better Homes and Gardens
Better Homes and Gardens GBC1486W owner's manual

Orbegozo
Orbegozo GR 2300 instruction manual

bora
bora PT11 Operating and installation instructions

Klarstein
Klarstein 10031664 manual

Garland
Garland MWE3W Installation and operation manual

Char-Broil
Char-Broil 463722714 Product guide

MPM
MPM MOP-03 user manual

Kenmore
Kenmore 415.16123800 Use and care guide

Tucker Barbecues
Tucker Barbecues GTR Series Assembly, installation and operating instructions

Monogram
Monogram ZGG540NCP1SS owner's manual