Smokin Brothers Wood Pellet User manual
®
Que-ViewTM Controller
Que-ViewTM Controller

TABLE OF CONTENTS
WELCOME TO THE SMOKIN BROTHERS FAMILY……………………......PAGE 2
SECTION 1: Quick Start Guide
Grill Assembly……………………………………………..…………….PAGE 4
Initial Firing and Burn in……………………………………..………...PAGE 5
Cooking with Your Smokin Brothers Grill…………………………..PAGE 6
Shutting down Your Smokin Brothers Grill………………………...PAGE 6
Connecting to your Network….……………………………………….PAGE 6
SECTION 2: Technical Guide
Grill Diagram………………...…………………………………..……….PAGE 4
QueViewTM Controller Wiring Diagram ..………………………...…PAGE 11
Using your Smokin Brothers Grill………………..…………………PAGE 13
Maintaining and Cleaning…………………………………………….PAGE 13
QueViewTM
Controller Details….……………………………………..PAGE 14
QueViewTM Web Portal Details……………………………………….PAGE 17
SECTION 3: Service Guide
Warranty Disclaimer.………………………………………….………PAGE 19
Troubleshooting…………………………..…………………………....PAGE 20
Contact Information …………………………………..……………….PAGE 22
3 Year Warranty Card…………………………………………...BACK COVER

®
WELCOME TO THE SMOKIN BROTHERS FAMILY
Thank you
for purchasing a Smokin Brothers Wood Pellet BBQ Grill. Your family
BBQ will never be the same.
Your
Smokin Brothers grill is a very versatile cooking machine. As you would expect,
you can GRILL burgers and steaks. Not only grill, but SMOKE pulled pork, ribs,
turkeys, and seafood. Plus BAKE pizzas and deserts to perfection. Also ROAST beef,
pork, and poultry on this amazing grill.
Prepare
every meal on your Smokin Brothers Grill. Even cook breakfast biscuits,
eggs and bacon. Don’t forget to cook vegetables and fruit. Making jerky is simple.
With regular maintenance
and care, the Smokin Brothers Grill will last
for years of trouble free grilling. It will become a permanent choice for your daily use
replacing other appliances. This residential grill is for outdoor use only.
At the top
of the priority list, is our commitment to manufacture the Smokin
Brothers Wood Pellet Grill in the U.S.A.
This manual
has been prepared to provide the necessary information to give you
confidence to use your new grill to become a grand champion master griller.
Congratulations,
you are the newest Smokin Brothers Grill Owner.
Authorized
Smokin Brothers Dealers are available to provide additional Smokin
Brothers products. We recommend using Smokin Brothers 100% Pure wood pellets
that are designed specifically to be used with your Smokin Brothers grill. DO NOT
USE a heating fuel pellet to cook your food. Smokin Brothers Rubs, Sauces and
Accessories are available to enhance your grilling experience. Check the website for a
local dealer near you.

INTRODUCTION
Residential Wood Pellet Grill
CONTACT INFORMATION
Smokin Brothers is based out of Chaffee, Missouri.
Contact us:
On the Web: www.smokinbrothers.com
Telephone: 573-803-1816
Ship to Address: 114 N. Main St, Chaffee, MO 63740
Mail to Address: 1923 N Kingshighway, Cape Girardeau, MO 63701
Distributor for Smokin Brothers Products: Double D Supply Company
Smokin Brothers Grills are proudly Made in America. The Que-ViewTM Controller has
been designed, engineered and manufactured in the United States.
Heavy duty American steel has been used for the body of this grill. All components,
used to complete the finished product, are being assembled by American workers.
Smokin Brothers believes in our Country and are proud to support it by keeping jobs
here in the U.S. and doing our part to sustain American traditions.
We are dedicated to providing quality barbeque products that help bring families
together whether it is around the dinner table, the picnic table or just standing over the
grill.

SECTION 1: Quick Start Guide
STEP 1 – GRILL ASSEMBLY
Is your grill assembled (wheels/handle/smoke cap and all interior parts)?
Yes – Skip to 2
No – Continue below
Tools required for Premier Plus assembly: Phillips screwdriver #3, 3/4 inch wrench,
screw gun with a 5/16 driver, 7/16 socket and ratchet.
1. Remove from the box and take everything out of the grill.
2. Remove the pallet screws that hold the grill to the pallet.
3.
4. Insert one caster into each leg. Hand tighten the bolt/nut by turning the top
of the castor counter-clockwise and finish using the wrench to secure
expanding adaptor into the leg tube. You may also apply the break then
turn to tighten the wheels if you do not have a wrench.
5. You can now do the right side by removing the pallet and propping the grill
up with assistance or with your knee to allow for clearance to insert the two
remaining casters.
6. Install the handle on grill lid (use a hand screw driver).
7. Place the smoke cap on the smoke-stack and tighten the bolt with a no. 3
screwdriver.
8. Locate the set of predrilled holes on the bottom of the front plate of the grill.
Attach each grid hook with the self tapping screws provided with a
screwgun.
9. Install the red safety latch by placing the flat side on the welded stud by the right
side hinge of the grill lid from the inside of the grill. Use a 7/16 socket and ratchet
to attach the crimp nut to the stud securing the safety latch to the grill.
Move the left side of the grill to the edge of the pallet so that two of the legs are
off the edge of the pallet. If you have a 2nd person, they can tilt the grill back to
allow for extra room to slide the castors into the legs, or you can place some
block on the bottom brace allowing for a minimum of 7 inch clearance so you
can slide the castors into the leg.

10.Place the deflector over the fire pot located in the bottom of the grill. Make sure
to install into the slots.
11. Secure the drip pan at an angle on the braces located at each end of the grill.
The short tab goes to the left of the grill.
12.Insert the long upper cooking grid.
13.Insert the lower cooking grid sections.
14.
Hang the grease bucket on the outside hook.
Step 2 – Initial Firing and Burn in
Has your grill completed the initial burn in sequence?
Yes – Skip to Step 3
No – Continue Below
Test the internal parts of the grill to be working properly.
1. Make sure the grill is turned off and unplugged.
2. Remove the grids, drip pan and deflector to expose the fire pot, auger, and igniter
hot rod.
3. Plug the grill into AC power.
4. Press the power button on the controller.
5. Look into the pellet hopper to verify the auger is turning.
6. Place your hand above the fire pot and verify air movement from the draft fan.
7. Verify the igniter hot rod, located in the base of the fire pot, is getting hot by
visual observance. DO NOT TOUCH THE IGNITER.
8. Turn the grill off.
9. Fill the hopper with Smokin Brothers pellets and start the
Auger load
process by
press POWER and AUGER for 6 seconds, the dots on the top line of the
controller will cycle, the screen will show
Auto LoAd
when it is ready, and you can
release the buttons. This will load an empty auger; it will cause the auger to load
pellets for 4 minutes. Do not use if the auger has any pellets in it as it will overfill
the firebox. To cancel press POWER button.
10.
Keep an ample supply of pellets in your hopper. If pellets run out, repeat the process to
fill the auger tube with pellets and turn the Cook Control Switch to the OFF position.
You are once again ready to turn the grill on and begin normal cooking.
You have successfully filled the auger tube with pellets and are now ready to
begin the initial firing. Place the heat deflector back in the correct slot inside
your grill and place the drip pan back in the correct place with the small lip on
the left side ledge. Do not place the grids in for initial burn off instead hand was
them and let them dry and then place in the grill for the first cook.
11. Initial burn: Start the grill at 225 and run for one hour. Then turn the temperature
to 325 for 1 hour. Press the power button to start the shut down sequence and
open yourgrill lid. You have successfully burned in your grill. When the grill is
cool to touch wipe down any excess residue.

1. Check the hopper for adequate amount of pellets.
2. Plug the grill into AC power.
3. Press POWER button, the controller will start the cooking cycle. It will first light
the fire, then the PID will take over. It will display the Current Temperature in the
top read out and the Set Temperature (180) in the bottom read out. The bottom
left dot indicates the igniter is on and the bottom right dot indicates the auger is
on. Setpoint can be changed at any time by pressing the UP and DOWN buttons
(Recommend letting grill get to 180 before changing temp).
4. Ready to begin normal cooking.
Step 4 - Shutting down your Smokin Brothers Grill
1. Remove all food from the Smokin Brothers Grill.
2. Press the power button to turn the grill off and raise the grill lid to help allow heat
out of the grill.
3. The controller will turn the fan on high and start the shutdown timer. The unit will
flash display current temperature/shut down countdown and
Cool Dn
for a
minimum of 10 minutes. After 10 minutes the grill will shut down when it has
cooled to below 120 degrees or after another 10 minutes. It will then run the
auger for a few seconds to help the grill start faster the next cook.
4. After the shut down sequence has concluded and your grill is completely cooled,
unplug your Smokin Brothers Grill to protect from lightning and power surges.
Step 5 - Connecting your grill to your network
The following items will be used in the setup, some you will need before the process
(bolded), the others will be identified through the process. (2.4 ghz band is required)
Your Network Name (SSID): this is the name of your network
Your Network Password: this is the password of your network
An email Address to register your controller:
Your Grill Network Name:
Your Grill Network Password:
Your Grill ID:
Step by Step Process
1. Plug in Grill
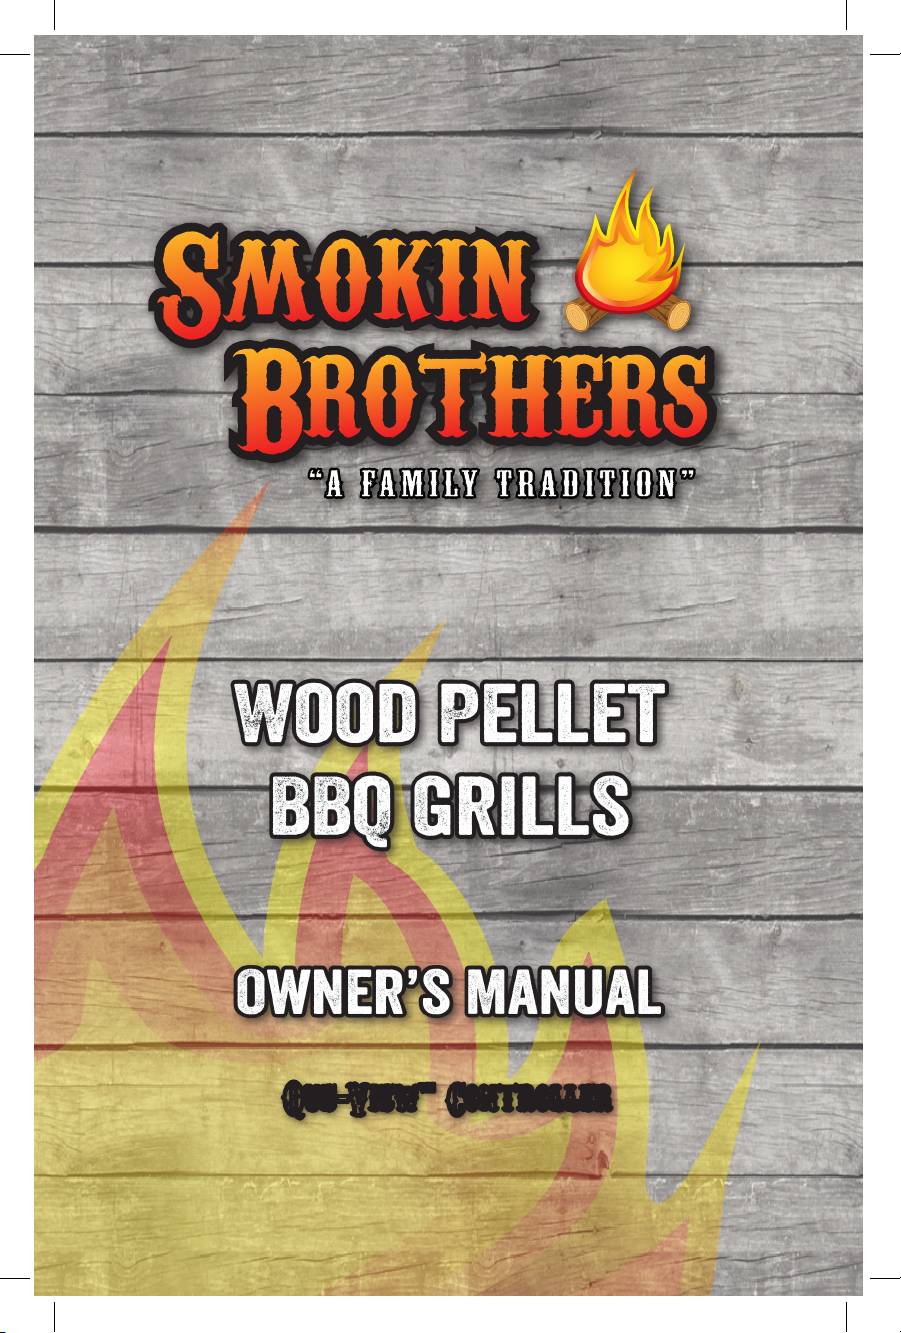
2. Using your cellphone/tablet/laptop close to grill signoff of your home Wi-Fi and
connect to the “Smokin Brothers” WIFI Network. This Network will be identified
Step 3 - Cooking with your Smokin Brothers Grill
as smokinbro_XXXXXX. (The XXXXXX is unique to your controller)
3. The Network will ask for a password. It will be $smoke_xxxxxxx. (the XXXXXX
will be the last digits of your Smokin Brothers Network Name.) In the example
shown the password was: $smoke_24CB21. This is case sensitive.
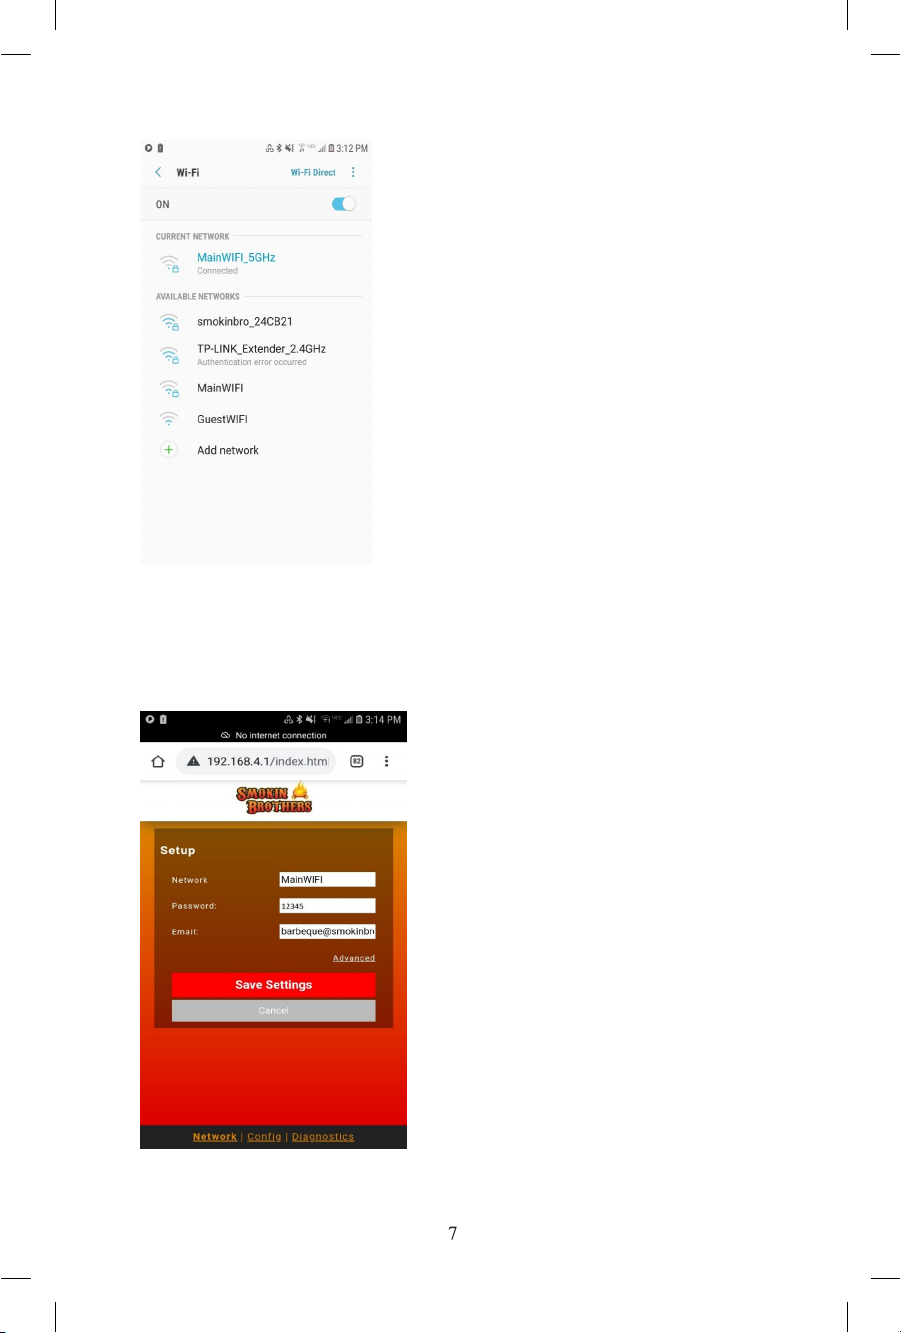
4. After you are connected to this network, open your Web Browser and go to the
following page 192.168.4.1
5.
a. Home Network Name (SSID)
b. Home Network Password
c. Your Email Address.
6.
7. At this point you can disconnect from the Smokin Brothers WIFI Network and
connect back to your home network.
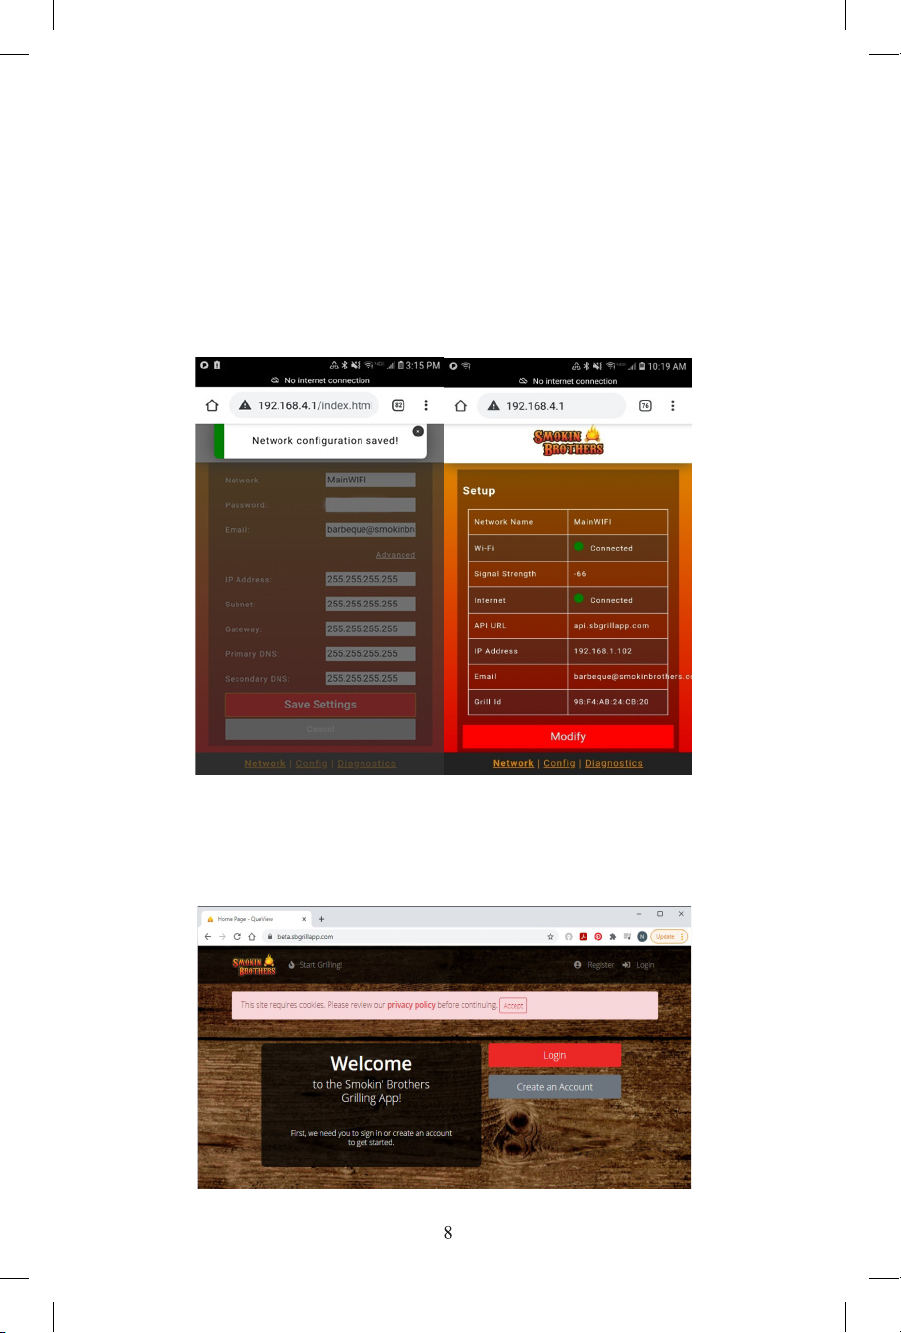
8. Now Go to grill.que-view.com. Click on the Create Account
At this page you will be able to set up your controller on your home network by
typing in the following (It is important that you type in using
exactly how your
network is setup as, including symbols, numeric and case sensitivity).
After hitting submit you will get a save successful prompt similar what is pictured
below. Close out of that prompt and it should show the next screen. Wifi and
Internet will show red dots that will turn to green when the grill has successfully
communicated to your network. If you get taken back to network setup page
double check you entered the network name and password correctly.

9. Complete the form to register with Que-View
TM
10. Please go to your registered email inbox and confirm your email address with
Que-View. It may have went to your junk or spam mail.
11. Complete the registering of your grill with your Que-View
TM
account. You may
have to go into your account and add a grill. It will be there waiting for you. IF it is
not there double check you are using the same email address with your network
configuration and Que-View
TM
account.

12.You now have access to the QueViewTM of your grill. For a detail of QueViewTM
features go to page 14.

QueViewTM Controller Wiring Diagram
Igniter Hot Rod
Power cord
RTD Temperature
Detector
Combustion Dra Fan
Auger Motor

Using Your Smokin Brothers Grill
Your Smokin Brothers Grill is an extremely versatile cooking machine. If it can be
smoked, baked, grilled or roasted, you can do it on your Smokin Brothers Grill! Use
only one grill to do everything.
Here are some Basic principles to remember when cooking on your Smokin Brothers
Grill.
•Similar Function – Smokin Brothers Grills function similar to a convection
oven; smoke and heat are circulated inside the grill with the use of a fan. When
the lid is open the smoke and heat escape and do not allow the food to cook.
Raise the lid minimally to check on the progress of your food. Thanks to the
grease pan placed under your cooking grids, you do not have to worry about
nasty flare ups causing unwanted fires. The grease and food drippings are
drained into a bucket.
•Smoking – Smoking is done at the lower temperature settings of the digital
control. Cooking low allows the pellets to smolder and produce significant
amounts of smoke. Smoke will penetrate the meat, providing a gorgeous
smoke ring and flavor. Also by cooking slow, the meat’s temperature is
gradually increased, which will help keep its tenderness. To reduce the amount
of smoke flavor turn your grill to a higher temperature setting.
•Baking – Baking on your Smokin Brothers Grill is similar to baking in your
conventional oven. Set the temperature to the appropriate setting at the higher
end of the controller (300-350). When the appropriate temperature is achieved
place your item on the grill. We have found that metal pans work better than
glass and that you may have to add a few extra minutes to the cooking time.
•Grilling - The Smokin Brothers HeatWavesTM allow you to grill without the risk
of flareups. Follow these step to use the HeatWavesTM :
1. Remove the grates.
2. Place Heat wave on the back grate ledge.
3. Place the grate on the base of the back heat wave.
4. Lift the front of the grate and place the front heat wave on the grate ledge.
5. Strat the grill normally, then set to 400 degrees.
6. Allow grate to heat up for 15 minutes. For an even better sear allow 30
minutes.
Grilling Tip –
•On smoke expect to use lb of pellets per hour
•On medium temperature (300-350) expect to use 1 lb of pellets per hour
•On high temperature expect to use 2 lbs of pellets per hour
•Each hopper is designed to hold a minimum of 18 lbs of pellets giving a
maximum of 36 hours of cooking depending on the temperature setting and
weather conditions

Questions and Answers – Smokin Brothers is available to answer questions for your
cooking needs with several options –
•Contact your dealer retail outlet
•Refer to our Smokin Brothers Owner’s Manual
•Refer to our Smokin Brothers Cookbook
•Contact Smokin Brothers through our contact information on the web
We take great pleasure in supporting our Smokin Brothers Family on their desire to be
adventurous in their cooking and grilling experience with our wood pellet grill. Share
with Smokin Brothers your grilling accomplishments and be rewarded if your recipes are
used and shared on the Smokin Brothers website.
MAINTAINING AND CLEANING
You will have years of trouble free grilling with our Smokin Brothers Grill, however some
minor maintenance will lengthen the life or your grill.
Following are some basic maintenance items that should be performed regularly:
•The drip pan should be cleaned regularly along with the lower brace the drip
pan rests on. This will reduce the risk of continued buildup of grease that can
cause a fire at high temperatures. Cover the drip pan with aluminum foil for
easy clean up. The foil should not overlap the sides of the drip pan blocking air
flow for proper operation inside the grill.
•The grease bucket should be emptied on a regular basis to ensure no overflow
and cause a significant mess on your deck or patio. For easy clean up, line the
bucket with foil for grease removal.
•The grill should be vacuumed to remove ash residue. Disassemble the grill by
removing the grids, drip pan, and heat deflector. Use a shop vacuum to
remove the ash from the fire pot and inside of grill after cooking approximately
20 hours or consuming one 20 pound bag of pellets. This will ensure many
years of care free service.
•The RTD temperature detector inside the grill should be cleaned after each
cooking along with cleaning the grids. This will ensure the proper temperature
reading and will increase the life of the temperature detector.
•Wipe the over all surface of the grill with a non abrasive cleaner and cloth to
remove any baked on food and grease residue.

QueViewTM Controller Details
LED info – The dots on the display will indicate when things are running as follows:
The top right dot is on when the unit is plugged in, indicating the unit has
power.
Top left dot flashing indicates there is a web connection, if the unit is correctly
connected with the user’s network.
The bottom left dot on indicates the igniter is on.
The bottom right dot will be on whenever the auger is on.
Auto Auger – When the grill is plugged in but not turned on, press POWER and
AUGER for 6 seconds, the dots on the top line will cycle, the screen will show Auto
LoAd when it is ready. This will load an empty an auger, it will cause the auger to
Power Button
Fuse Meat Probe Plug
Set Temperature/Meat
Probe Temperature
Current Temperature
Auger Button
Temperature/Settings
selector buttons

load wood pellets for 4 minutes. Do not use if the auger has pellets as it will overfill
the firebox. To cancel press POWER button.
Display Auger – While cooking press AUGER button. The current auger value will
be displayed on bottom line.
Manual Auger – While in cooking mode, hold the AUGER button for 6 seconds.
Then the controller will start with the “Manual auger percentage.” To change value,
press UP and DOWN. This mode will stop using the temperature control and will
only be based on the percentage of Auger selected. Note the low auger limits still
apply and will be restricted by the percentage selected. When left at 100% the grill
will go to the set point you have the grill set at then go to auger minimum. You will
likely notice overshoot because your grill must be physically taken out of manual
control. To cancel press AUGER button.
Cold cook - Hold the POWER button for 5 seconds, the screen will show
Cold cook
when it is ready. This allows for you to use a smoke tube to cold smoke.
Display IP address – press UP and DOWN. The network IP address will then be
displayed in octets over 10 seconds on the top line, if nothing is displayed unit does
not have an IP address. Note if network connection is made the top left dot will flash.
User settings (For Expert Users only) – press POWER and AUGER for 2 seconds,
the dots on the top line will cycle, the screen will show
sEt up
when it is ready. To
change value, use UP and DOWN buttons. To skip to the next setting press AUGER.
And to save a change hold POWER for second, you will see the message sAve for 2
seconds after you release the POWER button, and then it will go to the next setting. To
exit wait 20 seconds with no button presses or press UP and DOWN at the same time.
The settings are as follows with the default in (parentheses):

Error Codes:
If there is malfunction the unit will display
-Err
on the top line and a number code
on the second line.
1- Grill probe missing, on pressing POWER button the unit will look for the grill
RTD
2- Grill probe failed, cooking process is active and the grill RTD seems to have
gone missing
3- Startup failed, unit is started in an unsafe operation
4- Ignition failed, fire is not started in 10 minutes
5- Relight failed, relight does not happen in 10 minutes
6- Over temperature, unit is operating over 500 degrees
SEtp Setpoint (180)
fAnb Fan base speed - Choices are: FS-3 for high, FS-2 for medium, FS-1 for low, and
o for o. (3)
fAnh Fan holding speed - Choices are: FS-3 for high, FS-2 for medium, FS-1 for low,
and o for o. (2)
Au-p Manual auger percentage – When in manual mode this is the auger setting. (100)
Au-l Auger min – This is the lowest the auger will go, unless auger hold is set lower. (15)
Au-u Auger max – This is the highest the auger will go. (85)
Au-h Auger hold – This is the lowest the auger will go while holding temperature. If on hot
days, use this to help controller at lower temperatures. (15)
Au-b Auger boost – This is the auger stoking percentage every 60 seconds this amount
will be used for one cycle time
fp-t Meat(food) probe oset – In degrees Fahrenheit(0)
gp-t Grill probe oset – In degrees Fahrenheit (5)
cl-t Calibration oset – In degrees Fahrenheit (0)
rEs Reset all prams to defaults – Note at this time it will reset factory prams too.

QueViewTM Details
1. Go to Account page and manage your preferences.
2. The grill’s current temperature.
3. The temperature the grill is currently set to. If you change the temp from the app
it will show the temp that is pending to be reset under this until it is accepted by
2
4
6
8
1
3
5
7
9
the grill.
4. The current temperature of the meat probe.
5. The current network connection and the signal strength.
6. Type any temperature between 150 and 500 to change the grill temperature.
7. Quick set buttons to allow for temperature change without typing.
8. Allows for changes to the quick set button selections.
9. Starts the shutdown process for the grill.

1. Update Profile
1
3
5
7
2
4
6
8
2. Change your email address (this must match the one you used for setting up
grill. If this changes, you will need to log into grill as detailed in the quick start
section to change the address on grill.)
3. Provides information on your grill/grills.
4. Change your quick set temperatures.
5. Shows you how many times you have logged into app and your last 15 sessions.
6. Allows for you to change your password.
7. Allows for multifactor authentication for additional security.
8. This allows for you to download the data you have provided to us or delete your
account.

SECTION 3: SERVICE
WARRANTY DISCLAIMER
WARRANTY SHALL BE VOID IF THE FOLLOWING…
•Unit has not been operated according to manual instructions.
•Resold or traded to another owner.
•User has abused or failed to maintain the unit under normal residential use.
•Failure to disconnect electric before storing or repairing the unit.
Smokin Brothers shall not be held liable under this or any implied warranty for
incidental or consequential damages.
Copyright Notice All rights reserved. No part of this publication may be
reproduced, transmitted, transcribed, stored in a retrieval
system, or translated into any language, in any form or by
any means, electronic, mechanical, magnetic, optical,
chemical, manual or otherwise.
makes no representations or
warranties with respect to the contents hereof and
specifically disclaims any implied warranties of
merchantability or fitness for any particular purpose.
Further, information in this document is subject to change
without notice and does not represent any commitment on
the part of Smokin Brothers, Inc.
Table of contents
Other Smokin Brothers Grill manuals


Popular Grill manuals by other brands

EXPERT GRILL
EXPERT GRILL 720-0830HA Assembly instructions

Zanussi
Zanussi ZBX 626 SS User instructions

Members Mark
Members Mark Y0660LP-2 owner's manual

Turhan Celik
Turhan Celik SANAYI TIPI 630 Series user manual

GrillChef
GrillChef 12739A Assembly and operating manual

Silvercrest
Silvercrest 360844 2007 operating instructions

Superb
Superb SBB2804-1 owner's manual

HomComfort
HomComfort Smartfire PG-30 Assembly and operating instructions

Members Mark
Members Mark PRO Series Assembly instructions & user manual

Proficook
Proficook PC-GG 1058 instruction manual

Bodart & Gonay
Bodart & Gonay BG-PRO manual

Outdoorchef
Outdoorchef Ambri 480 Operating and assembly instructions


