Turhan Celik SANAYI TIPI 630 Series User manual

ENDÜSTRİYEL MUTFAK EKİPMANLARI SAN. ve TİC. LTD. ŞTİ.
BAIN MARIE ( SANAYİ TİPİ 630 –700 - 930 SERİ )
KULLANIM KILAVUZU USER MANUEL
FABRİKA: Nişanca mah. Mustafapaşa cad. No:13-1 / Eyup / ISTANBUL / TURKEY
TEL : 0090 212 297 48 09 –10 FAX : 0090 212 297 02 79

CİHAZ KURULUMU
AÇIKLAMA
Kılavuz içindeki bilgiler cihazın emniyetli montajı, kullanımı, temizliği ve bakımı hakkında önemli
bilgiler içermektedir. Bu nedenle kılavuzu, cihazı kullanacak olan kişi ve kişilerin kolaylıkla
ulaşabileceği yerlerde muhafaza ediniz.
Cihazın montajı, elektrik bağlantısı ve bakımı bu konuda uzman kişi yada kişiler tarafından, üretici
firmanın talimatlarına uygun bir şekilde yapılmalıdır.
Cihazın elektrik bağlantısı ‘Teknik Özellikler’ tablosunda verilen değerlere ve elektrik şemalarına uygun
olarak yapılmalıdır.
Üretici firma, kullanım kılavuzundaki talimatlara uymadan ve yetkili kişi yada kişiler tarafından
yapılmayan bakım ve teknik müdahaleler sonrası oluşabilecek herhangi bir zarardan sorumlu değildir.
MONTAJ
Cihazın Yerleştirilmesi
Cihazı, koku ve duman oluşumunu önlemek için, yeterli havalandırmanın yapılabildiği filtreli bir
davlumbaz altına yerleştiriniz.
Cihazı, aşırı ısı artışlarını önlemek için yan ve arka duvarlardan min. 5 cm uzağa yerleştiriniz.
Cihazı çalıştırmadan önce üzerinde bulunan koruyucu pvc kaplamayı çıkarınız. Yüzey üzerinde
yapışkan madde artıkları kalırsa uygun bir çözücü ile temizleyiniz.
Cihazın konulacağı set altı tezgahın ayakları ayarlı olmalı ve cihazın terazi düzleminde çalışması
sağlanmalıdır.
Cihazı diğer cihazlar ile yan yana yerleştirirken, ayarlı ayaklar yardımı ile yükseklikleri aynı olacak
şekilde ayarlayınız.
Su Bağlantısı
Cihaz havuzu manüel doldurulacağından su bağlantısına gerek yoktur.
Elektrik Bağlantısı
Cihaz DIN VDE 0100 elektrik tesisatı standartlarına uygun bir şebekeye bağlanmalıdır.
Cihaz 220-240 V AC 50-60 Hz şebeke gerilimi ile beslenmelidir.
Kablo en az H 07 RN-F kalitesinde ve kesiti maksimum akımı taşıyacak şekilde seçilmelidir.
Cihaz ve şebeke arasına W otomat sigorta konulmalıdır.
Besleme tesisatına kaçak akım sigortası konulması tavsiye edilir.
Voltaj toleransı …%10’u geçmemelidir.
Cihazı mutlaka topraklamalı bir hat ile çalıştırınız. Cihaz üzerindeki topraklama girişi …. işareti ile
belirtilmiştir.

KULLANIM ÖNCESİ
Cihazın kullanıma hazırlanması
Montaj yapıldıktan sonra, cihazı değişik ısı kademelerinde çalıştırarak ısıtıcıları kontrol ediniz.
Aksi taktirde ‘Olası Problemler ve Öneriler’ kısmına bakınız.
Cihazın montaj ve herhangi bir bakım faaliyeti sonrası ısı gücünü kontrol ediniz.
Cihazın gücü ‘Teknik Özellikler’ tablosunda verilmiştir.
OLASI PROBLEMLER ve ÇÖZÜMLERİ
Su ısınmıyor ise ;
Sigortaları kontrol ediniz.
Cihazı besleyen ana şalter açık değildir.
Düşük voltaj ya da elektrik bağlantısı doğru değildir.
Termostat arızalıdır
Isıtıcılar doğru bağlanmamıştır veya yanmıştır.( Arızalı ısıtıcıyı yenisi ile değiştirin)
Sıcaklık kontrolü yapılamıyor ise;
Termostat arızalıdır.
Isıtıcılar doğru bağlanmamıştır veya yanmıştır. ( Arızalı ısıtıcıyı yenisi ile değiştirin)

YEDEK PARÇALARIN DEĞİŞTİRİLMESİ
ÖNEMLİ: Cihaza müdahale etmeden önce bütün elektrik bağlantılarını mutlaka kesiniz.
Termostat
Kontrol panelini çıkarın.
Termostat veya şalteri bağlantı elemanlarından ayırın.
Termostatı sökerek yenisi ile değiştirin. İlgili bağlantıları yaparak kontrol panelini yerine takınız.
KULLANIM VE BAKIM TALİMATLARI
UYARILAR
Cihaz profesyonel kullanım için tasarlanmış ve sadece bu konuda eğitim almış kişiler tarafından
kullanılmalıdır.
Cihaz özellikle yiyecekleri sıcak tutma ve sos yapımına yönelik olarak tasarlanmıştır. Cihazı bunun
dışında herhangi bir amaç için kullanmayınız.
ÖNEMLİ su tankı boş iken asla ısıtıcıları çalıştırmayınız.
Cihaz da herhangi bir arıza meydana geldiğinde cihazı besleyen ana şalteri kapatınız.
Sadece üretici firma tarafından gönderilen teknik servis elemanlarına cihazınızı gösterin ve orijinal
yedek parça kullanın.
Cihaz ilk kullanımdan önce gıda ile temas edebilecek bütün yüzeyleri iyice temizleyiniz.
Haznenin temizleme işlemi için havuz üst tablaya kadar su ve deterjan ile doldurulur. Suyu birkaç
dakika kaynattıktan sonra havuz temizlenir.Son olarak temiz su ile iyice durulanır.

KULLANIM
Çalıştırma
Cihazın bağlı olduğu W otomatı devreye alın.
Cihazın devrede olduğunu gösteren sarı lamba yanmaya başlar.
Termostat düğmesini istediğiniz sıcaklığa ayarlayınız. Bu durumda yeşil termostat sinyal lambası yanar.
İstenilen sıcaklığa geldiğinde yeşil sinyal lambası söner.
0Kapalı
300C Minimum sıcaklık
--- Ara sıcaklık
1100CMaksimum sıcaklık
Kapatma
Termostat düğmesini ayarlanan dereceden ‘’0’’ konumuna getirin.
Cihazın bağlı olduğu W otomat devre dışı bırakın
TEMİZLEME VE BAKIM
Cihazı yüksek basınçlı su ile yıkamayın.
Temizlik yada bakım öncesi cihazın elektrik bağlantısını mutlaka kesin.
Cihazı her çalışma günü sonunda ılık sabunlu suya batırılmış bez ile silin.
Cihazı temizlerken aşındırıcı içeriği olan deterjanlar, tel fırçalar gibi yüzeyleri aşındıracak malzemeler
kullanmayın.
Eğer cihaz uzun süre kullanılmayacak ise, yüzeyler ince bir yağ tabakası ile kaplanmalıdır.
Cihazda anormal bir durum sezilmesi halinde teknik servis elemanları ile irtibata geçin. Ehliyetsiz
kişilerin cihaza müdahale etmesine asla izin vermeyin.

TEKNİK ÖZELLİKLER / TEKCICAL DATA
MODEL
TC.9SE800
TC.9SE400
TC.7SE800
TC.7SE400
TC.6SE400
GENEL
ÖLÇÜLER /
DIMENSION
800x930x850
400x930x850
400x700x300
400x700x850
400x630x300
ISIL GÜÇ (kW)
/ POWER
2,5 kW 2,5 kW 2,5 kW
TİP / TYPE A1A1A1
BESLEME
VOLT
220V-240V 50-60Hz 220V-240V 50-60Hz
220V-240V 50-
60Hz
TERMOSTAT
(0C)
300---1200300---1200300---1200
NET AĞIRLIK
(Kg) / NET
WEIGHT
55 kg
110 kg
39 kg
23 kg
15 kg

Elektrik şeması

700 SERİ / 700 SERIES
DOLAPLAR / CUPBOARDS

INSTALLATION INSTRUCTIONS
WARNINGS
Installation, modifications and maintenance of the appliance must be carried out by authorised personnel in
compliance with current safety standarts.
The manufacturer declines all responsibility for failure to comply with these obligations.
The instructions contained in this manual give important regarding security for installing and maintaining the
appliance. The manufacturer recommends that this manual be carefully stored in the work zone where it can be
consulted by technicians and workers.
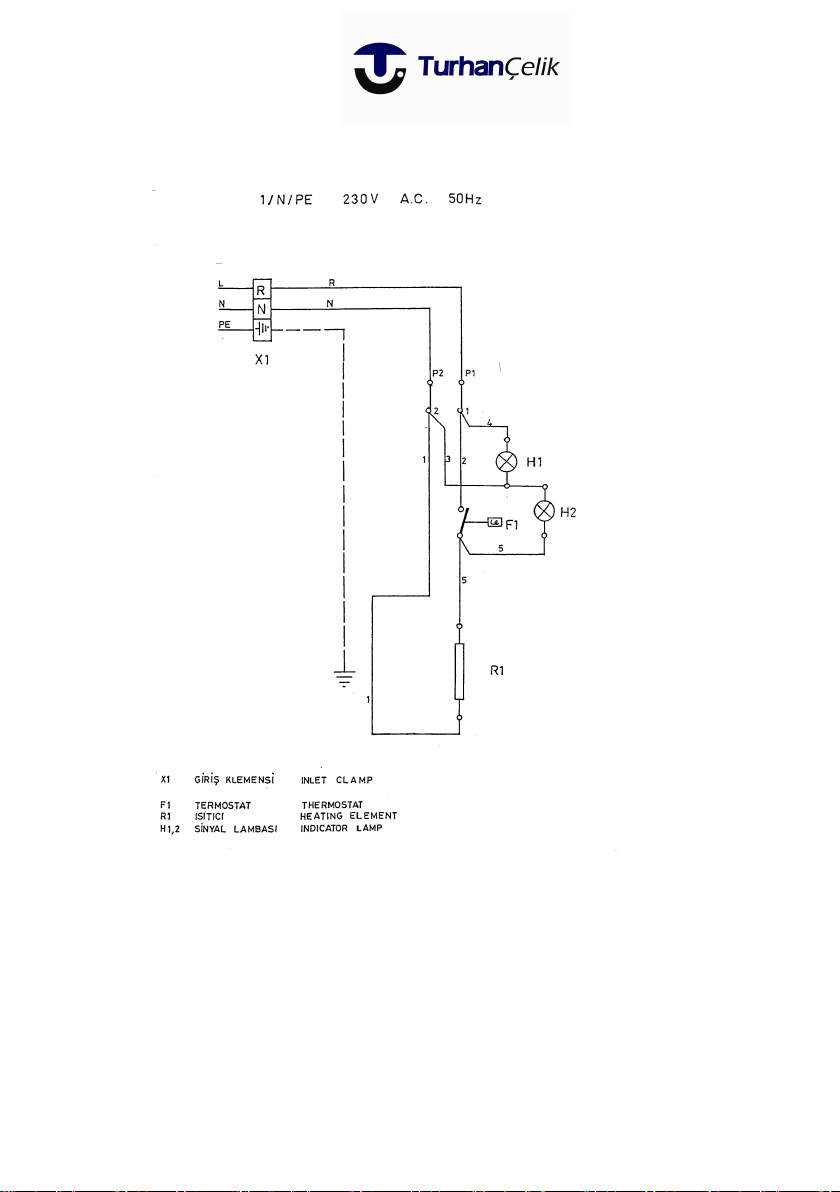
Electric connection of the appliance must be according to the instructions given on the technical data table and electric
scheme.
Disrespect of the instruction given by producer with the appliance (Use, maintenance, electric connectin, technical
data table and data plate) may compromise the appliance safety and will result in immediate loss of the warranty. The
manufacturer declines all responsibility for injury or damage to persons or things, due to disrespect of the instructions.
INSTALLATION
Positioning
The appliance should be placed under an exhaust hood to remove smoke and smell which may occur during the
cooking process.
Position the appliance at least 10 cm from surrounding walls. This distance may be reduced if the walls are
flameproof or protected by insulating material.
This appliance is not designed for built-in installation.
Installation
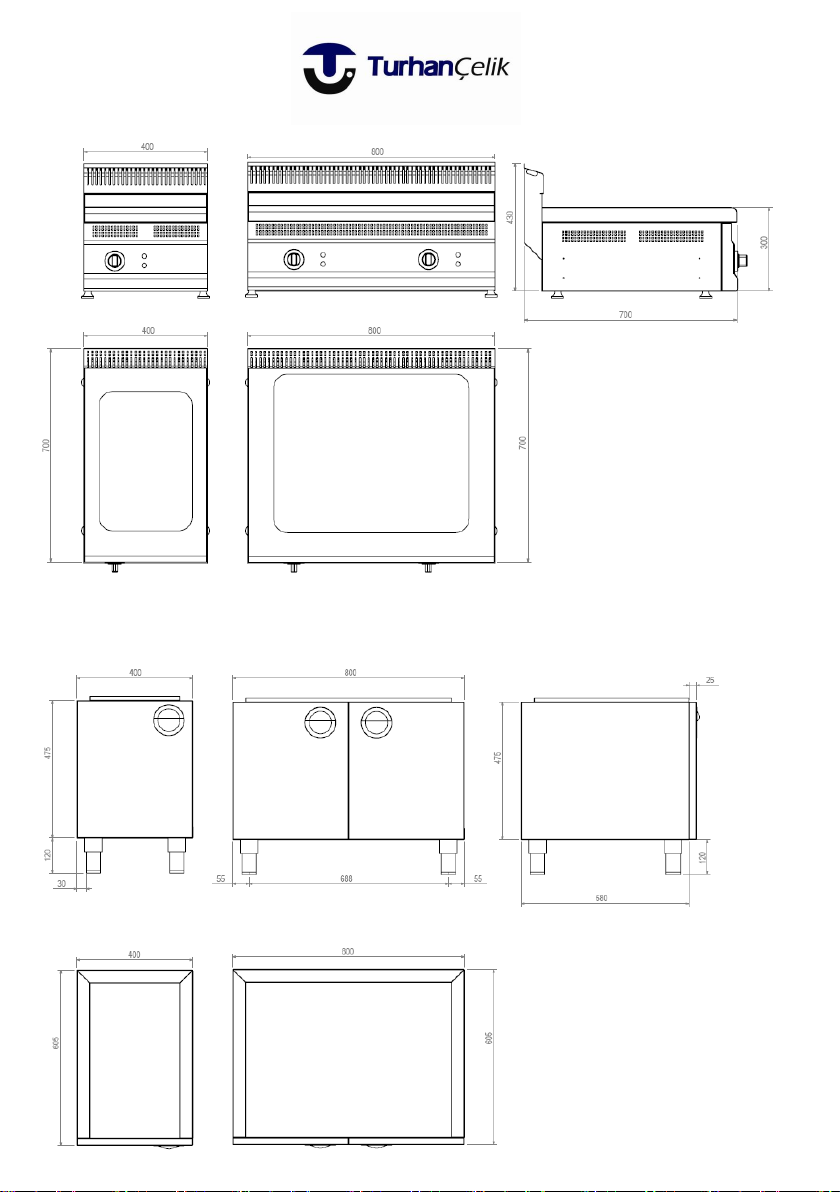
The appliance should be placed on a flat surface by balancing it due to its four adjustable feet.
Remove the protective nylon on the appliance. If sticky particles left on the appliance, clean them with a suitable
solvent.
Level the appliance using the adjustable feet.
Appliances of 40cms in width installed alone must be fixed to the floor using the special flanged feet.
In the case of cantilever installations, refer to the corresponding instructions.
Connection of adjacent appliances (Fig.-1)
Position the appliances next to each other and level to the same height.
Connect the appliances using the fixing holes drilled in the sides of the work top.
Electrical connections
The appliance is designed to operate at the voltage indicated on the data plate.
Each appliance must be connected to the power supply by a suitably dimensioned independent line (the total power is
indicated in the "Technical data" table). A flexible rubber cable with insulation specifications not lower than type H
07 RN-F must be used for connection to the temiinals.
The length of conductors between the cable clamp and terminals must be such that the live wires are pulled taut before
the ground wire (yellow-green) if the cable is worked loose from the clamp.
Multi-pole main isolating switches of suitable current ratin. (with minimum contact-breaking distance of 3 mm) must
be installed, as well as automatic residual current switches of suitable high sensitivity.
There should be a automate fuse between the appliance and the network.
Voltage changes should not exceed %10V.
Ground connections and equipotential bonding
The appliance must be connected to the ground circuit using the terminals marked by the symbol located next to the
connection terminals.

Water connection
No connection is required since the appliance is filled manually.
Water drain
Open the global valve in the bottom of the tank and discharge the water in the tank.
Important : The tank drain must be connected to the drainage system using a pipe resistant to high temperatures
(1000C).
START UP
Testing the electrical system
Switch on the appliance following the instructions for use and cheek the operation of the control devices and plate
heating elements.
Test the various operating temperatures.
If necessary, consult the Troubleshooting guide to identify the problem.
Testing the rated thermal power
Always cheek the thermal power of the appliance after installation and following maintenance work.
The rated thermal power is indicated in the "Technical data" table.
TROUBLESHOOTING GUIDE
The tank heating elements do not heat up
Check the fuses.
Main power switch not ON.
Low voltage or incorrect electrical connection.
Switch faulty.
Temperature control thermostat faulty.
One or more plate heating elements incorrectly connected or burnt out (replace faulty heating element).
The temperature control is difficult or impossible to regulate
Temperature control thermostat faulty.
One or more plate heating elements incorrectly connected or burnt out (replace faulty heating element).
REPLACEMENT OF SPARE PARTS
IMPORTANT : Before carrying out maintenance work or repairs, disconnect the appliance from the power supply at
the isolating switch.
Thermostat and switch
Remove the upper control panel.
Detach the bulb from the thermostat or switch fixed to the heating element by special support brackets.
Disconnect the electrical connections.
Replace the part.

WARNINGS
Beware of the appliance's hot surfaces!
This appliance is intended for professional use and must only be used by trained staff. This appliance is exclusively
designed to cook food. Any other use shall be deemed improper.
IMPORTANT : Do not operate the heating elements when the tank is empty.
In the event of fault, disconnect the electric connection of the appliance.
Only contact the technical service centre authorised by the manufacturer and only use original spare parts.
Before using the appliance for the first time, thoroughly clean all the food contact surfaces.
For the cleaning, fill the tank up to the upper table with water and detergent. Boil the water for a few minutes, clean it
and in the end rinse with clean water.
The thermocouple stops the gas circuit in cases of overheating of the water, so it provides the operation security.
USE
Operation
Switch on W autmat which is connected to the appliance.
Yellow indicator will be on.
Thermostad control kmob should be set required value, ın this stuation, yellow indicator will be on. When the
temperature reaches the required value yellow indicator will be off.
0Off
300CMinimum temperature
----- Intermediate temperatures
1100CMaximum temperature (approx.)
Turning Off
Thermostat control knob should be set to "0" stage.
Switch control knob should be set to "0" stage.
Switch off W automat which operates the appliance.
CLEANING AND MAINTENANCE
Do not wash the appliance with water jets.
Before cleaning the appliance, disconnect the electrical power supply.
Clean the stainless steel surfaces daily with water and ordinary non-abrasive detergents, rinse well and dry carefully.
Do not use steel wool or products containing chlorine.
Do not use sharp objects which can scratch and damage steel or coated surfaces.
Do not use corrosive products to clean the floor under the appliance.
If the equipment will not be operated for a long time, apply a thin layer of vaseline on the stainless steel surfaces of
the appiance and it should stay in a properly ventilated room.
In case of any failure at the appliance, call the authorized technical service. The appliance should be examined by
professional technical staff

MONTAGE DE L’APPAREIL
EXPLICATION
Les informations qui se trouvent dans le contenu de manuel d’utilisation contiennent des renseignements
importants sur le montage, l’utilisation, le nettoyage et l’entretien en sécurité de l’appareil. C’est pour cela
garder le manuel aux lieux facilement accessibles pour l’utilisateur/les utilisateurs qui vont utiliser l’appareil.
Le montage, la connexion d’électricité, et l’entretien de l’appareil doivent être faits par les personnes
qualifiées et selon les instructions de la firme productrice.
La connexion d’électricité doit être faite selon les valeurs données sur le tableau des « spécifications
techniques » et les schémas électriques.
La firme productrice n’est pas responsable n’importe quel endommagement qui pourront se produire après
les entretiens et les interventions techniques qui ne sont pas faits par les personnes qualifiées et non-
conformes avec les instructions du manuel d’utilisation.
MONTAGE
INSTALLATION DE L’APPAREIL
Pour empêcher la production de mauvaise odeur et de fumée, installer l’appareil sous une hotte à filtre où il
ya une aération suffisante.
Pour empêcher les augmentations de chaleur excessives, installer l’appareil minimum à 5 cm de distance des
murs latéraux et du mur derrière.
Avant le fonctionnement de l’appareil enlever le film protecteur en PVC. S’il en reste des résidus de colle sur
la surface de l’appareil, à nettoyer avec un solvant adéquat.
Les pieds du plan de travail à mettre l’appareil doivent être réglés, et l’appareil doit se fonctionner sur un
plan équilibré.
Lors d’installer l’appareil à côté des autres appareils, régler en façon qu’il soit sur la même hauteur avec les
autres appareils par l’intermédiaire des pieds réglables.
CONNEXION D’EAU
Il n’y a pas besoin une connexion d’eau, car la piscine de l’appareil se remplira manuellement.
CONNEXION D’ELECTRICITE
L’appareil doit être connecté sur un réseau qui est compatible avec les standards d’installation électrique de
DIN VDE 0100.
L’appareil doit être alimenté avec une tension de réseau 220-240V AC 50-60Hz.
Le câble doit être au minimum de qualité H 07 RN-F et son profil doit être capable de porter le courant
maximum.
Il faut mettre une boite à fusibles automatiques de type W entre l’appareil et le réseau.
Il est conseillé de mettre des fusibles de fuite de courant dans l’installation d’alimentation.
La tolérance du voltage ne doit pas dépasser … 10%.

L’appareil doit être connecté absolument sur une ligne mise en terre. L’emplacement de mise en terre est
indiqué sur l’appareil.
AVANT L’UTILISATION
Préparer l’appareil à l’utilisation
Apres avoir fait le montage, vérifier les chauffages en faire fonctionnant l’appareil aux différentes chaleurs.
Si nécessaire à consulter la section « les problèmes probables et les propositions ».
Apres le montage de l’appareil et après d’une activité d’entretien, vérifier la puissance thermique de
l’appareil.
La puissance thermique de l’appareil est indiquée sur le tableau des « spécifications techniques ».
Problèmes probables et propositions
L’eau ne se chauffe pas :
Vérifier les fusibles.
L’interrupteur principal qui alimente l’appareil n’est pas ouvert.
Il y a du voltage faible ou la connexion d’électricité n’est pas correcte.
Le thermostat est en panne.
Les chauffages ne sont pas connectés correctement ou elles sont brulées (Changer le chauffage en panne
avec un nouveau).
S’il n’est pas possible de faire le contrôle thermique :
Le thermostat est en panne.
Les chauffages ne sont pas connectés correctement ou ils sont brulés. (Changer le chauffage
en panne avec un nouveau).

CHANGEMENT DES PIECES DE RECHANGE
IMPORTANT : Avant de faire une activité d’entretien sur l’appareil, couper absolument la connexion
d’électricité.
Thermostat
Enlever le panel de contrôle.
Séparer le thermostat ou l’interrupteur de ses éléments de connexion.
Détacher le thermostat et changer avec une nouvelle pièce. Faire ses connexions et monter le panel de
contrôle à sa place.
INSTRUCTIONS D’UTILISATION ET D’ENTRETIEN
AVERTISSEMENTS
L’appareil est conçu pour l’utilisation professionnelle, et doit être utilisé seulement par les personnes
qualifiées sur ce sujet.
L’appareil est produit pour tenir chaud les produits alimentaires et pour la préparation des sauces, ne pas
utiliser pour des fins différentes.
Ne jamais chauffer l’appareil lorsqu’il n’y a pas d’eau dans la piscine.
S’il y a lieu une panne sur l’appareil, couper la connexion d’électricité de l’appareil en fermant l’interrupteur
principal.
Contacter seulement avec les éléments techniques autorisés par la firme productrice, et utiliser seulement
des pièces de rechange originales.
Bien nettoyer toutes les surfaces qui risquent de contacter avec les produits alimentaires avant la première
utilisation.
Pour nettoyer la piscine, remplir avec de l’eau et de détergent jusqu’à la table du haut. Apres avoir bouilli
l’eau pendant quelques minutes, on nettoie la piscine. Rincer bien avec de l’eau propre en dernier.
UTILISATION
OUVRIR
* Mettre l’automate de type W où l’appareil est connecté.
Dans ce cas la lampe jaune de signal sera allumée.
Régler le bouton de contrôle de thermostat à la puissance souhaitée. Dans ce cas la lampe verte de signal
sera allumée. La lampe verte de signal s’éteint une fois atteindre la chaleur souhaitée.
0 –Fermé
30◦C –Chaleur minimum
--- Chaleur moyenne
110◦C –Chaleur maximum

FERMER
Régler le thermostat au niveau « 0 ».
Désactiver l’automate de type W où l’appareil est connecté.
Nettoyage et entretien
Ne pas nettoyer l’appareil avec de l’eau de pression.
Avant commencer à une activité de nettoyage ou d’entretien, couper absolument le contact avec
l’électricité.
Nettoyer l’appareil à la fin de chaque jour d’utilisation avec un torchon tiède et savonné.
Ne pas utiliser des matériels qui peuvent rayer la surface comme des brosses en métal, ou des détergents
abrasifs.
Si l’appareil ne s’utilisera pas pendant longtemps, il faut mettre une fine couche de vaseline sur les surfaces.
En cas d’apercevoir une anomalie sur l’appareil, consulter au service agrée. Ne pas laisser à intervenir les
personnes non qualifiées à l’appareil.

This manual suits for next models
7
Table of contents
Languages:
Other Turhan Celik Grill manuals